EMGA 320.005 series User manual

FILTERBREW &
SERVING CONCEPT
TECHNICAL MANUAL
*320.005
320005 en ma 2014 02 1/20

CONTENT
CONTENT..........................................................................................................................................................................................2
GENERAL.............................................................................................................................................................................................4
Introduction ......................................................................................................................................................................................................4
Warnings............................................................................................................................................................................................................4
Precautions........................................................................................................................................................................................................4
Intended use......................................................................................................................................................................................................4
CLEANING AND CARE.............................................................................................................................................................5
Rinse Thermos, Decanter and Serving station ..........................................................................................................................................5
Dayly cleaning ...................................................................................................................................................................................................6
Weekly cleaning................................................................................................................................................................................................6
Cleaning Serving station.....................................................................................................................................................7
Exterior cleaning ..............................................................................................................................................................................................7
PROGRAMMING ............................................................................................................................................................................8
A-2, DA-4,Thermos A, Mega Gold A ...........................................................................................................................................................8
Cater................................................................................................................................................................................................................10
To w e r ...............................................................................................................................................................................................................14
HVA/HVM.......................................................................................................................................................................................................16
Grinder Original ..........................................................................................................................................................................................17
POSSIBLE SOLUTION ..............................................................................................................................................................19
Original A/M...................................................................................................................................................................................................19
Cater,Tower, HVA/HVM .............................................................................................................................................................................. 20
320005 en ma 2014 02 2/20

IMPORTANT!
INFO.
CAUTION!
INFO.
More INFO. INFO.
Some important information may appear in textboxes seen below
Note
320005 en ma 2014 02 3/20

GENERAL
Read the user guide before using the machine.
This guide contains important instructions for
proper and safe use of the vending machine.
Always keep this guide close at hand for future
reference.
Introduction
Thank you for choosing a FILTERBREWER coffee machine.
We hope you enjoy it !
Warnings
Never immerse the machine, plug or mains
cable in water because there is a danger of
electric shock.
The appliance is not intended for use by
persons (including children) with reduced
physical, sensory or mental capabilities, or
lack of experience and knowledge, unless they
have been given supervision or instruction
concerning the use of the appliance by a person
responsible for their safety.
Children should be supervised to ensure they
do not play with the appliance.
Do not use the machine if the mains cable, plug
is damaged or the machine has fallen down.
If the mains cable is damaged it must be
replaced by the manufacturer, service agent or
similarly qualified persons in order to avoid a
hazard.
Only plug the machine into a properly installed
earthed safety socket whose line voltage
matches the technical data for the machine.
Do not use the machine outdoors so it can be
exposed to weather (rain, snow, frost).It will
cause material damage to the machine.
Do not try to open the machine or repair it in
any way.To avoid danger only have the machine
repaired in a technical workshop, Service
Centre or by a qualified person.
Remove the mains cable from the socket when
the machine is not in use for longer periods.To
do this, pull the plug not the cable.
This appliance must be placed in a horizontal
position which is resistant to any water that
may leak.
Place the machine out of the reach of children.
Position the mains cable so that people cannot
trip over it.Keep it away from sharp edges and
heat sources.
The new hose-sets supplied with this appliance
are to be used, old hose-sets must not be re-
used.
This appliance is not suitable for installation in
an area where a water jet could be used.
This appliance must not be cleaned by a water
jet.
This appliance is intended to be used in
household and similar applications such as:
-Staff kitchen areas in shops.
-
environments.
-On agricultural estates.
-By clients in hotels, motels and other
residential type environments.
-Bed and breakfast type environments.
For the optimal performance of the machine
these parameters shall not be exceeded:
-Maximum permissible inlet water pressure :
800KPa (8Bar)
- Minimum permissible inlet water pressure:
200KPa (2Bar)
- Maximum working temperature: 40°ºC
- Minimum working temperature: 10°ºC
Precautions
Intended use
Offices and other commercial working
320005 en ma 2014 02 4/20
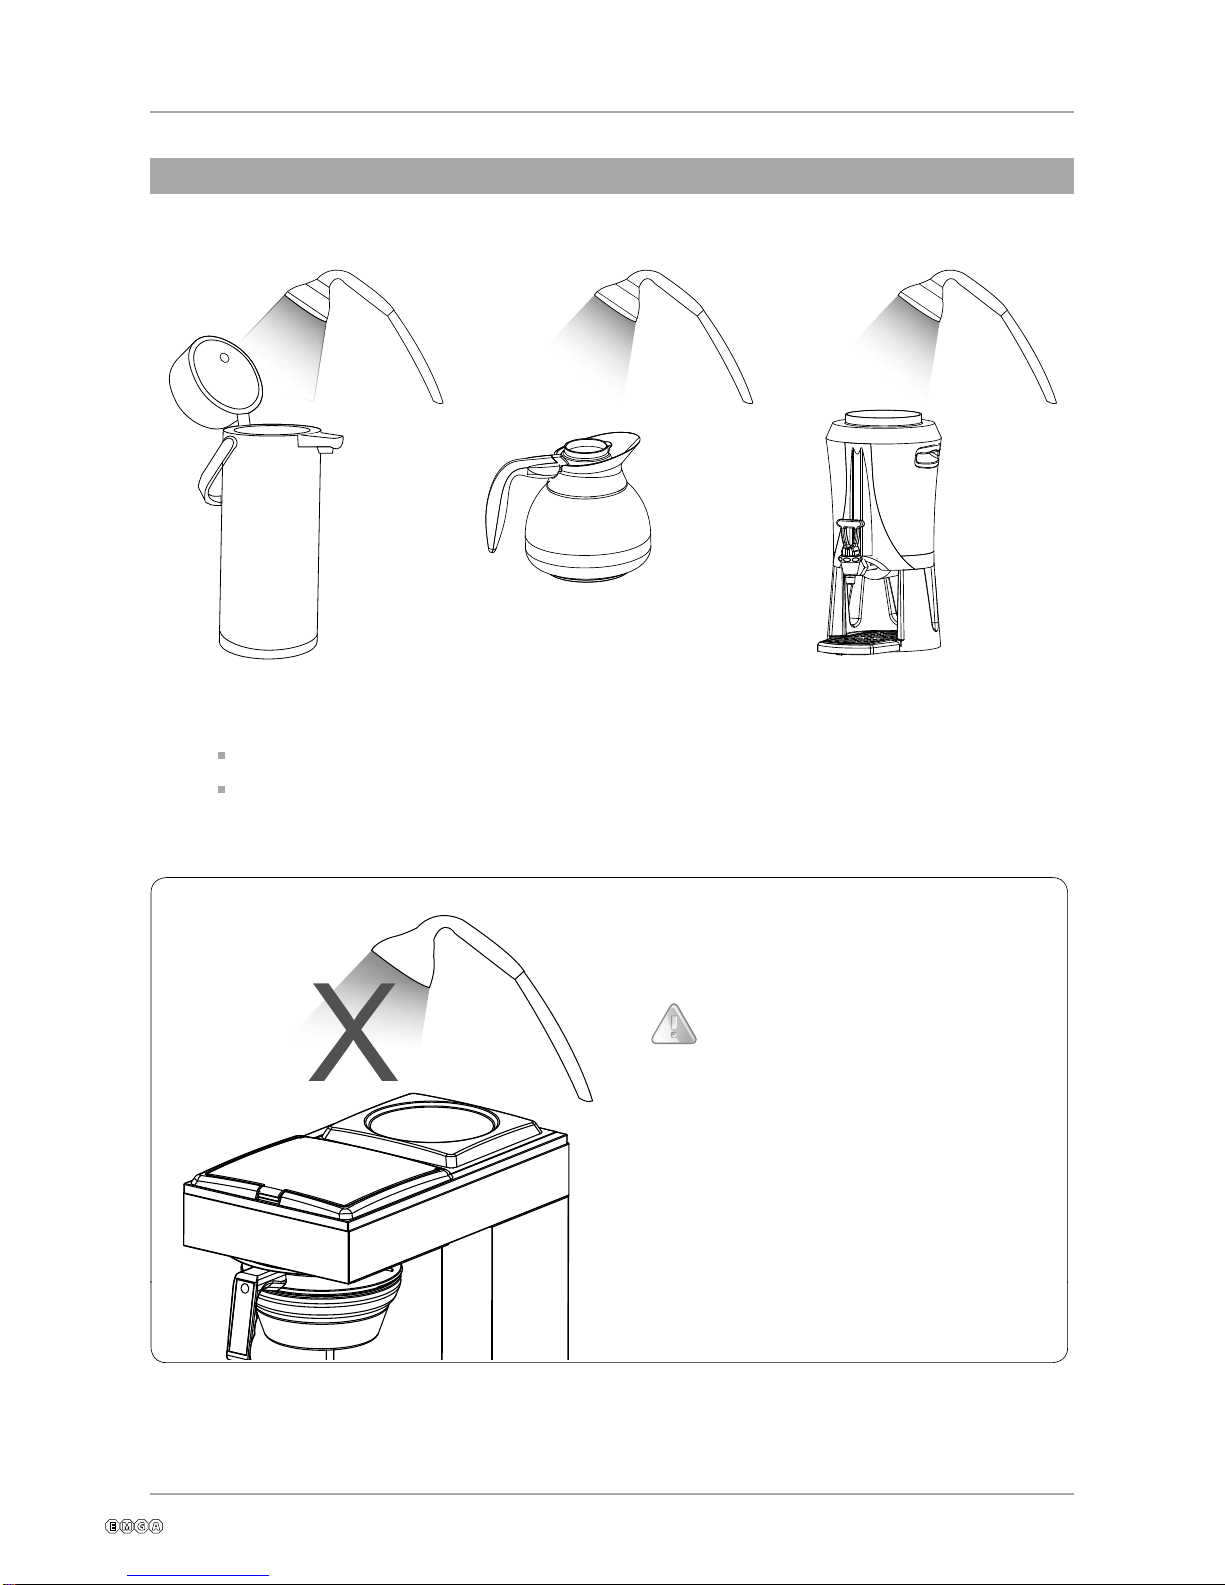
CLEANING AND CARE
Before each brewing, rinse the thermos, decanter or serving station with fresh tap water.
When cleaning the outside, use a soft rag with liquid cleaning agent to prevent scratches.
5LQVH7KHUPRV'HFDQWHUDQG6HUYLQJVWDWLRQ
&$87,21
The machine should not be submerged
in water or washed in a dishwasher. it
will result in machine damage.
320005 en ma 2014 02 5/20

Descaling and cleaning.
Pour 50 ml descaling / cleaning solution in a decanter and ll it up with cold water.
Pour the mixture in the machine and proceed with a brewing without a lterpaper or coffee.
Rinse the machine thoroughly by brewing at least 3 times with clean water so that the particles from
descaling solution disappear.
Regular descaling will ensure optimum brewing performance and a longer life of the machine.
When cleaning the decanter in a dishwasher. Dismantle lid and place decanter upside down in the
dishwasher.(A)
Pitcher
371R
A
B
CLEANING AND CARE
'D\O\FOHDQLQJ
:HHNO\FOHDQLQJ
Wash the thermos, decanter(B) and the lter holder with liquid solution for coffee machines.Always
remove the lter immediately and clean the lter holder daily, coffee will get moldy.
Clean the spray nozzle(A) and the surrounding area.
Use a soft rag and liquid solution that does not scratch.
Descaling agent
PT No. 110412
A
B
320005 en ma 2014 02 6/20

CLEANING AND CARE
'LVDVVHPEOHWKHOHYHOWXEHDQGFOHDQLW
HYHU\ZHHNZLWKWKHHQFORVHGEUXVK
7DNHRIIWKHPDLQOLGDQGFOHDQWKHPL[HU
WXEH$
)LOOWKHVHUYLQJVWDWLRQZLWKKRWZDWHU)XOO
EUHZLQJZLWKRXWFRIIHHDQGILOWHU
3XWWDEOHVSRRQZLWKFOHDQLQJSRZGHULQWKH
VHUYLQJVWDWLRQDQGZDLWDWOHDVWPLQXWHV
7DSRXWRIWKHFOHDQLQJVROXWLRQ
&OHDQWKHVHUYLQJVWDWLRQZLWKWKHFOHDQLQJEUXVK
Rinse the serving station with fresh tap water
several times before reuse.
&OHDQLQJ6HUYLQJVWDWLRQ
&OHDQLQJRI6HUYLQJVWDWLRQ
A
IMPORTANT!
Rinse the inside of
the serving station
several times with
fresh tap water.
([WHULRUFOHDQLQJ
When cleaning exterior of the machine, use a soft rag with liquid cleaning agent
to prevent scratches.
OPTIONS
Part No. CLEANING PARTS
&OHDQLQJSRZGHU
&OHDQLQJEUXVK
&OHDQLQJEUXVKIRUOHYHOWXEH
PL[HUWXEH
320005 en ma 2014 02 7/20

6HOHFWPDFKLQHW\SH
PROGRAMMING
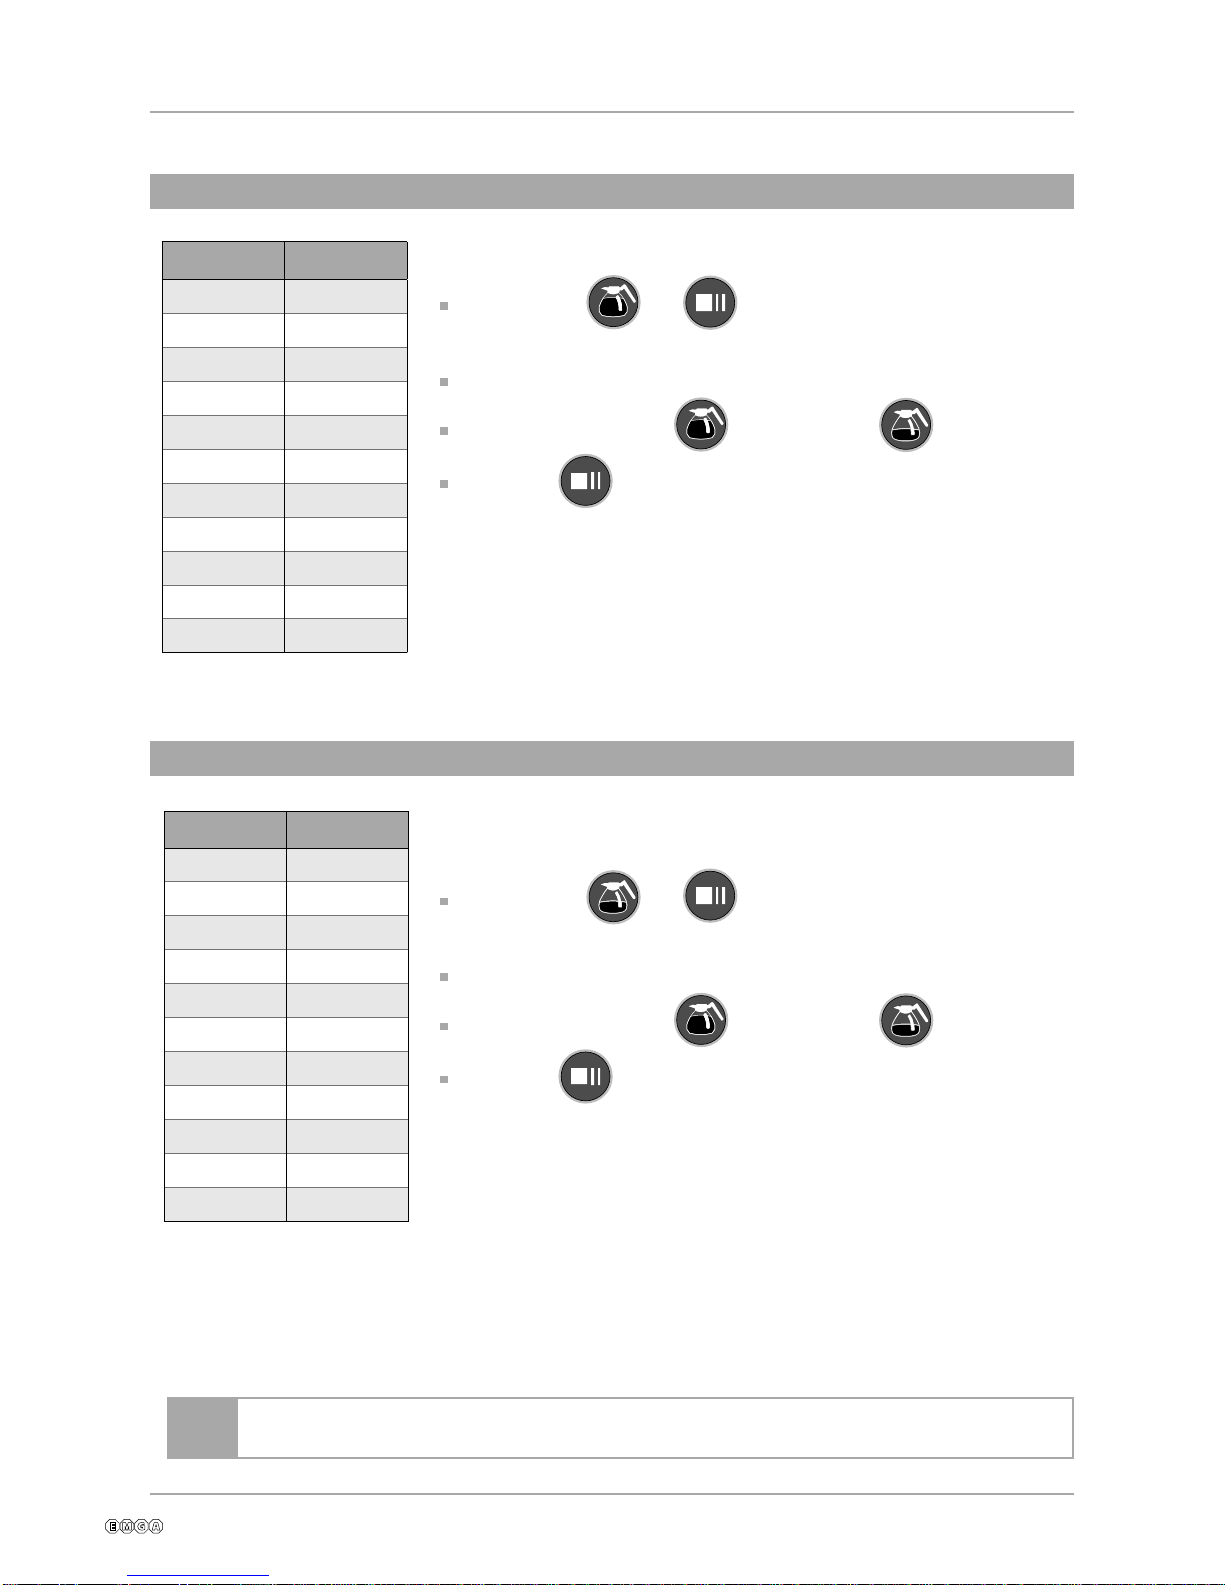
$'$7KHUPRV$0HJD*ROG$
MACHINE
TYPE DISPLAY CUPS CUPS TIME BUZZER TIME
DA/A-2 T1 4-12 9.25 s 247
Termos A T2 4-15 9.25 s 292
Mega A T3 4-17 9.25 s 344
Enter the procedure to select machine type is the following:
Press all three buttons , and at tKHVDPHWLPH
before turning on the mains switch The buzzer beeps once.
The display shows the current setting.
Step up with button and step down with button .
Press the button to save setting and exit to normal mode.
320005 en ma 2014 02 8/20

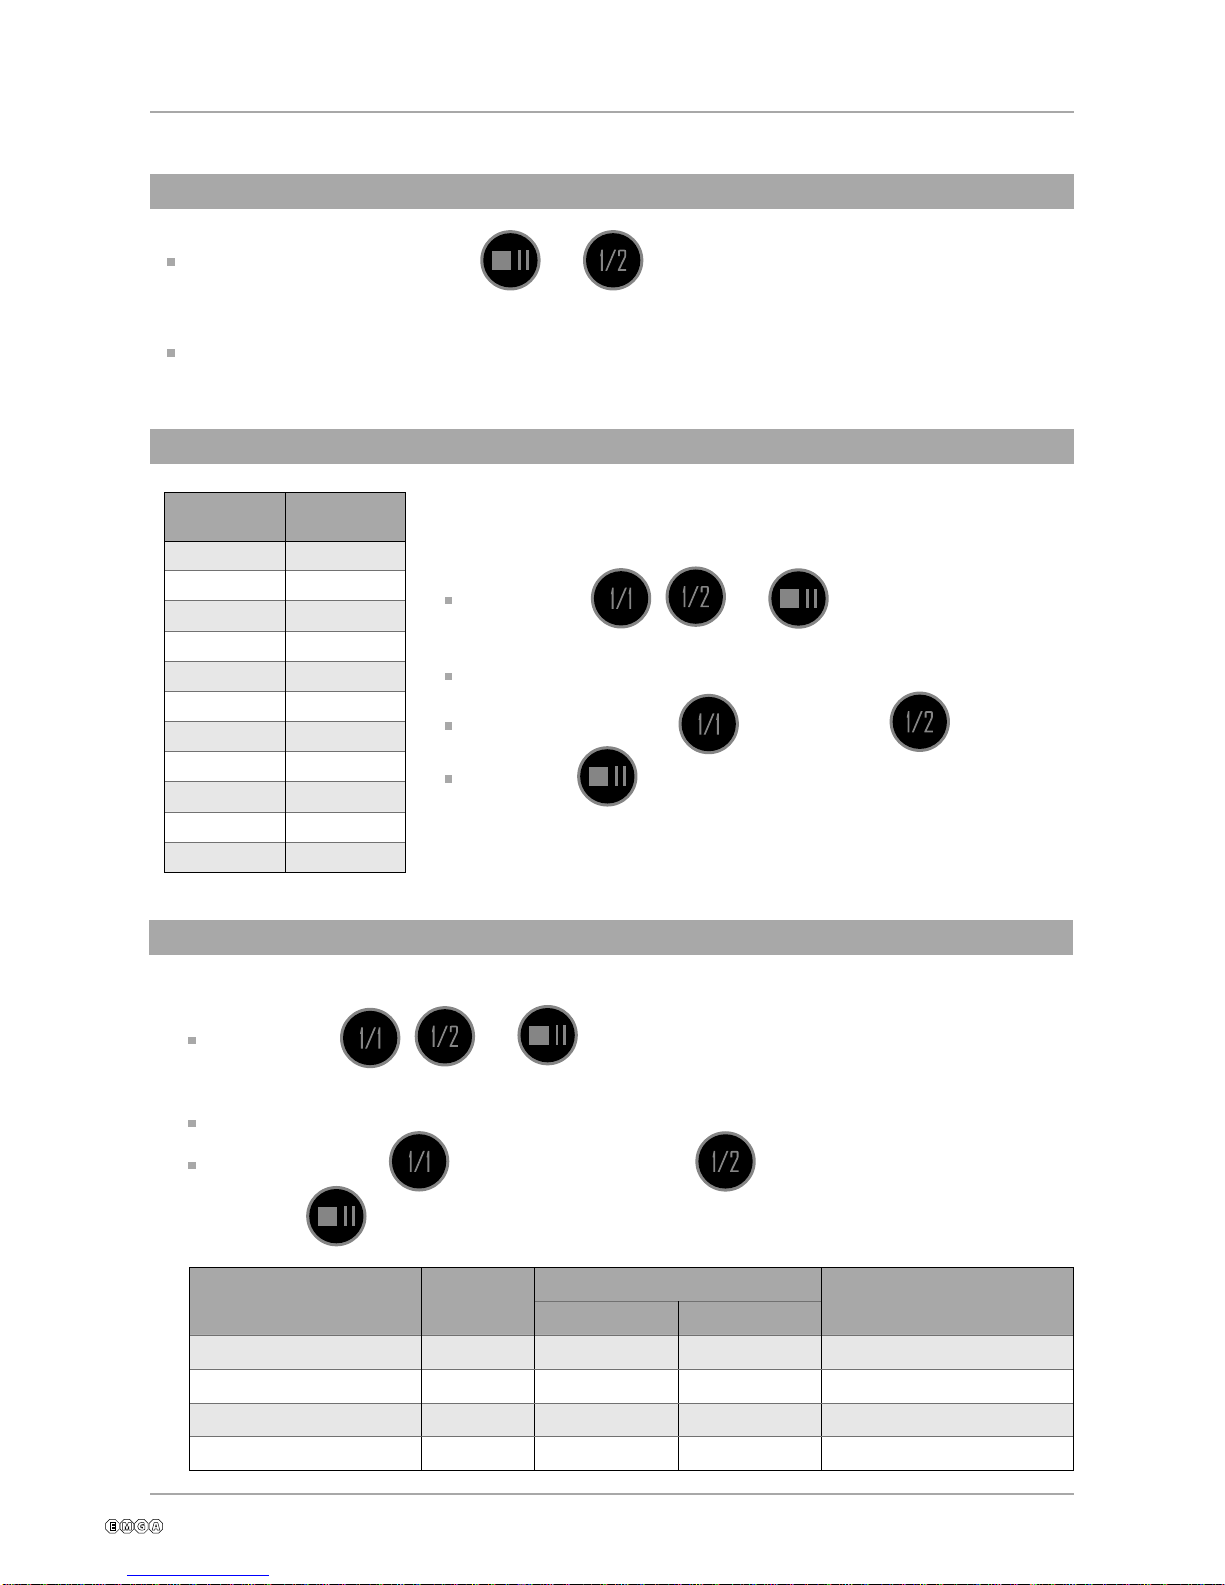
$GMXVWZDWHUDPRXQW
PROGRAMMING
Adjust amount of brew water
Press the buttons and at same time in 5 seconds.
The buzzer beeps twice. Display shows 0.
- Press the button to increase amount of water.
- Press the button to decrease amount of water.
- 1 step = 5%
- Press the button to conrm the change.
Adjust the brew time
Press the buttons and at same time in 5 seconds.
The buzzer beeps four times. Display shows 0.
- Press the button to increase brewing time.
- Press the button to decrease brewing time.
- 1 step = 5%
- Press the button to conrm the change.
Display shows and machine is ready to use.
$GMXVWEUHZWLPH
$'$7KHUPRV$0HJD*ROG$
ADJUST DISPLAY
25% 5
20% 4
15% 3
10% 2
5% 1
0% 0
-5% -1
-10% -2
-15% -3
-20% -4
-25% -5
320005 en ma 2014 02 9/20

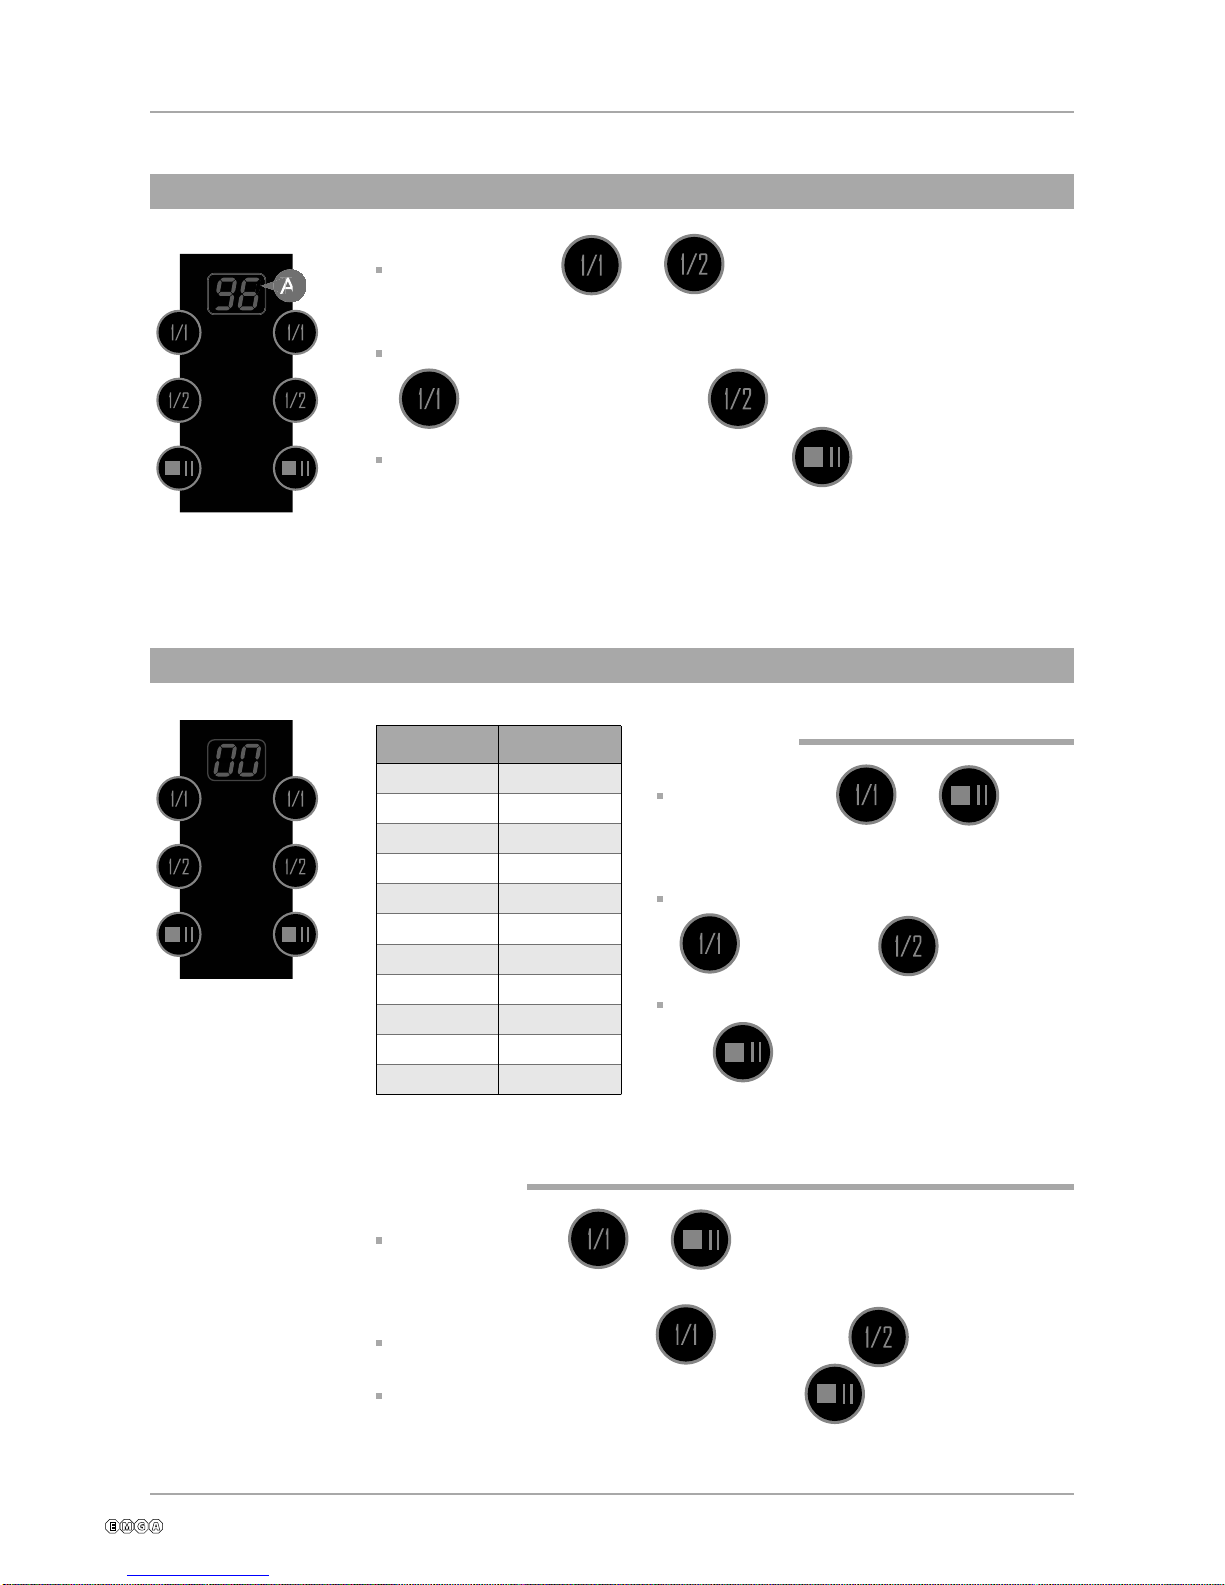
PROGRAMMING
ADJUST DISPLAY
+5°C 5
+4°C 4
+3°C 3
+2°C 2
+1°C 1
00
-1°C -1
-2°C -2
-3°C -3
-4°C -4
-5°C -5
&DWHU
$GMXVWLQJRIZDWHUWHPSHUDWXUH
1RUPDORSHUDWLRQZLWKUHGXFHGRXWOHWWLPH
3UHVVEXWWRQV DQG DWWKHVDPHWLPHIRUVHFRQGVXQWLO\RX
KHDURQHEHHS'LVSOD\VKRZVWKHSUHVHQWVHWWLQJ
$GMXVWZLWKWKHEXWWRQV LQFUHDVHDQG GHFUHDVH
&RQILUPWKHQHZVHWWLQJVE\SUHVVLQJWKH EXWWRQ
Ĉ& PLQWHPSHUDWXUH
Ĉ& PD[WHPSHUDWXUH
7KLVPRGHLVHQWHUHGE\SUHVVLQJWKH DQG EHIRUHWXUQLQJWKH
PDLQVVZLWFKRQ7KHEX]]HUJLYHVDVEHHSWRLQGLFDWHWKLVPRGH
7KLVPDFKLQHRSHUDWHVOLNHLQQRUPDOPRGHEXWWKHRXWOHWWLPHVDUHUHGXFHGE\
LQRUGHUWRDOORZIDVWHUDGMXVWPHQWRIYDOYHWLPHV
$GMXVWLQJRIWHPSHUDWXUHVHQVRU
In this mode a temperature offset for the NTC sensor can be adjusted.
The procedure to enter this mode is the following:
3UHVVEXWWRQV DQG DWWKHVDPHWLPHIRU
VHFRQGVXQWLO\RXKHDUEHHSV
The display shows the current setting.
$GMXVWZLWKWKHEXWWRQV LQFUHDVHDQG GHFUHDVH
3UHVVLQJWKH EXWWRQWRVDYHQHZVHWWLQJVDQGUHWXUQWRQRUPDO
PRGH
320005 en ma 2014 02 10/20
PROGRAMMING
&DWHU
$GMXVWLQJRIZDWHUTXDQWLW\
$GMXVWLQJRIEUHZLQJWLPH
ADJUST DISPLAY
25% 5
20% 4
15% 3
10% 2
5% 1
0% 0
-5% -1
-10% -2
-15% -3
-20% -4
-25% -5
7KHSURFHGXUHWRHQWHUWKLVPRGHLVWKHIROORZLQJ
3UHVVEXWWRQV DQG DWWKHVDPHWLPHIRUVHFRQGVXQWLO
\RXKHDUEHHSV
The display shows the current setting.
$GMXVWZLWKWKHEXWWRQV LQFUHDVHDQG GHFUHDVH
3UHVVHWKH EXWWRQWRVDYHQHZVHWWLQJVDQGUHWXUQWRQRUPDO
PRGH
,QWKLVPRGHWKHWLPHIRUthe brewing done buzzer activation can be
adjusted7KHSURFHGXUHWRHQWHUWKLVPRGHLVWKHIROORZLQJ
3UHVVEXWWRQV DQG DWWKHVDPHWLPHIRU
VHFRQGVXQWLO\RXKHDUEHHSV
The display shows the current setting.
$GMXVWZLWKWKHEXWWRQV LQFUHDVHDQG GHFUHDVH
3UHVVHWKH EXWWRQWRVDYHQHZVHWWLQJVDQGUHWXUQWR
QRUPDOPRGH
The brewing time is the same regardless adjustment of the outlet valve time.
Note
ADJUST DISPLAY
25% 5
20% 4
15% 3
10% 2
5% 1
0% 0
-5% -1
-10% -2
-15% -3
-20% -4
-25% -5
320005 en ma 2014 02 11/20
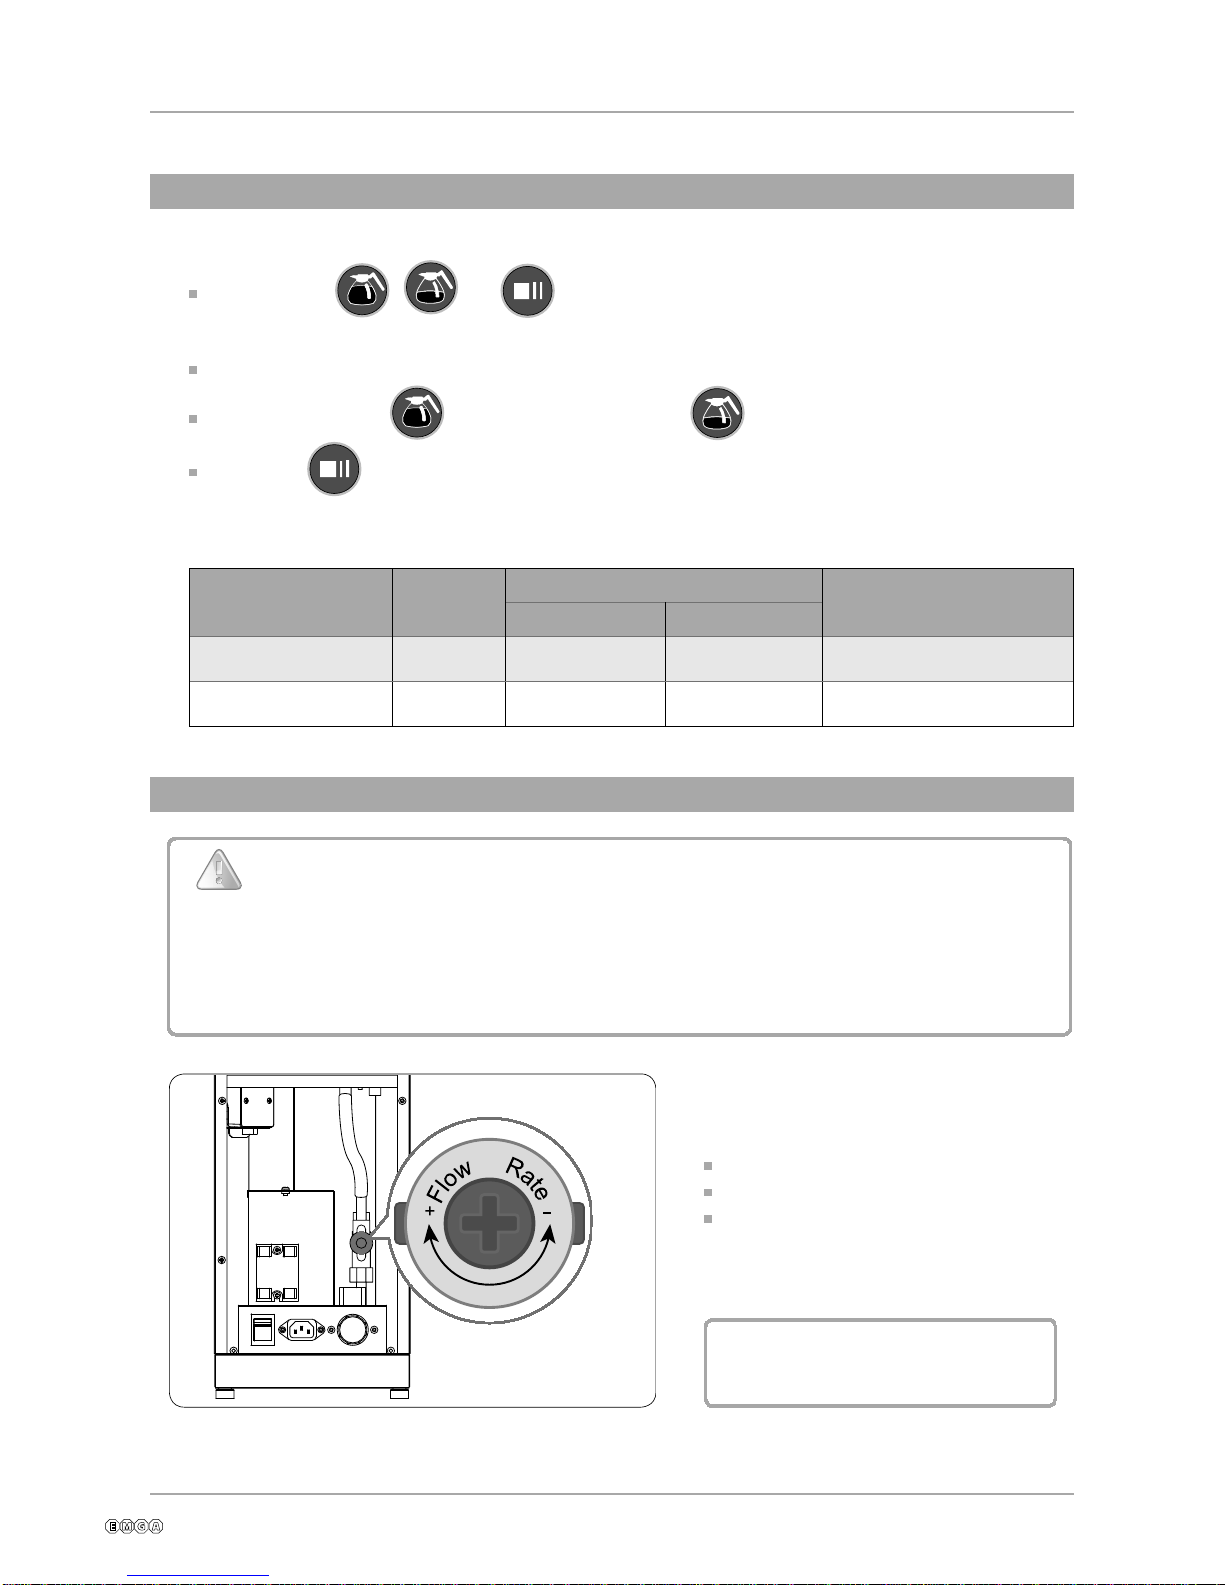
PROGRAMMING
&DWHU
6HOHFWPDFKLQHW\SH
$GMXVWLQJRIIORZZDWHU
In this mode the machine type can be chosen7KHSURFHGXUHWRHQWHUWKLVPRGHLVWKHIROORZLQJ
3UHVVEXWWRQV DQG DWWKHVDPHWLPH
before turning the mains switch onXQWLO\RXKHDUEHHSV
The display shows the machine type.
Step up with button DQGstep down with button
3UHVVHWKH EXWWRQWRVDYHQHZVHWWLQJDQGUHWXUQWR
QRUPDOPRGH
&KHFNWKHZDWHUIORZ
7KLVVKRXOGEH/PLQXWH
$GMXVW3'6YDOYHLIQHFHVVDU\
6HHILJ$
Shall been done by an authorized
installation engineer
,03257$17
From date 091001 Cater is delivered with an adjustable PDS valve.This is to improve the
water ow into lter holder.The ow of PDS valve is set to 0.95 litre /minute. Depending
on the coarseness and amount of coffee that’s used when brewing, the ow might need
adjustments to prevent overow in the lter holder.
A
PDS valve
Machine type Display Outlet time (s) Buzzer time (s)
Half Full
1.8L T1 56 113 90
2.5L T2 79 158 90
320005 en ma 2014 02 12/20
7HVWIXQFWLRQV
3UHVVEXWWRQV DQG DWWKHVDPHWLPHbefore turning the mains
switch on,puts the control board into test mode for time and temperature
controlled machines.
For the other types pressing EXWWRQV DQG before power-on results
in test mode.
A test sequence starts:
- Turn all outputs off
- Turn V_WATER on for 3 s
- Turn V_OUT_A on for 3 s
- Turn HEAT on for 3 s
- Turn buzzer on for 2 s
- Show NTC temperature on displayed
- If button is pressed display b1
- If button is pressed display b2
- If button is pressed display b3
- If LVL_SAFE is passive display L1
- If LVL_REF is passive display L2
PROGRAMMING
&DWHU
320005 en ma 2014 02 13/20
PROGRAMMING
In this mode a temperature offset for the NTC sensor can be adjusted.
The procedure to enter this mode is the following:
Press buttons
seconds until you hear 2 beeps.
The display shows the current setting.
Adjust with the buttons
Pressing the
Select machine type
In this mode the machine type can be chosen.The procedure to enter this mode is the following:
Press buttons , and at the same time before turningthe mains switch on until
you hear 6 beeps.
The display shows the machine type.
Step up with button and step down with button .
Presse the button to save new setting and return to normal mode.
MACHINE TYPE DISPLAY OUTLET TIME (s) BUZZER TIME(s)
HALF FULL
5L T1 150 300 300
10L T2 300 600 300
6L T3 180 360 300
12L T4 360 720 300
sniamrogulp,enihcamehtesremmireveN Do not use the machine if the mains cable, plug
PROGRAMMING
ADJUST DISPLAY
+5°C 5
+4°C 4
+3°C 3
+2°C 2
+1°C 1
00
-1°C -1
-2°C -2
-3°C -3
-4°C -4
-5°C -5
To w e r
Normal operation with reduced outlet time
Adjusting of temperature sensor
In this mode a temperature offset for the NTC sensor can be adjusted.
The procedure to enter this mode is the following:
Press buttons , and at the same time for 5
seconds until you hear 2 beeps.
The display shows the current setting.
Adjust with the buttons = (increase) and = (decrease).
button to save new settings and return to normal
mode.
This mode is entered by pressing and before turning the mains
switch on.The buzzer gives a 5s beep to indicate this mode.
This machine operates like in normal mode but the outlet times are reduced by 90% in order to allow
faster adjustment of valve times.
320005 en ma 2014 02 14/20
$GMXVWLQJZDWHUWHPSHUDWXUH
$GMXVWLQJZDWHUTXDQWLW\
3UHVVOHIWEXWWRQV and DWWKHVDPHWLPHIRUVHFRQGVXQWLO
\RXKHDUEHHS'LVSOD\VKRZVWKHSUHVHQWVHWWLQJ$
$GMXVWZLWKWKHOHIWEXWWRQV
LQFUHDVHZDWHUWHPSDQG GHFUHDVHZDWHUWHPS
&RQILUPWKHQHZVHWWLQJVE\SUHVVLQJWKHOHIW EXWWRQRQFH
Ĉ& PLQWHPSHUDWXUH
Ĉ& PD[WHPSHUDWXUH
For left side
3UHVVOHIWEXWWRQV DQG DWWKH
VDPHWLPHIRUVHFRQGVXQWLO\RXKHDU
EHHSV the display shows the current setting.
$GMXVWZLWKWKHOHIWEXWWRQV
LQFUHDVHDQG GHFUHDVH
&RQILUPWKHQHZVHWWLQJVE\SUHVVLQJWKH
OHIW EXWWRQRQFH
For right side
3UHVVULJKWEXWWRQV DQG DWWKHVDPHWLPHIRUVHFRQGVXQWLO
\RXKHDUEHHSV the display shows the current setting.
$GMXVWZLWKWKHULJKWEXWWRQV LQFUHDVHDQG GHFUHDVH
&RQILUPWKHQHZVHWWLQJVE\SUHVVLQJWKHULJKW EXWWRQRQFH
ADJUST DISPLAY
25% 5
20% 4
15% 3
10% 2
5% 1
0% 0
-5% -1
-10% -2
-15% -3
-20% -4
-25% -5
PROGRAMMING
7R Z H U
A
320005 en ma 2014 02 15/20
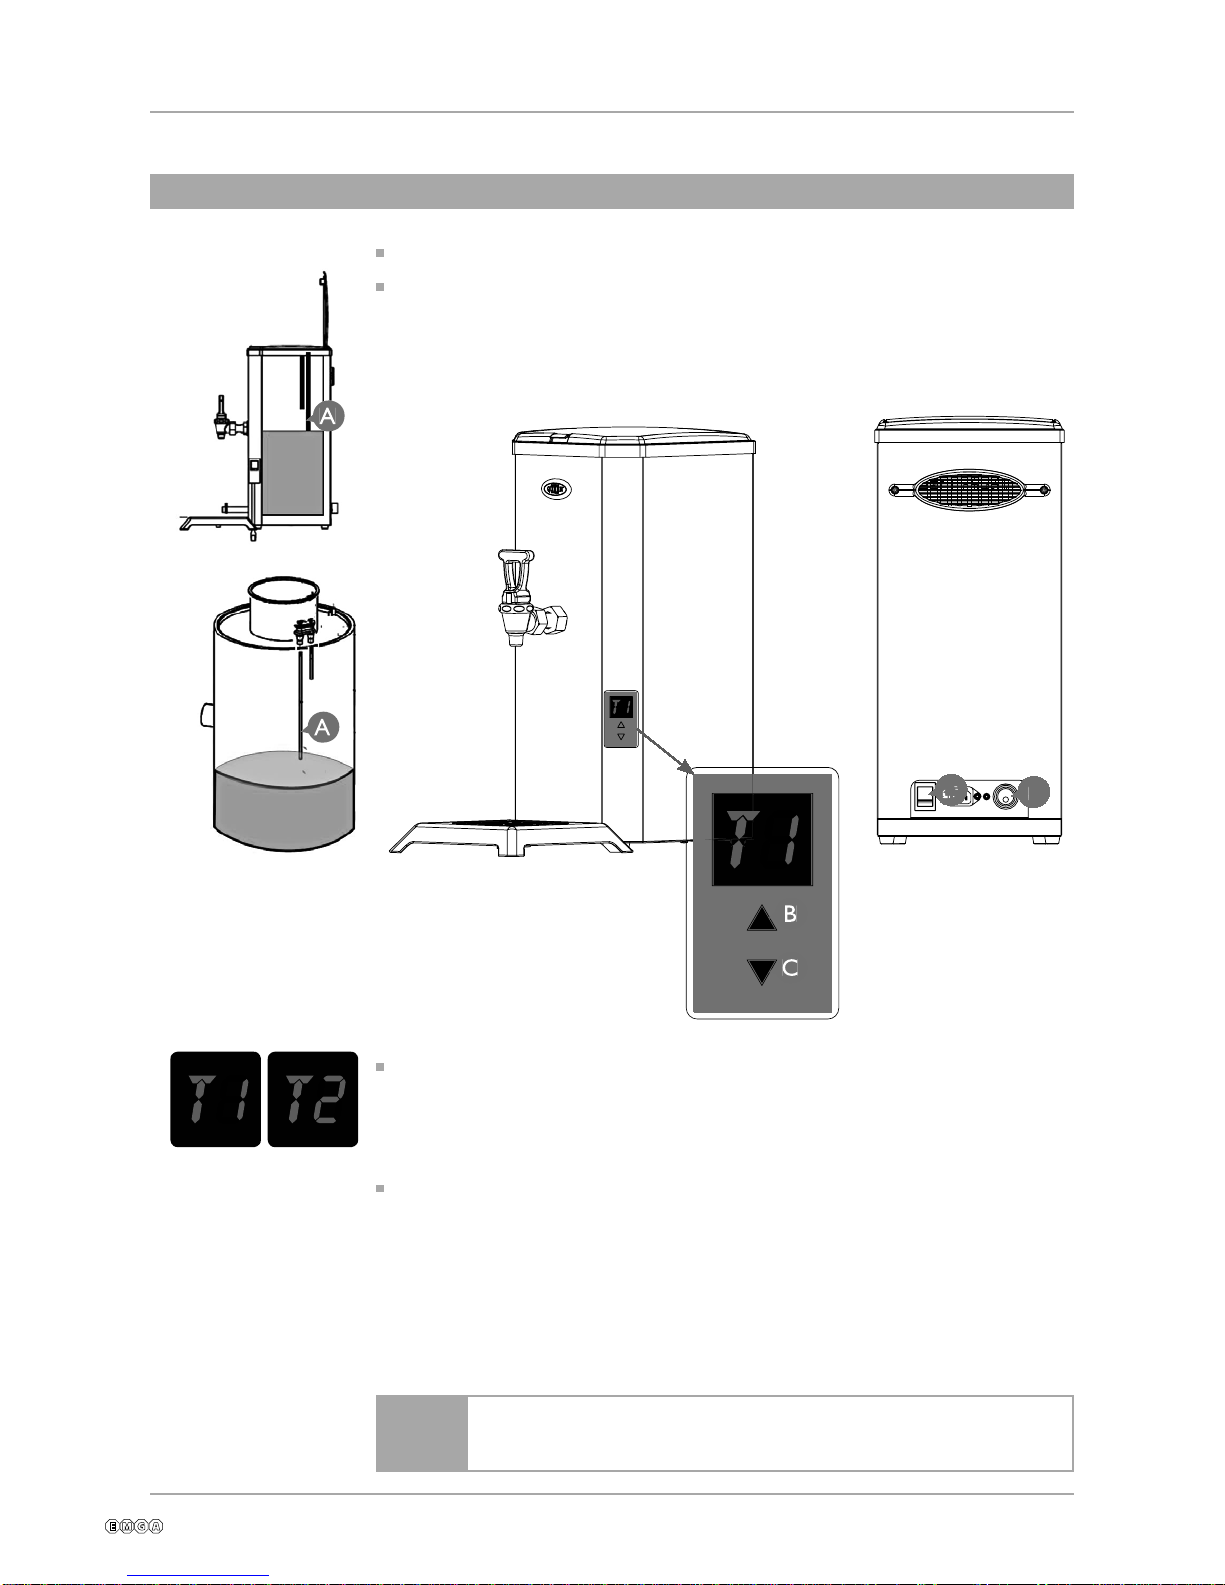
6HOHFWPDFKLQHW\SH
Install the plug supplied in the inlet valve (E) to avoid possible
leakage.
Note
The display will show T1, change the type of machine with buttons (B) or (C).
7 +9$DXWRPDWLF
7 +90PDQXDO
Conrm the choice by holding down the buttons (B) and (C) at the same
time for approximately 5 seconds.
Use a decanter to ll up the water tank to the long sensor pin.(A)
Keep button (B) pressed while turning on the power switch.(D)
PROGRAMMING
+9$+90
D
E
320005 en ma 2014 02 16/20

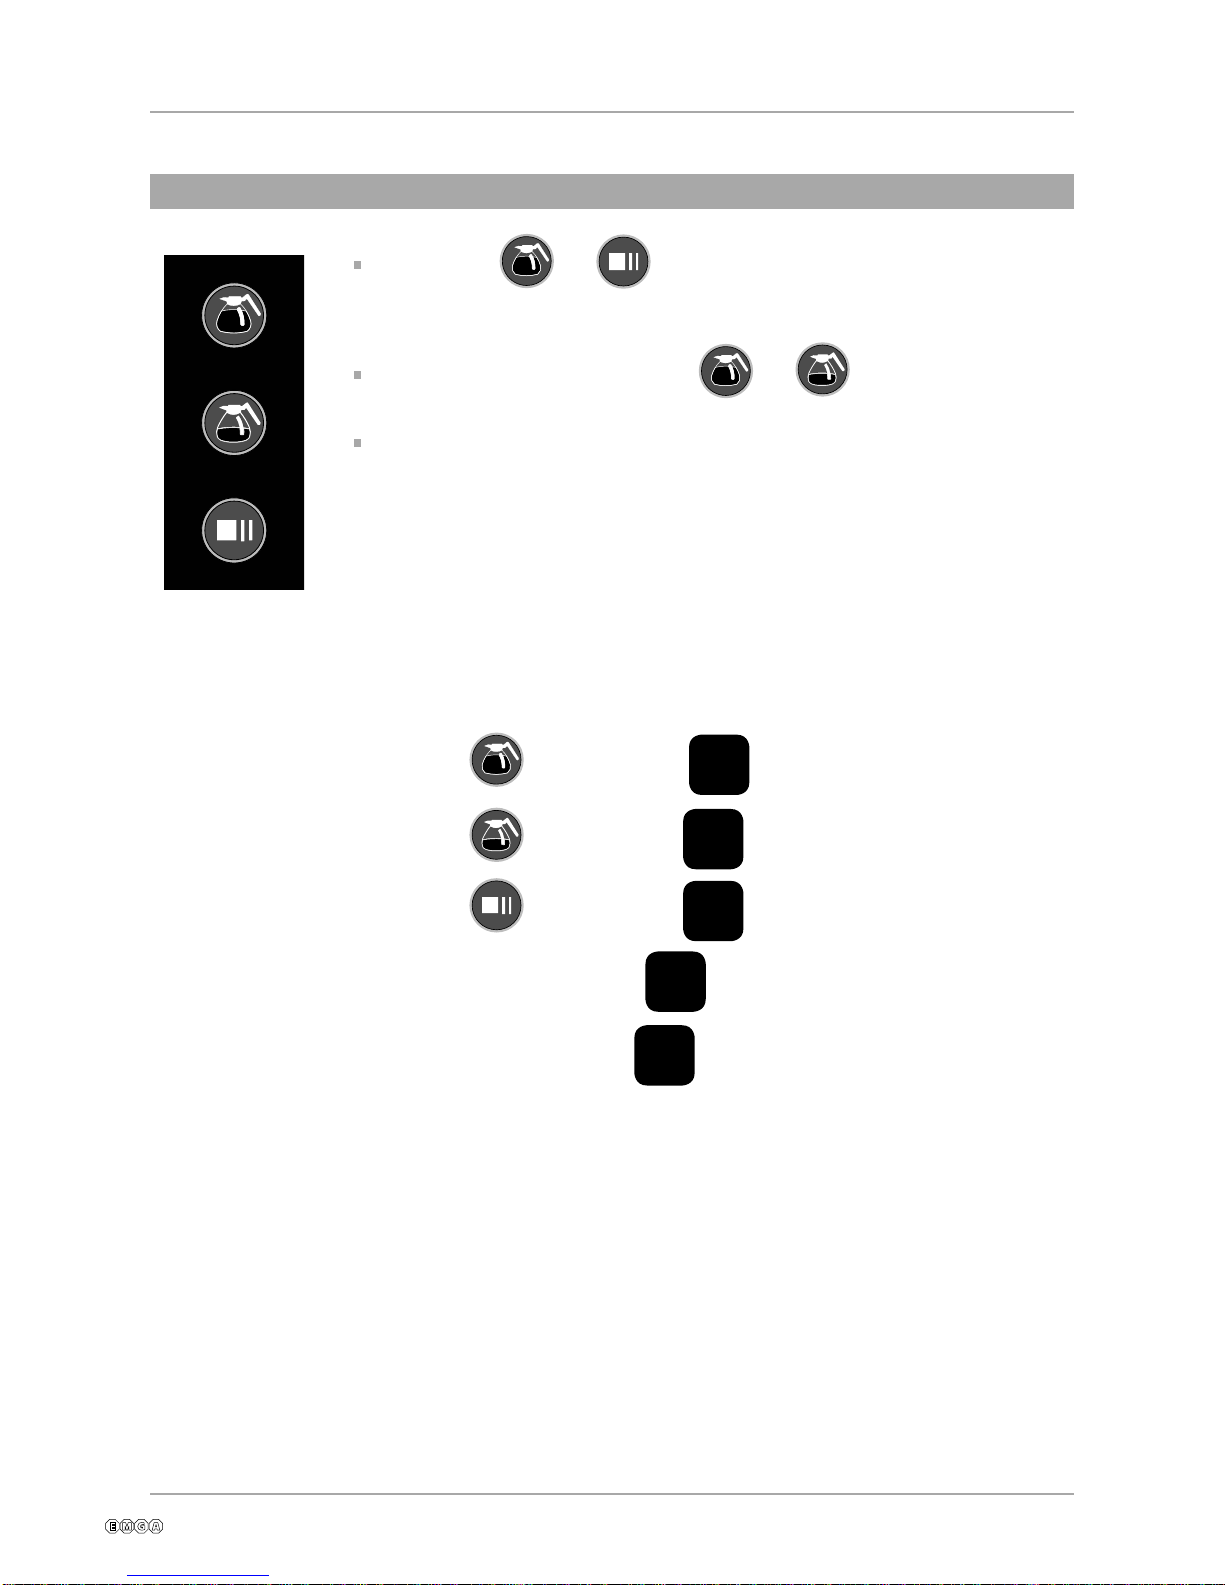
1RUPDORSHUDWLRQ
$GMXVWWLPHSHUFXS
There are several sub modes for this mode:
READY
The machine is in this mode after power on. The motor is off and timers are
stopped.
Pressing the button and changes the number of cups to be
prepared.The number of cups is displayed on the 2 digit display. The range is 4 -34
cups.The latest number of cups will be used even after power cycling the machine.
Pushing the button to start the motor timer (number of cups x time per
cup) and activates the motorV_MOTOR and moves the machine into GRINDING
mode.
GRINDING
The display is blinking at 0.5 Hz.The timer is checked.After the motor time has
expired the the motor is turned off. Pushing the button again pauses the
timer, deactivates the motor and moves into PAUSED mode. If button is
pressed more than 5 s the machine moves to READY mode.
PAUSED
The displays is blinking at 2 HZ. If the button is pressed again a beep
signals the recognition of the button press and the machine moves back to
GRINDING mode after 2 s unless the is still pressed and keeps pressed
more than 5 s which moves the machine to READY mode.
PROGRAMMING
*ULQGHU2ULJLQDO
In this mode the time for the motor activation per selected
number of cups can be adjusted.The procedure to enter this
mode is the following:
Press buttons and for 5 seconds XQWLO\RXKHDU
EHHSV
The display shows the current setting.
Increase inlet valve time with and decrease with .
Press to save new settings and return to normal mode.
The adjustment is made in 0.1 s steps.The range is 1.0 to 9.9 s
per cup.
The time per cup is saved permanently.
TIME/CUP DISPLAY
'LJLW 'LJLW
320005 en ma 2014 02 17/20

$GMXVWFRIIHHDPRXQW
$GMXVWFRIIHHJULQG
7HVWLQJ
The grinding degree is preset from the factory.
Push the knob and turn counterclockwise (A) for coarser grind or clockwise (B)
for ner grinding.
Press buttons and simultaneously for 6 seconds.
The display (A) shows the current time setting for grinding.
You can now choose to increase or decrease the time 15 = 1.5 seconds for
grinding, by pressing the buttons or .
This means that you increase or decrease the amount of coffee grounds.
A
B
PROGRAMMING
*ULQGHU2ULJLQDO
Pressing the and buttons before turning the mains switch on
puts thecontrol board into test mode.
A test sequence starts:
- Turn all outputs off
- Turn V_MOTOR on for 3 s
- Turn buzzer on for 2 s
- If button is pressed display b1
- If button is pressed display b2
- If button is pressed display b3
320005 en ma 2014 02 18/20

POSSIBLE SOLUTION
)DXOWDQGVROXWLRQ
FAULT POSSIBLE SOLUTION
Power switch does not lit
- Check plug connection to wall socket.
- Check fuse in plug.
- Check if hot plate becomes warm, if so
replace power switch.
Hot plate does not become
warm although switch is lit.
- Check connection to hot plate.
- If hot plate is defective, replace.
Brewer excess steam.
- Machine may require descaling.
- Spray nozzel may need unblocking.
- Hose may be bent.
- Inlet to boiler may be blocked. Descale
machine - if boiler still defective - replace.
Machine will not brew.
- Check overheating protection.
- Check microswicth.
- Check connection to boiler.
- Boiler unit may need replacing.
The machine does not take
in water
- Make sure water tap is open.
- Make sure the water hose is not bent.
- Check inlet valve.
- Check that the display is blinking.
The machines does not
stop taking in water.
- Dirt in the inlet valve.
- inlet valve is defective - replace
- PCB is defective - replace
The machine is giving
wrong amount of water.
- Check water tap.
- Water hose is bent.
- Dirt in inlet valve.
-Water amount adjustment set in display is
adjusted faulty. Adjust according to page 21.
- Defect oatregulator in inlet valve - replace
,03257$17
All maintenance
and installations
must be done
of an authorized
technician.
2ULJLQDO$0
320005 en ma 2014 02 19/20
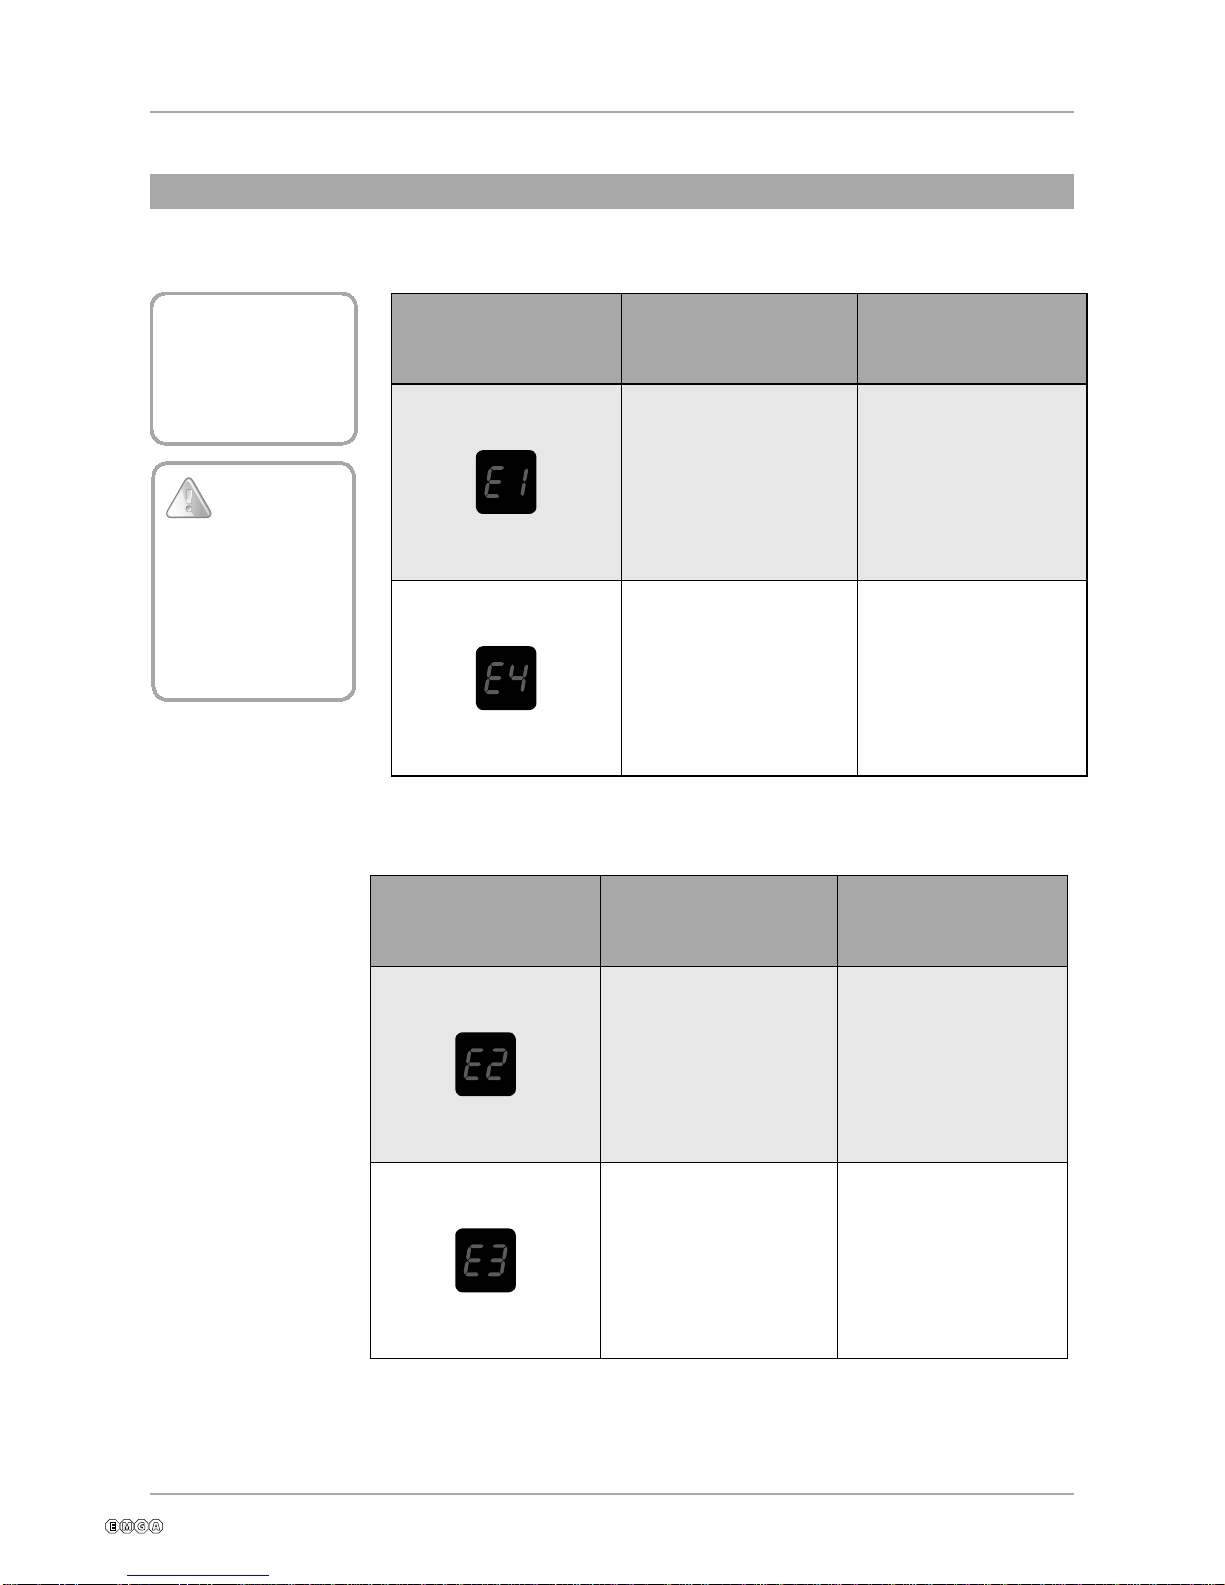
LEVEL CONTROL
TEMPERATURE CONTROL
SHOWN ON THE
DISPLAY POSSIBLE FAULT POSSIBLE
SOLUTION
- The high water level
sensor is triggerd
before the low level
sensor.
- Clean the level sensor.
- Replace.
- Cables connected is
incorrectly.
- The machine lls slowly.
- Poor water pressure.
- Water connection tap
is not open
- Check water
connection.
- Restart machine.
SHOWN ON THE
DISPLAY POSSIBLE FAULT POSSIBLE
SOLUTION
- Temperature sensor
out of range.
- Temperature sensor is
broken.
- Cable loose.
- 50C - 1050C.
- Replace temperature
sensor.
- Check cables.
- Heating time too long.
- Solid state broken.
- Element broken.
- Overheating guard
tripped or broken.
- Restart the machine.
- Replace element.
- Replace solid state.
- Check overheating
protection.
Remove the power
cord from the wall
socket during any
installation work.
POSSIBLE SOLUTION
&DWHU7RZHU+9$+90
,03257$17
All maintenance
and installations
must be done
of an authorized
technician.
)DXOWDQGVROXWLRQ
320005 en ma 2014 02 20/20
Table of contents
Other EMGA Coffee Maker manuals


