Emme Esse 82201 User manual

1
Centrale digitale terretre programmabile / Digital terrestrial programmable headend
Manuale d’uso 82201 v1.2
1. DESCRIZIONE DEL PRODOTTO
Domino TV organizer cod. 82201 è una centrale digitale terrestre programmabile. Il modulo
ottimizza i segnali digitali terrestri VHF/UHF e FM da ingressi multipli, con l’obiettivo di fornire
immagini di alta qualità sullo schermo TV. La sua tecnologia rivoluzionaria ne fa un prodotto
unico sul mercato:
Può processare più di 50 canali
Può convertire un’ampia selezione di canali
Filtri molto ripidi (50 dB su canali adiacenti)
AGC in tempo reale sui singoli mux
Completa flessibilità nell’assegnare i filtri da ogni ingresso. Ogni canale può essere spostato
in frequenza su un altro canale della banda VHF o UHF (Flex Matrix)
Per evitare accessi alla centrale e alle impostazioni da parte di persone non autorizzate è
possibile proteggere l’accesso con un codice di sicurezza.
5 ingressi: FM / 4 x VHF-UHF / > 50 canali / AGC / alimentazione 12-24 V
Dimensioni prodotto (A x L x P): 165mm x 217mm x 59mm
2. INSTALLAZIONE TIPICA
Il Domino TV organizer cod. 82201 può essere utilizzato per fornire immagini televisive e
segnali FM in alta qualità ed è adatto sia per il mercato residenziale che turistico. Ecco di
seguito alcune fra le possibili applicazioni in cui Domino TV organizer può essere utilizzato:
Piccoli e grandi hotel, ostelli, bed & breakfast , parchi vacanze
Ospedali, case di riposo, carceri
Unità abitative grandi o piccole
3. CONTENUTO DELLA CONFEZIONE
Domino TV Organizer (ref. 82201)
Cavo di alimentazione (180cm)
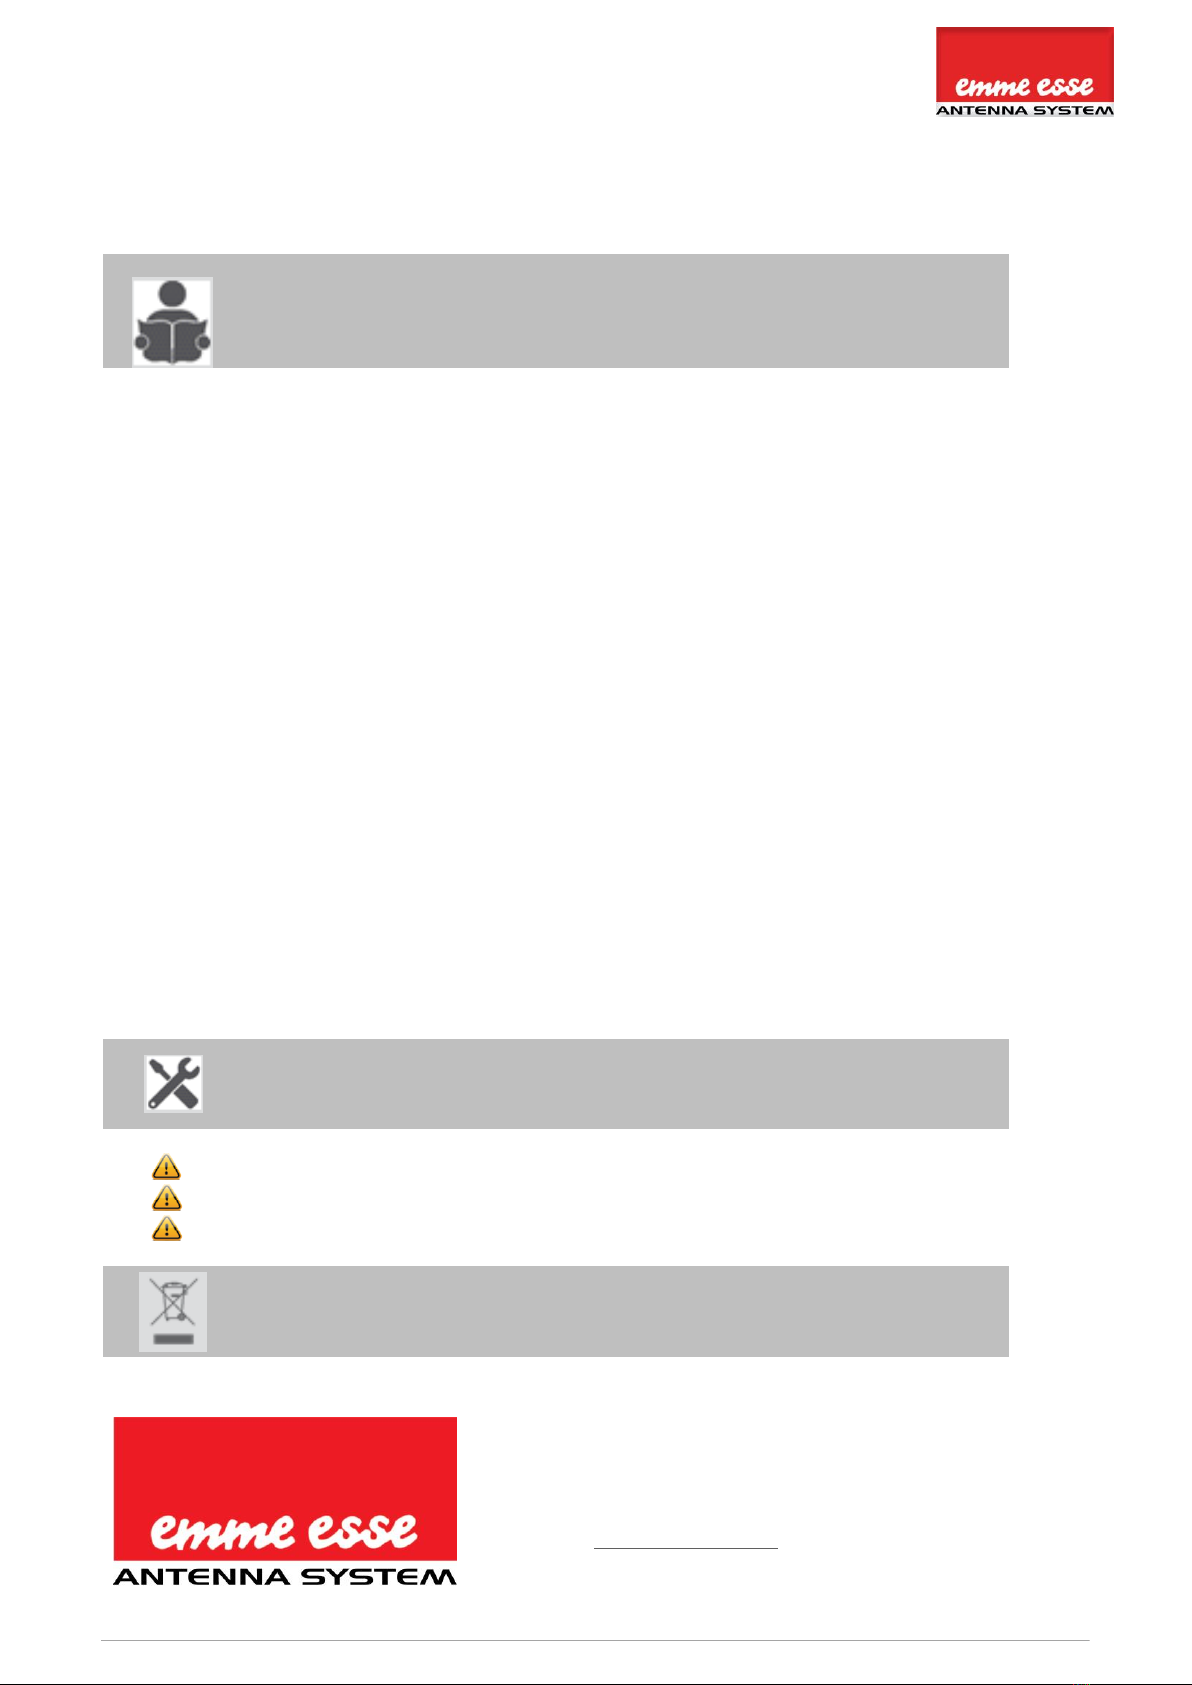
4. INSTALLAZIONE HARDWARE
Centrale digitale terretre programmabile / Digital terrestrial programmable headend
5. MONTAGGIO 82201
IMPORTANTE: Montare il modulo verticalmente su un muro in una stanza ben ventilata
lasciando uno spazio minimo di 15 cm intorno al prodotto per garantire un’adeguata
ventilazione del prodotto.
Connettere il prodotto alla messa a terra
Collegare il cavo dell’adattatore alla presa di alimentazione. Controllare il LED di stato
per indicare la presenza di corrente.
Collegare gli ingressi VHF/UHF e/o FM
Collegare un cavo coassiale al connettore di uscita per la distribuzione del segnale
Collegare un analizzatore di rete alla porta di prova per controllare la qualità del
segnale
Configurare il dispositivo usando il selettore rapido, come sotto riportato.
Opzionale: inserire una scheda SD nell’apposito slot per caricare le configurazioni di un
modulo precedente o per copiare le configurazioni per un altro modulo
L’adattatore di alimentazione può essere facilmente sostituito senza scollegare il
prodotto. A tale scopo, aprire il coperchio di plastica superiore sinistro spingendo la
levetta sul lato opposto al connettore di alimentazione.
6. CONFIGURAZIONE 82201
In questa sezione verrà descritta la configurazione del Domino TV organizer.
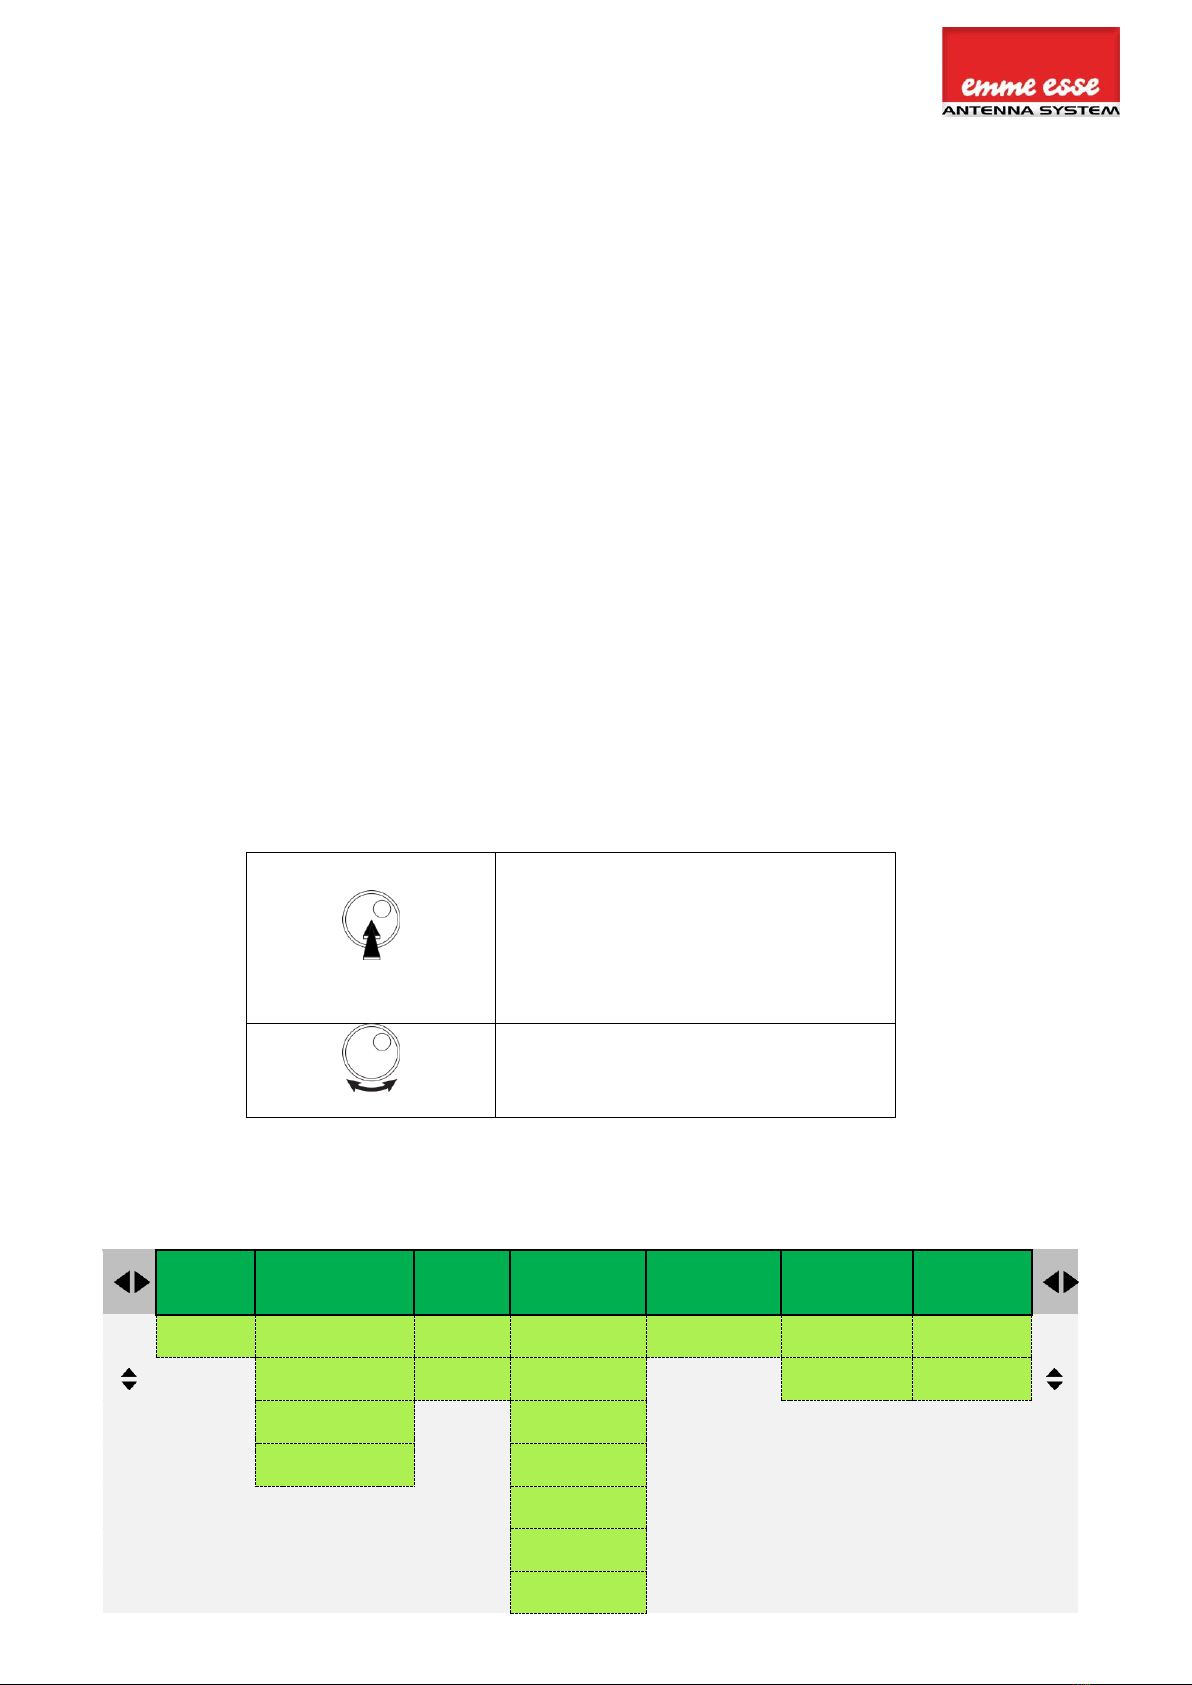
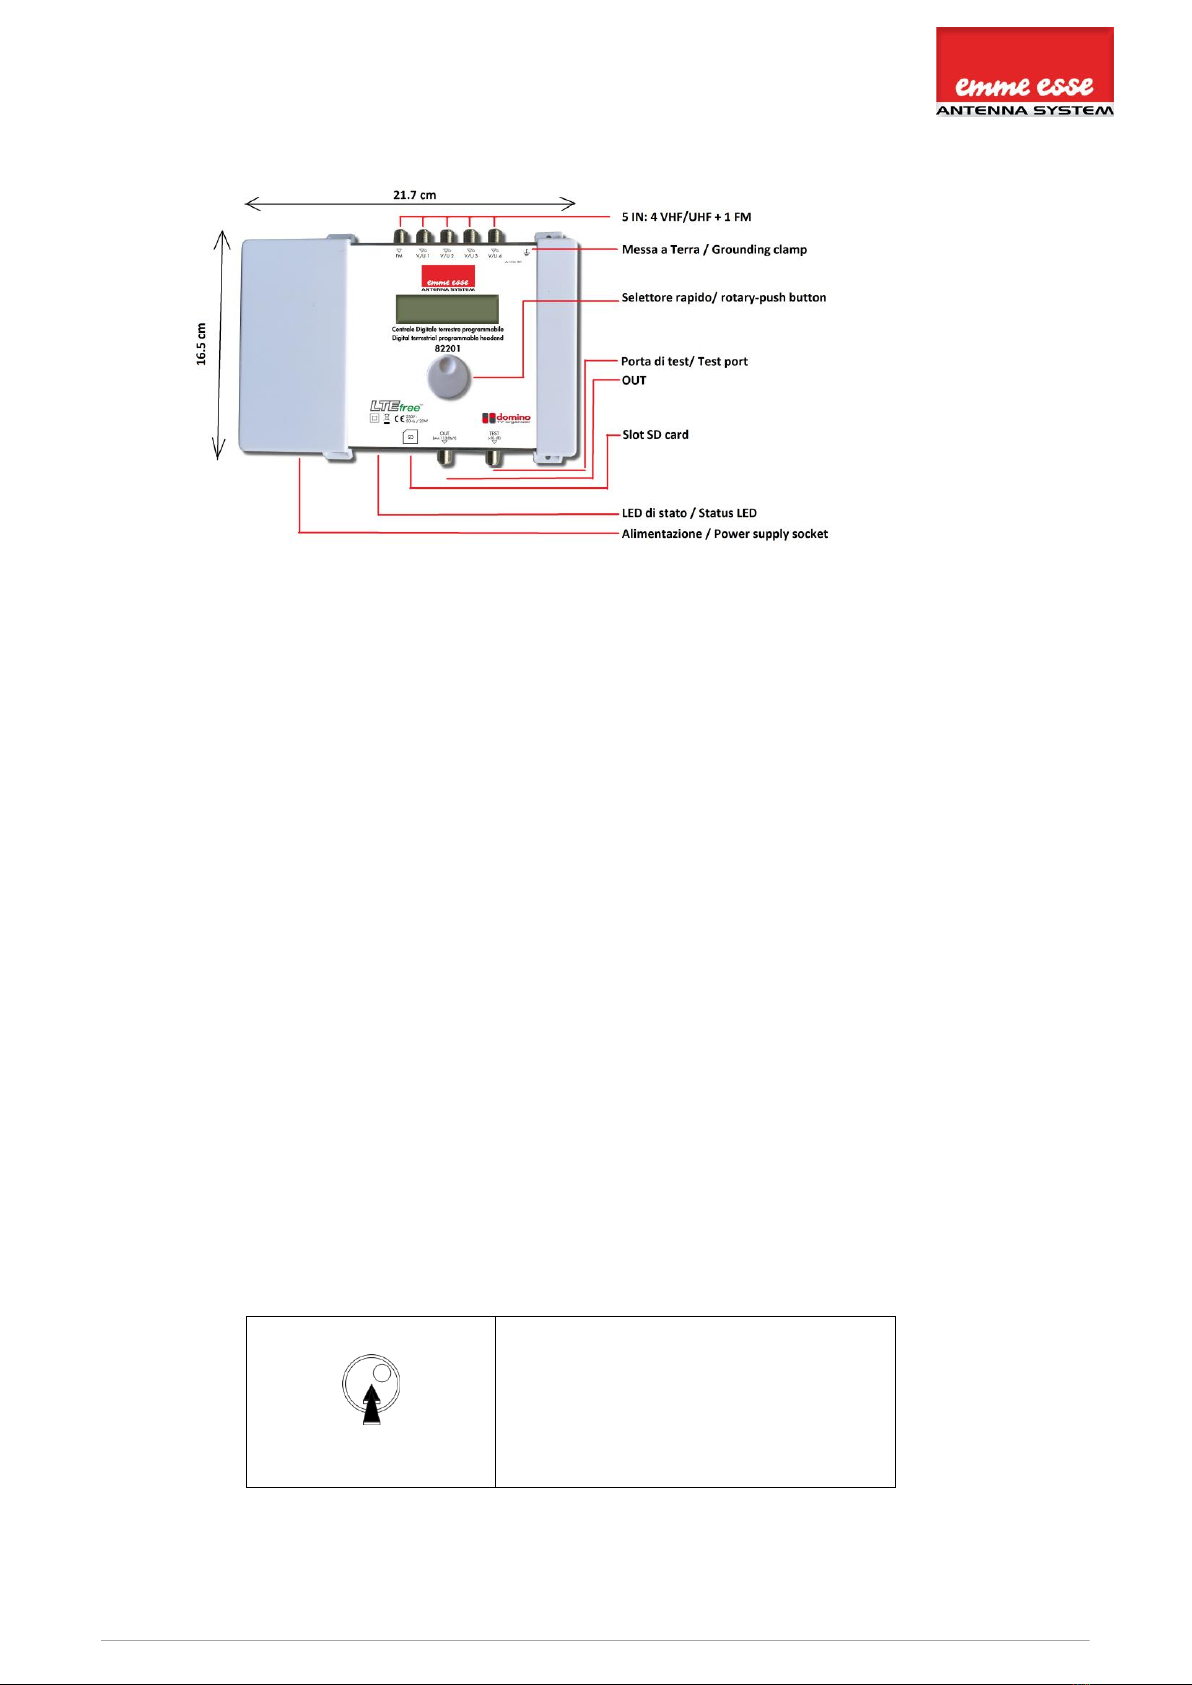
Utilizza il selettore rapido per navigare il menu. È estremamente facile ed intuitivo. La tabella
sottostante mostra le modalità di utilizzo del selettore:
Premi il pulsante per 2s per entrare
nella configurazione di base.
Premi il pulsante per confermare le
selezioni.
Ruotando il pulsante, è possibile
muoversi tra diverse schermate
PANORAMICA MENU
INPUT FM
Ingresso
FM
INPUT V/U 1 –4
Ingresso V/U 1-4
OUTPUT
Uscita
ADVANCED
Menù avanzato
LOAD SD PRESET
Carica dati SD
SAVE SD PRESET
Salva dati SD
EXIT
Esci
GAIN
Guadagno
PRE-AMPLIFIER
Preamplificatore
LEVEL
Livello
LANGUAGE
Linguaggio
PRESET X
Config.
CREATE PRESET
Crea config.
LOCK
Blocco PIN
DC
SLOPE
Pendenza
REGION
Area
DELETE ALL
Cancella tutto
NO LOCK
Nessun blocco
ADD 1 CHANNEL
Aggiungi 1 canale
DC VOLTAGE
Tensione DC
ADD 2 CHANNELS
Aggiungi 2 canali
FW VERSION
Versione FW
SERIAL NUMBER
Numero seriale
FORMAT CARD
Formatt. SD card
UPGRADE FW
Aggiorna FW

3
Centrale digitale terretre programmabile / Digital terrestrial programmable headend
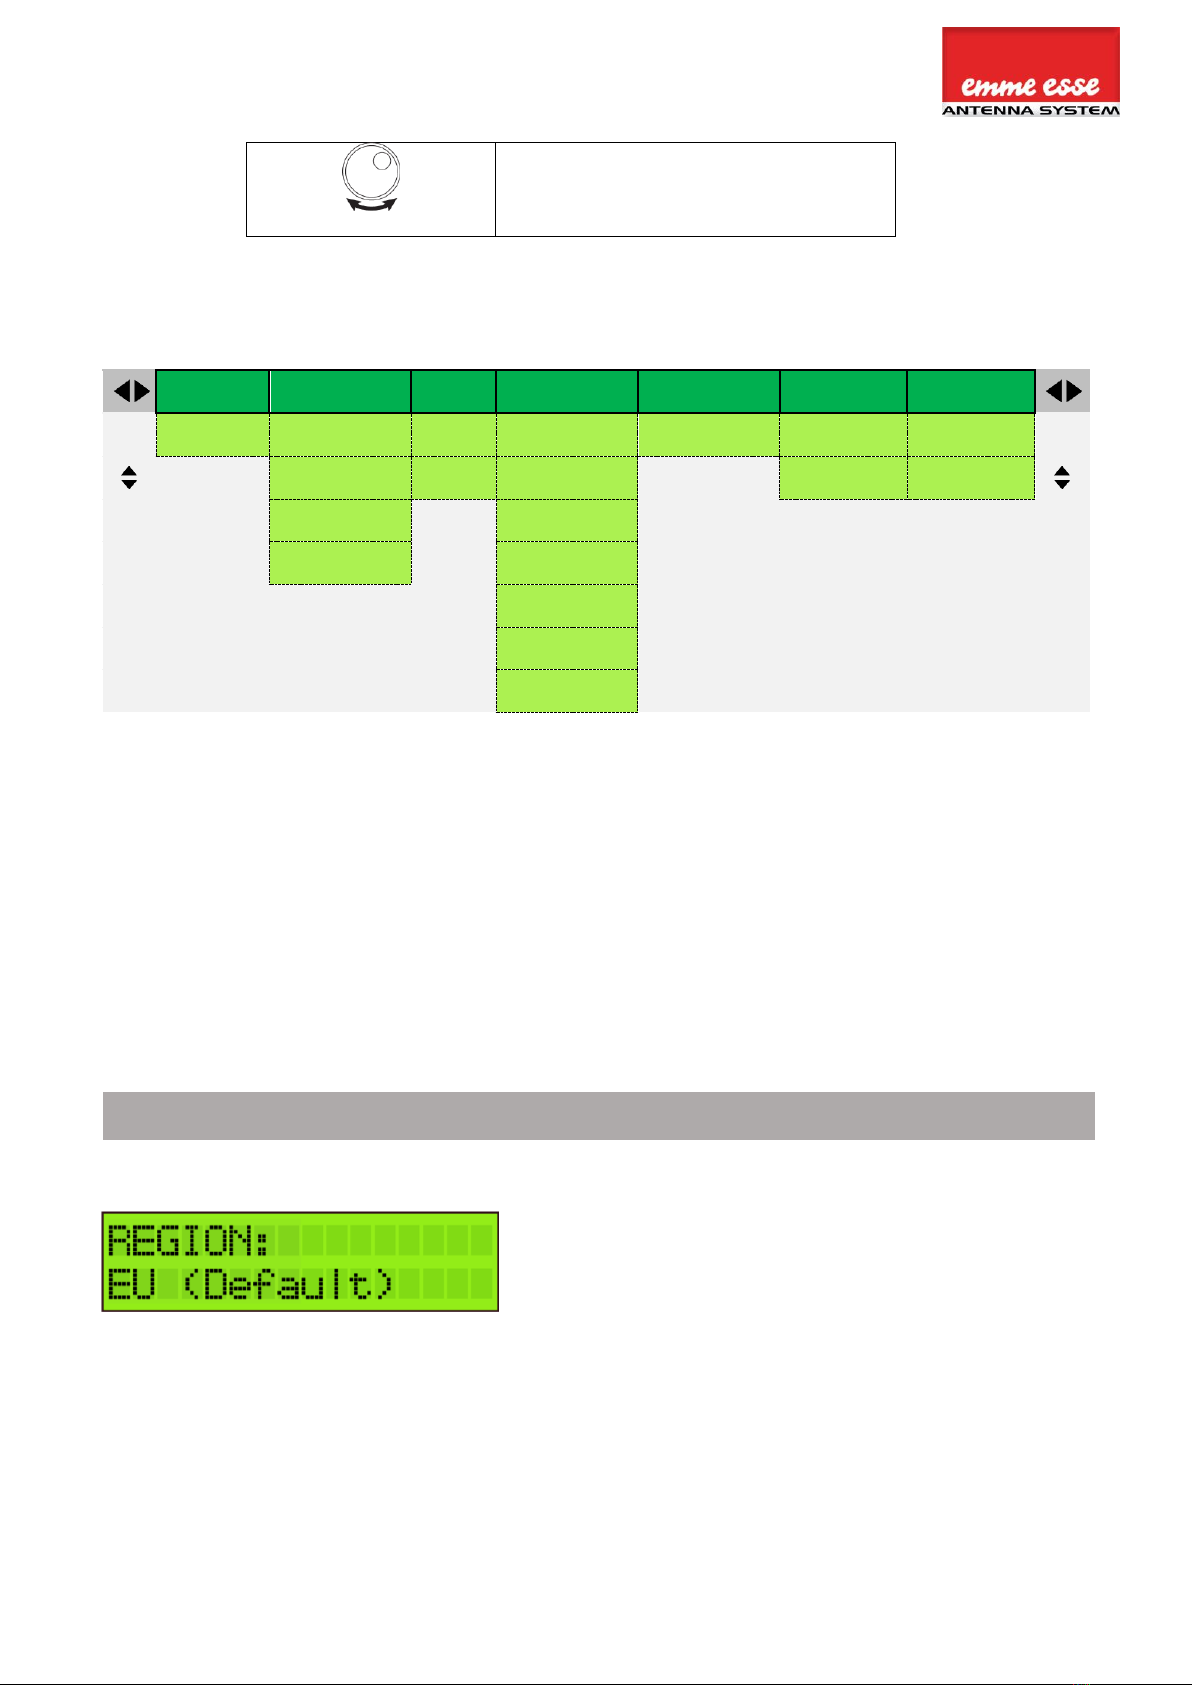
CONFIGURAZIONE INIZIALE E RESET
IMPORTANTE! Prima di impostare le configurazioni iniziali, è consigliabile selezionare
l’area e la nazione corretta. Spegni la centrale e togli l’alimentazione, tieni premuto il selettore
rapido mentre reinserisci l’alimentazione, fino a che non si riaccende l’unità. Rilascia il
pulsante fino a che sullo schermo non ricompare la scritta “RESET FINISHED”, per indicare che
il reset è terminato. Ora il prodotto è resettato e chiederà di selezionare la nazione o l’area. Ciò
determinerà il piano dei canali per VHF e UHF e la tensione DC (12 o 24 V).
DISPLAY SCRITTA
SPIEGAZIONE
Per impostare il corretto piano di canali, seleziona la
nazione o l’area dove si sta installando Domino TV
organizer. Ruotare il selettore e confermare premendo il
pulsante. Le impostazioni di default normalmente sono
quelle italiane. Se così non fosse, o si desiderasse
cambiarle, è possibile selezionare tra le aree disponibili
tra cui Australia, Europa, Brasile, Cina, Hongkong, Italia,
Nuova Zelanda, Russia, Sud Africa, UK e Usa.
Tutte le seguenti voci del menù si possono visitare senza resettare la centrale.
Premi il selettore rapido per 2 secondi per accedere al menù
IMPOSTAZIONI INGRESSO
DISPLAY SCRITTA
SPIEGAZIONE
Premi il selettore rapido per configurare l’ingresso FM.
Ruota il selettore per esplorare il sottomenù.
Per filtrare e amplificare un segnale FM, selezionare la
voce Gain (guadagno) e scegliere il guadagno da 15 a
35 dB; premere il selettore per confermare.
Nota: Il segnale DAB deve essere sommato agli
ingressi V/U 1-4.
Dopo aver configurato l’ingresso FM, ritornare ad inizio
menù (Input FM/ingresso FM), premere il selettore e
ruotarlo in senso orario per selezionare l’ingresso
successivo INPUT V/U 1 ( Ingresso V/U 1). Premere il
selettore in corrispondenza della voce INPUT V/U 1
(Ingresso V/U 1) per accedere al relativo sottomenù.
Ruotare il selettore per scorrere all’interno del
sottomenù.
Centrale digitale terretre programmabile / Digital terrestrial programmable headend
PRE-AMPLI: L'amplificatore interno è preimpostato su
ON, solo in caso di segnali in ingresso molto forti (se il
canale più forte di tale ingresso è superiore a 80dBμV),
è consigliabile spegnerlo.
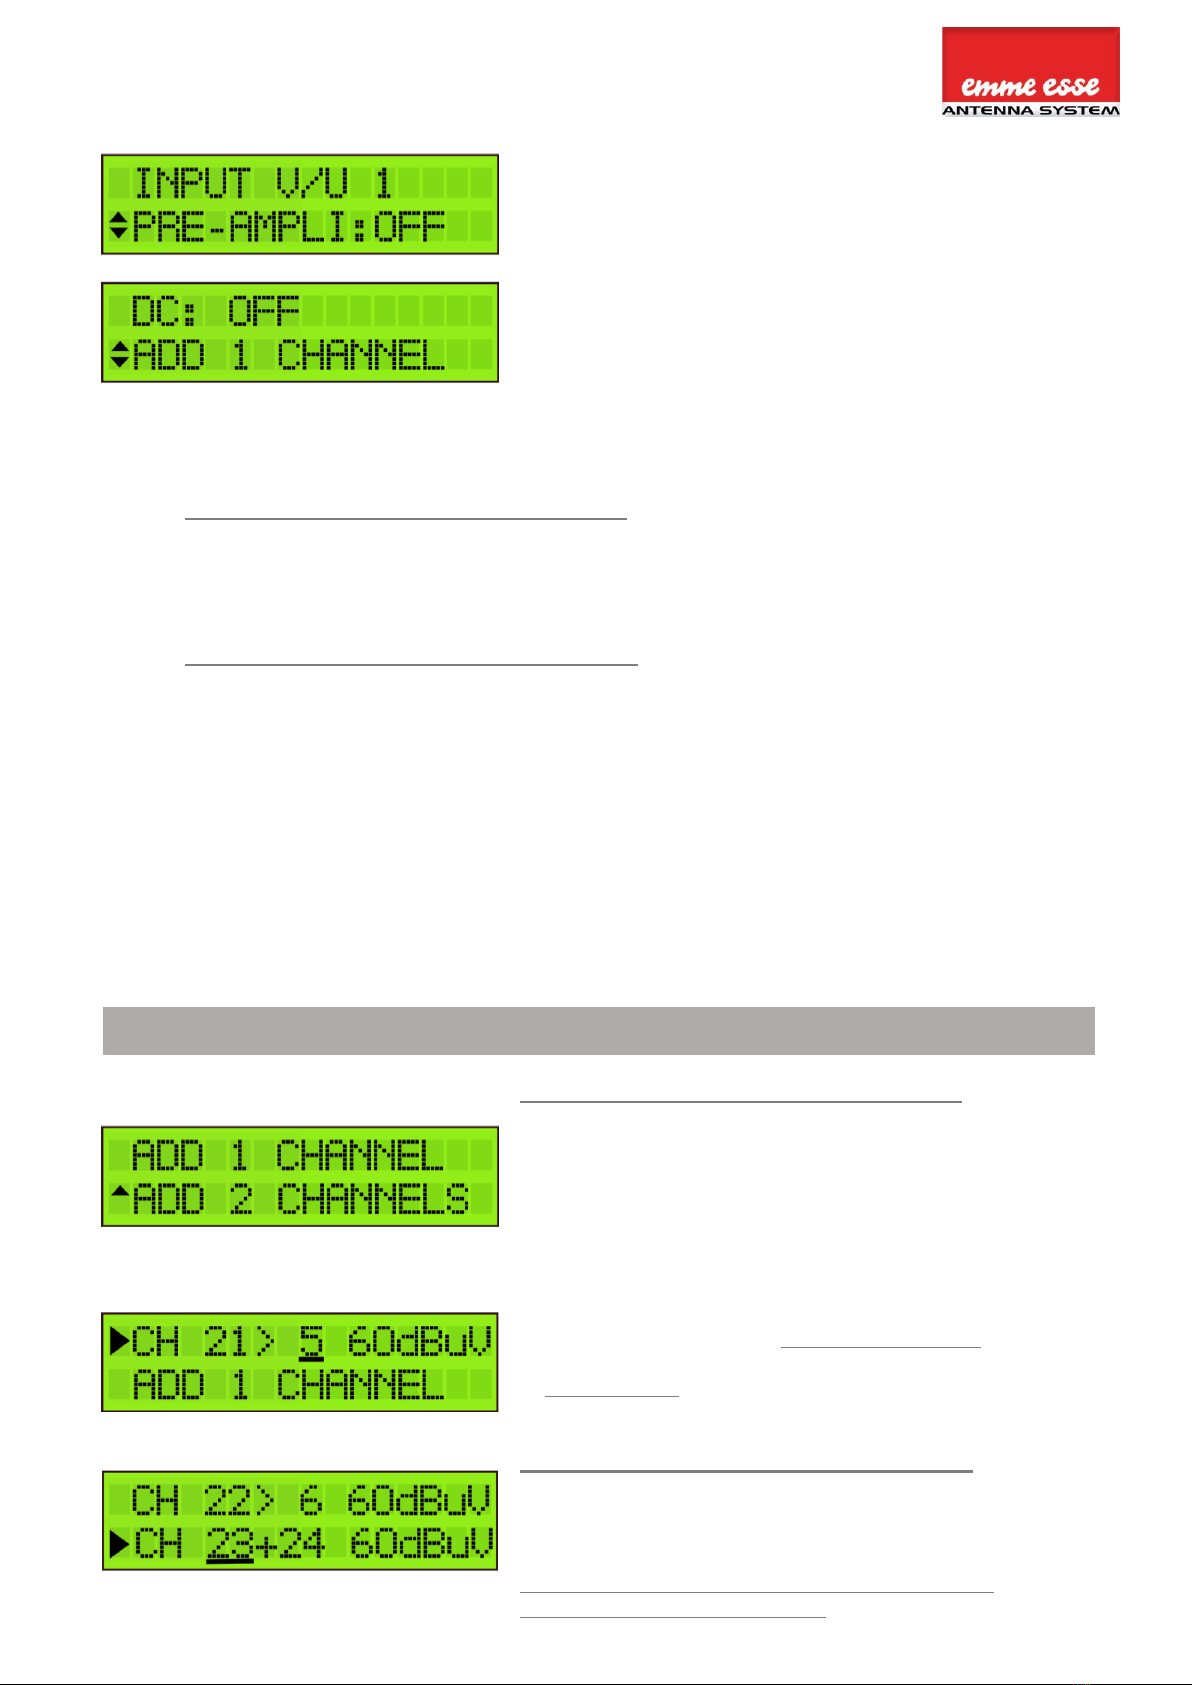
DC: Decidere se l'ingresso deve fornire alimentazione
ad un amplificatore esterno. Scegliere fra OFF o 12 V.
Nota: se l'amplificatore esterno necessita di 24 V, è
possibile modificarlo in impostazioni avanzate (vedere
prossimamente).
Ci sono due modalità per aggiungere canali per ogni
ingresso:
ADD 1 CHANNEL/AGGIUNGI 1 CANALE: Questa è la modalità standard in cui si
aggiunge un canale alla volta dall’ingresso. Ogni canale viene quindi filtrato e
livellato individualemente.
ADD 2 CHANNELS/AGGIUNGI 2 CANALI: In questa modalità vengono aggiunti
due canali adiacenti da un ingresso. Questa funzionalità consente di processare
più di 50 canali. I due canali adiacenti sono processati insieme come un solo
cluster. Ciò implica che il livello di ingresso, mostrato sul display, ed il livello
d’uscita sono entrambi la somma dell’intensità dei due canali.
Per raggiungere prestazioni ottimali, raccomandiamo di aggiungere singoli canali,
salvo il caso in cui sia necessario processare un elevato numero di canali.
DISPLAY SCRITTA
SPIEGAZIONE
ADD 1 CHANNEL/AGGIUNGI 1 CANALE:
Seleziona la voce ADD 1 CHANNEL/AGGIUNGI 1
CANALE e scegli il canale che si desidera ricevere.
Premere per confermare.
Cambiando il secondo valore, è possibile decidere dove
posizionare all’uscita il canale selezionato. Premere per
confermare. La modalità a singolo canale è indicata dal
simbolo “>”.
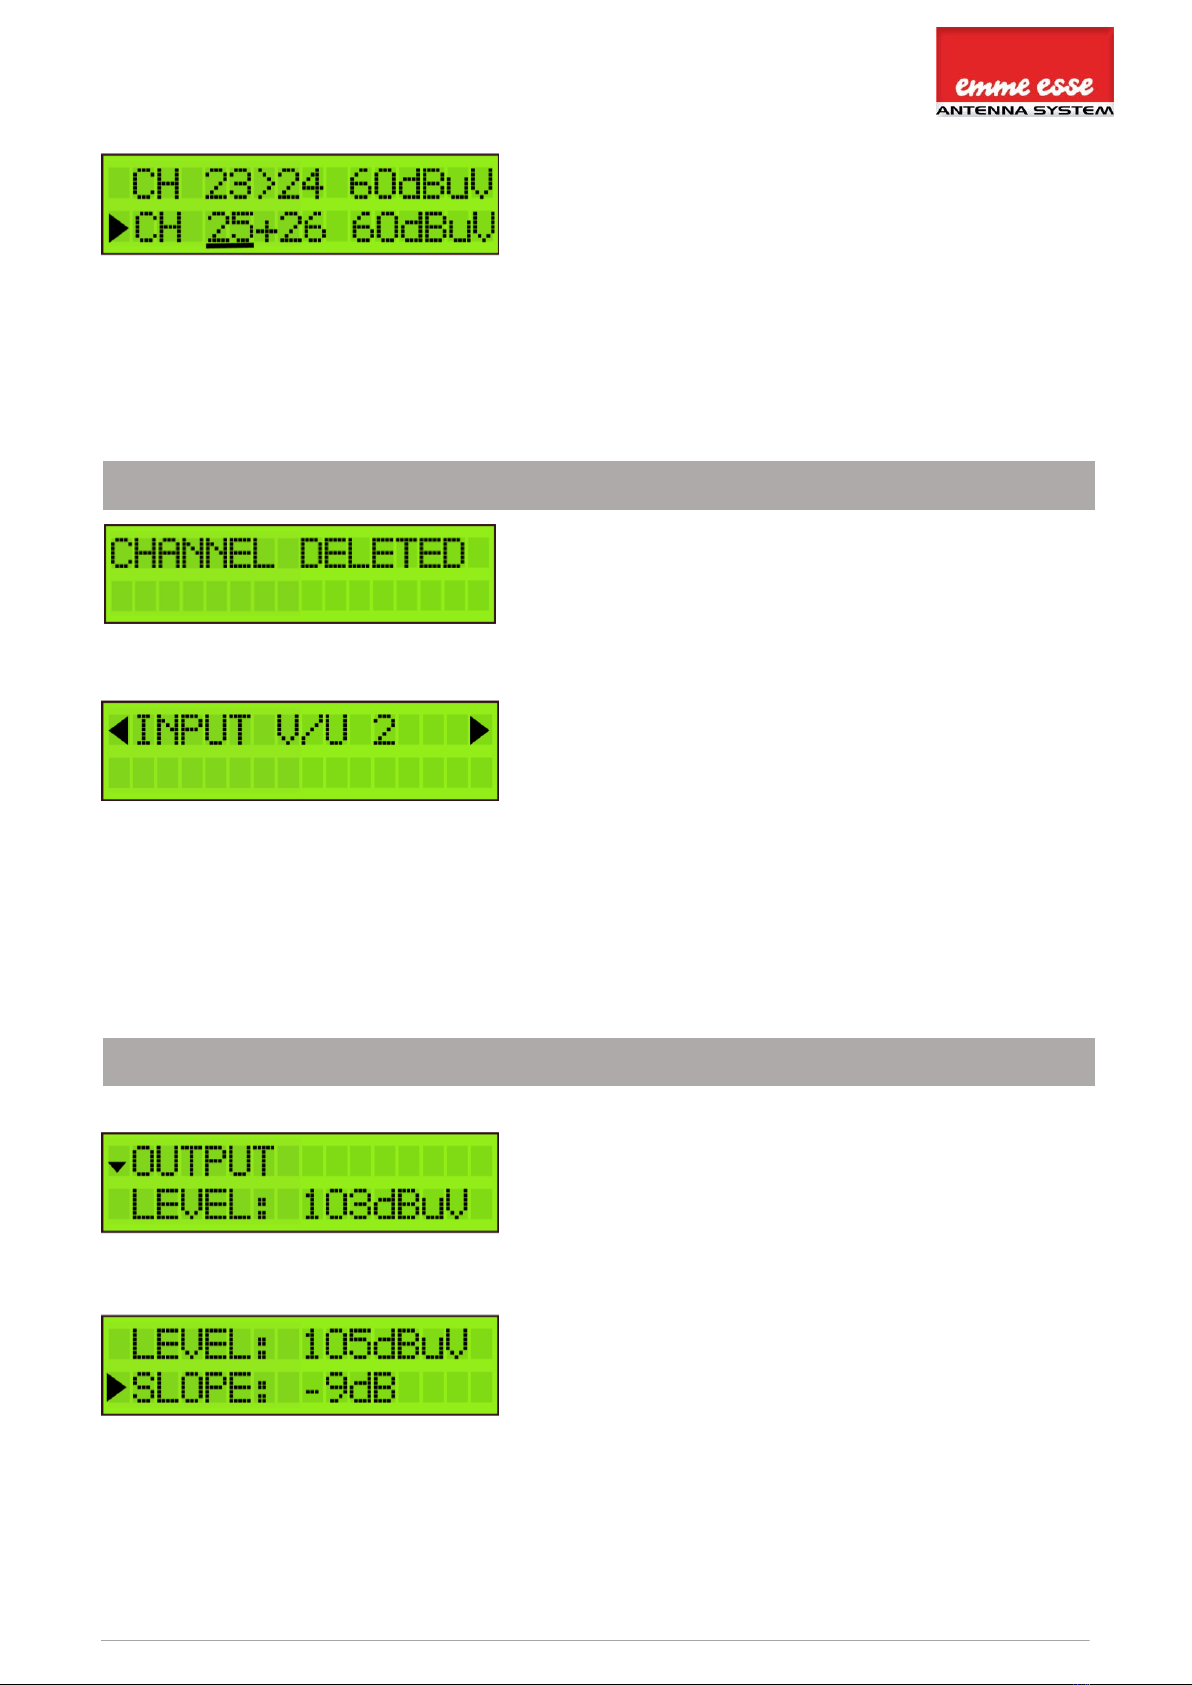
CONVERSIONE DI UN CANALE: Se i due canali
indicano lo stesso valore, non c’è conversione. Se i
numeri dei due canali sono differerenti, viene effettuata
la conversione. Nell’esempio a fianco il canale 21 in
ingresso viene convertito nel canale 5 in uscita.
ADD 2 CHANNELS/AGGIUNGI 2 CANALI:
Selezionare la voce ADD 2 CHANNELS/AGGIUNGI 2
CANALI e scegliere la coppia di canali adiacenti che s
idesidera ricevere. Premere per confermare. La
modalità 2 canali è indicata dal simbolo “+”.
Quando si aggiungono 2 canali, non è possibile
effettuare alcuna conversione.

5
Centrale digitale terretre programmabile / Digital terrestrial programmable headend
Nota 1: Il primo canale determina se l’ ingresso diventa
solo un ingresso VHF o solo UHF. Ciò significa che VHF
e UHF non possono essere combinati in un solo
ingresso.
Nota 2: Il valore 60dBμV (nell'angolo in basso a destra)
indica il livello di ingresso del canale.
Nota 3: Per EU, Italia e Nuova Zelanda, il canale 13
(230-240 MHz) ed il VHF possono essere utilizzati. VHF
significa che l’intera banda è trattata in un filtro
passabanda da 174 a 240 MHz. I canali VHF ed il
canale 13 non possono essere convertiti e non possono
essere trattati con la modalità 2 canali poiché hanno
differenti larghezze di banda.
Nota: l’AGC potrebbe richiedere fino a 20 secondi per
stabilizzare i livelli di segnale
Per aggiungere un altro canale, scorrere il menù e
selezionare ADD 1 CHANNEL/AGGIUNGI 1 CANALE o
ADD 2 CHANNELS/AGGIUNGI 2 CANALI. Premere il
selettore per confermare.
Per evitare cattiva qualità o immagini codificate, fare in
modo che un solo canale di ingresso sia assegnato ad
un canale di uscita. Se due canali sono assegnati allo
stesso canale di uscita, viene visualizzato un asterisco
(*).
La stessa cosa avviene per la modalità AGGIUNGI 2
CANALI. Assicurarsi che ciascun canale d’uscita sia
selezionato solo una volta.
Aggiungere tutti i canali di ingresso desiderati e
assegnarli ai canali di uscita.
Dopo questo, sarà impostato il filtro LTE corretto per l'ingresso (i possibili filtri sono
694MHz, 790MHz o OFF). Se i canali sono inferiori al canale 48, viene
automaticamente attivato il filtro a 694MHz. Il filtro 790MHz è attivato in presenza di
soli canali inferiori al 60.
Per eliminare un canale, posizionare la freccia sul
canale e premere il pulsante di rotazione per 3 secondi.

Centrale digitale terretre programmabile / Digital terrestrial programmable headend
Dopo aver aggiunto tutti i canali all'ingresso 1, se si
desidera aggiungere canali adi altri ingressi, scorrere
fino alla parte superiore del menu (INPUT V/U 1),
premere il selettore rapido e scorrere fino all’ingresso
successivo desiderato.
Ripetere i passaggi precedenti per tutti i canali di
ingresso.
IMPOSTAZIONI USCITA
DISPLAY SCRITTA
SPIEGAZIONE
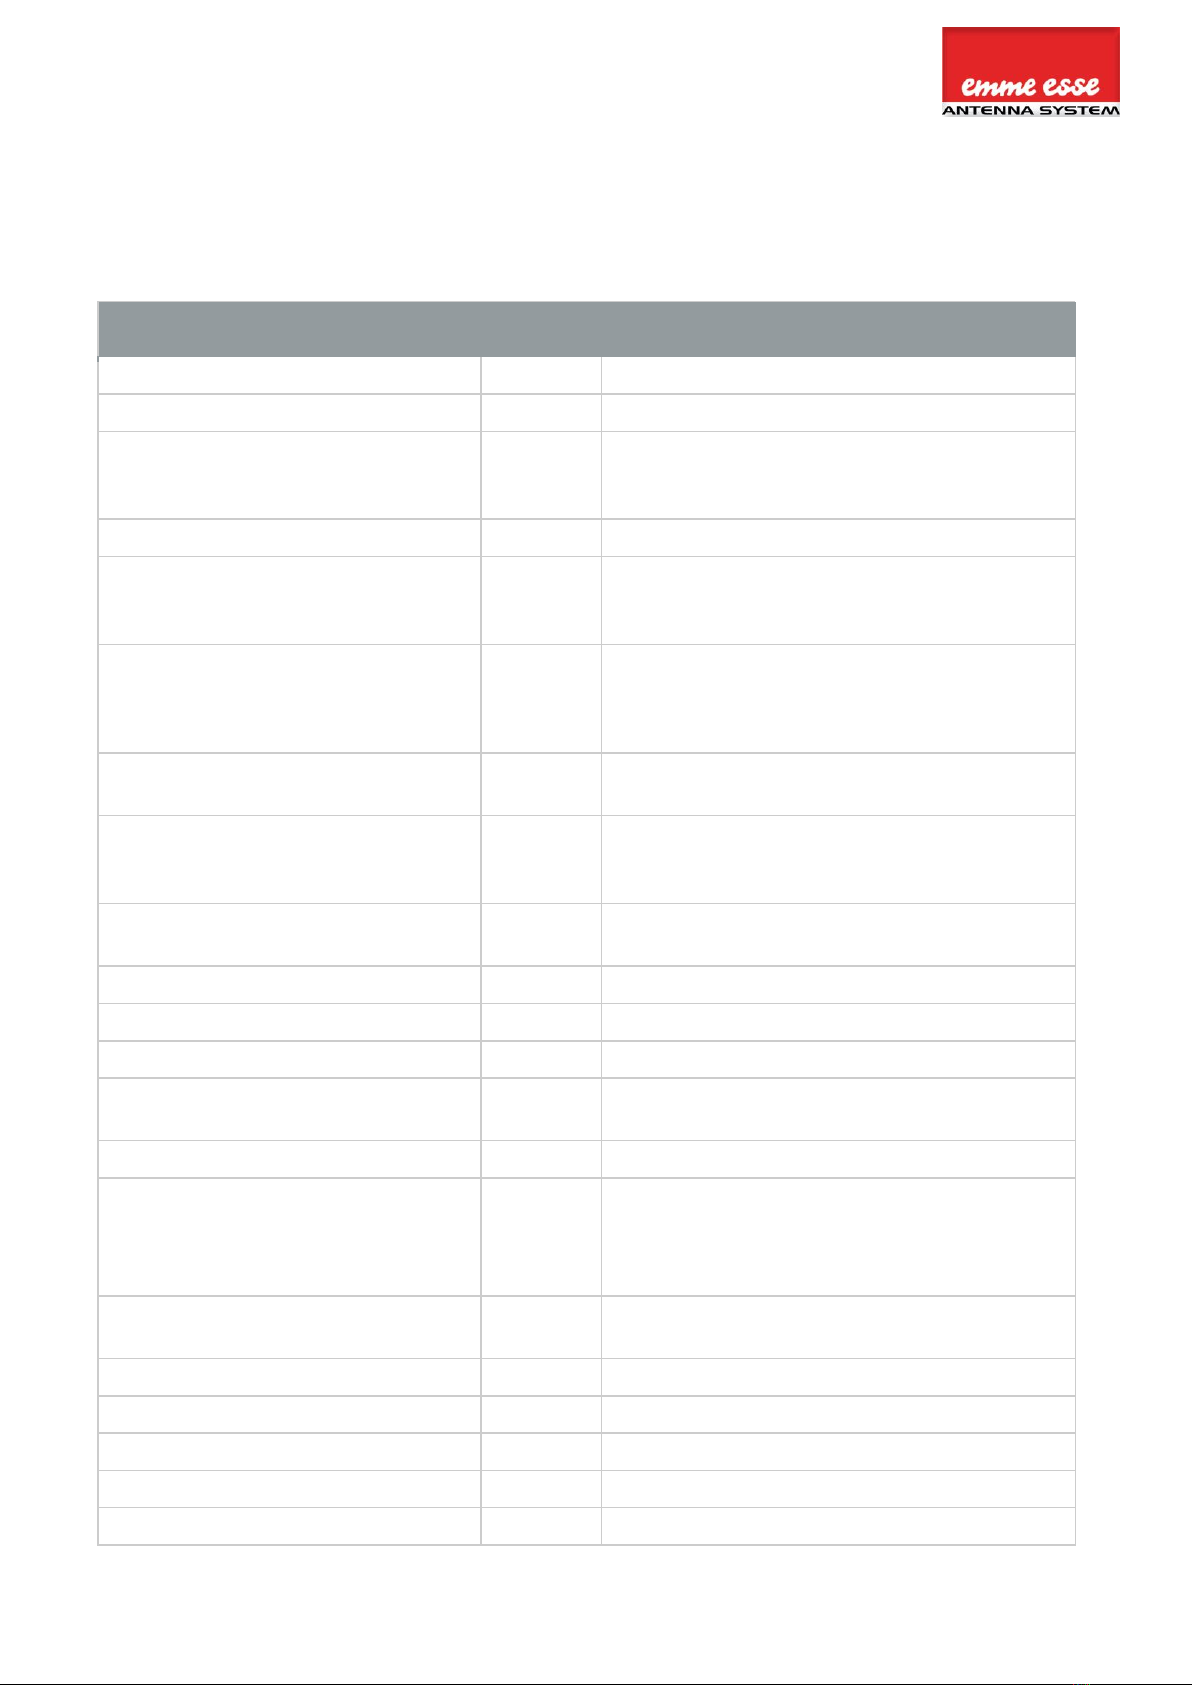
Definisce il livello di uscita del segnale di uscita.
Range tra 93 dBμV e 113 dBμV. Il livello d’uscita
impostato di default è 103 dBμV.
È possibile controllare l'uscita tramite un analizzatore di
rete sulla porta di prova -30dB.
Nota: più sono i canali selezionati, minore è la potenza
da dare (ad esempio da 106 a 110 dBμV per 10 canali).
È possibile impostare una pendenza fino a -9dB tra
l'inizio della banda BIII e la fine della UHF per
compensare le perdite del cavo. 0dB significa che tutti i
canali hanno lo stesso livello di uscita (vedi punto
precedente), -9dB significa che l'inizio di BIII (174MHz)
è 9dB più debole della fine dell'UHF.
Nota: Nel menu OUTPUT, è possibile definire il livello di uscita in dBμV dei MUX. Domino TV
organizer ha abbastanza guadagno per garantire questo livello di uscita in tutte le condizioni di
input. Nel caso in cui sia stata impostata una pendenza, il livello di uscita indicato sul display
sarà il livello di uscita della frequenza massima.
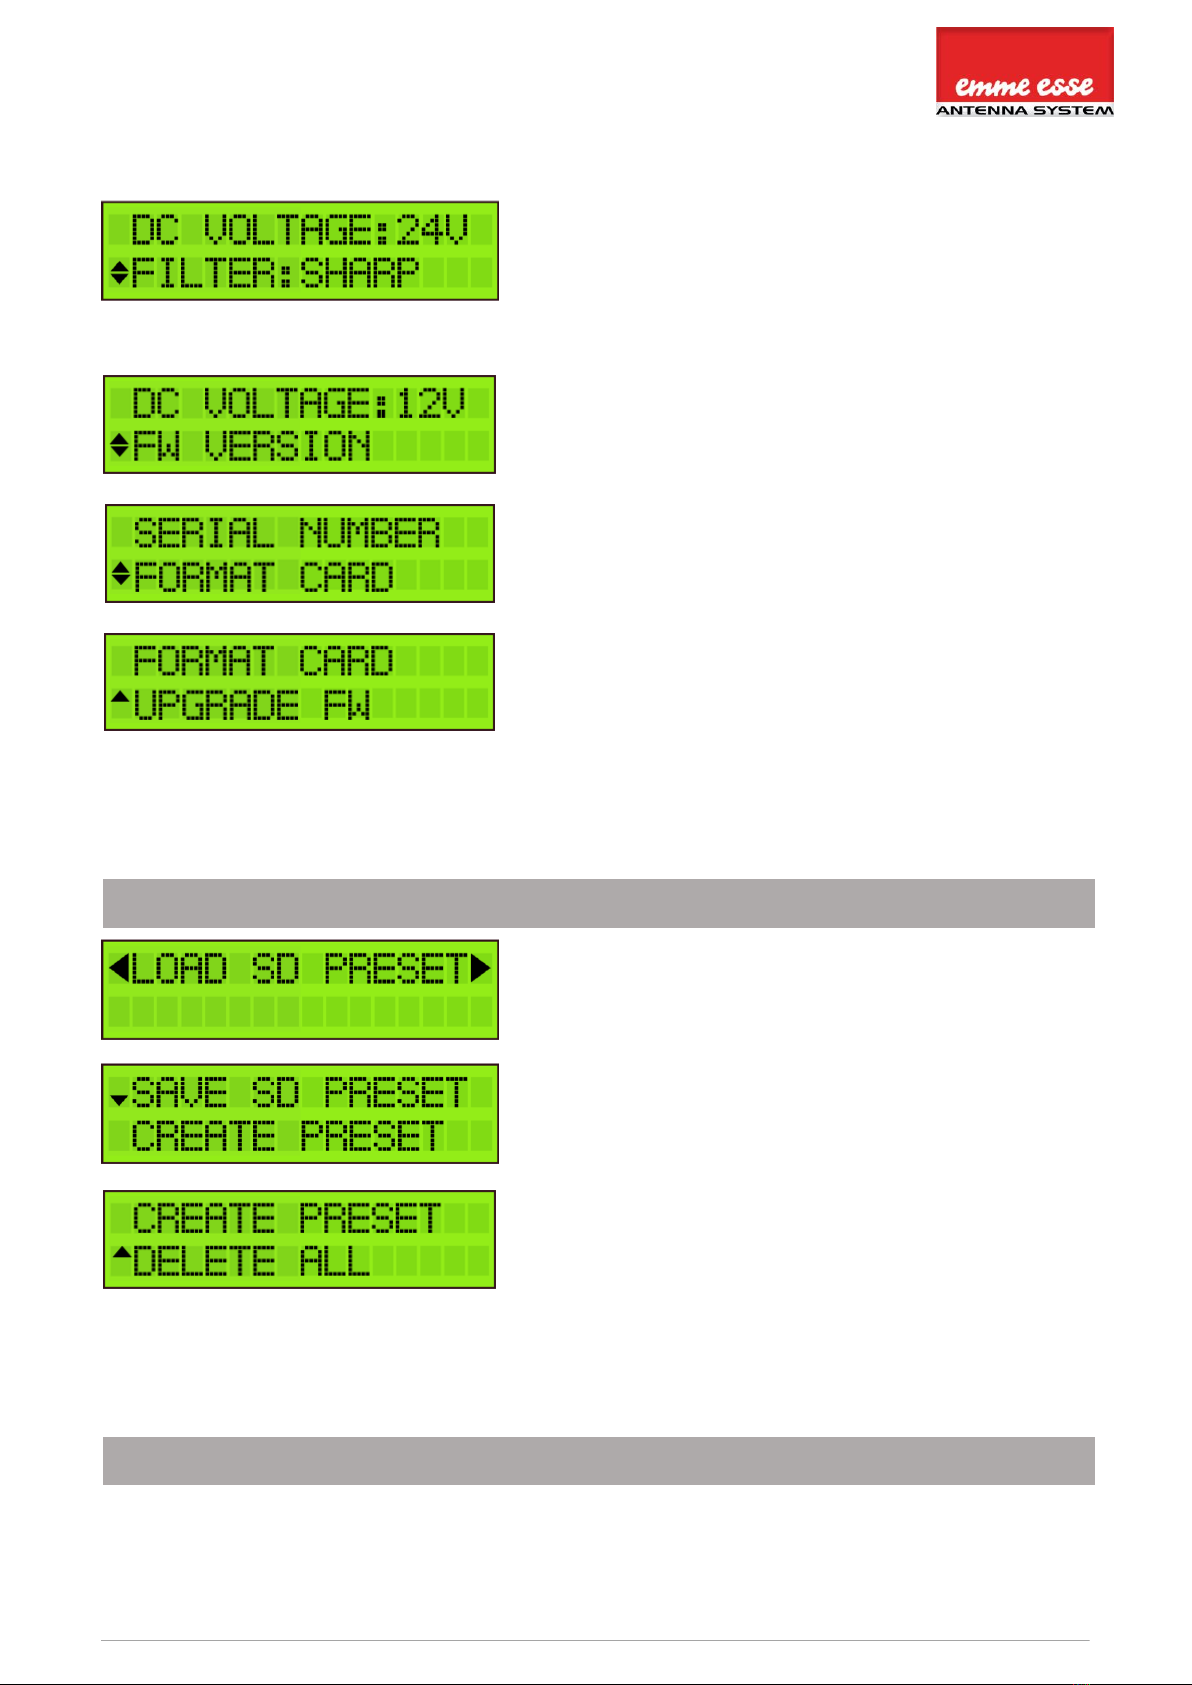
IMPOSTAZIONI AVANZATE
DISPLAY SCRITTA
SPIEGAZIONE
La lingua può essere settata in italiano, inglese,
spagnolo o francese.
Selezionare REGION/AREA per controllare in quale area
è impostato. Per cambiare l’area, è necessario
procedere con un reset della centrale.
Definire la TENSIONE DC per gli ingressi, scegliere tra
12V o 24V. Questa è un'impostazione globale per tutti
gli ingressi, quindi ciascun ingresso può essere
commutato tra OFF o questo valore.
(cfr. PASSO 2).
7
Centrale digitale terretre programmabile / Digital terrestrial programmable headend
Ci sono 3 opzioni per selezionare la larghezza di banda
del filtro: “Miglior MER”prevede il filtro con ampia
larghezza di banda. Ciò garantirà il miglior MER nel
caso in cui non vi siano multiplex adiacenti. “Selettivo”
prevede un filtro con larghezza di banda stretta, che
lavorerà meglio in caso vi siano mux adiacenti difficili
ma potrebbe compromettere il MER complessivo.
“Ottimo”è il compromesso tra le due opzioni ed è
consigliato nel 95% dei casi.
Premi FW VERSION/VERSIONE FW per verificare la
versione firmware del dispositivo
Premi SERIAL NUMBER/NUMERO SERIALE per
controllare il numero serial del dispositivo.
Per formattare la scheda SD, premi FORMAT
CARD/FORMATT. CARD.
Per aggiornare il firmware del dispositivo, selezionare
UPGRADE FW/AGGIORNA FW. Assicurarsi che il nuovo
file firmware sia sulla scheda SD prima di eseguire
l'aggiornamento
IMPOSTAZIONI SD CARD
DISPLAY SCRITTA
SPIEGAZIONE
Per caricare le impostazioni da una scheda SD,
selezionare LOAD SD PRESET/ CARICA DATI SD. In tal
modo verrà copiato il file di configurazione dalla SD
CARD al dispositivo.
Per salvare le impostazioni del dispositivo su una
scheda SD, selezionare SAVE SD PRESET/SALVA DATI
SD e cliccare CREATE PRESET/CREA CONFIG.
È possibile creare più preset. Quindi, selezionare
CREATE PRESET/CREA CONFIG. dopo ogni modifica alle
impostazioni.
Per eliminare tutti i preset, premere DELETE
ALL/CANCELLA TUTTO.
IMPOSTAZIONI USCITA
DISPLAY SCRITTA
SPIEGAZIONE
Centrale digitale terretre programmabile / Digital terrestrial programmable headend
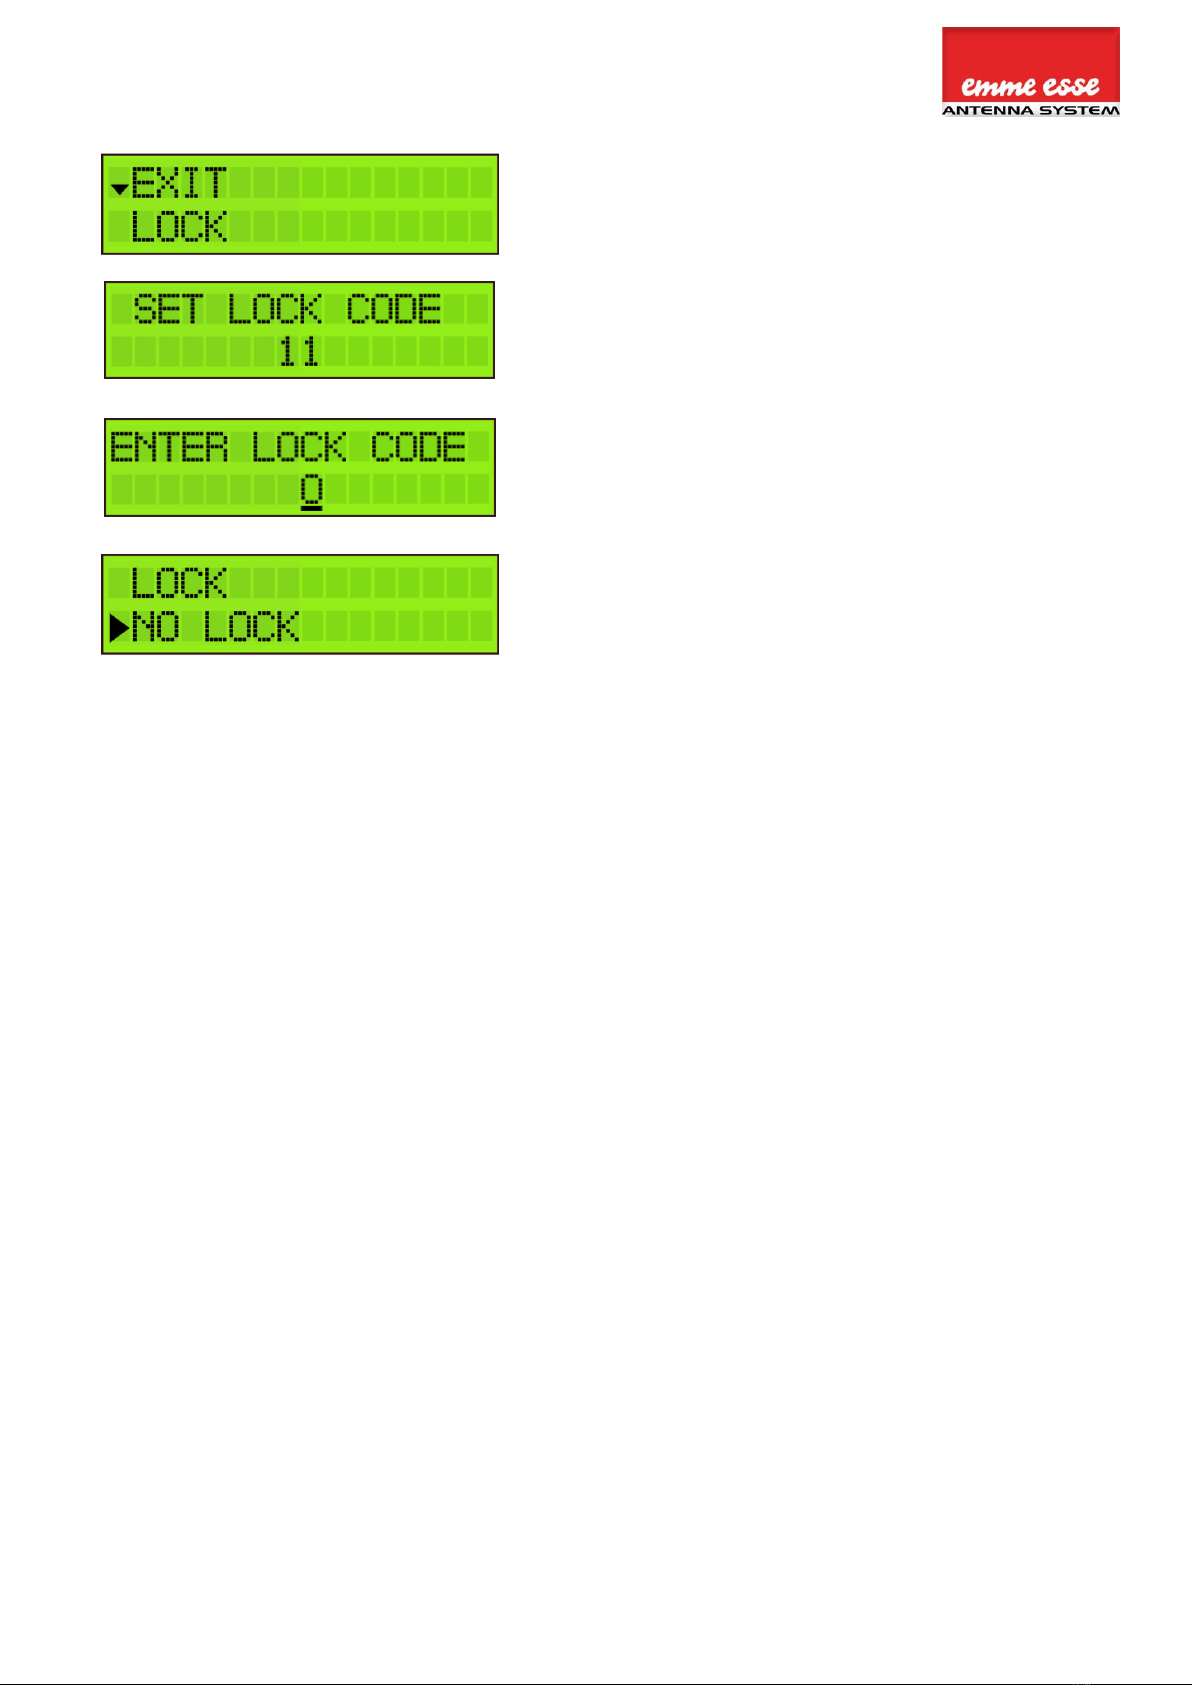
Per evitare che le persone non autorizzate cambino le
impostazioni, tutti i prodotti possono essere bloccati
con un codice di sicurezza.
Selezionare LOCK/BLOCCO PIN e SET LOCK
CODE/IMPOSTA CODICE DI BLOCCO. Il dispositivo si
spegnerà dopo che il codice di blocco è stato
impostato.
Quando si riavvia il dispositivo, è necessario immettere
il codice di blocco corretto.
Nota: se hai dimenticato il codice di blocco, puoi
sempre utilizzare il valore 50. Questo codice master è
fisso e non può essere modificato.
Se non si desidera lavorare con un codice di blocco,
andare su EXIT/USCITA e selezionare NO
LOCK/NESSUN BLOCCO.
9
Centrale digitale terretre programmabile / Digital terrestrial programmable headend
7. SPECIFICHE TECNICHE
Domino TV Organizer 82201
Ingressi
-
4 VHF/UHF + 1 FM
Uscita
-
1 principale (FM-VHF-UHF) + 1 test (-30dB)
Frequenze
MHz
MHz
MHz
FM: 88 - 108
VHF:174 - 240
UHF: 470 - 862
Protezione LTE
MHz
Selezione automatica: 694, 790 o OFF
Livello di ingresso
dBµV
dBµV
dBµV
FM: 37 - 77
VHF: 40* - 109
UHF: 40* - 109
Potenza uscita FM (60dB/IM3)
Potenza uscita VHF/UHF (60dB/IM3)
Potenza uscita VHF/UHF con1 MUX
Potenza uscita VHF/UHF con 6 MUX
dBµV
dBµV
dBµV
dBµV
113
120
113
110
Conversione
-
Si (da ogni canale VHF-UHF verso ogni
canale VHF-UHF)
Guadagno
dB
dB
dB
FM: 35
VHF: >45
UHF: >55
Regolazione guadagno : FM
VHF/UHF
dB
-
20
Channel AGC
Attenuatore generale
dB
20
Regolazione di pendenza
dB
9
Selettività
dB/1MHz
35
MER Uscita
dB
dB
VHF: 35
UHF: 35
Protezione ESD
-
Tutti gli ingressi
Telealimentazione per preampl.
Corrente remota
V
mA
12 or 24
100 (totale per 4 iingressi)
Porta SD
-
Si (Per copiare configurazioni e
aggiornamenti)
Temperatura di utilizzo
°C
-5 to +50
Alimentazione
Vac
100 - 240
Consumo
W
16
Dimensioni
mm
217 x 165 x 59
Peso
kg
0,8
* Per 64QAM 3/4

Centrale digitale terretre programmabile / Digital terrestrial programmable headend
8. DIAGRAMMA A BLOCCHI
11
Centrale digitale terretre programmabile / Digital terrestrial programmable headend
9. ISTRUZIONI DI SICUREZZA
Leggere attentamente prima di procedere con l’installazione
Per evitare incendi, corto circuiti e scosse elettriche
:
Non esporre gli apparati alla pioggia o all’umidità.
Installare gli apparati in un luogo asciutto senza infiltrazioni o condensazioni di acqua.
Non posizionare in luoghi esposti a schizzi o a getti d’acqua.
Non posizionare oggetti pieni di liquidi (come bottiglie, bicchieri o vasi) sugli apparati.
Se uno degli apparati dovesse bagnarsi, disconnettere immediatamente l’alimentazione.
Per evitare rischi di surriscaldamento
:
Installare gli apparati in un luogo sufficientemente areato.
Evitare di ostruire la ventilazione degli aparati con oggetti posizionati sopra di essi (giornali,
stracci, fogli, ecc.).
Non posizionare nessuna sorgente con fiamma libera (tipo candela) sugli apparati.
Non installare gli apparati in luoghi polverosi o particolarmente sporchi.
Utilizzare gli apparati solo in luoghi con climi miti.
Rispettare i range di minima e massima temperatura di funzionamento.
Per evitare rischi di shock elettrico
:
Collegare gli apparati a prese con la messa a terra.
Rimuovere la spina dalla presa di corrente prima di eseguire qualsiasi operazione di
collegamento o manutenzione
Non aprire i coperchi dei contenitori degli apparati.
Manutenzione
Utilizzare solo panni morbidi per pulire la parte esterna degli apparati
.
Non utilizzare solventi
Per riparazioni o ispezioni, richiedere l’intervento di personale qualificato
.
Smaltire secondo i processi di riciclaggio imposti dalla legge
italiana
EMME ESSE spa
Via Moretto, 46 –25025 Manerbio (BS) Italy
Tel. 030 9938500
email: in[email protected]
web: www.emmeesse.it
MADE IN EUROPE
MADE IN

Centrale digitale terretre programmabile / Digital terrestrial programmable headend
User Manual 82201 v1.2
1. PRODUCT DESCRIPTION
The Domino TV organizer ref. 82201 is an easy to use programmable filter amplifier and
convertor for terrestrial signals. The module optimizes terrestrial VHF/UHF and FM signals from
multiple inputs with the goal to provide high quality images on your TV screen. The state-of-
the-art programmable filter amplifier has no equivalent on the market due to its revolutionary
technology:
Can process more than 50 channels
Can convert a wide selection of channels
Sharpest filters on the market (50 dB on adjacent channels)
Real-time AGC on all individual multiplexes
Complete flexibility in assigning filters from any input. Each channel can be frequency
shifted to any other channel in the VHF or UHF band (Flex Matrix)
To avoid unauthorized persons changing the settings, all Profiler products can be locked
with a security code
5 inputs: FM / 4 x VHF-UHF / > 50 channels / AGC / 12-24 V remote power
Product dimensions (H x W x D): 165mm x 217mm x 59mm
2. TYPICAL INSTALLATION
The Domino TV organizer ref. 82201 can be used to provide high quality television images and
FM signals in a wide range of projects, both in the hospitality as in the residential market.
Typical buildings or infrastructures where the Domino TV organizer can be used include, but
are not limited to:
Large and small hotels, hostels, bed and breakfasts, holiday parks
Hospitals, rest homes, prisons, settlements
Large and small multi-dwelling units
3. PACKAGE CONTENTS
Domino TV Organizer (ref. 82201)
Power Adapter Cord (180cm)
13
Centrale digitale terretre programmabile / Digital terrestrial programmable headend
4. HARDWARE INSTALLATION
5. MOUNTING 82201
Important: Mount the module vertically to a wall in a well-ventilated room and leave a
minimum space of 15 cm around the product to guarantee a maximum ventilation of
the product
Connect an earth wire to the grounding clamp
Connect the power adapter cord to the power supply socket. Check the status LED for
the indication of DC power presence
Connect the VHF/UHF and/or FM inputs to the Domino TV organizer
Connect a coaxial cable to the output connector for distribution of the signal
Connect a network analyser to the test port to control the signal quality
Configure the Domino TV organizer using the rotary button, see below
Optionally: insert an SD card in the SD card slot to upload the configurations of a
previous module or to copy the configuration to another module
The power adapter can easily be replaced without disconnecting the product. To do so,
open the top left plastic cover by pushing the click at the opposite side of the mains
connector
6. CONFIGURING 82201
In this section, the configuration for the Domino TV organizer will be described.
Use the rotary/push button to navigate through the menu. This is very straightforward and
simple. The table below shows how the rotary/push should be used:
Push the button 2s to enter the basic
configuration.
Push the button to confirm your
selections.
Centrale digitale terretre programmabile / Digital terrestrial programmable headend
When rotating the button, you scroll
through the different screens.
MENU OVERVIEW
INPUT FM
Ingresso FM
INPUT V/U 1 –4
Ingresso V/U 1-4
OUTPUT
Uscita
ADVANCED
Menù avanzato
LOAD SD PRESET
Carica dati SD
SAVE SD PRESET
Salva dati SD
EXIT
Esci
GAIN
Guadagno
PRE-AMPLIFIER
Preamplificatore
LEVEL
Livello
LANGUAGE
Linguaggio
PRESET X
Config.
CREATE PRESET
Crea config.
LOCK
Blocco PIN
DC
SLOPE
Pendenza
REGION
Area
DELETE ALL
Cancella tutto
NO LOCK
Nessun blocco
ADD 1 CHANNEL
Aggiungi 1 canale
DC VOLTAGE
Tensione DC
ADD 2 CHANNELS
Aggiungi 2 canali
FW VERSION
Versione FW
SERIAL NUMBER
Numero seriale
FORMAT CARD
Formatt. SD card
UPGRADE FW
Aggiorna FW
RESET AND COUNTRY SETTINGS
IMPORTANT! Before starting the configuration, it is advised to set the correct region or
country. Unpower the unit, push the button and keep pushing the button while you repower
the unit. Release the button when the display shows “RESET FINISHED”. Now the product is
reset and will ask you to enter country or area. This will amongst others determine the channel
plan for VHF and UHF and the DC voltage for the inputs (12 or 24V).
DISPLAY READOUT
EXPLANATION
To activate the correct channel frequency plan, select
the country or region where Domino TV organizer is
situated. Rotate to select and confirm by tapping the
rotary button.
Italy is the default setting. If you need to change, reset
the headend and choose between the following
countries/regions: Australia, Brazil, China, Europe,
Hongkong, Italy, New-Zealand, Russia, South Africa, UK
and USA.
All the following menu items can be accessed without the reset procedure.
Push the rotary button for 2 seconds to access the menu

15
Centrale digitale terretre programmabile / Digital terrestrial programmable headend
INPUT SETTINGS
DISPLAY READOUT
EXPLANATION
Tap the rotary button to enter the INPUT FM menu.
Rotate the button to navigate through the submenu.
To filter and amplify an FM signal, tap GAIN, select the
gain of the input FM signal (15 to 35 dB) and tap to
confirm.
Remark: DAB should be added via V/U input 1-4
After INPUT FM is configured, scroll up to the top of the
menu (INPUT FM), tap the rotary button and scroll
right to INPUT V/U 1. Tap INPUT V/U 1 to enter the
menu to configure input 1.
Rotate the rotary button to scroll down in the submenu
of INPUT V/U 1.
PRE-AMPLI: The internal amplifier is by default ON,
only in case of very strong incoming signals (if the
strongest channel on that input is higher than
80dBµV), it can be advised to switch this OFF.
DC: Decide whether the input should provide power to
an external amplifier. Choose between OFF or 12 V.
Remark: If the external amplifier needs 24 V, you can
change this in advanced settings (see further).
There are 2 modes to add channels to each input:
ADD 1 CHANNEL: This is the standard mode where you add channels one by one to
an input. This implies that channels are filtered and levelled individually.
ADD 2 CHANNELS: In this mode you add 2 adjacent channels to an input. This
enables you to process more than 50 channels. The 2 channels are processed
together as 1 cluster. This means that the input level, shown on the display, and the
output level are both the sum of signal strength of the 2 channels.
For optimal performance we recommend to only add single channels, unless you
need to process a lot of channels.

Centrale digitale terretre programmabile / Digital terrestrial programmable headend
DISPLAY READOUT
EXPLANATION
ADD 1 CHANNEL:
Tap ADD 1 CHANNEL and choose the channel you want
to receive. Tap to confirm.
By changing the second value, you can decide where to
place the channel at the output. Tap to confirm.
1 CHANNEL mode is indicated by a ‘>’
CONVERSION OF A CHANNEL: If the 2 channel
numbers indicate the same value, there is
no conversion. If the 2 channel numbers indicate a
different value, there is conversion. In this example, if
the display is set to show 21> 5, the received channel
21 is converted or frequency shifted to the output
channel 5.
ADD 2 CHANNELS:
Tap ADD 2 CHANNELS and choose the adjacent pair of
channels you want to receive.
Tap to confirm.
2 CHANNELS mode is indicated by a ‘+’
When adding 2 channels, conversion is not possible.
Remark1: The first channel will determine if your input
becomes a VHF only or UHF only input. This means that
VHF and UHF cannot be combined in one input.
Remark 2: The value 60dBµV (in the bottom right
corner) indicates the incoming level of the channel.
Remark 3: For EU, Italy and New-Zealand region,
Channel 13 (230-240 MHz) and “VHF”can be used.
“VHF”means the whole band is treated in 1 bandpass
filter from 174 to 240 MHz. Channels “VHF”and CH13
cannot be converted and are not part of the 2-channel
mode, as they have different bandwidths.
Note: it might take up to 20 seconds for the AGC to stabilize
the signal levels
DISPLAY READOUT
EXPLANATION
To add another channel, scroll down to ADD 1
CHANNEL or ADD 2 CHANNELS and tap to confirm.
To prevent bad quality or scrambled images, make
sure that only one input channel is assigned to one
output channel. If 2 channels are assigned to the same
output channel, a star () will appear.
The same applies for adding 2 channels. Make sure
that each output channel is selected only once.
17
Centrale digitale terretre programmabile / Digital terrestrial programmable headend
Add all the input channels you want and assign them to
the output channels.
After this, the correct LTE filter will be set for the input (possible filters are 694MHz,
790MHz or OFF). If the channels are lower than 48, the 694MHz filter is activated.
The 790MHz filter is activated for the channels lower than 60.
DISPLAY READOUT
EXPLANATION
To delete a (pair of) channel(s), position the arrow on
the channel and press the rotary button 3 seconds.
When you have added all the channels to INPUT V/U 1,
and you want to add channels to the other inputs,
scroll up to the top of the menu (to INPUT V/U 1), tap
the button and scroll to the next input.
Repeat the previous steps for all input channels.
OUTPUT SETTINGS
DISPLAY READOUT
EXPLANATION
Define the OUTPUT LEVEL of the output signal.
Range between 93 dBµV and 113 dBµV (default output
level is 103 dBµV). Check the output via a network
analyser on the -30dB test port.
Note: The more channels you select, the less input
power you should give (e.g. 106 to 110 dBµV for 10
channels).
A SLOPE of up to -9dB can be set between the
beginning of BIII and the end of UHF to compensate for
cable losses. 0dB means all channels have the same
output level (see previous display readout), -9dB
means the beginning of BIII (174MHz) is 9dB weaker
than the end of UHF.
Note: In the OUTPUT menu, you define the output level in dBµV of the MUX’s. The Domino TV
Organizer has enough gain to guarantee this output level under all input conditions. In case a
slope has been set, the output level indicated on the display will be the output level of the

Centrale digitale terretre programmabile / Digital terrestrial programmable headend
highest frequency MUX.
ADVANCED SETTINGS
DISPLAY READOUT
EXPLANATION
The language of Domino TV organizer can be set to
English, Italian, Spanish or French.
Tap REGION to check to which region/country the
Domino TV organizer is set. To change the
region/country, a hard reset is required (see
instructions above (cfr. REGION/COUNTRY SETTINGS).
There are 3 options to select the filter bandwidth:
“Best MER” has the widest filter bandwidth. This will
give the best MER in case where there are no adjacent
Multiplexes. “Sharp” has the narrowest bandwidth and
will work best when there are difficult adjacent
Multiplexes but this could be at the expense of the
overall MER performance. “Optimal” is the compromise
between the other 2 options. This is the best setting in
95% of the cases.
Define DC VOLTAGE for the inputs, choose between
12V or 24V. This is a global setting for all inputs, each
input can then be switched between OFF or this value.
(cfr. STEP 2).
Tap FW VERSION to check the firmware version of the
device.
Tap SERIAL NUMBER to check the serial number of the
device.
To format the SD CARD, tap FORMAT CARD.
To upgrade the firmware of the device, tap UPGRADE
FW. Make sure the new firmware file is on the SD Card
before upgrading.

19
Centrale digitale terretre programmabile / Digital terrestrial programmable headend
SD CARD SETTINGS
DISPLAY READOUT
EXPLANATION
To upload settings from a SD card, tap LOAD SD
PRESET. This will copy the configuration file from the
SD CARD to the device.
To save the device settings on the SD CARD, go to
SAVE SD PRESET and tap on CREATE PRESET.
It is possible to create multiple presets. Therefore, tap
CREATE PRESET after each modification of the settings.
To delete all presets, press DELETE ALL.
EXIT SETTINGS
DISPLAY READOUT
EXPLANATION
To avoid unauthorized people changing the settings, all
Profiler products can be locked with a security code.
Select LOCK and SET LOCK CODE.
When the lock code is set, the device will shut down.
When you restart the device, you will now have to
enter the correct lock code.
Remark: If you forgot the lock code, you can always
use the value 50. This master code is fixed and cannot
be changed.
If you do not want to work with a lock code, go to EXIT
and tap NO LOCK.
Centrale digitale terretre programmabile / Digital terrestrial programmable headend
7. TECHNICAL SPECIFICATIONS
Domino TV Organizer 82201
Inputs
-
4 VHF/UHF + 1 FM
Outputs
-
1 main (FM-VHF-UHF) + 1 test port (-30dB)
Frequency range
MHz
MHz
MHz
FM: 88 - 108
VHF:174 - 240
UHF: 470 - 862
LTE protection
MHz
Automatic selection: 694, 790 or OFF
Input level
dBµV
dBµV
dBµV
FM: 37 - 77
VHF: 40* - 109
UHF: 40* - 109
FM Output power (60dB/IM3)
VHF/UHF Output power (60dB/IM3)
VHF/UHF Output power with 1 MUX
VHF/UHF Output power with 6 MUX
dBµV
dBµV
dBµV
dBµV
113
120
113
110
Conversion
-
Yes (from any VHF-UHF channel to any
VHF-UHF channel)
Gain
dB
dB
dB
FM: 35
VHF: >45
UHF: >55
Gain adjustment : FM
VHF/UHF
dB
-
20
Channel AGC
General attenuator
dB
20
Slope adjustment
dB
9
Selectivity
dB/1MHz
35
Output MER
dB
dB
VHF: 35
UHF: 35
ESD protection
-
All inputs
Remote voltage for
preamp
Remote current
V
mA
12 or 24
100 (total for the 4 inputs)
SD port
-
Yes (for copy configuration and upgrade
features)
Operating temperature
°C
-5 to +50
Power Supply
Vac
100 - 240
Power consumption
W
16
Dimensions
mm
217 x 165 x 59
Weight
kg
0,8
*For 64QAM with code rate 3/4
Table of contents
Languages:
Other Emme Esse Amplifier manuals


