EMMERSON FREEMOUNT LCD 680 User manual
LCD –680 / 680 EW (White)
Retractable rotating wall mount for LED/LCD TVs
recommended screen size: 22" –60”
maximum permissible load: 45 kg
maximum vesa hole spacing: 400 x 400 mm
forward range: 65 - 460 mm
maximum TILT: +3°/- 15°
range of rotation: 120 °
spirit level –levelling indicator
SAFE LOCK system™ - safety lock
INSTALLATION INSTRUCTIONS
Thank you for choosing a Freemount TV wall mount. Our products are distinguished by high
quality, durability and modern design. The holder ensures a durable and safe fastening of the TV
or LCD / LED monitor with parameters consistent with the parameters given on the package and
in the installation instructions.
PLEASE READ THE USER MANUAL CAREFULLY BEFORE INSTALLING THE WALL MOUNT
AND STARTING USE.
The most important conditions for proper and safe use of the equipment together with the wall
mount are: the correct selection of the wall mount for the TV or monitor and the correct mounting
of the wall mount on the wall and the attachment of the TV / monitor on the wall mount.
Before installing, please make sure that the model of the wall mount you have purchased fully
matches the parameters of the TV for which you want to use the wall mount.
First of all, make sure that: - the weight of the TV does not exceed the maximum permissible load
on the wall mount, - the diagonal of the TV screen falls within the range of diagonals
recommended for the wall mount, - the spacing of the mounting holes located on the back wall of
the TV (usually according to vesa standard) falls within the range of the spacing of the mounting
holes of the wall mount.
IMPORTANT WARNINGS BEFORE INSTALLATION.
The structure of the wall must be such as to maintain a load corresponding to the load
parameters given for the handle model and to the weight of the equipment mounted on the
handle. If this condition is not met, the face must be reinforced to obtain the appropriate maximum
load.
The installation of the wall mount and equipment must be carried out in accordance with
the installation instructions of the wall mount and the instructions of the equipment manufacturer,
provided that the equipment manufacturer gives instructions or recommendations for installation
on the wall mounts.
The installation of the wall mount requires basic knowledge and skills in the installation of
such devices and the use of basic tools enabling the making of appropriate holes in the wall, the
placement of dowels with appropriate parameters for a given type of wall structure, and screwing
the fixing screws and screwing the TV /monitor to the handle. In case of doubt or lack of suitable
tools, we recommend that you contact a specialized assembly plant for this type of equipment.
Do not install on a structure that is subjected to vibrations, movements, shifts, or is
exposed to impacts or any type of impact and shock. Failure to comply with this condition may
result in damage or damage to equipment and walls, material damage and danger to the user.
Do not install on loose structures, on walls made of unknown material, on any surface
whose load carrying capacity and rigidity is inspecified or in doubt. In such cases, you should
consult a construction specialist, the administrator / owner of the building or the relevant building
documentation.
Do not install in the vicinity of appliances that heat or operate with open flames, such as
fireplaces, in places exposed to direct sunlight, or any factors causing strong heating or cooling,
such as air conditioning systems, or causing high humidity. Failure to do so may damage or
damage the TV, equipment and walls, material damage and danger to the user.

At least 2 qualified persons must be able to install the holder and the TV. The danger to
the user or damage to the equipment may occur as a result of the fall of the TV receiver during
installation.
The recommended mounting surfaces of the handle are smooth and uniform concrete
walls, of bricks, walls of hardened wood composites or uniform hardwood, in the case of concrete
and similar walls, provided that suitable pins and screws are used for a given type of substrate.
We do not recommend mounting on partitions made of plasterboard, chipboard and the like. If you
need to mount the handle on this type of wall, you need to stock up on screws / fixing pins suitable
for your wall type. If you have any doubts, consult a construction specialist to determine the
strength of the wall, the appropriate screw attachment points and the use of appropriate
pins/screws to secure the wall type.
In case of any doubts, you should consult a construction specialist. Incorrect mounting of the
handle, use of incorrect screws or pins, selection of a wall with insufficient load carrying capacity,
threatens danger.
Set of mounting elements of the wall mount:
The included set of screws and dowels is suitable for most wall types, but it does not have to be
suitable for every type of wall. In case of doubt, you should stock up on a set of screws (and
possibly dowels) suitable for the type of wall and maximum load, available in specialized
construction stores.
TO INSTALL THE WALL MOUNT, YOU WILL NEED BASIC TOOLS:
Screwdriver, drill with drill suitable for wall type, spirit level (for handle model without built-in level
indicator). For different types of wall surfaces, you should stock up on suitable screws or dowel
fasteners for your type of walls, available in specialized construction stores.

Before mounting, select the correct place to attach the TV.
NOTE: Electrical, water, gas, etc. wiring must not run at the hole sites. Before choosing a
mounting location, make sure or check with appropriate testers that there is no installation at the
site of drilling the hole, there is no joining of the wall plates, there are no steel or other structural
building elements. If you have any doubts, please consult the appropriate specialist or the
administrator/owner of the building or read the relevant building documentation.
STEP 1 : INSTALLATION OF THE BASE ELEMENT (WALL FIXER).
CONCRETE WALLS, OF BRICKS, OR OF SIMILAR MATERIAL.
In the case of a wall of concrete, brick or similar material, dowels should be used.
In the wall, drill holes of suitable cross-section into the applied dowels and then insert (or slightly
knock with a hammer, depending on the wall and fit into the hole) pins into the holes. Then attach
the handle to the wall and screw it by screwing the screws into the pins. Do not drill holes at the
place where the bricks are joined.
When using the attached dowels for brick/concrete walls: - hole depth approx. 50 mm, drill
section: Ø 10 mm or Ø 8 mm depending on the dowels used.
INSTALLATION ORDER:
1. Place the wall mount against the wall at the location you selected earlier.
2. Using the built-in level indicator or secondary level, level the wall mount and mark the holes to
be drilled on the wall.
3. Drill holes in the wall at the selected points, then insert (slightly knock) the dowels (I). Do not
drill holes at the place where the bricks are joined.
4. Apply and screw the wall mount to the wall with screws (ST) after laying the washers (J).
5. Apply a plastic cover

After mounting the wall mount, the level indicator should be in the center, as shown in the figure.
WOODEN WALLS, OF CHIPBOARD, OF DRYWALL.
In the case of partition walls of drywall, wood or chipboard, the screws fixing the wall mount must
be screwed in place of the posts supporting the wall, provided that the posts are strong enough
and can maintain the weight of the TV.
For this type of walls, dowels are not used (except for specialized dowels for drywall).
INSTALLATION ORDER:
1. Place the handle against the wall at the location you selected earlier.
2. Using the built-in level indicator or secondary level, level the wall mount and mark the holes to be drilled
on the wall.
3. Drill holes in the wall at the selected points. (drill cross-section: Ø 5 mm or Ø 3 mm depending on the
screws used)
4. Attach and screw the wall mount to the wall with screws (ST) after laying the washers (J).
5. Apply the plastic cover
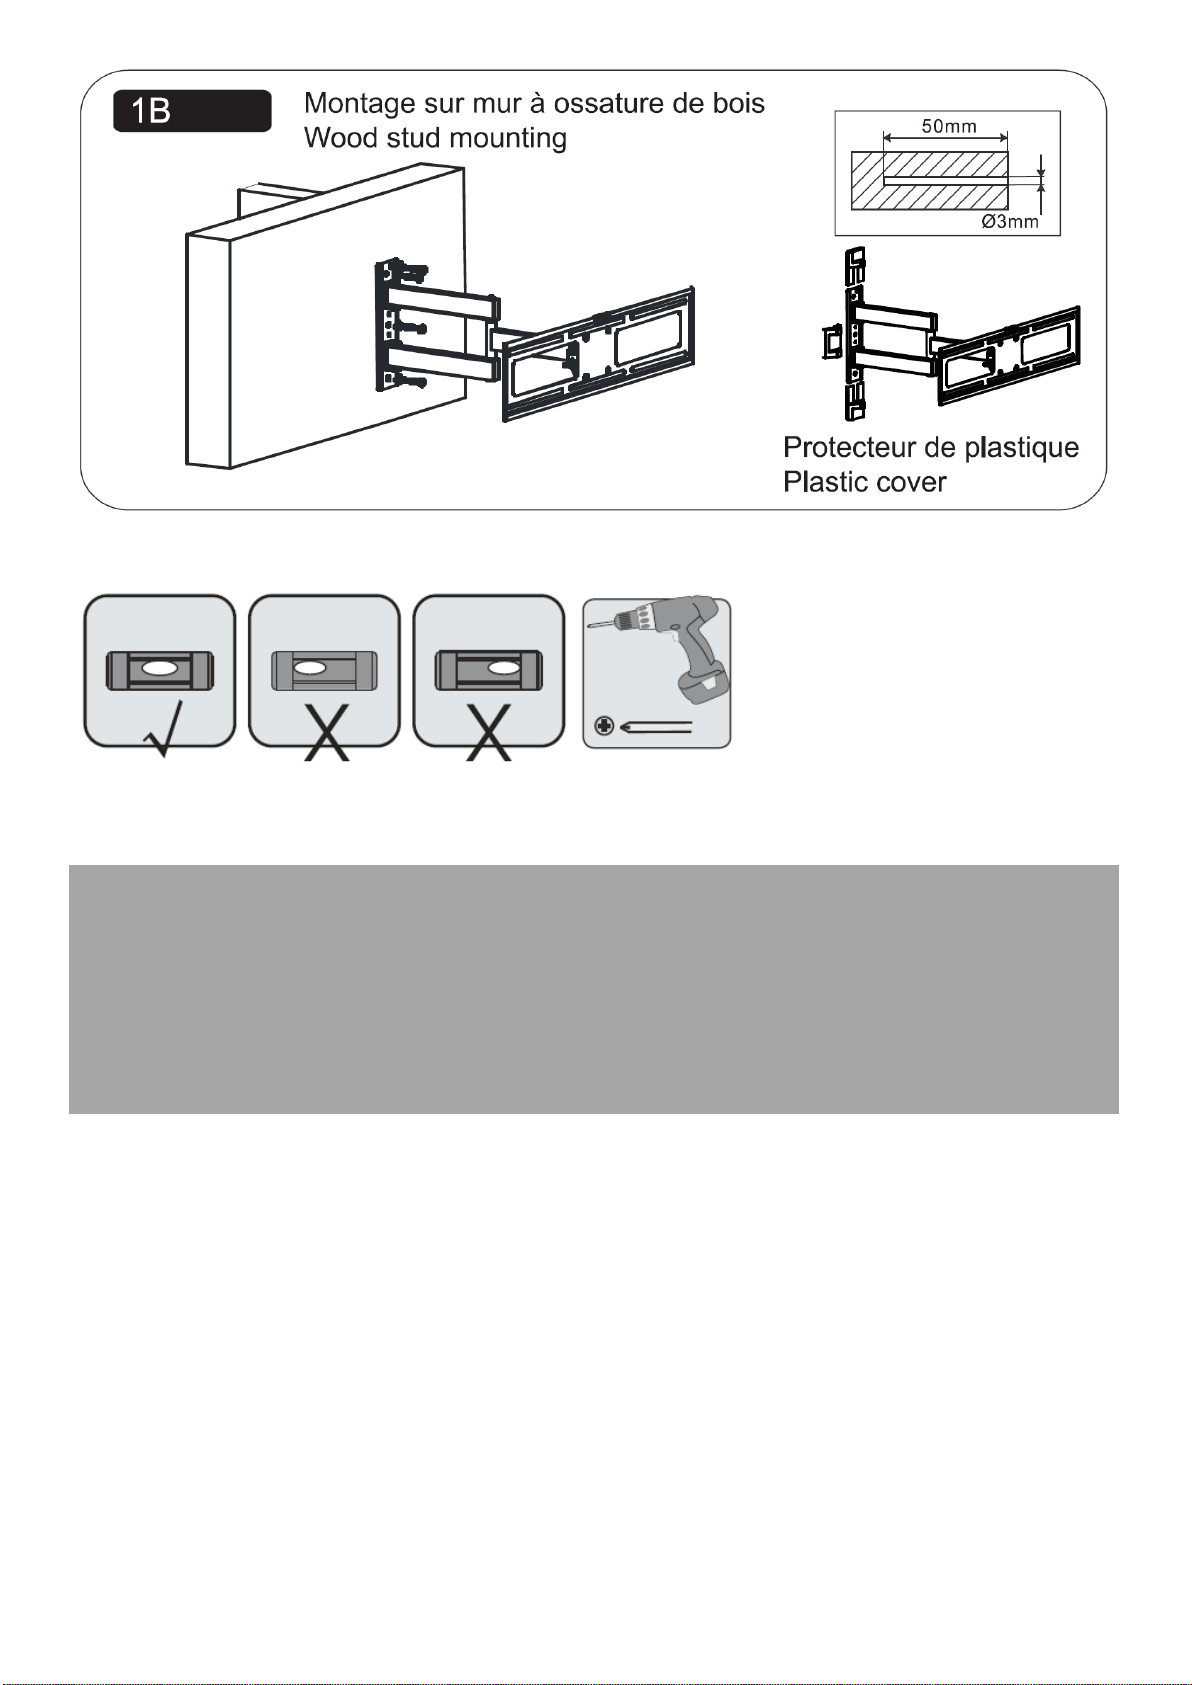
After mounting the wall mount, the leveling indicator should be in the center, as shown in the figure.
NOTE: After screwing the wall mount, make sure that the screws are tightened properly, do not
move, twist loosely, do not move in the wall, in the case of dowels make sure that they are firmly
fixed in the wall and do not move.
The screw should be tightened until there is palpable, strong resistance. After tightening to the
end of the length, the screw must not rotate loosely in the hole. In this case, the thread has been
twisted or the section of the screw does not correspond to the cross-section of the hole, the screw
does not fix the wall mount, the fixing is dangerous.
In this case, repeat the installation of the screw until a strong attachment is obtained.
STEP 2 : INSTALL THE SCREEN FASTENERS.
Place the TV (screen) on a soft and safe surface and screw the fasteners (rails) to the back of the
TV case. Select screws that match your TV's openings and mounting areas using the included
screws (A, B, C or D), washers (G) and spacers (H) if necessary.
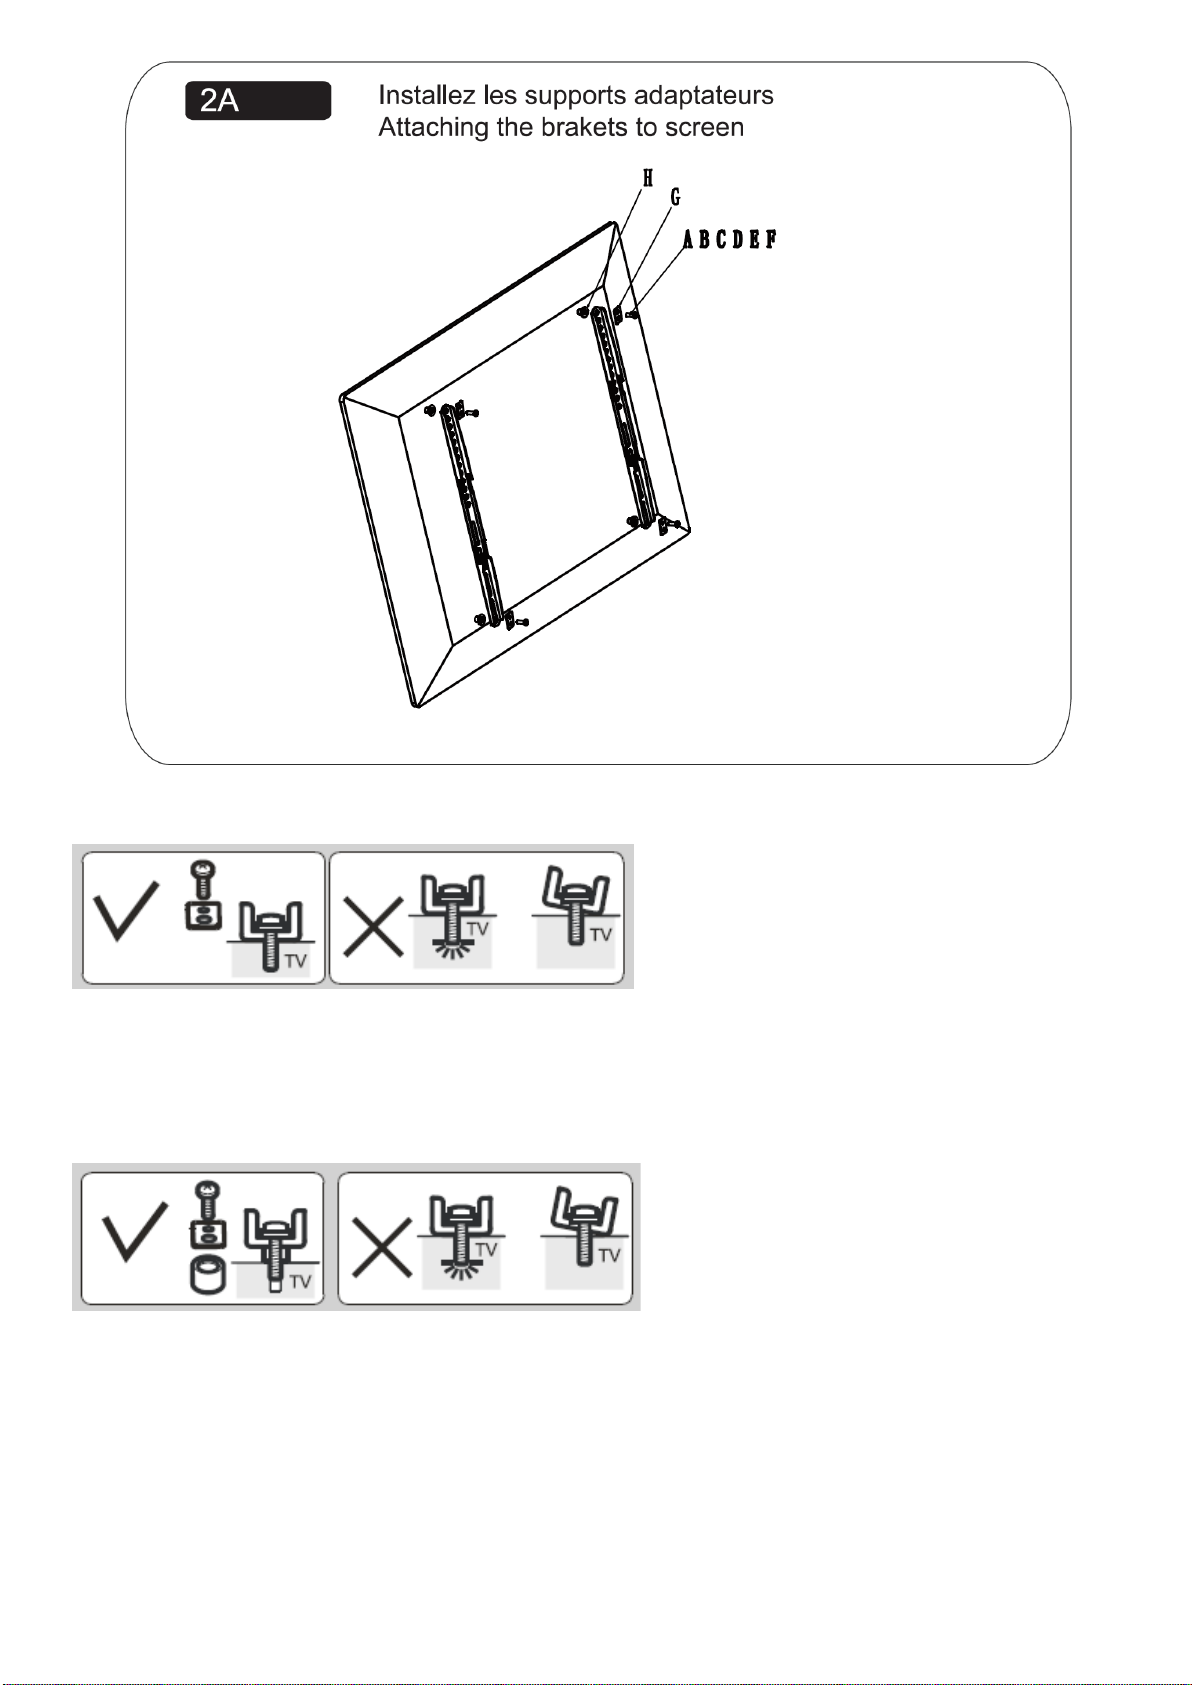
FOR TVS WITH A CURVED BACK PANEL OR OTHER BUMPS ON THE CASE:
If the ends of the mounting rails do not exactly adhere to the surface of the rear of the TV case, use
spacers (H) as shown in the picture.
The fastening elements (rails) must be fully tightened and adhere the entire surface to the rear
casing of the TV receiver, must not move, move, be tilted, the attachment must ensure that the
weight of the TV is maintained.

STEP 3 : ATTACH THE SCREEN TO THE BASE ELEMENT AND ADJUST IT.
With the help of the other person, lift the TV with screwed-on rails over the wall- attached element,
place the TV and carefully lower it by attaching the tv's mounting rails to the rails fixing the wall
element, as shown in the figure.

Tighten the locking screw at the bottom of the mounting rail to prevent the TV from falling.
SETTING THE TV'S TILT ANGLE.
Loosen the clamping knobs that lock the tilt angle adjustment, then position the TV at the desired
angle and tighten the terminal knobs to lock the TV in its position.
CABLE HOLDERS
The wall mount has hooks to hold the connection cables so that they do not hang from the TV.
The cables must be led through the hooks on the shoulders of the wall holder. (Depending on the
version, the tabs may be included separately in the wall mount kit.)
After mounting the wall mount with the TV on the wall, make sure that the wall mount firmly holds
the TV firmly, the fixing on the screws does not shift, move, screws or fixing pins do not come out
of the holes, they are not loosened.
After mounting on the wall, do not place additional load on the TV, do not hang additional objects
on it that may cause the permissible load on the wall mount to be exceeded. Do not twist, tilt, pull
away the suspended TV. To re-position the tilt, first loosen the adjustment screws, then set the tilt
and tighten the screws again.
The included set of screws and pins does not have to be suitable for any type of wall. In case of
doubt, you should stock up on a set of screws (and possibly dowels) suitable for the type of wall
and maximum load, available in specialized construction stores.
NOTE: Electrical, water, gas, etc. wiring must not run at the hole sites. Before choosing a
mounting location, make sure or check with appropriate testers that there is no installation at the
site of drilling the hole, there is no joining of the wall plates, there are no steel or other structural
building elements. If you have any doubts, please consult the appropriate specialist or the
administrator/owner of the building or read the relevant building documentation.
Do not tighten with too much force so as not to twist the screws. Make sure that the screws are
tightened properly, do not move, twist loosely, do not move in the wall, in the case of dowels make
sure that they are firmly fixed in the wall and do not move.
Make sure both parts of the wall mount are properly and securely connected, there is no slack, the
fixing screws have not loosen.
NOTE: IT IS NECESSARY TO CHECK REGULARLY THE CORRECTNESS OF THE
FASTENING
The base attaching to the wall must not move, it must not deviate from the wall. The tv mount
must not deviate from the back of the TV case.
If loosening of the wall mount is found, remove the TV from the holder, check and tighten the
screws, and reassemble if necessary.
IMPORTANT INFORMATION ON USE AND INSTALLATION
Before installing, make sure that the handle and its details do not have defects (cracks, etc.).
Installation and installation must be carried out in accordance with the description and
recommendations given in the user's manual.
The product is intended for home use only, in temperate climatic conditions.
The product is intended for internal installation only and must not be suitable for outdoor use.
Do not expose the product to weather conditions, high temperatures, moisture, etc.
Do not expose the product to vibrations, shocks or other similar factors.
Never load the handle with a weight greater than the specified weight.
Never change, weaken and/or strengthen the handle structure.
The product is intended only for installation on walls made of solid material: e.g. stone, concrete,
cement elements, hollow.


Warranty
The warranty on wall mounts and mounting accessories covers the proper operation of the wall
mount. It does not cover the installation and effects of incorrect or inappropriate installation and
installation not in accordance with the safety recommendations and rules for the installation of
such devices, and losses resulting from the aforementioned violations.
GENERAL WARRANTY CONDITIONS
1. The warranty period is 5 years from the date of sale indicated on the proof of purchase. Defects
or defects of the goods revealed during this period will be removed free of charge in
accordance with the terms of the warranty. If you replace your equipment for a new warranty
period, it will be re-dated from the date of replacement of the product by Emmerson Service.
2. The warranty is valid only in the territory of the country where the product was purchased.
3. The performance standards of the product shall be deemed to be the manufacturer's standards.
4. As part of the warranty provided, Emmerson undertakes to repair, replace defective equipment
free of charge, or, in justified cases, inability to repair, refund cash for the purchased product
within 21 business days from the date of acceptance of the equipment by Emmerson Service.
In justified cases (e.g. complicated repair, need to bring a spare part) the deadline for
processing the complaint and warranty repair may be extended.
5. The manufacturer limits its warranty obligations to repair or replace the advertised equipment,
which is decided solely by the Emmerson Service. The manufacturer is not responsible for
damage to other objects and/or devices of a real and virtual nature. In addition, any claims
arising out of the under-usability of the products, the coverage of losses or lost profits due to
damage, equipment failure and all other liability are excluded.
6. Complaints should be made as soon as a defect is detected. The product complaint must be
submitted at the place of purchase or the advertised product must be sent directly to the
Emmerson Service for consideration of the complaint. The cost of delivering the product to the
service is covered by the Buyer. If the advertised product is shipped to the Emmerson Service,
the product should be packed in its original packaging if the Buyer owns it, or packaged in such
a way as to ensure a safe shipment of equipment. Emmerson service is not responsible for
damage to equipment that occurred during transportation to the Service.
7. Terms of acceptance of the complaint by Emmerson Service: delivery of equipment in complete
condition delivery of a valid, completed warranty card (for products sold with a warranty card) or
confirmation of purchase of the product (fiscal receipt or VAT invoice containing the date of
purchase, product name and seller's details), providing a clear description of the revealed
defect/malfunction of the advertised product.
8. The warranty expires in the event of: termination of the warranty period, cancellation of the
warranty card (for products sold with a warranty card) violation, damage, breaking of warranty
seals, if there are changes, violations, removal of the serial number of the device, if there is a
self-introduction of technical changes to the product or the discovery of any other unauthorized
interference with the product.
9. The warranty does not cover the natural wear and tear of the product and its individual
components, damage or malfunction of equipment resulting from misuse, any mechanical,
chemical and thermal damage to the housing, external and internal components and
components as well as defects caused therein, flooding with liquid or other substance, other
damage and defects specified under the warranty conditions.
Before sending the product, we recommend that you contact the Service and report any problems
in the operation of the equipment, the found defect / malfunction of the equipment or any
questions regarding the use and operation of the equipment.

This manual suits for next models
1
Table of contents


