eMotions Embroidery Machine User manual

eMotions Manual Cover.indd 1 7/22/2005 9:57:41 AM
eMotions Manual Cover.indd 2 7/22/2005 9:57:43 AM

eMotions TM 2005 Blosil Enterprises, LLC. Produced under License by OESD, Inc. All manual contents (C) 2005 OESD, Inc. 3
Table of Contents
Introduction .............................................................................. 4
Machine Parts ....................................................................................................5
Display and Selection keys ...........................................................................6
Select Mode Arrows ........................................................................................7
Align Mode Arrows .........................................................................................7
Sewing Mode Arrows .....................................................................................7
Accessories .........................................................................................................9
Optional Tools ................................................................................................. 10
Operation ..................................................................................11
Preparing to Embroider .............................................................................. 11
Bobbin Winding ........................................................................................... 11
Installing the Bobbin ................................................................................... 14
Threading the Machine .............................................................................. 15
Thread the Needle Using the Needle Threader ....................................... 16
Hooping ......................................................................................................... 18
Using the Template ..................................................................................... 19
Attaching the Hoop to the Machine ........................................................ 23
Selecting a Design ........................................................................................ 24
Selecting a Design from Internal Memory .............................................. 24
Selecting a Design from a Memory Card ................................................ 25
Align Design .................................................................................................... 26
Sewing the Design ........................................................................................ 27
Trace the Design ........................................................................................... 27
Sew the Design ............................................................................................. 28
Thread Tension adjustment ....................................................................... 31
Adjust Upper thread tension ...................................................................... 30
Bobbin Tension Adjustment ....................................................................... 31
Changing a Needle ....................................................................................... 33
Thread Breaks ................................................................................................. 35
Bobbin Thread Breaks .................................................................................. 36
Removing hoop from machine ................................................................ 37
Machine Cleaning and Oiling ..........................................37
Error Codes and Troubleshooting .................................39
Error Codes ...................................................................................................... 39
Trouble Shooting ........................................................................................... 41
Table of Contents
eMotions Manual 7x9.indd 3 7/22/2005 11:10:58 AM
eMotions TM 2005 Blosil Enterprises, LLC. Produced under License by OESD, Inc. All manual contents © 2005 OESD, Inc.
4
Introduction
Welcome to the exciting and fun world of machine embroidery.
Your eMotions machine should give you many, many hours of fun
and creativity. To familiarize yourself with the machine and how it
works, it is recommended that you read through this manual. Your
experience will be much more fun if you are familiar with the parts
of the machine, what each one does and where to reference it
again when you need more information.
Use supplies recommended for use with embroidery. Many
products look the same but are not made especially for machine
embroidery. Needles, threads and stabilizers are the main
products you will want to keep on hand to make your embroidery
experience easier. When you have the products handy and ready
to use, you’ll be more apt to use your machine more often. It will
be great for gifts for family and friends. They’ll be so impressed
with your new talent when you make special gifts for them.
Enhance your home décor with pillows, towels, even wall hangings
and quilts. Use your machine for scrap-booking or card making.
Your cards will be extra special! There is no limit to your creativity!
Best of all, you’ll have many hours of relaxation and fun!
Every effort has been made to make your eMotions User’s Guide accurate and as easy to understand as possible. OESD, Inc. is not
responsible for any errors or ommissions.
Introduction
eMotions Manual 7x9.indd 4 7/22/2005 11:11:00 AM
eMotions TM 2005 Blosil Enterprises, LLC. Produced under License by OESD, Inc. All manual contents (C) 2005 OESD, Inc. 5
Know your machine
Machine Parts
1. Bobbin Winding Guide 10. USB outlet and card slot
2. Presser Foot Lever 11. Main Power switch and Connectors
3. Start/Stop Button 12. Balance Wheel
4. Needle Threader 13. Bobbin winding Device
5. Presser Foot 14. Spool Holder and Felt Pad
6. Bobbin Cover 15. Spool Cap
7. Needle Plate 16. Upper Thread Tension dial
8. Embroidery Hoop Holder 17. Upright spool holder receptacle
9. Display and Selection Keys
Introduction
eMotions Manual 7x9.indd 5 7/22/2005 11:11:01 AM
eMotions TM 2005 Blosil Enterprises, LLC. Produced under License by OESD, Inc. All manual contents © 2005 OESD, Inc.
6
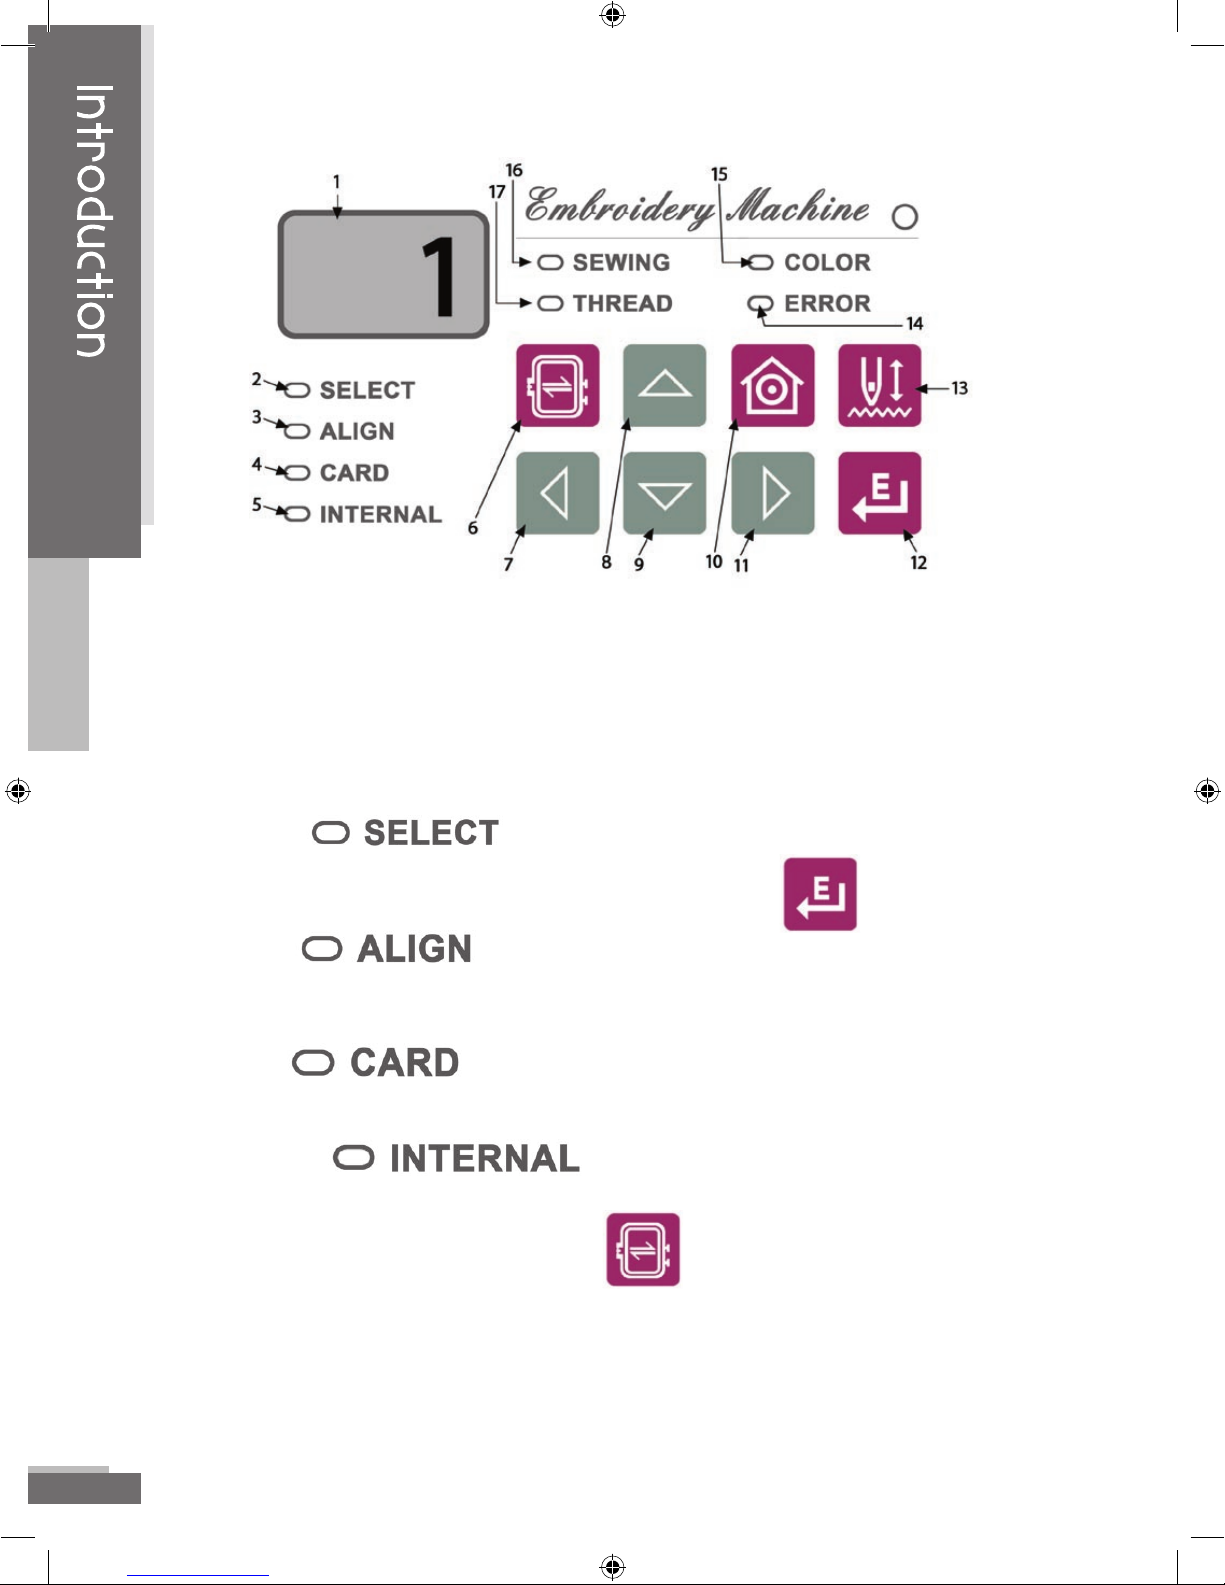
Display and Selection Keys
1. LED Screen – Displays functions
a. Design Number (## for design from Internal Memory or C##
for design on Memory Card)
b. Color Number (i.e. c01, c02)
c. Error message codes—see Error codes, p. 61.
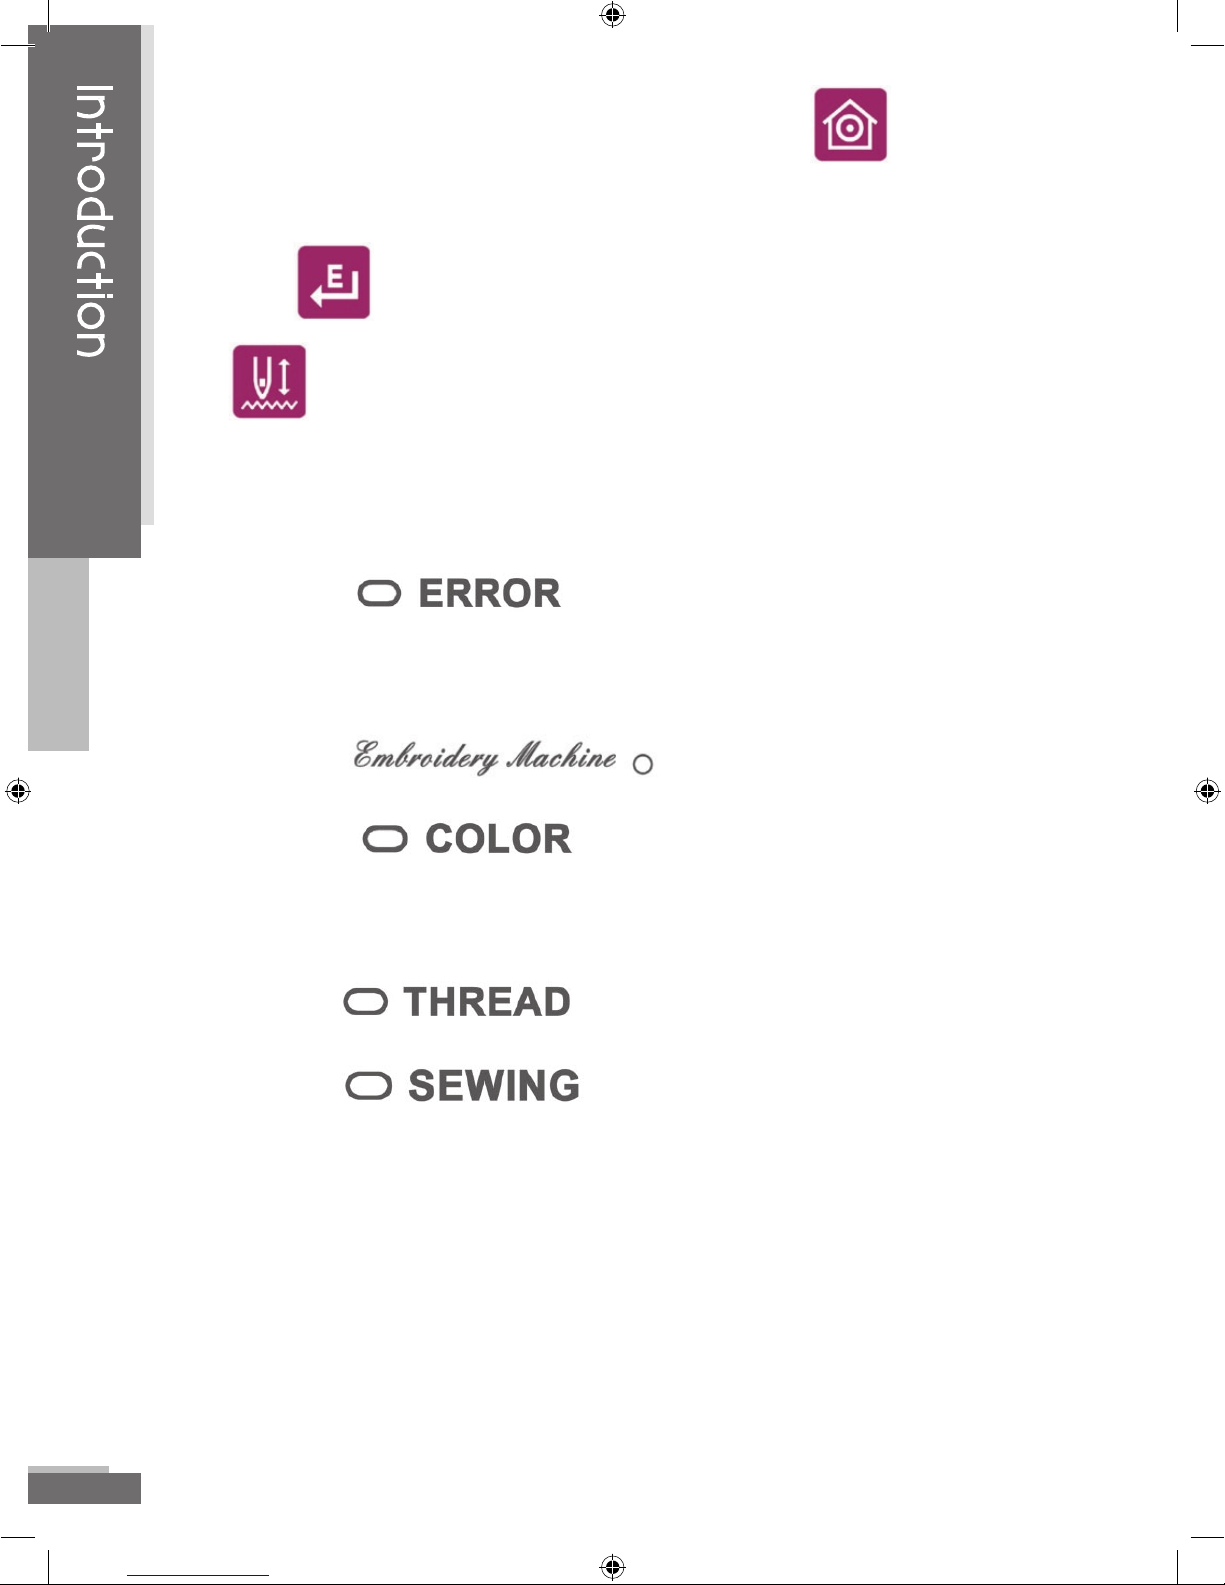
2. Select is lit when you are in the process of selecting
a design. To make your selection press the button.
3. Align lights after you have selected a design.
Design can now be embroidered or needle position moved in the
hoop.
4. Card lights to indicate you are accessing designs
from a Memory Card.
5. Internal lights to indicate you are accessing
designs from the Internal Memory of the machine.
6. Only available in align mode, traces the four corners of the
perimeter of the design in the hoop.
7. The arrow keys perform different functions depending on which
mode has been accessed.
Introduction
eMotions Manual 7x9.indd 6 7/22/2005 11:11:03 AM
eMotions TM 2005 Blosil Enterprises, LLC. Produced under License by OESD, Inc. All manual contents (C) 2005 OESD, Inc. 7
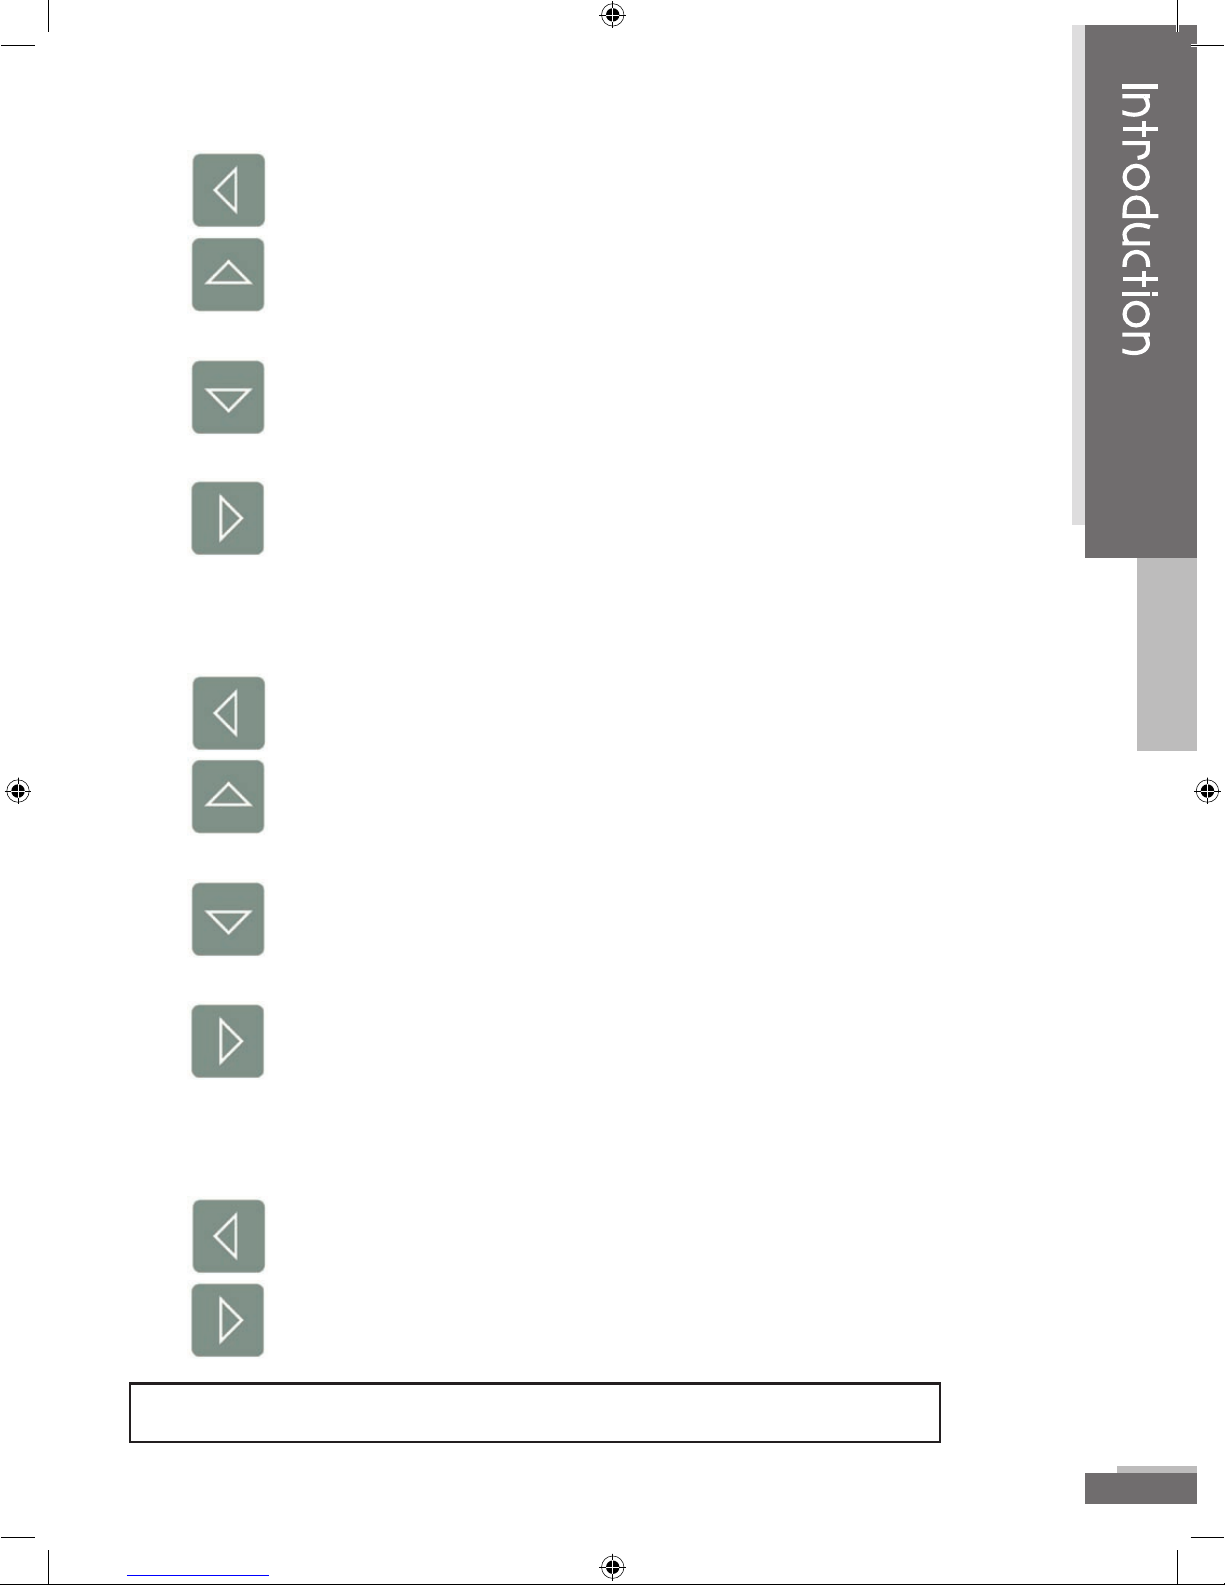
Select Mode Arrows
Goes backward through the list of designs one design at a time.
Advances 10 designs at a time in the Internal Memory or
Card Memory.
Goes backward 10 designs at a time in the Internal Memory
or Card Memory.
Goes forward through the list one design at a time.
Align Mode Arrows
moves needle position closer to the left of the hoop.
moves needle position closer to the top of the hoop (toward
the back of the machine).
moves needle position closer to the bottom of the hoop
(toward the front of the machine).
moves needle position closer to the right of the hoop.
Sewing Mode Arrows
moves backward through the design one stitch at a time.
moves forward through the design one stitch at a time.
NOTE: The Up and Down arrows are not functional in Sewing Mode.
Introduction
eMotions Manual 7x9.indd 7 7/22/2005 11:11:05 AM
eMotions TM 2005 Blosil Enterprises, LLC. Produced under License by OESD, Inc. All manual contents © 2005 OESD, Inc.
8
8. To center a selected design in the hoop press .
9. To enter or accept a design number shown in the LED window
press .
10. Toggles between Internal memory and a Memory Card.
## will be displayed on the LED when the Internal memory of
the machine is accessed. C## signifies Card Memory has been
accessed.
11. When lit, indicates an error—see LED for error
number. In some cases you may have to press the START/STOP
button to see which error has occurred.
12. When lit, indicates machine power is on.
13. When lit, indicates a color change—see LED
for color change number. This will be displayed as a lower case “c”
followed by the number of the sequence of the color.
14. When lit, indicates thread break.
15. When lit, indicates machine is in sewing mode.
Introduction
eMotions Manual 7x9.indd 8 7/22/2005 11:11:06 AM
eMotions TM 2005 Blosil Enterprises, LLC. Produced under License by OESD, Inc. All manual contents (C) 2005 OESD, Inc. 9
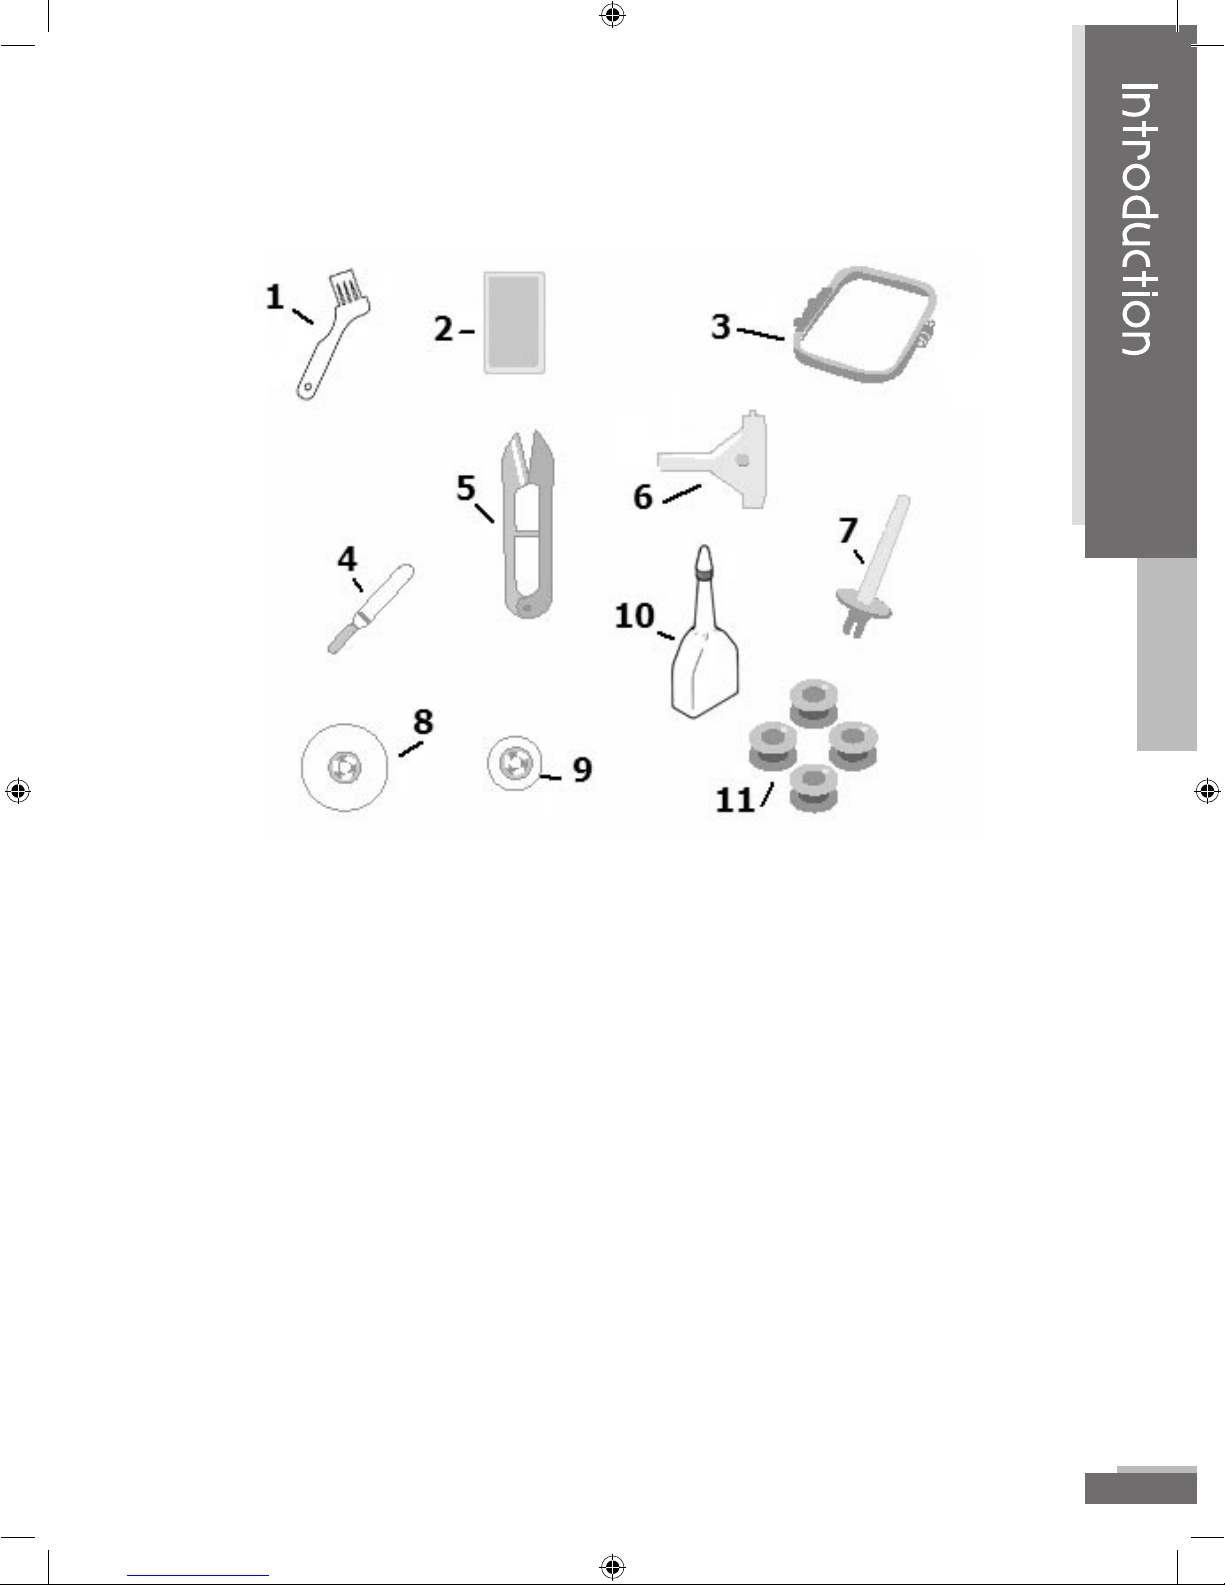
Accessories
1. Cleaning Brush 7. Upright spool holder
2. Needle Pack 8. Felt Pad
3. Hoop 9. Thread Cap
4. Seam Ripper 10. Oiler
5. Thread Nippers 11. Bobbins (4)
6. 3-Way Screwdriver Tool
Introduction
eMotions Manual 7x9.indd 9 7/22/2005 11:11:07 AM

eMotions TM 2005 Blosil Enterprises, LLC. Produced under License by OESD, Inc. All manual contents © 2005 OESD, Inc.
10
Optional Tools
To get the most from your eMotions embroidery machine you will want
to connect it to a Personal Computer. Explorations Lite software
has been included with your machine. (See the Explorations
Installation Notes for information on installing this software on
your computer.) By using the Explorations Lite software, you
can add more designs to your collection as well as many other
great features. The software gives you the ability to connect to
the Internet and get more designs, ideas for projects, and new
information about your machine. Note: You do not need to be connected
to the internet to use the software.
With the Explorations Lite software you can see your design before you
sew it. You can size, rotate and mirror image the design as well
as add lettering to personalize your projects. Changing colors of
the design is simple. Using the Explorations Lite software simply
changes the color of the design on the screen and sees what the
design will look like with the new colors, without having to sew out
the design.
With the included OESD Navigator, you can see the design sew on
the computer screen as it is sewing on the machine. This is really
helpful if you happen to want to skip part of the design. Simply
stop the machine from the Navigator software, go forward through
the design and then tell the machine to move to that point. If your
machine has a problem you can also back up through the design
using the Navigator. This can be a real time saver as well as being
much easier than backing up with the arrow keys on the machine.
(See Quick Start Guide for more information.)
The Explorations Lite software is very powerful, fun and easy to
use. You can even get more from your machine by upgrading
your Explorations Lite software to Explorations Basic software
or Explorations Galaxy. You can create new designs as well as
edit pre-digitized designs plus have many more features at your
fingertips.
Introduction
eMotions Manual 7x9.indd 10 7/22/2005 11:11:07 AM

eMotions TM 2005 Blosil Enterprises, LLC. Produced under License by OESD, Inc. All manual contents (C) 2005 OESD, Inc. 11
Operation
The operation of the eMotions Embroidery Machine is simple. However,
there are some guidelines to follow to make your embroidery
experience a good one. To prepare to sew your first design, there
are a few steps you’ll need to take.
Preparing to Embroider
Bobbin Winding
1. Connect the machine to the power supply and turn on the main
power.
Operation
eMotions Manual 7x9.indd 11 7/22/2005 11:11:08 AM
eMotions TM 2005 Blosil Enterprises, LLC. Produced under License by OESD, Inc. All manual contents © 2005 OESD, Inc.
12
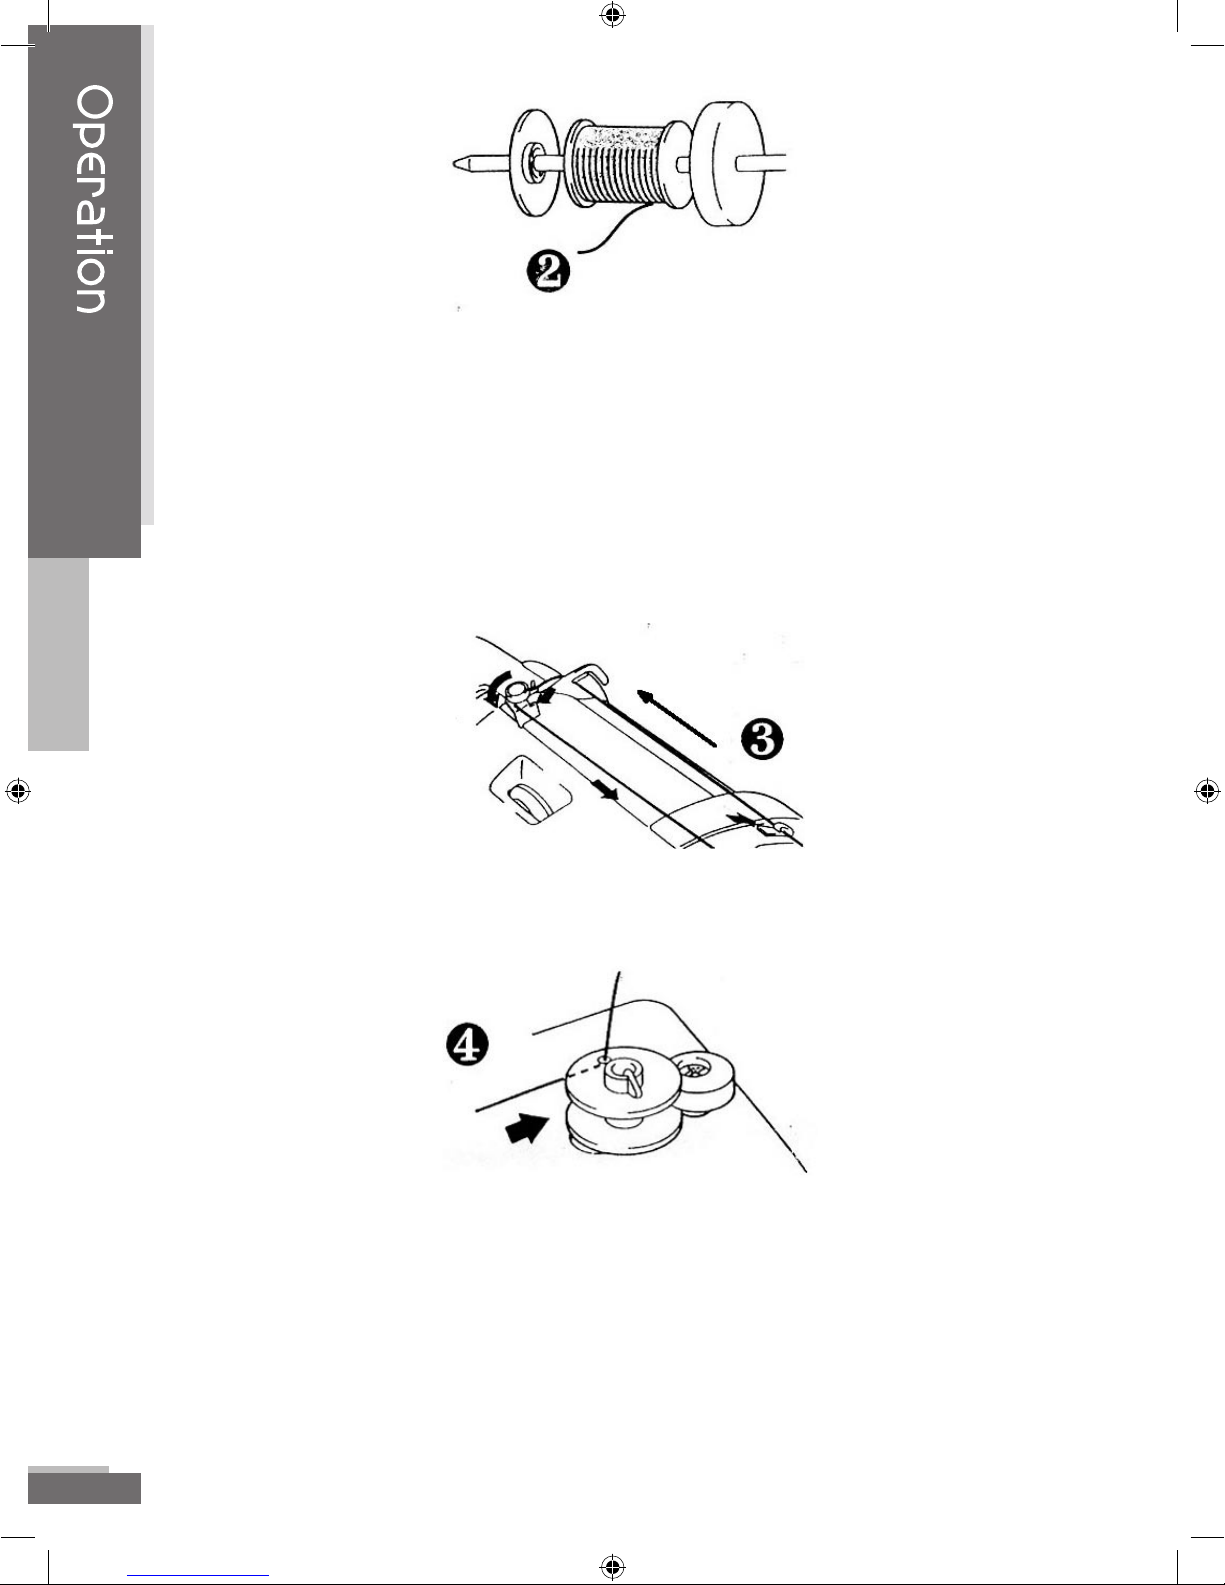
2. Place the felt pad, spool of thread, and spool cap on spool pin. If
a spool of thread that is cross wound is used on the thread spool,
eliminate the felt pad from the spool pin. NOTE: Bobbin thread
should always be used for normal embroidery (usually white or
black & specifically made for machine embroidery). An exception is
when stand alone lace is embroidered. Use the same thread in the
bobbin as is threaded on top when embroidering stand alone lace.
3. Bring the thread through the guides and around the bobbin
winder guide. (Follow thread path illustration on top of machine.)
4. Place an empty bobbin on the bobbin spindle. Put the thread
through the small hole in the side of the bobbin from the inside.
Match the groove of the bobbin with the spring on the shaft and
press the bobbin onto the shaft. Push the bobbin winder shaft to
the right. The word bob will be displayed in the LED screen. This
tells you when the bobbin winder is engaged.
Operation
eMotions Manual 7x9.indd 12 7/22/2005 11:11:08 AM
eMotions TM 2005 Blosil Enterprises, LLC. Produced under License by OESD, Inc. All manual contents (C) 2005 OESD, Inc. 13
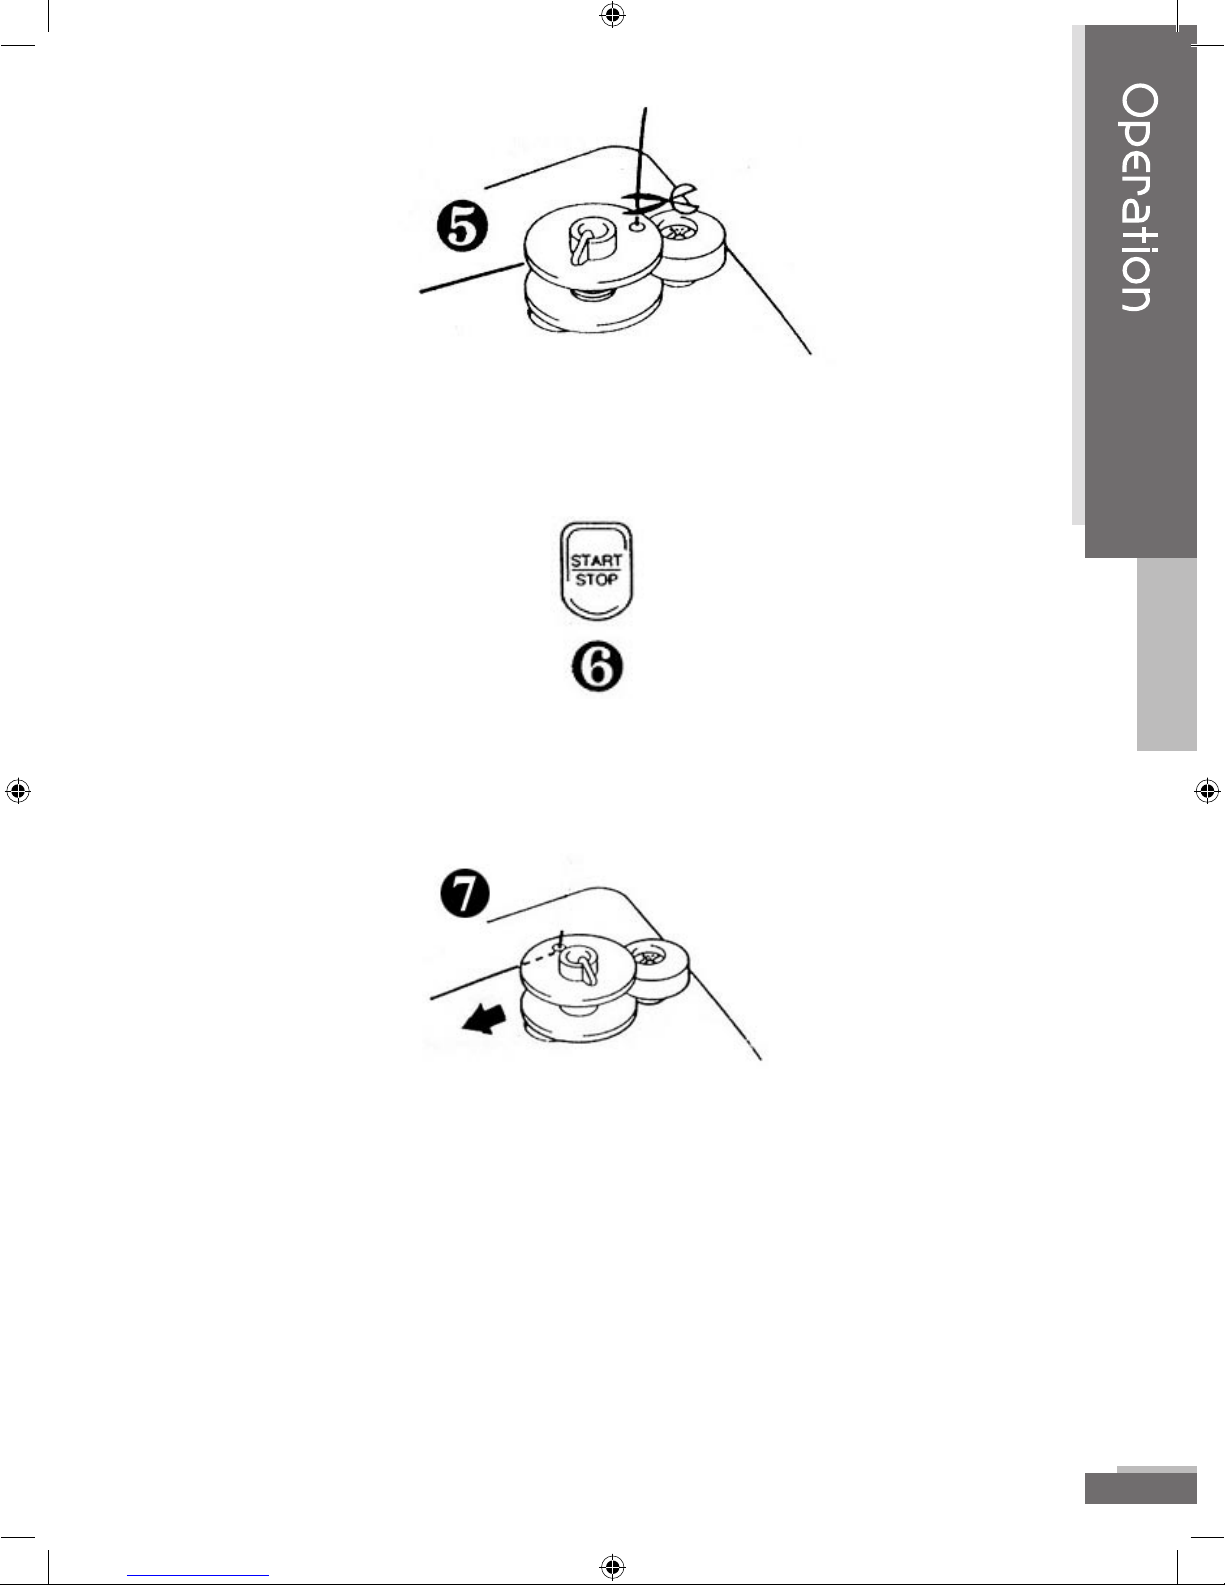
5. Holding the thread end, press the START/STOP button. After the
thread has wound a few times, press the START/STOP button to
stop the machine. Trim thread from top of bobbin.
6. Press START/STOP button to finish winding bobbin. Winding will
stop automatically when the bobbin is full. Press the START/STOP
button to stop the machine.
7. Push the bobbin shaft to the left and remove the bobbin by lifting
it up from the spindle. Clip the thread.
Operation
eMotions Manual 7x9.indd 13 7/22/2005 11:11:08 AM
eMotions TM 2005 Blosil Enterprises, LLC. Produced under License by OESD, Inc. All manual contents © 2005 OESD, Inc.
14
Installing the Bobbin
To put the bobbin in the machine, follow these steps:
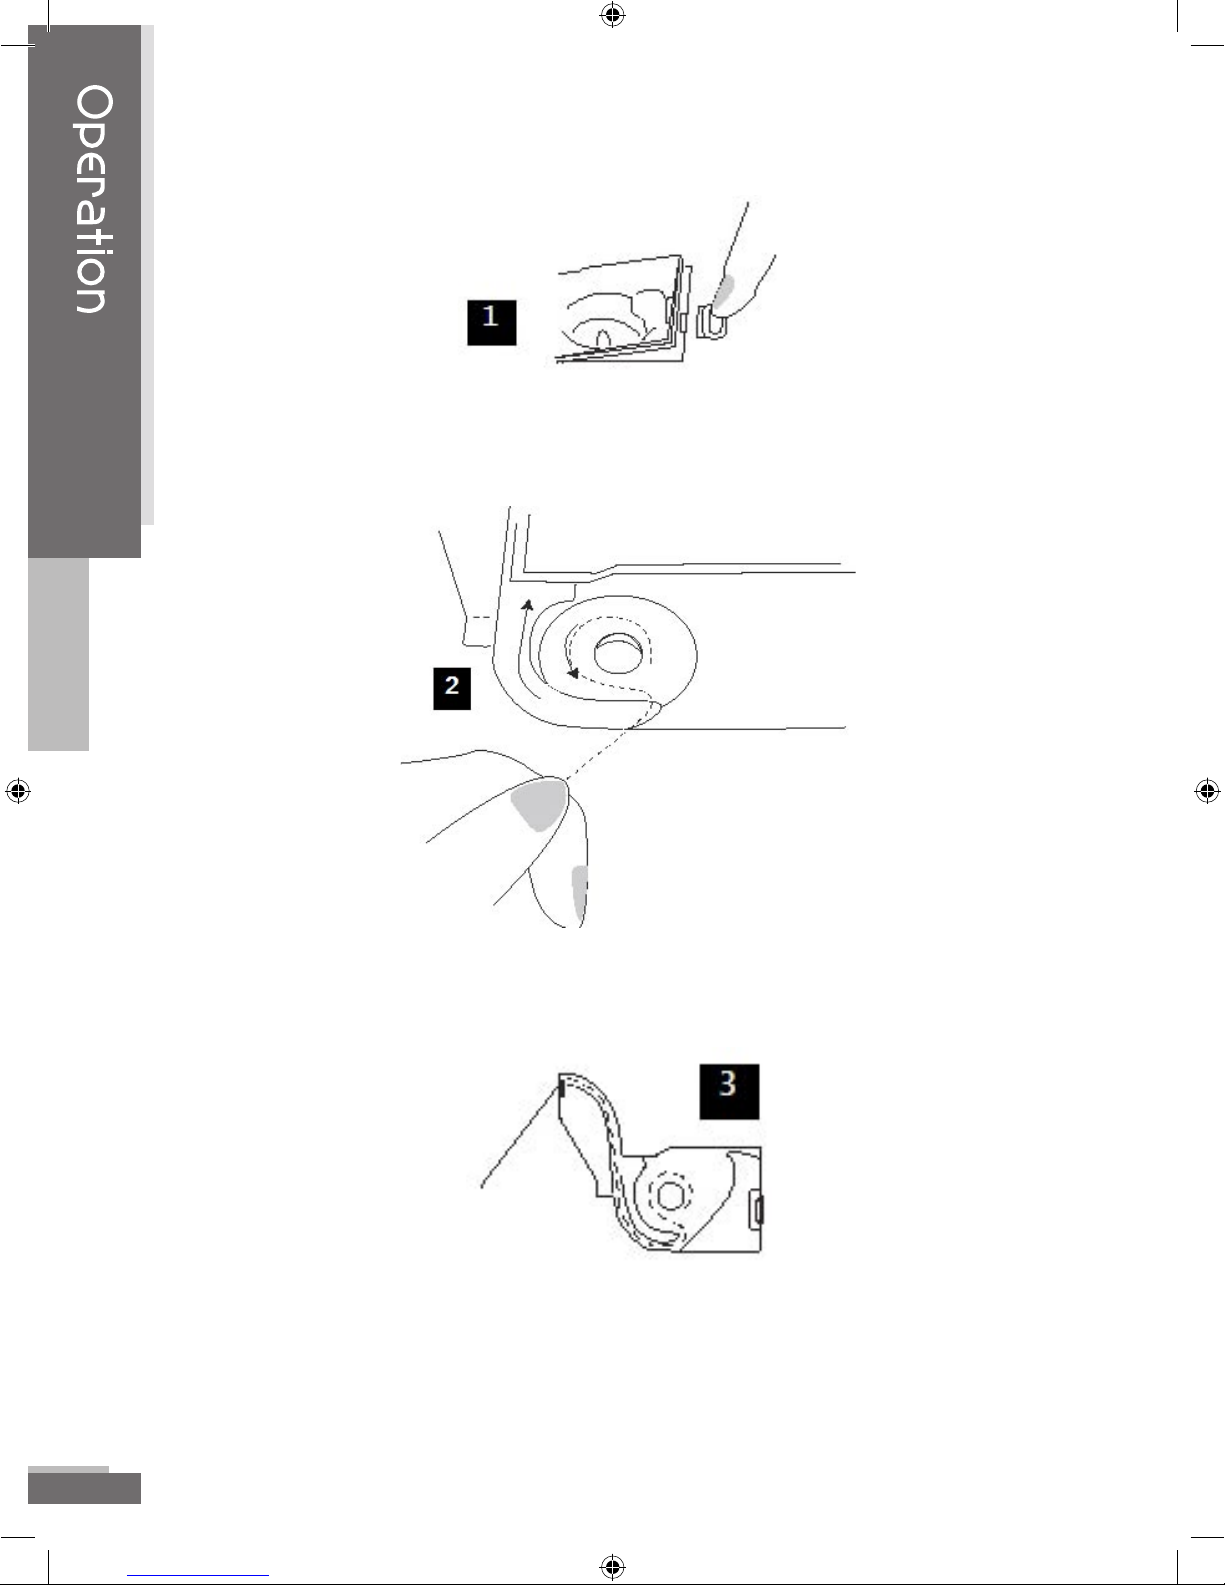
1. Slide open the bobbin cover by sliding the small black slide bar to
the right. Remove the plastic cover. If the clear plastic cover does
not flip up, slide it to the right a bit.
2. Insert the bobbin into the shuttle with the thread direction as
noted in the etching under the bobbin cover.
3. Guide the thread around the finger of the machine through the
channel toward the back, and then pull the thread toward you to
cut the thread end. The thread will be cut at the end of the channel
and be ready for use.
Operation
eMotions Manual 7x9.indd 14 7/22/2005 11:11:08 AM
eMotions TM 2005 Blosil Enterprises, LLC. Produced under License by OESD, Inc. All manual contents (C) 2005 OESD, Inc. 15
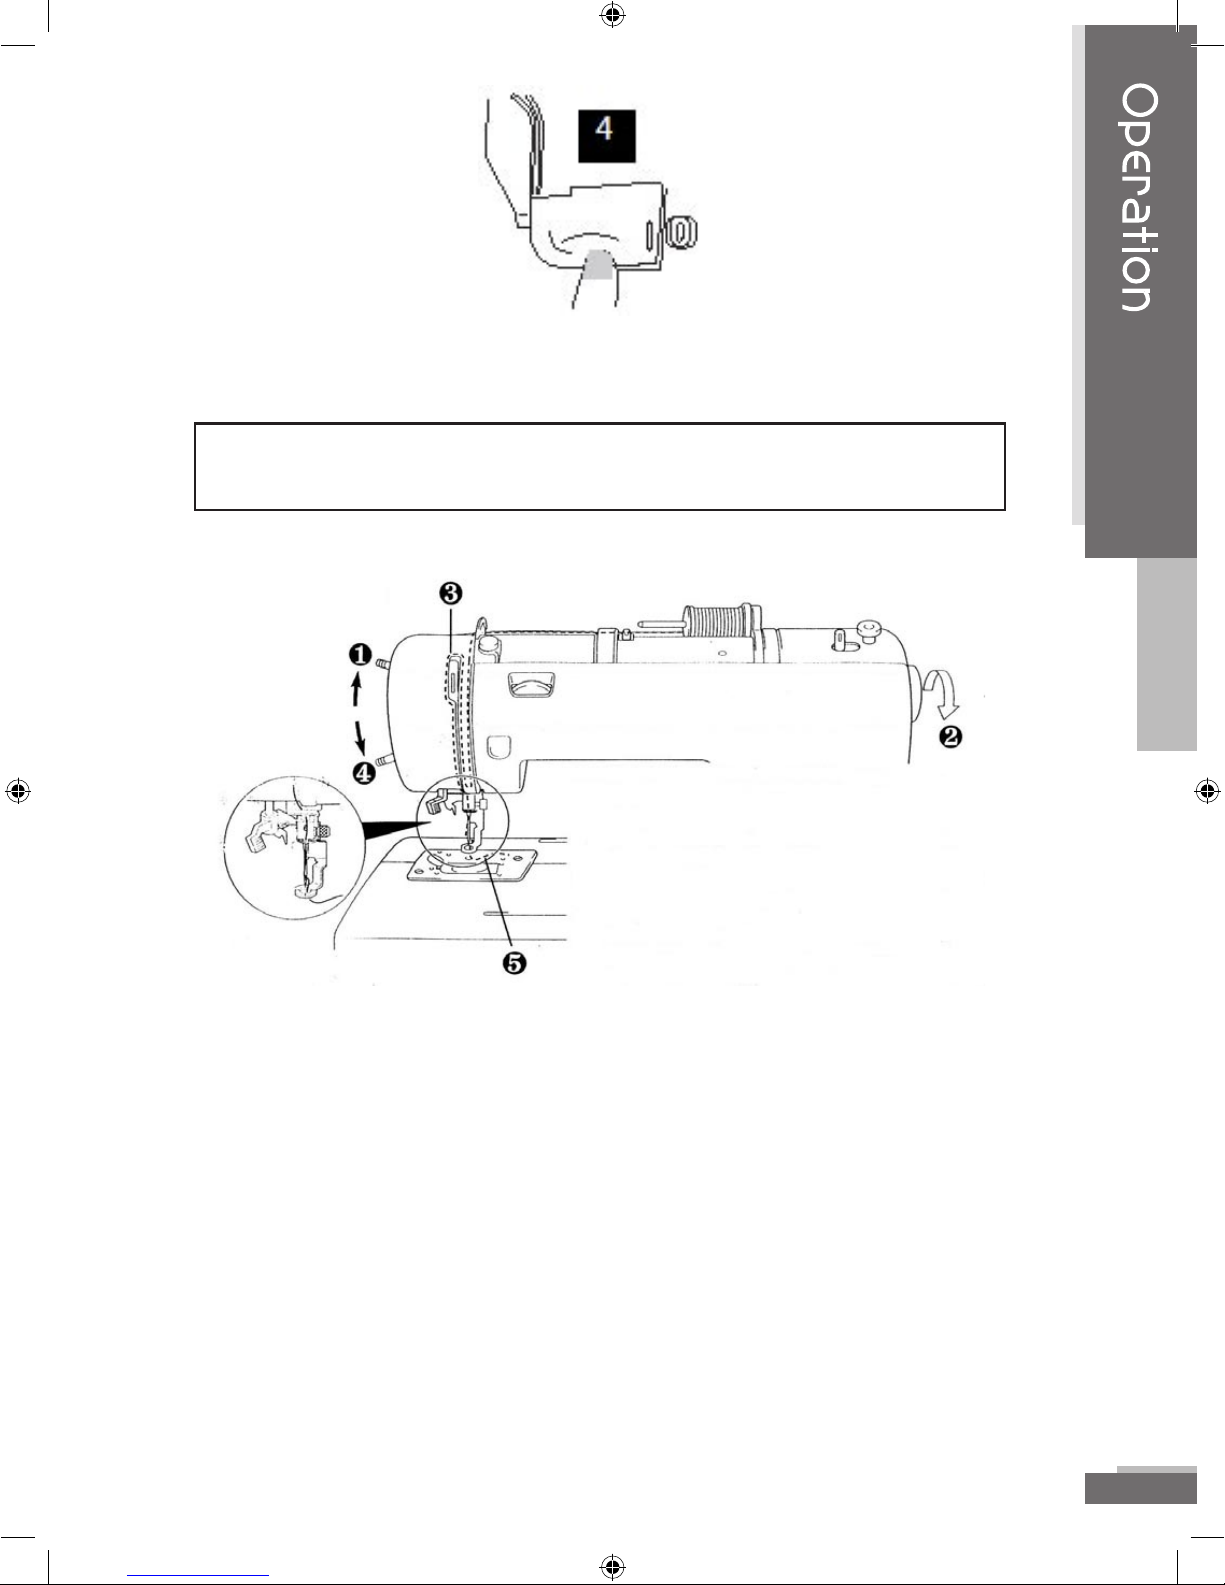
4. Replace the bobbin cover by placing the left end in place and
pressing down lightly on the right end to snap in place.
NOTE: There is no need to pull up the lower thread, as it is done automatically.
TIP: It’s a good idea to have several full bobbins before starting a new project.
Threading the Machine
1. Raise the presser foot lever. (If the presser foot is not raised, the upper
thread cannot be threaded.)
2. Turn the balance wheel toward you to raise the needle to its
highest position.
3. Guide the thread through the thread path, following the arrows
and number sequence on the machine. (See dotted line in
illustration.)
4. Lower the presser foot.
5. Thread the needle using the needle threader or thread manually.
CAUTION: Always be sure to raise the presser foot before removing upper thread
to prevent damage to the thread tension system.
Operation
eMotions Manual 7x9.indd 15 7/22/2005 11:11:08 AM
eMotions TM 2005 Blosil Enterprises, LLC. Produced under License by OESD, Inc. All manual contents © 2005 OESD, Inc.
16
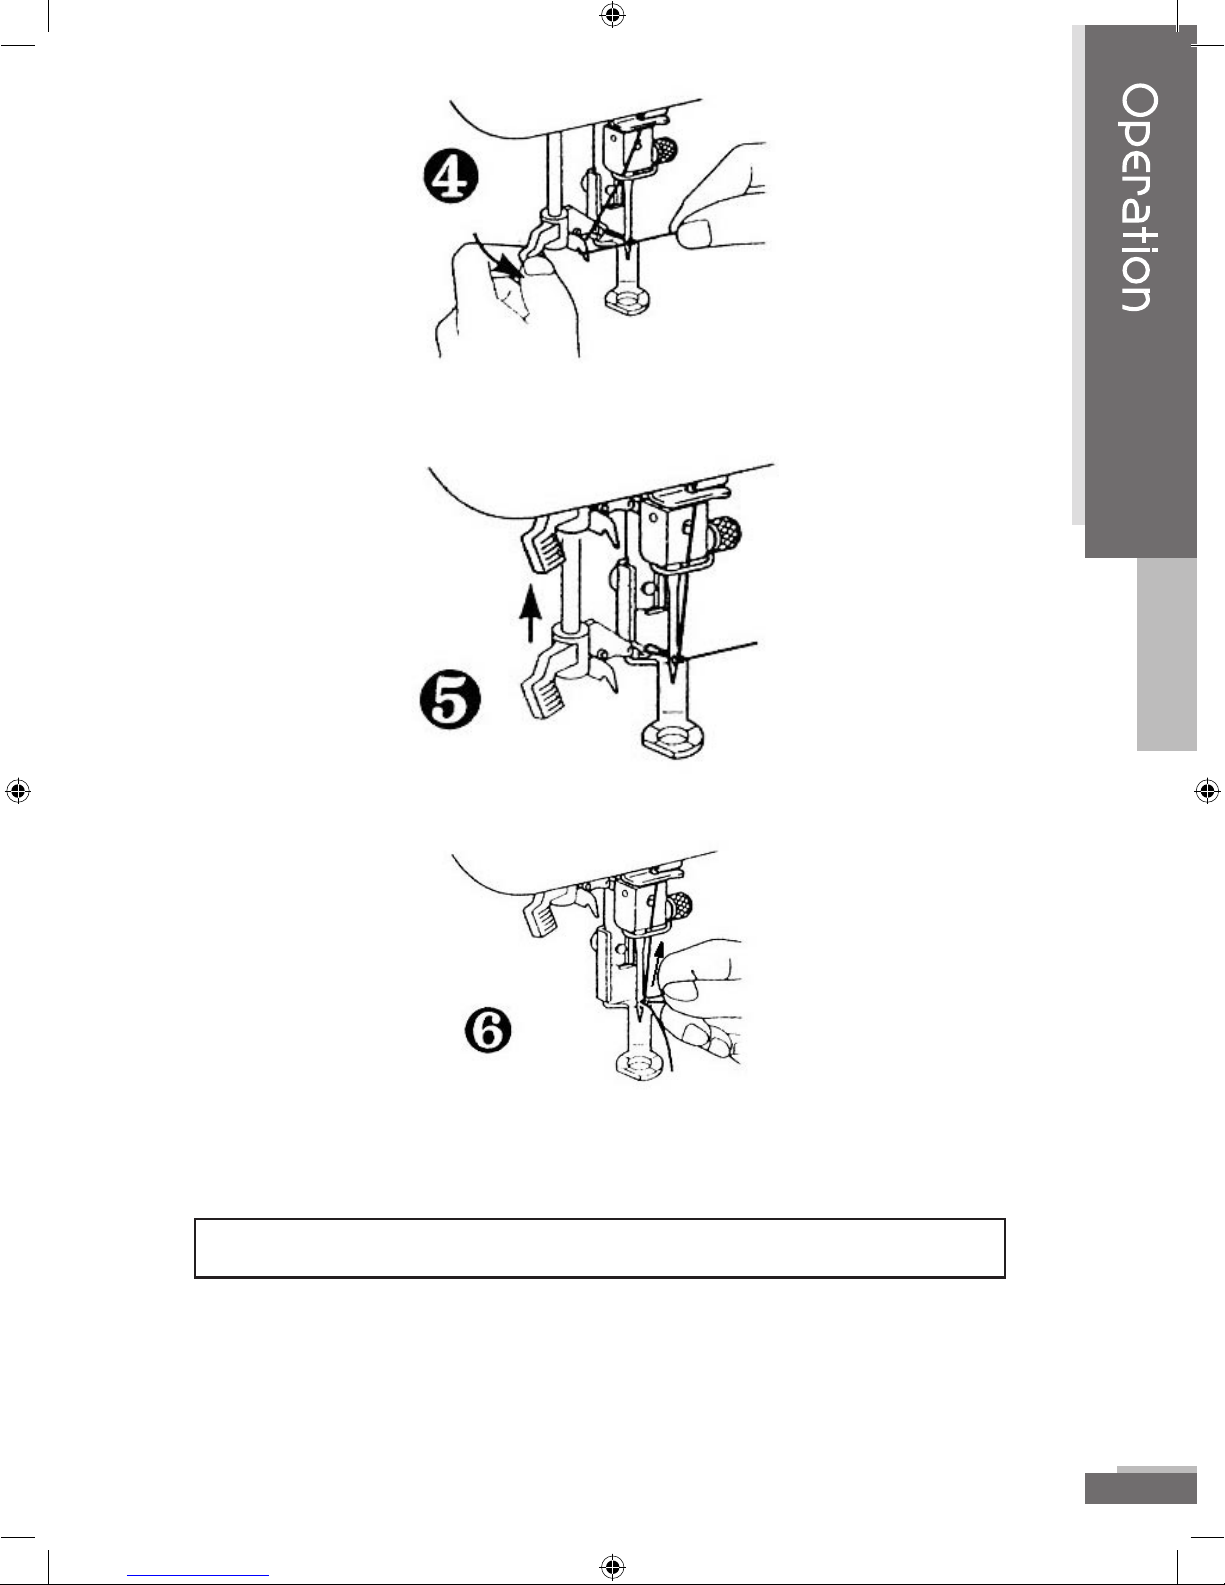
Thread the Needle Using the Needle Threader
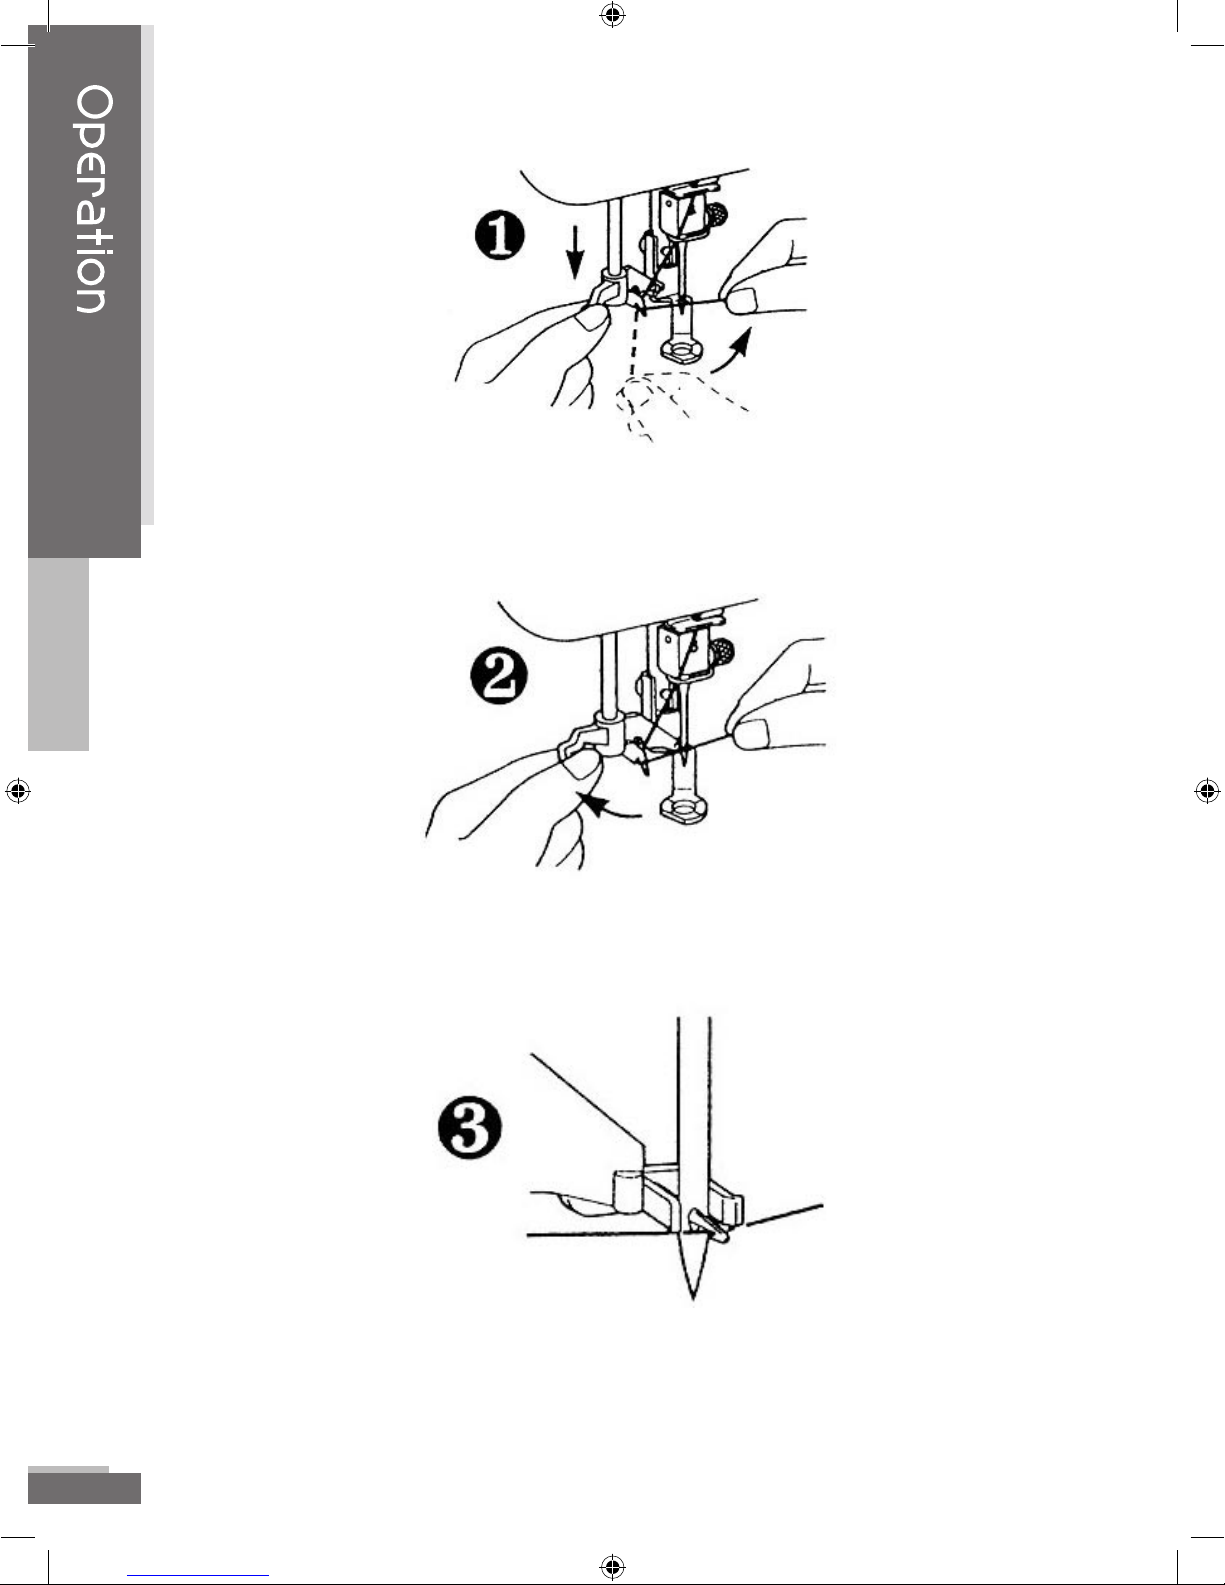
1. Be sure to have the presser foot lowered at this time. Lower the
needle threader lever until it stops. Hook the thread into the
threader guide and pull the thread to the right.
2. Push the needle thread lever toward the back to swing threader
into place.
3. Check to be sure that the hook has passed through the eye of the
needle and route the thread through the metal guides and under
the hook. Pull the thread toward you and check that it is being
held by the thread hook.
Operation
eMotions Manual 7x9.indd 16 7/22/2005 11:11:09 AM
eMotions TM 2005 Blosil Enterprises, LLC. Produced under License by OESD, Inc. All manual contents (C) 2005 OESD, Inc. 17
4. While gently holding the thread, pull the needle threader lever
forward.
5. Release the thread from the needle threader lever.
6. Pull the upper thread through the needle eye from front to back
toward the rear of the machine.
NOTE: Replace the needle often. Discard used needles, do not reuse.
Operation
eMotions Manual 7x9.indd 17 7/22/2005 11:11:09 AM
eMotions TM 2005 Blosil Enterprises, LLC. Produced under License by OESD, Inc. All manual contents © 2005 OESD, Inc.
18
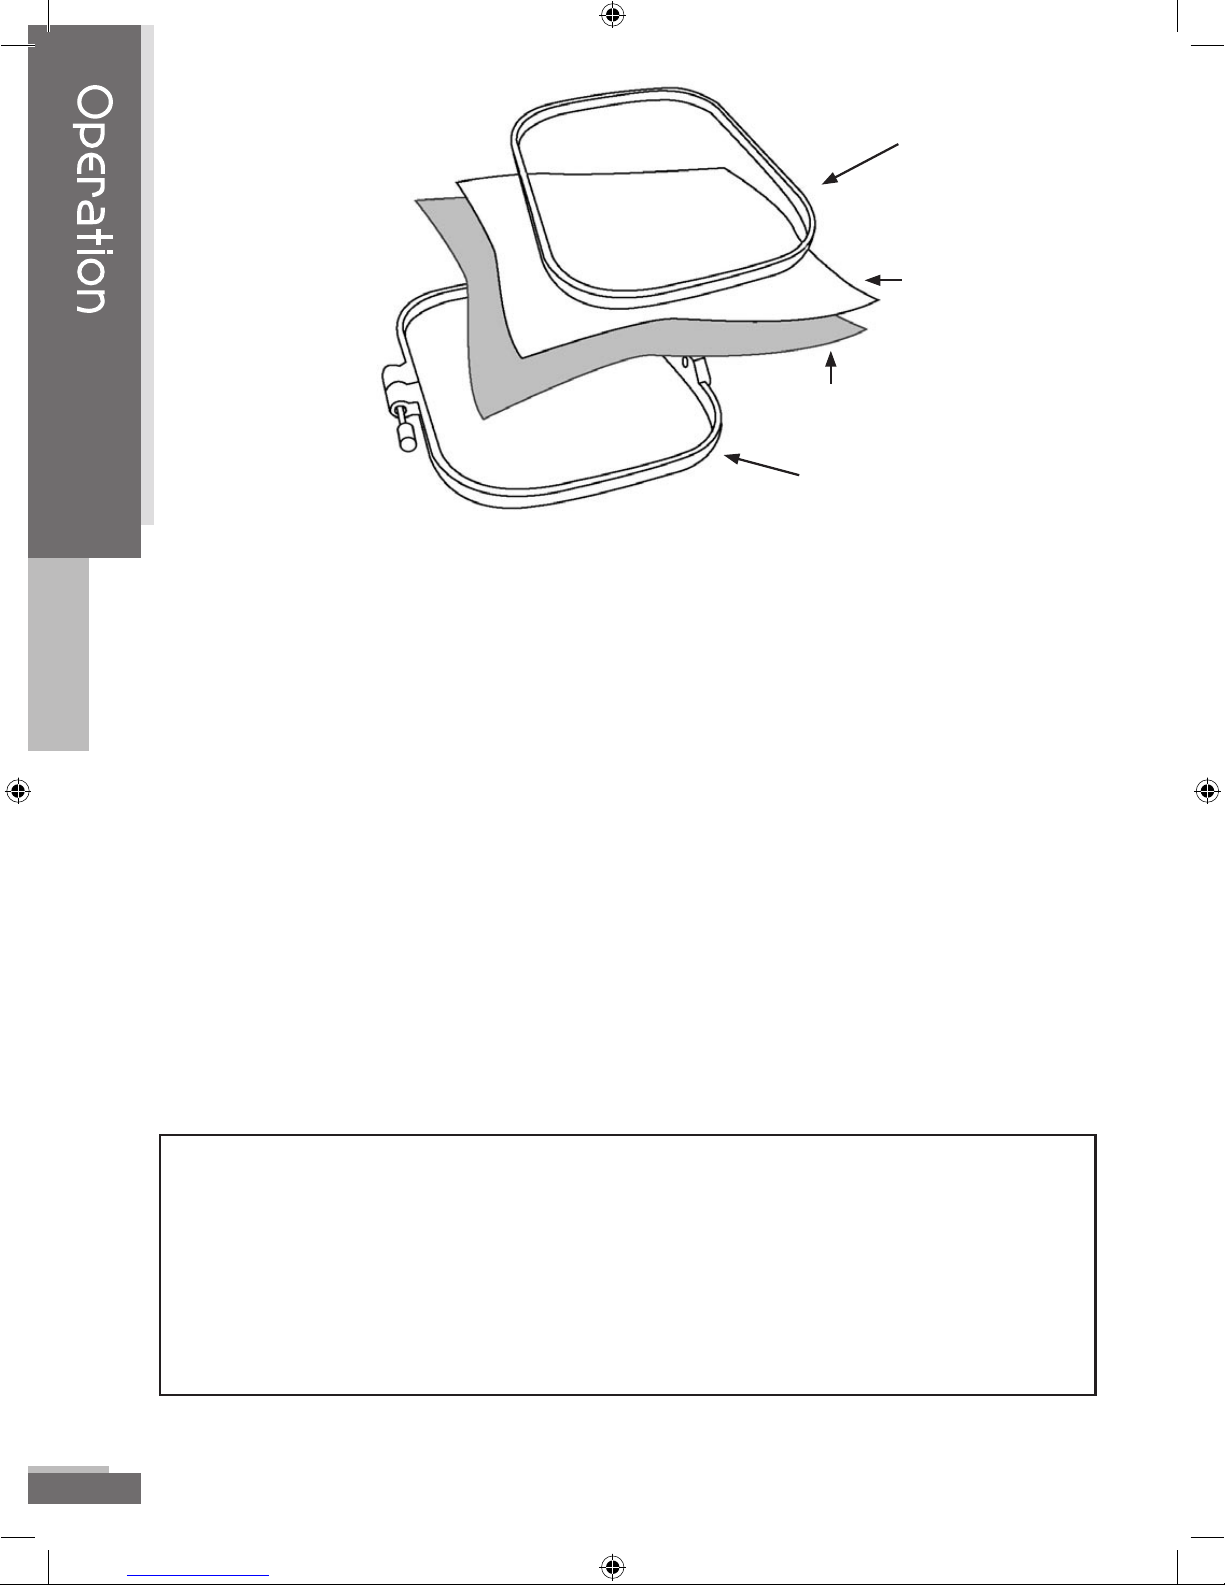
Hooping
Make sure fabric, threads and stabilizer are compatible for laundering.
1. Place stabilizer on the wrong side of the fabric in the area to be
embroidered.
2. Loosen the adjusting screw on the outer hoop, place the stabilizer
(must be larger than the hoop) and fabric on top of the outer hoop
with the right side of the fabric up. Always put stabilizer in the
hoop with the fabric. Stabilizer must be larger that the hoop to
adequately stabilize the fabric.
3. Place the inner hoop into the outer hoop to clamp the fabric and
stabilizer. Fabric and stabilizer should be smooth in the hoop, but
do not stretch or distort it. Smooth the fabric but do not stretch it.
Push the inner hoop into the outer hoop. Clamp securely so that
the edges of the outer hoop and inner hoop are even.
4. Firmly tighten the adjusting screw.
NOTE: Stabilizer provides body and control to fabric and aids in ensuring that stitches go
where they should go. Stabilizers can be bonded fabric, liquid, or water soluble and can be
sewn on, applied with spray adhesive or ironed on. Different blends of fabric react differently
when water or heat is applied or when tearing or cutting stabilizer away from your finished
design. Always have an assortment of stabilizer on hand to match with various fabrics.
Always stitch a test design on actual fabric and stabilizer. Remove stabilizer gently and
carefully to avoid distorting your design.
Operation
Inner Hoop
Fabric
Stabilizer
Outer Hoop
eMotions Manual 7x9.indd 18 7/22/2005 11:11:09 AM
eMotions TM 2005 Blosil Enterprises, LLC. Produced under License by OESD, Inc. All manual contents (C) 2005 OESD, Inc. 19
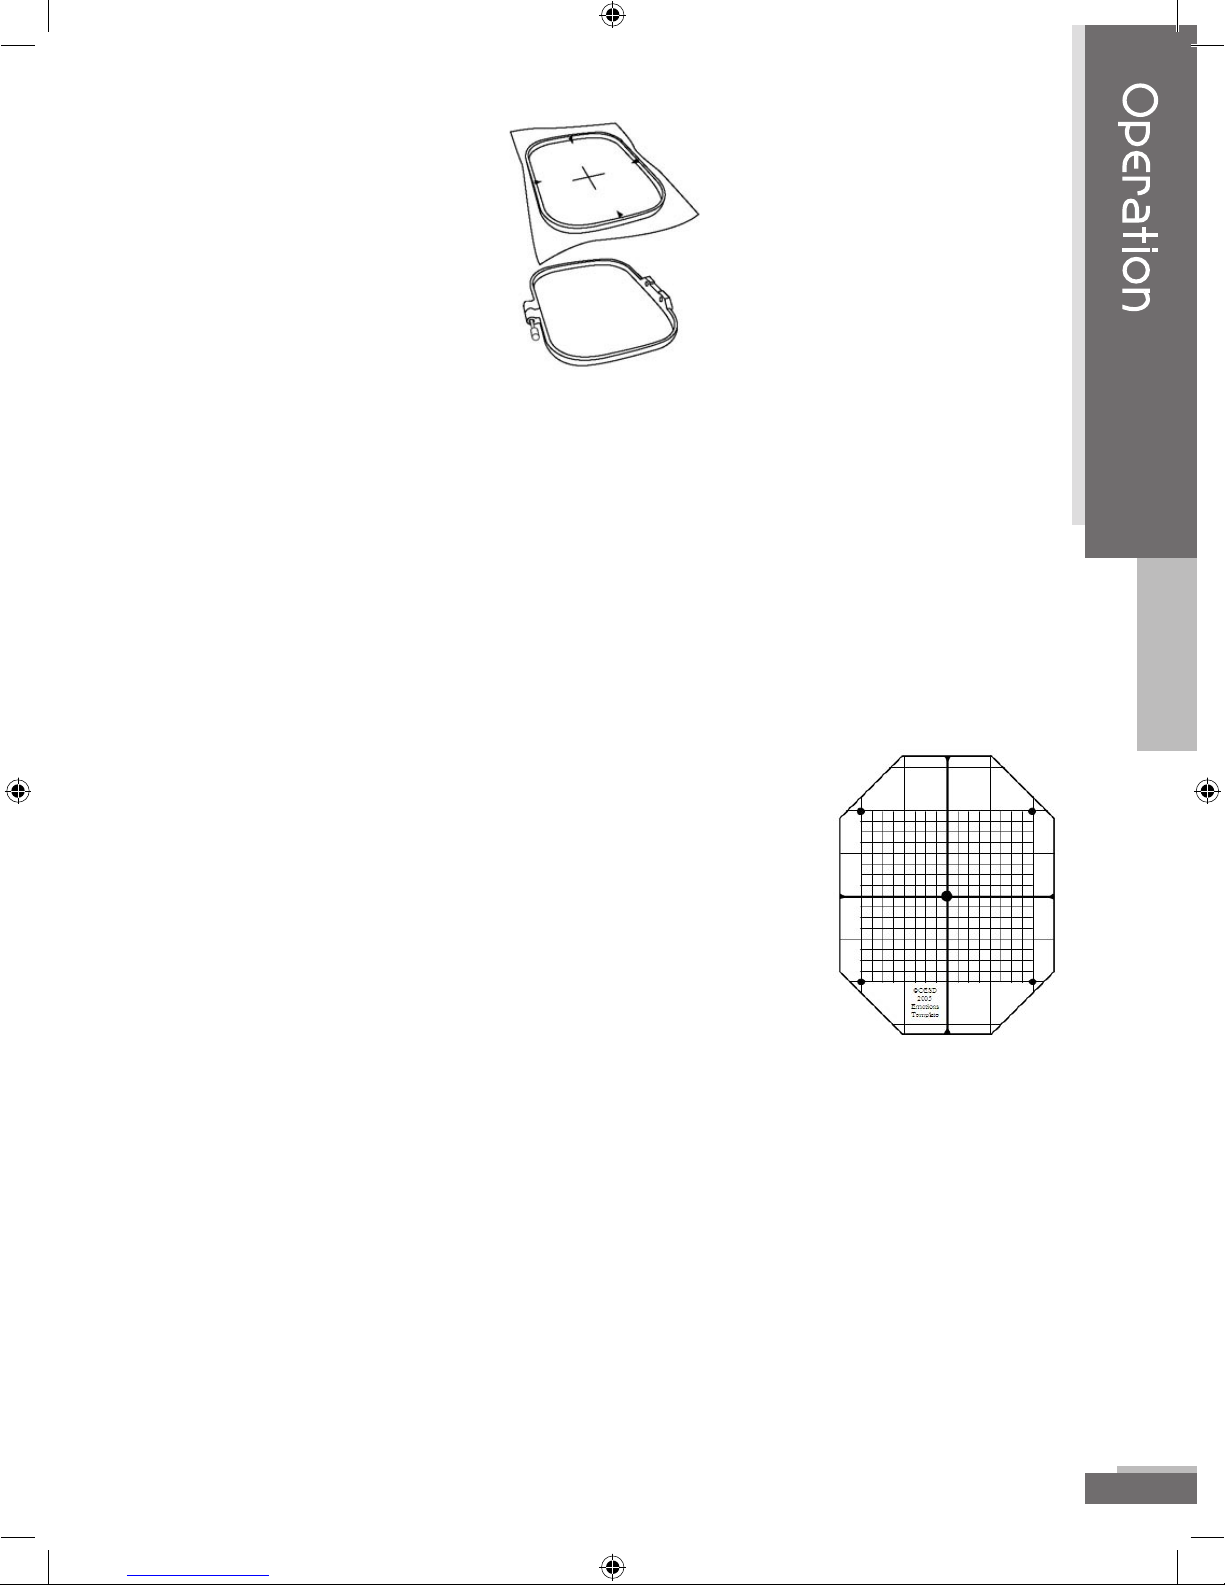
Using the Template
In order to hoop a garment straight, you may need to make some marks
on the garment. Draw a + sign in the center where you want the
design to be with chalk, a water soluble, air soluble or temporary
marker that will wash out easily.
On the inner hoop there are four arrows, at the top and bottom and
both sides. By lining up the marked center with the arrows at the
top, bottom and sides, you will get a straight embroidery that is
lined up with your markings.
To make this process much easier, a printable
template has been included on the Explorations
Lite Installation CD for your convenience.
(Note: template.pdf prints 1 template per page
and template2.pdf prints 2 templates per page.
Template2.pdf may not print on all printers
depending on the margins that are needed by
the printer.)
You must install Acrobat Reader to view and print this template. This
program is also included on the Installation CD. You may print
as many templates as you need. Print the template on clear
transparency film, such as that used for overhead projectors, to
create a reusable template. There is also a printed template in this
book. If you do not have a printer and want to make copies, take
this entire book to the copy shop. This will inform the copy shop
that you have permission to make copies of the template.
Operation
eMotions Manual 7x9.indd 19 7/22/2005 11:11:10 AM

eMotions TM 2005 Blosil Enterprises, LLC. Produced under License by OESD, Inc. All manual contents © 2005 OESD, Inc.
20
The template is ruled in 1 inch squares with the sewing field of the
machine subdivided by ¼” squares. Cut out the template along
the outside edge of the diamond shape. You may want to use a
hole punch to punch out the circles. To get to the center circle, just
barely fold the template so you can punch it. Or you can use a craft
knife and make cross cuts at each circle. These will indicate the
outside edge of the sewing field and the center where the design
will start. You may also want to make a small notch in the top,
bottom and both sides to denote the horizontal and vertical center
lines. These horizontal and vertical center lines correspond with
the arrows of the hoop.
NOTE: The sewing field of your eMotions machine is 100mm x 100mm or 3.93 inches. The
template is marked in inches, therefore the design will always fit within this area.
Mark the horizontal and vertical lines for the center of the design on the
garment to be embroidered. Use the template to make sure the
centers are lined up with the center of the sewing field.
Operation
eMotions Manual 7x9.indd 20 7/22/2005 11:11:11 AM
Table of contents


