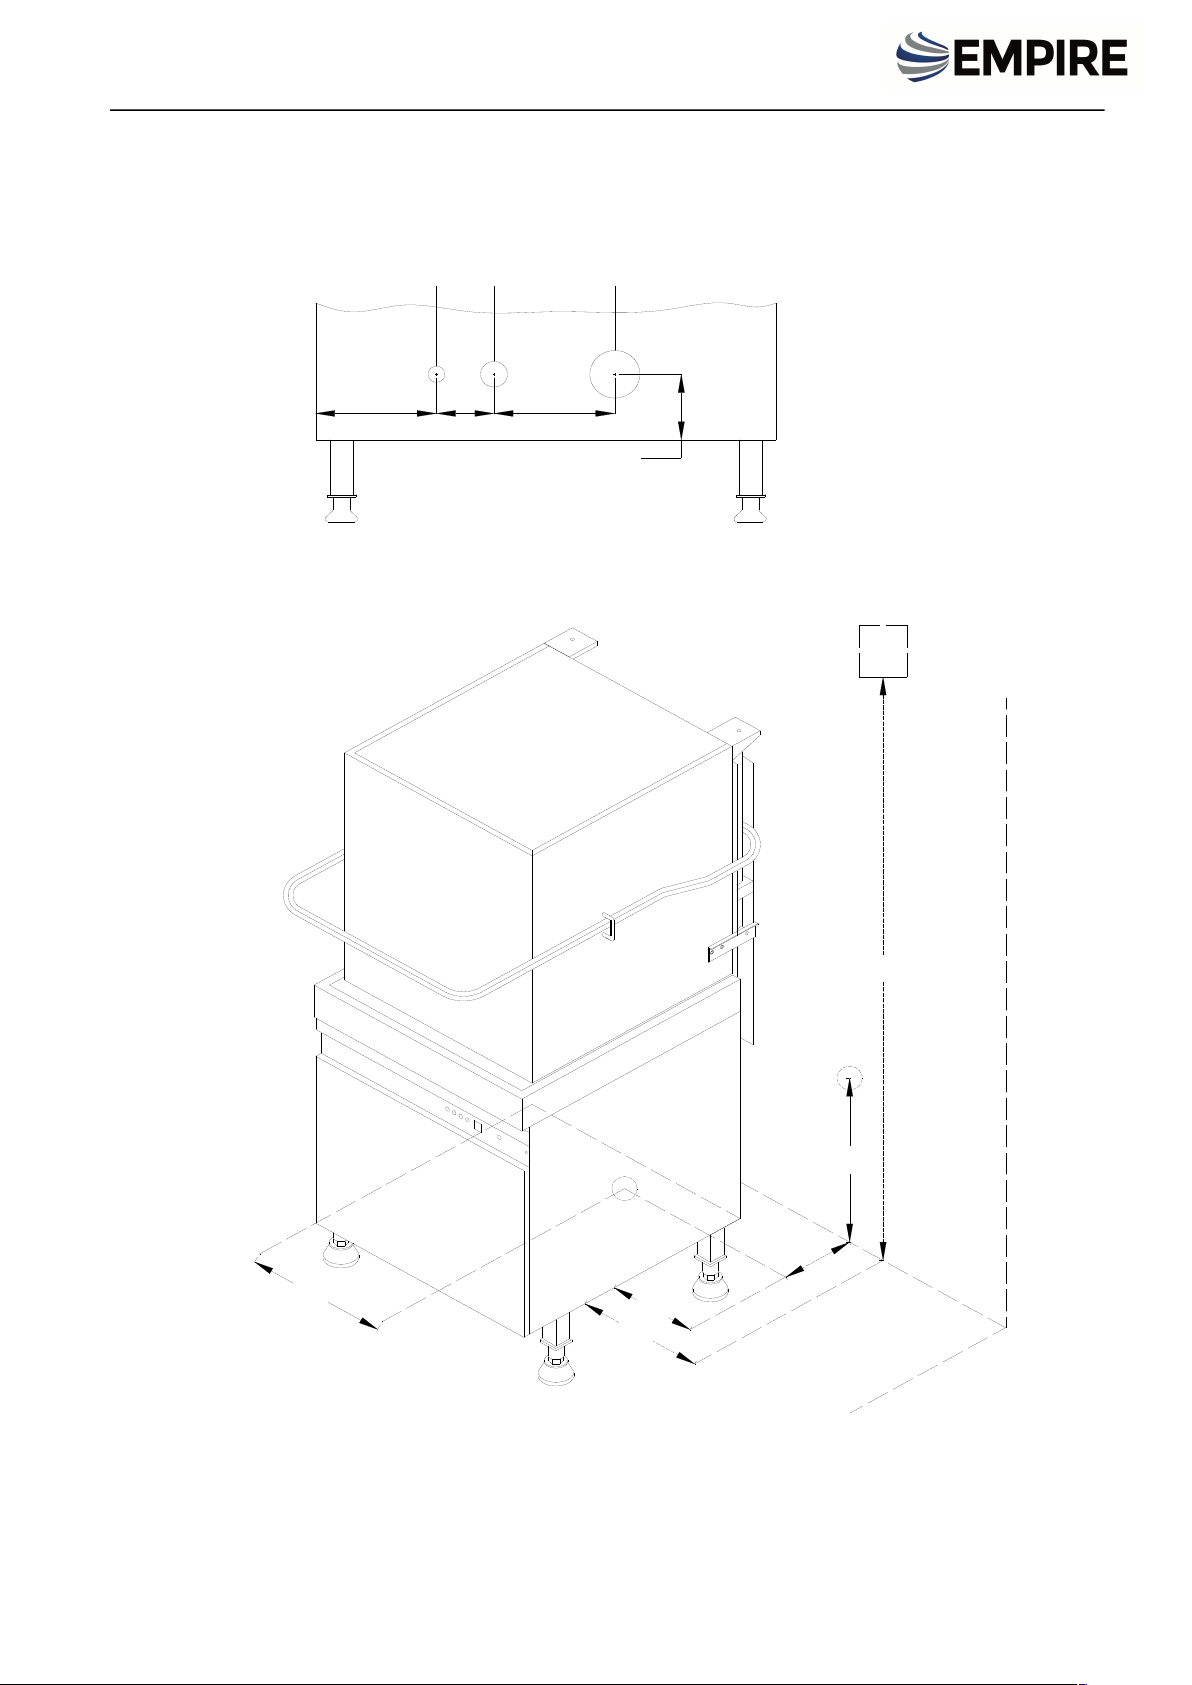
Empire DW1040TP User manual

DISHWASHER
INSTRUCTION MANUAL
DW1040TP

2 / 20
CONTENTS
1. AIMS AND SCOPE
2. RESPONSIBILITIES
3. SIGNS
4. TECHNICAL DATA (BASIC FEATURES)
5. TRANSPORTATION AND INSTALLATION
6. GENERAL PRINCIPLES
7. INFORMATIONS AND EQUIPMENTS RELATED TO PRODUCT
8. DESCRIPTION OF DEVICE WITH EXPLANATIONS
9. REPLACING THE DEVICE AND PREPARING FOR START UP
INSTALLATION BEFORE ASSEMBLING
PREPARATION FOR START UP
FINAL CHECK BEFORE START UP
10. START UP
11. ELECTRICAL DIAGRAM
12. MAINTENANCE AND CLEANING
DAILY MAINTENANCE AND CLEANING
WEEKLY MAINTENANCE AND CLEANING
13. SAFE LIFE
14. INTERVENTION AFTER FAILURE
15. SPARE PARTS LIST

3 / 20
1. AIMS AND SCOPE
Descriptions for safe use and maintenance of the product
2. RESPONSIBILITIES
Responsibilities of Product’s Owner: The product’s owner is responsible for applying of safety rules stated in this
Instruction Manual or getting them applied by delegating his authorities and risks, which may arise due to not applying.
The product’s owner is also responsible for the periodical maintenance of the machine.
Responsibilities of the Manufacturers: The manufacturer is responsible for the risks due to manufacturing and
assembling faults, even though all requirements stated in this manual have been fulfilled.
3. SIGNS
WARNING: This sign indicates that it must be complied with the instructions related to the subject; otherwise,
the risky conditions, in which there can occur some damages and dangers
CAUTION: This sign indicates any risky conditions, which can cause damages in material and injuring of people,
provided that one does not pay attention and states that one must be careful.
DANGER: This sign indicates high risky conditions in which people can be injured, provided that one does not
pay attention and the rules always to be complied with.
DANGER: This sign indicates high risky conditions in which the people can be injured or can die due to electrical
shock.
Equipotential connection terminal
(If necessary, it must be connected to other equipment to make equal the potential)

4 / 20
4. TECHNICAL DATA

5 / 20
5. TRANSPORTATION AND INSTALLATION
During transportation, take necessary precautions against the risk of falling down and being turned upside
down for the product.
Place the product onto a flat and solid ground.
Do not install the product near the flammable and explosive materials and do not keep any flammable and
explosive material near the furnace, while it is working.
Keep surely a fire extinguisher near the furnace and check whether the periodical checking of the fire
extinguisher has been implemented or not.
MODEL
DW1040TP
CAPACITY
PLATES
GLASSES
60’
1080
2880
STANDART SEPET
BASKET FOR 18 PLATES
GLASS-CUP BASKET
CUTLERY BASKET
50X50
50X50
50X50
n
n
n
2
0
1
ELECTRIC
VOLTAGE
WASHING TANK HEATER
RINSING WATER HEATER
MAXIMUM POWER
MAIN SUPPLY CABLE
V
W
W
W
mm²
220-230 V AC , 1~ , 50Hz
3000
9000
10120
3x6
FEED WATER
WATER INLET PRESSURE
WATER HARDNESS
WATER INLET TEMPARATURE
WATER INLET CONNECTOR DIAMETER
WATER INLET CONNECTOR DIAMETER DRAINAGE
HEIGHT
bar
ºFr
ºC
Ø
Ømm
cm
2-4
15
45-50
¾”
32
28
WASHING
TEMPARATURE
WASHING TANK CAPACITY
WASHING PUMP
WASHING DURATION
ºC
It
KW
50-55
60
1.10
1040TP 1-3 min.
RINSING
TEMPARATURE
RINSING WATER CONSUMPTION
LENGTH
WIDTH
HEIGHT
GROSS WEIGHT
VOLUME
ºC
It/basket
cm
cm
cm
kg
m³
80-85
2,5
72
83
148
123
1,06

6 / 20
6. GENERAL PRINCIPLES
The users agree and accept to be in conformity with all requirements included in using manual, otherwise the machine
shall be deemed OUT OF GUARANTEE COVERAGE.
The user also accepts that he/she was fully informed about the limited guarantee liability.
Any living body or any object should not be placed on machines. In addition, any living body should not be put inside the
machines.
It should not be allowed the children or any other unauthorized persons to operate the machines.
Any electrical operating machines should be cleaned after the required electrical connections switched off.
The electrical products should never be operated if any sufficient grounding installation had not been practiced in
addition; the LEAK CURRENT RELAY and fuse groups had not been installed in control box supplying the electrical energy
to the machine.
The cover of any machine should not be opened during the period of working.
Use , foam free and foam controlled liquid detergent and polisher in your machine. While the device is working , do not
open in any way the cover of the device with cover.
Be careful not to squeeze your hands while closing the covers.
The machines and covers should not be treated as step or ladder in any case.
The electrical devices should never be washed in the manner of spraying water. They should be cleaned by means of
rubbing after switching the power off the power had been switched off.
Any scratchier or stripper tools should not be used during the cleaning.
This manual verifies all machines were tested and the required security controls were done in due diligence so delivered
under operating conditions.
Do not connect the devices, which are in connection with hose, to the waterlines in the temperatures below – 5ºC and
above 50ºC.
Use rubber gloves during the cleaning and maintenance practices procedures
Do not remove the labels and panels of the devices.
In order to use efficiently and to decrease minimum the energy expenses, supply water in 50ºC to your devices with
electrical heating system. Additionally, in order to elongate the life of your device, use surely soft water in 15 ºF If
you do not have the water in this softness, use a water softening device.
Manufacturer firm is not responsible for the printing errors, which take place in the instruction manual and device
description catalogue, coming together with the device.
Manufacturer has the right to make all changes, which he/she deems to be useful for user or him/her. However, he/she
guarantees that the features related to primary functionality and safety of the device will be maintained.
In case of any failure, cut the electrical and water connection of the device off and apply to the authorized services.
In your device, do not wash the things such as pots and pans, saucepans in different and big sizes, which do not fit to
use purpose.
While the water in the boiler of your device is hot, do not insert your hand into the boiler. Water that is hot and contains
detergent can be harmful for your skin. In such a condition, rinse your hand with warm water.
Power cord must be min. H05RN-F type.
Cable diameter must be min 5x2.5 mm2
Grounding line must be continuously checked.

7 / 20
7. COMING THINGS TOGETHER WITH THE PRODUCT
A. Description Catalogue
B. User/Maintenance/Assembling Manual
D. Water supplying hose
E. Drainage hose to sewer system
F. Basket
Dear Customers, please check the above written auxiliary equipment to be given with the machine on delivery. If you notice
any damage or loss occurred during the transportation then you should request the transporter to issue any written report
including the relevant damage or loss.
UPON REQUEST
A) Automatic polisher feeding apparatus
B) Automatic detergent feeding apparatus
C) Water pump (If the water pressure is low)
D) Inlet/outlet counters
8. DESCRIPTION OF DEVICE WITH EXPLANATIONS
Washing machine has been manufactured regarding the hygienic standards.
The frame (inside/outside), including chassis, panel and boiler, has been wholly manufactured from stainless steel material.
The legs are in adjustable feature and manufactured from stainless steel material.
Washing tank is automatically filled and continuous level controlled.
Washing and rinsing water temperatures are automatically controlled via two thermostats working independently.
Its performance and efficiency are higher than those of its competitors.
Program duration can be adjusted by means of timer as from 1 to 3 minutes for DW1040TP
Cover is opened upward in similar to guillotine. Once the cover is opened, device passes to “stop” position. Provided that it
is closed, program continues to work from the previous point. Pumps have been manufactured as detergent and hot
water resistant.
Motors have a heat resistant feature and are protected by cooling of fan against higher temperatures.
The insulation of boiler has been provided by glass wool that is a special insulation material. Thus, heat losses can be
reduced to minimum level and prevented the wasting of energy as well. System has been fully secured by means of
thermal and electrical protectors. Access to electrical panel, executing of maintenance works and inspections have been
quite facilitated. Full automatically washing has been performed at 55 ºC. Rinsing is performed at 80 to 85 ºC by hot and
fresh water. Electrical equipment and cables comply with European Standards and safety regulations.

8 / 20
A- UPPER PANEL F- TABLE (OPTIONEL)
B- HANDLE
C- LOWER BODY
D- CONTROL PANEL
E- BASKETS

9 / 20
160
18
33
45
37
G
E
F
180
C
150
AB
315315
10.5
9. REPLACING THE DEVICE AND PREPARING FOR START UP
INSTALLATION BEFORE ASSEMBLING

10 / 20
DW1040TP :
A – Fresh water inlet
B – Power cord
C – Dirty water outlet
D – Connection of the machine to grounding line that has independently and adequately technical feature.
E – Tap with connector to supply the pressured (202 – 404 kpa) and hot water (45-50 ºC).(If the water hardness is higher
than 10 –15ºF, softening water device must be used.)
F– Dirty water drainage in 50 mm of diameter, which dirty water hose will be connected to. (on the ground and below the
machine, and next to the back wall.)
G- 380 V 3x25 A. K – automat fuse group to meet the requirement of the device.
PREPARATION FOR START UP
Open the packing of the device and remove all protective tapes.
Opening the cover of the device, take out the instruction manual.
Place the devices with adjustable legs by adjusting their legs and the device with fixed legs by aligning the ground.
Connect the elbowed part of the supply hose the solenoid valve of the device,the other end,to the tap.
Clamp one end of drainage hose to the drainage outlet of the machine.Connect the other end of it to sewer system
coming from the ground.
Drainage hose must not be twisted, folded, and bent more than 90º
Supply water must be at 50ºC in temperature and 202 to 404 kpa in pressure
If the connection to sewer system on the ground is above the drainage outlet of the machine, a drainage pump must
be used.
If water pressure is higher than 404 kpa, a pressure reducer valve must be used.
If the water pressure is lower than 202 kpa, a water pressurizing pump must be used.
Supply water of the machine must be a 10 to 15 º Fr.
If it is not so, a water softening device must be used.
Drainage line to sewer system on the ground, which drainage pipe was connected to, must have a siphon, in order to
prevent bad smells.
Required voltage a washing machine is 380-400 AC V / 50 Hz.
Make a grounding connection and be sure that this connection has been made correctly.
Be sure that there is energy supply in the system.
On the condition that you have fulfilled all requirement for operating the device, your device is ready for working.
FINAL CHECK BEFORE START UP
o The users should fulfill the following last-controls by accepting the required couplings of fresh water, electric,
wastewater , installations to be carried out by the authorized technicians;
o You must be sure that the power supply and grounding installation are ensured as required in leaflets of electrical
equipment.
o You must be sure that the feeding water has been installed and the water vane is turned on.
o You must be sure that the wastewater installation was done properly and discharging hose was coupled with
discharging pipe tightly.

11 / 20
10. START UP
Have a specialist electrician your device working 380-400 V connect to the K-automat fuses group.
Device must not be operated without being made adequate grounding and from the electricity source, which do not
have leak current relay.
Water supply connection must be made and its valve must be open
Water drainage connection must be made.
Before placing things into the baskets, solid wastes must be cleaned and subjected to pre-washing by washing buttery
with sprayer.
Do not place more dirty dishes than stated in the Table into baskets.
Do not use any detergent for pre-washing.
Keep the very dirty dishes (waiting ones more than 2-3 hour) under water until complete dissolving
Do not wash materials made of plastic.
Use foam controlled liquid detergent in your machine.
Have the detergent firm dosing apparatus to supply detergent into your machine connect.
Have the detergent firm dosing apparatus to supply polisher into your machine connect.
Check the water supply hose and water drainage connection.
Fix overflow pipe into its place.
Open the valve of pressured hot water supply.
Place the basket, in which you place the things to be washed, in machine.
DW1040TP
Close the device cover.
Bring the switch from the position “0” into position “1”. In this case, control lamp lights on.
Machine takes the water into the tank and heats up it. When the water is ready, lamp “ready” lights on.
When the cover of the machine is opened and closed, program starts automatically.
Washing time can be adjusted as 30 seconds for the 1st program, 60 seconds for 2nd program 90 seconds for 3rd
program.
During washing and stopping, the lamp “it is washing” lights on. After 4 seconds from stopping of rinsing, this lamps
lights off. When this lamp lights off, the operation programmed is completed.
Open the cover and take the pots out. You can load the machine to be washed into the machine.
When the cover is opened, the machine stops.
If the cover is opened or closed after the program starts, program continues to run from the point it stops.
Bring the switch into position “AW” in order to make manually washing.
Bring the switch into position “AR” in order to make automatically washing.
When the washing pump of the machine encounters any forcing, voltage fluctuation or failure, the lamp of thermal relay is
going to light on. In this case, opening the control panel of the machine, one must press on the reset button of thermal
relay.
Be careful of not running the cover holder, after opening the cover.

12 / 20
CONTROL PANEL
Full automatic washing cycle at 55 C with a choice of three different programs from 1 to 2 minutes.
A : Switch Off
B : Program 1
C : Program 2
D : AW Program (Washing)
E :Program 3
F : AP Program (Rinsine)
G : Wash Ready
H : Wash On
J : Thermic Contactor Off

13 / 20
11. ELECTRIC DIAGRAM

14 / 20

15 / 20
12. MAINTANCE AND CLEANING
Implement the following periodical maintenance so that the product should work in safe and long life
DAILY MAINTANCE
When the water in washing tank gets dirty, it must be replaced by fresh water. For this purpose, bring the “0-1” switch
of the machine into “0” position and close the device.
Switch off the electricity, switching off the switch.
Opening the cover of the device, sponge the solid wastes in the device
CLEANING THE DEVICE
When the water in washing tank gets dirty, it must be replaced by fresh water.
For this propose, bring the STAND BY and START swatches of the machine into “stop” and close the device.
Closing the switch, switch the electricity off.
After opening the cover, be careful of not impacting the cover holder.
Take out the overflow pipe.
Remove the washing and rinsing buttery nozzles and clean them. Wash the rinsing nozzles and rinse them.
Taking out the surface filters and pump suction filters, clean them by brush under the flowing water.
Fix all parts in their place in such a way conforming to their original conditions.
Close the cover of the device.
Open the relevant switch on the control panel supplying electric to the device. Bring the “STAND BY and “START”
switchs into starting position.
For complete cleaning of the device, run the device for 5 minutes
Bring the “START” switch into” pause” position.
Open the cover.
WEEKLY MAINTANCE
When the water in washing tank gets dirty, it must be replaced by fresh water.
For this propose, bring the STAND BY and START swatches of the machine into “stop” and close the device.
Closing the switch, switch the electricity off.
After opening the cover, be careful of not impacting the cover holder.
Take out the overflow pipe.
Remove the washing and rinsing buttery nozzles and clean them. Wash the rinsing nozzles and rinse them.
Taking out the surface filters and pump suction filters, clean them by brush under the flowing water.
Fix all parts in their place in such a way conforming to their original conditions.
Close the cover of the device.
Open the relevant switch on the control panel supplying electric to the device. Bring the “STAND BY and “START”
switchs into starting position.
For complete cleaning of the device, run the device for 5 minutes
Bring the “START” switch into” pause” position.
Open the cover.

16 / 20
13. SAFE LIFE
The safe life of the product is 5 years.
14. INTERVENTION AFTER FAILURE
FAILURES / CAUSES
• Device is not working
• Check whether there is electric supply to the device.
• Be sure that there is electric supply to the stand by and start switchs
• Be sure that electric supply to level switch and solenoid valve.
• There is no being filled:
• Check the level switch.
• Check whether there are any contaminants in the tube in washing tank
• Be sure that there is adequate level of water in washing tank.
• Check the solenoid valve opens and closes. Open and close the switch. If it does not work, change by new ones.
• Washing tank is mot being filled or there is no rinsing:
• Be sure that the tap supplying water is open
• Check whether drainage pipe is fixed in its place or not.
• Be sure that stand by and start switchs are open.
• Be sure that main fuse supplying the machine is in active.
• Check the fuse of machine.
• Be sure that there is no plugging in buttery nozzles due to contaminants.
• Be sure that sufficient amount of air in air housing
• Take out the overflow pipe and empty the tank completely.
• If this is not a solution for the problem, change the level switch.
• Opening and closing the stand by switch, check the solenoid valve. If it does not work, change it by new one.
• Washing tank is slowly being filled.
• Be sure that the tap supplying water is open.
• Check the water pressure, if it is lower than 202 kpa, use the pressurizing pump.
• Remove the water supplying hose. Take apart the filter of solenoid valve and clean it
• Be sure that rinsing nozzles are not plugged
• Be sure that overflow pipe completely sits in its housing. If there is pressure reducing valve, take it out.
• Machine is not heating washing and rinsing water :
• After checking that overflow pipe is connected to its place, be filled the washing tank.
• Check whether or not the thermostat of rinsing water boiler is set to 80 ºC, and the thermostat of washing water, to 50ºC
• Check the cables and their connections.
• Washing tank is not being emptied:
• Washing tank can not be emptied due to solid wastes. Inspect the water drainage hose from overflow pipe to siphon on the
ground. Be sure that it is clean.
• Machine is not efficiently working:
• Be sure that pump suction filter is clean
• Be sure that the nozzles of washing buttery are clean
• Be sure that adequate amount of detergent is delivered to the machine.
• Selected washing program is very short due to the fact that the pots are dirty
• Select the longer program and run again the machine.

17 / 20
• Check whether water temperature in washing tank is correct or not.
• There is no drying: (Models with drying system)
• Be sure that the amount of polisher injected to the machine is correct
• Check the thermostat of rinsing water is set to 80 ºC.
• Condensation in the glasses.
• Do not store the glasses on a flat surface.
• The amount of dosed polisher is not correct.
• Striped glasses:
• Use only foamless detergent.
• There is excess amount of foam in washing tank:
• Water temperature in washing tank must not be lower than 50ºC.
• Check the detergent and polisher dosing apparatus. There cam be excessive dosing
• Be sure that machine was mot cleaned by foamed detergent. Empty the tank and boiler.
• If foamed detergent was used, empty the tank and be filled it by fresh water. Continue to make this operation until the foam
disappear.
• There is stain on the glass :
• Decrease the amount of dosed polisher. Acceptable dosage is 0,1 cc / liter water.
• The arms of washing buttery are not correctly rotating.
• Remove the washing arm and clean it.
• Be sure that water pressure is more than 202 kpa, If the pressure is lower, mount a pressurizing pump.

18 / 20
15. SPARE PARTS LIST
NO
DESCRIPTION
NO
DESCRIPTION
NO
DESCRIPTION
01
Heating Element
12
Pulley
23
Signal Lamp
02
Handle
13
Holder
24
Thermic
03
Filter
14
Handle
25
Contactor
04
Shelf
15
Timer
26
Contactor
05
Foot
16
Switch
27
Timer knob
06
Fascia
17
Pressure Switch
28
Fitting
07
Spring
18
Switch with Pulley
29
Fitting
08
Tension Rod
19
Limiter
30
Connector
09
Bearing
20
Timer
10
Spindle
21
Socket
11
Rail
22
Thermostats

19 / 20
NO
PARÇA ADI
NO
PARÇA ADI
NO
PARÇA ADI
NO
PARÇA ADI
01
Rinse Line
13
Nozzle
25
Drainer
39
Heating Element
02
Shaft
14
Nut
26
Drain Pipe
40
Solenoid Valve
03
Suction Filter
15
Nozzle
27
Lid
41
Limiter
04
Boiler
16
Nut
28
Pressure Pot
05
Wash Pump
17
Nut
29
Inlet Hose
06
Body
18
Flange
30
Hose
07
Faucet
19
Suction Filter
31
Hose
08
Wash Arm
20
Bottom
32
Clip
09
Rinse Arm
21
Nut
33
Clip
10
Terminal
22
Hose
34
Clip
11
Bolt
23
Hose
35
Clip
12
Nozzle
24
Drain Hose
36
Clip

EMPIRE SUPPLIES LIMITED
UNIT 1,RIVER VIEW BUSINESS PARK SHORE WOOD ROAD,
BROMBOROUGH, WIRRAL
CH62 3RQ
UNITED KINGDOM
TEL: 0151 601 6220
sales@empiresupplies.co.uk
Table of contents
Other Empire Dishwasher manuals