Encore ENXTV-DIT - User manual

© 2010 Encore Electronics, Inc. All rights reserved.COVER
Product specifications, size, and shape are subject to change without notice, and actual product appearance may differ from that depicted herein.
All trademarks and brand names are the properties of their respective holders.
© 2010 Encore Electronics, Inc.

1
www.encore-usa.com
T
ABLE OF
C
ONTENTS
CHAPTER 1: INTRODUCTION........................................................................................ 2
1.1
F
EATURES
............................................................................................................... 3
1.2
S
YSTEM
R
EQUIREMENTS
.......................................................................................... 3
1.3
S
PECIFICATIONS
...................................................................................................... 4
1.4
P
ACKAGE
C
ONTENTS
............................................................................................... 4
CHAPTER 2: GETTING STARTED.................................................................................. 5
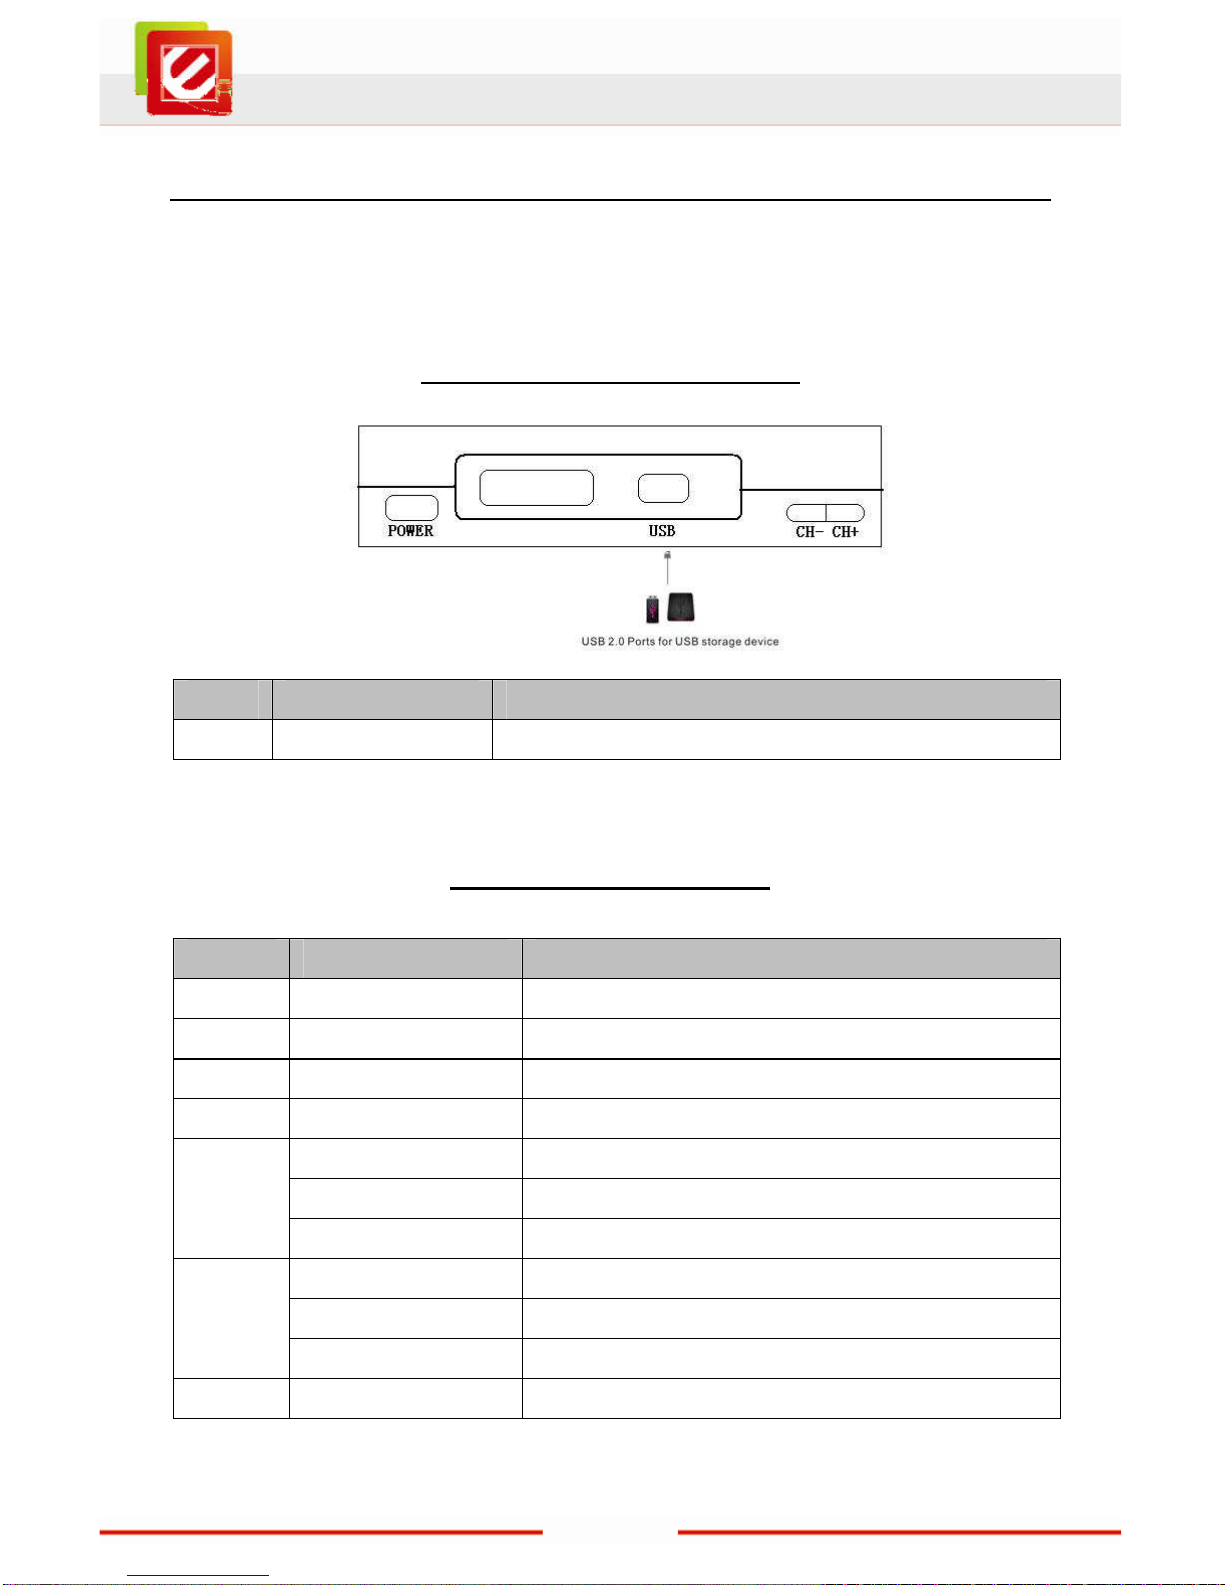
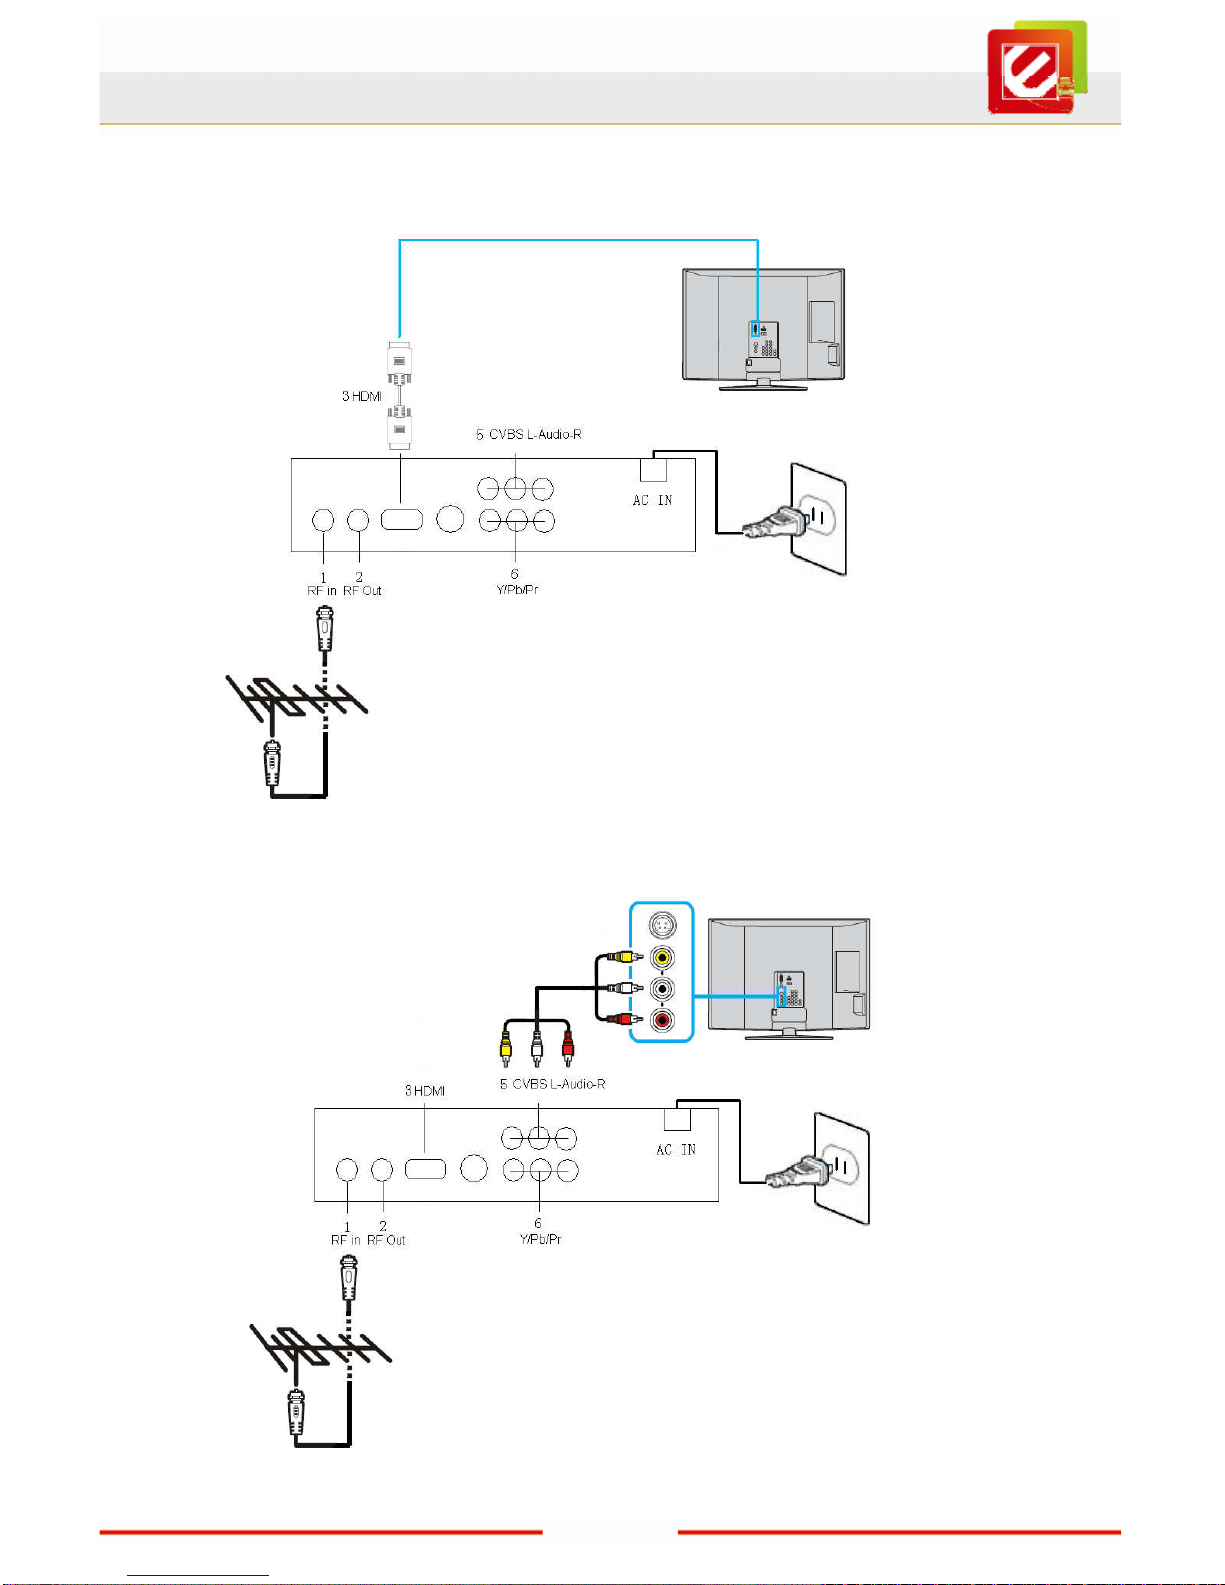
2.1
F
RONT
R
EAR PANEL CONNECTOR
............................................................................. 5
2.2
R
EAR PANEL CONNECTORS
....................................................................................... 5
2.
3
F
IRST
L
AUNCH
........................................................................................................ 8
CHAPTER 3: REMOTE CONTROL.................................................................................. 9
3.1
I
NSTALLING
B
ATTERIES
............................................................................................. 9
3.2
R
EMOTE CONTROLLER FUNCTIONS
........................................................................... 9
CHAPTER 4: USING THE ENXTV-DIT........................................................................... 10
4.1
H
OW TO USE THE
M
AIN
M
ENU
................................................................................. 10
4.2
S
ETTINGS
.............................................................................................................. 10
4.3
W
ATCHING
F
REE
-
TO
-
AIR
D
IGITAL
TV....................................................................... 20
4.4
R
UNNING THE
R
ADIO
.............................................................................................. 22
4.5
P
LAYING
M
ULTIMEDIA FROM
USB
STORAGE DEVICES
............................................... 23
CHAPTER 5: TECHNICAL SUPPORT........................................................................... 25
APPENDIX A: USER’S NOTICE .................................................................................... 25
Product specifications, size, and shape are subject to change without notice,
and actual product appearance may differ from that depicted herein.
All trademarks and brand names
are the properties of their respective holders.
© 2010 Encore Electronics, Inc. All rights reserved.

2
www.encore-usa.com
Chapter 1: Introduction
Enjoy the quality of digital TV without the price of digitizing all your multimedia
devices! The truth is, by 2014, analog TV network will be switched off in most countries
and old analogue TVs won't work without a signal converter. Encore's ISDB-T/SBTVD
Digital TV Converter Box is the solution – just connect the Converter Box between the TV
signal source and your TV set, you can now enjoy free-to-air digital TV!
All this means -- clear images and sound quality free from ghosting (double image),
fuzziness or snow. You get to keep your old TV set along with all the new features of digital
TV, including EPG (electronic program guide), PVR (personal video recorder), and more.
You can browse the up-to-date TV guide on your screen or schedule auto program
recording at just a push of a button**.
Encore's ISDB-T/SBTVD Digital TV Converter Box also features HDMI and Component
outputs (YPbPr) that will satisfy your digital entertainment needs with high definition (HD)
image and sound quality*. Enjoy clear videos with resolution of up to 1920x1080.
* HD TV screen is required to display HD signal.
** EPG features may vary by region.

3
www.encore-usa.com
1.1 Features
ISDB-T / SBTVD full segment TV standard
The simplest and cost-effective way to experience the benefits of digital TV – keep
your old analog TV and receive free-to-air digital TV broadcast
All things digital – clear pictures free from ghosting, fuzziness and snow; more
channels to choose from than analog TV broadcast
EPG (Electronic Program Guide): always get the up-to-date TV guide on your TV
screen or schedule program recordings at the push of a button
PVR (Personal Video Recorder): save TV shows or movies on external storage
device for direct playback
Parental control: protect your children from inappropriate media contents
Connectors: AV, component (YPbPr) and HDMI outputs, resolution of up to 1080P
Selectable output for 1080P, 720P HD format
Easy firmware upgrade via USB 2.0 Port
Full function remote control
Multiple on-screen-display languages: English, Spanish, and Portuguese
No software / driver required when using USB storage devices as direct input
1.2 System Requirements
ISDB-T/SBTVD TV signal: over-the-air (RF) signal (a TV antenna is required)
TV display unit: CRT, LCD TV, Plasma or DLP
USB external hard drive partition format: FAT32

4
www.encore-usa.com
1.3 Specifications
USB Port 1 x USB 2.0 ports to connect to external USB hard drives, flash drives,
or card readers (backward compatible with USB 1.x)
Video Format 1080p, 1080i, 720p, 576p/480p, 576i/480i
Video Output HDMI, YPbPr, CVBS, S-Video
Audio Output Stereo sound
Video Format MPEG4 (*.pvr)
Music Format MP3
Picture Format BMP, JPEG
Convenience Remote control included
Dimensions 260 x 155 x 38 mm (W x D x H)
1.4 Package Contents
ENXTV-DIT
Digital TV Antenna
Full Function Remote control
Audio / Video cable
YPbPr cable
User manual

5
www.encore-usa.com
Chapter 2: Getting Started
ENXTV-DIT cable connection is easy. The most typical cable connections are shown in
this chapter.
2.1 Front Rear panel connector
Item Connector Function
1. USB Port USB Host to connect storage
2.2 Rear panel connectors
Item Connector Function
1. RF input RF input
2. RF output RF output
3. HDMI HDMI host
4. S-Video 4Pin S-video output
CVBS output RCA jack
Audio-R output RCA jack
5.
Audio-L output RCA jack
Y Y carries output
Pb Pb carries output
6.
Pr Pr carries output
7 .
AC IN 100~240V Power connector

6
www.encore-usa.com
There are 4 kinds of connections:
(1) HDMI connector:
(2) CVBS connector:

7
www.encore-usa.com
(3) S-video connector:
(4) YPbPr connector:

8
www.encore-usa.com
Notes:
We highly recommend you use the outdoor antenna for better signal reception.
2. 3 First Launch
The first time you connect ENXTV-DIT to TV, the setup screen should automatically
appear below.
OSD Language:
Please select the system language from the list.
LCN: On/Off
You can choose to use the local channel name (LCN) or not.
Start:
Choose “Start” to scanning all TV programs. It will auto scan all channels. After
scanning is complete, the first TV program of the Channel list appears.

9
www.encore-usa.com
Chapter 3: Remote Control
The Remote Control allows you to operate ENXTV-DIT remotely. Aim the front of the
Remote Control at the Remote Control Receiver window and press the control buttons as
you would.
3.1 Installing Batteries
Open the back cover of the remote control and put in two AAAbatteries (alkaline battery
recommended).
3.2 Remote controller functions
Menu

10
www.encore-usa.com
Chapter 4: Using the ENXTV-DIT
In this section the ENXTV-DIT Main Menu and its operations will be discussed here.
4.1 How to use the Main Menu
Press the MENU button on the remote control to get to this screen.
Use direction buttons on remote control to move the cursor to the desired item.
Click “OK” button on the remote control to confirm the setting.
Use the EXIT button to return to the page or exit from the main menu.
4.2 Settings
Press the MENU button on the remote control to get to this screen. Then select “Settings”
to set up the following: System Setup, Video Settings, Audio Settings, Installation, Channel
Edit.

11
www.encore-usa.com
System Setup
By selecting “System setup”, you can change the settings of:
OSD Language
There are three on-screen display languages to choose from: English, Spanish, and
Portuguese. (Default: English)
Country
You can select your country from the list. (Default: Brazil)

12
www.encore-usa.com
LCN (Local Channel Name): On/Off
It will give you an option to scan for local channel names. (Default: Off)
Parental Control: On/Off
You can protect your children from certain TV channels by setting a password:
Change password:
You can change password any time.

13
www.encore-usa.com
System Information:
Display system information.
Factory Reset: Yes/No
Reset to default settings if you would like to eliminate all the above changes you
have made.
Video Settings
By selecting “Video Settings”, you can change the settings of:

14
www.encore-usa.com
TV System: PAL or NTSC
Select the TV system, according toAV output of your TV. (Default: NTSC)
HD Output : 1080p, 1080i, 720p, 576p/480p, 576i/480i
Select HD Output according to your HDMI or YPbPr output. (Default: 1080i)
Screen Ratio: 4:3/16:9
Select the screen ratio based on your TV screen ratio. (Default: 16:9)

15
www.encore-usa.com
Aspect Conversion: Letter BOX, Pascan or FULL
Select a screen display mode according to signal mode. (Default: Letter BOX)
Audio Settings
By selecting “Audio Settings”, you can change the settings of:
LR Mode
Set the audio mode to Stereo, Left or Right. (Default: Stereo)

16
www.encore-usa.com
Installation
By selecting “Installation”, you can do the following:
Manual Search:
If you want to add new channels in list, you can search for channels manually by
channel numbers and frequency.
Auto Search:
Or you can set it to auto search for new channels.

17
www.encore-usa.com
Upgrade STB:
You can also upgrade the firmware by the following steps:
1. Please download the last firmware from our website (www.encore-usa.com).
2. Unzip this file to a USB storage device or memory card and plug it to the USB port on
the front of the TV converter box.
Note:
The file name may sure is “NEC_EMMA3SLP.UPG”
3. Press “MENU” on the remote control and then select “Settings“.
4. Select “Installation” and then select “Upgrade STB “.
5. Press ”OK”. The system will upgrade automatically after showing “Read Upgrade File”
6. Once it is finished, the system will reboot automatically.
Format Disk:
You can format your USB storage devices in order to use it with the TV converter
box.

18
www.encore-usa.com
Auto standby: On/Off (Default: On)
If you choose auto standby, it will auto power off after 3 hours.
Channel Edit
By selecting “Channel Edit”, you can edit your favorite TV channels/ Radio channels.
or
Use the color buttons to make selection:
Favorite:
Use red color button on remote control to add your favorite channels in favorite
groups list.

19
www.encore-usa.com
Lock:
Use green color button on remote control to set certain TV channels only watched
by password.
And then system will ask you input the password. (Prompt: 1234)
Move:
Use yellow color button on remote control to arrange the order in channels list.
Delete:
Use blue color button on remote control to delete the channel from the list.
Other manuals for ENXTV-DIT -
1
Table of contents
Other Encore Media Converter manuals
Popular Media Converter manuals by other brands

Z3 Technology
Z3 Technology BLD265-SC2 user guide

HDCVT TECHNOLOGY
HDCVT TECHNOLOGY HDV-331 user manual

Optical Systems Design
Optical Systems Design OSD2168M Series Operator's manual

Mitsubishi
Mitsubishi AJ65BT-64AD user manual

AJA
AJA Hi5-4K Installation and operation guide

ELGO Electronic
ELGO Electronic EMAX-RO Series Operation manual