Endomedical Bravo User manual

www.endomedical.ca 3
Information
Important Information .........................................................................4
Specifications.........................................................................................6
Bravo™ Blood Glucose Monitoring System.........................................7
Bravo™ Blood Glucose Test Strip .........................................................8
Bravo™ Blood Glucose Meter ............................................................10
Bravo™ Blood Glucose Meter Display ...............................................11
Preparation
Setting up Your System.......................................................................12
Adjusting the Date and Time ..........................................................................12
Setting the Sound On/OFF...............................................................................15
Setting the ‘Test Result Reset’ .........................................................................16
Checking the System...........................................................................17
Control Solution Testing ..................................................................................18
Comparing the Control Solution Test Results.................................................20
Testing
Using the Lancing Device....................................................................21
Preparing the Lancing Device..........................................................................22
Preparing the Meter and Test Strip.................................................................24
Flagging Post-meal Test Results ......................................................................24
Applying Blood Sample ...................................................................................25
Discarding Used Lancets ..................................................................................27
Alternative Site Testing.......................................................................28
HI and Lo Messages.............................................................................31
Target Blood Glucose Ranges .............................................................32
Additional Functions
Meter Memory ....................................................................................33
Viewing Test Results Stored in the Meter’s Memory......................................33
Setting the Alarm Function ................................................................35
Setting the Post-meal Alarm (PP2 alarm) .......................................................35
Setting the Time Alarm (alarm 1~3)................................................................36
Maintenance
Putting in or Replacing the Batteries.................................................38
Caring for Your System .......................................................................39
Understanding Error and Other Messages ........................................40
General Troubleshooting....................................................................42
Performance Characteristics ...............................................................43
Warranty Information.........................................................................47
TABLE OF CONTENTS

BLOOD GLUCOSE MONITORING SYSTEM
4
www.endomedical.ca 5
To receive safe and optimum system benefits, please read the
entire manual contents before using the system. Please note
the following instructions:
Intended use:
Bravo™ Blood Glucose Monitoring System is used for the
quantitative measurement of the glucose level in capillary
whole blood as an aid in monitoring diabetes management
of individual user effectively.
Bravo™ Blood Glucose Monitoring System should be used
only for self-testing outside the body (in vitro diagnostic
use only). Bravo™ Blood Glucose Monitoring System should
not be used for the diagnosis of diabetes or for testing
newborns. Testing sites include the traditional fingertip
testing along with alternate sites testing on forearm, palm,
thigh and calf.
The following chart explains the symbols you’ll find in the
Bravo™ User Manual, product packaging, and product
inserts.
IMPORTANT INFORMATION: READ THIS FIRST!
Bravo™ Blood Glucose Monitoring System is intended
for self-testing outside the body (in vitro diagnostic use).
chemicals on the test strip to produce a small electrical
current. The Bravo™ Meter detects this electrical current
and measures the amount of glucose in the blood sample.
Bravo™ Blood Glucose Meter is designed to minimize
code related errors in monitoring by using the no-coding
function.
Bravo™ Blood Glucose Meter should be used only with
the Bravo™ Test Strip.
level over 60% or below 20%) may produce inaccurate
results.
consult a healthcare professional immediately.
Bravo™ Meter and lancing device are for single patient
use. Do not share them with anyone including other family
members.
(having low blood pressure) individuals or patients in
shock. Inaccurate low results may occur for individuals
experiencing a hyperglycemic (high blood sugar) or
hyperosmolar state, with or without ketosis. Critically ill
patients should not be tested with blood glucose meters.
If you need assistance, please contact your authorized
Endomedical™ sales representative or visit www.
endomedical.ca for more information.
IMPORTANT INFORMATION
For in vitro diagnostic use
This product fulfills the requirements for Directive 98/79/EC
on in vitro diagnostic medical devices.
Cautions for safety and optimum product use
Do not discard this product with other household-type waste.
Consult instruction for use Manufacturer
Authorized representative Do not reuse.
Batch code Serial number
Use by Temperature limitations
LOT SN
2
!

BLOOD GLUCOSE MONITORING SYSTEM
6
www.endomedical.ca 7
SPECIFICATIONS
Measurement range 1.1 ~ 33.3 mmol/L
Sample size Minimum 0.5 µL
Test time 5 seconds
Sample type Fresh capillary whole blood
Calibration Plasma-equivalent
Assay method Electrochemical
Battery life 1,000 tests
Power Two 3.0 V lithium batteries
(disposable, type CR2032)
Memory 250 test results
Size 93 X 45 X 15 (mm)
Weight 54 g (with batteries)
Product specifications
Temperature 10 ~ 40°C (50 ~ 104°F)
Relative humidity 10 ~ 90%
Hematocrit 20 ~ 60%
Operating ranges
The components of the product are identical to what’s
listed in the meter manual, however you need to check the
meter box for the quantity of strips.
Endomedical™ sales
representative if any component is missing or damaged.
Please contact your authorized Endomedical™ sales
representative or visit www.endomedical.ca.
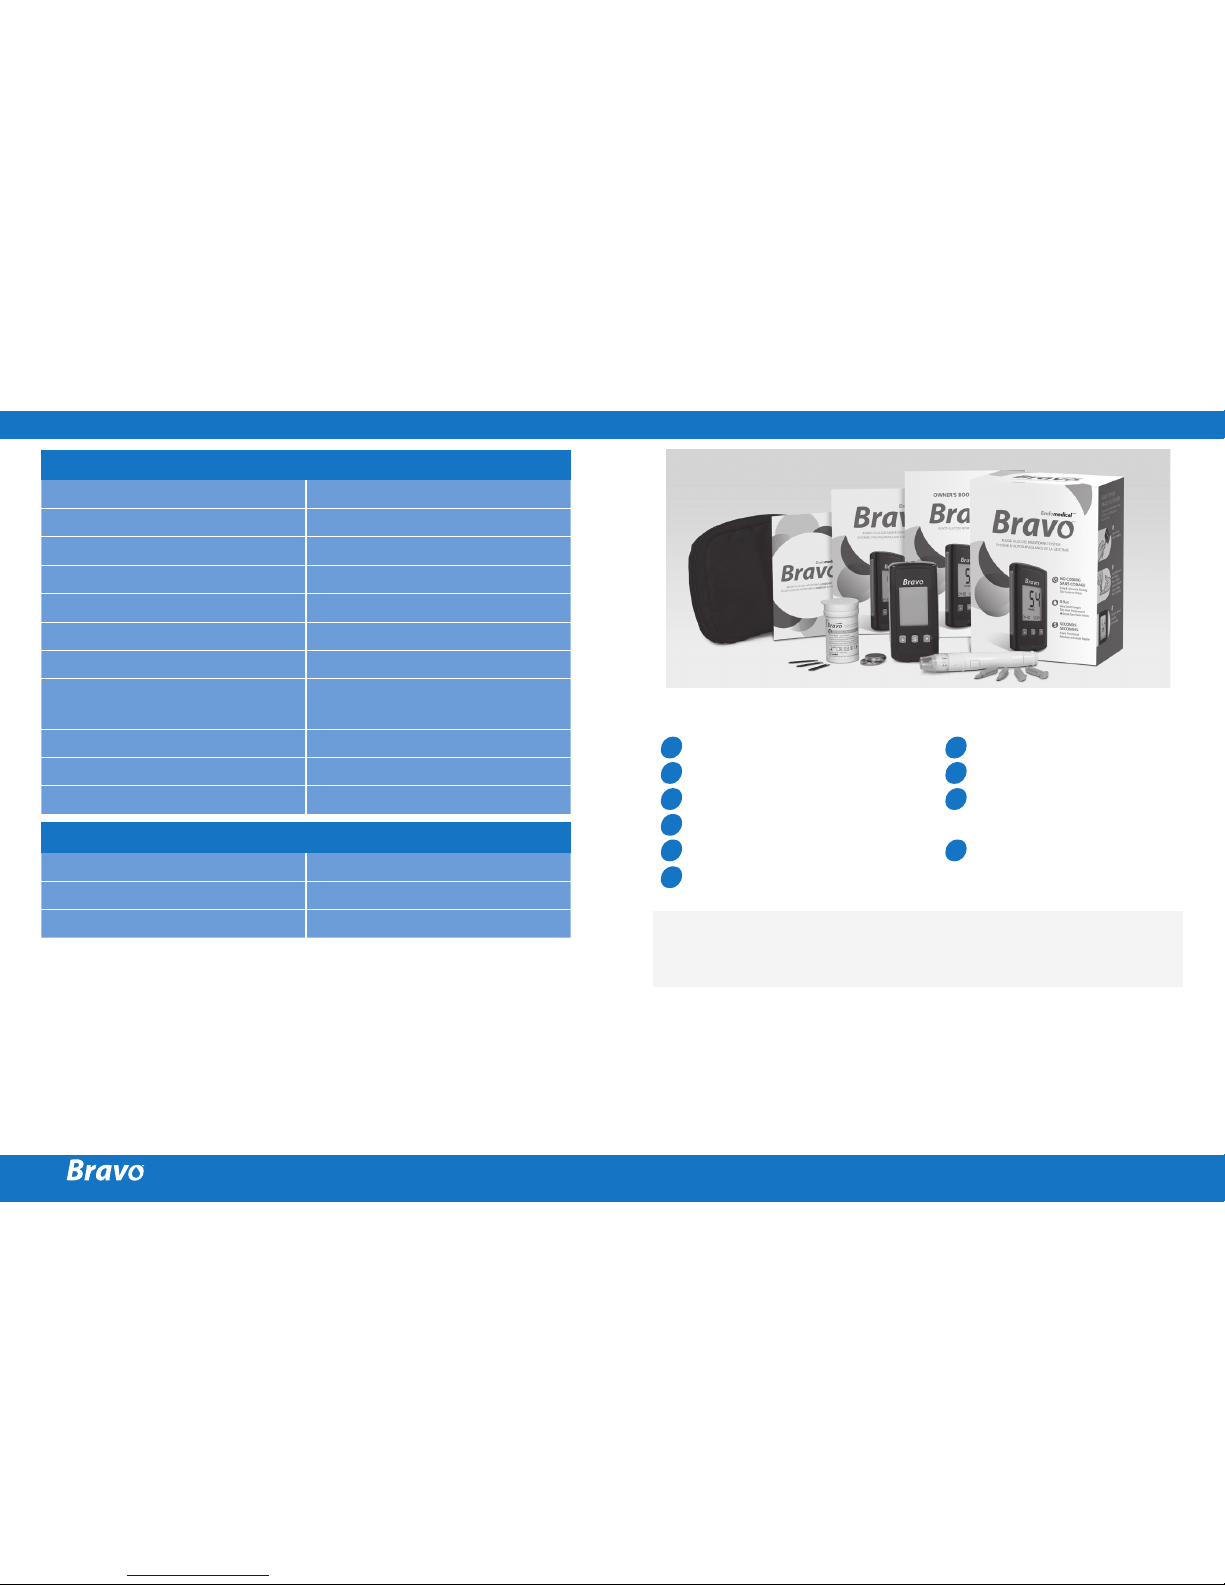
BRAVO™ BLOOD GLUCOSE MONITORING SYSTEM
Components
1Bravo™ Blood Glucose Meter
2 Lancing Device
3Lancets (10)
4Owner’s Booklet
5Quick Reference Guide
6 Warranty Card
7Logbook
8Carrying Case
9
Bravo™ Blood Glucose
Test Strips (10)
Batteries (2)
10

BLOOD GLUCOSE MONITORING SYSTEM
8
www.endomedical.ca 9
The Bravo™ blood glucose monitoring system measures blood
glucose quickly and accurately. It automatically absorbs the
small blood sample applied to the narrow edge of the strip.
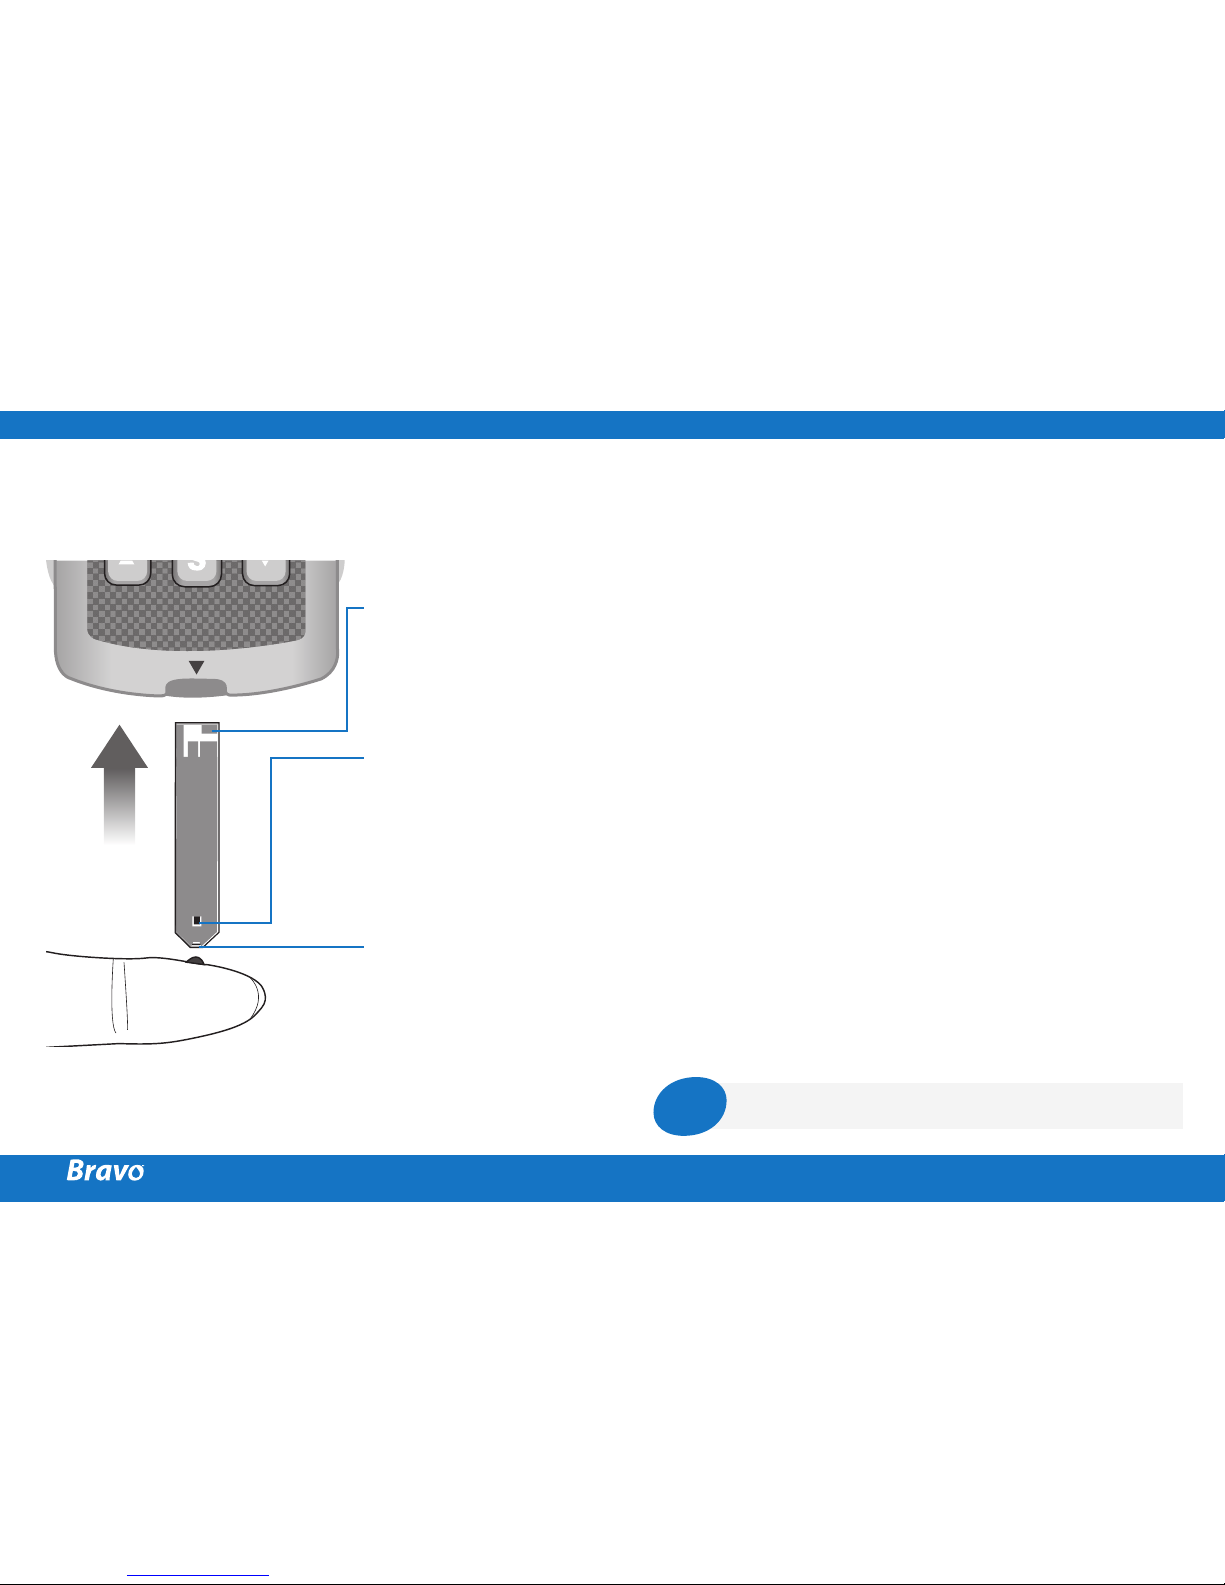
BRAVO™ BLOOD GLUCOSE TEST STRIP
Contact bars
Gently push the test
strip, with its contact
bars facing up, into
the test strip port
of meter
Confirmation window
Check here to see
whether sufficient
blood sample has
been applied
Edge to apply
blood sample
Apply blood sample
here for testing
Insert
Bravo™ test strip should be used only with fresh capillary
whole blood samples.
open a test strip vial, you must record the discard date (date
opened plus six months) in the space provided on the label.
1 ~ 30°C (34 ~ 86°F).
freeze.
and use the strip immediately.
Bravo™ test strip package insert.
IMPORTANT NOTE:
Your meter has been preset and locked to display results in
mmol/L (millimoles of glucose per liter). In some countries,
the meters are preset to display unit in mg/dL (milligrams of
glucose per deciliter).
Check your display to ensure that results are being displayed in
mmol/L. If they are not, contact Endomedical™ at 1-800-282-
6542.
WARNING!
Caution
young children.

BLOOD GLUCOSE MONITORING SYSTEM
10
www.endomedical.ca 11
BRAVO™ GLUCOSE METER
Data Port
Used to transfer data
from the meter to a
computer with a cable
Display
Shows results,
messages
Test Strip Port
Insert test strip here
Button
Selects or changes
information
Button
Selects or changes
information
Button
Turns the meter on/off
and confirms
menu selections
Note
The cable for data transmission to PC can be
ordered
separately. Please contact your authorized
Endomedical™ sales representative or visit www.
endomedical.ca.
BRAVO™ BLOOD GLUCOSE METER DISPLAY
mem
appears when test results
stored in the memory are
displayed
Sound icon
appears only when the
sound is set to OFF
alarm
appears when the time
alarm has been set
check
appears when
test results have
not been saved
Battery icon
indicates meter
battery is running
low and needs to
be replaced
Test results
test results
displaying panel
Post-meal test flag
appears during
post-meal testing
and when post-
meal test results
are displayed
Decimal point
appears when
the blood glucose
measuring unit is
set to mmol/L
Alarm icon
appears when the
post-meal alarm
has been set
Month Day
MinuteHour
mmol/L, mg/dL
unit for measuring
blood glucose
Blood insertion icon
indicates meter is ready for
the application of a drop of
blood or control solution
Note
Your meter has been preset and locked to display
results in mmol/L (millimoles of glucose per liter).
In some countries, the meters are preset to display
unit in mg/dL (milligrams of glucose per deciliter).
Check your display to ensure that results are
being displayed in mmol/L. If they are not, contact
Endomedical at 1-800-282-6542.

BLOOD GLUCOSE MONITORING SYSTEM
12
www.endomedical.ca 13
Press and hold the Sbutton for 3 seconds to enter the SET
mode.
After all settings are finished, press and hold the
S
button for 3 seconds to turn off the meter.
Press or to reach the accurate value. Press and hold to
scroll faster.
SETTING UP YOUR SYSTEM
ADJUSTING THE DATE AND TIME
Entering the SET Mode
Press and hold the
S
button for 3 seconds
to enter the SET mode. After all the
segments flash across the screen, the ‘SET’
character will be displayed on the screen.
Press the
S
button again to enter the year
setting mode.
Setting the Year
Press and release or to adjust until
the correct year appears. Press and hold
button to scroll through the numbers
quickly.
After setting the year, press the
S
button
to confirm your selection and enter the
month setting mode.
1
2
Setting the Month
A number indicating the month will be
blinking on the left corner of the screen.
Press or until the correct month
appears. Press the
S
button to confirm your
selection and enter the date setting mode.
Setting the Date
Press or until the screen displays the
correct date. Press the
S
button to confirm
the date and enter the time setting mode.
Setting the Time
The meter can be set in the AM/PM 12-
hour or the 24-hour clock format. Press
or to select a format. The AM/PM icon is
not displayed in the 24-hour format. After
selecting the format, press the
S
button to
enter the hour setting mode.
3
4
5

BLOOD GLUCOSE MONITORING SYSTEM
14
www.endomedical.ca 15
Setting the Hour
Press or until the correct hour appears.
After the hour is set, press the Sbutton to
enter the minute setting mode.
Setting the Minute
Press or until the correct minute
appears. After setting the minute, press the
Sbutton to enter the sound setting mode.
6
7
Setting the Sound On/OFF
On pressing or , the screen will display
On or OFF. Press the
S
button to confirm
the selection.
The meter will beep in the following
instances if set to On.
meter
the test strip and the test starts
S
button or button
to turn on the meter
button to set the
post-meal (PP2) alarm
test
If the sound is set to OFF, none of the
sound functions will work.
8
Note
Only when the sound is set to OFF, icon appears
on the display.

BLOOD GLUCOSE MONITORING SYSTEM
16
www.endomedical.ca 17
You may check your meter and test strips using
the Bravo™ Control Solution (control A and/
or B). The Bravo™ Control Solution contains a
known amount of glucose and is used to check
that the meter and the test strips are working
properly.
The test strip vials have Bravo™ Control Solution
ranges printed on their labels. Compare the
result displayed on the meter to the Bravo™
Control Solution range printed on the test strip
vial. Before using a new meter or a new vial of
test strips, you may conduct a control solution
test following the procedure on pages 18 ~ 19.
Notes:
Bravo™ Control Solution.
first open a control solution bottle, record the discard date
(date opened plus 3 months) in the space provided on the
label.
at room temperature before testing. Control solution tests
must be done at room temperature (20 ~ 25°C, 68 ~ 77°F).
the first few drops and wipe the tip clean.
temperature of 8 ~ 30°C (46 ~ 86°F).
You may do a control solution test:
control solution instead of blood,
Note
At any stage, if the
S
button is pressed for 3
seconds, setting mode will finish and the meter
will be turned off. Press and hold to scroll
through numbers quickly.
Setting the ‘Test Result Reset’
(Deleting all the saved test results)
In this mode all the test results stored in
the meter can be deleted. Please note that
if you select YES, all the stored test results
will be deleted and cannot be restored.
After the beeper mode is set, press the
S
button to enter the ‘Test Result Reset’
mode. The ‘dEL’character will blink on the
screen.
Press or to alternate between ‘YES’or
‘no’.
To delete all the stored test results, press
the
S
button while the screen displays
‘YES’. Then, all the test results stored in the
meter will be deleted and the screen will
be similar to the picture on the right.
If you do not want to delete the results,
press the
S
button while the screen displays
‘no’. Then, the screen will return to step 2.
See page 12.
9

BLOOD GLUCOSE MONITORING SYSTEM
18
www.endomedical.ca 19
CONTROL SOLUTION TESTING
1
2Shake the Bravo™ Control
Solution bottle before each test.
Remove the cap and squeeze the
bottle to discard the first drop.
Then wipe the tip with a clean
tissue or cloth. After the
symbol appears on the display, apply the solution to the
narrow edge of the test strip until the meter beeps. Make
sure the confirmation window fills completely.
Insert a test strip into the meter’s
test strip port, with the contact
bars facing upwards. Gently push
the test strip into the port until
the meter beeps. Be careful not to
break the strip while pushing it in.
The symbol will be displayed
on the screen.
A test result will appear after the
meter counts down from 5 to 1.
After your control solution result
appears on the display, press for 3
seconds till the ‘check’ appears on the
display. When the ‘check’ is displayed,
the result is not stored in the meter’s
memory and is not included in the 14-
day averages.
Compare the result displayed
on the meter to the range printed
on the test strip vial.
The result should fall within that
range.
Used strips should be discarded
safely in disposable containers.
3
4
Note
The meter may switch off if the control solution
sample is not applied within 2 minutes of the
symbol appearing on the screen. If the
meter turns off, remove the strip, reinsert, and
start from step 1.
Caution
The range printed on the test strip vial is for the
Bravo™ Control Solution only. It does not have any
connection to your blood glucose level.
Note
The Bravo™ Control Solution can be purchased
separately. Please contact your authorized
Endomedical™ sales representative.
test results and you feel that the meter or test strips are not
working properly,

BLOOD GLUCOSE MONITORING SYSTEM
20
www.endomedical.ca 21
You will need a lancing device in order to collect a blood
sample.
You may use the lancing device contained in the Bravo™ Blood
Glucose Monitoring System or any other medically approved
lancing device.
patient. It must not be used on more than one person
due to risk of infection.
necessary, a small amount of alcohol on a soft cloth or
tissue may be used.
USING THE LANCING DEVICE
Repeated puncturing at the same sample site may
cause pain or skin calluses (thick hard skin). Choose
a different site each time you test.
Note
To avoid infection when drawing a sample, use
a lancet only one time, and:
Caution
!
Adjustable Tip
Lancet Holder
Sliding Barrel
Release Button
Ejection System
Lancet
Comparing the Control Solution Test Results
The test result of each control solution should be within the
range printed on the label of the test strip vial. Repeat the
control solution test if the test result falls outside of this range.
Out of range results may occur due to the following factors:
If results continue to fall outside the range printed on the
test strip vial, the Bravo™ Test Strip and Meter may not be
working properly. Do not use your system and contact
Endomedical™ sales representative.
not shaken well,
control solution were exposed to high
or low temperatures,
solution was not discarded or the tip
of the bottle was not wiped clean,
properly.
Repeat the control
solution test by
referring to the
“Notes” on page
17.
expiration date printed on the bottle,
discard date (the date the bottle was
opened plus three (3) months),
contaminated.
Discard the used
control solution
and repeat the test
using a new bottle
of control solution.
Situations Actions

BLOOD GLUCOSE MONITORING SYSTEM
22
www.endomedical.ca 23
1
2
3
Select a desired depth of
one-to-five (1-5) on lancing
device’s adjustable tip.
Rotate ring to align desired
number with arrow.
A beginning setting of three
(3) is recommended.
To cock the lancing device,
hold the body in one hand.
Pull the sliding barrel on
with the other hand. The
lancing device is cocked
when you feel a click.
4
5
The skin depth to get blood samples will vary for
various people at different sample sites.
The lancing device’s adjustable tip allows the
best depth of skin penetration for an adequate
sample size. A beginning setting of three (3) is
recommended.
Note
Wash hands and fingertip
sample site with soap and
warm water. Rinse and dry
thoroughly.
Unscrew and remove the
lancing device tip.
Firmly insert a new lancet
into the lancet holder. Hold
the lancet firmly. Gently
twist to pull off protective
disk. Save disk to recap
lancet after use. Replace
lancing device tip.
PREPARING THE LANCING DEVICE

BLOOD GLUCOSE MONITORING SYSTEM
24
www.endomedical.ca 25
Insert a test strip with the
contact bars facing upwards
into the meter’s test strip
port. Push the strip in gently
until the meter beeps. Be
careful not to bend the test
strip. The symbol
will appear on the screen.
If you want to attach a post-meal
flag ( ) to a test result, press
and hold for 3 seconds after
inserting the test strip.
The post-meal flag ( ) and the
symbol will appear on the
screen. The test result will also be
displayed with the post-meal flag
( ).
If you do not want to save the
result as a post-meal test, move
on to the step 8 after the step 6.
Flagging Post-meal Test Results
The meter allows you to flag a result of a post-meal test
with icon. The post-meal test flag ( ) can be attached
just before applying the blood sample. Once you attach the
post-meal flag ( ) to the test results, it cannot be deleted.
6
7
Obtain a blood sample using
the lancing device. Place the
device against the pad of
the finger. The best puncture
sites are on the middle or
ring fingers. Press the release
button. Remove the device
from the finger.
Wait a few seconds for a blood
drop to form.
A minimum volume of 0.5
microliter is needed to fill the
confirmation window. (Actual
size of 0.5 µL: )
After the symbol
appears on the screen, apply
the blood sample to the
narrow end of the test strip
till the meter beeps. If the
confirmation window is not
filled before the meter finishes
counting down then discard
the test strip and insert a new
one.
If confirmation window is
not filled in time because
of abnormal viscosity or
insufficient volume, Er4
message will appear.
8
9
PREPARING THE METER AND TEST STRIP APPLYING BLOOD SAMPLE
Good
Sample
Insufficient
Sample

BLOOD GLUCOSE MONITORING SYSTEM
26
www.endomedical.ca 27
The meter may switch off if the blood sample is
not applied within 2 minutes of the symbol
appearing on the screen. If the meter turns off,
remove the strip, reinsert it and start from step 6.
The lancet is for single use only. Never share
or reuse a lancet. Always dispose of lancets
properly.
Note
Caution
The test result will appear after
the meter counts down from 5
to 1.
The result will be automatically
stored in the meter’s memory.
If the test strip is removed after
the test result is displayed, the
meter will automatically switch
off after 3 seconds. Discard used
test strips safely in disposable
containers.
10
DISCARDING USED LANCETS
Unscrew lancing device tip.
Place protective cover on
lancet. Push the lancet ejector
forward with the thumb and
simultaneously pull out the
sliding barrel to dispose of
the used lancet in a proper
biohazard container.
1
2

BLOOD GLUCOSE MONITORING SYSTEM
28
www.endomedical.ca 29
What is Alternative Site Testing(AST)?
Usually, when someone tests their glucose, they take the
blood sample from the tip of the finger. However, since there
are many nerve endings distributed there, it can be quite
painful. When doing a glucose test, using different parts
of the body such as the arms, palms, thighs, and calves can
reduce the pain during testing. This method of testing with
different parts of the body other than the fingertips is called
Alternative Site Testing. While AST may reduce the pain
during testing, it may not be simple for everyone and the
following precautions should be observed during testing.
Alternative Site for Testing
(during the two hours after a meal, insulin dose or
exercise)
test value
(hypoglycemic unawareness)
machinery
ALTERNATIVE SITE TESTING
Please understand the following things before testing outside
of the fingertip (arms, palm, thighs, calves). The capillary
blood of the fingertip shows the change in glucose more
rapidly than AST. Therefore, the test results from the fingertip
test and AST may differ. This is because things such as lifestyle
and ingested food have an effect on glucose levels.
Vacuum-assisted lancing devices are useful in collecting blood
from alternative sites. It is possible to use regular lancing
devices for alternative sites by piercing deeper than when
sampling from fingertips and pressing slightly against the skin.
ACCEPTABLE SITUATIONS FOR AST
SITUATIONS REQUIRING FINGERTIP TEST
Alternative Site Blood Sampling (forearm, palm, thigh, calf)
Select a clean, soft and fleshy sample site area free of visible
veins and hair and away from bones. Gently massage the
sample site to help blood circulation to minimize result
differences between fingertip and alternative site sampling.
Firmly press and hold the lancing device against site. Wait
until the skin surface under the lancing device changes color.
Then press the release button while continuing to apply
until sufficient (at least 0.5 µL, actual size: ) blood is drawn.
Carefully lift the lancing device away from your skin.

BLOOD GLUCOSE MONITORING SYSTEM
30
www.endomedical.ca 31
AST PRECAUTIONS HI AND LO MESSAGES
hypoglycemia.
retest using the fingertip test. If the test results do not
reflect your opinion, please consult your healthcare
professional.
treatment method.
person to person.
professional.
HI Message
The meter displays results between 1.1
~ 33.3 mmol/L. HI appears when the
blood glucose level is more than 33.3
mmol/L and indicates hyperglycemia.
If the HI is displayed again on
retesting, please contact your
healthcare professional immediately.
Lo Message
Lo appears when the result is less
than 1.1 mmol/L and indicates
hypoglycemia.
If the Lo is displayed again on
retesting, please contact your
healthcare professional immediately.
Please contact your authorized Endomedical™
sales representative if such messages are displayed
even if you do not have hyperglycemia or
hypoglycemia.
If the sample drop of blood runs or spreads due to
contact with hair or with a line in you palm, do
not use that sample. Try puncturing again in a
smoother area.
Results from alternative site and fingertip samples
may differ from each other as there is a time lag
for the glucose
levels to reach the same value.
Use a fingertip for drawing
if you suffer from
hypoglycemia or have experienced hypoglycemic
shock or symptoms.
Note
Note
Note

BLOOD GLUCOSE MONITORING SYSTEM
32
www.endomedical.ca 33
TARGET BLOOD GLUCOSE RANGES
Reminders
Time of day
Your target ranges from
your healthcare professional
Before breakfast
Before lunch or dinner
1 hour after meals
2 hours after meals
Between 2 a.m. and 4 a.m.
Blood Glucose Targets for Most People with Diabetes
A recommended target for fasting blood glucose or glucose
before meals is 4.0 - 7.0 mmol/L. A recommended target for
blood glucose 2 hours after eating is 5.0 to 10.0 mmol/L.
Reference
Canadian Diabetes Association, 2008. Clinical Practice
Guidelines for the Prevention and Management of Diabetes
in Canada.
These targets are intended to be a guide. Please discuss your
blood glucose targets with your healthcare professional.
Press the or
S
button
to turn the meter on. The
current date and time will
be displayed on the bottom
of the screen for 2 seconds,
followed by the average
value and the number of the
test results saved within the
last 14 days.
Press to view the average
value and the number of
tests performed before
eating a meal for the last 14
days. On pressing again,
the average value and the
number of tests performed
post-meals for the same
period will appear on the
screen.
1
2
METER MEMORY
The meter can save up to 250 glucose test results with time
and date. If the memory is full, the oldest test result will be
deleted and the latest test result will be stored.
The meter calculates and displays the averages of total test
results, pre-meal test results, and post-meal ( ) test results
from the last 14 days.
VIEWING TEST RESULTS STORED IN THE METER’S
MEMORY
The number of
tests
The number of
pre-meal tests
The number of
post-meal tests
button
button

BLOOD GLUCOSE MONITORING SYSTEM
34
www.endomedical.ca 35
On pressing , the latest test result saved in the
meter’s memory will be displayed on the screen
along with the date and time. Press and hold to
scroll through the test results.
Note
Use the button to scroll through the test results, starting
from the most recent and ending with the oldest. Press
to return to the result seen previously.
After checking the stored test result, press the
S
button to
turn off the meter.
Setting the PP2 alarm On
Without inserting a test strip,
press and hold for 3 seconds
to set the post-meal alarm. The
‘PP2’character, the bell ( ) icon
and then the ‘On’character will
be displayed. The screen will
then automatically change to
the memory check mode.
At this time, the bell ( ) icon,
indicating that the PP2 alarm
has been set, will be displayed
on the screen.
Setting the PP2 alarm OFF
To turn off the PP2 alarm, press
and hold for 3 seconds. The
‘PP2’character, the bell ( ) icon
and then the ‘OFF’character
will appear on the screen.
Then the screen will change
automatically to the memory
check mode without the bell
( ) icon being displayed.
1
2
SETTING THE ALARM FUNCTION
SETTING THE POST-MEAL ALARM (PP2 ALARM)
Four types of alarms can be set in the meter: one post-meal
alarm (PP2 alarm) and three time-set alarms (alarm1 ~ 3).
The PP2 alarm goes off 2 hours after setting the alarm.
The alarms ring for 15 seconds and can be silenced by
pressing , or the
S
button or by inserting a test strip.
3
Icon vanishes

BLOOD GLUCOSE MONITORING SYSTEM
36
www.endomedical.ca 37
Without inserting a test strip,
press and the
S
button
simultaneously for 3 seconds to
enter the time alarm mode. The
‘alarm1’will be displayed while
the ‘OFF’ blinks on the screen.
On pressing , the ‘alarm1’is set
and the ‘On’is displayed on the
screen. Press again to cancel
the ‘alarm1’. The ‘OFF’will blink
on the screen.
Press to adjust the time of the
‘alarm1’. A number representing
the time will blink on the screen.
Press to set the time. Press
to end.
On pressing , the number
indicating the minute will start
blinking. Press to set the
accurate minute.
Press the
S
button to finish
and to enter the ‘alarm 2’
mode. Repeat steps 2 to 5 to
set the remaining time alarms
(alarm 2 ~ 3).
Press the
S
button for 3
seconds to finish and turn the
meter off.
SETTING THE TIME ALARMS (ALARM 1 ~ 3)
14
25
36

BLOOD GLUCOSE MONITORING SYSTEM
38
www.endomedical.ca 39
PUTTING IN OR REPLACING THE BATTERIES
Use a soft cloth or tissue to wipe the meter exterior.
If necessary, the soft cloth or tissue might be dipped in a small
amount of alcohol.
Do not use organic solvents such as benzene, or acetone, or
household and industrial cleaners that may cause irreparable
damage to the meter.
Store all the meter components in the portable case to
prevent loss.
Caution:
extended period of time.
test strip port.
such as cell phones and microwave ovens.
Bravo™ Meter should be used only with Bravo™ strips.
prevent loss.
CARING FOR YOUR SYSTEM
Removing the meter batteries will not affect your
stored result. However, you may need to reset
your meter settings. See pages 12 ~ 15.
Note
Make sure the meter is turned off.
Push the cover in the direction
of the arrow to open the battery
compartment.
Remove the old batteries one by
one by lifting with the index finger
and pulling with your thumb and
index fingers as shown in the
figure on the right. Insert two new
batteries with the + side facing up
and make sure the batteries are
inserted firmly.
Place the cover on the battery
compartment. Push down until you
hear the tab click into place.
1
2
3
The Bravo™ Meter comes with two 3.0 V lithium batteries.
Before using the meter, check the battery compartment and
insert batteries if empty.
When the icon appears on the display for the first time,
the battery should be replaced as soon as possible.
The test results might not be saved if the battery runs out.

BLOOD GLUCOSE MONITORING SYSTEM
40
www.endomedical.ca 41
A used test strip
was inserted.
Repeat the test with
a new test strip.
The blood or control
solution sample was
applied before the
symbol
appeared.
Repeat the test with
a new test strip and
wait until the
symbol appears
before applying the
blood or control
solution sample.
The temperature
during the test was
above or below
the operating
range.
Move to an area
where
the
temperature is
within the
operating range (10
~ 40°C / 50 ~ 104°F)
and repeat the test
after the meter
and test strips
have reached a
temperature within
the operating
range.
UNDERSTANDING ERROR AND OTHER MESSAGES
MESSAGE WHAT IT MEANS WHAT TO DO MESSAGE WHAT IT MEANS WHAT TO DO
WHAT TO DO
The blood sample
has abnormally
high viscosity or
insufficient volume.
Repeat the test
after inserting
a new test strip.
This error message
may appear when
the wrong blood
glucose test strip
is used instead
of Bravo™ blood
glucose test strip.
Repeat test after
inserting a Bravo™
test strip.
There is a problem
with the meter.
Do not use the
meter.
Contact
your authorized
Endomedical™ sales
representative.
If the error messages persist, contact your
authorized Endomedical™ sales representative.
Note
Table of contents
Popular Blood Glucose Meter manuals by other brands

McKesson
McKesson TRUEresult owner's guide

EPS Bio Technology
EPS Bio Technology EasyPlus mini R13N user manual

Accu-Chek
Accu-Chek Performa Connect Getting started guide

Dexcom
Dexcom G4 Platinum quick start guide

Beurer
Beurer GL30 mg/dL Instructions for use

Bayer HealthCare
Bayer HealthCare Ascensia DEX2 user guide