Energy Intelligence miniUPS User manual


Installation & Operating Manual Page ii
INSTRUCTION MANUAL
1GENERAL INFORMATION......................................................................................................3
2PRE-INSTALLATION CHECKLIST.........................................................................................4
Voltage and Polarity Check....................................................................................................................4
Total Current Check (for dual device only) ............................................................................................4
Validate Adapter Power .........................................................................................................................4
312V Single Device Installation...............................................................................................5
Step 1 –Connect the Adaptor................................................................................................................5
Step 2 –Connect your device................................................................................................................5
4Single Device Installation (Jio/Syrotech/Netlink/BSNL/Alphion/Nokia-2425) .................6
Step 1 - Connect the Adaptor ................................................................................................................6
Step 2 - Connect the Voltage Equalizer Cable ......................................................................................6
Step 3 –Connect your device................................................................................................................6
59V/5V/19V Single Device Installation....................................................................................7
Step 1- Connect the Adaptor .................................................................................................................7
Step 2 - Connect the Voltage Converter Cable .....................................................................................7
Step 3 –Connect your device................................................................................................................7
612V Dual Device Installation..................................................................................................8
Step 1- Connect the Adaptor .................................................................................................................8
Step 2 - Connect the Splitter(Y) Cable...................................................................................................8
Step 3 –Connect your device................................................................................................................8
7One 12V and One 9V/5V/19V Device Installation................................................................9
Step 1- Connect the Adaptor .................................................................................................................9
Step 2 - Connect the Splitter(Y) Cable...................................................................................................9
Step 3 –Connect your 12V device ........................................................................................................9
Step 4 –Connect your 9V/5V/19V Device.............................................................................................9
8Normal Operation & Turning OFF...................................................................................... 10
9Precautions .......................................................................................................................... 10
10 Unique Configurations................................................................................................... 10
11 Customer Service and Support..................................................................................... 11
Email Us...............................................................................................................................................11
WhatsApp Us .......................................................................................................................................11
Call Us..................................................................................................................................................11
Warranty Policy....................................................................................................................................11
Installation & Operating Manual
3
1 GENERAL INFORMATION
Congratulations on purchasing the miniUPS. Our products are designed and built for
the Indian tropical climate and unreliable grid. With Patent Pending
Technology, miniUPS from Energy Intelligence uses superior quality Electrical Vehicle
Grade batteries and comes with best in category 3 year warranty and an expected
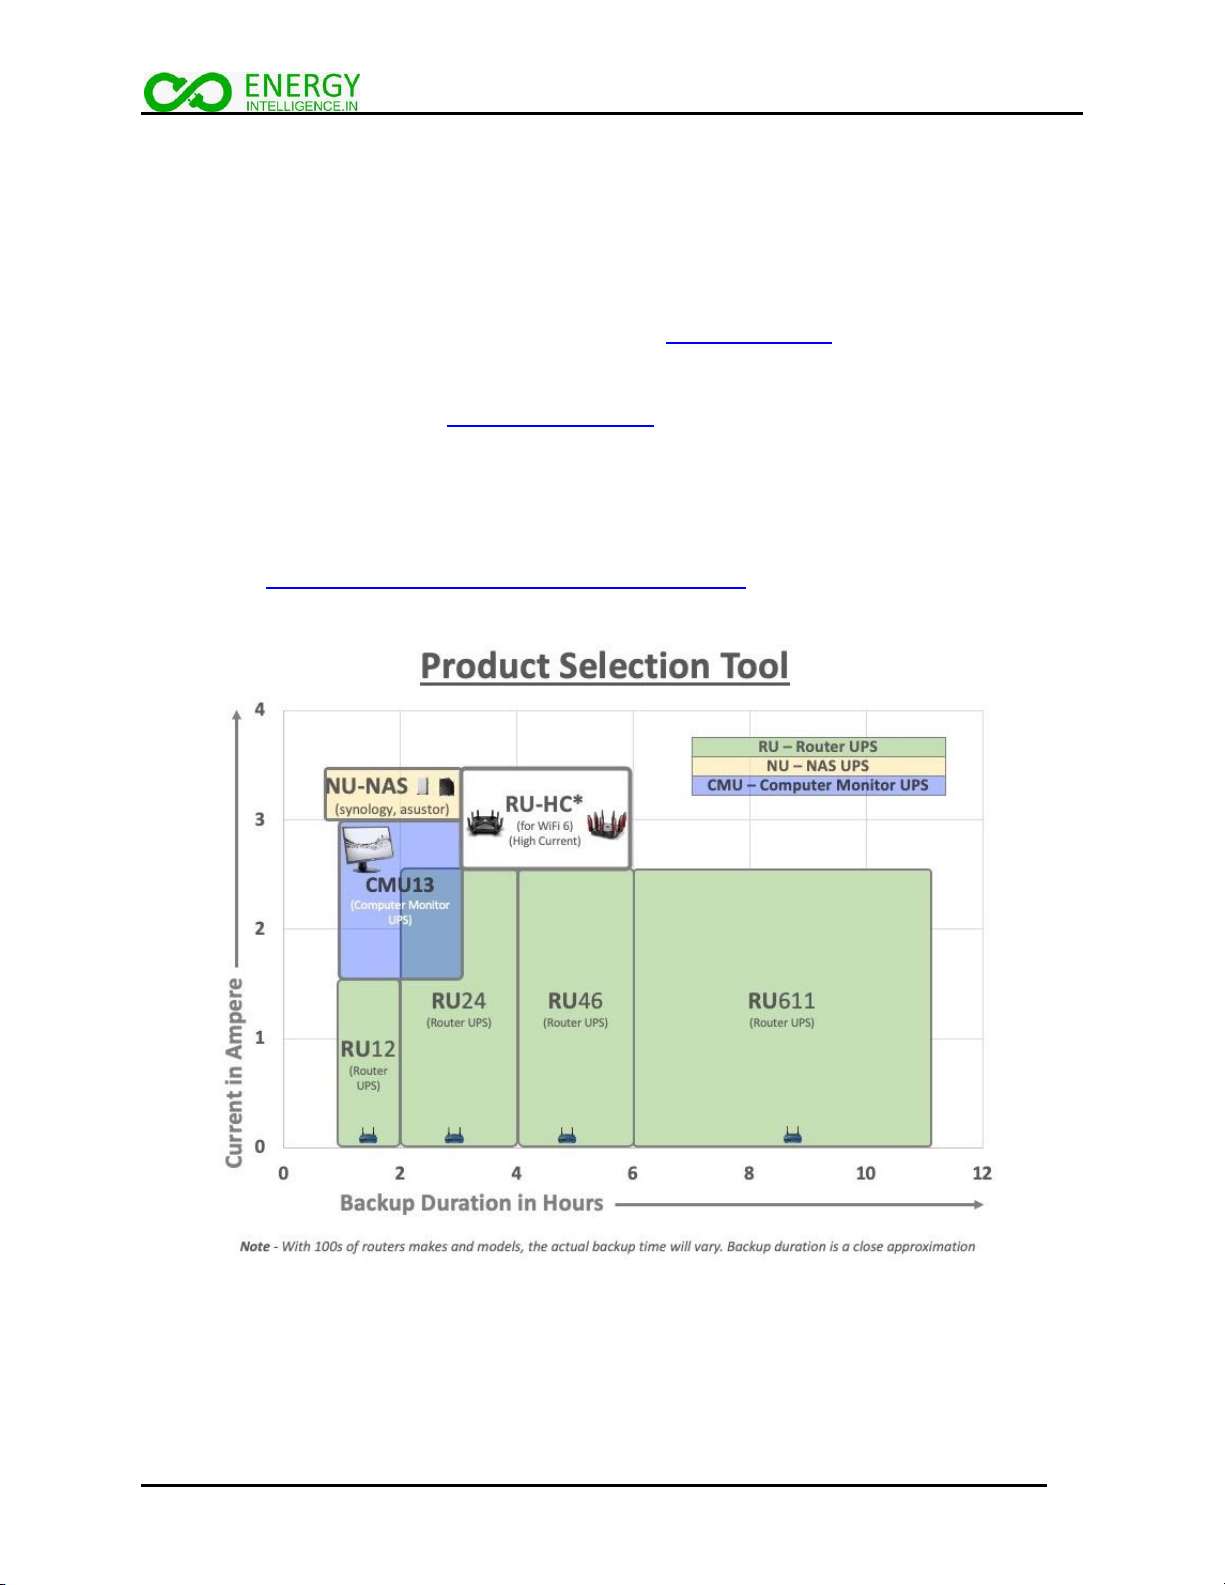
battery life of 5 years. Ours is the only brand with models for 1 - 11 hours of backup,
12/9/5/19V configuration, 0.5 - 3.5A consumption (at 12V) and single/dual device
configuration. We also have BUILD-TO-ORDER capability.
This guide will help you ensure that you get the most of your UPS.
Depending on your need there are multiple configurations, and this guide will help you
configure the setup correctly. In case you need further help, we are just a call away.
Contact us https://energyintelligence.in/pages/contact-us

Installation & Operating Manual
4
2 PRE-INSTALLATION CHECKLIST
Voltage and Polarity Check
Ensure that the operating voltage of the device is same as that of the UPS that you
have ordered. To check operating voltage of the device please check the voltage rating
given at the back of device or check the output voltage rating of original adaptor
provided by the device manufacturer.
Please refer to picture above. Make sure that your adapter voltage matches the UPS
that you have ordered. If Voltage ratings do not match, DO NOT proceed with the
installation and Contact Us.
Also make sure that the polarity indicator shows the center pin is positive (+). Most
adapters have this set up in very rare cases the center is negative. In that case do not
use the UPS and Contact Us.
Based on the configuration you ordered, follow the instructions in following sections. In
case of any questions, please Contact Us.
Total Current Check (for dual device only)
If you are using miniUPS in dual device configuration, please check that the sum of
currents of both the devices should not be more than the rated current of miniUPS.
Current ratings of miniUPS is 2.5A or 3.5A. All the UPS rating (2.5A or 3.5A) is specified
at 12V. If you are not sure of you set up and the model that will work for you, please
Contact Us.
Validate Adapter Power
Connect the adaptor to power and make sure the indicator light of adaptor turns on. If
you are using your existing adaptor, make sure it is 12V. In some
models/configurations, the adaptor is provided by us.

Installation & Operating Manual
5
3 12V SINGLE DEVICE INSTALLATION
Step 1 –Connect the Adaptor
Connect the 12V adaptor supplied with your router/CCTV/Cordless phone or the one
supplied with your UPS. Both the LEDs inside the UPS will turn ON. The device is
shipped turned off for safe transportation and will turn on only when powered.
Step 2 –Connect your device
Connect the output cable of miniUPS to the device i.e. router/CCTV/Cordless phone.
Important - If the output jack does not match your router jack, do not force. Please
contact us
WiFI Router
Default Output Cable
1
2
Installation & Operating Manual
6
4 SINGLE DEVICE INSTALLATION
(JIO/SYROTECH/NETLINK/BSNL/ALPHION/NOKIA-2425)
Step 1 - Connect the Adaptor
Connect the 12V adaptor supplied with your router/CCTV/Cordless phone or the one
supplied with your UPS. Both the LEDs inside the UPS will turn ON. The device is
shipped turned off for safe transportation and will turn on only when powered.
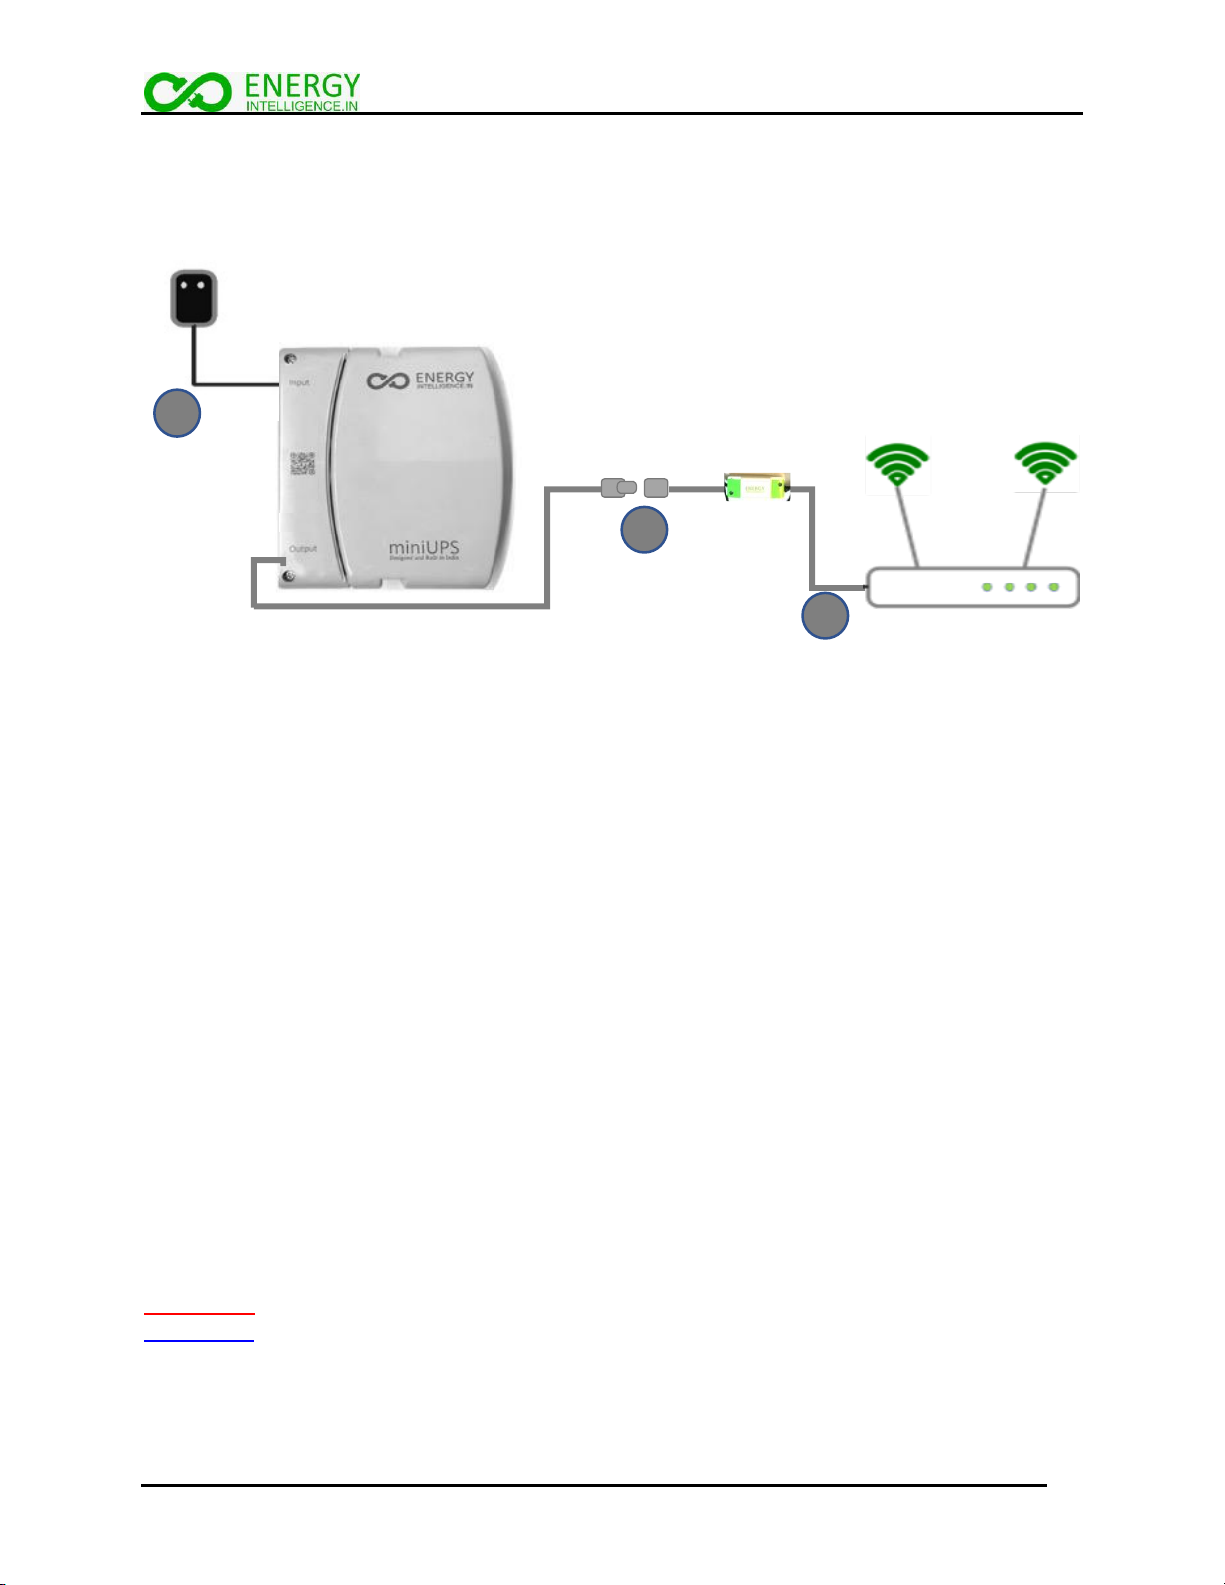
Step 2 - Connect the Voltage Equalizer Cable
Connect the output cable of the UPS to the female port of provided Voltage Equalizer
Cable.
Step 3 –Connect your device
Connect the output of special cable to the Jio / Syrotech / Netlink / BSNL / Alphion /
Nokia-2425 device.
Important - If the output jack does not match your router jack, do not force. Please
contact us.
Voltage Equalizer Cable
WiFI Router
Default Output Cable
1
2
3
Adaptor
Installation & Operating Manual
7
5 9V/5V/19V SINGLE DEVICE INSTALLATION
Step 1- Connect the Adaptor
Connect the 12V adaptor supplied with your UPS. Both the LEDs inside the UPS will
turn ON. The device is shipped turned off for safe transportation and will turn on only
when powered.
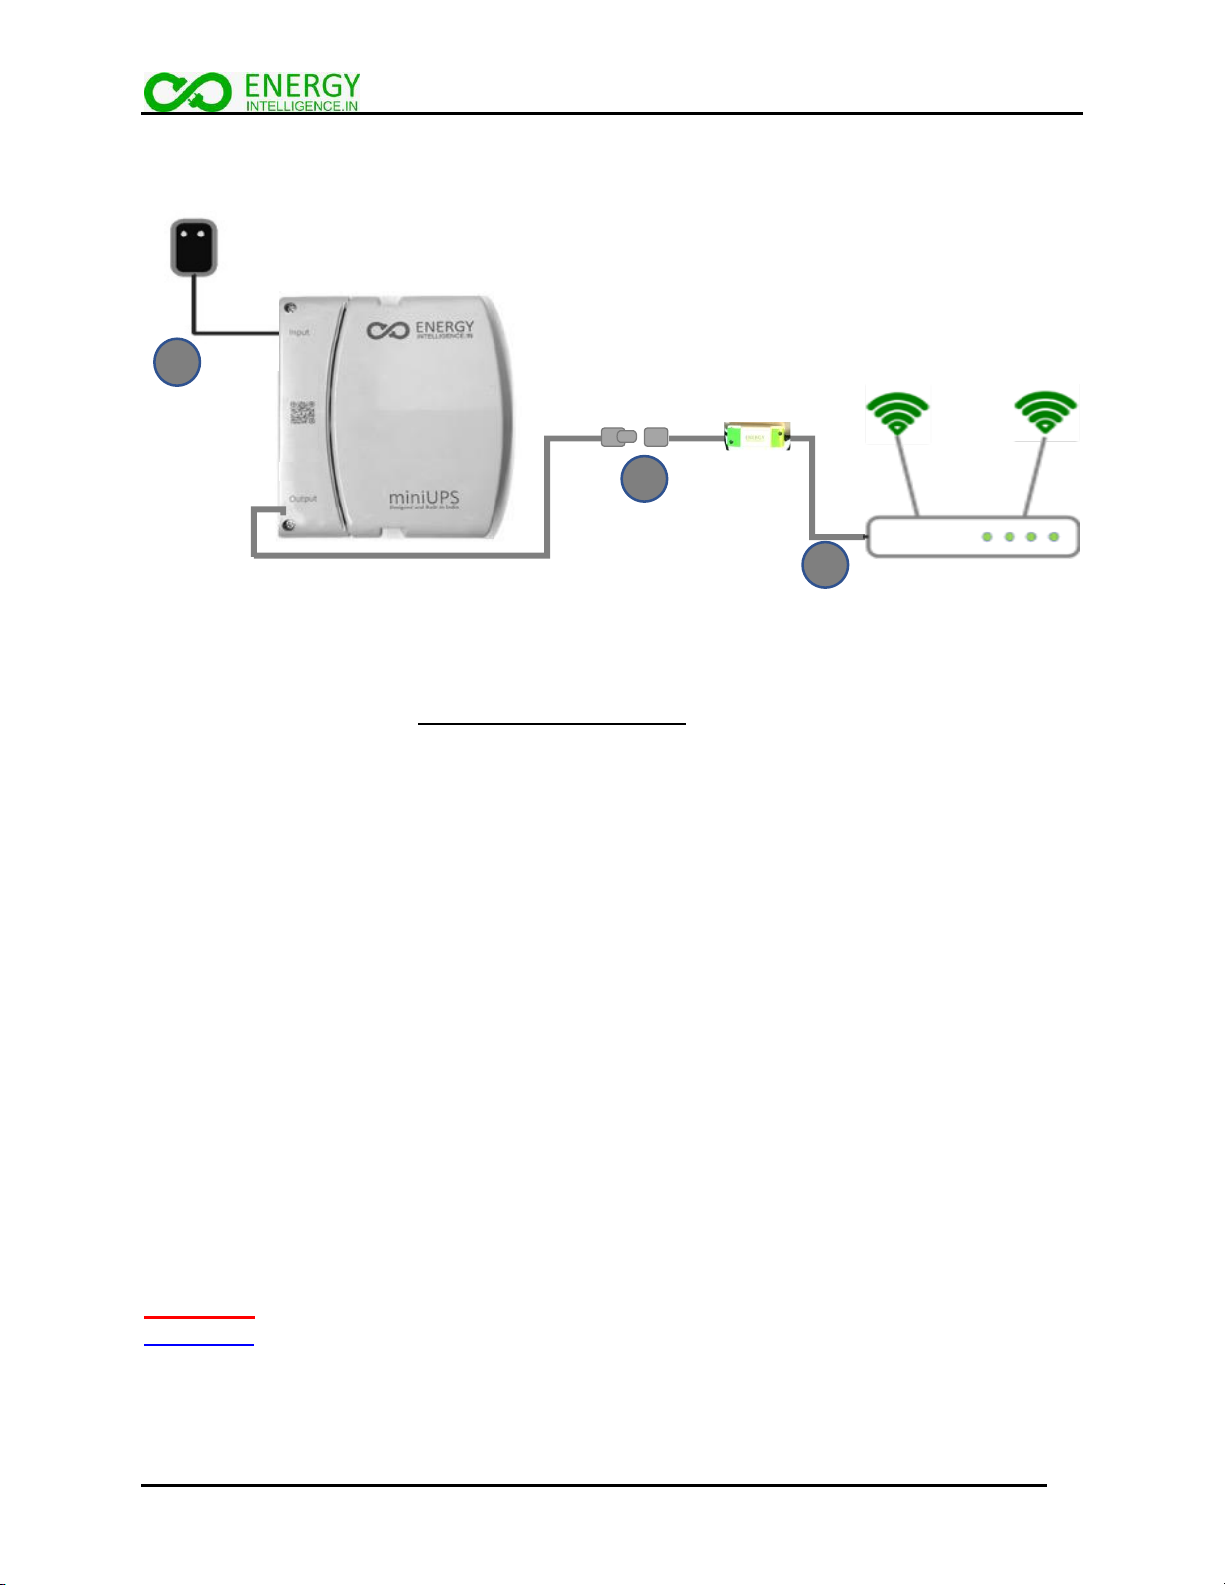
Step 2 - Connect the Voltage Converter Cable
Connect the output cable of the UPS to the female port of provided Voltage Converter
Cable.
Step 3 –Connect your device
Connect the output of special cable to your 9V/5V/19V device.
Important - If the output jack does not match your router jack, do not force. Please
contact us.
Voltage Converter Cable
WiFI Router
Default Output Cable
1
2
3
Installation & Operating Manual
8
6 12V DUAL DEVICE INSTALLATION
Step 1- Connect the Adaptor
Connect the 12V adaptor supplied with your router/CCTV/Cordless phone or the one
supplied with your UPS. Both the LEDs inside the UPS will turn ON. The device is
shipped turned off for safe transportation and will turn on only when powered.
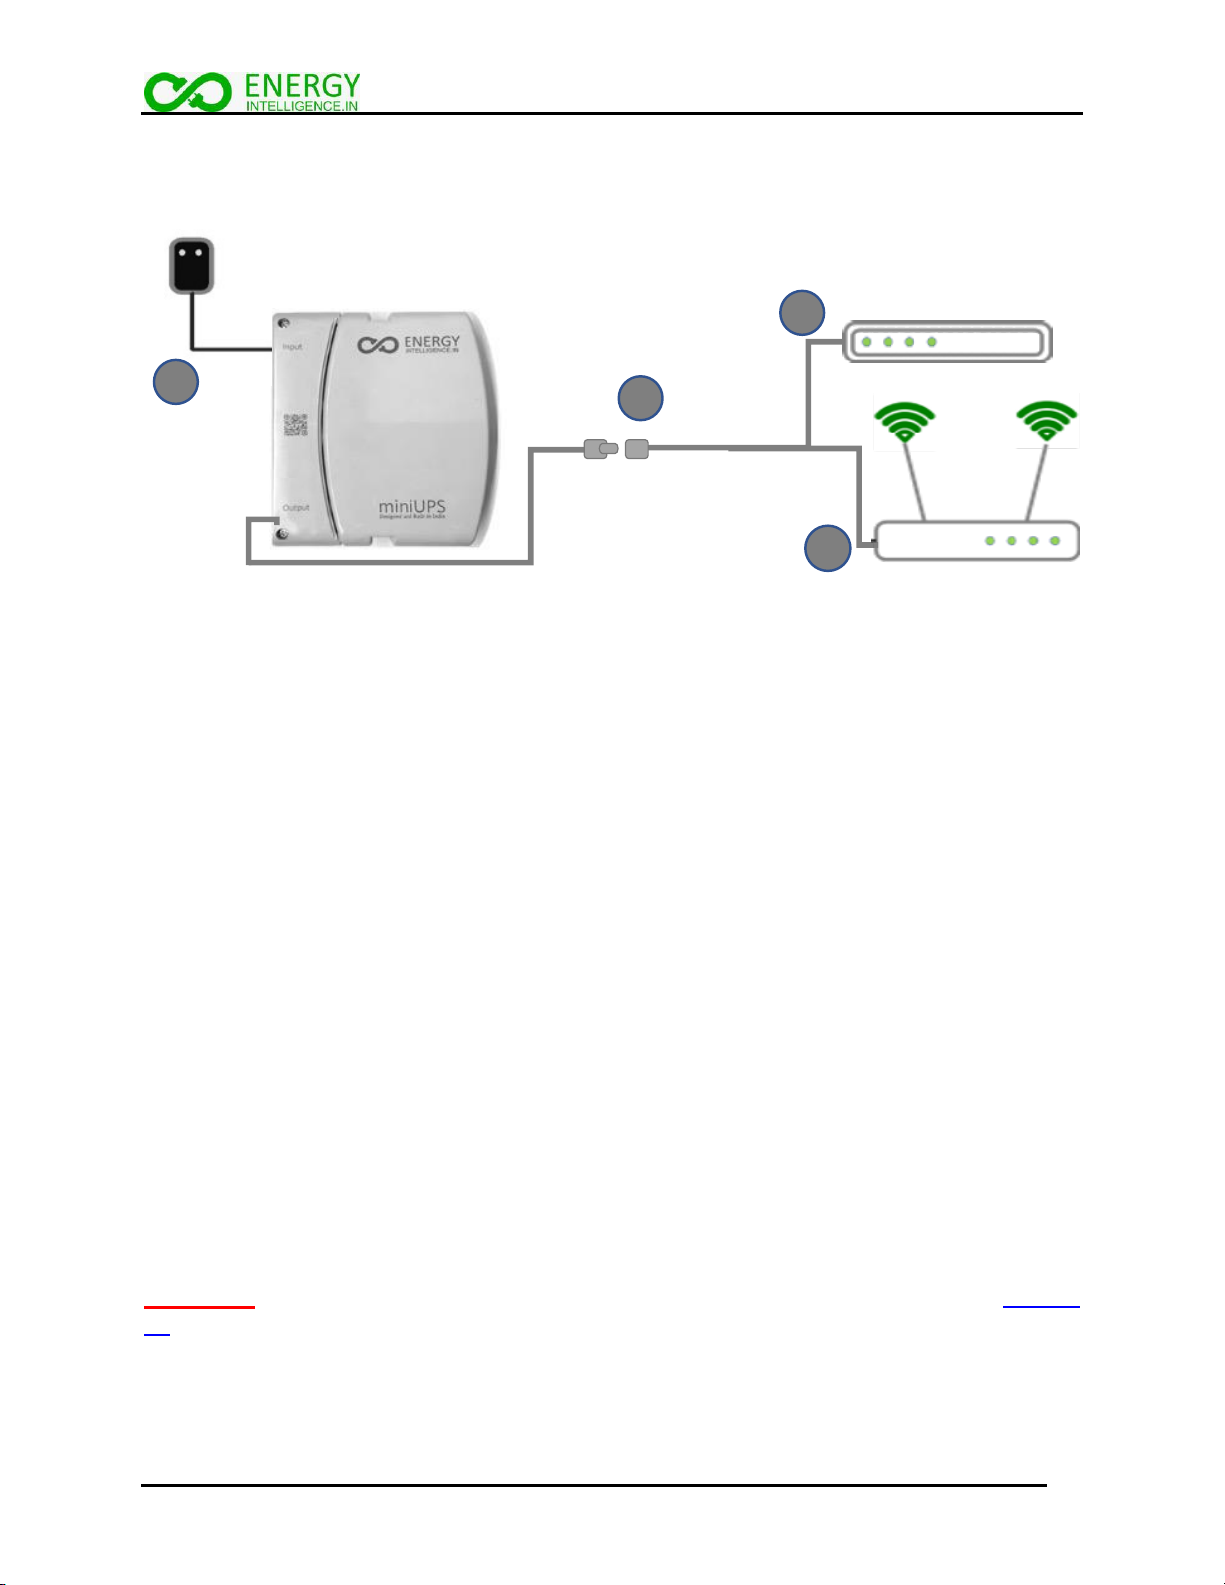
Step 2 - Connect the Splitter(Y) Cable
Connect the output cable of miniUPS to the female port of provided special Y (splitter)
cable.
Step 3 –Connect your device
Connect the output of this splitter cable to the respective devices after making sure that
the devices have a 12V rating.
Important - If the output jack does not match your router jack, do notforce. Please contact
us.
Dual Device
Splitter(Y) cable
WiFI RouterDefault Output Cable
Cable Modem
2
3
1
3
Adaptor

Installation & Operating Manual
9
7 ONE 12V AND ONE 9V/5V/19V DEVICE INSTALLATION
Step 1- Connect the Adaptor
Connect the 12V adaptor supplied with your UPS. Both the LEDs inside the UPS will
turn ON. The device is shipped turned off for safe transportation and will turn on only
when powered.
Step 2 - Connect the Splitter(Y) Cable
Connect the output cable of miniUPS to the female port of provided special Y (splitter)
cable.
Step 3 –Connect your 12V device
Connect one output of Y cable to the 12V device.
Step 4 –Connect your 9V/5V/19V Device
Connect the second output of the Y cable to the female port of provided voltage
converter cable. Connect the output of voltage converter cable to the 5V/9V/19V device.
Important - If the output jack does not match your router jack, do notforce. Please contact
us.
Dual Device Y cable
WiFI Router (12V)Default Output Cable
9V/5V/19V Device
2
3
14
Voltage
Converter
Cable

Installation & Operating Manual
10
8 NORMAL OPERATION & TURNING OFF
During normal operation of the miniUPS, you do not need to do anything. When there is
power cut, the UPS provides power to your devices until it runs out of backup. There are
no replaceable parts in the UPS.
Some models have a switch, and the newer models are designed for continuous
operation like a networking equipment without a switch. Unlike mobile phone and other
router UPS the battery does not degrade drastically when it is continuously on.
In case you want to put the UPS off (only in case you are away for many days) if the
UPS has a switch turn the miniUPS switch off. For the UPS without switch, take off the
supply adapter connected from the power. In this condition one yellow light will be
growing inside the UPS which consumes insignificant power.
9 PRECAUTIONS
The miniUPS contains Li-Ion cell for energy storage.
oDo not store them in hot areas (for e.g. sunlight, hot vehicles, stove, next to
microwave)
oDo not crush them
oDispose them after useful life at nearest e-waste center
oIf your utility power in not stable OR your DG generator supply
voltage fluctuates OR you are in zone with lightning and thunder please use
spike buster/surge protector to protect your adapter and miniUPS
10 UNIQUE CONFIGURATIONS
The unit ships with a 5.5mm x 2.1mm DC barrel connector and two smaller size pins. If
your unit receptacle is different, please do not try to jam the connector. Please
contact us and we will help you identify the correct connector and ship that to you.

Installation & Operating Manual
11
11 CUSTOMER SERVICE AND SUPPORT
We are here to provide best customer service to you. You can reach us using eMail,
Whatsapp and direct phone call.
Email Us
Contact us at hello@energyintelligence.in for any sales, configuration, or support
questions
WhatsApp Us
Call Us
+91 86759 76666
+91 70047 12808
Warranty Policy
Table of contents
Popular UPS manuals by other brands

Best Power
Best Power Fortress 750 VA user guide

Orion Power Systems
Orion Power Systems Edge Pro Series user manual

CyberPower
CyberPower 649532009237 Specification sheet

Toshiba
Toshiba 1400XL Plus Series Operation manual

Tripp Lite
Tripp Lite AVR750U owner's manual

MGE UPS Systems
MGE UPS Systems Pulsar MX Frame 15000 RT Installation and user manual


