ENHANCED LISTENING TECHNOLOGIES ChatterVox 100 User manual

™
Operating Instructions
PORTABLE VOICE
AMPLIFICATION SYSTEM
Specifications
Nominal gain before feedback:
15dB w/ Headset microphone
18dB w/ Transdermal microphone
12dB w/ with Collar or Pencil microphone
Max power output:
5W (at 4 ohm speaker load)
Distortion:
5% Max at 2W output
Hum & Noise:
50dB Min
Audio frequency response:
±3dB 100Hz — 10KHz
Power:
9VDC (6 x AA NiMH rechargeable)
Current consumption:
1.2A Max.
Dimensions:
8" W x 2.9" H x 2.5" D
Weight:
1lb. 2oz. (including batteries)
ChatterVox is designed and manufactured by
ENHANCED LISTENING TECHNOLOGIES, CORP.
™
Congratulations on your purchase of ChatterVox . This compact
“waist pack” style personal amplifier was conceived and
designed for a friend of the developer whose voice is impaired as
a result of Parkinson’s Disease.
It is intended to elevate vocal output of people with temporary or
permanent voice impairments to a level that is comfortable and
effective for everyday communication while reducing vocal stress
and strain.
ChatterVox can boost vocal output by as much as 15db using its
headset style microphone. Even greater boost can be achieved for
esophageal speakers and users of complimentary prosthetic
devices such as Servox™by employing ChatterVox ’sunique
“transdermal” neck microphone.
The unit is provided with an environmentally friendly, high
capacity Nickel Metal-Hydride rechargeable power system that
can provide more than 14 hours of continuous use and be
recharged overnight.
For more information contact:
United States:
connections unlimited, inc.
542 13th Street
West Palm Beach, FL 33401
800/286-3481
www.connectionsunltd.com
Canada:
ALDS
220-4611 No. 6 Road
Richmond, B.C. V6V 2L3
866/845-2537
www.ALDS.com
Australia:
Phoenix Hearing Instruments
47 Prospect Street
Brisbane, 4006
617/385-4622
www.PhoenixHearing.com.AU
Denmark / Finland/ Norway / Sweden:
Scandex Import
Opalvej 10
DK-2730 Herlev
Denmark
45 44530530
www.chattervox.se
or
Censorsgatan 12C
S-21150 Malmo
Sweden
46 40123432
www.chattervox.dk
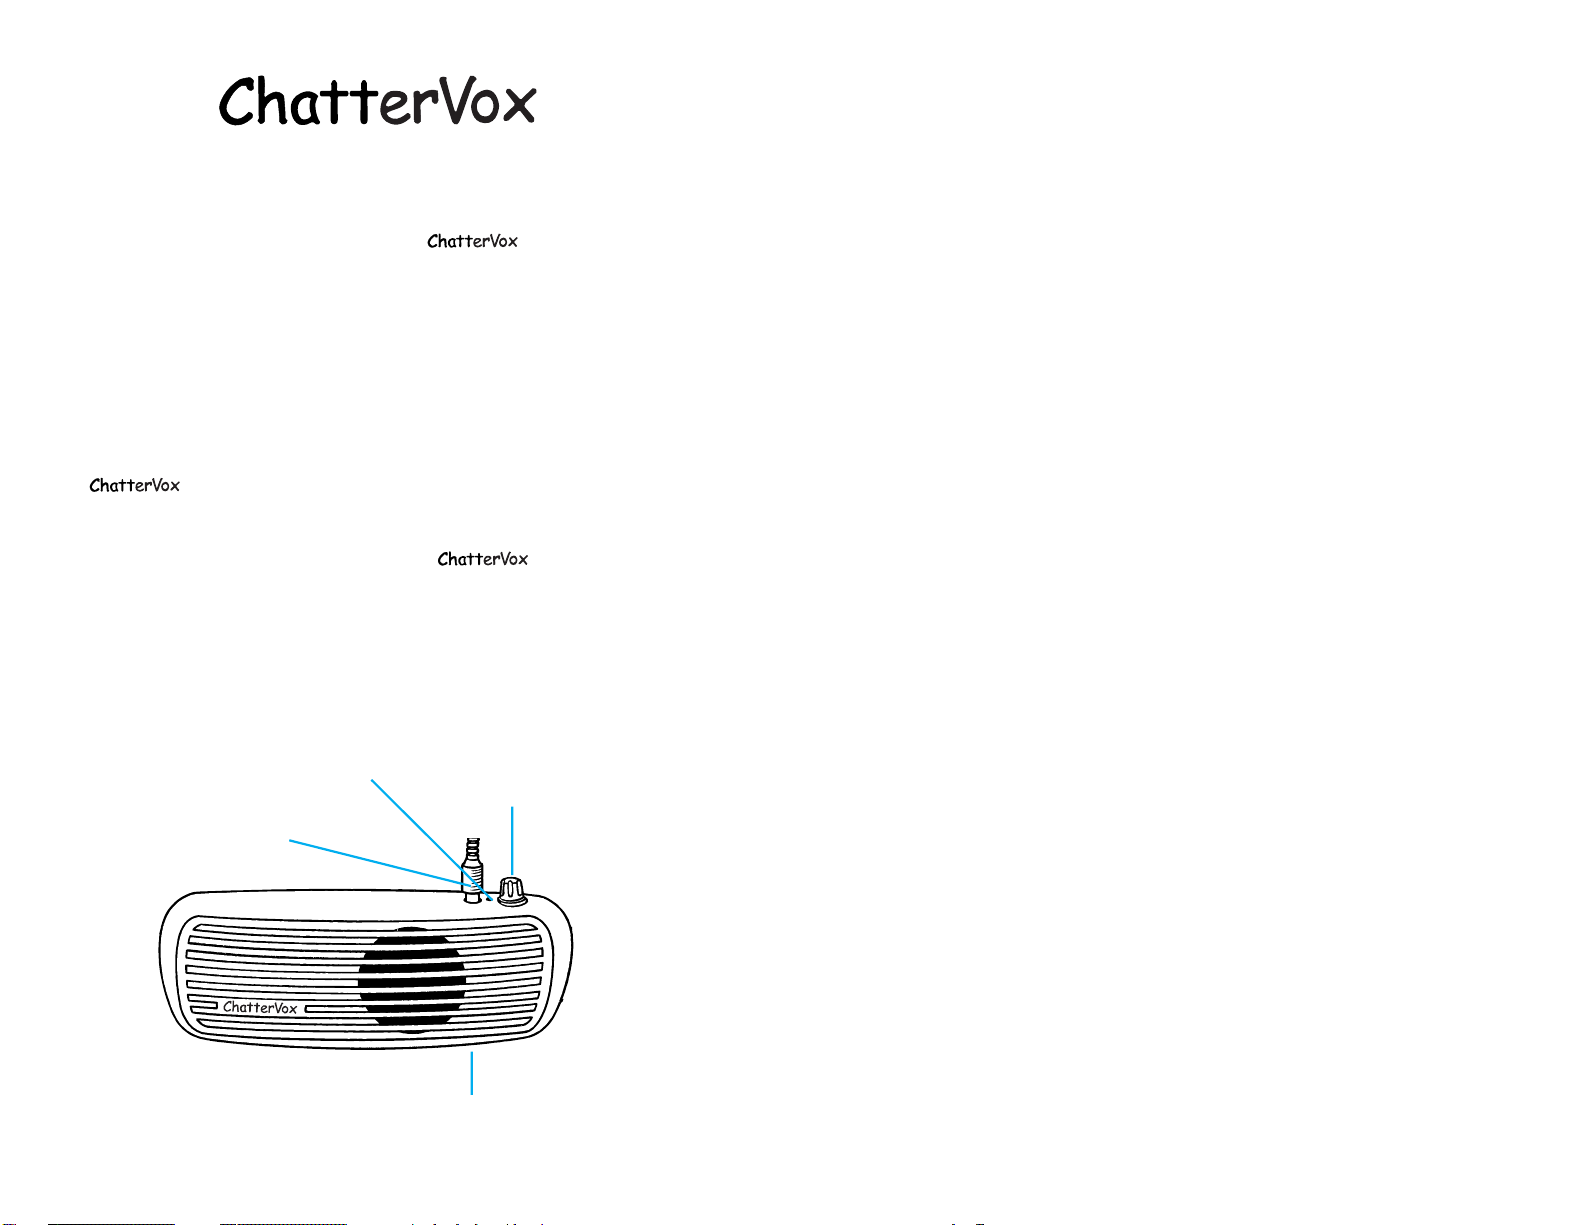
Battery Indicator
Charger Jack
and Charge Indicator
Microphone Jack
On/Off
Volume Control
™
™
Portable Voice Amplification System
Model 100
Operation
Charging ChatterVox for first use:
Your new ChatterVox is shipped with six Nickel Metal-Hydride
rechargeable batteries installed. They must receive a deep cycle (24
hour) charge before being placed into regular service. Short term
testing when you first get the unit is OK, but give the batteries a
deep charge as soon as possible to maximize their performance.
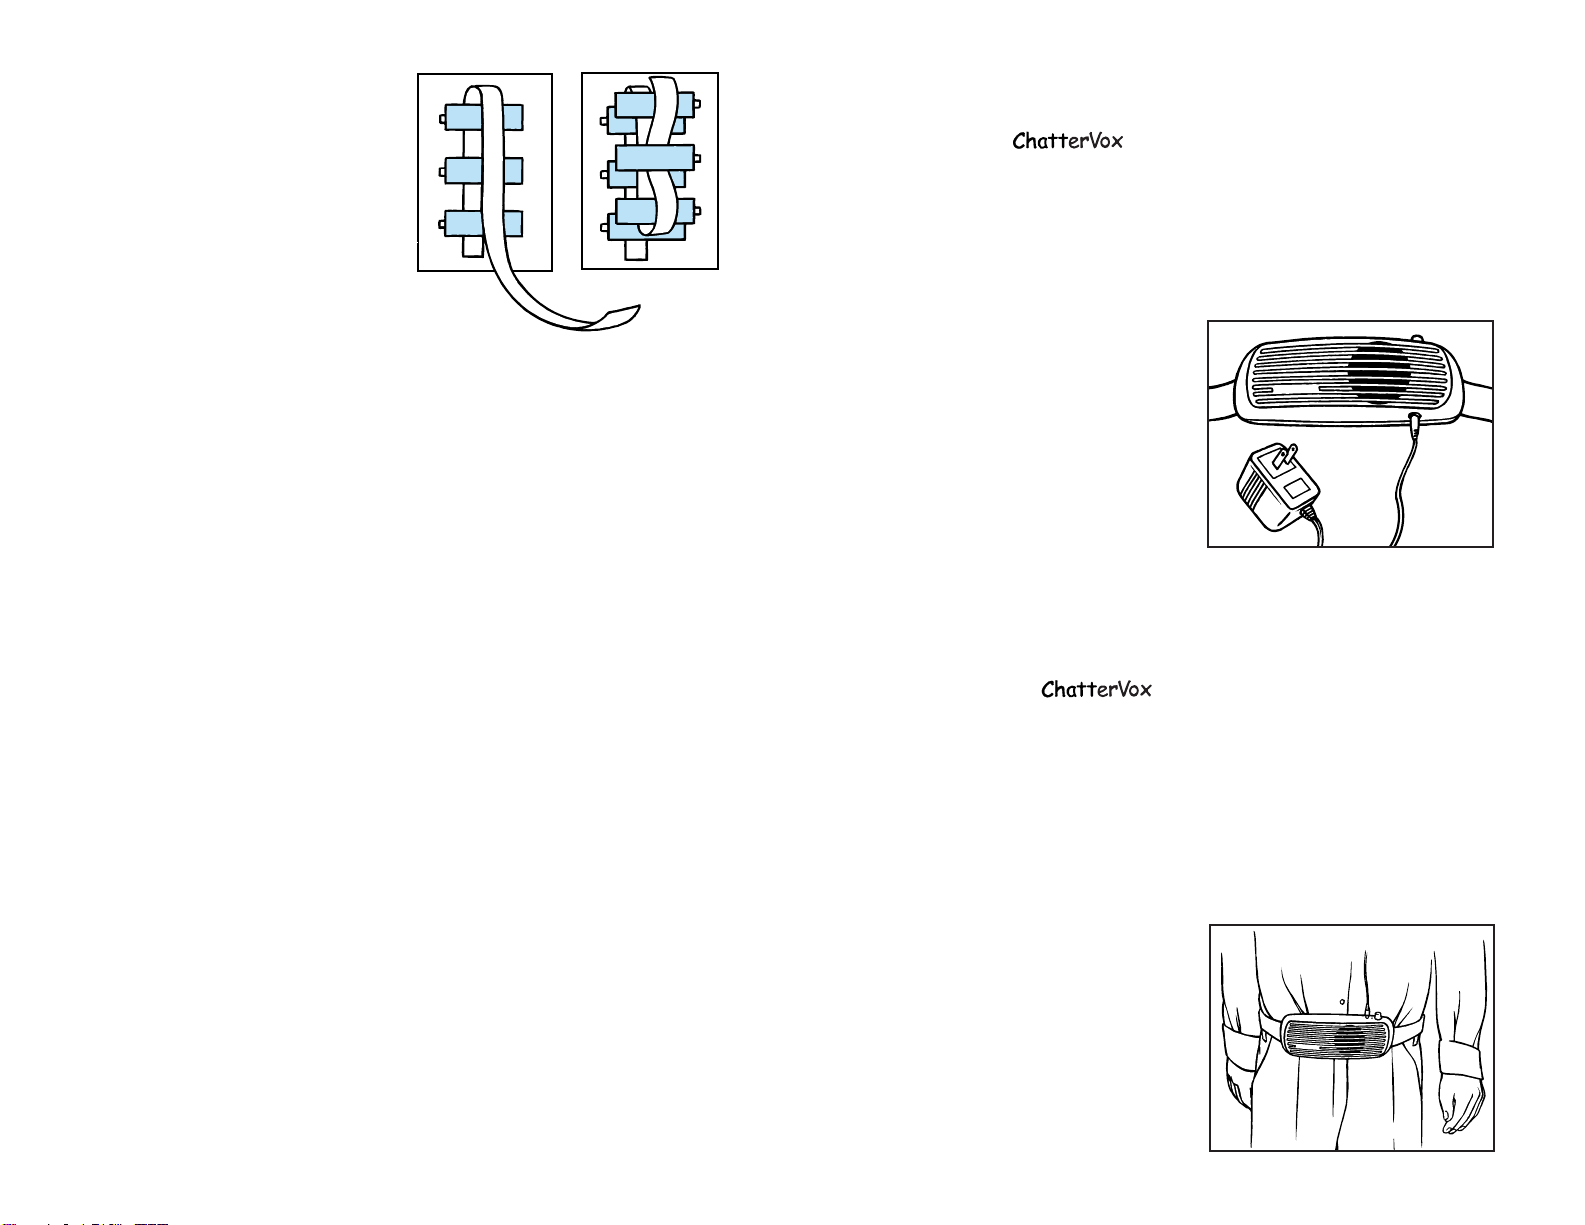
1. Insert the battery charger
mini-plug into the charging
port located on the bottom
of the ChatterVox amplifier.
2. Plug the AC adapter into a
working power outlet
(beware of the upper outlet.
In many rooms this outlet is
controlled by a wall switch.)
3. Charge the ChatterVox amplifier for 24 hours (first charge).
Thereafter it will be sufficient to charge the unit overnight
(minimum 8 hours, optimum 12-14 hours).
Wearing the ChatterVox Amplifier
The unit is normally worn at the front of the waist much like a
“waist pack” that would hold your wallet. The woven nylon
waist band is adjustable to 42". Larger waist dimensions can be
accommodated by requesting a free 12" belt extension from your
supplier.
Try to wear the ChatterVox in such a fashion that the speaker grill
faces outward or downward to reduce the likelihood of acoustic
feedback (squealing).
IMPORTANT: Carefully note
the path of the nylon belt
through its clips. In the event
the belt is disassembled, it is
imperative that the belt be
correctly reinstalled. Failing to
do so could result in the belt
loosening and the amplifier
dropping to the floor suddenly.
3. Gently lift the red battery
ribbon to loosen and remove
the center top cell.
4. Continue lifting the red
battery ribbon to remove the
remaining five battery cells.
Installing new batteries:
1. Lace the red battery ribbon across the bottom of the battery
compartment.
2. Install the outer two cells first with negative contact toward
the springs.
3. Insert the center cell of the bottom row with negative contact
toward spring.
4. Lace red battery ribbon across top of first battery row.
5. Install outer cells of top row with battery positive contact
toward springs and red battery ribbon under one cell.
6. Install center cell of top row with battery positive contact
toward spring and red battery ribbon under cell.
7. Insert anchor tabs of battery cover into case.
8. Lower cover down into case and press locking tab to left to
latch cover.
NOTE: Only original ChatterVox batteries are to be charged in the unit.
Attempting to charge disposable or non-approved batteries may cause
leakage and damage to the unit and will void the product warranty.
Battery Replacement
All 6 batteries must be replaced at the same time. Mixing old and
new batteries can lead to battery failure.
™
™

3. Be wary as you approach hard reflective surfaces that can
bounce the speaker’s sound back into the microphone (i.e.
teachers approaching a blackboard). Feedback from reflective
surfaces can be overcome by aiming the system down slightly
towards the floor or sliding the ChatterVox amplifier around
the waist and toward the listener(s).
About ChatterVox Batteries
The Nickel Metal-Hydride batteries of your new ChatterVox have
a life expectancy of approximately two years. Actual life will vary
significantly depending upon your usage and charging habits.
There may be times, however, when you need back-up power to
get through a period of use (i.e. you forget to recharge).
ChatterVox was intentionally designed to accommodate standard
AA battery cells for just such occasions. However, when the time
comes to replace the original rechargeable cells, we suggest you
order them from your dealer. ChatterVox’s batteries are industrial
quality cells like those used to power cellular phones.
Changing ChatterVox Batteries
In the event you find it necessary to change the batteries of your
ChatterVox, either for temporary use with disposable AA batteries or
to install a new set of Nickel Metal-Hydride cells, follow these steps:
Removing existing batteries:
1. Locate the battery compartment on the right rear side of the
amplifier.
2. Press (do not pry) the cover locking tab to the right and lift to
remove the battery cover.
Wearing the Headset Microphone
Whether your musical tastes tend toward Pop or
Country, you’ve likely seen microphones of this
type used by famous artists.
1. Fit the headset around the back of the head
and rest it on top of the ears with the
microphone boom on the right.
2. Pivot the microphone boom down, approximately D" below
the level of the lower lip.
3. Bend the boom to position it close to the
face C"-R" from the mouth.
4. Turn the microphone capsule (end) so
the flattened side faces the mouth. (You
can feel this flattened side through the
foam windscreen).
5. With the amplifier turned off, insert
the 3.5 mm microphone plug into the
jack on top of the amplifier body
adjacent to volume control & pilot light.
6. Turn amplifier on by turning the volume control knob clockwise.
7. Gradually increase the amplifier volume to an appropriate
boost level. Generally this is found at approximately the
9-10 o’clock position.
8. When you perceive your voice is loud enough, reduce the
volume slightly. This is done because you are standing
behind the speaker and your voice is actually considerably
louder than you perceive.
Wearing the Collar Microphone (CM200)
An integral element in the successful design of the ChatterVox is
its microphone assortment. High quality, directional microphone
capsules help ChatterVox achieve a high gain before feedback
ratio. This is relatively easy to achieve with both the headset and
transdermal microphone designs. It is significantly more difficult
to achieve for users who cannot (or will not) wear one of these
primary designs. For those individuals we have designed a very
high performance “Collar” style microphone. There is only one
compromise in using this style of microphone. Wide movements
of the head from left to right will cause effective output to vary
significantly. We suggest that collar mic users avoid dramatic,
™
™

theatrical head movements while
speaking.
1. Form the snake-like collar mic around
the back of your neck bringing the
microphone capsule to a clock position
of 11am (from the left) or 1pm (from
the right) relative to the mouth.
2. To stabilize the collar mic it is
possible to form the microphone
body over your shoulder or wear it
under a shirt or coat collar.
3. Turn approximately 2-3” of the collar mic body upward
toward the corner of your mouth.
4. Position the microphone capsule labeled FRONT) approximately
1-2” from the corner of the mouth to avoid breath blasts
during speaking from falling directly on the microphone
capsule. Breath blasts are what cause the dreaded “Popping P’s”
and other vocal distortions that are disturbing to listeners.
5. With the amplifier turned off, insert the 3.5mm microphone
plug into the jack on top of the amplifier body adjacent to the
volume control and pilot light.
6. Turn the amplifier on by turning the volume control clockwise.
7. Gradually increase the amplifier volume to approximately the
11 o’clock position while speaking at a consistent volume level.
8. When you perceive your voice is loud enough, reduce the
volume slightly. This is done because you are standing
behind the speaker and your voice is actually considerably
louder than you perceive.
Wearing the "Transdermal" Neck Microphone
NOTE: Due to its extremely high sensitivity, this microphone is not
appropriate for applications amplifying normal voice. It is designed to
permit individuals with severe voice impairment to benefit from
ChatterVox amplification.
Placement of the Transdermal microphone is a bit of an art. Each
individual has a point on their neck where the clearest and most
intelligible sound is present. It is necessary to locate this “Soft” or
“Sweet” spot by trial and error. It is most often located in the
fleshy area off-axis from the normal position of the larynx.
2. Loop one end of the lanyard cord over one leg of the
mounting yoke and secure to the yoke with its slip ring.
3. Loop the lanyard cord around the back of your neck and
hook the other end of the lanyard cord to the second leg of
the mounting yoke. We suggest you again use the slip ring to
secure the lanyard cord to the leg.
4. Position the microphone now hanging on your chest at a level
approximately 6” below your mouth. This is approximately
equal to the height of your closed fist with thumb extended.
Use the black slip ring on the lanyard cord to secure this
position.
5. Turn the amplifier on by turing the volume control clockwise.
6. Gradually increase the amplifier volume while speaking at a
consistent volume level.
7. When you perceive your voice is loud enough, reduce the
volume slightly. This is done because you are standing
behind the speaker and your voice is actually considerably
louder than you perceive.
AWord About FEEDBACK
Your new ChatterVox is, in the end, a “Public Address or PA
System”. It has a microphone, an amplifier and a speaker. As
such, it obeys the same laws of sound physics and acoustics that
rule the performance of the sound system at Carnegie Hall. If you
violate these laws, the system will “Feedback” (squeal). Feedback
occurs when the sound from the speaker is picked up by the
microphone and a regenerative cycle begins.
The basic rules to avoid or minimize potential for Feedback are as
follows:
1. Use only the minimum amplification necessary to make
communication possible.
2. Do not point the speaker located on
the front of the ChatterVox amplifier toward the microphone.

Handheld use
1. With the amplifier turned off, insert
the 3.5mm microphone plug into the
jack on top of the amplifier body
adjacent to the volume control and
pilot light.
2. Make certain the microphone capsule
is not facing into the loudspeaker.
Preferably it will be located behind or greater than 90 degrees
off axis from the loudspeaker.
3. Turn the amplifier on by turing the volume control clockwise.
4. Gradually increase the amplifier volume level or move the
microphone farther from the loudspeaker.
5. If feedback should begin either reduce the volume level or
move the microphone farther from the loudspeaker.
6. When you perceive your voice is loud enough, reduce the
volume slightly. This is done because you are standing
behind the speaker and your voice is actually considerably
louder than you perceive.
We have been asked on many occasions to provide a lapel
microphone for ChatterVox. To date we have been unsuccessful in
developing or locating a lapel microphone that provides acceptable
performance with the ChatterVox system on a consistent basis.
The critical nature of microphone placement to the overall success
of ChatterVox leads us to advise against the use of such
microphones with the product. We firmly believe this is a bad
technology marriage and will lead to unsatisfactory performance
that would reflect badly on an otherwise excellent product. For
that reason we specifically state that lapel microphones are not
approved for use with the ChatterVox system.
Lavaliere use
1. Remove the windscreen and install the spring steel mounting
yoke on the microphone. This is accomplished by gently pressing
the arms of the yoke together to enlarge the hole sufficiently to
slide onto the microphone body. Then reinstall the windscreen.
1. Place the Transdermal microphone
around the neck (from either left or
right).
2. With the amplifier turned off, insert
the 3.5 mm microphone plug into the
jack on top of the amplifier body
adjacent to the volume control and
pilot light.
3. Turn the amplifier on by turning the
volume control knob clockwise.
4. Gradually increase the amplifier
volume to approximately the 12 o’clock position while
speaking at a consistent volume level.
5. Move the microphone capsule to various locations on the neck
to identify the position that provides the most intelligible
sound. (Don’t expect a booming voice, our goal here is
intelligible speech with minimal vocal stress and strain).
6. Having identified your vocal “Soft-spot”, adjust the ChatterVox
volume control to the most comfortable and useful level.
Using the ChatterVoxpencil microphone (MM100).
There are times when it is simply not practical to use the headset,
collar or transdermal microphones. For those times and
application we have developed a miniature pencil microphone
that can be handheld or worn as a lavaliere microphone. Typical
applications for handheld use are for prosthetic users (Parkinson’s
patients and others) during meals. Typical lavaliere applications
include presenters (School teachers, etc.) as a viable alternative to
the headset and collar mic styles for comfort and flexibility. The
“pencil” microphone is packaged with a flexible stand, which
doubles as the lavaliere holder. NOTE: due to its extremely
sensitive microphone capsule the pencil microphone should
always be used with the included windscreen. We have also
included a convenient mute switch in this microphone design to
facilitate use at meals, in presentation and a quick feedback
intervention tool.
™
Table of contents


