ENKHO 162913.01 User manual

3
G
A
R
A
N
Z
I
A
E
S
T
E
S
A
A
N
N
I
MANUALE D’USO
art: 162913.01
SPINSERVICE S.r.l.
Via Campalto, 3/D - 37036
San Martino B.A. (VR) Italia / Italy / Italija
www.eurospin.it
MADE IN CHINA / ZEMLJA PORIJEKLA: Kina
Leggere e conservare /
Read and keep for future reference /
Preberite in shranite / Pročitati i sačuvati.
forno microonde 23L
23L microwave oven
mikrovalovna pečica 23L
mikrovalna pećnica 23L
forno microonde 23L
23L microwave oven
mikrovalovna pečica 23L
mikrovalna pećnica 23L
CODICE ART.: 162913.01
Tensione: 230 V~
Frequenza: 50 Hz
Potenza forno a microonde ingresso: 1250 W
Potenza forno a microonde uscita: 800 W, 2450 MHz
Emissioni orarie indirette pari a 0.649 kgCO2
INDICE
IMPORTANTI ISTRUZIONI DI SICUREZZA LEGGERE
ATTENTAMENTE E TENERE PER FUTURE
CONSULTAZIONI
AVVERTENZA PER QUANTO RIGUARDA IL CONTATTO
CON IL CIBO
MATERIALI UTILIZZABILI NEL MICROONDE
MATERIALI DA EVITARE IN MICROONDE
DESCRIZIONE DEL FORNO MICROONDE
SPECIFICHE
DISIMBALLAGGIO E MONTAGGIO
MONTAGGIO DEL PIATTO IN VETRO
POSIZIONAMENTO DEL FORNO MICROONDE
PANNELLO DI CONTROLLO
ISTRUZIONI PER L'USO
PULIZIA E MANUTENZIONE
GARANZIA
SMALTIMENTO
1-5
5-6
7
7-8
8
8
9
9
9-10
10
10-15
15
16
16
su www.eurospin.it trovi
la versione digitale del manuale d’uso
Chiamaci al numero verde gratuito!
Dal lunedì al venerdì 8.30 -12.30 / 15.30 -19.30 • il sabato
8.30 -12-30. Esclusi i giorni festivi.
La sicurezza di prodotti
testati e certificati
per te.
• Emissioni indirette di CO
2
quantificate
• Provato nell’uso
• Sicurezza verificata
forno microonde
23L
La società italiana IMQ con il logo IMQ verified
attesta la conformità di questo prodotto a quanto
dichiarato sulla confezione, secondo requisiti di
sostenibilità, sicurezza e qualità.

IMPORTANTI ISTRUZIONI DI
SICUREZZA LEGGERE ATTENTAMENTE
E TENERE PER FUTURE
CONSULTAZIONI
1 2
siasi operazione di manutenzione o di
riparazione che implichi la rimozione di qua-
lunque coperchio che protegge dall’espo-
sizione all’energia delle microonde;
6.
ATTENZIONE:
I liquidi o altri cibi non
devono essere scaldati in contenitori sigillati
poiché potrebbero esplodere;
7. L'apparecchio è destinato a esclusivo uso
domestico in ambienti al chiuso; Non è desti-
nato all'uso:
-in negozi, uffici e altri luoghi di lavoro simi-
lari;
-in aziende agricole o similari;
-da clienti di alberghi, motel e altri ambienti
di tipo residenziale;
-in ambienti del tipo bed and breakfast.
8. Lasciare una altezza minima dello spazio
libero di 30 cm sopra al forno e una distanza
di spazio libero di almeno 20 cm tra il forno e
le pareti adiacenti.
9. Usare esclusivamente utensili che sono
adatti all'utilizzo in microonde.
10. Quando si riscaldano gli alimenti in con-
tenitori di plastica o carta, controllare il forno
frequentemente a causa dei rischi di incendio;
11. Il forno a microonde ha lo scopo di riscal-
dare cibi e bevande. Utilizzarlo per disidra
Prima di usare questo elettrodomestico, si prega di
osservare sempre le seguenti precauzioni basilari, tra
cui:
1. L'apparecchio deve essere usato esclusiva-
mente per gli scopi previsti, ovvero come
forno microonde per uso domestico. Qualsiasi
altro utilizzo è considerato improprio e
quindi pericoloso.
2. Prima di collegare l'apparecchio alla presa
di corrente, accertarsi che tensione e frequen-
za di rete siano compatibili con quelle indi-
cate nella targhetta dati nominali dell'appar-
ecchio.
3. Il forno è destinato al posizionamento
libero; Non deve essere posizionato all'inter-
no di un mobile e non è destinato come unità
ad incasso.
4.
ATTENZIONE:
Se la porta o le guarnizioni
della porta sono danneggiate, il forno non
deve essere fatto funzionare finché non è
stato riparato dal personale addetto;
5.
ATTENZIONE:
È pericoloso per tutti, ad ec-
cezione del personale addetto, eseguire qual-
tare cibi o asciugare vestiti oppure per riscal-
dare cuscinetti riscaldanti, pantofole, spugne,
panni umidi o simili può portare al rischio di
lesioni o incendio.
12. Se si nota emissione di fumo, spegnere o
togliere la spina dell’apparecchio e mantene-
re la porta chiusa per estinguere eventuali
fiamme;
13. Il riscaldamento di bevande nei forni a
microonde può avere come risultato un’ebol-
lizione eruttiva ritardata, perciò occorre pre-
stare attenzione quando si maneggia il con-
tenitore;
14. Il contenuto di biberon e gli omogeneiz-
zati in vasetti devono essere mescolati o agi-
tati e la temperatura deve essere controllata
prima della consumazione per evitare scottat-
ure;
15. Per la cottura in microonde di cibi e bev-
ande, non sono ammessi contenitori metallici.
16. Le uova nel guscio e le uova sode intere
non devono essere riscaldate nei forni a mi-
croonde poiché potrebbero esplodere anche
una volta terminata l’operazione di riscalda-
mento nel microonde;
17. Il forno deve essere pulito regolarmente,
rimuovendo eventuali residui di cibi.
18. Per pulire le superfici a contatto con gli
alimenti, consultare la sezione "Pulizia e Ma-
nutenzione".
19. Il non mantenere il forno pulito potrebbe
portare al deterioramento delle superfici che
potrebbe influire negativamente sulla vita
dell’apparecchio e dare origine ad una situ-
azione di pericolo;
20. L'apparecchio non può essere pulito con il
vapore.
21. L’apparecchio può essere utilizzato da
bambini di età non inferiore a 8 anni e da
persone con ridotte capacità fisiche, sensoriali
o mentali, o prive di esperienza o della neces-
saria conoscenza, purché sotto sorveglianza
oppure dopo che le stesse abbiano ricevuto
istruzioni relative all’uso sicuro dell’apparec-
chio e alla comprensione dei pericoli ad esso
inerenti. I bambini non devono giocare con
l’apparecchio. La pulizia e la manutenzione
destinata ad essere effettuata dall’utilizza-
tore non deve essere effettuata da bambini
senza sorveglianza.
22. Tenere l'apparecchio e il suo cavo fuori
dalla portata dei bambini di età inferiore a 8
anni.
23. L'apparecchio non è predisposto per
essere azionato mediante un timer esterno o
un dispositivo di comando remoto separato.
24. Scollegare sempre l'apparecchio dalla
presa di corrente prima di pulirlo o sottoporlo
a manutenzione, e quando l'apparecchio non
è in uso.
25. Se il cavo di alimentazione è danneggia-
to, esso deve essere sostituito dal costruttore
o dal suo servizio assistenza tecnica o comun-
que da una persona con qualifica similare, in
modo da prevenire ogni rischio.
26. Questo apparecchio è classificato di
Gruppo 2, in quanto genera energia a radiof-
requenza per riscaldare gli alimenti o oggetti.
27. Questo apparecchio è di Classe B, in
quanto è adatto per l'uso in ambienti resi-
denziali e in stabilimenti direttamente colle-
gati ad una rete di alimentazione a bassa ten-
sione che serve edifici adibiti ad uso abitativo.
28.
AVVERTENZA:
in caso di danni ai compo-
nenti del forno (per es. sportello, luce, ecc.)
non provare a ripararlo da soli, altrimenti si
rischiano scosse elettriche. Interrompere l'uti-
lizzo dell'apparecchio e contattare il servizio
assistenza per farlo riparare.

3 4
tare cibi o asciugare vestiti oppure per riscal-
dare cuscinetti riscaldanti, pantofole, spugne,
panni umidi o simili può portare al rischio di
lesioni o incendio.
12. Se si nota emissione di fumo, spegnere o
togliere la spina dell’apparecchio e mantene-
re la porta chiusa per estinguere eventuali
fiamme;
13. Il riscaldamento di bevande nei forni a
microonde può avere come risultato un’ebol-
lizione eruttiva ritardata, perciò occorre pre-
stare attenzione quando si maneggia il con-
tenitore;
14. Il contenuto di biberon e gli omogeneiz-
zati in vasetti devono essere mescolati o agi-
tati e la temperatura deve essere controllata
prima della consumazione per evitare scottat-
ure;
15. Per la cottura in microonde di cibi e bev-
ande, non sono ammessi contenitori metallici.
16. Le uova nel guscio e le uova sode intere
non devono essere riscaldate nei forni a mi-
croonde poiché potrebbero esplodere anche
una volta terminata l’operazione di riscalda-
mento nel microonde;
17. Il forno deve essere pulito regolarmente,
rimuovendo eventuali residui di cibi.
18. Per pulire le superfici a contatto con gli
alimenti, consultare la sezione "Pulizia e Ma-
nutenzione".
19. Il non mantenere il forno pulito potrebbe
portare al deterioramento delle superfici che
potrebbe influire negativamente sulla vita
dell’apparecchio e dare origine ad una situ-
azione di pericolo;
20. L'apparecchio non può essere pulito con il
vapore.
21. L’apparecchio può essere utilizzato da
bambini di età non inferiore a 8 anni e da
persone con ridotte capacità fisiche, sensoriali
o mentali, o prive di esperienza o della neces-
saria conoscenza, purché sotto sorveglianza
oppure dopo che le stesse abbiano ricevuto
istruzioni relative all’uso sicuro dell’apparec-
chio e alla comprensione dei pericoli ad esso
inerenti. I bambini non devono giocare con
l’apparecchio. La pulizia e la manutenzione
destinata ad essere effettuata dall’utilizza-
tore non deve essere effettuata da bambini
senza sorveglianza.
22. Tenere l'apparecchio e il suo cavo fuori
dalla portata dei bambini di età inferiore a 8
anni.
23. L'apparecchio non è predisposto per
essere azionato mediante un timer esterno o
un dispositivo di comando remoto separato.
24. Scollegare sempre l'apparecchio dalla
presa di corrente prima di pulirlo o sottoporlo
a manutenzione, e quando l'apparecchio non
è in uso.
25. Se il cavo di alimentazione è danneggia-
to, esso deve essere sostituito dal costruttore
o dal suo servizio assistenza tecnica o comun-
que da una persona con qualifica similare, in
modo da prevenire ogni rischio.
26. Questo apparecchio è classificato di
Gruppo 2, in quanto genera energia a radiof-
requenza per riscaldare gli alimenti o oggetti.
27. Questo apparecchio è di Classe B, in
quanto è adatto per l'uso in ambienti resi-
denziali e in stabilimenti direttamente colle-
gati ad una rete di alimentazione a bassa ten-
sione che serve edifici adibiti ad uso abitativo.
28.
AVVERTENZA:
in caso di danni ai compo-
nenti del forno (per es. sportello, luce, ecc.)
non provare a ripararlo da soli, altrimenti si
rischiano scosse elettriche. Interrompere l'uti-
lizzo dell'apparecchio e contattare il servizio
assistenza per farlo riparare.

tare cibi o asciugare vestiti oppure per riscal-
dare cuscinetti riscaldanti, pantofole, spugne,
panni umidi o simili può portare al rischio di
lesioni o incendio.
12. Se si nota emissione di fumo, spegnere o
togliere la spina dell’apparecchio e mantene-
re la porta chiusa per estinguere eventuali
fiamme;
13. Il riscaldamento di bevande nei forni a
microonde può avere come risultato un’ebol-
lizione eruttiva ritardata, perciò occorre pre-
stare attenzione quando si maneggia il con-
tenitore;
14. Il contenuto di biberon e gli omogeneiz-
zati in vasetti devono essere mescolati o agi-
tati e la temperatura deve essere controllata
prima della consumazione per evitare scottat-
ure;
15. Per la cottura in microonde di cibi e bev-
ande, non sono ammessi contenitori metallici.
16. Le uova nel guscio e le uova sode intere
non devono essere riscaldate nei forni a mi-
croonde poiché potrebbero esplodere anche
una volta terminata l’operazione di riscalda-
mento nel microonde;
17. Il forno deve essere pulito regolarmente,
rimuovendo eventuali residui di cibi.
18. Per pulire le superfici a contatto con gli
alimenti, consultare la sezione "Pulizia e Ma-
nutenzione".
19. Il non mantenere il forno pulito potrebbe
portare al deterioramento delle superfici che
potrebbe influire negativamente sulla vita
dell’apparecchio e dare origine ad una situ-
azione di pericolo;
20. L'apparecchio non può essere pulito con il
vapore.
21. L’apparecchio può essere utilizzato da
bambini di età non inferiore a 8 anni e da
persone con ridotte capacità fisiche, sensoriali
o mentali, o prive di esperienza o della neces-
saria conoscenza, purché sotto sorveglianza
oppure dopo che le stesse abbiano ricevuto
istruzioni relative all’uso sicuro dell’apparec-
chio e alla comprensione dei pericoli ad esso
inerenti. I bambini non devono giocare con
l’apparecchio. La pulizia e la manutenzione
destinata ad essere effettuata dall’utilizza-
tore non deve essere effettuata da bambini
senza sorveglianza.
22. Tenere l'apparecchio e il suo cavo fuori
dalla portata dei bambini di età inferiore a 8
anni.
23. L'apparecchio non è predisposto per
6
5
Per assicurarsi che l'apparecchio sia utilizzato in
modo sicuro, attenersi alle seguenti linee guida:
1. Solo il piatto in vetro può entrare in con-
tatto con gli alimenti durante il funziona-
mento dell'apparecchio o durante l'introduzi-
one e la rimozione degli alimenti dal forno.
2. Quando si usa il forno, durante l'inserimen-
to o la rimozione dei cibi è assolutamente
vietato il contatto diretto tra gli alimenti e le
superfici interne dello scomparto di cottura.
3. Dopo la cottura occorre prendere precauzi-
oni speciali per la pulizia della superficie in-
terna e di eventuali parti interne del forno.
Fare riferimento alla sezione "pulizia e ma-
nutenzione".
4. Quando si usano materiali del tipo specifi-
cato nella sezione "MATERIALI UTILIZZABILI
NEL MICROONDE", controllare attentamente
che siano idonei al contatto con gli alimenti.
AVVERTENZA PER QUANTO RIGUARDA
IL CONTATTO CON IL CIBO
essere azionato mediante un timer esterno o
un dispositivo di comando remoto separato.
24. Scollegare sempre l'apparecchio dalla
presa di corrente prima di pulirlo o sottoporlo
a manutenzione, e quando l'apparecchio non
è in uso.
25. Se il cavo di alimentazione è danneggia-
to, esso deve essere sostituito dal costruttore
o dal suo servizio assistenza tecnica o comun-
que da una persona con qualifica similare, in
modo da prevenire ogni rischio.
26. Questo apparecchio è classificato di
Gruppo 2, in quanto genera energia a radiof-
requenza per riscaldare gli alimenti o oggetti.
27. Questo apparecchio è di Classe B, in
quanto è adatto per l'uso in ambienti resi-
denziali e in stabilimenti direttamente colle-
gati ad una rete di alimentazione a bassa ten-
sione che serve edifici adibiti ad uso abitativo.
28.
AVVERTENZA:
in caso di danni ai compo-
nenti del forno (per es. sportello, luce, ecc.)
non provare a ripararlo da soli, altrimenti si
rischiano scosse elettriche. Interrompere l'uti-
lizzo dell'apparecchio e contattare il servizio
assistenza per farlo riparare.

78
MATERIALI UTILIZZABILI NEL MICROONDE
Utensili Note
Plastica
Solo di tipo idoneo per microonde. Seguire le istruzioni del produttore.
Deve riportare la dicitura "Adatto al microonde". Alcuni contenitori in
plastica si sciolgono quando gli alimenti all'interno diventano caldi. La
"buste per cottura in forno" e le buste di plastica chiuse bene devono
essere perforate o fessurate come riportato nelle istruzioni sulla
confezione.
Stoviglie Solo di tipo idoneo per microonde. Seguire le istruzioni del produttore.
Non usare piatti con spacchi o scheggiature.
Vasetti di vetro
Rimuovere sempre il coperchio. Utilizzare unicamente per riscaldare
rapidamente gli alimenti. La maggior parte dei vasetti non sono resistenti
al calore e possono rompersi.
Cristalleria Usare solo quelli in vetro termoresistente. Accertarsi che non ci siano
finiture o decori in metallo. Non usare piatti con spacchi o scheggiature.
Buste per cottura in
forno
Seguire le istruzioni del produttore. Non chiuderle con laccetti metallici.
Praticare dei fori per fare uscire il vapore.
Piatti e coppette di
carta
Usare solo per cotture rapide o per scaldare. Non lasciare il forno
incustodito durante la cottura.
Tovaglioli di carta Usare per coprire gli alimenti da scaldare e per assorbire i grassi. Usare,
tenendo sempre sott'occhio il microonde, solo per cotture rapide.
Carta da forno Usare come protezione per gli schizzi o come carta avvolgente per la
cottura a vapore.
Pellicola alimentare
in plastica
Solo per microonde. Utilizzare per coprire gli alimenti durante la cottura
per trattenere l'umidità. Evitare il contatto diretto della pellicola
alimentare con gli alimenti .
Termometri Solo di tipo idoneo per microonde (termometri per carne e dolci).
Carta oleata Usare come protezione per gli schizzi e per trattenere l'umidità.
MATERIALI DA EVITARE IN MICROONDE
Utensili Note
Vassoi in alluminio Possono innescare archi elettrici. Trasferire gli alimenti su un piatto adatto
al microonde.
Laccetti con anima
in metallo Possono innescare archi elettrici e incendi nel microonde.
Contenitori in cart-
one con maniglia in
metallo
Possono innescare archi elettrici. Trasferire gli alimenti su un piatto adatto
al microonde.
Utensili in metallo o
con finiture di
metallo
Il metallo impedisce all'energia del microonde di arrivare agli alimenti.
Le finiture in metallo possono innescare archi elettrici.
Polistirolo Il polistirolo esposto alle alte temperature può sciogliersi o contaminare il
liquido all'interno.
Legno Il legno si secca troppo se messo in microonde, e può spaccarsi o aprirsi.
Buste di carta Possono provocare incendi nel forno.
Modello: 162913.01
Tensione nominale: 230 V~, 50 Hz
Capacità del forno: 23 L
Diametro piatto rotante:
Dimensioni d'ingombro: 485x383x292.5 mm
Peso netto: Circa 13kg
Potenza nominale in ingresso (Microonde): 1250 W
Potenza nominale in uscita (Microonde): 800 W, 2450 MHz
270 mm
DESCRIZIONE DEL FORNO MICROONDE
SPECIFICHE
A: Sportello
B: Sistema di blocco di sicurezza
C: Vetro di osservazione
D: Piatto in vetro
E: Gruppo anello piatto rotante
F: Alberino piatto rotante
G: Display LED
H: Manopola parametri/funzioni
I: Tasto Stop/Azzeramento
J: Tasto Avvio
A
D
G
H
E
B
C
F
J
I
Rimuovere tutti gli imballi e gli accessori dall'apparecchio.
Il forno è dotato dei seguenti accessori:
Piatto in vetro
Gruppo anello disco rotante
Manuale di istruzioni
DISIMBALLAGGIO E MONTAGGIO
n°1pz
n°1pz
1 pezzo

910
2. Inserire la spina in una presa di corrente, accertandosi che la tensione erogata sia di tipo adatto
all'apparecchio.
3. Consultare sempre la sezione "Materiali utilizzabili nel microonde" per scegliere gli utensili adatti
ed evitare quindi di danneggiare l'apparecchio o provocare lesioni fisiche.
AVVERTENZA: Non montare l’apparecchio dentro un mobile. Non utilizzare l'apparecchio come
un'unità da incasso.
AVVERTENZA: Se le prese d'aria o le bocchette sono tappate, il forno può essere danneggiato.
AVVERTENZA: Non installare il forno sopra un fornello o altri apparecchi che emanano calore. Se
montato sopra o vicino a una fonte di calore, il forno può essere danneggiato e la garanzia
invalidata.
Mettere il gruppo anello piatto rotante sulla
scanalatura tonda sul fondo del forno, quindi
appoggiare il piatto in vetro sull'anello,
accertandosi che il mozzo sul fondo del piatto
in vetro sia ben inserito sull'alberino del piatto
rotante che si trova sempre sul fondo del
forno (Figura 1).
a. L'altezza di installazione minima è di 85cm.
b. Il lato posteriore dell'apparecchio deve
essere appoggiato alla parete.
c. Lasciare uno spazio di 30cm sopra il forno, e
tenerlo scostato di almeno 20cm da eventuali
pareti adiacenti.
d. Non togliere i piedini dal fondo del forno.
e. Posizionare il microonde il più lontano
possibile da radio e TV. Da acceso, il
microonde può interferire sul segnale radio o
TV.
20cm
30cm
20cm
min85cm
0cm
Microonde
Auto/Menu
Tempo/Scongelamento
Peso/Scongelamento
Orologio
Timer da cucina
Peso
Stop/Azzeramento
Avvio//+30s/Conferma
LEGENDA
Riscaldamento
MICROONDE
10%
30%
50%
100%
80%
PANNELLO DI CONTROLLO
Nota:
1. Non posizionare mai il piatto alla rovescia. Deve essere sempre posizionato correttamente.
2. Il piatto in vetro e il gruppo anello piatto rotante devono essere utilizzati sempre per la cottura.
3. Per la cottura, gli alimenti e i contenitori di alimenti devono essere sempre appoggiati sul piatto
in vetro.
4. Se il piatto in vetro o il gruppo anello piatto rotante sono spaccati o rotti, contattare il centro
assistenza più vicino.
MONTAGGIO DEL PIATTO IN VETRO
1. Selezionare una superficie piana e stabile che offra abbastanza spazio intorno alle prese d'aria e
alle bocchette.
POSIZIONAMENTO DEL FORNO MICROONDE
Mozzo (lato inferiore)
Piatto in vetro
Gruppo anello piatto rotante
Alberino piatto
rotante
Figura 1
Questo microonde utilizza un controllo elettronico di moderna concezione per regolare i parametri
di cottura in base alle vostre preferenze.
Istruzioni per la manopola di controllo Ci sono due manopole sul pannello. Per una maggiore
chiarezza, il manuale definisce la manopola di sinistra "manopola dei parametri", mentre quella di
ISTRUZIONI PER L'USO
Controllare che il forno non presenti danni come ammaccature e che lo sportello non sia rotto.
Conservare l'imballo. Se si butta l'apparecchio, farlo nel rispetto delle normative sul corretto
smaltimento.
AVVERTENZA: Non rimuovere il coperchio di mica marrone chiaro fissato all'interno del forno a
protezione del magnetron.
2) Agire sulla manopola parametri per impostare il peso degli alimenti da riscaldare; appariranno i
valori "200" , "400" o "600".
3) Premere "Avvio/+30s" per avviare la cottura.
Nota 1: Durante il processo di impostazione della cottura al microonde, se non si preme "Avvio/+30s
" per confermare entro 1 minuto, il forno torna in automatico allo stato precedente.
Nota 2: Durante il processo di cottura al microonde, premere una volta il tasto "Stop/Azzeramento"
per far tornare il forno allo stato precedente.
5. Cottura rapida
1) Premere "Avvio/+30s" per avviare la cottura con livello di potenza P100. Ad ogni pressione il
tempo di cottura aumenta di 30 secondi, fino a un massimo di 95 minuti.
2) Durante la cottura al microonde o lo scongelamento, ad ogni pressione del tasto "Avvio/+30s" si
aumenta il tempo di cottura di 30 secondi.
3) Agire sulla manopola parametri per impostare il tempo di cottura alla potenza microonde P100,
quindi premere "Avvio/+30s" per avviare la cottura.
Nota 1: Durante il processo di impostazione della cottura rapida, se non si preme "Avvio/+30s " per
confermare entro 1 minuto, il forno torna in automatico allo stato precedente.
Nota 2: Durante il processo di cottura rapida, premere una volta il tasto "Stop/Azzeramento" per
far tornare il forno allo stato precedente.
6. Scongelamento in base al peso
1) Portando la manopola funzioni su "Scongelamento/peso", il display LED visualizza “dEF1”
insieme a ” ” e ” ”.
11
Nota 1: Durante il processo di impostazione della cottura al microonde, se non si preme "Avvio/+30s
" per confermare entro 1 minuto, il forno torna in automatico allo stato precedente.
Nota 2: Durante il processo di cottura al microonde, premere una volta il tasto "Stop/Azzeramento"
per far tornare il forno allo stato precedente.
4. Riscaldamento
1) Portare la manopola funzioni su “Riscaldamento”; il display LED visualizza “200” insieme a
” ”.
1. Impostazione orologio
Quando viene data corrente al microonde, il display visualizza "0:00" e il cicalino emette un suono.
Quindi vengono visualizzati degli stati di attesa.
1) Portare la manopola funzioni su "Clock" (Orologio); iniziano a lampeggiare le cifre dell'ora.
2) Agire sulla manopola parametri per impostare le cifre dell'ora scegliendo un valore tra 0 e 23.
3) Premere "Avvio/+30s" per confermare, quindi inizieranno a lampeggiare le cifre dei minuti.
4) Agire sulla manopola parametri per impostare le cifre dei minuti scegliendo un valore tra 0 e 59.
5) Premere "Avvio/+30s" per completare l'impostazione dell'orologio. Appare ":" lampeggiante.
Nota: 1 L'impostazione dell'orologio non influisce sul funzionamento del forno microonde.
Nota: 2 Durante il processo di impostazione dell'orologio, se non si preme "Avvio/+30s " per
confermare entro 1 minuto, il forno torna in automatico allo stato precedente.
Nota 3: Durante il processo di impostazione dell'orologio, premere una volta il tasto
"Stop/Azzeramento" per far tornare il forno allo stato precedente.
2. Timer da cucina
1) Portare la manopola funzioni su "Timer da cucina"; il display visualizzerà "00:00".
2) Agire sulla manopola parametri per inserire il tempo desiderato (il tempo massimo è di 95
minuti).
3) Premere "Avvio/+30s" per confermare l'impostazione.
4) Una volta raggiunto il tempo impostato, la spia dell'orologio si spegne. Il cicalino suona 5 volte.
Se era stata impostata l'ora, il display visualizzerà l'ora attuale.
Nota 1: La funzione timer da cucina è diversa dalla funzione orologio. Il timer da cucina viene
utilizzato unicamente con funzione di timer e nessuna delle funzioni della cottura a microonde sarà
vincolata dal timer da cucina. Le funzioni del formo non si arrestano una volta raggiunto il tempo
impostato del timer.
Nota 2: Durante il processo di impostazione del timer da cucina, se non si preme "Avvio/+30s " per
confermare entro 1 minuto, il forno torna in automatico allo stato precedente.
Durante il processo di impostazione del timer da cucina, premere una volta il tasto
"Stop/Azzeramento" per far tornare il forno allo stato precedente.
3. Cottura al microonde
1) Portare la manopola funzioni su " 10% "," 30% "....." 100% ". Si riferisce al livello di potenza del
microonde. Il display LED indica “ P10 ”, “ P30 ”…..” P100 ” insieme a ” ”,
12
2) Agire sulla manopola parametri per selezionare il peso degli alimenti da scongelare. Il peso varia
da 100 a 2000g.
3) Premere "Avvio/+30s" per avviare lo scongelamento.
Nota 1: Durante il processo di impostazione dello scongelamento in base al peso, se non si preme
"Avvio/+30s " per confermare entro 1 minuto, il forno torna in automatico allo stato precedente.
Nota 2: Durante il processo di scongelamento in base al peso, premere due volte il tasto
appare anche ” ”quando la potenza del microonde è sotto il livello “P80 e P100”.
2) Agire sulla manopola parametri per regolare il tempo di cottura (il tempo massimo è di 95
minuti).
Tabella della potenza microonde
Potenza microonde
Display
100%
P100
80%
P80
50%
P50
30%
P30
10%
P10
destra è la "manopola funzioni". 3) Premere "Avvio/+30s" per avviare la cottura. Il cicalino emette un suono.
Nota: gli incrementi di regolazione del tempo sono espressi come riportato di seguito:
0---1 min : 5 secondi
1---5 min : 10 secondi
5---10 min : 30 secondi
10---30 min : 1 minuto
30---95 min : 5 minuti

13
2) Agire sulla manopola parametri per selezionare il tempo di scongelamento. Il tempo impostabile
è compreso tra 0:05 e 95:00.
3) Premere "Avvio/+30s" per avviare lo scongelamento. La potenza di scongelamento è P30.
Nota 1: Durante il processo di scongelamento in base al tempo, se non si preme "Avvio/+30s " per
confermare entro 1 minuto, il forno torna in automatico allo stato precedente.
Nota 2: Durante il processo di scongelamento in base al tempo, premere due volte il tasto
"Stop/Azzeramento" per far tornare il forno allo stato precedente.
8. Menu Auto
1) Portare la manopola funzioni su "Menu Auto" per scegliere la cottura in automatico. Lampeggia
la dicitura "A-1".
2) Agire sulla manopola parametri per selezionare il menu desiderato. Appariranno le voci
"A-1","A-2"..."A-8".
3) Premere "Avvio/+30s" per confermare il menu scelto.
4) Agire sulla manopola parametri per selezionare il peso degli alimenti da cuocere.
5) Premere "Avvio/+30s" per avviare la cottura.
Nota 1: Durante il processo di impostazione del menu di cottura in automatico, se non si preme
"Avvio/+30s" per confermare entro 1 minuto, il forno torna in automatico allo stato precedente.
Nota 2: Durante la di cottura in automatico, premere due volte il tasto "Stop/Azzeramento" per far
tornare il forno allo stato precedente.
9. Funzione di blocco per protezione bambini
Attivazione blocco: In stato di attesa selezione, premere "Stop/Azzeramento" per 3 secondi. Si
avvertirà un suono lungo che segnala l'attivazione del blocco di protezione bambini e verrà
visualizzata l'ora attuale, se l'orologio è stato precedentemente impostato, altrimenti il display
visualizzerà " ".
Disattivazione blocco: In modalità di blocco, premere "Stop/Azzeramento" per 3 secondi; si
avvertirà un suono lungo a segnalare la disattivazione del blocco.
10. Funzione ECO
Attivazione modalità ECO: Premere "Stop/Azzeramento" due volte nel giro di un secondo; il display
visualizzerà "ECO" per 3 secondi. Dopo 3 secondi il forno entra in modalità ECO.
Se non si fanno selezioni, il display si spegne dopo 1 minuto. Il display si riattiverà alla prima
selezione operata sul forno. Se lo sportello viene aperto, la luce del forno si spegne
automaticamente dopo 1 minuto.
In modalità ECO, il forno può essere adoperato nelle stesse modalità descritte sopra.
Disattivazione modalità ECO: Premere "Stop/Azzeramento" due volte nel giro di 1 secondo; il
display visualizzerà "OFF" per 3 secondi. Dopo 3 secondi il forno esce dalla modalità ECO.
Nota: Se si scollega la spina dalla presa di corrente, l'impostazione ECO viene disattivata.
11. Specifica
1) Il cicalino emette un suono alla prima rotazione della manopola parametri.
2) Occorre premere "Avvio/+30s" per continuare a cuocere se viene aperto lo sportello durante la
cottura.
3) Una volta impostato il programma di cottura, se non viene premuto "Avvio"+30s" nel giro di un
minuto, viene visualizzata l'ora attuale. L'impostazione verrà annullata.
4) Il cicalino emette 5 suoni per ricordare che la cottura è terminata.
"Stop/Azzeramento" per far tornare il forno allo stato precedente.
7. Scongelamento in base al tempo
1) Portando la manopola funzioni su "Scongelamento/tempo", il display LED visualizza “dEF2”
insieme a ” ” e ” ”.
14
Menù DisplayPeso
A-1
Pizza
200200 g
400400 g
A-4
Pasta
5050g (con 450g di acqua fredda)
100100g (con 450g di acqua fredda)
A-2
Carne
250250 g
350350 g
450450 g
450450 g
A-6
Pesce
250250 g
350350 g
33 tazze(360ml)
A-7
Bevande
11 tazza(120 ml)
22 tazze(240 ml)
A-5
Patate
200200 g
400400 g
600600 g
A-8
Popcorn
5050 g
8585 g
100100 g
A-3
Verdure
200200 g
300300 g
400400 g
Tabella menu
Nota: Si raccomanda l'utilizzo di coperchi quando si usa la funzione popcorn. In caso contrario, i
popcorn saranno sparsi per tutto il forno dopo la cottura.
Normale
Interferenza del microonde
su TV e radio
Riduzione della luminosità
Durante la cottura in microonde a bassa potenza, la luce
del forno può ridursi di intensità. È normale.
Avviamento accidentale del
forno a vuoto.
È vietato azionare l'apparecchio a vuoto. È molto
pericoloso.
Accumulo di vapore sullo
sportello, fuoriuscita di aria
calda dalle bocchette.
Durante la cottura, il vapore può fuoriuscire dagli alimenti.
La maggior parte di questo vapore fuoriesce dalle
bocchette, ma parte di esso può accumularsi su superfici
fredde come lo sportello del forno, ed è normale.
La ricezione del segnale radio e TV può subire
l'interferenza del microonde in funzione. Si tratta di
un'interferenza simile a quella di piccoli apparecchi
elettrici come mixer, aspirapolvere e ventole elettriche. È
normale.

15 16
PULIZIA E MANUTENZIONE
1. Scollegare l'apparecchio dalla presa di corrente e attendere fino al suo completo raffreddamento,
prima di procedere alla pulizia.
2. Pulire la superficie interna del forno con un panno leggermente inumidito.
Attenzione: la superficie interna del forno deve essere pulita con un panno leggermente inumidito
dopo ogni cottura di alimenti a elevata acidità, come riso, pesce, carne.
3. Il piatto in vetro, il gruppo anello piatto rotante ed l'alberino possono essere lavati in acqua e
detersivo per piatti, quindi sciacquarli in acqua corrente. Se necessario, asciugare con un panno.
4. Pulire di frequente lo sportello e l’oblò su entrambi i lati e le parti adiacenti allo sportello con un
panno umido.
5. Non usare detersivi aggressivi o abrasivi, né raschietti in metallo, per pulire lo sportello del forno,
poiché queste sostanze possono graffiare la superficie e provocare di conseguenza la rottura del
vetro.
6. Non utilizzare un pulitore a vapore.
Problema Possibile causa
(1) Il filo di alimentazione non
è inserito bene nella presa.
Scollegare. Reinserire la spina
nella presa dopo 10 secondi.
Il forno non si av via.
Rimedio
(2) Si è bruciato un fusibile
oppure è scattato un
interruttore automatico.
Sostituire il fusibile o risettare
l'interruttore automatico
(fare riparare da un
professionista autorizzato).
(3) Problemi alla presa.
(4) Lo sportello non è chiuso
bene.
Il forno non scalda.
Provare la presa con altri
elettrodomestici.
Chiudere bene lo sportello.
L’apparecchio è garantito per un periodo di tre anni dalla data di acquisto.
Fa fede la data riportata sullo scontrino / fattura. In caso di difetto preesistente all’acquisto, viene
garantita la sostituzione. Non sono coperte da garanzie tutte le parti che dovessero risultare difettose
a causa della negligenza o della trascuratezza nell’uso.
La garanzia è inoltre esclusa in tutti i casi di uso improprio dell’apparecchio ed in caso di un utilizzo
di tipo professionale. Il venditore declina ogni responsabilità per eventuali danni che possano
direttamente o indirettamente derivare a persone, cose e animali domestici da conseguenza della
mancata osservazione di tutte le prescrizioni indicate nel manuale di istruzioni.
Il simbolo del cestino barrato riportato sull’apparecchio indica che il prodotto, alla fine della propria
vita utile, dovendo essere trattato separatamente dai rifiuti domestici, deve essere conferito in un
centro di raccolta differenziata per apparecchiature elettriche ed elettroniche oppure riconsegnato
al rivenditore al momento dell’acquisto di una nuova apparecchiatura equivalente. L’adeguata
raccolta differenziata per l’avvio successivo dell’apparecchio al riciclaggio, al trattamento e allo
smaltimento ambientale compatibile contribuisce ad evitare possibili effetti negativi sull’ambiente e
sulla salute e favorisce il recupero dei materiali di cui è composto. L’utente è responsabile del
conferimento dell’apparecchio a fine vita alle appropriate strutture di raccolta. Per informazioni più
dettagliate inerenti i sistemi di raccolta disponibili, rivolgersi al servizio locale di smaltimento rifiuti,
o al negozio dove è stato effettuato l’acquisto. Chiunque abbandona o cestina questo apparecchio e
non lo riporta in un centro di raccolta differenziata per rifiuti elettrici-elettronici è punito con la
sanzione amministrativa pecuniaria prevista dalla normativa vigente in materia di smaltimento
abusivo di rifiuti.
GARANZIA
SMALTIMENTO

CONTENTS
IMPORTANT SAFETY INSTRUCTIONS READ
CAREFULLY AND KEEP FOR FUTURE
REFERENCE
INFORMATION REGARDING CONTACT
WITH FOOD
MICROWAVE-SAFE MATERIALS
MATERIALS UNSUITABLE FOR MICROWAVES
DESCRIPTION OF THE MICROWAVE OVEN
SPECIFICATIONS
UNPACKING AND ASSEMBLY
INSTALLING THE GLASS PLATE
POSITIONING THE MICROWAVE OVEN
CONTROL PANEL
INSTRUCTIONS FOR USE
CLEANING AND MAINTENANCE
WARRANTY
DISPOSAL
1-5
5-6
7
7-8
8
8
9
9
9-10
10
10-15
15
16
16
23L
microwave oven
The safety of products
tested and certified
for you.
• Indirect CO2 emissions quantified
• Tested for use
• Safety tested
The Italian company IMQ, with the IMQ verified
logo, guarantees this product’s conformity with
package specifications in accordance with
sustainability, safety and quality requirements.

IMPORTANT SAFETY INSTRUCTIONS
READ CAREFULLY AND KEEP FOR
FUTURE REFERENCE
1 2
explode;
7. The appliance is intended for domestic use
in indoor environments only; it is not intend-
ed for use:
- in shops, offices or other workplaces;
- in farms or similar sites;
- by guests in hotels, motels and other resi-
dential environments;
- in bed & breakfast facilities.
8. Leave a minimum clearance height of 30
cm above the oven and a clearance space of
at least 20 cm between the oven and adja-
cent walls.
9. Only use utensils suitable for microwave
use.
10. When heating food in plastic or paper
containers, check the oven frequently due to
the risk of fire;
11. The purpose of the microwave oven is to
heat food and drink. Using it to dehydrate
foods or dry clothes, or to heat up heating
pads, slippers, sponges, damp cloths or the
like can lead to the risk of injury or fire.
12. If you notice any emission of smoke, turn
off the appliance or remove the plug and
keep the door closed to extinguish any
flames;
Before using this household appliance, always ob-
serve the following basic precautions:
1. The appliance must be used exclusively for
its intended purposes, i.e. as a microwave
oven for domestic use. Any other use is con-
sidered incorrect and therefore hazardous.
2. Before connecting the appliance to the
power outlet, make sure that the mains volt-
age and frequency are compatible with those
indicated on the appliance nameplate.
3. The oven is intended to be free standing; it
must not be installed inside a piece of furni-
ture and it is not intended as a built-in unit.
4.
CAUTION:
If the door or door seals are dam-
aged, the oven must not be operated until it
has been repaired by specialised personnel;
5.
CAUTION:
It is dangerous for anyone, other
than specialised personnel, to perform any
any type of maintenance or repair operation
involving the removal of any cover that pro-
tects against exposure to microwave energy;
6.
CAUTION:
Liquids or other foods should not
be heated in sealed containers as these can
13. Heating drinks in microwave ovens can
result in delayed eruptive boiling, therefore
care must be taken when handling the con-
tainer;
14. The content of bottles and baby foods in
jars must be mixed or stirred and the tem-
perature checked before consumption, to
avoid scalding;
15. Metal containers are not permitted for
heating food and drinks in microwaves.
16. Eggs in shells and whole hard-boiled eggs
must not be heated in a microwave oven as
they can explode, even after the heating in
the microwave is finished;
17. The oven should be cleaned regularly to
remove all food residue.
18. To clean the surfaces which come into
contact with food, see the section on "Clean-
ing and Maintenance".
19. Failure to keep the oven clean can lead to
deterioration of the surfaces, which can ad-
versely affect the life of the appliance and
give rise to hazardous conditions;
20. The appliance cannot be steam cleaned.
21. The appliance may be used by children of
8 years or older and by people with reduced
physical, sensory or mental abilities or with
lack of experience and the necessary knowl-
edge, as long as they are supervised or have
been instructed in the safe use of the appli-
ance and have understood the dangers in-
volved. Children must not play with the appli-
ance. The cleaning and maintenance required
of the user must not be carried out by unsu-
pervised children.
22. Keep the appliance and its power cable
out of the reach of children under 8 years of
age.
23. This appliance is not designed for use
with an external timer or a separate remote
control device.
24. Always disconnect the appliance from the
power outlet before cleaning or servicing it,
and when not in use.
25. If the power cord is damaged, it must be
replaced by the manufacturer or by its techni-
cal assistance service or in any case by a
person with similar qualifications, in order to
prevent any risks.
26. This appliance is classified as Group 2, as it
generates radio frequency energy to heat
food or objects.
27. This is a Class B appliance, as it is suitable
for use in residential environments and facili-
ties directly connected to a low-voltage
power supply grid that serves residential
buildings.
28.
CAUTION:
in the event of damage to the
oven components (e.g. door, light, etc.), do
not try to repair it yourself due to risk of elec-
tric shock. Stop using the appliance and con-
tact the service department to have it re-
paired.

3 4
13. Heating drinks in microwave ovens can
result in delayed eruptive boiling, therefore
care must be taken when handling the con-
tainer;
14. The content of bottles and baby foods in
jars must be mixed or stirred and the tem-
perature checked before consumption, to
avoid scalding;
15. Metal containers are not permitted for
heating food and drinks in microwaves.
16. Eggs in shells and whole hard-boiled eggs
must not be heated in a microwave oven as
they can explode, even after the heating in
the microwave is finished;
17. The oven should be cleaned regularly to
remove all food residue.
18. To clean the surfaces which come into
contact with food, see the section on "Clean-
ing and Maintenance".
19. Failure to keep the oven clean can lead to
deterioration of the surfaces, which can ad-
versely affect the life of the appliance and
give rise to hazardous conditions;
20. The appliance cannot be steam cleaned.
21. The appliance may be used by children of
8 years or older and by people with reduced
physical, sensory or mental abilities or with
lack of experience and the necessary knowl-
edge, as long as they are supervised or have
been instructed in the safe use of the appli-
ance and have understood the dangers in-
volved. Children must not play with the appli-
ance. The cleaning and maintenance required
of the user must not be carried out by unsu-
pervised children.
22. Keep the appliance and its power cable
out of the reach of children under 8 years of
age.
23. This appliance is not designed for use
with an external timer or a separate remote
control device.
24. Always disconnect the appliance from the
power outlet before cleaning or servicing it,
and when not in use.
25. If the power cord is damaged, it must be
replaced by the manufacturer or by its techni-
cal assistance service or in any case by a
person with similar qualifications, in order to
prevent any risks.
26. This appliance is classified as Group 2, as it
generates radio frequency energy to heat
food or objects.
27. This is a Class B appliance, as it is suitable
for use in residential environments and facili-
ties directly connected to a low-voltage
power supply grid that serves residential
buildings.
28.
CAUTION:
in the event of damage to the
oven components (e.g. door, light, etc.), do
not try to repair it yourself due to risk of elec-
tric shock. Stop using the appliance and con-
tact the service department to have it re-
paired.

13. Heating drinks in microwave ovens can
result in delayed eruptive boiling, therefore
care must be taken when handling the con-
tainer;
14. The content of bottles and baby foods in
jars must be mixed or stirred and the tem-
perature checked before consumption, to
avoid scalding;
15. Metal containers are not permitted for
heating food and drinks in microwaves.
16. Eggs in shells and whole hard-boiled eggs
must not be heated in a microwave oven as
they can explode, even after the heating in
the microwave is finished;
17. The oven should be cleaned regularly to
remove all food residue.
18. To clean the surfaces which come into
contact with food, see the section on "Clean-
ing and Maintenance".
19. Failure to keep the oven clean can lead to
deterioration of the surfaces, which can ad-
versely affect the life of the appliance and
give rise to hazardous conditions;
20. The appliance cannot be steam cleaned.
21. The appliance may be used by children of
8 years or older and by people with reduced
physical, sensory or mental abilities or with
lack of experience and the necessary knowl-
edge, as long as they are supervised or have
been instructed in the safe use of the appli-
ance and have understood the dangers in-
volved. Children must not play with the appli-
ance. The cleaning and maintenance required
of the user must not be carried out by unsu-
pervised children.
22. Keep the appliance and its power cable
out of the reach of children under 8 years of
age.
23. This appliance is not designed for use
with an external timer or a separate remote
control device.
24. Always disconnect the appliance from the
power outlet before cleaning or servicing it,
and when not in use.
25. If the power cord is damaged, it must be
replaced by the manufacturer or by its techni-
cal assistance service or in any case by a
person with similar qualifications, in order to
prevent any risks.
26. This appliance is classified as Group 2, as it
generates radio frequency energy to heat
food or objects.
27. This is a Class B appliance, as it is suitable
for use in residential environments and facili-
6
5
To make sure that the appliance is used safely,
adhere to the following guidelines:
1. Only the glass plate should come into con-
tact with food while the appliance is operat-
ing or when placing food into and removing
it from the oven.
2. When using the oven, direct contact be-
tween the internal surfaces of the cooking
cavity and the food, while placing or remov-
ing it, is strictly forbidden.
3. After cooking, special precautions must be
taken in cleaning the interior surface and any
internal parts of the oven. Refer to the
"cleaning and maintenance" section.
4. When using materials of the type specified
in the “MICROWAVE-SAFE MATERIALS" sec-
tion, carefully check that they are suitable for
contact with food.
PRECAUTIONS REGARDING CONTACT
WITH FOOD
ties directly connected to a low-voltage
power supply grid that serves residential
buildings.
28.
CAUTION:
in the event of damage to the
oven components (e.g. door, light, etc.), do
not try to repair it yourself due to risk of elec-
tric shock. Stop using the appliance and con-
tact the service department to have it re-
paired.
78
MICROWAVE-SAFE MATERIALS
Utensils Note
Plastic
Only of a type suitable for microwave use. Follow the manufacturer's
instructions. Must be labelled as "Microwave safe". Some plastic
containers melt when the food inside them becomes hot.
Well-sealed "oven cooking bags" and plastic bags must be perforated or
torn as indicated in the instructions on the packaging.
Crockery Only of a type suitable for microwave use. Follow the manufacturer's
instructions. Do not use plates that are cracked or chipped.
Glass jar Always remove the lid. Use only for heating food quickly. Most jars are
not heat resistant and can break.
Glassware UOnly use heat-resistant glass. Make sure there are no metal finishes or
decorations. Do not use plates that are cracked or chipped.
Oven cooking bags Follow the manufacturer's instructions. Do not close them with metal ties.
Make holes to let the steam out.
Paper plates and
cups
Use only for quick cooking or heating. Do not leave the oven unattended
during cooking.
Paper napkins Use to cover food to be heated and to absorb fat. Use for quick cooking
only, keeping an eye always on the microwave.
Baking paper Use as a splash guard or as wrapping paper for steaming.
Plastic food wrap Only for microwave use. Use to cover food during cooking to retain
moisture. Avoid direct contact of the food wrap with the food.
Thermometers Only of a type suitable for microwave use (meat and dessert
thermometers).
Greaseproof paper Use as a splash guard and to retain moisture.
MATERIALS UNSUITABLE FOR MICROWAVES
Utensils Note
Aluminium trays They can cause electric arcing. Transfer food to a microwave-safe plate.
Bag ties with metal
wire cores They can trigger electric arcs and fires in the microwave.
Cardboard
containers with
metal handles
They can cause electric arcing. Transfer food to a microwave-safe plate.
Metal or
metal-finished
utensils
The metal prevents the microwave energy from reaching the food.
Metal finishes can trigger electric arcs.
Polystyrene When exposed to high temperatures, polystyrene can dissolve or
contaminate the liquid inside it.
Wood Wood dries too much when microwaved, and can crack or split.
Paper bags They can cause fires in the oven.
Model: 162913.01
Nominal voltage: 230 V~, 50 Hz
Oven capacity: 23 L
Turntable plate diameter:
Overall dimensions: 485x383x292.5 mm
Net weight: Approximately 13kg
Rated input power (Microwave): 1250 W
Rated output power (Microwave): 800 W, 2450 MHz
270 mm
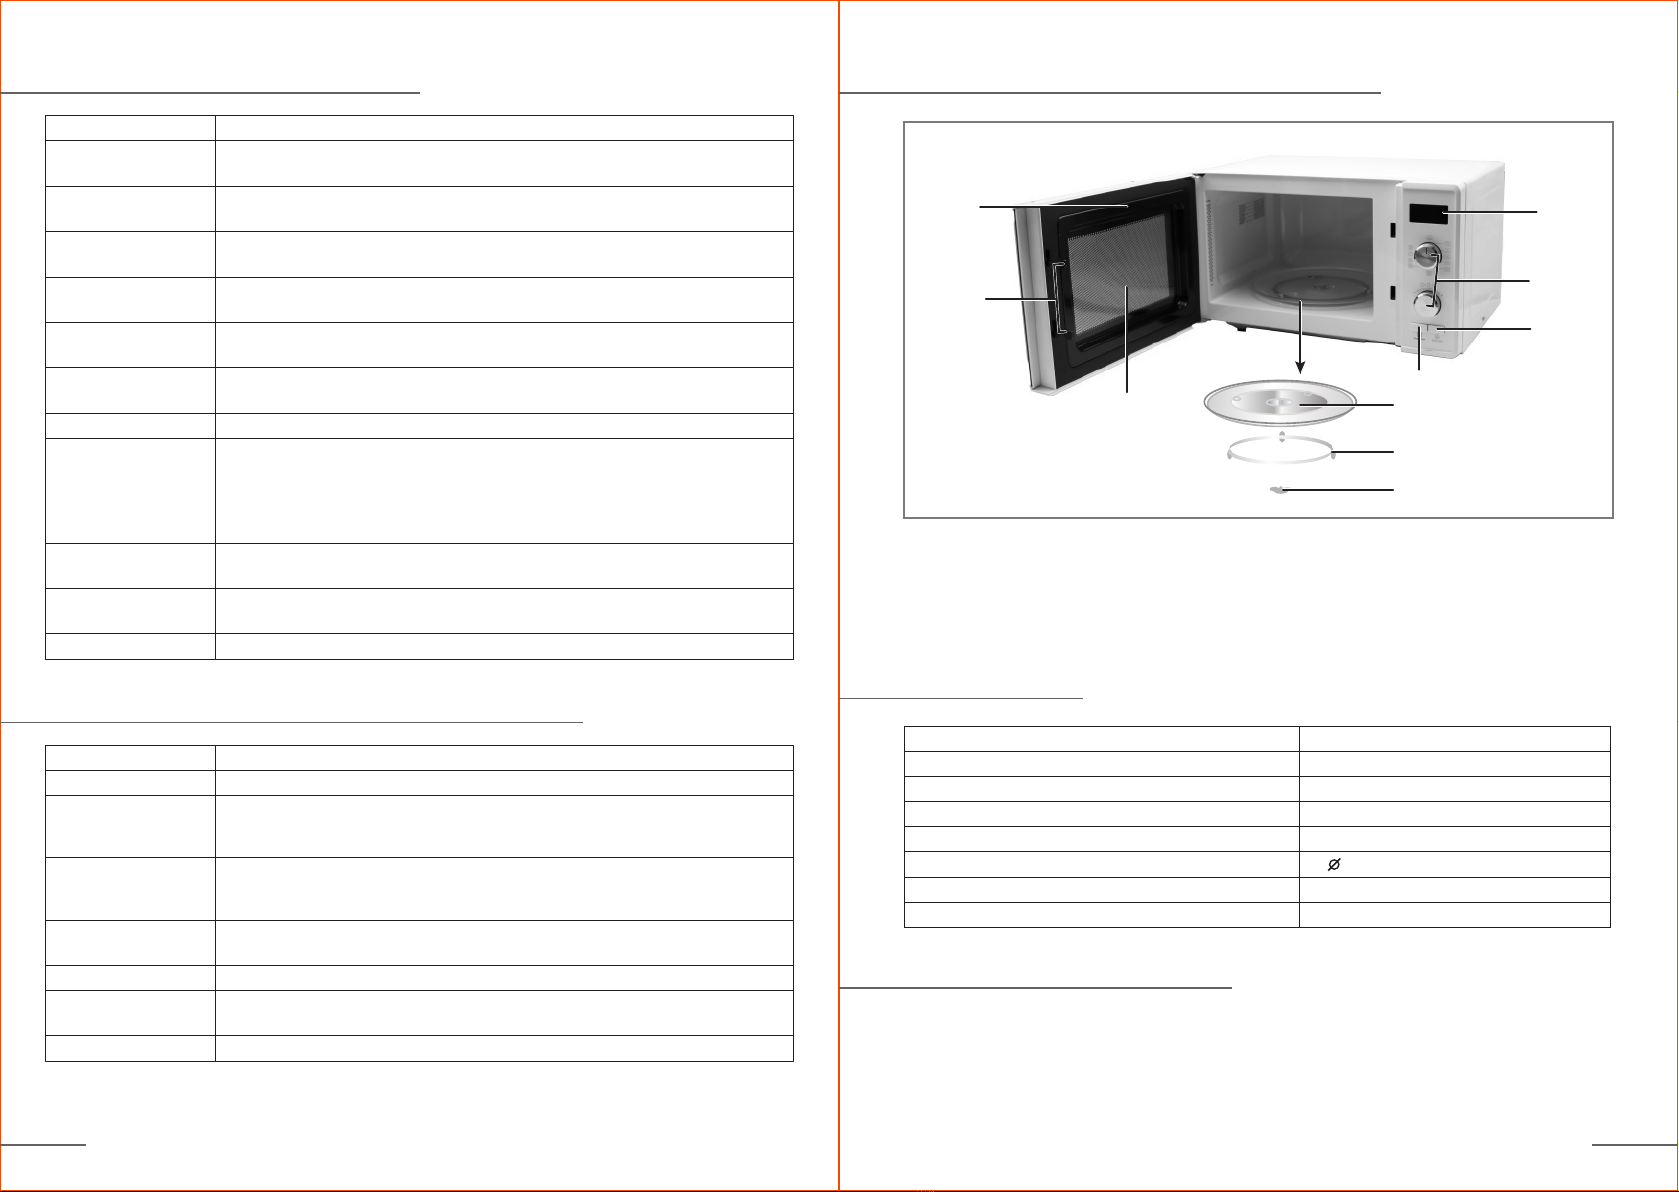
DESCRIPTION OF THE MICROWAVE OVEN
SPECIFICATIONS
A: Door
B: Safety locking system
C: Viewing window
D: Glass plate
E: Turntable ring assembly
F: Turntable coupling
G: LED display
H: Settings/function knob
I: Stop/Clear button
J: Start button
A
D
G
H
E
B
C
F
J
I
Remove all packaging and accessories from the appliance.
The oven is equipped with the following accessories:
Glass plate
Turntable ring assembly
Instruction manual
UNPACKING AND ASSEMBLY
1 piece
1 piece
1 piece

910
CAUTION: Do not install the appliance inside a cabinet. Do not use the appliance as a built-in unit.
CAUTION: If the air inlets or vents are blocked, the oven may be damaged.
CAUTION: Do not install the oven over a stove or other heat-emitting appliance. If installed on or
near a heat source, the oven may be damaged and the warranty voided.
2.Inserire la spina in una presa di corrente, accertandosi che la tensione erogata sia di tipo adatto
all'apparecchio.
3.Always refer to the "Microwave-safe materials" section to select appropriate utensils and thus
avoid damaging the appliance or causing physical injury.
Place the turntable ring assembly in the round
channel in the base of the oven, then place
the glass plate on the ring, making sure that
the hub on the bottom of the glass plate
properly engages the turntable coupling that
is always on the base of the oven (Figure 1).
a. The minimum installation height is 85cm.
b. The rear side of the appliance must rest
against the wall.
c. Leave a space of 30cm above the oven, and
keep it at least 20cm away from any adjacent
walls.
d. Do not remove the feet from the bottom of
the oven.
e. Place the microwave as far away from any
radios and TVs as possible. When the
microwave is switched on, it may interfere
with the radio or TV signal.
20cm
30cm
20cm
min85cm
0cm
Note:
1. Never position the plate upside down. It must always be positioned correctly.
2. The glass plate and turntable ring assembly must always be used for cooking.
3. Food and food containers must always be placed on the glass plate for cooking.
4. If the glass plate or turntable ring assembly is cracked or broken, contact your nearest service
centre.
INSTALLING THE GLASS PLATE
1. Select a flat, stable surface that allows sufficient clearance around the air intakes and vents.
POSITIONING THE MICROWAVE OVEN
Hub (lower side)
Glass plate
Turntable ring assembly
Turntable plate
coupling
Figure 1
Check that the oven is free from damage such as dents and that the door is not broken. Retain the
packaging. When disposing of the appliance, follow the regulations on proper waste disposal.
CAUTION: Do not remove the light brown mica cover fitted to the inside of the oven to protect the
magnetron.
Microwave
Auto/Menu
Time/Defrost
Weight/Defrost
Clock
Kitchen timer
Weight
Stop/Clear
Start/+30s/Confirm
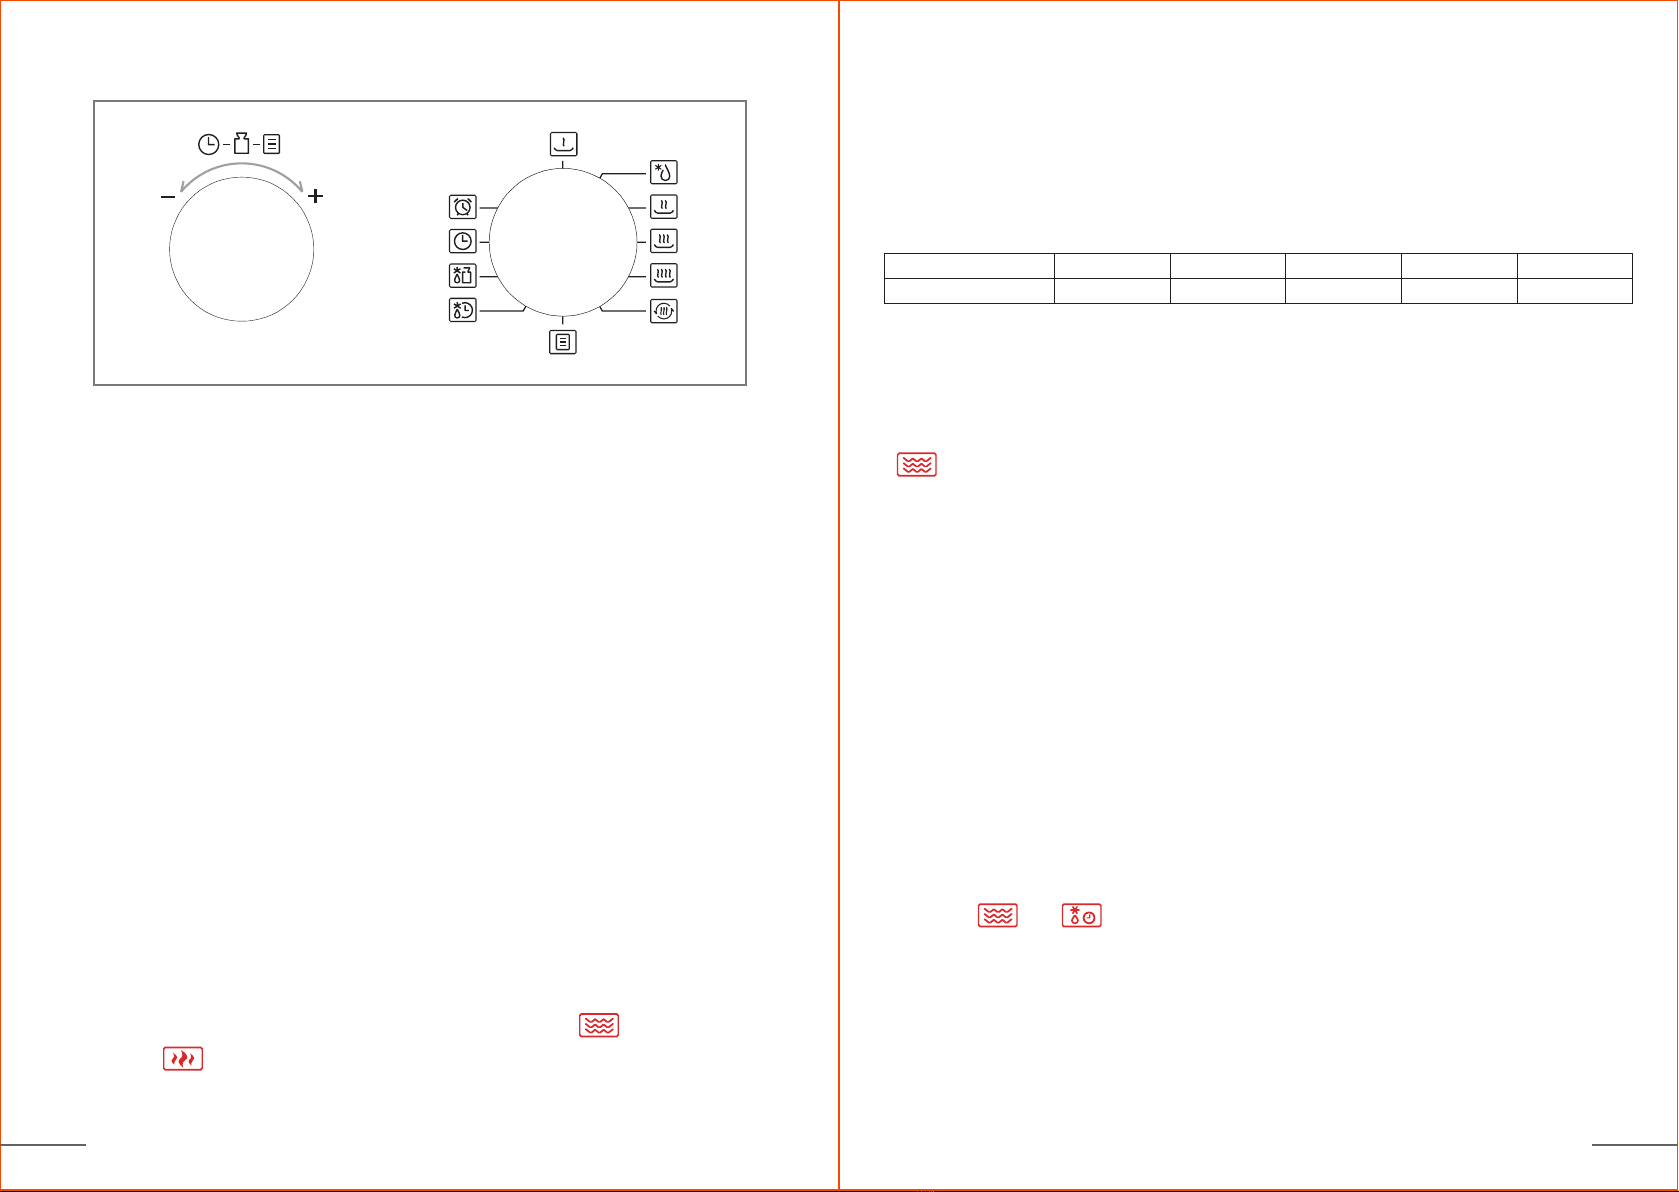
KEY
Heat
MICROWAVE
10%
30%
50%
100%
80%
CONTROL PANEL
This microwave uses a modern electronic control to adjust the cooking settings according to your
preferences.
Control knob instructions There are two knobs on the panel. For greater clarity, the manual refers
to the left knob as the "settings knob" and that on the right as the "function knob".
INSTRUCTIONS FOR USE

2) 2)Use the settings knob to set the weight of the food to be heated; the values "200", "400" or
"600" will appear.
3)Press "Start/+30s" to start cooking.
Note 1: When setting the microwave cooking, if you do not press "Start/+30s " to confirm within 1
minute, the oven automatically returns to the previous state.
Note 2: During the microwave cooking process, press the "Stop/Clear" button once to return the
oven to its previous state.
5. Quick cooking
1) Press "Start/+30s" to start cooking with power level P100. Each time you press the button, the
cooking time increases by 30 seconds, up to a maximum of 95 minutes.
2) During microwave cooking or defrosting, each time you press the "Start/+30s" button, the
cooking time increases by 30 seconds.
3) Use the settings knob to set the cooking time to microwave power P100, then press "Start/+30s"
to start cooking.
Note 1: During the quick cooking setting process, if you do not press "Start/+30s" to confirm within
1 minute, the oven automatically returns to the previous state.
Note 2: During quick cooking, press the "Stop/Clear" button once to return the oven to its previous
state.
6. Weight defrost
1) When the function knob is turned to "Defrost/weight", the LED display shows “dEF1” together
with ” ”and “ ”.
11
Note 1: When setting the microwave cooking, if you do not press "Start/+30s” to confirm within 1
minute, the oven automatically returns to the previous state.
Note 2: During the microwave cooking process, press the "Stop/Clear" button once to return the
oven to its previous state.
4. Heating
1) 1)Turn the function knob to “Heating”; the LED display shows “200” together with ” ”.
12
2)Use the settings knob to select the weight of the food to be defrosted. The weight ranges from
100 to 2,000g.
3)Press "Start/+30s" to start defrosting.
Note 1: When setting the weight defrost, if you do not press "Start/+30s” to confirm within 1
minute, the oven automatically returns to the previous state. Note 2: When weight defrosting, press
the “Stop/Clear" button twice to return the oven to the previous state.
7. Time defrost
1) When the function knob is turned to "Defrost/time", the LED display shows “dEF2”
together with ” ” and ” ”.
1. Setting the clock
When the microwave is switched on, the display shows "0:00" and the buzzer sounds. The standby
state is then displayed.
1) Turn the function knob to "Clock"; the hour digits begin to flash.
2) Use the settings knob to set the hour digits, selecting a number between 0 and 23.
3) Press "Start/+30s" to confirm, then the minute digits will start flashing.
4) Use the settings knob to set the minute digits, selecting a number between 0 and 59.
5) Press "Start/+30s" to complete the clock setting. The ":" sign flashes.
Note: 1 Setting the clock does not affect microwave operation.
Note: 2 When setting the clock, if you do not press "Start/+30s” to confirm within 1 minute, the
oven automatically returns to the previous state.
Note 3: When setting the clock, press the "Stop/Clear" button once to return the oven to its
previous state.
2. Kitchen timer
1) Turn the function knob to "Kitchen timer"; the display will show "00:00".
2) Use the settings knob to enter the desired time (the maximum time is 95 minutes).
3) Press "Start/+30s" to confirm the setting.
4) Once the set time is reached, the clock indicator light switches off. The buzzer sounds 5 times. If
the time has been set, the display will show the current time.
Note 1: The kitchen timer function is different from the clock function. The kitchen timer only has a
timer function and it does not affect any of the microwave functions. The oven functions do not
stop once the time set on the timer is reached.
Note 2: When setting the kitchen timer, if you do not press "Start/+30s” to confirm within 1 minute,
the oven automatically returns to the previous state.
When setting the kitchen timer, press the "Stop/Clear" button once to return the oven to its
previous state.
3. Microwave cooking
1) 1)Set the function knob to “10%”, “30%” ... “100%”. This indicates the power level of the
microwave. The LED display indicates “P10”, “P30” …. “P100”, together with ” ”;
” ” also appears when the microwave power is below the “P80 and P100” level.
2) Use the settings knob to adjust the cooking time (the maximum time is 95 minutes).
3) Press "Start/+30s" to start cooking. The buzzer makes a sound.
Note: the time adjustment intervals are expressed as follows:
0---1 min.: 5 seconds.
Microwave power
Display
100%
P100
80%
P80
50%
P50
30%
P30
10%
P10
1---5 min.: 10 seconds.
5---10 min.: 30 seconds.
10---30 min.: 1 minute
30---95 min.: 5 minutes
Microwave power table

13
2) Use the settings knob to select the defrosting time. A time can be set from 0:05 to 95:00.
3) Press "Start/+30s" to start defrosting. The defrosting power is P30.
Note 1: When setting the time defrost process, if you do not press "Start/+30s" to confirm within 1
minute, the oven automatically returns to the previous state.
Note 2: When time defrosting, press the "Stop/Clear" button once to return the oven to its previous
state.
8. Auto Menu
1) Turn the function knob to "Auto Menu" to choose automatic cooking. The menu "A-1" flashes.
2) Use the settings knob to select the desired menu. The menus “A-1”, “A-2” ... “A-8” appear.
3) Press "Start/+30s" to confirm the chosen menu.
4) Use the settings knob to select the weight of the food to be cooked.
5) Press "Start/+30s" to start cooking.
Note 1: When setting automatic cooking, if you do not press "Start/+30s” to confirm within 1
minute, the oven automatically returns to the previous state. Note 2: During automatic cooking,
press the "Stop/Clear" button once to return the oven to its previous state.
9. Child protection lock function
Activating the lock: In standby state, press "Stop/Clear" for 3 seconds. You will hear a long beep
that signals the activation of the child protection lock and the current time will be displayed, if the
clock has been previously set; otherwise the display will show " ".
Deactivating the lock: In locked mode, press "Stop/Clear" for 3 seconds; a long beep will sound to
signal the deactivation of the lock.
10. ECO function
Activating ECO mode: Press "Stop/Clear" twice within one second; the display will show "ECO" for 3
seconds. After 3 seconds the oven goes into ECO mode.
If nothing is selected, the display turns off after 1 minute. The display will reactivate to the first
selection made on the oven. If the door is open, the oven light automatically turns off after 1
minute.
In ECO mode, the oven can be operated in the same manner as described above. Deactivating ECO
mode: Press "Stop/Clear" twice within 1 second; the display will show "OFF" for 3 seconds. After 3
seconds the oven comes out of ECO mode. Note: If you disconnect the plug from the power outlet,
the ECO setting is disabled.
11. Specific details
1) The buzzer sounds the first time the settings knob is rotated.
2) Press "Start/+30s" to resume cooking if the door is opened during cooking.
3) Once the cooking programme is set, if "Start/+30s” is not pressed within one minute, the current
time is displayed. The setting will be cancelled.
4) The buzzer beeps 5 times to remind you that cooking is finished.
14
Menu DisplayWeight
A-1
Pizza
200200 g
400400 g
A-4
Pasta
5050g (with 450g of cold water)
100100g (with 450g of cold water)
A-2
Meat
250250 g
350350 g
450450 g
450450 g
A-6
Fish
250250 g
350350 g
33 cups (360 ml)
A-7
Drinks
11 cup (120 ml)
22 cups (240 ml)
A-5
Potatoes
200200 g
400400 g
600600 g
A-8
Popcorn
5050 g
8585 g
100100 g
A-3
Vegetables
200200 g
300300 g
400400 g
Menu table
Note: It is recommended to use a lid when using the popcorn function. Otherwise, the popcorn will
be scattered throughout the oven after cooking.
Normal
Microwave interference
with TV and radio
Reduction in brightness
During low-power microwave cooking, the oven light may
diminish in brightness. This is normal.
Accidental start-up of the
empty oven.
The appliance must not be operated when empty. It is
highly dangerous.
Accumulation of steam on
the door, hot air coming
from the vents.
During cooking, the food may give off steam. Most of this
steam is released through the vents, but some of it can
accumulate on cold surfaces, such as the oven door, and is
normal.
Radio and TV signal reception may experience interference
when the microwave is in operation. This interference is
similar to that from small electrical appliances such as
mixers, vacuum cleaners and electric fans. This is normal.

15 16
CLEANING AND MAINTENANCE
1.Unplug the appliance from the electric socket and wait for it to cool down completely before
beginning the cleaning process.
2.Clean the outside of the appliance with a slightly damp cloth.
Caution: the internal surface of the oven must be cleaned with a slightly damp cloth after cooking
foods with high acidity, such as rice, fish or meat.
3.The glass plate, turntable ring assembly and coupling can be washed in water and washing-up
liquid, then rinsed in running water. If necessary, dry with a cloth.
4.Frequently wipe the door and window on both sides and the parts adjacent to the door with a
damp cloth.
5.Do not use harsh or abrasive detergents or metal scrapers to clean the oven door, as they can
scratch the surface and cause the glass to break.
6. Do not use a steam cleaner.
Problem Possible cause
(1) The power cord is not
properly plugged into the
socket.
Disconnect. Plug back into the
socket after 10 seconds.
The oven doesn't start.
Solution
(2) A fuse has blown or a
circuit breaker has tripped.
Replace the fuse or reset the
circuit breaker (have it
repaired by an authorised
professional).
(3) Problems with the socket.
(4) The door is not closed
properly.
The oven doesn't heat up.
Test the socket with other
appliances.
Close the door tightly.
WARRANTY
DISPOSAL
The appliance is guaranteed for a period of three years from the date of purchase.
The date on the receipt / invoice is the warranty start date. In cases of pre-existing defects, the
appliance will be replaced. The warranty does not cover parts rendered defective by negligence or
carelessness.
Moreover, the warranty does not cover improper or professional use of the appliance. The seller shall
not be liable for any damage that may result directly or indirectly to persons, property and pets as a
result of non-compliance with any of the indications given in the owner’s manual.
The crossed-out dustbin symbol appearing on the appliance indicates that, at the end of its life, the
product must be treated separately from household waste, and delivered to a separate waste
collection facility for electric and electronic equipment or returned to the retailer when purchasing a
new, equivalent appliance. The correct separation of waste and the subsequent delivery of the
appliance for recycling, treatment and environmentally compatible disposal help to safeguard health
and the environment; and promote the reuse and/or recycling of materials contained in the
appliance. The user is responsible for delivering the appliance to the appropriate collection facilities
at the end of its life. For more detailed information on available collection systems, contact your local
waste disposal service or the shop where you purchased the product. Dumping or inadequately
disposing of this appliance, or failure to return it to a separate collection centre for electrical and
electronic waste, is punishable with the administrative sanctions and fines imposed by current law
regarding waste disposal.

KAZALO
POMEMBNA VARNOSTNA NAVODILA POZORNO
PREBERITE IN SHRANITE ZA POZNEJŠA
POSVETOVANJA
OPOZORILO V ZVEZI S STIKOM S HRANO
MATERIALI, KI JIH JE DOVOLJENO UPORABLJATI
V MIKROVALOVNI PEČICI
MATERIALI, KI SE JIM IZOGNEMO V
MIKROVALOVNI PEČICI
OPIS MIKROVALOVNE PEČICE
SPECIFIKACIJE
ODSTRANITEV EMBALAŽE IN NAMESTITEV
NAMESTITEV STEKLENEGA KROŽNIKA
POSTAVITEV MIKROVALOVNE PEČICE
UKAZNA PLOŠČA
NAVODILA ZA UPORABO
ČIŠČENJE IN VZDRŽEVANJE
GARANCIJA
ODLAGANJE
1-5
5
6
6
7
7
7-8
8
8
9
9-14
14
15
15
mikrovalovna pečica
23L
Varnost izdelkov je bila
preizkušena in potrjena
za vas.
na www.eurospin.si je
na voljo digitalna različica uporabniškega
priročnika
Na voljo smo vam: PONEDELJEK - PETEK: 7.00 - 20.00
(klici so možni samo znotraj Slovenije)
Brezplačna modra številka!
Italijanska družba IMQ z logotipom IMQ verified
potrjuje skladnost izdelka z izjavo na embalaži na
podlagi zahtev trajnosti, varnosti in kakovosti.
• Kvantificirane posredne emisije CO2
• Preizkušena uporaba
• Preverjena varnost
Table of contents
Languages:
Other ENKHO Microwave Oven manuals


