Envioni Ultra Light Professional User manual
Owner’s
Manual
ULTRA LIGHT
PROFESSIONAL
VACUUM
GV112108
By
Garry manual 11.21.08.indd 1-2 11/21/08 5:29:15 PM
WELCOME!
Congratulations on your purchase of
the Garry™ Ultra Light Professional
Vacuum! With the Garry™ vacuum,
you don’t have to sacrice the power
of the heavier vacuums. This amazing
product combines the convenience
and ease of a light weight vacuum
with the power you can count on. No
more sore backs from vacuuming, no
more ignoring the upstairs because
you don’t feel like lugging the heavy
vacuum. The Garry™ Ultra Light
Weight Vacuum will get your carpet or
hard oors clean quickly and easily.
And with a true hypo-allergenic lter
bag, you can be sure that the dirt and
dust you vacuum with stay out of the
air. You’ll soon agree that the Garry™
Ultra Light Professional Vacuum is one
product you can’t live without!
TABLE OF CONTENTS
IMPORTANT SAFETY INSTRUCTIONS
PRODUCT OVERVIEW
ASSEMBLY INSTRUCTIONS
INSTRUCTIONS FOR USE
CLEANING CARPETS AND FLOORS
USING ATTACHMENTS
MAINTENANCE
REPLACING THE FILTER BAG
CHANGING THE BELT
CLEANING THE ROLLER
IMPROVING AIRFLOW
SPARE PARTS
TROUBLESHOOTING
LIMITED WARRANTY
ARBITRATION AGREEMENT
1
2
3
5
5
5
6
6
7
7
8
8
8
9
10
PLEASE READ ALL SAFETY INSTRUCTIONS IN THIS
PRODUCT MANUAL BEFORE USING
THE GARRY VACUUM.
KEEP THIS PRODUCT MANUAL FOR
FUTURE REFERENCE.
Garry manual 11.21.08.indd 3-4 11/21/08 5:29:15 PM

1
2
IMPORTANT SAFETY INSTRUCTIONS
Read all instructions before using your Garry™ vacuum.
WARNING: To reduce the risk of re, electric shock, or injury:
Do not leave your Garry™ vacuum cleaner plugged in. Always unplug
from the outlet when not use and before servicing.
To reduce the risk of electric shock, do not use your Garry™ vacuum
cleaner outdoors or on wet surfaces
Do not allow this or any appliance to be used as a toy. Pay close
attention when using near children.
Use the Garry™ vacuum only as described in this manual. Use only
manufacturer recommended attachments.
Do not use with a damaged cord or plug. If your Garry™ vacuum
cleaner is not working as it should, discontinue use immediately and
have it repaired at an authorized service center.
Do not pull or carry by the cord, use the cord as a handle, close door on
cord, or pull cord around sharp edges or corners. Do not run vacuum
cleaner over cord. Keep cord away from heated surfaces.
Do not unplug by pulling on cord. To unplug the unit, grasp the plug not
the cord.
Do not handle vacuum cleaner or plug with wet hands.
Do not put any object into openings. Do not use with any opening blocked.
Keep free of dust, lint, hair and anything that may reduce airow.
Keep hair, loose clothing, ngers and all parts of body away from
openings and moving parts.
Turn off the vacuum via the power switch before unplugging.
Use extra care when cleaning on stairs.
Do not use to pick up ammable or combustible liquid such as gasoline;
Do not use in areas where these liquids may be present.
Unplug the vacuum before connecting the hose.
Do not pick up anything that is burning or smoking, such as
cigarettes, matches, or hot ashes. Do not operate too close to space
heaters or replaces
Do not use without dust bag and/or lters in place.
If airow becomes blocked, switch off the vacuum immediately and
unplug the cord before you remove the obstruction.
Clear the oor of large, metal and sharp object such as coins, nuts and
bolts, paper, foam and similar items prior to vacuuming.
Always unplug the Garry™ vacuum cleaner before installing or
removing accessories.
This product operates at 120V AC, 60Hz only.
For household use only.
SAVE THESE INSTRUCTIONS
THIS APPLIANCE HAS A POLARIZED PLUG. To reduce the risk
of electric shock, this vacuum cleaner has a polarized plug (one blade is wider than
the other). This plug will t in a polarized outlet only one way. If the plug does not
easily t in the outlet, reverse the plug. If it still does not t, contact a qualied
electrician to install the proper outlet. Do not change or modify the plug in any way.
PRODUCT OVERVIEW
A. Power Switch
B. Handle
C. Power cord
D. Handle tube
E. Outer bag
F. Hypo-allergenic bag
G. Hose
H. Hose end
I. Hose divert knob
J. Light lens
K. Extension wand
L. Crevice tool
M. Upholstery tool
N. Round nozzle tool
O. Middle tube
P. Hardware
Q. Power Base
Power base components:
a. Roller
b. Roller pulley
c. Motor drive shaft
d. Belt
e. Belt cover lid
f. Hose attachment socket
g. Intake opening
h. Bag spring clip
i. Side brush
A
D
B
CI
J
Q
E
P
FNML
0G
H K
a
i
h
e
i
f
g
c
b
d
Garry manual 11.21.08.indd 1-2 11/21/08 5:29:18 PM

3
4
ASSEMBLY INSTRUCTIONS (Assembly Instructions continued)
Step 1
Insert handle tube into
the tube on the bag
as shown. Verify the
handle tube’s cord hook
is facing away from the
outer bag as shown
in the image to the
right. Use the hardware
provided to secure the
handle tube to the outer
bag. Carefully tighten
with a screwdriver. Do
not overtighten.
Clip the power cord
into the upper clip
near the handle.
See 4a. Repeat this
step by clipping the
power cord to the
bottom clip located on
the bottom end of the
handle close to the base.
See 4b.
Step 2 2a
2b
Gently insert the
hose into the hose
attachment socket and
twist clockwise until it
softly clicks. Do not
apply excessive force.
Step 3
Raise the hose over
the lowest hook on the
handle and insert it into
the hose retainer cup.
Next, clip the hose into
the hose clamp.This
secures the hose while
not in use.
Step 4
Hook
Hose
clamp
Hose
retainer
cup
Garry manual 11.21.08.indd 3-4 11/21/08 5:29:21 PM
5
6
INSTRUCTIONS FOR USE
CLEANING CARPETS AND
FLOORS
Unwind enough cord for the area you
wish to clean with your Garry™ vacuum
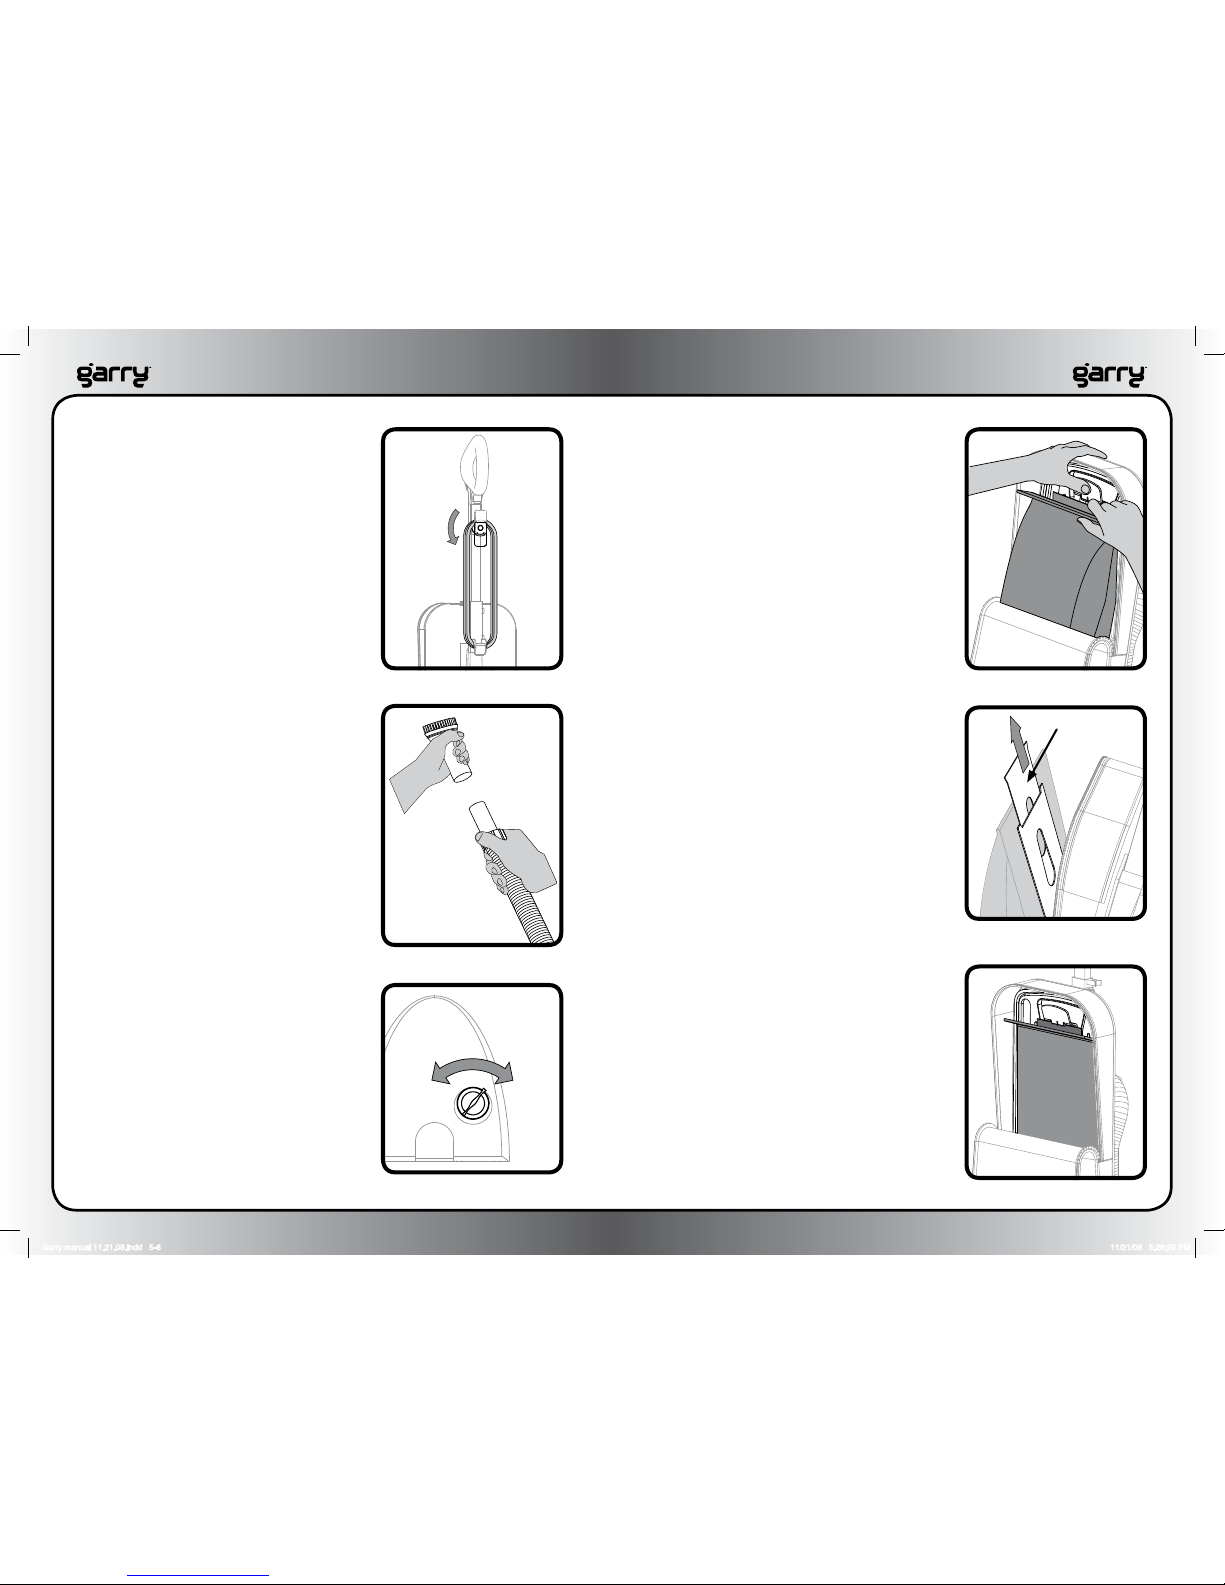
cleaner. NOTE: You can quickly remove
the entire cord length by simply twisting
the upper cable hook 1/2 turn and
removing the entire cord. See Figure 1.
Plug the cord into an approved power
outlet and turn on your Garry™ vacuum
cleaner by moving the power switch on
the handle to the forward position. You
are now ready to clean your carpets and
other ooring surfaces in your home.
IMPORTANT: Remember to always clear
the oor of metal and large objects before
you start to vacuum.
NOTE: If you hear a loud noise from your
vacuum such as blockage by a large object
or the roller freezes up, immediately turn
off the vacuum and clear the roller and
power base for any obstructions.
USING ATTACHMENTS
To install your attachments, simply
remove the hose end from the retainer
cup and gently press on the desired
attachment. See Figure 2.
IMPORTANT NOTE: You must turn the
hose divert switch 90 degrees in the
counter-clockwise direction in order to
have suction come through the hose.
See Figure 3 .
Use the crevice tool for cleaning in
narrow or often difcult areas such as
between couch cushions or along the
baseboard where the wall meets the oor.
Use the upholstery tool on your furniture
and other sensitive fabrics to gently lift
dust, pet hair and other debris. The round
nozzle tool is perfect for cleaning very
soiled spots like area rugs, and car mats.
Figure 1
Figure 2
Figure 3
Tools Floor
Also included with your Garry™ vacuum
cleaner is an extension wand, which
allows you to extend the reach of your
vacuum to clean high areas and corners
safely and thoroughly.
MAINTENANCE
REPLACING THE FILTER BAG
If you notice a loss of suction, the rst
thing you should do is check the bag. It is
important to replace the bag whenever it
becomes full. Do not try to reuse a bag.
The Garry™ vacuum cleaner makes it so
easy to check and replace the bag. You
can easily check to see if the bag is full by
gently pressing on the front of the outer
bag with your hand.
When the bag needs replacing, follow
these simple steps:
First, unzip the outer bag. Gently1.
press on the bag release tab with
one hand and carefully pull the bag
away from the vacuum bag plate.
See Figure 4.
As soon as you get the bag off of the2.
plate, pull on the bag sealing tab to
seal the bag before you remove it from
the outer bag. See Figure 5.
Lift the bag up and out of the outer3.
bag and dispose of it.
Before you install the new bag, quickly 4.
inspect the vacuum plate to make
sure there are no blockages or other
obstructions that might inhibit air ow.
Next, slide the new bag into the slots 5.
under the plate and pivot the bag up
and around the vacuum plate. This
should be a snug t. Gently press the
bag past the release tab until it clicks
into place. See Figure 6.
Inspect the bag to make sure it is 6.
completely inside the outer back and
zip the outer back all the way closed.
You are now ready to continue using
your Garry™ vacuum cleaner!
Figure 4
Figure 6
Figure 5
Sealing tab
Garry manual 11.21.08.indd 5-6 11/21/08 5:29:29 PM
7
8
CHANGING THE BELT
WARNING: Always
unplug the cord from the outlet when
servicing.
The belt should be replaced when
necessary, usually once a year.
Removing the belt:
Remove the screw which holds the belt 1.
cover lid to the unit and place it in a
secure location.
Remove the old belt by rotating the2.
roller pulley with one hand and pulling
the belt off to the side with the other.
Continue to rotate the pulley until the
belt comes off.
Remove the belt from the motor drive3.
shaft and discard.
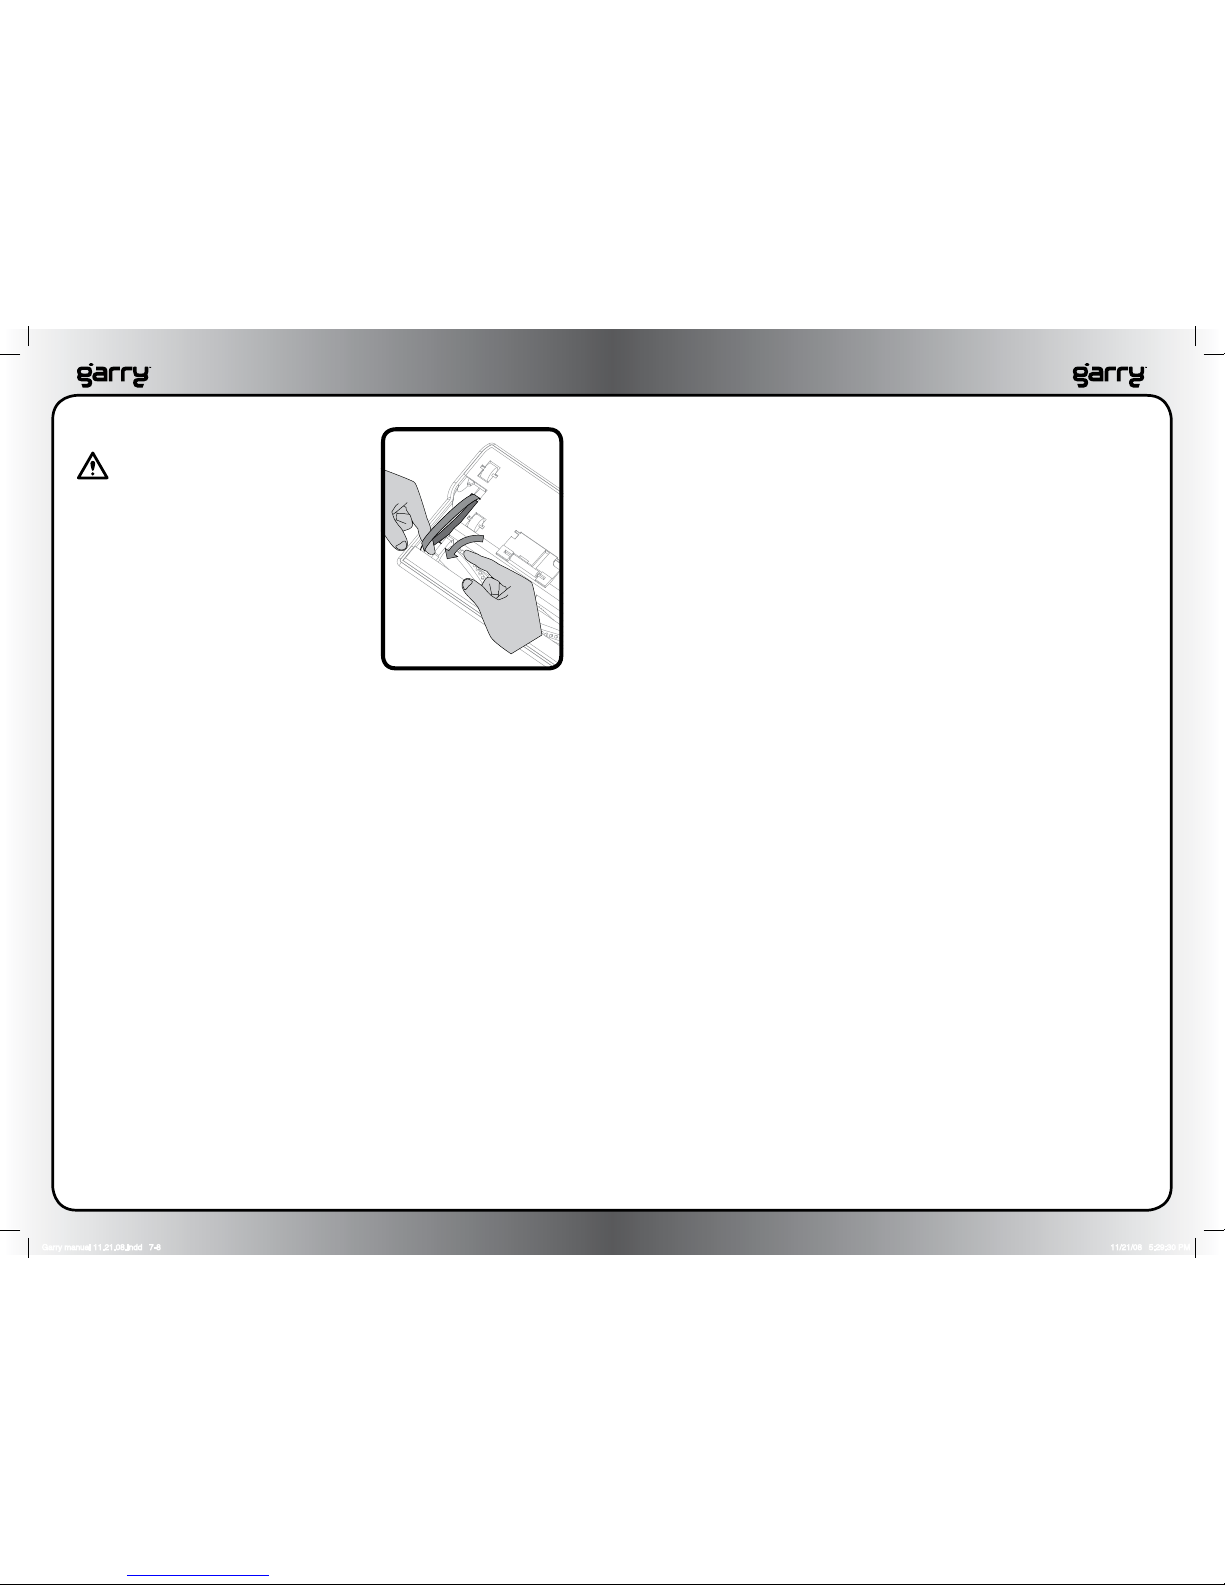
Installing the new belt:
Loop the new belt over the motor 1.
drive shaft.
Carefully stretch the belt toward the 2.
roller pulley and place the belt on the
pulley and hold it with one hand. With
the other hand, slowly rotate the roller
pulley until the belt is successfully
wrapped around the roller pulley.
Continue to rotate the roller 2 or3.
3 rotations while verifying that the
belt is centered on the roller pulley.
See Figure 7.
Replace the belt cover lid and fasten4.
with screw.
CLEANING THE ROLLER
After some time, string and other debris
will start to accumulate on the roller. To
keep the Garry™ vacuum running as
efcient as posible, the debris should be
removed. To do this, turn the vacuum
over so the roller is viewable and
accessible. With a sharp pair of scissors,
carefully cut the debris from the roller by
cutting parallel to the roller. Take care not
to cut the bristles of the roller brush.
Figure 7
IMPROVING AIRFLOW
If you notice your Garry™ vacuum has lost suction, is making unusual
noise or is not inating the bag as it should, follow these steps to
improve airow:
Check the bag.1. Replace the bag if it appears to be full. If a bag
is very full it may have caused dust and dirt to collect in the system
prior to the input funnel. If this is the case, please seek assistance
from a qualied professional.
Check the intake opening.2. Clear any oversized objects that may
have become lodged in the area.
SPARE PARTS
Roller belt....................... GL501
Bag (Size A)...................... GL502
Crevice tool..................... GL503
Upholstery tool................ GL504
Round nozzle tool............. GL505
Hose............................... GL506
TROUBLESHOOTING
If you experience problems with your Garry™ vacuum cleaner, please
review the following before contacting customer support. If you still
require further assistance, please refer to the LIMITED WARRANTY
near the end of this manual for Customer Support contact information.
Problem: The vacuum cleaner won’t turn on.
Try the following:
Make sure the plug is rmly inserted into the outlet.•
Check the outlet’s fuse or breaker. Replace or reset if necessary.•
Problem: Low cleaner suction.
Try the following:
Replace bag if full.•
Remove obstructions from intake opening, hose, wand or •
attachments.
Make sure the hose is connected properly.•
Make sure the hose divert switch is set to the proper setting •
according to the task at hand.
Problem: Roller brush won’t spin
Try the following:
Check/replace belt if worn or broken.•
Remove obstructions around the roller.•
Garry manual 11.21.08.indd 7-8 11/21/08 5:29:30 PM

9
10
ARBITRATION AGREEMENT
THIS ARBITRATION AGREEMENT (“AGREEMENT”) AFFECTS YOUR LEGAL RIGHTS AND REM-
EDIES BY PROVIDING THAT DISPUTES BETWEEN YOU AND THE SELLER OF THIS PRODUCT
(“COMPANY”), MUST BE RESOLVED THROUGH BINDING ARBITRATION, RATHER THAN IN A
COURT. PLEASE READ THIS AGREEMENT CAREFULLY. YOU ACCEPT THE TERMS OF THIS
AGREEMENT BY RETAINING THE PRODUCT(S) SHIPPED IN CONNECTION WITH THIS AGREE-
MENT (THE “PRODUCT”) FOR MORE THAN FOURTEEN (14) DAYS AFTER RECEIPT. IF YOU DO NOT
AGREE TO THE TERMS OF THIS AGREEMENT, YOU MAY RETURN THE PRODUCT TO COMPANY
WITHIN FOURTEEN (14) DAYS OF RECEIPT AT NO COST TO YOU.
RESOLUTION OF CLAIMS OR DISPUTES.
Any claim or dispute between you and Company (or any of Company’s subsidiaries or afliates) arising out
of or relating in any way to the Product or this Agreement shall be resolved through nal, binding arbitra-
tion. This arbitration obligation applies regardless of whether the claim or dispute involves a tort, fraud,
misrepresentation, product liability, negligence, violation of a statute, or any other legal theory. Both you
and Company specically acknowledge and agree that you waive your right to bring a lawsuit based on
such claims or disputes and to have such lawsuit resolved by a judge or jury.
LIMITATION OF LEGAL REMEDIES.
All arbitrations under this Agreement shall be conducted on an individual (and not a class-wide) basis,
and an arbitrator shall have no authority to award class-wide relief. You acknowledge and agree that this
Agreement specically prohibits you from commencing arbitration proceedings as a representative of oth-
ers or joining in any arbitration proceedings brought by any other person.
ARBITRATION PROCEDURES.
a. Before commencing any arbitration proceedings under this Agreement, you must rst present the claim
or dispute to Company by calling 818-217-2500 and asking for the Legal Department and allowing Com-
pany the opportunity to resolve the claim or dispute. If your claim or dispute is not resolved within sixty (60)
days, you may commence arbitration proceedings in accordance with the terms of this Agreement.
b. The arbitration of any claim or dispute under this Agreement shall be conducted pursuant to the
American Arbitration Association’s (“AAA”) United States Commercial Dispute Resolution Procedures and
Supplementary Procedures for Consumer-Related Disputes. These rules and procedures are available by
calling the AAA or by visiting its web site at www.adr.org.
c. The arbitration of any claim or dispute under this Agreement shall be conducted in the State of Califor-
nia or the location in which you received this Agreement.
d. All administrative expenses of arbitration proceedings commenced under this Agreement shall be
divided equally between you and Company, except that: (a) if the claim or dispute that is the subject of
the arbitration proceedings is less than ten thousand dollars (US$10,000), you will be responsible for no
more than one hundred twenty-ve dollars (US$125) in administrative expenses; (b) if the claim or dispute
that is the subject of the arbitration proceedings is more than ten thousand dollars (US$10,000) but less
than seventy-ve thousand dollars (US$75,000), you will be responsible for no more than three hundred
seventy-ve dollars (US$375) in administrative expenses; and (c) if the claim or dispute that is the subject
of the arbitration proceedings is more than seventy-ve thousand dollars (US$75,000), then you will be
responsible for administrative expenses in accordance with the Commercial Fee Schedule provided by the
AAA. You acknowledge and agree that each party shall pay the fees and costs of its own counsel, experts
and witnesses
CHOICE OF LAW.
This Agreement shall be governed by the United States Federal Arbitration Act and the laws of the state
of California.
SEVERABILITY.
If any provision of this Agreement is declared or found to be unlawful, unenforceable or void, such provi-
sion will be ineffective only to the extent that it is found unlawful, unenforceable or void, and the remainder
of the provision and all other provisions shall remain fully enforceable.
NOTES:
Garry manual 11.21.08.indd 9-10 11/21/08 5:29:31 PM

11
12
NOTES:NOTES:
Garry manual 11.21.08.indd 11-12 11/21/08 5:29:31 PM
This manual suits for next models
1
Table of contents


