epiphan video Standalone VGA Grid User manual

Standalone VGA Grid
User Guide
Release 3.15.3
November 9, 2015
UG103-05

Terms and Conditions
This document, the Epiphan web site, and the information contained therein, including but not limited to the
text, videos and images as well as Epiphan System Inc.’s trademarks, trade names and logos are the property
of Epiphan Systems Inc. and its affiliates and licensors, and are protected from unauthorized copying and
dissemination by Canadian copyright law, United States copyright law, trademark law, international
conventions and other intellectual property laws.
Epiphan, Epiphan Video, Epiphan Systems, Epiphan Systems Inc., and Epiphan logos are trademarks or
registered trademarks of Epiphan Systems Inc., in certain countries. All Epiphan product names and logos are
trademarks or registered trademarks of Epiphan. All other company and product names and logos may be
trademarks or registered trademarks of their respective owners in certain countries.
Copyright © 2015 Epiphan Systems Inc. All Rights Reserved.
THE SOFTWARE LICENSE AND LIMITED WARRANTY FOR THE ACCOMPANYING PRODUCT ARE SET FORTH IN
THE INFORMATION PACKET OR PRODUCT INSTALLATION SOFTWARE PACKAGE THAT SHIPPED WITH THE
PRODUCT AND ARE INCORPORATED HEREIN BY REFERENCE. IF YOU ARE UNABLE TO LOCATE THE SOFTWARE
LICENSES OR LIMITED WARRANTY, CONTACT YOUR EPIPHAN REPRESENTATIVE FOR A COPY.
PRODUCT DESCRIPTIONS AND SPECIFICATIONS REGARDING THE PRODUCTS IN THIS MANUAL ARE SUBJECT
TO CHANGE WITHOUT NOTICE. EPIPHAN PERIODICALLY ADDS OR UPDATES THE INFORMATION AND
DOCUMENTS ON ITS WEB SITE WITHOUT NOTICE. ALL STATEMENTS, INFORMATION AND
RECOMMENDATIONS ARE BELIEVED TO BE ACCURATE AT TIME OF WRITING BUT ARE PRESENTED WITHOUT
WARRANTY OF ANY KIND, EXPRESS OR IMPLIED. USERS MUST TAKE FULL RESPONSIBILITY FOR THEIR
APPLICATION OF ANY PRODUCTS.
LIMITATION OF LIABILITY
UNDER NO CIRCUMSTANCES SHALL EPIPHAN BE LIABLE FOR ANY INCIDENTAL, SPECIAL, CONSEQUENTIAL,
EXEMPLARY OR OTHER INDIRECT DAMAGES THAT RESULT FROM THE USE OF, OR THE INABILITY TO USE,
THIS PRODUCT OR THE INFORMATION CONTAINED IN THIS DOCUMENT OR PROVIDED ON EPIPHAN’S WEB
SITE, EVEN IF EPIPHAN HAS BEEN ADVISED OF THE POSSIBILITY OF SUCH DAMAGES. IN NO EVENT SHALL
EPIPHAN’S TOTAL LIABILITY TO YOU FOR ALL DAMAGES, LOSSES, AND CAUSES OF ACTION RESULTING FROM
YOUR USE OF THIS PRODUCT, WHETHER IN CONTRACT, TORT (INCLUDING, BUT NOT LIMITED TO,
NEGLIGENCE) OR OTHERWISE, EXCEED THE AMOUNTS YOU PAID TO EPIPHAN DURING THE MOST RECENT
THREE-MONTH PERIOD IN CONNECTION WITH AMOUNTS WHICH YOU PAID FOR USING THIS PRODUCT.
INFORMATION AND DOCUMENTS, INCLUDING PRODUCT SPECIFICATIONS, PROVIDED IN THIS DOCUMENT
OR THE EPIPHAN WEB SITE ARE PROVIDED “AS IS”. SPECIFICALLY, BUT NOT WITHOUT LIMITATION, EPIPHAN
DOES NOT WARRANT THAT: (i) THE INFORMATION IS CORRECT, ACCURATE, RELIABLE OR COMPLETE; (ii) THE
FUNCTIONS CONTAINED ON THE EPIPHAN WEB SITE WILL BE UNINTERRUPTED OR ERROR-FREE; (iii) DEFECTS
WILL BE CORRECTED, OR (iv) THIS WEB SITE OR THE SERVER(S) THAT MAKES IT AVAILABLE ARE FREE OF
VIRUSES OR OTHER HARMFUL COMPONENTS. EPIPHAN SPECIFICALLY DISCLAIMS ALL REPRESENTATIONS,
WARRANTIES, AND CONDITIONS, EITHER EXPRESS, IMPLIED, STATUTORY, BY USAGE OF TRADE OR
OTHERWISE INCLUDING BUT NOT LIMITED TO ANY IMPLIED WARRANTIES OF MERCHANTABILITY, NON-
INFRINGEMENT, TITLE, SATISFACTORY QUALITY OR FITNESS FOR A PARTICULAR PURPOSE.
For additional terms and conditions, please refer to additional sections in this document.

Thank You for Choosing Epiphan!
At Epiphan Video (“Epiphan”), product function and quality are our top priority. We make every effort to make
sure that our products exceed your expectations.
Product Feedback
Your feedback is important! We regularly contact our customers to ensure our products meet your
performance and reliability requirements. We strive to continually enhance our products to accommodate
your needs. Please let us know how you think we can improve our products by emailing your suggestions to
info@epiphan.com.
Specifications
Go to the Professional Recording and StreamingSystems page of the Epiphan website to get the most recent
product specifications and additional information about Epiphan's Standalone VGA Grid.
Warranty
All Epiphan Systems products are provided with a 100% return to depot warranty for one year from the date
of purchase.
Technical Support
Epiphan’s products are backed by our professional support team. If you are having issues with your product,
please gather details about your system and contact our team by:
lEmailing support@epiphan.com
lLive chat via the link on our support site http://www.epiphan.com/support/
lPhone toll free at 1-877-599-6581 or call +1-613-599-6581
Be sure to include as much information about your problem as possible. Including:
lProblem description
lDetails of the video or audio source (type, connection, resolution, refresh rate, etc.)
lProduct serial number
lProduct firmware version (if applicable, from web admin interface)
Copyright © 2015 Epiphan Systems Inc. All Rights Reserved.

What's New in Release 3.15.3?
Firmware release 3.15.3 is a significant upgrade for Standalone VGA Grid that offers exciting new
streaming/recording features while improving the functionality of existing ones.
Live video production
The features described below are applicable on all channels for Standalone VGA Grid, VGADVI Broadcaster
Pro, and VGADVI Recorder Pro, but only on custom local channels for Networked VGAGrid (i.e. not HD
Encoder channels).
New custom layout designer
The new custom layout designer helps you create unique personalized layouts using multiple video sources,
pictures, logos, text overlays and backgrounds. Refine your sources and layout items to perfection with the
layout editor’s precision positioning, resizing, reordering and cropping tools before previewing the end result.
Learn how to create custom layouts in Create a custom channel or layout.
Live switching
You can now switch video sources and custom layouts seamlessly while live streaming/recording. Change your
streamed video content using the web interface (or HTTP and RS-232 APIs) to create dynamic and engaging
live streams that will captivate your audience. Learn more about live switching in Live video mixing /
switching.
Video source cropping
Selectively crop your video source content to remove unnecessary or redundant information, or crop multiple
sources strategically to create perfect custom layouts.
Pictures as video sources
Upload a picture file to use as a video source and further your creative streaming possibilities. Use pictures as
sources for custom pre-show announcement, a post-show display, or in conjunction with other images and
video sources in custom layouts – the options are entirely up to you.
Transparent PNG images
Use PNG images with transparent backgrounds for improved customization in your layouts. Add corporate
logos or other visual details to imbue a truly professional quality to your design.
Live streaming layout adjustments
Change video sources, swap visuals, adjust text overlays and modify backgrounds – all without disrupting the
live stream. Adapt to any contingency for added flexibility and peace of mind while live streaming.

Configuration improvements
Custom "No Signal" images for sources
You can now create and upload customized “No Signal” images. These images are assigned to a specific source
and display in any channel where the source is used but has no input detected. Ideal for enhancing
professionalism in your next live event!

Important firmware 3.15.3 upgrade notice
Firmware release 3.15.3 introduces the new visual channel layout editor which adds the ability to have
multiple layouts per channel and simplifies custom channel components like text overlays, images, and picture
in picture layouts.
The firmware update process preserves your channel's existing encoding, streaming and recording settings
and merges your previous visual channel setup in a new channel layout. We have tested this process carefully,
but in some circumstances you may still need to do some small manual adjustments to get the best possible
results.
Before you do a firmware update, take notes or a snapshot of your channel's layout. It is also a good idea
to note your current release version make a configuration backup for the rare case you choose to return to
your current release. After the firmware update, go to the sources page for your channel and review the
created layout for your channel. If needed, make adjustments using the procedures described in Create a
custom channel.

7
Table of contents
What's New in Release 3.15.3? 4
Table of contents 7
Start here 13
Standalone VGA Grid Overview 14
AV inputs 14
What's in the box? 15
Tech specs 18
Quick Start 20
Step 1: Physical set-up and power-on 20
Step 2: Admin discovery and login 21
Step 3: Set up the video source 22
Step 4: Configure the channel 24
Step 5: Testing the stream 25
Step 6: Recording the stream 26
What’s Next? 26
PART 1: Setup 27
The admin interface 28
Connect to the admin interface 28
User administration 32
View system information 45
Configure network settings 46
Verify IP Address and MAC address 46
Configure DHCP 47
Configure a static IP address 48
Tether to a mobile network 50
Perform network diagnostics 51
Configuration presets 53
Configuration presets overview 53
Configuration groups 56

8
Create a configuration preset 57
Apply a configuration preset 58
Apply theFactory default configuration preset 60
Update a configuration preset 61
Delete a configuration preset 62
Configurationpreset considerations 63
Configure date and time 67
Verify date and time settings 67
Configure synchronized time (NTP, PTP v1 and RDATE) 68
Configure the date and time manually 70
Change the time zone 70
Configure a local NTP server 71
PART 2: Capture 72
What is a channel? 73
Create a simple channel 74
Create a custom channel 78
Configure encoding 106
Add channel metadata 116
Preview a channel 117
Preview all channels at once 119
Rename a channel 120
Delete a channel 121
Live video mixing / switching 122
What is a source? 124
Connect a source 125
Preview a source 126
Configure a source 126
Rename a source 132
Control audio volume 133
Troubleshoot capture 135
Remove black bars (matte) from the video 135

9
Force the capture card to use a specific EDID 138
Unstretch the output video 142
Video not centered (VGAsources only) 143
Remove the combing effect on images 144
Video looks squished (VGA sources only) 144
Video too bright, too dark or washed out (VGAsources only) 146
PART 3: Stream 147
What is streaming? 148
Choose a streaming option 148
Supported streaming formats 149
Stream to viewers 150
Stream content using HTTPor RTSP 150
Configure HTTP and RTSP streaming ports 152
Stream content using HLS(HTTP Live Streaming) 153
Send stream URLs to viewers 154
View the Flash stream 155
Viewing with a web browser 158
Viewing with a media player (RTSP) 159
Disable (and enable) streams for viewers 160
Restrict access to streams for viewers 161
Restrict viewers by IPaddress 163
IPrestriction examples 164
Stream to a server 167
Stream to a CDN 168
Stream content using multicast 178
Stream to a media player 184
Stream content using multicast 184
Stream content using UPnP 191
Samples of stream settings 198
Streaming video content 198

10
Streaming slide content 199
PART 4: Record 200
What is a recording? 201
Recording basics 201
Record a channel via the web interface 202
Configure recording file size and type 204
Control recording with a mouse 206
Restart recording 207
Recorders 208
Add a recorder 208
Change the channels recorded by a recorder 209
Record with a recorder 210
Rename recorded files 212
Delete recorded files manually 212
Recorded files 215
View list of recorded files 215
Download recorded files manually 216
Extract tracks from a recording 217
Rename recorded files 219
Delete recorded files manually 219
File and recording transfer 221
Automatic file upload (AFU) overview 221
Choose files to include in AFU 222
Enable and set timing for AFU 224
AFU to an FTP server 227
AFU using RSync 228
AFU using CIFS 229
AFU to a secure FTP server 231
AFU using SCP 233
AFU or copy to USB drive 234

11
View the AFU log 241
Manage the AFU queue 242
Local FTPserver 244
Configure the local FTP server 244
Using the local FTP Server 246
PART 5: Maintenance 248
Mobile / tablet operator interface 249
Connect to the tablet interface 249
Confidence monitoring using the tablet interface 251
Verify disk space via the tablet interface 253
Control recording via the tablet interface 253
Switch to the full admin interface 254
Power down and system restart 255
Restarting the device via the web interface 255
Shutting down the device via the web interface 256
Shutting down the device manually 256
Save and restore device configuration 258
Save device configuration 258
Load a saved device configuration 259
Perform factory reset 261
Restore factory configuration via the web interface 261
Firmware upgrade 263
Check for firmware updates 263
Install firmware 264
Support 267
Download logs and "allinfo" 267
Configure remote support 269
Disable remote support 270
Storage disk maintenance 272
Check disk storage space 272
Schedule disk check 273

12
Perform disk check 273
Rebuild or replace storage disks 274
Verify RAID storage 279
Read data from removed storage disks 281
Third party integration 283
Control with RS-232 / serial port 284
Control with HTTPcommands 290
Configurationkeys forthirdparty APIs 294
Troubleshooting 307
Limitations and known issues 309
Previous releases and features 311
Software and Documentation License 313

Standalone VGA Grid User Guide Start here
Start here
Welcome, and thank you for buying Epiphan’s Standalone VGA Grid™. This guide will help you configure your
new system.
To get started, review the Overview and What's in the Box? sections. Next, a Quick Start guide walks you
through the basic steps to get a single video (and optional audio) source configured as a streamable,
recordable output from the Standalone VGA Grid.
Following the quick start section, a set of task-based procedures help you to tweak the system exactly how
you want. These procedures are broken into five categories: Setup, Capture, Stream, Record and
Maintenance.
About this Guide
Warnings are depicted as follows.
This is a warning.
Tips and Notes are depicted as follows.
This is a tip.
Throughout this guide there are situations where more than one solution will complete a task. In those cases
the guide describes the simplest or most common variation first.
13
Standalone VGA Grid User Guide Standalone VGA Grid Overview
Standalone VGA Grid Overview
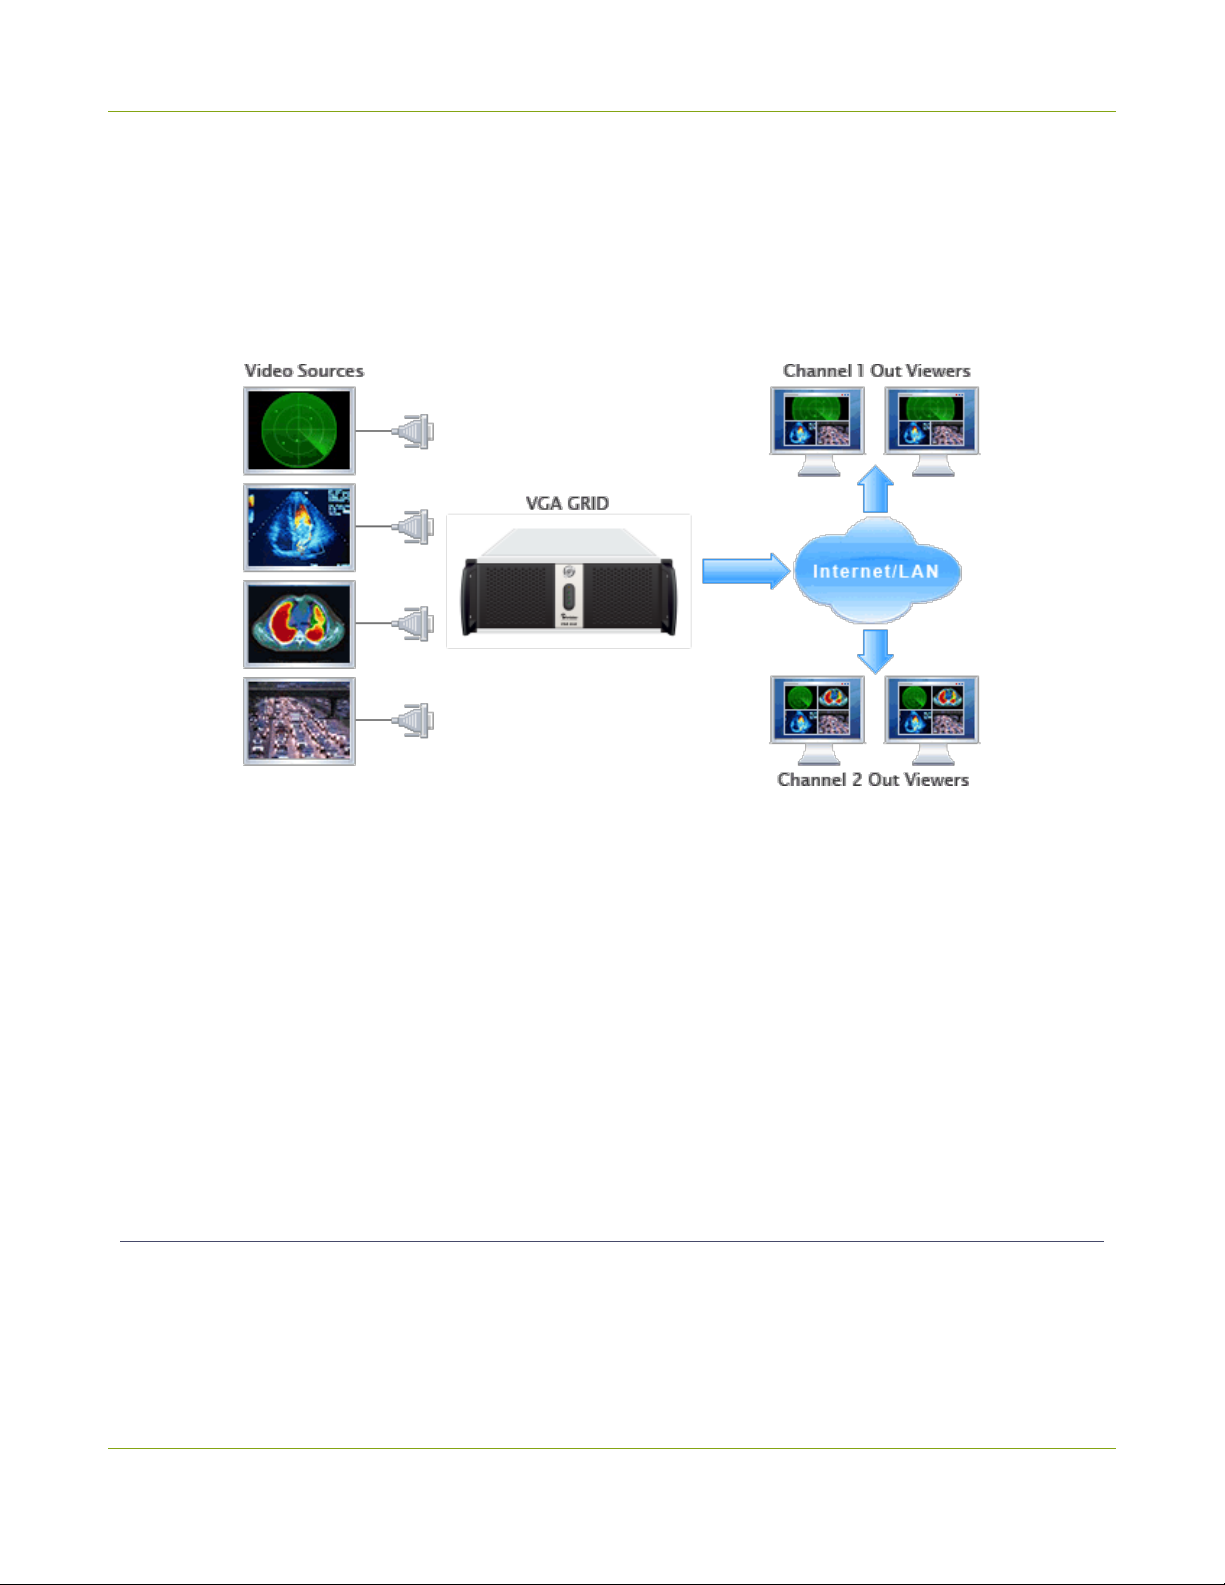
Epiphan's VGAGrid allows you to capture, stream, and record audio and video from a large number of VGA,
DVI, HDMI, composite and component sources. It supports streaming to a large number of viewers using
industry-standard codecs such as H.264 and MPEG-TS. Supporting resolutions between 640×480 and
2048×2048, the VGAGrid is suitable for a broad range of applications.
This versatile system has a variety of options enabling you to create and configure any number of streaming
channels. You can choose to stream (or record) a single channel at once or a configuration of synchronized
channels with picture-in-picture or picture-with-picture multiplexing selections.
The VGAGrid comes in two styles to meet your needs:Networked and Standalone. The Standalone VGA
Grid captures video and audio through internal cards. Depending on the model, it has 4 or 6 DVI source ports,
4 or 6 SDI source ports and 4 or 6 S-Video source ports. The latest hardware models(with SDIcapture) also
support HDMI and SDIaudio capture. Encoding and synchronization of the stream is done locally on the
Standalone VGA Grid. The Networked VGAGrid has no internal capture cards, instead it uses VGAGrid HD
Encoders to capture and encode sources, sending the already encoded stream to the VGAGrid. Using external
encoders means the VGAGrid has less stress on its CPU so it can handle a greater number of inputs.
HDMIaudio capture and SDI video capture are not supported with Networked VGAGrid systems.
AV inputs
The latest hardware revision of Standalone VGA Grid supports the following AVinputs directly. Nearly every
other AV input is supported provided you have the correct converter or adapter.
This document covers the Standalone VGA Grid.
14

Standalone VGA Grid User Guide What's in the box?
Table 1 Comparison for Networked VGAGrid and Standalone VGA Grid
Model DVI-I
(single link)
DVI-I
(dual link) S-Video SDI Audio
Networked VGAGrid up to 64
encoders with
up to
1920×1200
- up to 64 - up to
64
Standalone VGA Grid
-
4 or 6
(model)
local at up
to
2048×2048
4 of 6
(model)
4 or 6
(model)
5 or 7
(model)
+
SDIand
HDMI
audio
What's in the box?
The Standalone VGA Grid is a 4U rackmount server with dimensions 522 mm (D) × 430 mm (W) × 176 mm(H)
(20.5” × 16.9” × 6.9”).
Latest hardware revision:
Standalone VGA Grid can now capture more HD content than ever before. The newest Standalone VGA Grid
comes with eight or twelve HD inputs (depending on the model). Half the inputs are for capturing from
DVI/HDMI/VGA sources while the other half are for SDI sources. As before there are also 4 or 6 S-Video ports.
With this combination of available input ports and applicable DVI, SDI or S-Videoadapters/converters you can
bring in signals from nearly any source. This hardware upgrade also provides audio capture support for HDMI
and SDI in addition to pre-existing support for 3.5 mm analog audio input ports.
Previous hardware revisions
Previous versions of Standalone VGA Grid came with four or six HD inputs (depending on the model). Many,
although not all, previous hardware revisions can support the latest software release.Use the Firmware
upgrade feature to see if your device is upgradeable. Noteprevious hardware revisions do not support
HDMIaudio capture.
Unpacking the box
The following list applies only to new devices with the latest hardware revision:
15

Standalone VGA Grid User Guide What's in the box?
1. 4 or 6 (depending on model) VGA to DVI-I cables
2. 4 or 6 (depending on model) HDMI to DVI-I adapters
3. 4 or 6 (depending on model) DVI-I to DVI-I cables
4. 4 or 6 (depending on model) composite to S-Video cables
5. 4 or 6 (depending on model) SDI cables
6. One Ethernet cable
7. Power cable
Image Name Description
VGA to DVI cable Connects a VGA source to the system’s DVI
port(s).
HDMI to DVI adapter Connects an HDMI source to the system’s
DVI port(s).
DVI-I Single Link cable Connects a DVI source to the encoder’s DVI
port(s).
Composite to S-Video
cable
Connects a composite output from an analog
sources to the system’s S-Video port(s).
SDI Cable Connects anSDIsource to the system via
BNCconnectors.
RJ-45 Ethernet cable Connects the system to your network.
16

Standalone VGA Grid User Guide What's in the box?
Front and back panel view for the VGAGrid
Table 2 Rackmount Standalone VGA Grid Front and Back Panel Descriptions
Label Name Description
Power Button (behind
door)
Unlock the door to reveal the power button.
Press to turn on; press and release to turn off the system.Press and
hold for 4 seconds for a forced system shutdown.
Reset (behind door) Unlock the door to reveal the reset button.
Cycles the power off then on, like a computer reset button.
Power LED Indicates the system is powered on.
Hard Drive LED Blinks when the system is recording or accessing the hard drive.
USB Ports (behind door)
Unlock the door to reveal two USB ports.
For connection of external hard drives, flash drives or control
interfaces.
USB Ports For connection of external hard drives, flash drives or control
interfaces.
USB Ports For connection of external hard drives, flash drives or control
interfaces.
RJ-45 Ethernet Auto-sensing gigabit Ethernet 10/100/1000 Base-T network port.
17

Standalone VGA Grid User Guide Tech specs
Label Name Description
Audio In (blue) Connect amplified line in audio sources to the system.
Audio In (pink) Connect unamplified microphone audio sources to the system.
Audio In (4 or 6) Connect audio sources to the system.
S-Video ports (4 or 6) Connect analog video sources (S-Video, composite etc) to the system.
DVI-I Dual Link (4 or 6) Connect analog or HD video sources to the system.
SDIports (4 or 6) Connect digital SDI sources to the system.
Tech specs
This table outlines the technical specifications for the latest hardware revision of Standalone VGA Grid. Go to
the Professional Recording and StreamingSystems page of the Epiphan website to get the most recent
product specifications and additional information about Standalone VGA Grid.
Feature Standalone Networked
Style 4U Rackmount Server
Dimensions 445 mm (D) × 430 mm (W) × 176 mm(H) (17.5” × 16.9” × 6.9”)
Number of Encoders - up to 64
Maximum Resolution 2048×2048 1920×1200
VGA/DVI Screen Video Interfaces 4-6 up to 64 (via encoders)
S-Video/Composite Interfaces 4-6 up to 64 (via encoders)
SDI Interfaces 4-6 -
Audio Interfaces 5-7 plus audio support
throughSDIand HDMI up to 64 (via encoders)
Video Codecs / Compression H.264, MPEG-4, MJPEG
18

Standalone VGA Grid User Guide Tech specs
Feature Standalone Networked
Video Bitrate 10 Mb/s
Audio Codecs PCM, MP3, AAC
Audio Sampling Rate 48000 Hz, 44100 Hz, 22050 Hz
Audio Bitrate 64 - 160 kb/s
Key Frames Intervals programable
Video Format Options
RGB plus HSync and VSync
RGB plus CSync signal
RGB with Sync-on-Green synchronization
Update Rates
Resolution fps
640×480 30-60
1280×1024 30-60
1920×1200 30-90
2048×2048 10-60
Resolution fps
640×480 30
1280×1024 30
1920×1200 25
2048×2048 -
19

Standalone VGA Grid User Guide Quick Start
Quick Start
This section helps you get up and running quickly with your Standalone VGA Grid.
lStep 1: Physical set-up and power-on
lStep 2: Admin discovery and login
lStep 3: Set up the video source
lStep 4: Configure the channel
lStep 5: Testing the stream
lStep 6: Recording the stream
Before you get started, make sure you have:
lan HD source (i.e. a computer, a tablet, or a phone)
lthe appropriate cables or adapters to convert the output to DVI or SDI (if needed)
lideally, a network with Dynamic Host Configuration Protocol (DHCP)
la computer with a web browser connected to the same network (this is referred to as the “admin”
computer in the steps below)
loptionally, an audio source such as a microphone or the headphone jack from a laptop . Note that
audio signals sent overHDMI andSDI are supported in the latest hardware revision(s). If you have
SDIports, your system supports HDMIand SDI audio.
These instructions include steps for setting up and configuring audio. Skip these optional steps if
you do not want to configure an audio source at this time.
Step 1: Physical set-up and power-on
Complete the following steps to prepare and power on the system. Refer to the Front and Back Panel View
section for your system to locate the appropriate input ports.
1. Turn on your HD source and connect the output cable to a DVI-I or SDI port on the back of the system.
2. (optional) Attach a 3.5 mm audio cable from your audio source to the system’s motherboard audio
input port(blue port on the back of the system).
3. Connect the Ethernet cable to the Standalone VGA Grid.
4. Connect the Ethernet cable to your network.
5. Attach the power cable to the system and plug it into a power source.
20
Table of contents


