FONESTAR MP-121P User manual

INSTRUCTION MANUAL/MANUAL DE USUARIO/
MODE D’EMPLOI/MANUAL DE INSTRUÇÕES
MP-121P
WEEKLY PROGRAMMER
PROGRAMADOR SEMANAL
PROGRAMMATEUR HEBDOMADAIRE
PROGRAMADOR SEMANAL

EN
- 2 -
DESCRIPTION
- Weekly USB/SD/MP3 programmer/player.
- Weekly programming of MP3 file playback: bells, advertisements, background music, etc.
- Especially suitable for schools, officzes, shops, churches, etc.
- Direct playback of 9 messages via remote push button.
CONTROLS AND FUNCTIONS
FRONT PANEL
1.- MP3: button to access MP3 configuration menu. For more information, see MP3 operating section in
this manual.
2.- SWIFT: button to activate standby program. For more information, see the Standby program section in
this manual.
3.- Confirmation button. It can also be used to access the system configuration main menu.
4.- Navigation buttons to scroll through the different configuration menus.
5.- Information display.
6.- 0-9: number buttons, used to directly play a specific audio track when the MP3 module is in use.
7.- LED output signal level indicators.
8.- POWER: device LED power indicator.
9.- USB storage device connection port.
10.- SD: SD memory card connection slot.
11.- INPUT 1: INPUT 1 volume control.
12.- MP3: USB/SD/MP3 player volume control.
13.- INPUT 2: INPUT 2 volume control.
14.- BASS: reinforces or attenuates bass frequencies, ±10 dB.
15.- AUX 3: aux INPUT 3 volume control.
16.- TREBLE: reinforces or attenuates treble frequencies, ±10 dB.
17.- AUX 4: aux INPUT 4 volume control.
18.- BALANCE: L-R balance control of output signal.
19.- MASTER: device general volume control.
20.- Device on/off switch.
REAR PANEL

EN
- 3 -
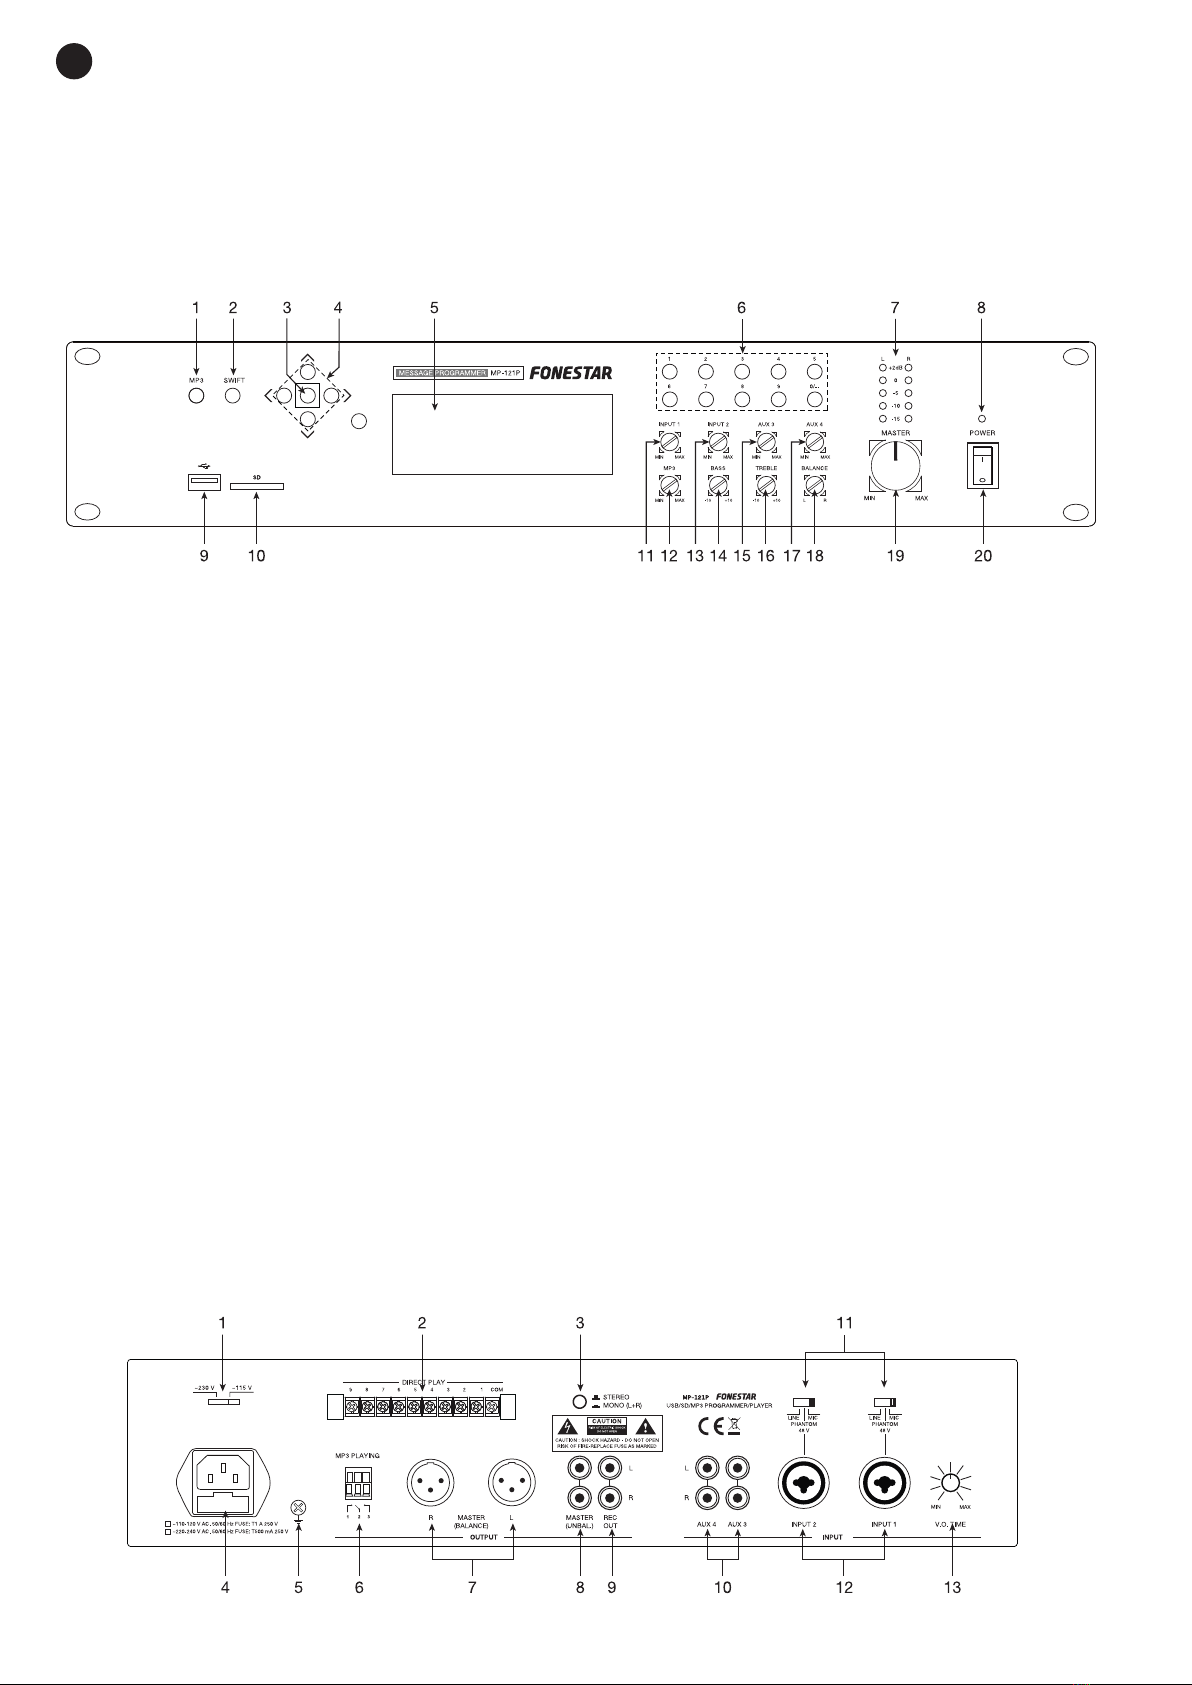
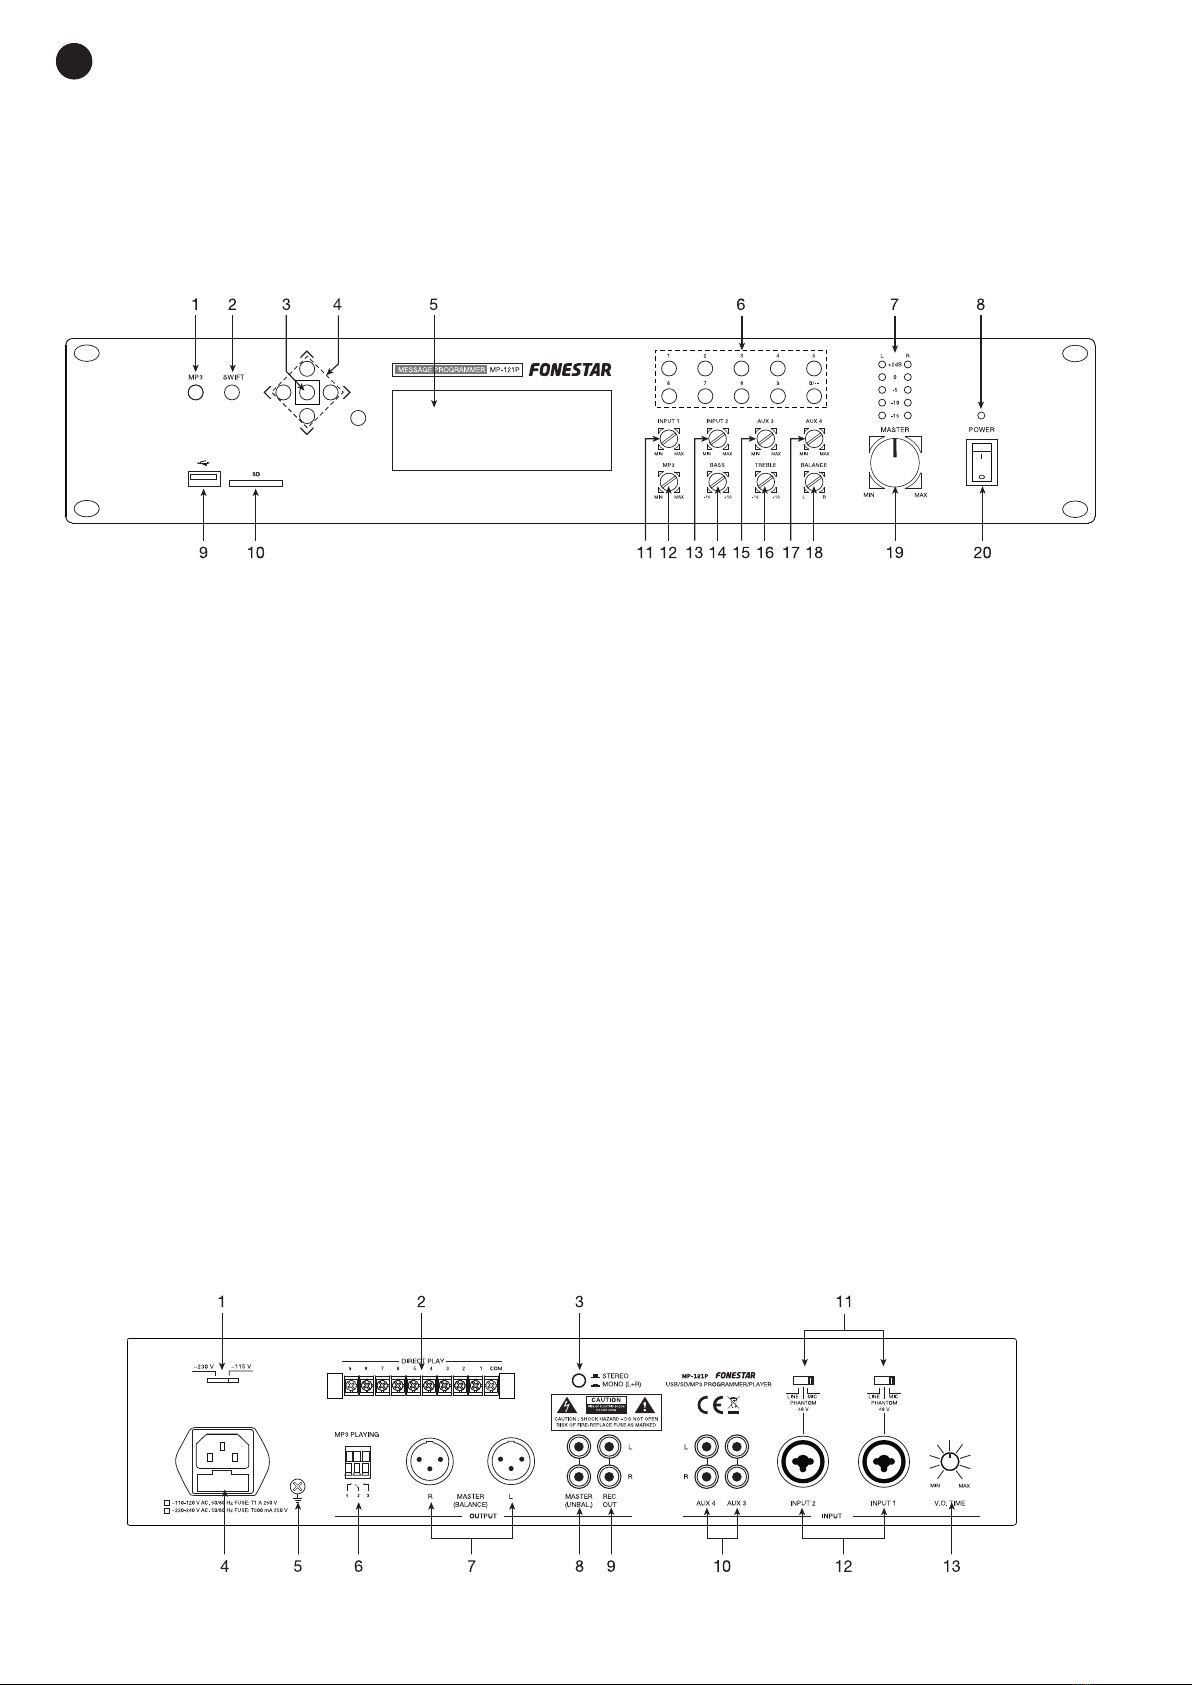
1.- Power supply voltage selector.
2.- DIRECT PLAY: contact closures to initiate direct playback of a track. Each of these terminals 1-9
corresponds to a track, 1 to 9 respectively, on the USB storage device or SD memory card. To start
playback of a track, close and reopen the contact (with a push button), connecting and disconnecting
the track terminal with the COM terminal.
3.- STEREO/MONO: selector which allows the audio output to be through two channels (STEREO) or
onesingle channel (MONO).
4.- AC socket to connect the mains supply cable provided.
5.- Grounding screw.
6.- MP3 PLAYING: these contacts close when the MP3 playback is operating.
7.- MASTER BALANCE: line level balanced master output, 2 x XLR connectors.
8.- MASTER UNBAL.: line level unbalanced master output, 2 x XLR connectors.
9.- REC OUT: recording output, line level, 2 x RCA connectors.
10.- AUX 3/4: line level aux inputs, 2 x RCA connectors.
11.- LINE/PHANTOM 48 V/MIC: input sensitivity switches and 48 V phantom power supply. These switches
have 3 positions:
LINE: in this position, line level audio sources can be connected to INPUT 1/2 : CD players, etc.
PHANTOM 48 V: in this position, electret condenser microphones that require 48 V phantom power
supply can be connected to INPUT 1/2.
MIC: in this position, low impedance 30-600 Ωdynamic microphones can be connected to INPUT 1/2.
12.- INPUT 1/2: mic./line inputs, combo connectors (XLR and 6.3 mm jack). Select the appropriate position
on the switch depending on the type of input being used.
13.- V.O. TIME: voice-over control. Allows the audio output attenuation level to be regulated when a
microphone signal is entered in INPUT 1. Turn the control in an anticlockwise direction to its minimum
and the rest of the inputs will automatically be attenuated when a signal is detected in INPUT 1. Turn it
in a clockwise direction to its maximum and the priority function will be set at its minimum level.
INSRUCTIONS FOR USE
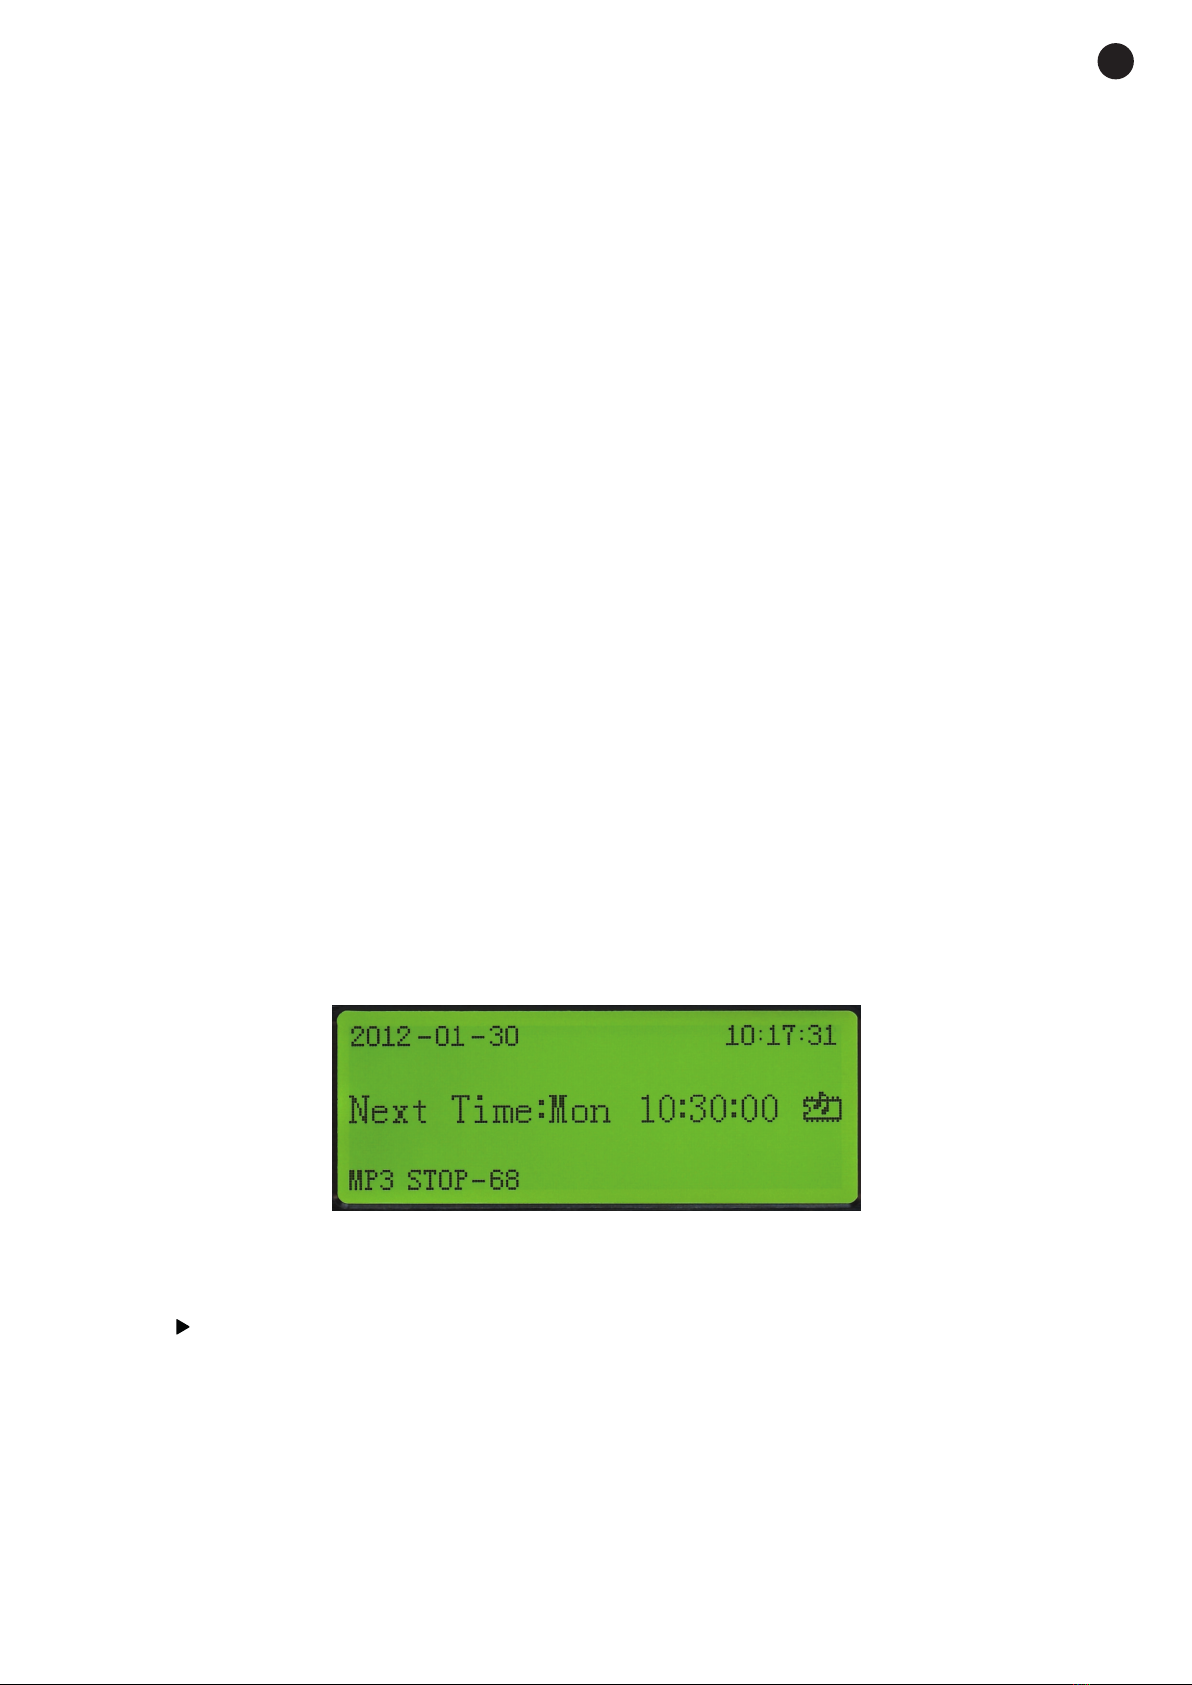
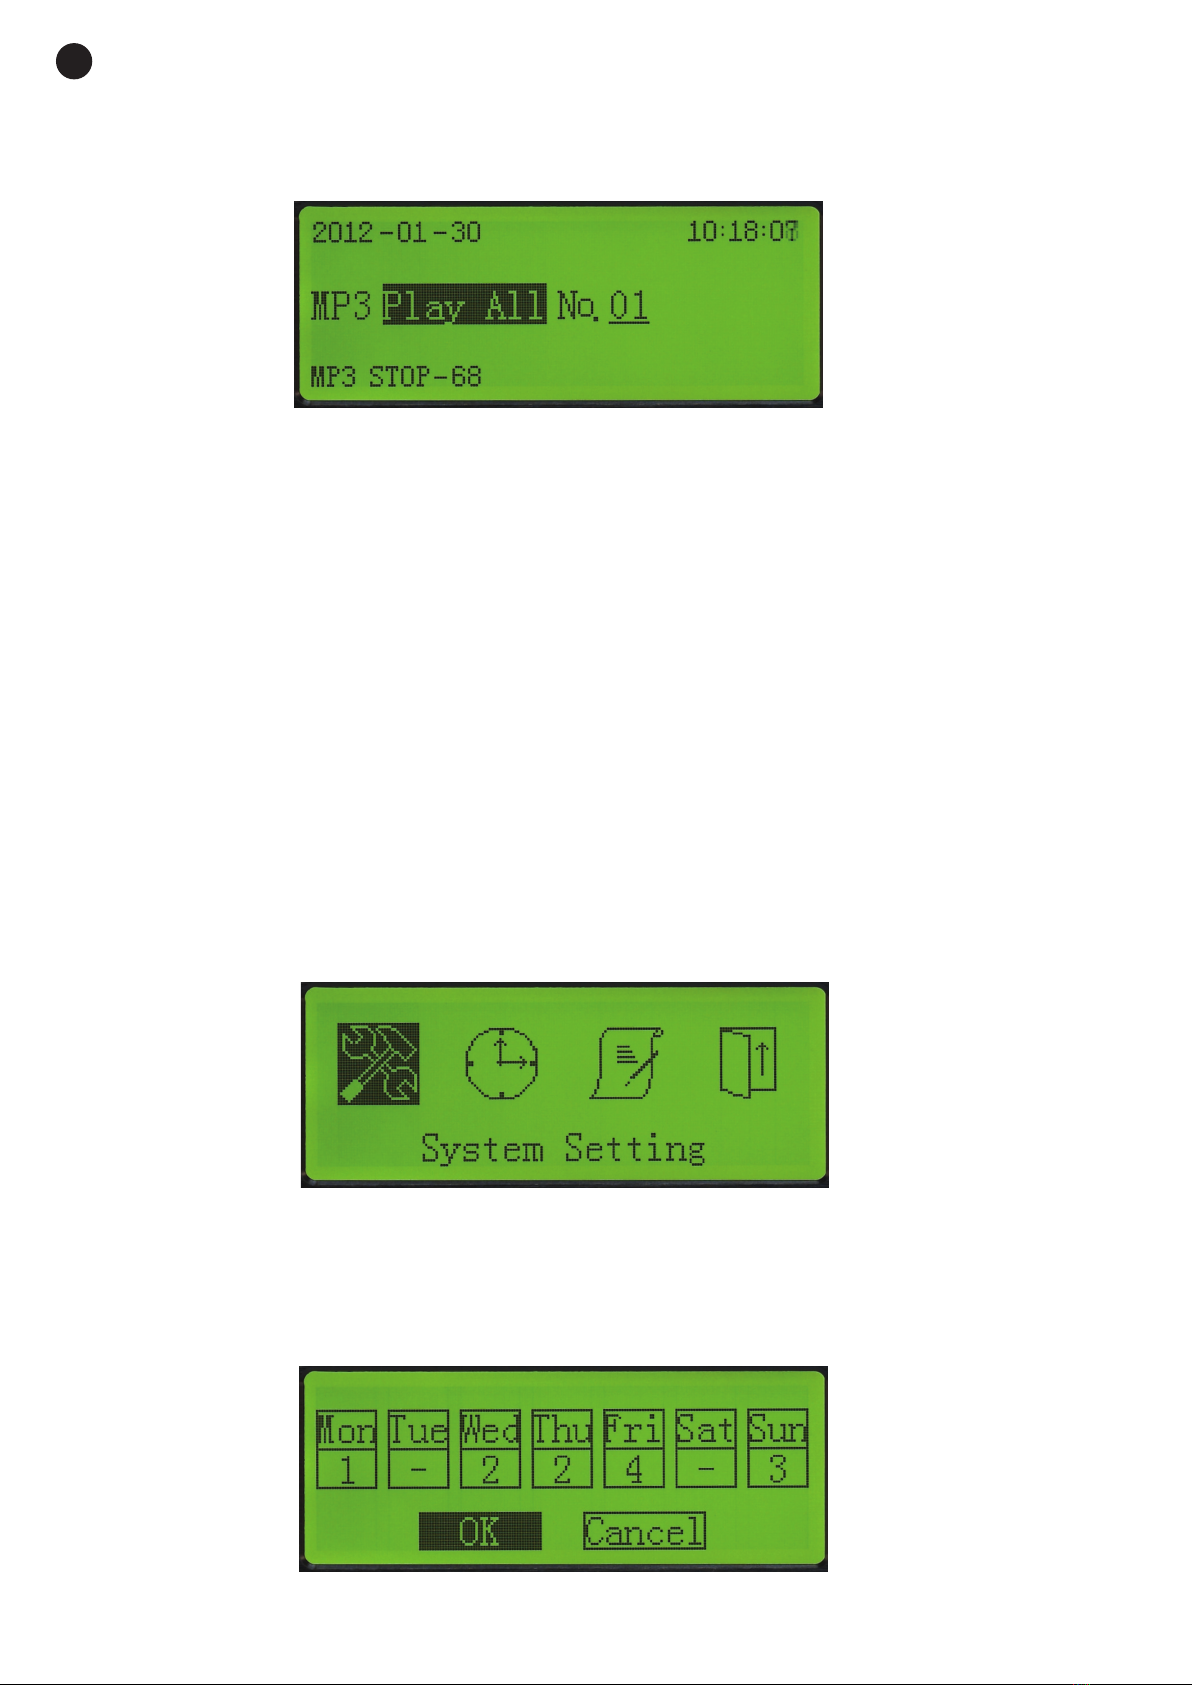
If the programmer is switched on, the information display will look like this:
PROGRAMA EN ESPERAEDITAR PROGRAMA
CONFIGURACIÓN DEL SISTEMA
FUNCIONAMIENTO MP3
CONFIGURACIÓN DE LA HORA
MENU PRINCIPAL
On the first line, the date and present time will be shown.
On the second line, the day of the week and the time of the next event will be shown (if it is available).
On the third line, the current status of the MP3 player will be shown, which could be one of these options:
1.- MP3
NEXT VOL- VOL+
ACCEPT END REJECT REDIAL
5 V DC
Macho Hembra
X-BASS
REWIND FORWARD
5 V DC
Cat 6/6a/7 (FTP/SFTP)
*
RJ-45
CABLE
GAIN
(10 EQ)
HDMI
IR
IR
VIDEO PLAYER
Tx Rx
Tx Rx
12
FLASHING / INTERMITENTE / CLIGNOTANT / INTERMITENTE
ON / ENCENDIDO / ALLUMÉ / LIGADO
BLUE/AZUL/
BLEU/AZUIS
FLASHING/INTERMITENTE/CLIGNOTANT/INTERMITENTE
MODE
MicroSD/USB
MODE
FM
MODE
AUX
MODE
BT
ON/ENCENDIDO/ALLUMÉ/LIGADO
OFF/APAGADO/ÉTEINT/DESLIGADO
RED/ROJO/
ROUGE/VERMELHO
RED
BLUE
x2
Tx Rx
Tx Rx
2s
PRIORITY
PRIORITY
MIC
LANGUAGE VOICE
PROMPT
2s
2 x AA
PRESET- PRESET+
BT
BLUE / AZUL /
BLEU / AZUIS
FLASHING / INTERMITENTE / CLIGNOTANT / INTERMITENTE
ON / ENCENDIDO / ALLUMÉ / LIGADO
OFF / APAGADO / ÉTEINT / DESLIGADO
RED / ROJO /
ROUGE / VERMELHO
PLAY PAUSE PREVIOUS
ON/OFF AUDIO
MODE
MUTE
FX
MIC FX
MIC VOL FOLDER
LOCK
PREVIOUS
FOLDER
NEXT
FOLDER
EJECT
BASS TREBLE
L R
BALANCE EQ REPEAT
RANDOM
RELOAD LIGHT FX
FM ANT. RECEIVER IR
RADIO
AUTO
MANUAL
MEMO
START
REC
STOP
REC
STATUS SET ALARM SET CLOCK SLEEP
TRACKS
0 - 9
CH+CH-
STOP
A
1
OFF
FREQ- FREQ+
PRESETS
0 - 9
153
264 7
10 1513
12 1614 17
11
89
18 19
Set on a free FM frequency
Seleccione una frecuencia FM libre
Sélectionnez une fréquence FM libre
Selecione uma frequência FM livre
A
REPEAT
ALL
REPEAT
ONE
1
REPEAT
FOLDER
L
R
EQ
CHARGE
MIC
MIC
MUTE
GREEN / VERDE /
VERT / VERDE
START
REC
1s
STOP
REC
1s
!
AUDIO
SYSTEM
BLUE/AZUL/
BLEU/AZUIS
FLASHING / INTERMITENTE / CLIGNOTANT / INTERMITENTE
BT
ON / ENCENDIDO / ALLUMÉ / LIGADO
OFF / APAGADO / ÉTEINT / DESLIGADO
RED/ROJO/
ROUGE/VERMELHO
SLOW
SLOW
FAST / RÁPIDO / RAPIDE / RÁPIDO
SLOW / LENTO / LENT / LENTO
OFF
x3
ON
x3
INPUT
MASTER VOL
MIXER
INPUT VOL
INPUT
MIC
ON
MIC
OFF
LED
ON
LED
OFF
MENU
OFF
RANDOM
OFF
RANDOM
ALL
RANDOM
FOLDER
CONNECTING CONNECTION OK
Left (L)
Right (R)
Ground (G)
L RG
OUTPUT
OUTPUT VOL
230 V AC
AUDIO
RECORDER
CLICK
MODE
HEADPHONES
VOL
SNOOZE
SOUND
PC
3s
ON/OFF
STATUS
FE-1150T
POWER
15
10
5
3
1
7.5
5
2.5
1.5
0.5
670 Ω
1,000 Ω
2,000 Ω
3,300 Ω
10,000 Ω
OFF
1W
3W 5W 10W
15W
IMPEDANCE
100 V 70 V
1
2
Configure the speaker
Configure el altavoz
Configurez le haut-parleur
Configure o altifalante
Connect the cables
Conecte los cables
Connectez les câbles
Ligue os cabos
CHARGING
BATTERY
BATTERY
FULL
1. LOUDSPEAKER ENCLOSURE
2. REFERENCE AXIS
3. HORIZONTAL PLANE
4. REFERENCE PLANE
1
2
3
4
2 x AA
04 ----- 00:01:52
Shows the audio track number that is being played and the playback time.
2.- MP3 STOP --- 36
Indicates that playback has stopped and the total number of audio tracks contained in the USB storage
device or the SD memory card.
3.- MP3 ERR
There is no USB storage device or SD card inserted.
4.- MP3 WAITING
The device is getting ready to read the USB storage device or the SD memory card. On the first line, the
date and present time will be shown.

EN
- 4 -
MP3 OPERATING
To access the MP3 configuration menu press the MP3 button on the front panel.
The information display will show:
PROGRAMA EN ESPERAEDITAR PROGRAMA
CONFIGURACIÓN DEL SISTEMA
FUNCIONAMIENTO MP3
CONFIGURACIÓN DE LA HORA
MENU PRINCIPAL
Use the navigation buttons UP, DOWN, LEFT and RIGHT to select the type of playback among the following
modes:
1.- PLAY ALL: plays all the audio tracks contained and stops playback.
2.- PLAY ONE: plays the selected audio track once and stops playback.
3.- REP ALL: plays all the audio tracks continuously.
4.- REP ONE: plays the selected audio track continuously.
5.- STOP: stops playback.
6.- RANDOM: continuous random playback of the audio tracks contained in the storage device.
7.- SPECIFY: plays up to a maximum of 10 tracks of the user’s choice.
8.- SPEC REP: plays and continuously repeats up to a maximum of 10 tracks of the user’s choice.
Then press the confirmation button to select the chosen option. If you wish to exit the MP3 operating menu
press the MP3 button on the front panel of the device.
MAIN MENU
Press the confirmation button to access the system main menu.
PROGRAMA EN ESPERAEDITAR PROGRAMA
CONFIGURACIÓN DEL SISTEMA
FUNCIONAMIENTO MP3
CONFIGURACIÓN DE LA HORA
MENU PRINCIPAL
Use the LEFT and RIGHT navigation buttons to select the required configuration menu.
SYSTEM SETTING
To access the main menu press the confirmation button and then place the cursor on the System Setting
option. To acces the system setting menu press the confirmation button again.
PROGRAMA EN ESPERAEDITAR PROGRAMA
CONFIGURACIÓN DEL SISTEMA
FUNCIONAMIENTO MP3
CONFIGURACIÓN DE LA HORA
MENU PRINCIPAL

EN
- 5 -
A program consists of a series of events that are executed sequentially, each of them at a time determined
by the user, the parameters of these events being configurable in the Edit Program menu.
There aer 5 different programs to make different schedules, but only the first 4 can be assigned to each
day (1 to 4), as the fifth program is only assignable using the SWIFT button located on the front panel of the
device.
Use the navigation buttons UP, DOWN, LEFT and RIGHT to scroll through the different days of the weekand
to assign to each one of them a given program number (1 to 4). It is also possible to not assign any programs.
Note: for a program to run, it must always be configured beforehand in the Edit Program menu.
If you wish to confirm the changes, use the LEFT and RIGHT navigation buttons, place the cursor over the
OK option and then, press the confirmation button. On the other hand, if you do not wish to confirm the
changes made, place the cursor on the Cancel option and press the confirmation button.
TIME SETTING
Press the confirmation button to access the main menu. Then place the cursor over the Time Setting option.
PROGRAMA EN ESPERAEDITAR PROGRAMA
CONFIGURACIÓN DEL SISTEMA
FUNCIONAMIENTO MP3
CONFIGURACIÓN DE LA HORA
MENU PRINCIPAL
Press the confirmation button again to access the time setting menu.
PROGRAMA EN ESPERAEDITAR PROGRAMA
CONFIGURACIÓN DEL SISTEMA
FUNCIONAMIENTO MP3
CONFIGURACIÓN DE LA HORA
MENU PRINCIPAL
Use the navigation buttons UP, DOWN, LEFT and RIGHT to configure the parameters of this menu. The year,
month, day, day of the week, hour, minutes and seconds on the timer clock can be modified. If you wish to
confirm the changes, place the cursor on the OK option and press the confirmation button and if you wish
to save the established changes, place the cursor on the Cancel option and press the confirmation button.
Note: bear in mind that this is not an atomic clock, consequently the clock could be fast or slow. Check the
time periodically.
EDIT PROGRAM
Press the confirmation button to access the main menu. Then place the cursor on the Edit Program option.
PROGRAMA EN ESPERAEDITAR PROGRAMA
CONFIGURACIÓN DEL SISTEMA
FUNCIONAMIENTO MP3
CONFIGURACIÓN DE LA HORA
MENU PRINCIPAL

EN
- 6 -
Press the confirmation button again to access the Edit Program menu.
PROGRAMA EN ESPERAEDITAR PROGRAMA
CONFIGURACIÓN DEL SISTEMA
FUNCIONAMIENTO MP3
CONFIGURACIÓN DE LA HORA
MENU PRINCIPAL
A program consists of a series of events (one or several) that are executed sequentially, each one of them
at a time determined by the user, the parameters of these events also being configurable by the user. In this
menu all the available programs can be edited (1 to 5).
An event consists of a series of parameters to be configured (order, time of execution and type of playback)
and are automatically ordered in their respective program according to their time of execution.
PROGRAMA EN ESPERAEDITAR PROGRAMA
CONFIGURACIÓN DEL SISTEMA
FUNCIONAMIENTO MP3
CONFIGURACIÓN DE LA HORA
MENU PRINCIPAL
Select the program number you wish to edit using the navigation buttons. Then place the cursor on the
Add option and press the confirmation button to add an event in the selected program. At that moment, the
diffrent configuration parameters of the event and the order of execution of this event within the selected
program will appear on the screen.
Editing program and event
Select the program number required and scroll through the different configuration options of each of the
existing events. Place the cursor on the parameter you wish to edit and use the UP and DOWN navigation
buttons to modify the specifications.
Adding an event to a program
Select the required program number, use the LEFT and RIGHT navigation buttons and place the cursor on
the Add option. Press the confirmation button to add a new event in the selected program.
If you wish to edit or modify this new event or any of those already created, scroll through the different
configuration options of the event and use the UP and DOWN navigation buttons to select the execution
time and the type of playback you wish to implement.
Deleting an event
Firstly select the required program and then, use the navigation buttons to select the event in that program
you wish to delete. Place the cursor on the Delete (Del) option and press the confirmation button to delete
the event of the selected program.
Deleting all the events of a program
Select the required program number and use the LEFT and RIGHT navigation buttons to place the cursor on
the Delete All (Del All) option. Press the confirmation button to delete all the events of the selected program.
Exiting
Select the Exit option to exit the Edit Program menu and return to the main menu.
Note: each one of the 5 programs accepts a maximum of 200 different events and the device, in total, a
maximum of 512 different events.

EN
- 7 -
STANDBY PROGRAM
The standby program corresponds to the program number 5 in the Edit Program). This program is only
activated with the SWIFT button on the front panel of the device and will have priority over the rest of
programmed configurations.
The standby program is executed at a set time according to the programming of events, but the day on
which it is executed cannot be assigned in the System Setting), that’s to say, this program cannot be
assigned to a specific day in the weekly setting.
The standby program can be configured on the current day, the following day or both options at the same
time. Press the SWIFT button on the front panel of the device when the display shows the general information
so that the standby program is the priority option.
PROGRAMA EN ESPERAEDITAR PROGRAMA
CONFIGURACIÓN DEL SISTEMA
FUNCIONAMIENTO MP3
CONFIGURACIÓN DE LA HORA
MENU PRINCIPAL
Press the SWIFT button repeatedly to select the days on which the standby program is executed. Below the
different options for executing the standby program are described:
1: the standby program is executed on the present day.
2: the standby program is executed on the following day.
1 2: the standby program is executed on the present day and on the following day.
If none of these parameters are shown on the screen, the standby program is not activated, consequently
the amplifier will maintain the weekly programming currently configured.

EN
- 8 -
CONNECTION
Make the connections with the player and all the components of the audio system switched off and
disconnected from the power supply.
Connect the USB storage device or the SD memory card in the corresponding inputs on the front panel.
Connect the required inputs to the inputs INPUT 1/2. Place the selector in the corresponding position
depending on the input you are connecting. If you are connecting a line input, place the selector in the
LINE position. If you are connecting dynamic microphones, place the selector in the MIC position. If you are
connecting condenser microphones, place the selector in the PHANTOM position.
Connect the required audio sources to the inputs AUX 3/4.
Connect the amplifier or autoamplified loudspeaker to the player’s MASTER output. Use the balanced or
unbalanced MASTER output.
If you wish, connect a recorder, another amplifier or an autoamplified loudspeaker to the REC OUT line level
output for that purpose.
Once the connections have been made according to your needs, connect the devices to the mains supply
and switch them on. After use, do not forget to switch them off and disconnect the device from the mains
supply.
Microphones
CD Player

EN
- 9 -
TECHNICAL SPECIFICATIONS
MP-121P
CHARACTERISTICS Weekly programmer.
USB/SD/MP3 player.
LCD display.
Priority paging.
9 messages, individually selectable via direct access buttons or contact
closure.
RESPONSE 50-18,000 Hz ±3 dB
DISTORTION Harmonic: < 0.5% at 1 kHz
INPUTS 2 balanced mics/lines, combo (XLR and 6.3 mm jack) 600 Ω 4 mV RMS and
47,000 Ω 360 mV RMS, switchable
2 aux, 2 x RCA 10,000 Ω 120 mV RMS
OUTPUTS 1 master, 2 x RCA and 2 x XLR 600 Ω 1 V mono/stereo selectable
1 rec out, 2 x RCA
CONTROLS Tone: bass and treble
Balance
Volume: mic, aux 1 and 2, MP3 and general volume
PRIORITY Mic. 1 through signal level, selectable
POWER SUPPLY 230/115 V AC, 9 W
DIMENSIONS 483 x 89 x 390 mm depth. 2 U 19" rack

EN
- 10 -
ES
DESCRIPCIÓN
- Programador/reproductor semanal USB/SD/MP3.
- Programación semanal de reproducción de ficheros MP3: timbres, anuncios, música ambiente, etc.
- Especialmente recomendado en colegios, oficinas, comercios, iglesias, etc.
- Reproducción directa de 9 mensajes mediante pulsador remoto.
CONTROLES Y FUNCIONES
PANEL FRONTAL
1.- MP3: botón para acceder al menú de configuración MP3. Para más información, ver sección
Funcionamiento MP3 en este manual.
2.- SWIFT: botón para activar el programa en espera. Para más información, ver sección Programa en
espera en este manual.
3.- Botón de confirmación. También se utiliza para acceder al menú principal de configuración del sistema.
4.- Botones de desplazamiento para navegar por los diferentes menús de configuración.
5.- Pantalla de información.
6.- 0-9: botones numéricos, se utilizan para reproducir directamente una pista de audio determinada
cuando está en funcionamiento el módulo MP3.
7.- Indicadores luminosos de nivel de señal de salida.
8.- POWER: indicador luminoso de encendido del equipo.
9.- Puerto de conexión de dispositivos de almacenamiento USB.
10.- SD: puerto de conexión de tarjetas de memoria SD.
11.- INPUT 1: control de volumen de la entrada INPUT 1.
12.- MP3: control de volumen del reproductor USB/SD/MP3.
13.- INPUT 2: control de volumen de la entrada INPUT 2.
14.- BASS: refuerza o atenúa las frecuencias graves, ±10 dB.
15.- AUX 3: control de volumen de la entrada auxiliar 3.
16.- TREBLE: refuerza o atenúa las frecuencias agudas, ±10 dB.
17.- AUX 4: control de volumen de la entrada auxiliar 4.
18.- BALANCE: control de balance L-R de la señal de salida.
19.- MASTER: control de volumen general del equipo.
20.- Interruptor de encendido/apagado del equipo.
PANEL POSTERIOR

EN
- 11 -
ES
1.- Selector de voltaje de alimentación.
2.- DIRECT PLAY: cierres de contactos para iniciar la reproducción directa de una pista. Cada uno de
estos terminales 1-9 corresponde con una pista, de la 1 a la 9 respectivamente, del dispositivo de
almacenamiento USB o la tarjeta de memoria SD. Para iniciar la reproducción de una pista cierre y
vuelva a abrir el contacto (con un pulsador), conectando y desconectando el terminal de la pista con
el terminal COM.
3.- STEREO/MONO: selector que permite que la salida de audio salga por los dos canales (STEREO) o en
un mismo canal (MONO).
4.- Zócalo CA para conectar el cable de alimentación incluido.
5.- Tornillo para toma de tierra.
6.- MP3 PLAYING: estos contactos se cierran cuando la reproducción MP3 está en funcionamiento.
7.- MASTER BALANCE: salida balanceada master de nivel de línea, conectores 2 x XLR.
8.- MASTER UNBAL.: salida desbalanceada master de nivel de línea, conectores 2 x RCA.
9.- REC OUT: salida de grabación, nivel de línea, conectores 2 x RCA.
10.- AUX 3/4: entradas auxiliares de nivel de línea, conectores 2 x RCA.
11.- LINE/PHANTOM 48 V/MIC: conmutadores de sensibilidad de las entradas y alimentación phantom 48
V. Estos conmutadores tienen 3 posiciones:
LINE: en esta posición, a las entradas INPUT 1/2 pueden conectarse fuentes de audio de nivel de línea:
reproductores de CD, etc.
PHANTOM 48 V: en esta posición, las entradas INPUT 1/2 pueden conectarse micrófonos de
condensador electret que requieran alimentación phantom 48 V.
MIC: en esta posición, a las entradas INPUT 1/2 pueden conectarse micrófonos dinámicos de baja
impedancia 30-600 Ω.
12.- INPUT 1/2: entradas de micrófono/línea, conectores combo (XLR y jack 6’3 mm). Seleccione la posición
adecuada en el conmutador dependiendo del tipo de entrada que utilice.
13.- V.O. TIME: control voice-over. Permite regular el nivel de atenuación de la salida de audio cuando se
introduce una señal de micrófono en INPUT 1. Gire el control en sentido antihorario hasta el mínimo y
el resto de entradas se atenuarán automáticamente cuando se detecte una señal en la entrada INPUT
1. Gírelo en sentido horario hasta el máximo y la función de prioridad se situará en su nivel mínimo.
INSTRUCCIONES DE USO
Si el programador se encuentra encendido, la pantalla de información muestra el siguiente aspecto:
PROGRAMA EN ESPERAEDITAR PROGRAMA
CONFIGURACIÓN DEL SISTEMA
FUNCIONAMIENTO MP3
CONFIGURACIÓN DE LA HORA
MENU PRINCIPAL
En la primera línea se muestra la fecha y la hora actual.
En la segunda línea se muestra el día de la semana y la hora del siguiente evento (si está disponible).
En la tercera línea se muestra el estado actual del reproductor MP3, que puede ser una de estas opciones:
1.- MP3
NEXT VOL- VOL+
ACCEPT END REJECT REDIAL
5 V DC
Macho Hembra
X-BASS
REWIND FORWARD
5 V DC
Cat 6/6a/7 (FTP/SFTP)
*
RJ-45
CABLE
GAIN
(10 EQ)
HDMI
IR
IR
VIDEO PLAYER
Tx Rx
Tx Rx
12
FLASHING / INTERMITENTE / CLIGNOTANT / INTERMITENTE
ON / ENCENDIDO / ALLUMÉ / LIGADO
BLUE/AZUL/
BLEU/AZUIS
FLASHING/INTERMITENTE/CLIGNOTANT/INTERMITENTE
MODE
MicroSD/USB
MODE
FM
MODE
AUX
MODE
BT
ON/ENCENDIDO/ALLUMÉ/LIGADO
OFF/APAGADO/ÉTEINT/DESLIGADO
RED/ROJO/
ROUGE/VERMELHO
RED
BLUE
x2
Tx Rx
Tx Rx
2s
PRIORITY
PRIORITY
MIC
LANGUAGE VOICE
PROMPT
2s
2 x AA
PRESET- PRESET+
BT
BLUE / AZUL /
BLEU / AZUIS
FLASHING / INTERMITENTE / CLIGNOTANT / INTERMITENTE
ON / ENCENDIDO / ALLUMÉ / LIGADO
OFF / APAGADO / ÉTEINT / DESLIGADO
RED / ROJO /
ROUGE / VERMELHO
PLAY PAUSE PREVIOUS
ON/OFF AUDIO
MODE
MUTE
FX
MIC FX
MIC VOL FOLDER
LOCK
PREVIOUS
FOLDER
NEXT
FOLDER
EJECT
BASS TREBLE
L R
BALANCE EQ REPEAT
RANDOM
RELOAD LIGHT FX
FM ANT. RECEIVER IR
RADIO
AUTO
MANUAL
MEMO
START
REC
STOP
REC
STATUS SET ALARM SET CLOCK SLEEP
TRACKS
0 - 9
CH+CH-
STOP
A
1
OFF
FREQ- FREQ+
PRESETS
0 - 9
153
264 7
10 1513
12 1614 17
11
89
18 19
Set on a free FM frequency
Seleccione una frecuencia FM libre
Sélectionnez une fréquence FM libre
Selecione uma frequência FM livre
A
REPEAT
ALL
REPEAT
ONE
1
REPEAT
FOLDER
L
R
EQ
CHARGE
MIC
MIC
MUTE
GREEN / VERDE /
VERT / VERDE
START
REC
1s
STOP
REC
1s
!
AUDIO
SYSTEM
BLUE/AZUL/
BLEU/AZUIS
FLASHING / INTERMITENTE / CLIGNOTANT / INTERMITENTE
BT
ON / ENCENDIDO / ALLUMÉ / LIGADO
OFF / APAGADO / ÉTEINT / DESLIGADO
RED/ROJO/
ROUGE/VERMELHO
SLOW
SLOW
FAST / RÁPIDO / RAPIDE / RÁPIDO
SLOW / LENTO / LENT / LENTO
OFF
x3
ON
x3
INPUT
MASTER VOL
MIXER
INPUT VOL
INPUT
MIC
ON
MIC
OFF
LED
ON
LED
OFF
MENU
OFF
RANDOM
OFF
RANDOM
ALL
RANDOM
FOLDER
CONNECTING CONNECTION OK
Left (L)
Right (R)
Ground (G)
L RG
OUTPUT
OUTPUT VOL
230 V AC
AUDIO
RECORDER
CLICK
MODE
HEADPHONES
VOL
SNOOZE
SOUND
PC
3s
ON/OFF
STATUS
FE-1150T
POWER
15
10
5
3
1
7.5
5
2.5
1.5
0.5
670 Ω
1,000 Ω
2,000 Ω
3,300 Ω
10,000 Ω
OFF
1W
3W 5W 10W
15W
IMPEDANCE
100 V 70 V
1
2
Configure the speaker
Configure el altavoz
Configurez le haut-parleur
Configure o altifalante
Connect the cables
Conecte los cables
Connectez les câbles
Ligue os cabos
CHARGING
BATTERY
BATTERY
FULL
1. LOUDSPEAKER ENCLOSURE
2. REFERENCE AXIS
3. HORIZONTAL PLANE
4. REFERENCE PLANE
1
2
3
4
2 x AA
04 ----- 00:01:52
Muestra el número de la pista de audio que se está reproduciendo y el tiempo de reproducción.
2.- MP3 STOP --- 36
Indica que la reproducción se encuentra parada y el número total de pistas de audio contenidas en el
dispositivo de almacenamiento USB o la tarjeta de memoria SD.
3.- MP3 ERR
No hay dispositivo de almacenamiento USB o tarjeta de memoria SD insertada.
4.- MP3 WAITING
El dispositivo se está preparando para leer la información del dispositivo de almacenamiento USB o la
tarjeta de memoria SD.

EN
- 12 -
ES
FUNCIONAMIENTO MP3
Para acceder al menú de configuración MP3 pulse el botón MP3 del panel frontal.
Se mostrará en la pantalla de información:
PROGRAMA EN ESPERAEDITAR PROGRAMA
CONFIGURACIÓN DEL SISTEMA
FUNCIONAMIENTO MP3
CONFIGURACIÓN DE LA HORA
MENU PRINCIPAL
Utilice los botones de navegación UP, DOWN, LEFT y RIGHT para seleccionar el tipo de reproducción entre
los siguientes modos:
1.- PLAY ALL: reproduce todas las pistas de audio contenidas y se detiene la reproducción.
2.- PLAY ONE: reproduce la pista de audio seleccionada una única vez y se detiene la reproducción.
3.- REP ALL: reproduce todas las pistas de audio continuamente.
4.- REP ONE: reproduce la pista de audio seleccionada continuamente.
5.- STOP: detiene la reproducción.
6.- RANDOM: reproducción aleatoria continua de las pistas de audio contenidas en el dispositivo de
almacenamiento.
7.- SPECIFY: reproduce hasta un máximo de 10 pistas de audio a elección del usuario.
8.- SPEC REP: reproduce y repite continuamente hasta un máximo de 10 pistas de audio a elección del
usuario.
A continuación pulse el botón de confirmación para seleccionar la opción escogida. Si desea salir del menú
de funcionamiento MP3 pulse el botón MP3 del panel frontal del dispositivo.
MENÚ PRINCIPAL
Pulse el botón de confirmación para acceder al menú principal del sistema.
PROGRAMA EN ESPERAEDITAR PROGRAMA
CONFIGURACIÓN DEL SISTEMA
FUNCIONAMIENTO MP3
CONFIGURACIÓN DE LA HORA
MENU PRINCIPAL
Utilice los botones de navegación LEFT y RIGHT para seleccionar el menú de configuración deseado.
CONFIGURACIÓN DEL SISTEMA (SYSTEM SETTING)
Para acceder al menú principal pulse el botón de confirmación y a continuación sitúese sobre la opción
Configuración del Sistema (System Setting). Para entrar en el menú de configuración del sistema presione
de nuevo el botón de confirmación.
PROGRAMA EN ESPERAEDITAR PROGRAMA
CONFIGURACIÓN DEL SISTEMA
FUNCIONAMIENTO MP3
CONFIGURACIÓN DE LA HORA
MENU PRINCIPAL

EN
- 13 -
ES
Un programa consta de una serie de eventos que se ejecutan secuencialmente, cada uno de ellos a una
hora determinada por el usuario, siendo los parámetros de estos eventos configurables en el menú Editar
Programa (Edit Program).
Existen 5 programas diferentes para realizar diferentes programaciones, pero únicamente se pueden asignar
a cada día los 4 primeros (1 a 4), ya que el quinto programa es únicamente asignable desde el botón SWIFT
situado en el panel frontal del dispositivo.
Utilice los botones de desplazamiento UP, DOWN, LEFT y RIGHT para navegar por los diferentes días de
la semana y asignar a cada uno de ellos un número determinado de programa (1 al 4). También existe la
posibilidad de no asignar ningún programa.
Nota: para que un programa se ejecute, debe estar antes configurado en el menú Editar Programa (Edit
Program).
Si desea confirmar los cambios, utilice los botones de desplazamiento LEFT y RIGHT, sitúese sobre la
opción OK y a continuación, presione el botón de confirmación. Por el contrario, si no desea confirmar los
cambios realizados, sitúese sobre la opción Cancel y presione el botón de confirmación.
CONFIGURACIÓN DE LA HORA (TIME SETTING)
Pulse el botón de confirmación para acceder al menú principal. A continuación sitúese sobre la opción
Configuración de la Hora (Time Setting).
PROGRAMA EN ESPERAEDITAR PROGRAMA
CONFIGURACIÓN DEL SISTEMA
FUNCIONAMIENTO MP3
CONFIGURACIÓN DE LA HORA
MENU PRINCIPAL
Presione de nuevo el botón de confirmación para entrar en el menú de configuración de la hora.
PROGRAMA EN ESPERAEDITAR PROGRAMA
CONFIGURACIÓN DEL SISTEMA
FUNCIONAMIENTO MP3
CONFIGURACIÓN DE LA HORA
MENU PRINCIPAL
Utilice los botones de desplazamiento UP, DOWN, LEFT y RIGHT para configurar los parámetros de este
menú. Puede modificar el año, mes, día, día de la semana, hora, minutos y segundos del reloj del temporizador.
Si desea confirmar los cambios, sitúese sobre la opción OK y pulse el botón de confirmación y si no desea
guardar los cambios establecidos, sitúese sobre la opción Cancel y pulse el botón de confirmación.
Nota: tenga en cuenta que no se trata de un reloj atómico, por lo que la hora puede sufrir adelantos/
retrasos. Procure revisar la hora periódicamente.
EDIT PROGRAM
Pulse el botón de confirmación para acceder al menú principal. A continuación sitúese sobre la opción
Editar Programa (Edit Program).
PROGRAMA EN ESPERAEDITAR PROGRAMA
CONFIGURACIÓN DEL SISTEMA
FUNCIONAMIENTO MP3
CONFIGURACIÓN DE LA HORA
MENU PRINCIPAL

EN
- 14 -
ES
Presione de nuevo el botón de confirmación para entrar en el menú de edición de programas.
PROGRAMA EN ESPERAEDITAR PROGRAMA
CONFIGURACIÓN DEL SISTEMA
FUNCIONAMIENTO MP3
CONFIGURACIÓN DE LA HORA
MENU PRINCIPAL
Un programa consta de una serie de eventos (uno o varios) que se ejecutan secuencialmente, cada uno de
ellos a una hora determinada por el usuario, siendo los parámetros de estos eventos configurables también
por el usuario. En este menú se pueden editar todos los programas disponibles (1 al 5).
Un evento consta de una serie de parámetros a configurar (orden, hora de ejecución y tipo de reproducción)
y se ordenan automáticamente en su respectivo programa según su hora de ejecución.
PROGRAMA EN ESPERAEDITAR PROGRAMA
CONFIGURACIÓN DEL SISTEMA
FUNCIONAMIENTO MP3
CONFIGURACIÓN DE LA HORA
MENU PRINCIPAL
Seleccione el número de programa que desea editar utilizando los botones de desplazamiento. A continuación
sitúese sobre la opción Añadir (Add) y presione el botón de confirmación para añadir un evento en el
programa seleccionado. En ese momento, aparecen en pantalla los diferentes parámetros de configuración
del evento y el orden de ejecución de este evento dentro del programa seleccionado.
Editar programa y evento
Seleccione el número de programa deseado y navegue por las diferentes opciones de configuración de
cada uno de los eventos existentes. Sitúese en el parámetro que desea editar y utilice los botones de
desplazamiento UP y DOWN para modificar las especificaciones.
Añadir un evento a un programa
Seleccione el número de programa deseado, utilice los botones de desplazamiento LEFT y RIGHT y sitúese
sobre la opción Añadir (Add). Presione el botón de confirmación para añadir un nuevo evento en el programa
seleccionado.
Si desea editar o modificar este nuevo evento o cualquiera de los ya creados, navegue por las diferentes
opciones de configuración del evento y utilice los botones de desplazamiento UP y DOWN para seleccionar
la hora de ejecución y el tipo de reproducción que desea llevar a cabo.
Borrar un evento
Seleccione en primer lugar el programa deseado y a continuación, utilice las teclas de desplazamiento para
seleccionar el evento de ese programa que desea borrar. Sitúese sobre la opción Borrar (Del) y presione el
botón de confirmación para borrar el evento del programa seleccionado.
Borrar todos los eventos de un programa
Seleccione el número de programa deseado y utilice los botones de desplazamiento LEFT y RIGHT para
situarse sobre la opción Borrar Todos (Del All). Presione el botón de confirmación para borrar todos los
eventos del programa seleccionado.
Salir
Seleccione la opción Exit para salir del menú Editar Programa y volver al menú principal.
Nota: cada uno de los 5 programas admite un máximo de 200 eventos diferentes y el equipo, en total, un
máximo de 512 eventos diferentes.

EN
- 15 -
ES
PROGRAMA EN ESPERA
El programa en espera se corresponde con el programa número 5 en el menú Editar Programa (Edit Program).
Este programa se activa únicamente con el botón SWIFT del panel frontal del dispositivo y tendrá prioridad
sobre el resto de configuraciones programadas.
El programa en espera se ejecuta a una hora determinada según la programación de sus eventos, pero no
se puede asignar el día en que se ejecuta en el menú de Configuración del Sistema (System Setting), es
decir, no se puede asignar este programa a un día determinado de la configuración semanal.
El programa en espera puede ser configurado en el día actual, el día siguiente o ambas opciones a la vez.
Presione el botón SWIFT del panel frontal del dispositivo cuando la pantalla muestre la información general
para que el programa en espera sea la opción prioritaria.
PROGRAMA EN ESPERAEDITAR PROGRAMA
CONFIGURACIÓN DEL SISTEMA
FUNCIONAMIENTO MP3
CONFIGURACIÓN DE LA HORA
MENU PRINCIPAL
Pulse el botón SWIFT sucesivas veces para seleccionar los días de ejecución del programa en espera. A
continuación se describen las diferentes opciones de ejecución del programa en espera:
1: el programa en espera se ejecuta en el día actual.
2: el programa en espera se ejecuta el día siguiente.
1 2: el programa en espera se ejecuta en el día actual y el siguiente.
Si no se muestra ninguno de estos parámetros en pantalla, el programa en espera no se encuentra activado,
por lo que el amplificador mantendrá la programación semanal configurada actualmente.

EN
- 16 -
ES
CONEXIÓN
Realice las conexiones con el reproductor y todos los componentes del sistema de audio apagados y
desconectados de la alimentación.
Conecte el dispositivo de almacenamiento USB o la tarjeta de memoria SD en las entradas correspondientes
del panel frontal.
Conecte las entradas deseadas a las entradas INPUT 1/2. Sitúe el selector en la posición correspondiente
dependiendo de la entrada que conecte. Si conecta una entrada de línea sitúe el selector en la posición
LINE. Si conecta micrófonos dinámicos sitúe el selector en la posición MIC. Si conecta micrófonos de
condensador sitúe el selector en la posición PHANTOM.
Conecte las fuentes de audio deseadas a las entradas AUX 3/4.
Conecte el amplificador, etapa de potencia o altavoz autoamplificado a la salida MASTER del reproductor.
Utilice la salida MASTER balanceada o desbalanceada.
Si lo desea, conecte un grabador, una etapa u otro amplificador o un altavoz autoamplificado a la salida de
nivel de línea REC OUT habilitada para ello.
Una vez realizadas las conexiones según sus necesidades, conecte los aparatos a la toma de corriente y
enciéndalos. Tras su uso, no olvide apagar y desconectar el aparato de la toma de corriente.
Micrófonos
Reproductor CD

EN
- 17 -
ES
ESPECIFICACIONES TÉCNICAS
MP-121P
CARACTERÍSTICAS Programador semanal.
Reproductor USB/SD/MP3.
Pantalla LCD.
Prioridad de avisos.
9 mensajes, seleccionables individualmente mediante botones de acceso
directo o cierre de contactos.
RESPUESTA 50-18,000 Hz ±3 dB
DISTORSIÓN Armónica: < 0'5% a 1 kHz
ENTRADAS 2 micros/líneas balanceados, combo (XLR y jack 6'3 mm) 600 Ω 4 mV RMS
y 47.000 Ω 360 mV RMS, conmutables
2 auxiliares, 2 x RCA 10.000 Ω 120 mV RMS
SALIDAS 1 master, 2 x RCA y 2 x XLR 600 Ω 1 V mono/estéreo seleccionable
1 rec out, 2 x RCA
CONTROLES Tono: graves y agudos
Balance
Volumen: input 1 y 2, aux 3 y 4, MP3 y volumen general
PRIORIDAD Micro 1 por nivel de señal, seleccionable
ALIMENTACIÓN 230/115 V AC, 9 W
MEDIDAS 483 x 89 x 390 mm depth. 2 U 19" rack

FR
- 18 -
DESCRIPTION
- Programmateur/reproducteur hebdommadaire USB/SD/MP3.
-
Programmation hebdomadaire de reproduction de fichiers MP3: timbres, annonces, musique ambiance, etc.
- Spécialement recommandés pour les écoles, les bureaux, le commerce, les églises, etc.
- Reproduction directe de 9 messages par poussoir à distance.
CONTRÔLES ET FONCTIONS
PANNEAU FRONTAL
1.- MP3 : bouton pour accéder au menu de configuration MP3. Pour plus d’information, voir la section
Fonctionnement MP3 de ce mode d’emploi.
2.- SWIFT : bouton pour activer le programme en attente. Pour plus d’information, voir la section Programme
en attente de ce mode d’emploi.
3.- Bouton de confirmation. Il s’utilise aussi pour accéder au menu principal de configuration du système.
4.- Boutons de déplacement pour naviguer entre les différents menus de configuration.
5.- Écran d’information.
6.- 0-9 : boutons numériques, qui s’utilisent pour reproduire directement un piste d’audio déterminée
quand le module MP3 est en fonctionnement.
7.- Indicateurs lumineux de niveau de signal de sortie.
8.- POWER : indicateur lumineux de mise en marche de l’appareil.
9.- Port de connexion des dispositifs de stockage USB.
10.- SD : port de connexion des cartes de mémoires SD.
11.- INPUT 1 : contrôle du volume de l’entrée INPUT 1.
12.- MP3 : contrôle du volume du reproducteur USB/SD/MP3.
13.- INPUT 2 : contrôle du volume de l’entrée INPUT 2.
14.- BASS : renforce ou atténue les fréquences graves, ±10 dB.
15.- AUX 3 : contrôle du volume de l’entrée auxiliaire 3.
16.- TREBLE : renforce ou atténue les fréquences aigus, ±10 dB.
17.- AUX 4 : contrôle du volume de l’entrée auxiliaire 4.
18.- BALANCE : contrôle de balance L-R du signal de sortie.
19.- MASTER : contrôle du volume général de l’appareil.
20.- Interupteur de mise en marche/arrêt de l’appareil.
PANNEAU POSTÉRIEUR

FR
- 19 -
1.- Sëlecteur de voltage de l ’ alimentation.
2.- DIRECT PLAY : Fermeture des contacts pour lancer la lecture directe d'une piste. Chacune de ces
bornes 1-9 correspond à une piste, 1-9 respectivement, sur le périphérique de stockage USB ou la
carte mémoire SD. Pour lancer la lecture d'une piste, fermer et rouvrir le contact (avec un bouton
poussoir), en connectant et déconnectant le terminal de la piste avec le terminal COM.
3.- STEREO/MONO : sélecteur qui permet que la sortie d’audio sorte par les deux canaux (STÉRÉO) ou
dans un même canal (MONO).
4.- Plinthe CA pour connecter le câble de l’alimentation incl.
5.- Vis pour la prise de terre.
6.- MP3 PLAYING : ces contacts se vérouillent quand la reproduction MP3 est en fonctionnement.
7.- MASTER BALANCE : sortie équilibrée master de niveau de ligne, connecteurs 2 x XLR.
8.- MASTER UNBAL : sortie déséquilibrée master de niveau de ligne, connecteurs 2 x RCA.
9.- REC OUT : sortie d’enregistrement, niveau de ligne, connecteurs 2 x RCA.
10.- AUX 3/4 : entrées auxiliaires de niveau de ligne, connecteurs 2 x RCA.
11.- LINE/PHANTOM 48 V/MIC :
commutateurs de sensibilité des entrées et de l’alimentation phantom 48
V. Ces commutateurs ont 3 positions:
LINE : sur cette position , aux entrées INPUT 1/2 il est possible de connecter des sources d’audio de
niveau de ligne: reproducteurs de CD, etc.
PHANTOM 48 V : sur cette position, aux entrées INPUT 1/2 peuvent se connecter des microphones de
condensateur électret demandant une alimentation phantom 48 V.
MIC : sur cette position, dans les entrées INPUT 1/2 il est possible de connecter des microphones
dynamiques de basse impédance 30-600 Ω.
12.- INPUT 1/2 : entrées de microphone/ligne, connecteurs combo (XLR et jack 6’3 mm). Sélectionnez la
position adéquate sur le commutateur dépendant du type d’entrée utilisée.
13.- V.O. TIME : contrôle voice-over. Permet de régler le niveau d’atténuation de la sortie d’audio à
l’introduction de la sortie d’audio quand s’introduit un signal de microphone dans INPUT 1. Tournez
le contrôle antihoraire jusqu’au minimum et le reste des entrées s’atténueront automatiquement à la
détection d’un signal dans l’entrée INPUT 1. Tournez-le dans le sens horaire jusqu’au maximum et la
fonction de priorité se placera sur le niveau minimum.
INSTRUCCIONES DE USO
Si le programmateur est allumé, l’écran d’information affichera l’aspect suivant:
PROGRAMA EN ESPERAEDITAR PROGRAMA
CONFIGURACIÓN DEL SISTEMA
FUNCIONAMIENTO MP3
CONFIGURACIÓN DE LA HORA
MENU PRINCIPAL
Sur la première ligne s’affiche la date et l’heure actuelle.
Sur la deuxième ligne s’affiche le jour de la semaine et l’heure de l’événement suivant (si il est disponible).
Sur la troisième ligne s’affiche l’état actuel du reproducteur MP3, qui peut être entre 3 options:
1.- MP3
NEXT VOL- VOL+
ACCEPT END REJECT REDIAL
5 V DC
Macho Hembra
X-BASS
REWIND FORWARD
5 V DC
Cat 6/6a/7 (FTP/SFTP)
*
RJ-45
CABLE
GAIN
(10 EQ)
HDMI
IR
IR
VIDEO PLAYER
Tx Rx
Tx Rx
12
FLASHING / INTERMITENTE / CLIGNOTANT / INTERMITENTE
ON / ENCENDIDO / ALLUMÉ / LIGADO
BLUE/AZUL/
BLEU/AZUIS
FLASHING/INTERMITENTE/CLIGNOTANT/INTERMITENTE
MODE
MicroSD/USB
MODE
FM
MODE
AUX
MODE
BT
ON/ENCENDIDO/ALLUMÉ/LIGADO
OFF/APAGADO/ÉTEINT/DESLIGADO
RED/ROJO/
ROUGE/VERMELHO
RED
BLUE
x2
Tx Rx
Tx Rx
2s
PRIORITY
PRIORITY
MIC
LANGUAGE VOICE
PROMPT
2s
2 x AA
PRESET- PRESET+
BT
BLUE / AZUL /
BLEU / AZUIS
FLASHING / INTERMITENTE / CLIGNOTANT / INTERMITENTE
ON / ENCENDIDO / ALLUMÉ / LIGADO
OFF / APAGADO / ÉTEINT / DESLIGADO
RED / ROJO /
ROUGE / VERMELHO
PLAY PAUSE PREVIOUS
ON/OFF AUDIO
MODE
MUTE
FX
MIC FX
MIC VOL FOLDER
LOCK
PREVIOUS
FOLDER
NEXT
FOLDER
EJECT
BASS TREBLE
L R
BALANCE EQ REPEAT
RANDOM
RELOAD LIGHT FX
FM ANT. RECEIVER IR
RADIO
AUTO
MANUAL
MEMO
START
REC
STOP
REC
STATUS SET ALARM SET CLOCK SLEEP
TRACKS
0 - 9
CH+CH-
STOP
A
1
OFF
FREQ- FREQ+
PRESETS
0 - 9
153
264 7
10 1513
12 1614 17
11
89
18 19
Set on a free FM frequency
Seleccione una frecuencia FM libre
Sélectionnez une fréquence FM libre
Selecione uma frequência FM livre
A
REPEAT
ALL
REPEAT
ONE
1
REPEAT
FOLDER
L
R
EQ
CHARGE
MIC
MIC
MUTE
GREEN / VERDE /
VERT / VERDE
START
REC
1s
STOP
REC
1s
!
AUDIO
SYSTEM
BLUE/AZUL/
BLEU/AZUIS
FLASHING / INTERMITENTE / CLIGNOTANT / INTERMITENTE
BT
ON / ENCENDIDO / ALLUMÉ / LIGADO
OFF / APAGADO / ÉTEINT / DESLIGADO
RED/ROJO/
ROUGE/VERMELHO
SLOW
SLOW
FAST / RÁPIDO / RAPIDE / RÁPIDO
SLOW / LENTO / LENT / LENTO
OFF
x3
ON
x3
INPUT
MASTER VOL
MIXER
INPUT VOL
INPUT
MIC
ON
MIC
OFF
LED
ON
LED
OFF
MENU
OFF
RANDOM
OFF
RANDOM
ALL
RANDOM
FOLDER
CONNECTING CONNECTION OK
Left (L)
Right (R)
Ground (G)
L RG
OUTPUT
OUTPUT VOL
230 V AC
AUDIO
RECORDER
CLICK
MODE
HEADPHONES
VOL
SNOOZE
SOUND
PC
3s
ON/OFF
STATUS
FE-1150T
POWER
15
10
5
3
1
7.5
5
2.5
1.5
0.5
670 Ω
1,000 Ω
2,000 Ω
3,300 Ω
10,000 Ω
OFF
1W
3W 5W 10W
15W
IMPEDANCE
100 V 70 V
1
2
Configure the speaker
Configure el altavoz
Configurez le haut-parleur
Configure o altifalante
Connect the cables
Conecte los cables
Connectez les câbles
Ligue os cabos
CHARGING
BATTERY
BATTERY
FULL
1. LOUDSPEAKER ENCLOSURE
2. REFERENCE AXIS
3. HORIZONTAL PLANE
4. REFERENCE PLANE
1
2
3
4
2 x AA
04 ----- 00:01:52
S’affiche le numéro de la piste d’audio en reproduction et le temps de cette reproduction.
2.- MP3 STOP --- 36
Il indique que la reproduction se trouve arrêtée et le numéro total de piste d’audio contenues dans le
dispositifs de stockage USB ou la carte de mémoire SD.
3.- MP3 ERR
Pas de dispositif de stockage USB ou carte de mémoire SD insérée.
4.- MP3 WAITING
Le dispositif se prépare pour lire l’information du dispositif de stockage USB ou la carte de mémoire SD.

FR
- 20 -
FONCTIONNEMENT MP3
Pour eccéder au menu de configuration MP3 appuyez sur le bouton MP3 du panneau frontal.
Il affichera sur l’écran d’information:
PROGRAMA EN ESPERAEDITAR PROGRAMA
CONFIGURACIÓN DEL SISTEMA
FUNCIONAMIENTO MP3
CONFIGURACIÓN DE LA HORA
MENU PRINCIPAL
Utilisez les boutons de navigation UP, DOWN, LEFT y RIGHT pour sélectionner le type de reproduction que
vous désirez entre les modes suivants:
1.- PLAY ALL : reproduit toutes les pistes d’audio contenues et arrête la reproduction.
2.- PLAY ONE : reproduit la piste d’audio sélectionnée une seule fois et la reproduction s’arrête.
3.- REP ALL : reproduit toutes les pistes d’audio continuellement.
4.- REP ONE : reproduit la piste d’audio sélectionnée continuellement.
5.- STOP : arrête la reproduction.
6.- RANDOM : reproduction aléatoire continue des pistes d’audio contenues dans le dispositif de stockage.
7.- SPECIFY : reproduit jusqu’à un maximimum de 10 pistes d’audio au choix de l’utilisateur.
8.- SPEC REP : reproduit et répète continuellement jusqu’á un maximum de 10 pistes d’audio au choix de
l’utillisateur.
Puis appuyez sur le bouton de confirmation pour sélectionner l’option choisie. Si vous souhaitez sortir du
menu de fonctionnement MP3 appuyez sur le bouton MP3 du panneau frontal du dispositif.
MENU PRINCIPAL
Appuyez sur le bouton de confirmation pour accéder au menu principal du système.
PROGRAMA EN ESPERAEDITAR PROGRAMA
CONFIGURACIÓN DEL SISTEMA
FUNCIONAMIENTO MP3
CONFIGURACIÓN DE LA HORA
MENU PRINCIPAL
Utilisez les voutons de navigation LEFT et RIGHT pour sélectionner le menu de configuration souhaité.
CONFIGURATION DU SYSTÈME (SYSTEM SETTING)
Pour accéder au menu principal appuyez sur le bouoton de configuration puis indiqué l’option Configuration
du Système (System Setting). Pour entrer dans le menu configuration du système appuyez à nouveau sur le
bouton de configuration.
PROGRAMA EN ESPERAEDITAR PROGRAMA
CONFIGURACIÓN DEL SISTEMA
FUNCIONAMIENTO MP3
CONFIGURACIÓN DE LA HORA
MENU PRINCIPAL
Other manuals for MP-121P
1
Table of contents
Languages:
Other FONESTAR Media Player manuals