Equila TONAL EQ User manual
EQUILA
Instruction Manual
V1.0.1
Rack Extension for Reason
Instruction Manual

Page 2
EQUILA
Instruction Manual
V1.0.1
Contents
Page Subject
3: Thank You, cknowledgements & Dedications
4: Introduction
5: brief guide to Equila
9 : Working with Equila
12: Using the Dual Function Display
13: Selecting the different slopes and using the controls
14: CV Inputs & controls
15: MIDI Implementation chart
16: How to ‘latch’ your own MIDI via Remote Overriding
18: ppendix 1: Instrument frequency ranges
20: ppendix 2: EQ Tables
22: Licence greement

Page 3
EQUILA
Instruction Manual
V1.0.1
TH NK YOU
We thank you for expressing your confidence by purchasing one of our equalizers; in this case the
Equila 3 Band Tonal EQ. This 2-channel high-quality equalizer was designed with our experience of
both filtering capabilities in the digital realm as well as the crafting of audio for all types of users;
producers, engineers and artists alike.
We hope you continue to enjoy using Equila in your projects for now and for future.
Lab:One Recordings © 2017
CKNOWLEDGEMENTS
Thanks to all of the Lab One lpha Team for all the testing, comments, suggestions and feedback, as
well as aiding us to bring our products to you.
Propellerhead Software (for Reason, the SDK and the concept of the Re)
Presets designed by:
DEDIC TIONS
This Re is dedicated to all the Propellerhead Reason users & forum threaders, friends, & colleagues
we have spoken to over the years.
DjFresha: Thanks goes out to my studio buddies; Dos aka Ocro, Dj EQ, for the support & feedback,
shouts go out to all who know me; Ben ‘Devious’, ndy ‘Ruthless’, Scott ‘Sniper’, the REBIRTH crew
and SCHTUM massive (Pete C, Kalist, ybee), and all who continue to work with and support us.
lso not forgetting my family for the support, and last but by no means least, my wife licia who
now enjoys the fact that we can bring products to your guys faster is now a happy bunny :D
Now let’s get into Equila….

Page 4
EQUILA
Instruction Manual
V1.0.1
In
InIn
Introduction
troductiontroduction
troduction
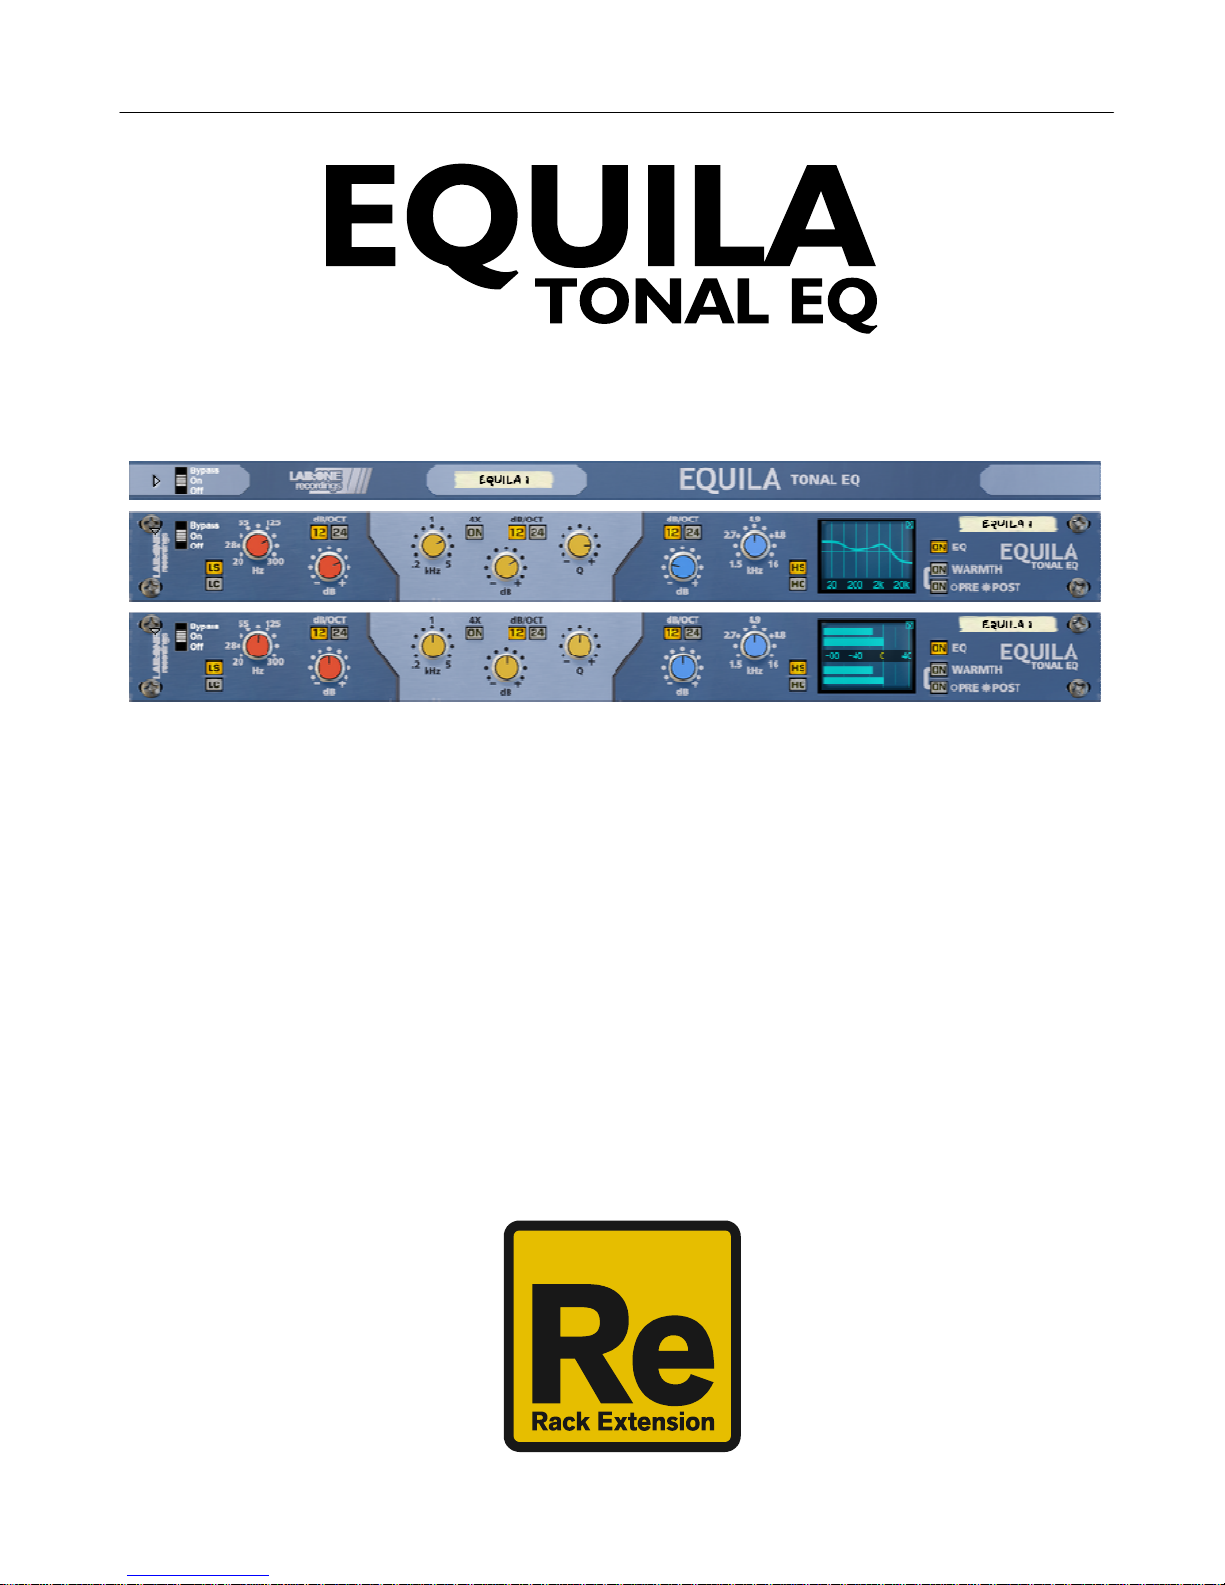
Equila is a dedicated rack unit, built as a Rack Extension for the Propellerhead Reason environment.
This device has a maximum of what would be 1U space in the real world – the classic 19in rack unit.
Being a Rack Extension (Re), this gives you various options of versatility within your projects.
Equila features at a glance:
3 band stereo-linked filters, dedicated to their audio spectrum regions
(Low, Mid and High band ranges)
2 Filter modes for Low and High bands (shelving and passing)
2 slope modes for all 3 bands (12dB/octave & 24dB/octave)
Frequency multiplier for Mid band, to allow high frequency control
Dedicated CV controls linking to all knob controls
Dual Function Display, for input & output metering, plus EQ curve plot mode
‘Ears only’ mode to disable the display
True stereo processing (allowing for dual mono inputs to be process together)
EQ enable mode
Warmth function with pre- and post-EQ routing
Rear ‘state’ indicator for the device (perfect for back-of-the-rack users)
ll these controls are adjustable to suit your application, and these settings can be stored as part of
a Combinator preset (when combined) as well as settings stored within your project. Due to the
minimal amount of controls needed, the need for presets is not required due to the efficiency and
speed you can dial in your settings.
Equila features two audio inputs and two audio outputs, which are processed independently; this
allows you to have two totally separate signals being processed together at the same time using
one set of controls. Mono operation is also an option (see ‘How to connect audio’ section).
For reference, the 3 band ranges of Equila are:
Low band: 20Hz to 300Hz
Mid band: 200Hz to 5kHz / 800Hz to 20kHz (with frequency multiplier active)
High band: 1.5kHz to 16kHz
Equila is designed to be a transparent effect, meaning that if no adjustments are made on the
device, the audio passing through the effect is ‘clean’ and has not been affected by the equalisation
filters or the low pass or high pass filters. This is the ideal, so that no coloration is applied to the
sound.

Page 5
EQUILA
Instruction Manual
V1.0.1
brief guide of Equila
Equila is based on a 3 band equalizer unit that may be commonly found on console units as well as
19in rack units.
A C D F G J K L NQ T
R
B E M P SH
The Front Panel
] Bypass Switch (Bypass effect / Enable effect / Disable effect)
B] Low Band Filter mode selector
C] Low Band Frequency
D] Low Band Slope
E] Low Band Gain
F] Mid Band Frequency
G] Mid Band Frequency Multiplier
H] Mid Band Gain
J] Mid Band Slope
K] Mid Band Resonance
L] High Band Slope
M] High Band Gain
N] High Band Frequency
P] High Band Filter mode selector
Q] Dual Function Display
R] EQ Enable
S] Warmth Enable and Routing mode
T] Device Label
The folded front view includes the Bypass switch ( ) and the Device Label (T).

Page 6
EQUILA
Instruction Manual
V1.0.1
Each band comes with a frequency setting. This determines the point of ‘action’ where the filter starts to
work on the signal. Depending on the Slope, the Mode, the Frequency and in the case of the Mid Band
Resonance control determines the final effect on the processed audio.
Low Pass and High Pass filters attenuate the signal below (for Low) and above (for High) up to the
frequency centre. This can help to remove rumble when using Low Pass, while cutting harsh or headroom
eating high end frequiencies can give you more level to play with.
Low Shelf and High Shelf filters work very much alike the tone controls you find on high grade studio
equipment to more commonly found consumer equipment such as radios, TVs, home stereo systems and
personal audio devices. Boosting or cutting with shelf filters can make equalizing sound more natural
than Low Pass / High Pass filters, which can make the listening experience more enjoyable.
The Mid Band filter is a parametric EQ filter which can be very broad (low Q, 12dB setting) to very tight
(high Q, 24dB setting) which can allow a wide range of applications, from a mid-frequency tone control
style setting to a surgical treatment tool.
Each band employs a gain control of +/-18dB level. When used with the Low Pass / High Pass filters, the
signal post filter can be attenuated. This can be useful if you find that cutting some frequencies results in
a lower signal level so the gain control can readjust the level back up. NOTE: C RE MUST BE T KEN
WHEN SWITCHING FILTER MODES WITH HIGH G IN. If you wish to change modes, stop audio processing,
change the mode and be aware of the gain control setting before applying to your signal. This method
will ensure that you save your speakers but more importantly your ears.
The Warmth function introduces a more ‘analog’ style sound akin a real-world rack counterpart.
Warmth also allows for high drive without overloading (softclipping). The routing option allows you
to choose if you want to apply warmth to the signal post EQ processing or pre-EQ processing. The
key difference is that when in POST mode, the warmth level is a constant, whilst in pre-EQ mode the
warmth function is applied to the signal then the EQ controls can affect the ‘warmed up’ audio. Try
this out to see which you prefer.
The EQ Button allows you to bypass the equalization process within Equila, so you could use just the
Warmth section on audio alone.
The Dual Function Display allows the user to change the view of Equila from the EQ plot chart to
audio metering, by simply clicking the display.
Page 7
EQUILA
Instruction Manual
V1.0.1
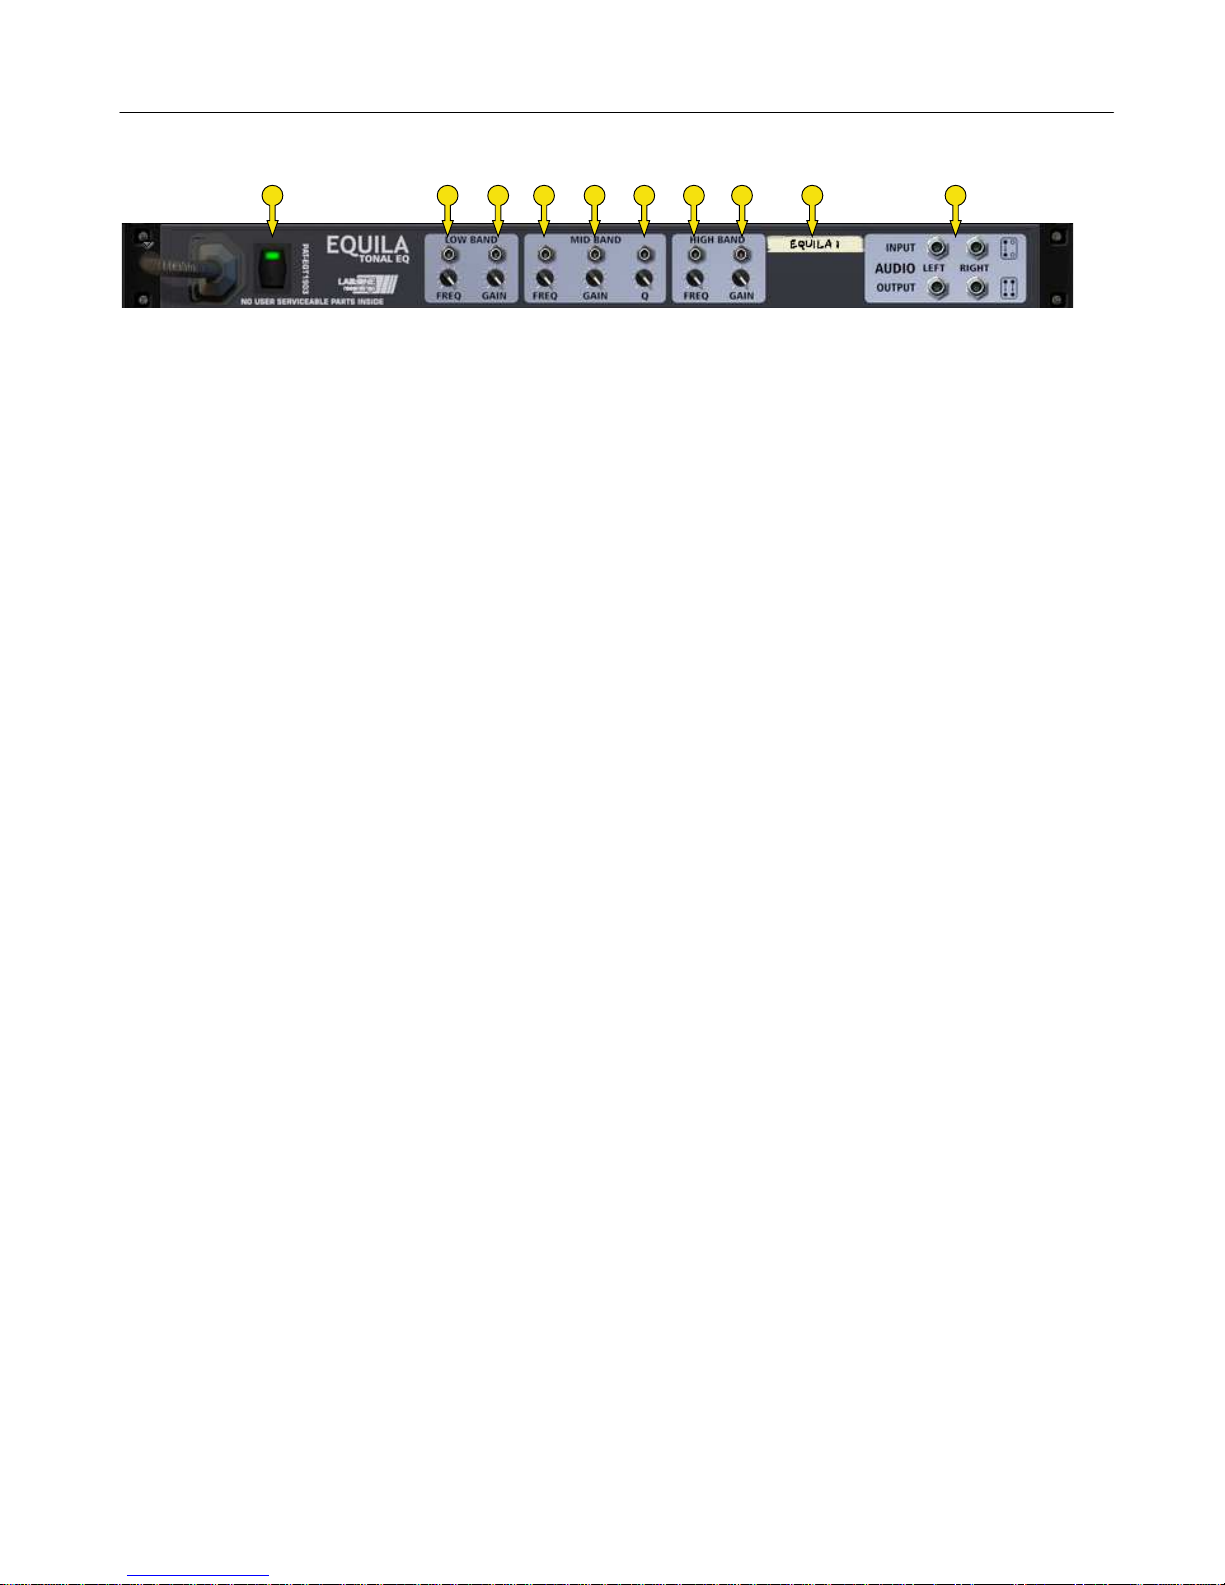
A B C D E F G H J K
The Back Panel
] State indicator
B] Low Band Frequency CV + trim controls
C] Low Band Gain CV + trim controls
D] Mid Band Frequency CV + trim controls
E] Mid Band Gain CV + trim controls
F] Mid Band Q CV + trim controls
G] High Band Frequency CV + trim controls
H] High Band Gain CV + trim controls
J] Device Label
K] udio Input & Output sockets
The udio Inputs & Outputs [K] are used to connect Equila to various modules within the Propellerhead
Reason environment, in a form of either an insert or a send effect
Connecting up the audio sockets can be done automatically by Reason, or can be manually done to your
own requirements. Mono devices, when connecting a new Equila to them, can automatically route their
mono signal in to the left channel, and the left output of Equila is connected to the originally wired
socket of the mono device, closing the audio loop. Stereo devices can automatically connect their outputs
to the left and right inputs of Equila, and Equila completes the audio chain by connecting its outputs to
the originally connected stereo pair sockets.
Each audio socket processes the audio separately from each other within Equila. Left and right channels
never mix within Equila. This ensures that if you have two separate mono devices connected to Equila,
the settings on Equila affect both channels at the same time with the same amount of equalization
effect.

Page 8
EQUILA
Instruction Manual
V1.0.1
How to connect audio
To connect Equila you can use Reason’s own auto-connection system, and Equila will decide the best
way to auto-wire; if you have a mono-output device (Subtractor, for example), and you wish to add
Equila to it, Equila will auto-connect the Subtractor output to the Left input, and then continue to
route the Left output of the Equila to the Left input of the mix-channel (or next device in your
processing chain).
You can do any of the following to create Equila;
a) right-click (Win) / CTRL-click (Mac) on the device, select ‘Create Device’, choose sub-menu ‘Studio
Effects’, and select ‘Equila 3 Band Tonal EQ’ from the listing.
b) with the device selected, use the ‘Create’, select ‘Create Device’, choose sub-menu ‘Studio Effects’
and select ‘Equila 3 Band Tonal EQ’ from the listing
c) using the Tool Palette in Reason (F8), select ‘Studio Effects’ when in the ‘Devices’ tab, and locate
the ‘Equila 3 Band Tonal EQ’ device, click on the icon and drag it to the device you wish to add it to.
Page 9
EQUILA
Instruction Manual
V1.0.1
Working with Equila
Equila is designed to be a flexible device, allowing it to be used however you see best fit. Only
typical applications will be listed in this manual.
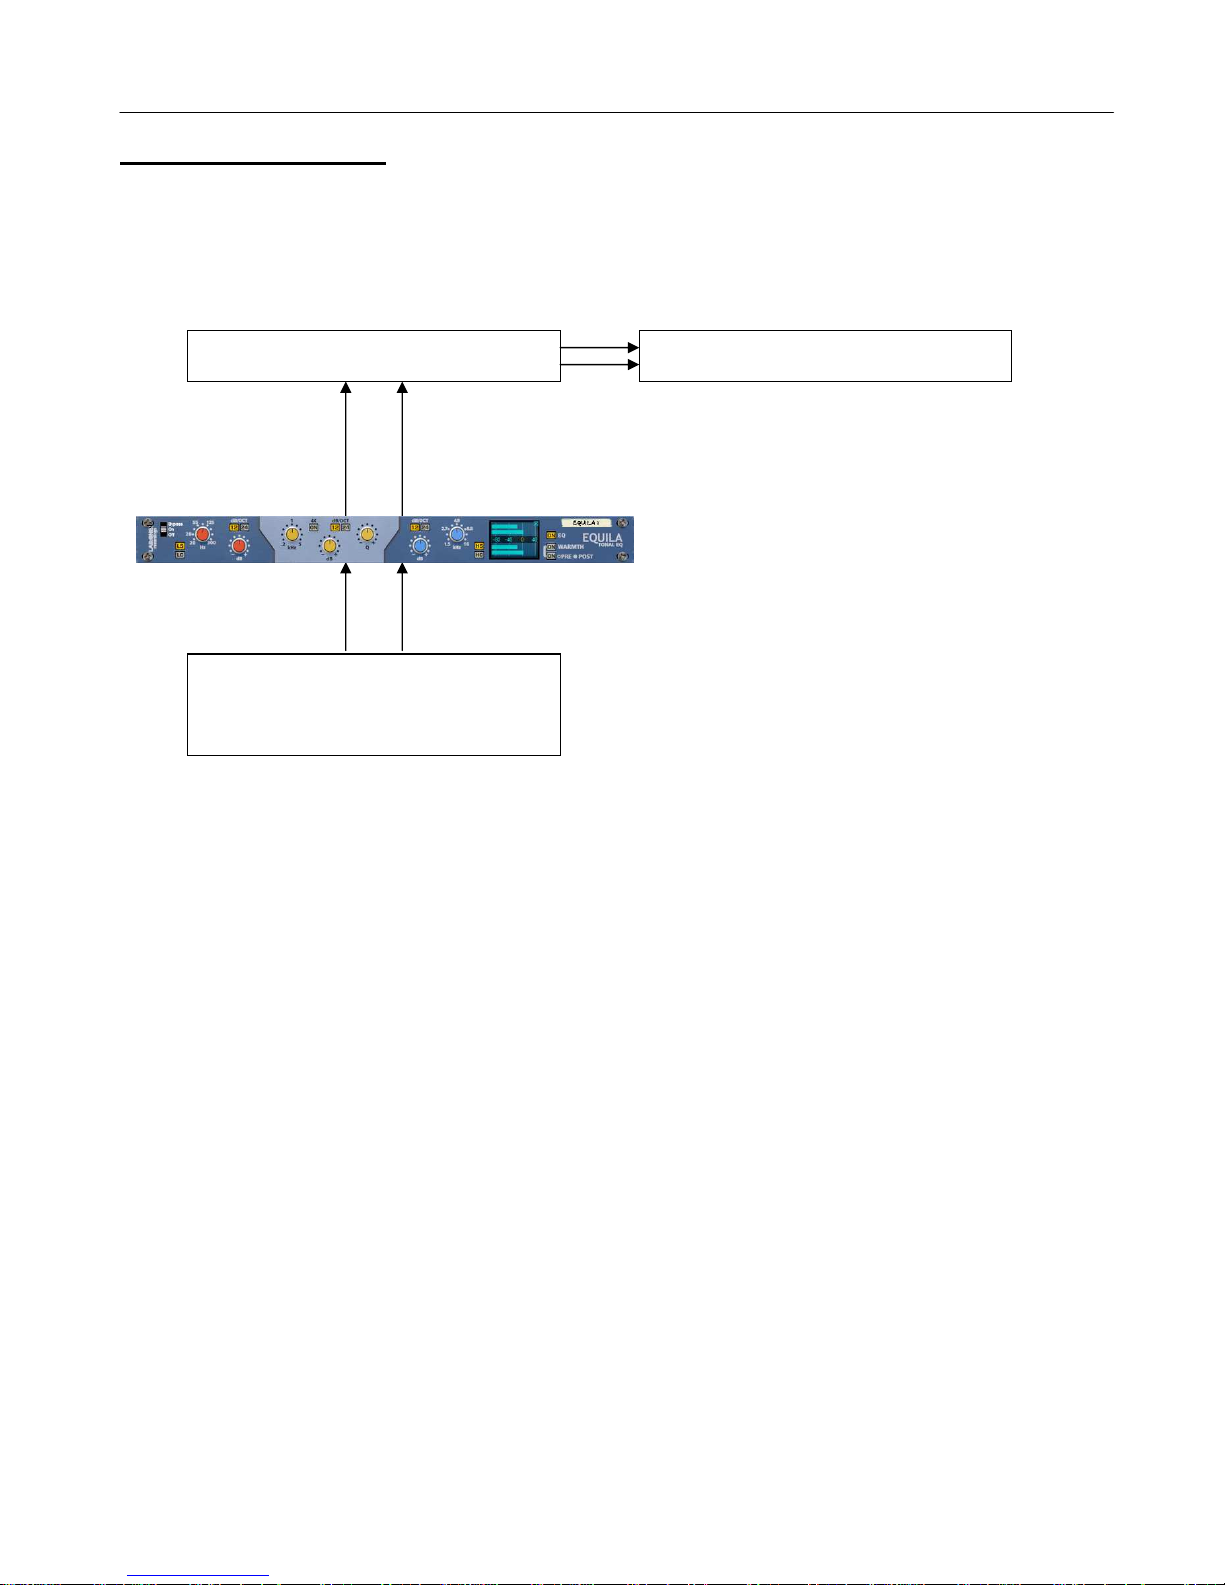
) Using Equila as an insert (mix channel setup).
In setup ( ), this would use Equila as an insert effect. This means that whatever control you adjust
on Equila, it will affect the total sound coming out of the sampler / synth module. If Equila is in
bypass mode, the audio playing would still sound ‘clean’ and unaffected.
To affect the sound, begin with adjusting the potentiometer controls – this can be level, frequency
and for mid band resonance values. Using Low passing will ‘dull’ the sound by suppressing the
higher frequencies, while High passing would remove some ‘body’ from the lower end of the
frequency spectrum. The audio to be processed can vary in frequency (pitch) as well as level, so you
can tweak the parameters freely to meet your needs. To help you, refer to ppendix 1: Frequency
Band ‘character’ descriptions. Be aware of audio level when processing: the ‘illusion’ of louder tricks
us into believing it is ‘better’. Equalization should be done subjectively, to determine if the
equalisation used is the correct treatment of the audio. Remember to equalize carefully, so not to
make wrong decisions too quickly.
Reason sampler / synth module
Reason
Mix
Channel
Equila
Right Input
Equila
Left Input
Right Output
Left Output
Equila
Right Output
Equila
Left Output
Mix Channel
Right Input
Mix Channel
Left Input
Reason
Master Channel

Page 10
EQUILA
Instruction Manual
V1.0.1
B) Using Equila as a send effect (mix / audio channel setup).
In setup (B), this would use Equila as a send effect. This means that whatever control you adjust on
Equila, it will affect the sound coming from the Master Section at a set amount, determined by the
Send Effect dial on that specific Mix / udio channel. This means you can have a clean sound mixed
with an altered equalized sound. This is known as Parallel Processing, and may be desired in some
cases.
gain you can adjust Equila as mentioned in setup ( ) above, with the addition of the SEND dial
located on the Main Mixer in Reason. Full left setting of the SEND dial has no effect on the sound,
while full right setting of the SEND dial will send a maximum level possible to Equila. This means
you can have one Equila as a send device for all your audio channels. However, latency may have a
side effect of cancellation of audio (aka phasing), due to the processing time needed to perform the
filtering of Equila, when used as a Send effect.
lternative setups
For devices which have multiple outputs (ie NN-XT, Redrum, Thor, Spider udio), then if required
additional Equila units could be added as either mono-devices (only connecting left audio input &
output sockets), or as stereo devices. This in turn allows you to edit specific sounds within a preset if
you so wish (ie split zone instrument patches may have a bass guitar for one half of the keymap,
while a synth lead is using the other half, and you wish to effect the sounds independently). See the
next page for more examples of setups.
nother possible option would be to use one instance of Equila, and have 2 mono devices linked into
it (ie guitar lead and guitar bass), and process both inputs in parallel, and output the two signals to
two separate mixer channels. This may be desired to help use the same eqing settings on two mono
devices at the same time.
Reason sampler / synth module
Reason
udio Channel 1
Mix channel 1
Right Input
Mix channel 1
Left Input
Right Output Left Output
Equila
Inputs
Reason Master Section
Reason
Mix Channel 1
Equila
Outputs
Return inputs
Send
Outputs
udio Clips
on sequencer

Page 11
EQUILA
Instruction Manual
V1.0.1
C) Using the Equila as an insert to a side-chain (mix / audio channel setup)
bove you will see two alternative setups using Equila as part of a side-chain effect signal path.
The method on the left utilises the udio Channel insert sockets, to send signal from the udio clips
on the sequencer through the SSL desk channel strip. The insert sockets send the original signal to
Equila, which then can alter the signal by using the band controls, to ‘exaggerate’ the signal more.
Reason for doing this may be to use Equila to help with sibilance and plosive sounds which can be
found in vocal recordings. From Equila the outputs are then fed into the channel strips own side-
chain sockets, and the ‘KEY’ button will become active on the SSL desk, indicating that the side-chain
functionality of the compressor found on the SSL desk is in operation.
Method 2 on the right shows a similar setup, but using a Spider udio Splitter unit to divide the
original signal / sound source into two parallel pairs of signals, one set is sent to the M-Class
Compressor unit audio inputs, while the second pair from the Spider is sent to the audio inputs of
Equila, and the outputs of Equila are connected to the side-chain input of the M-Class Compressor.
This frees the side-chain of the SSL compressor, so another sound source could be used to control the
main SSL dynamics for that channel strip.
Experiment with setups to your own way of working, use these as a guide, but not necessarily as the
be-all-and-end-all approach.
Reason
multi
-
channel
sampler /
synth module
Reason udio Channel
Reason Master Section
udio Channel
Insert outputs
Equila
inputs
udio Channel
Sidechain inputs
udio Channel
Outputs
Spider udio Spl
itter
M
-
Class Compressor
Reason Mix Channel
Equila
inputs
Setup :
Side-chaining the SSL Compressor
M-Class outputs
Original signal (via Spider)
M
-
Class Comp.
Sidechain inputs
Equila outputs
Module outputs to Spider Split inputs
Setup B:
Side-chaining using M-Class Compressor
udio Clips
on sequencer
Equila
outputs

Page 12
EQUILA
Instruction Manual
V1.0.1
Using the Dual Function Display
Equila comes with a dual functioning display. By default it is set to display the equalization curve
(when EQ is ON). By simply clicking the display the view mode can change from EQ curve to meters
and vice versa. This can be extremely useful for those who want to display the curve that is being
applied to the audio signal, as well as checking the levels pre and post processing. dditionally, you
can disable the view totally (‘Ears only’) mode, which may help you focus more on the sound rather
that seeing the effect
Meters mode
EQ curve display mode
Ears only mode
The Input and Output Meters can be used to assess initial audio signal levels, and processed final
output levels. The best way to use the meters is as follows;
1) Set the output of the sound module (synth / sampler / insert effect) so that the input meter on
Equila is below the zero line – this aids your decisions later in and also helps to prevent any clipping
if any louder signals come through the signal chain into Equila.
2) Use the band controls to your desired choice, be it boosting or cutting of frequencies.
3) Whilst affecting the signal within Equila, you may notice the Output meters may vary above or
below the input levels. This is due to signal spectrum & frequency changes in relation to the
adjustments you have made. To compensate, you may need to relevel the trim control on the SSL
desk, or the channel fader to increase/reduce the output level; ideally aim to match the level of
original signal level, so that you can match your audio signal levels better and so that volume is not
a bias to your decisions.
NOTE: Equila can allow up to +40dB signal output maximum. ny higher than this level may result
in hard clipping; If you find you are driving a loud signal through Equila, use the Warmth control in
POST mode to soft-clip the signal and prevent digital hard clipping (also known as overs)
This method will help you to determine if your decisions relating to filter use and / or EQ band
filtering are good or bad, without raising or lowering the level too much, which would be bias
towards whether your EQing is right or wrong. Human nature determines louder sounds as ‘better’,
even as little as 3dB gain can give the listener a ‘false’ pretence that a 3dB louder mix sounds better
that a 0dB mix of the same material.

Page 13
EQUILA
Instruction Manual
V1.0.1
Selecting the different slopes and using the controls
Equila has dual mode slope function which allows for greater attenuation for the Low and High
bands, plus a tighter resonance for the mod band. This helps make Equila a great device for gentle
‘character’ shaping to a more pronounced obvious effect.
The Low and High band employ 12dB and 24dB per octave slope function. This means that for every
octave up / down (band depending) the audio level would reduce in that frequency range by that set
amount. For example
300Hz Low pass filter with 12dB/Oct means that 150Hz (1 octave below) will output at 12dB
lower than the signal level at 300Hz, 75Hz (2 octaves below) will output 12dB lower than
150Hz, 37.5Hz (3 octaves below) would be 12dB lower than 75Hz….
For shelving filters, the logic is still applied but due to the nature of shelving the range of the slope
affects a shorter amount of frequencies and then ‘level off’ to work much alike a tone control on a
car stereo (Bass / treble controls are shelving filters)
You may need to experiment to see which slope works best for your application.
The frequency controls set the frequency centre of the filters. This is the key ‘start point’ for filters,
so Equila understands what signal to affect where across the frequency spectrum.
For the Mid band, Q (resonance) is added as a parametric band, which may focus better on smaller
key areas, or could be used in a broad fashion much like a mid band ‘bell’ boost (revert to the car
stereo analogy where Bass and Treble are shelves while Mid could be a wide Q EQ filter).
dditionally, Mid band includes a 12dB/24dB per octave mode, to aid with tighter / wider resonance.
ll 3 bands have frequency and gain controls. The frequency controls cover the ranges mentioned
above. The gain controls for Low and High shelving, as well as Mid band EQ allow for +/-18dB level.
When the Low / High band is set to Passing mode, the gain control allows you to re-level the audio
post filter. This is added to allow for any level loss due to harder filtering.
The benefits of this can be useful, in respect to audio engineers, musicians and producers alike.
Page 14
EQUILA
Instruction Manual
V1.0.1
CV inputs and controls
Equila has a total of 7 CV inputs, with corresponding trim knobs (to scale CV input signals). The CV
input sockets are unipolar by design but can allow bi-polar signal. Each of the 7 CV sockets connect
to the 7 knob controls on the front of Equila, giving more creative use of the equalizer where the
user sees best fit.
Each CV input has a corresponding label to the parameter the CV may control.
To use the CV inputs, simply connect a CV output from another device. Default settings for CV trim
knobs are at maximum, so be aware of possible loud signals if using CV inputs whist in 18 or 24dB
modes.
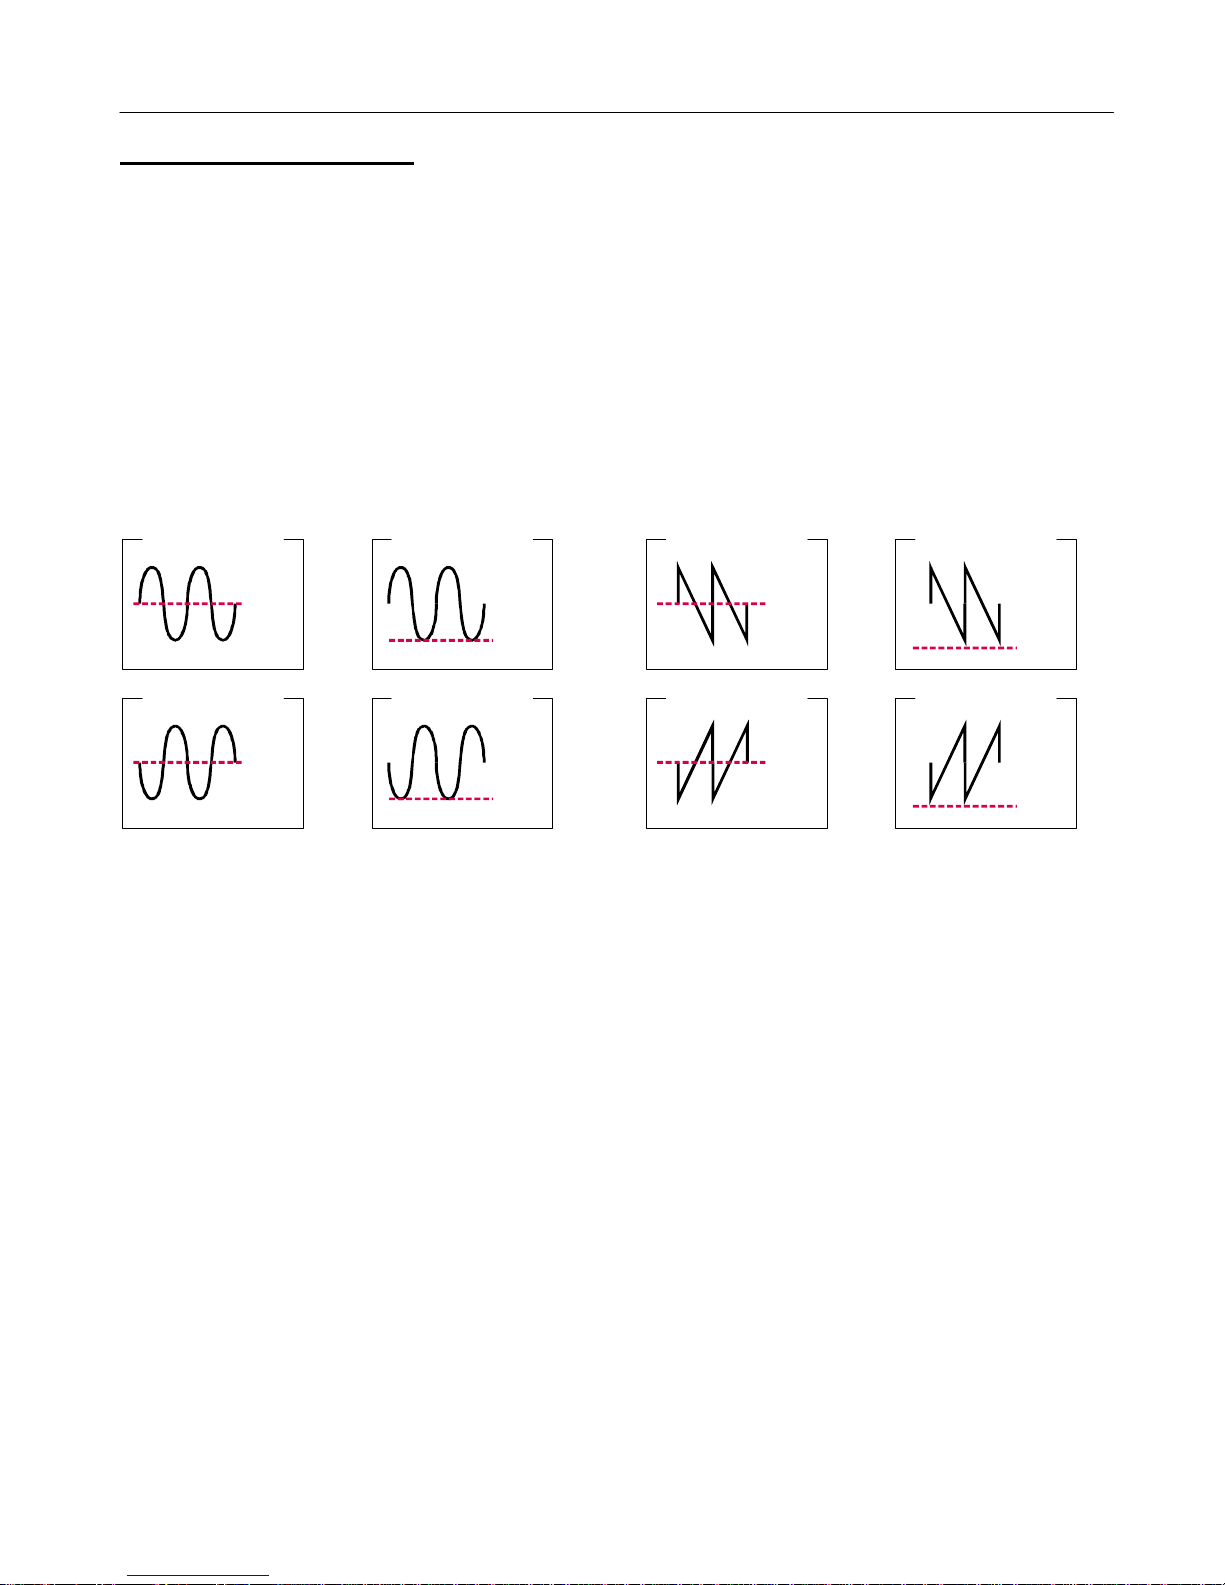
In relation to the way CV works, polarities and inversions please see the illustration below
From the example above, we can see the effect of changing the polarity and bi-polar / uni-polar
modes has on CV input signals.
NOTE. CV signal patching will remain only within Mixer / udio Channel effect chains, or within a
Combinator, and of course your template rack setups.
0.5
0
-0.5
0.5
0
-0.5
1.0
0.5
0
1.0
0.5
0
BiPolar Normal
BiPolar Inverted
UniPolar Normal
UniPolar Inverted
0.5
0
-0.5
0.5
0
-0.5
1.0
0.5
0
1.0
0.5
0
BiPolar Normal
BiPolar Inverted
UniPolar Normal
UniPolar Inverted

Page 15
EQUILA
Instruction Manual
V1.0.1
MIDI Implementation table
Below is a listing of all MIDI Control Change (CC) numbers, which can be applied to your choice of
device.
MIDI
CC Controls
12 Low Gain
13 Low Frequency
14 Low Slope Mode
15 Low Filter Type
16 Mid Frequency
17 Mid Resoance
18 Mid Gain
19 Mid Slope Mode
21 High Gain
26 Mid Band Frequency Multiply
20 High Frequency
23 High Slope Mode
22 High Filter Type
24 Warmth Pre/Post
25 Warmth Enable
27 EQ Enable

Page 16
EQUILA
Instruction Manual
V1.0.1
How to ‘latch’ your own MIDI via Remote Overriding
Reason allows the user to re-define certain controls via MIDI devices by using the Remote Override
configuration. This means that a control on Equila can be mapped by any MIDI controller you have
connected to your D W. However, you can only map one specific control to any of the available
Remote ‘receiving’ controls on the Rack Extension. lso, Remote Override controls are only saved
within each independent Reason song file. Ideally, if you use a dedicated piece of MIDI equipment
for Equila, a template start-up file would be a better option, so that the Remote Override template is
pre-defined on each new song from the off.
ll the controls on Equila are Remote Override-able. To access the override editor, select from the
‘Options’ Menu ‘Edit Remote Overrides’. The Rack will now display the specific device selected, with
either pre-defined Remote control indicators (the Remote symbol), yellow Lightning bolts (over-
ridden Remote controls pre-defined) or blue arrows (unassigned Remote controls)
You can right-click one of the controls (except for the main EQ handles) and select ‘Edit Remote
override’. This will open a new popup window, with some available options, and to show you which
MIDI controller is currently set to that specific Remote Override.
By moving one of the controls on your MIDI device (already pre-
defined in Reason), you should then see MIDI activity indicator
display that a MIDI message was received. Note also the control
surface and the control itself on the MIDI device that was
adjusted relays to the new Remote Override.

Page 17
EQUILA
Instruction Manual
V1.0.1
Once you are happy with the control being set, you can click ‘OK’ to continue with the new setting,
or ‘C NCEL’ to abort the mapping. lso note that if you accept this mapping, the control (if already
linked to another) will be fixed to the new mapping. ny previously set mappings will be ‘moved’ to
the new mapped control. This should be used with care if you already have pre-defined Remote
Override mappings.
This Remote Overriding method can be handy if you don’t know how to set up your own MIDI
controller to the dedicated MIDI controls mentioned in the previous chapter. For speed, you can
simply double click a blue arrow, and the arrow with turn into a spinning yellow Lightning bolt,
indicating that Reason is awaiting a MIDI signal to that control. You can then adjust a MIDI control
on your MIDI device, and the control will map automatically without the need to use the popup
previously mentioned. Double-click each specific control you want to map to save time and to use
the mapping in a faster method.
ll Remote Overrides can then be used to record automation within Reason, which can be fine tuned
using the Sequencer and the clips (see the Reason Operating Manual for more information on how to
edit & record automation)

Page 18
EQUILA
Instruction Manual
V1.0.1
ppendix 1:
Instrument Frequency ranges
To understand EQ and its intricacies you need hands-on experience, but through practice and use of
Equila you will start to become accustomed to certain ‘ranges’ of the frequency spectrum.
lso, every sound that you use may sound different to someone else, even if you use the same sound
– different variables come into play (amplitude, pitch, envelope, bit rate,.. etc.), so you need to keep
in mind that the below listed frequency settings can be used with ‘a pinch of salt’; EQing is like
seasoning of your sound, it adds flavour (and can also take it away too).
The Kick Drum
ny apparent muddiness can be rolled off around 300Hz. Try a small boost around 5-7kHz to add
some high end.
50-100Hz ~ dds bottom to the sound
100-250Hz ~ dds roundness
250-800Hz ~ Muddiness rea
5-8kHz ~ dds high end presence
8-12kHz ~ dds Hiss
The Snare
Try a small boost around 60-120Hz if the sound is a little too wimpy. Try boosting around
6kHz for that 'snappy' sound.
100-250Hz ~ Fills out the sound
6-8kHz ~ dds presence
The Hi hats, The Cymbals, The Rides & The Other High-end Percussive sounds
ny apparent muddiness can be rolled off around 300Hz. To add some brightness try a small boost
around 3kHz.
250-800Hz ~ Muddiness area
1-6kHz ~ dds presence
6-8kHz ~ dds clarity
8-12kHz ~ dds brightness
The Bass
Try boosting around 60Hz to add more body. ny apparent muddiness can be rolled off around
300Hz.
If more presence is needed, boost around 6kHz.
50-100Hz ~ dds bottom end
100-250Hz ~ dds roundness
250-800Hz ~ Muddiness rea
800-1kHz ~ dds beef to small speakers
1-6kHz ~ dds presence
6-8kHz ~ dds high-end presence
8-12kHz ~ dds hiss

Page 19
EQUILA
Instruction Manual
V1.0.1
The Vocal
This is a difficult one, as it depends on the microphone that was used to record the vocal.
pply either cut or boost around 300hz. pply a very small boost around 6kHz to add some clarity.
100-250Hz ~ dds 'up-frontness'
250-800Hz ~ Muddiness area
1-6kHz ~ dds presence
6-8kHz ~ dds sibilance and clarity
8-12kHz ~ dds brightness
The Piano
ny apparent muddiness can be rolled off around 300Hz. pply a very small boost around 6kHz to
add some clarity.
50-100Hz ~ dds bottom
100-250Hz ~ dds roundness
250-1kHz ~ Muddiness area
1-6kHz ~ dds presence
6-8Khz ~ dds clarity
8-12kHz ~ dds hiss
The Electric Guitar
gain this depends on the mix and the recording. pply either cut or boost around 300hz,
depending on the song and sound. Try boosting around 3kHz to add some edge to the sound, or cut
to add some transparency. Try boosting around 6kHz to add presence. Try boosting around 10kHz to
add brightness.
100-250Hz ~ dds body
250-800Hz ~ Muddiness area
1-6 kHz ~ Cuts through the mix
6-8 kHz ~ dds clarity
8-12 kHz ~ dds hiss
The coustic Guitar
ny apparent muddiness can be rolled off between 100-300Hz. pply small amounts of cut around
1-3 kHz, to push the image higher. pply small amounts of boost around 5 kHz to add some
presence.
100-250Hz ~ dds body
6-8kHz ~ dds clarity
8-12kHz ~ dds brightness
The Strings
These depend entirely on the mix and the sound used.
50-100Hz ~ dds bottom end
100-250Hz ~ dds body
250-800Hz ~ Muddiness area
1-6hHz ~ Sounds crunchy
6-8kHz ~ dds clarity
8-12kHz ~ dds brightness

Page 20
EQUILA
Instruction Manual
V1.0.1
ppendix 2: EQ Tables
Below is a general guide to what specific frequencies may do to your sounds / mix.
50 Hz
1. Increase to add more fullness to lowest frequency instruments like foot, toms, and the bass.
2. Reduce to decrease the "boom" of the bass and will increase overtones and the recognition of bass
line in the mix. This is most often used on bass lines in Rap and R&B.
100 Hz
Increase to add a harder bass sound to lowest frequency instruments.
Increase to add fullness to guitars, snare.
Increase to add warmth to piano and horns.
Reduce to remove boom on guitars & increase clarity.
200 Hz
1. Increase to add fullness to vocals.
2. Increase to add fullness to snare and guitar (harder sound).
3. Reduce to decrease muddiness of vocals or mid-range instruments.
4. Reduce to decrease gong sound of cymbals.
400 Hz
1. Increase to add clarity to bass lines especially when speakers are at low volume.
2. Reduce to decrease "cardboard" sound of lower drums (foot and toms).
3. Reduce to decrease ambiance on cymbals.
800 Hz
1. Increase for clarity and "punch" of bass.
2. Reduce to remove "cheap" sound of guitars
1.5 KHz
1. Increase for "clarity" and "pluck" of bass.
2. Reduce to remove dullness of guitars.
3 KHz
1. Increase for more "pluck" of bass.
2. Increase for more attack of electric / acoustic guitar.
3. Increase for more attack on low piano parts.
4. Increase for more clarity / hardness on voice.
5. Reduce to increase breathy, soft sound on background vocals.
6. Reduce to disguise out-of-tune vocals / guitars
5 KHz
1. Increase for vocal presence.
2. Increase low frequency drum attack (foot/toms).
3. Increase for more "finger sound" on bass.
4. Increase attack of piano, acoustic guitar and brightness on guitars.
5. Reduce to make background parts more distant.
6. Reduce to soften "thin" guitar.


