EQUILAB SMARTMARKER User manual

SMARTMARKER

new page
power
status
power status
Smartmarker
Sensor
Bluetooth status
color ring
marker
release
SMARTMARKER
eraser
cap
Smartmarker
Sleeve
power button
charging
case
Bluetooth
button
sensor
USB port
USB charge
port
1
Components

Record and organize written notes.
Stream, edit, enhance and share
them with friends and colleagues.
Convert your handwriting to text for
easy editing and sharing. For
download instructions, see the
following page.
Equil Note App
user guide black marker
2
quick start card
direct connect cable
*Ferrite core
sensor mounting
bracket
USB power adapter & international adapters
wireless dongle

3
Tablet
Computer
Phone
Charging
Tips
Use the wall adapter for faster charging.
You may use any micro-USB cable to
charge your Equil Smartmarker.
The amber LED indicates active
charging. The green LED indicates that
charging is complete.
❶Download and install Equil Note
iOS the App Store
Android™ Google Play™
Mac OS X® the Mac App Store
Windows myequil.com
❷Charge your marker and sensor
Fully charge Equil
Smartmarker
before use.
Charging takes
approximately
two hours.
Once charged, your
Equil Smartmarker
can be used
continuously for up
to eight hours.
USB
Equil Note platform available on

❸Turn on the sensor
The Power button is found on the side
of the sensor.
4
Power
Tips
To save battery power, the
sensor will turn off automatically
after 60 minutes of inactivity.
❹Set Bluetooth Mode
The Bluetooth button is found on the side of the
sensor. Bluetooth mode will be on by default.
When the sensor is powered up, Bluetooth
mode can be turned on and off with a short
press of the Bluetooth button. Turning
Bluetooth mode off ensures no one is capturing
what is being written on any pre-paired device.
The status of Bluetooth mode is shown via LED
lights next to the Bluetooth button.

❺Pair sensor with your device
Use the dongle for a wireless
connection without pairing
5
Tips
❶Press and hold the Bluetooth
button (1) until you hear the
beep sound.
❷Turn on Bluetooth for the
device you are pairing
(phone, tablet, computer)
and select “EquilSM-xxxxxx”
in the devices list.
❸ When pairing is complete,
the Bluetooth LED will start
to blink slowly (approx. once
every 2 seconds).
Note: When Equil Note
is open, Bluetooth LED
will stay solid.
For more detailed pairing info
for your specific device, refer
to the tutorial in Equil Note.
To pair with a new device
when a previously-paired
device is nearby, you may
need to delete/remove
“EquilSM-XXXXXX” from the
list of devices paired on the
other device.
Pairing
❻
Make sure your Bluetooth status is on.
The sensor will connect to the dongle automatically.
Connect the USB wireless dongle to your Windows
or Mac computer.
Dongle Ease of Use
The dongle is useful when
a Bluetooth device or
connection is not available.
The dongle does not
require any pairing and
will connect with the
sensor automatically.
Works only with Windows
and Mac Computers.
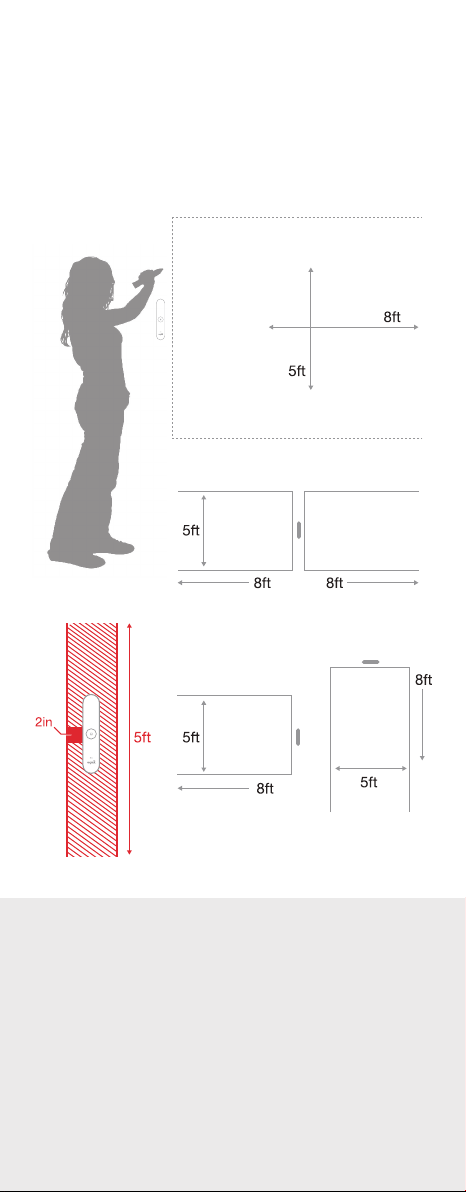
Depending on the size and orientation of your
whiteboard, the sensor can be centered
vertically on either side––or in the middle––of
your writing area.
❼Place sensor on your
whiteboard
6
Tips
Setup
Position the sensor where it
will be convenient to press
the new page button.
If your board area is wider
than 8 feet, place the
sensor in the center and
write notes on both sides,
up to 16 feet wide.
If you write too far from the
sensor, it will alert you to stay
within the recording area.
For your notes to be captured,
you must write at least 2 inches
away from the sensor. If you
write too close to the sensor, it
will alert you to move back into
the writing area.
draw
area
draw
area
draw
area
draw
area
draw
area

The charging case provides a
handy place to store the
Smartmarker, and keeps it
charged and ready for use.
The sensor is always portable.
Simply remove the sensor
from its magnetic hold in the
charging case and place on
other whiteboard surfaces.
To use your Smartmarker
while the sensor is docked
in the charging case, make
sure that you attach the
charging case on the left
side of your whiteboard.
The sensor will continue to
function, but will no longer
capture writing on the
left side.
Installation
Tips
7
❶Attach metal mounting
bracket to sensor.
❷Remove protective
backing.
❸Place sensor on surface,
press firmly for best
adhesion.
Place sensor on
magnetic whiteboard.
All Other Surfaces
Magnetic Whiteboards
Using the charging case on
your whiteboard
You can set up a more permanent installation by
plugging the charging case into a power outlet.
Use the provided 10 foot (3 meter) USB cable
and the USB power adapter to plug the charging
case into the nearest electrical outlet.
draw area
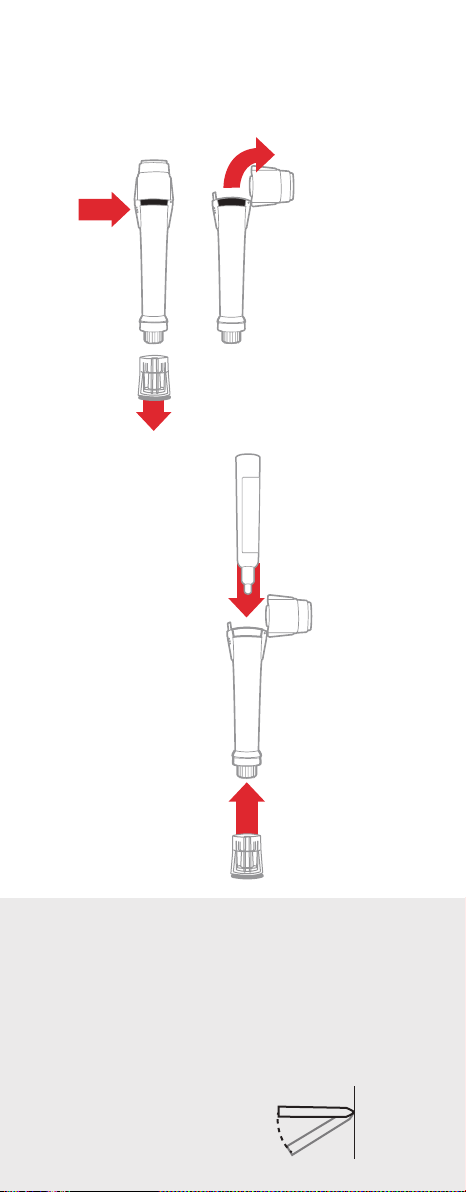
❽Install the dry erase marker
❷Remove the
eraser cap
❹Replace the
eraser cap
❶ Open the marker barrel
❸ Insert the
corresponding
dry erase marker
Tips
Ideal Draw Angles
For best results, the
marker should be used
close to a 90 degree angle
(perpendicular) from the
draw surface. More than a
15 degree tilt may cause
errant strokes.
8
Different color marker sleeves
can be purchased as an added
accessory to match different
color markers. Alternate colors
include: Red, blue, and green.
Marker
15°
draw
surface
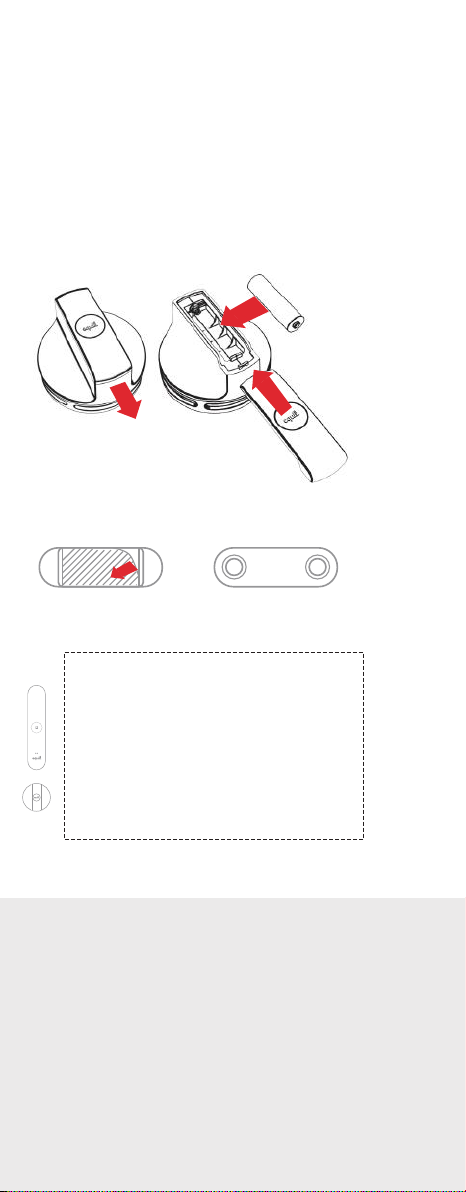
❾Large eraser accessory
–
+
Eraser bracket with adhesive back.
Extra accessories can be purchased at
www.myequil.com
draw area
Note: Park eraser outside of drawing area
Tips
9
If your Smartmarker or eraser
battery is running low, the
amber LED will blink 5 times
when you turn on the sensor
to remind you to recharge
soon.
The Smartmarker and eraser
have no power buttons. They
will turn off automatically.
Battery Large Eraser Usage
Press the eraser firmly
against the wall for best
results.
Eraser Bracket
The eraser bracket allows
you to park the eraser on
any surface.
This accessory can be purchased through
authorized dealers.
The large eraser accessory operates with a
single AA battery. Using the eraser bracket, you
can mount the large eraser on any flat surface
Tips
10
Finished!
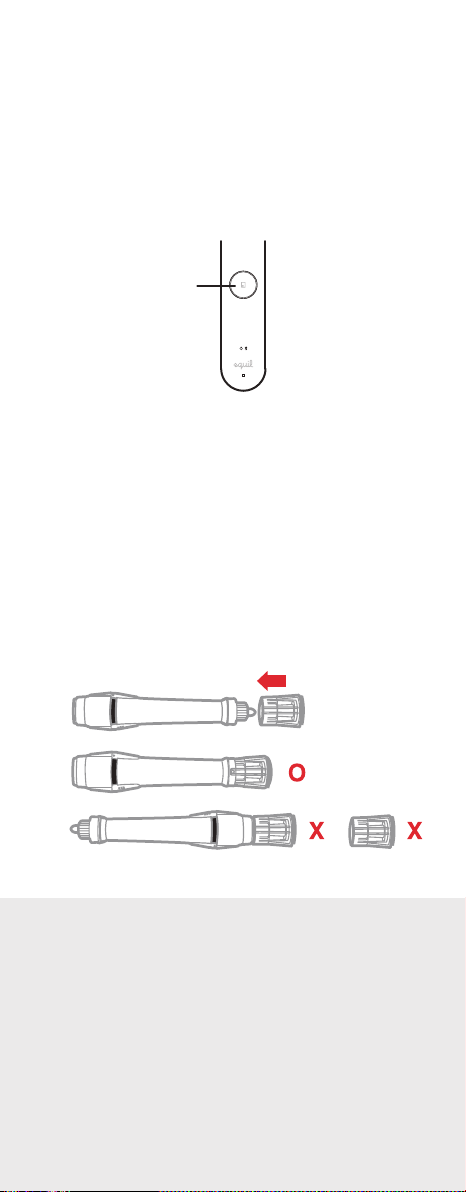
new page button
Using the Eraser Cap
Learn about all of the great features of Equil
Smartmarker through the tutorials and user
guide included in the Equil Note App.
Now you can start capturing whiteboard notes
directly to your smart phone, tablet or computer!
The eraser cap is an accessory that allows you to
make small corrections to your whiteboard notes
as you are drawing.
Note: The eraser cap only works in its capped
position on the Smartmarker. Do not erase with
the cap in your hand or placed on the back of the
Smartmarker. When using the eraser cap, make
sure the eraser felt is completely touching the wall.
Marker Life
Press the new page
button to create a
fresh page.
Always remember to replace
the cap firmly to prevent the
marker from drying out.
Tips
11
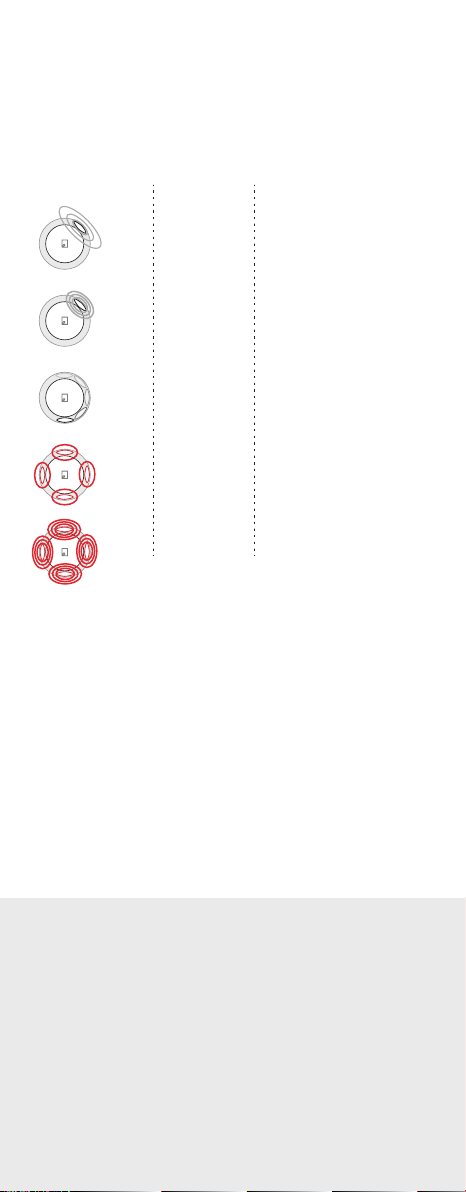
Recording notes to memory
Reached capture
area boundary
Solid, BrighterRed
Nearing capture
area boundary
Slow BlinkRed
Creating
New Page
RotatingWhite
Receiving
Pen Strokes
Solid, BrighterWhite
Notes in
sensor memory
BreathingWhite
Color Action Meaning
When recording notes directly to the sensor
memory, there are a few helpful indicators that
appear around the New Page button.
Memory
You can also take notes without your phone, tablet or
computer. All of your strokes will be saved in memory,
and you can import them back to your device when
it’s convenient.
The receiver memory can store at least 10,000 pages of
written content, so let your ideas flow!
When switching modes, wait until the new page LED
button finishes rotating before drawing again to avoid
losing strokes.

12
Troubleshooting
My marker notes appear
on the whiteboard but not
on my device running
Equil Note.
Make sure your sensor
and Smartmarker are
fully charged.
Confirm that
Smartmarker is paired
with your device.
Make sure you are
pressing firmly enough
while drawing.
The sensor is beeping
when I draw, and the red
LED lights are glowing.
You may be drawing
beyond the capture
area of your board
space. Draw closer to
the sensor.
The sensor or eraser is
sliding on the board surface.
The Smartmarker sleeve
keeps buzzing even when
I’ve stopped drawing.
Your magnetic whiteboard
may not be thick enough
for the sensor magnets.
Please use the included
mounting plates with
Command Adhesive tape.
The neck of the dry erase
marker is most likely
bent. Replace the bent
marker with another dry
erase marker inside the
sleeve.
Compatible markers
e-boardmarker
Legamaster
e-boardmarker
Sharpie
Whiteboard Marker
Sharpie
Bullet Point only
Expo
bold color dry marker
low odor

Thank You
Merci
Grazie
Vielen Dank
Gracias
ありがとうご ざ い まし た 。
谢谢
감사합니다
Cпасибо
www.myequil.com
support.myequil.com
facebook.com/equilsmartmarker

FCC Information to User
This equipment has been tested and found to comply
with the limits for a Class B digital device, pursuant
to Part 15 of the FCC Rules. These limits are
designed to provide reasonable protection against
harmful interference in a residential installation. This
equipment generates, uses and can radiate radio
frequency energy and, if not installed and used in
accordance with the instructions, may cause harmful
interference to radio communications. However, there
is no guarantee that interference will not occur in a
particular installation. If this equipment does cause
harmful interference to radio or television reception,
which can be determined by turning the equipment
off and on, the user is encouraged to try to correct
the interference by one of the following measures:
• Reorient or relocate the receiving antenna.
• Increase the separation between the equipment
and receiver.
• Connect the equipment into an outlet on a circuit
different from that to which the receiver
is connected.
• Consult the dealer or an experienced radio/TV
technician for help.
Caution
Modifications not expressly approved by the party
responsible for compliance could void the user’s
authority to operate the equipment.
FCC Compliance Information: This device complies
with Part 15 of the FCC Rules. Operation is subject
to the following two conditions: (1) This device may
not cause harmful interference, and (2) this device
must accept any interference received, including
interference that may cause undesired operation.
CAUTION: RISK OF EXPLOSION IF BATTERY IS
REPLACED BY AN INCORRECT TYPE. DISPOSE OF
USED BATTERIES ACCORDING TO THE
INSTRUCTIONS.
Complies with
IDA Standards
DA103548

Designed in California by Luidia Inc.
Manufactured in Korea by PNF Co., Ltd.
“Made for iPod,” “Made for iPhone,” and “Made for
iPad” indicates an electronic accessory has been
designed to connect specifically to iPod, iPhone, or
iPad, respectively, and has been certified by the
developer to meet Apple performance standards. Apple
is not responsible for the operation of this device or its
compliance with safety and regulatory standards. Please
note that the use of this accessory with iPod, iPhone, or
iPad may affect wireless performance.
© 2016 PNF Co., Ltd. All Rights Reserved. Equil and the
Equil Logo are registered trademarks of PNF Co., Ltd.
www.myequil.com
Other manuals for SMARTMARKER
2
Table of contents


