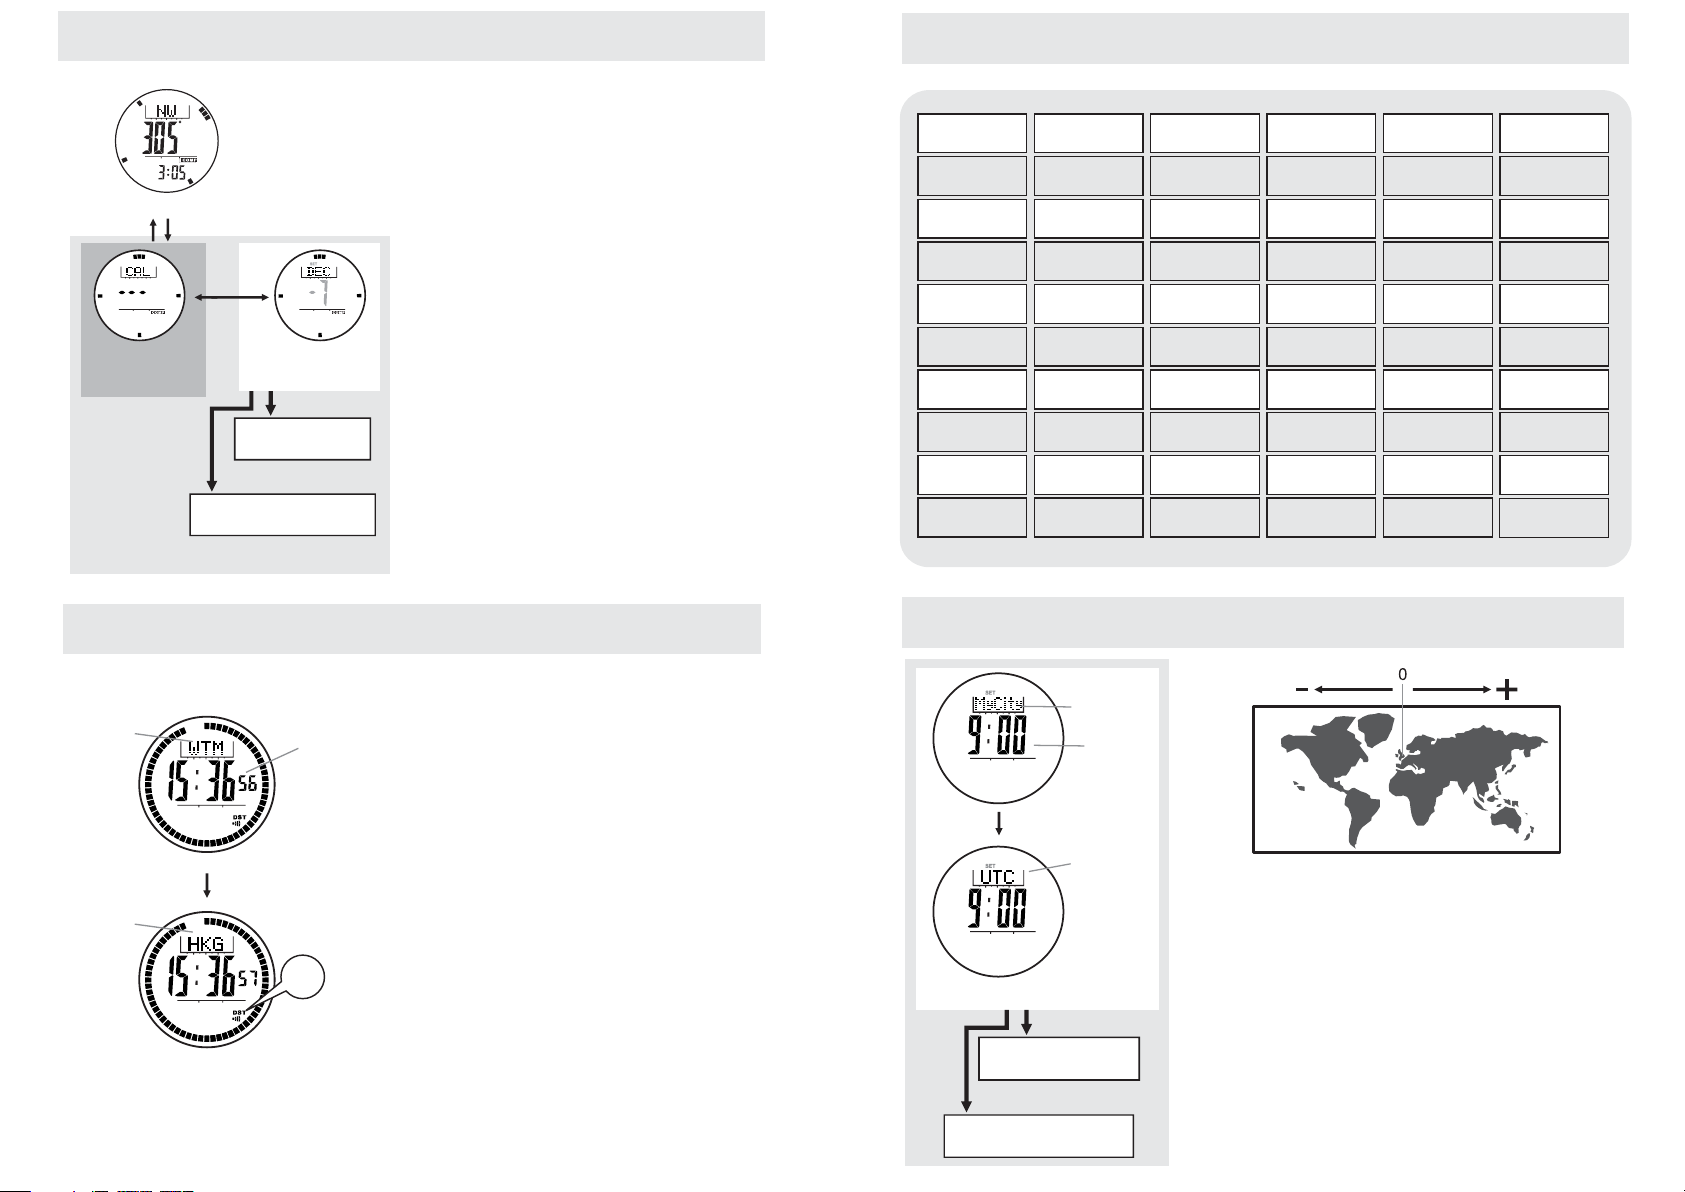
Weather Forecast Symbols
4.1 Current Time Mode - Weather Forecast Feature
4.2 Current Time Mode - Setting the Current Time
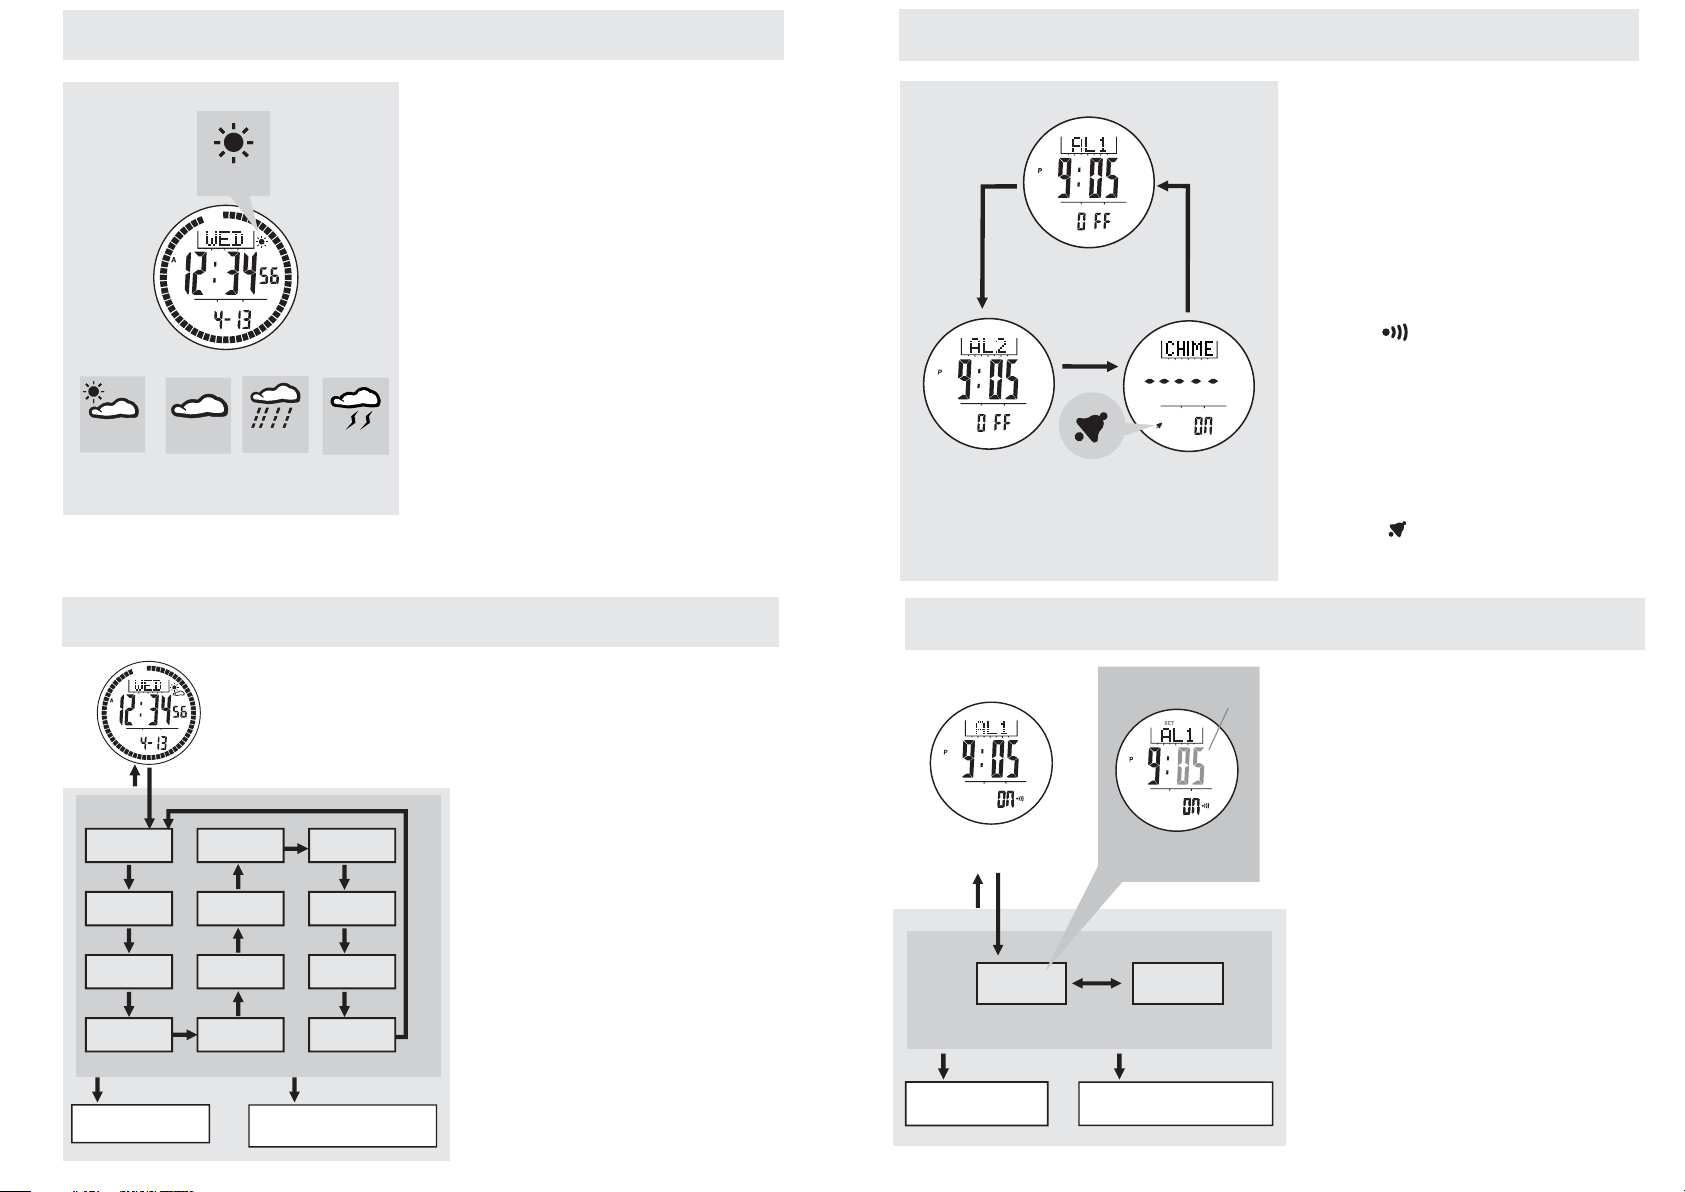
5.0 Daily Alarm Mode -
Daily Alarm 1, Daily Alarm 2 and Chime Display
5.1 Daily Alarm Mode - Setting the Alarm
Weather Forecast Feature
A special feature of the Watch is the
coming weather predicting function. It works by
analyzing the changes of the past air pressure.
How to Indicate the Coming Weather
The Watch provides 5 different symbols to
indicate the forecast weather, which includes:
- Sunny
- Cloudy with Sun
- Cloudy
- Raining
- Storm
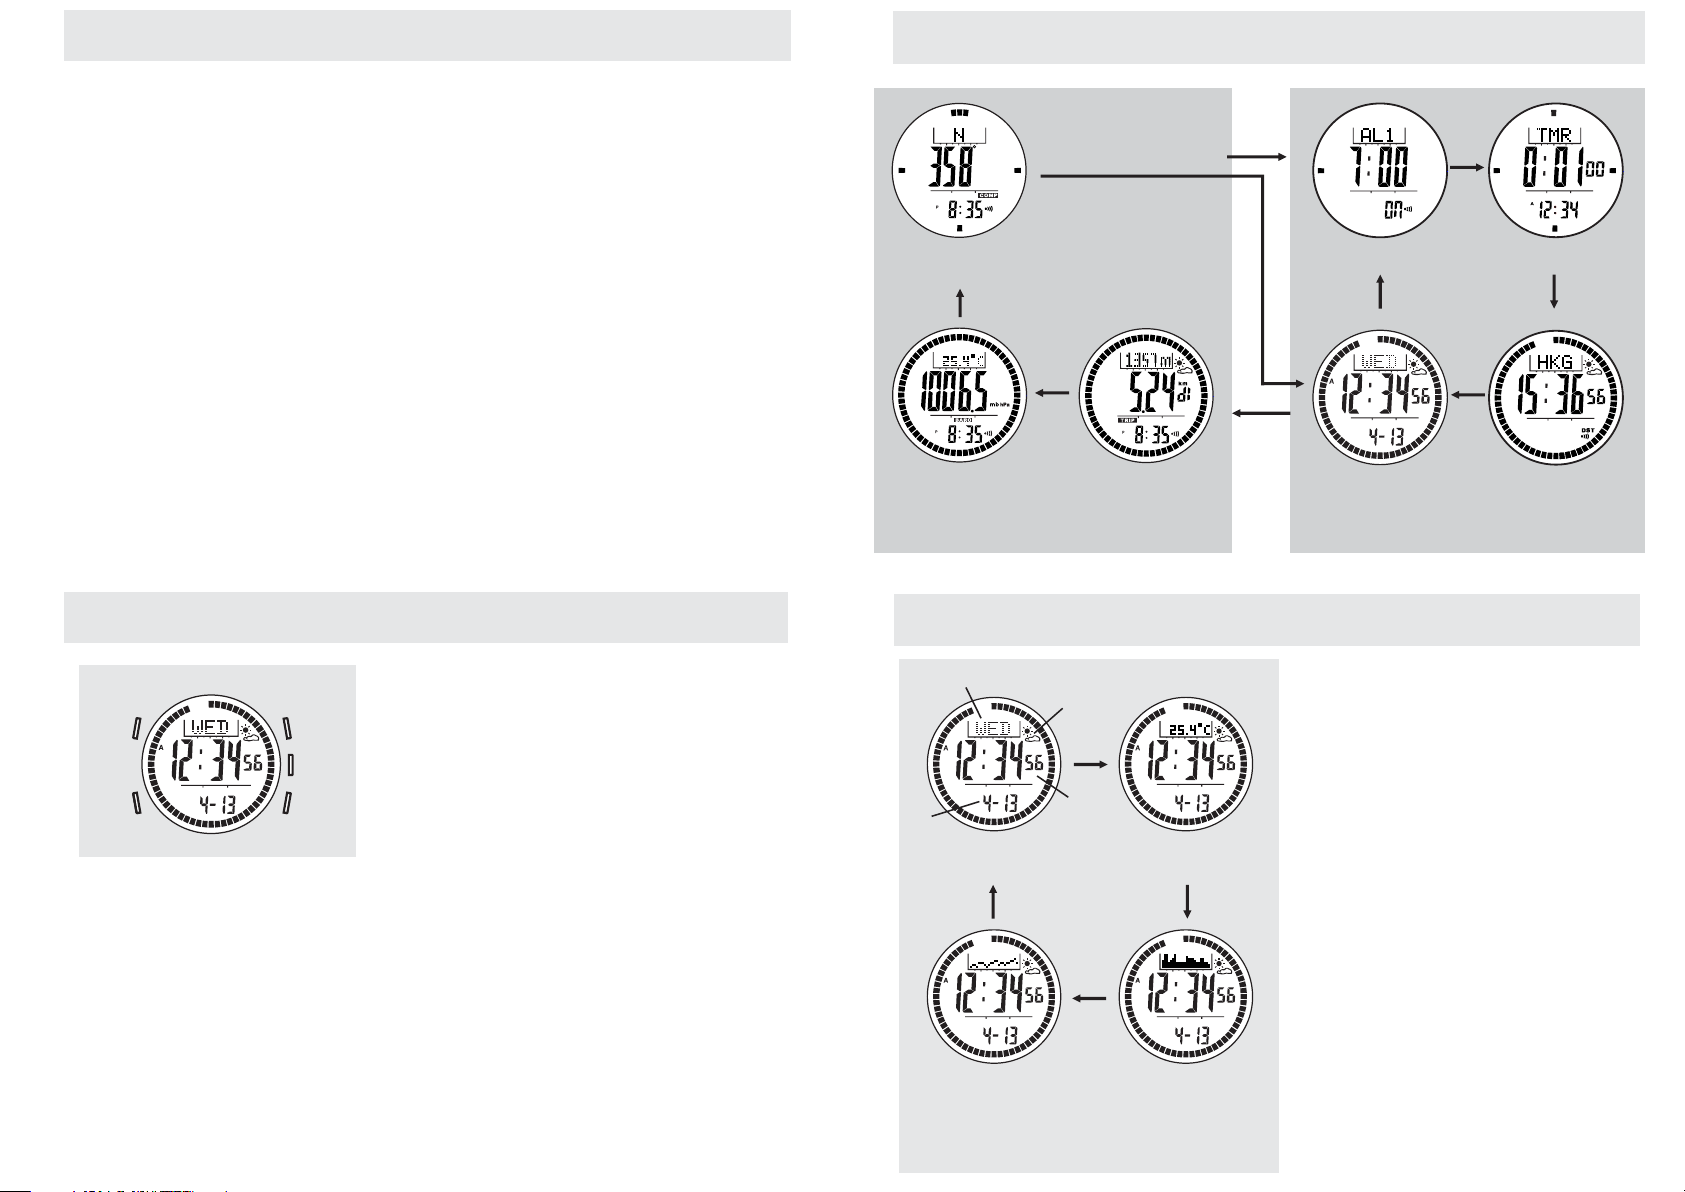
The symbols will be shown only in Current Time
Mode and World Time Mode.
IMPORTANT: Since the Watch predicts the
coming weather by using the data of the changes
in the air pressure, it is highly recommended to
stay at the same altitude for at least 24 hours for
a higher accuracy predication.
IMPORTANT: The Watch predicts the weather
by adopting general weather prediction principles,
it is NOT capable to reflect the dramatic changing
of weather within a very short period of time.
Note: To allow storm prediction, see 7.1 to set
storm alert On/Off.
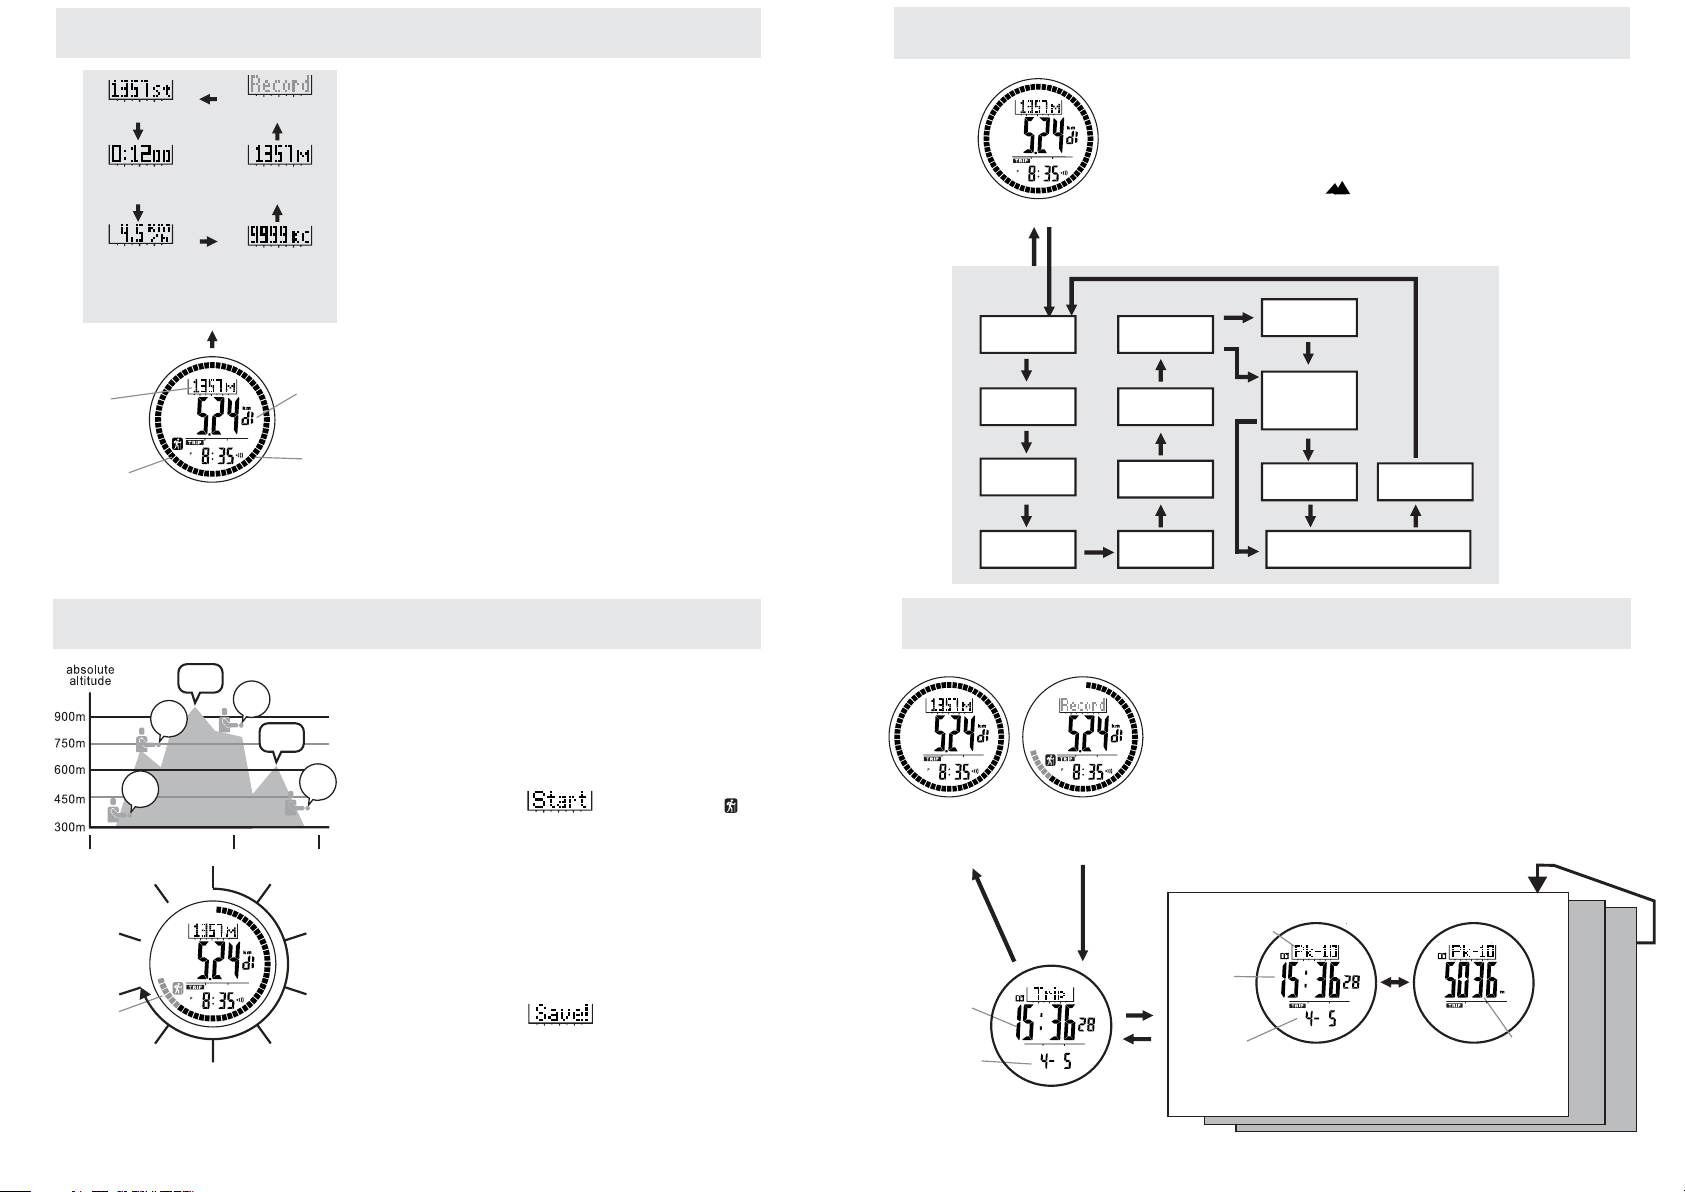
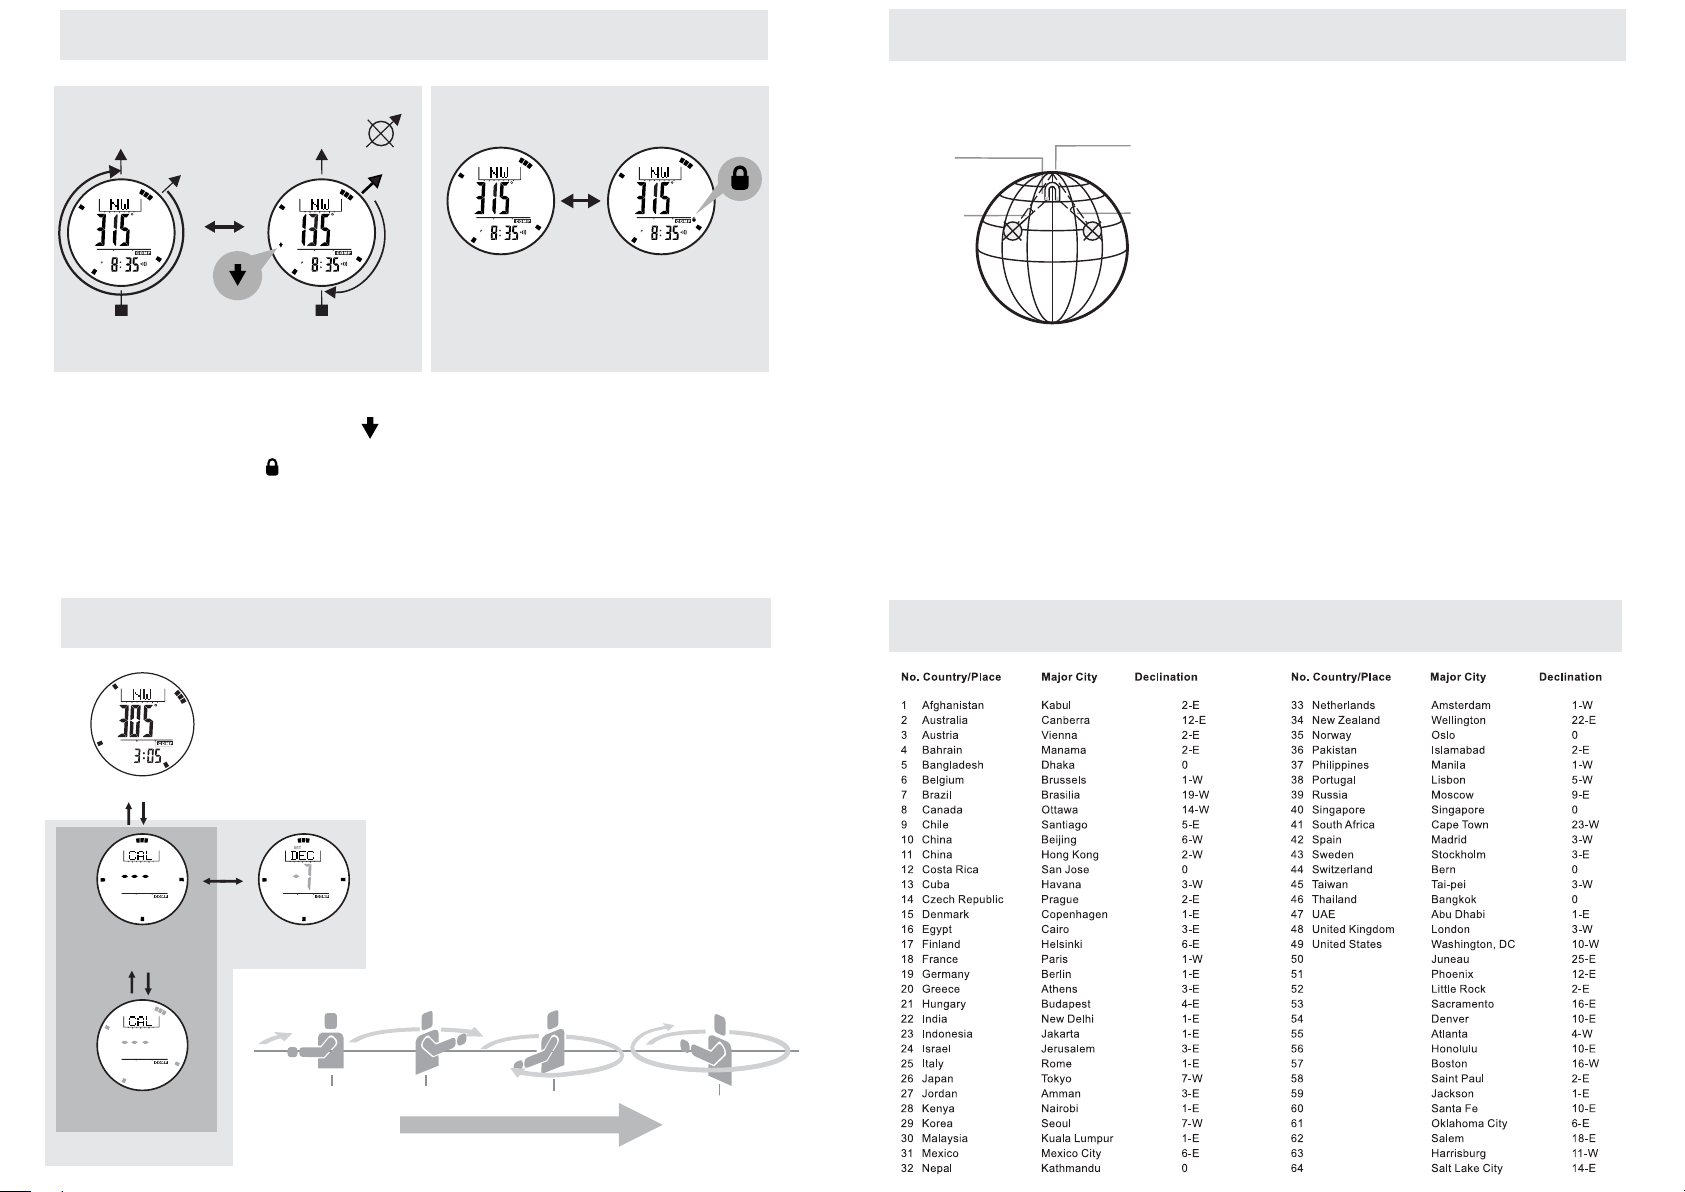
How to Set Current Time
- To select the setting display, press and hold
the[M] button for about 2 seconds in Current
Time Mode. In setting display, the flashing
"SET" icon will appear.
- In setting display, press the [M] button to
change the selection following the adjacent
Current Time Setting Sequence.
- When the digits are flashing (selected), press
the [S/S] or [L/R] button to increase /
decrease the number. (Hold down the button
change the number at a higher speed).
- When the setting is completed, press and hold
the [M] button to exit the setting display.
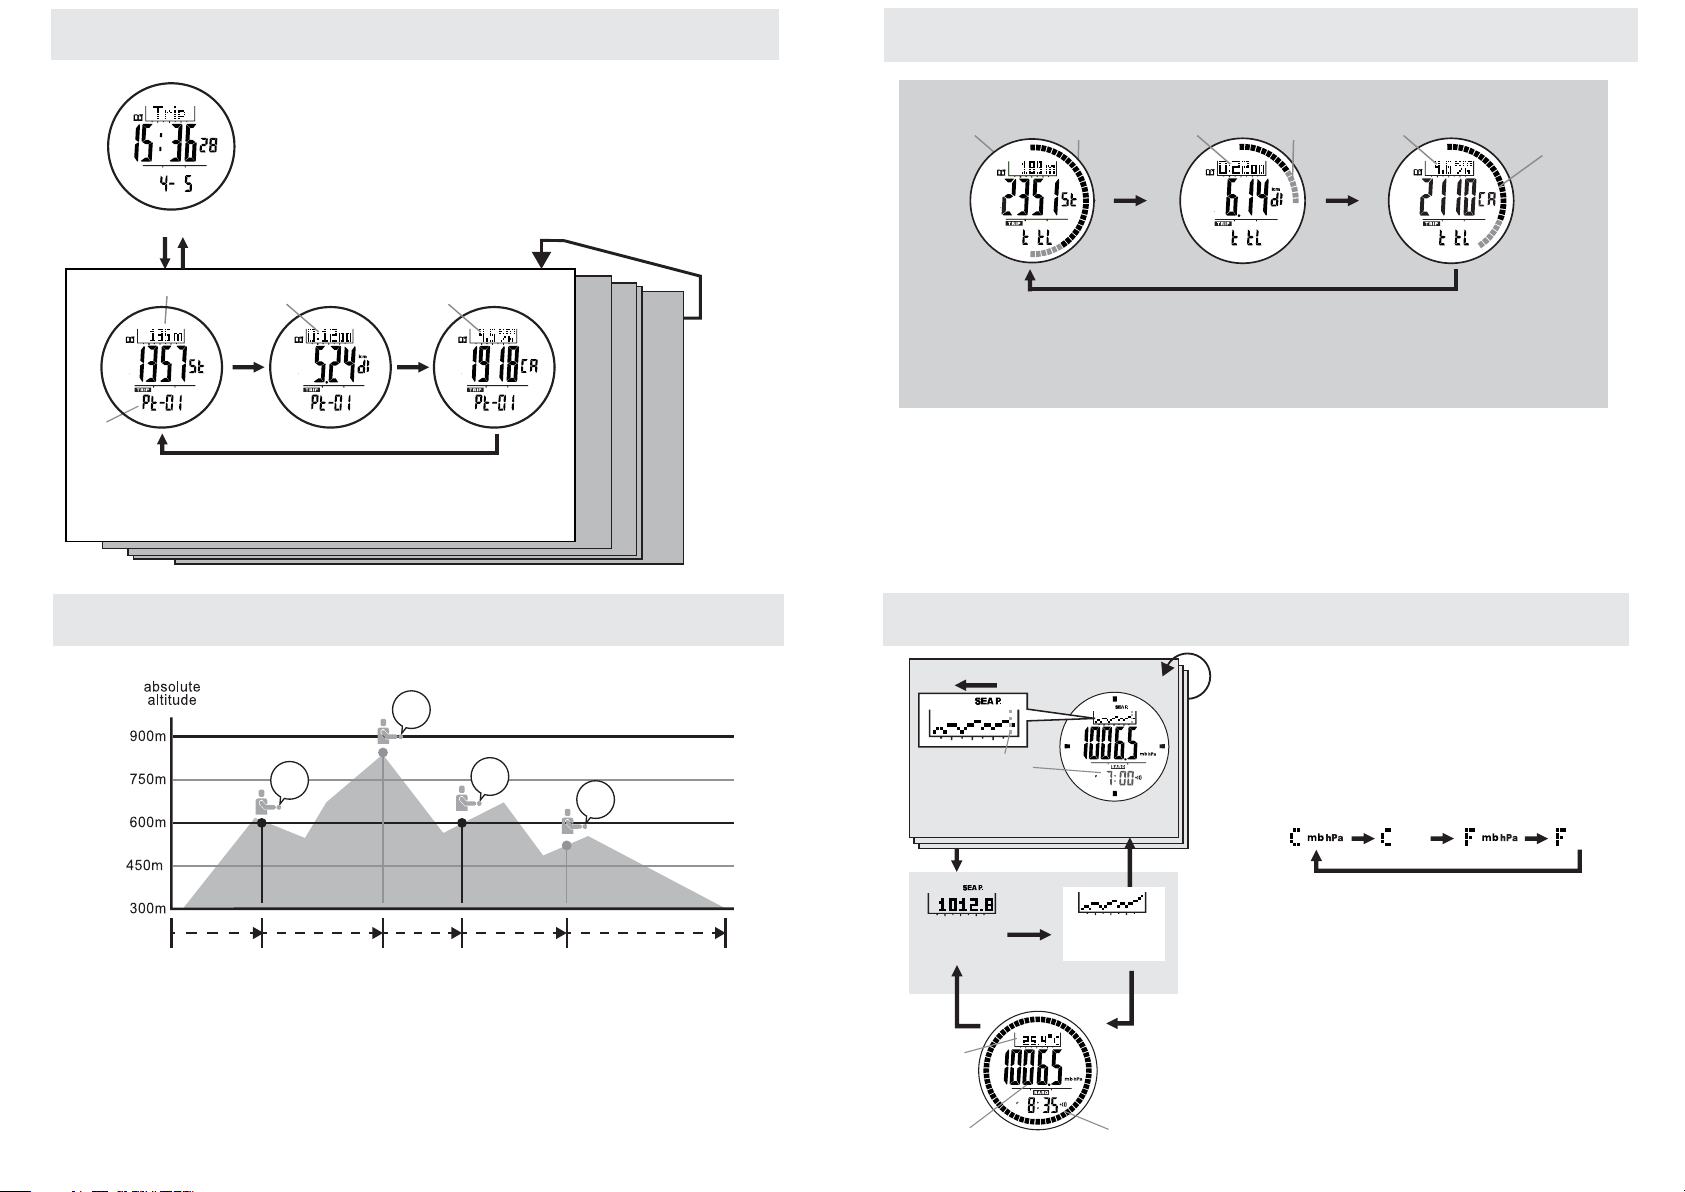
Daily Alarm 1 and Daily Alarm 2
- The Watch includes two daily alarms: Daily
Alarm 1 and Daily Alarm 2. The Daily Alarm 1
and Daily Alarm 2 are working independently.
- Press the [S/S] button to switch among the Daily
Alarm 1, Daily Alarm 2 and Chime Display
following the adjacent diagram.
How to Turn ON/OFF the Daily Alarm
- To turn ON/OFF the Daily Alarm 1 (2), press the
[L/R] button in Daily Alarm 1 (2) Display.
- When the Daily Alarm 1 (2) is ON, the alarm
indicator ' ' will appear.
- If the alarm indicator is appeared, the Watch will
sound at the preset alarm time every day. When
the alarm sounds, press any button to stop
the beep.
How to Turn ON/OFF the Hourly Chime
- To turn ON/OFF the Hourly Chime, press the
[L/R] button in Chime Display.
- When the chime is ON, the Chime
indicator ' ' will appear. If the Chime
indicator is appeared, the Watch will beep once
at the hour every hour.
Sunny
Cloudy
with Sun Cloudy Raining Storm
Current
Time Mode
Hold [M]
[S/S] / [L/R]
Hold [M]
Time Zone
Second
Minute
Increase/Decrease
the number
Increase/Decrease the
number at a higher speed
Hour Year
Month
Day
Date
Format
Hour
Format
DST
On/Off
key Tone
On/Off
LCD
Contrast
[M]
[M]
Hold [S/S] / [L/R]
[M]
[M]
[M]
[M]
[M]
[M]
[M]
[M]
[M]
[M]
Current Time Setting Sequence
Daily Alarm Mode
Daily Alarm 1
Display
Daily Alarm 2
Display
Hourly Chime
Display
[S/S]
hold
[M]
hold
[M]
[S/S]
[S/S]
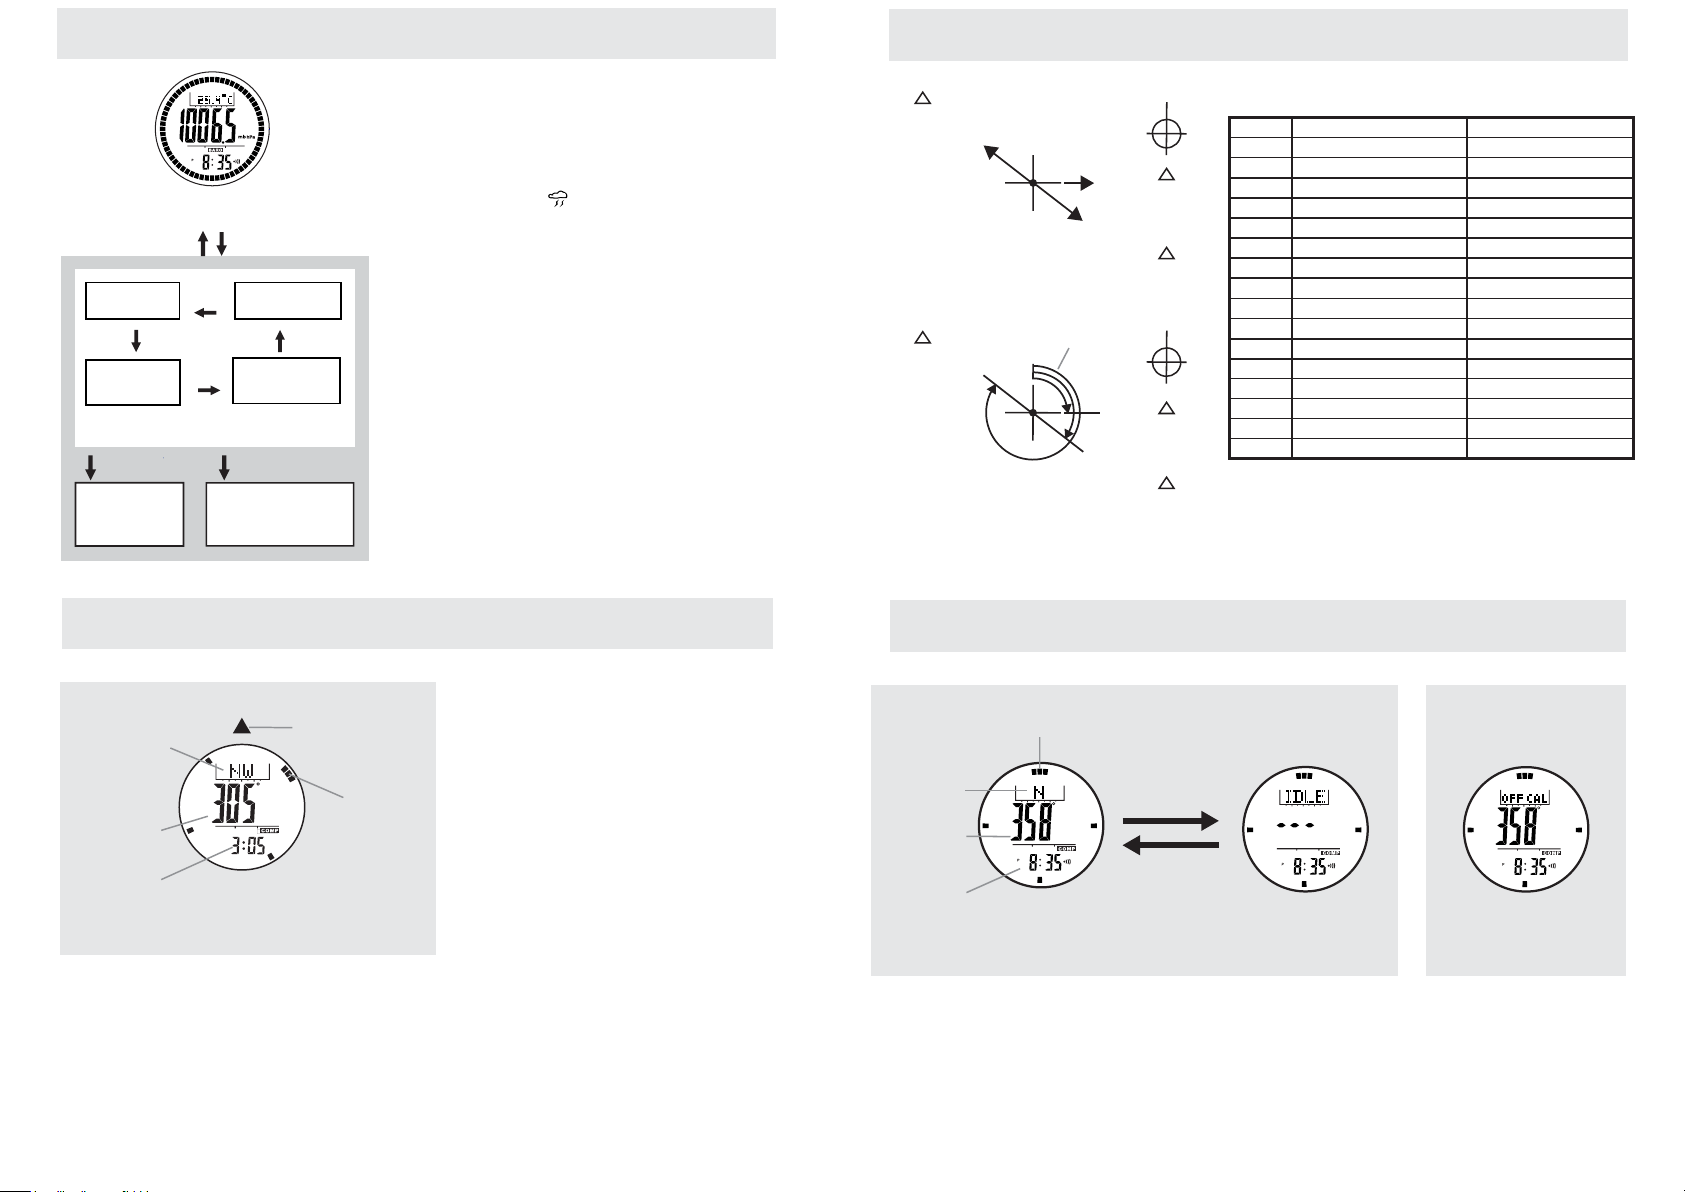
Daily Alarm 1 Display
Digits have been
selected (flashing)
Setting Display
Daily Alarm Time Setting Sequence
[M]
Minute Hour
[S/S] / [L/R]
Increase/Decrease
the number
Increase/Decrease the
number at a higher speed
Hold [S/S] / [L/R]
How to Set the Alarm 1 and Alarm 2
- To select the setting display, hold the [M] button
for about 2 seconds in Alarm 1 (2) Display,
then the flashing “SET” icon will appear.
- In setting display, press the [M] button to change
the selection between minute and hour.
- When the digits are flashing (selected),
press the [S/S] or [L/R] button to increase /
decrease the number. (Hold down the button
change the number at a higher speed).
- When the set is completed, press and hold
the [M] button to exit the setting display.