Equipa RPB L4 Light User manual

INSTRUCTION MANUAL
22
RPB Safety Global Headquarters 2807 Samoset Rd, Royal Oak, MI 48073, USA.
T: 1-866-494-4599 F: 1-866-494-4509 E: sales.us@rpbsafety.com www.rpbsafety.com
RPB Safety Asia Pacic Headquarters 652 Halswell Junction Road, Hornby South 8042
New Zealand. T: +64-3-357-1761 F: +64-3-357-1763 E: sales.nz@rpbsafety.com
www.rpbsafety.com
RPB and advancing your safety are registered trademarks of RPB Safety.
For technical assistance contact our Customer Service Department
L4 LIGHT OPERATIONS 3
WARNINGS 3
SETUP 4
CHARGING AND MAINTENANCE 6
PARTS LIST 7
Form #: 7.20.518
Rev: 00
CONTENTS
Read all instructions and warnings before using this product.
Keep this manual for future reference.

33
The L4 Light is designed to provide a
clear and bright light for the operator of
the Respirator that is directed at the work
area and where the operator looks.
The unit is powered by a battery pack,
containing Lithium Ion batteries.
The lower capacity (09-530-4) unit is
designed to last up to 4 hours while
running on the full power setting when
fully charged.
The larger capacity (09-530-8) unit will
last for more than 8 hours while running
on the full power setting when fully
charged.
LIGHT CONFIGURATION
The L4 has 5 light settings which provide
the following amounts of light:
ENVIRONMENTS
The L4 Lights are a sealed unit and can be
used in outdoor environments, but must
not be submersed in water or used in
excessively wet conditions.
WARNING!
The LED lights in this unit are extremely
bright and it is not recommended that
they are shone in the eyes of anybody as
excessive exposure may cause harm or
blindness.
Exposure to excessively wet conditions or
submersion in water could cause serious
injury or death from electric shock.
CHARGING
The Power Supply is a universal 110-240
volt adaptor. Full charging cycles take 3.5
hours, it processes through 3 steps of
charging as listed below:
1. 0-20% slow initial charge (Red LED)
2. 20-95% faster bulk charge (Orange
LED)
3. 95-100% Slow trickle charge
(Flashing Green LED)
Before using the light for the rst time,
make sure a full charge is performed.
The batteries are manufactured to last
350 charge cycles for peak performance.
WARRANTY
All RPB® products are covered by a
manufacturers warranty of 3 months.
The manufacturer warranty covers
defects in material, workmanship and
does not cover damage caused by
misuse or abuse. RPB®’s only obligation
and your exclusive remedy shall be to
repair, replace or refund the purchase
price of such parts or products upon
the presentation of proof of purchase.
Maximum liability is in no case to exceed
the value of the RPB® Product involved.
L4 LIGHT OPERATIONS
Hold 3 Sec (ON/OFF)
#1
#2
#3
#4
#5
Full
Medium
Low
44
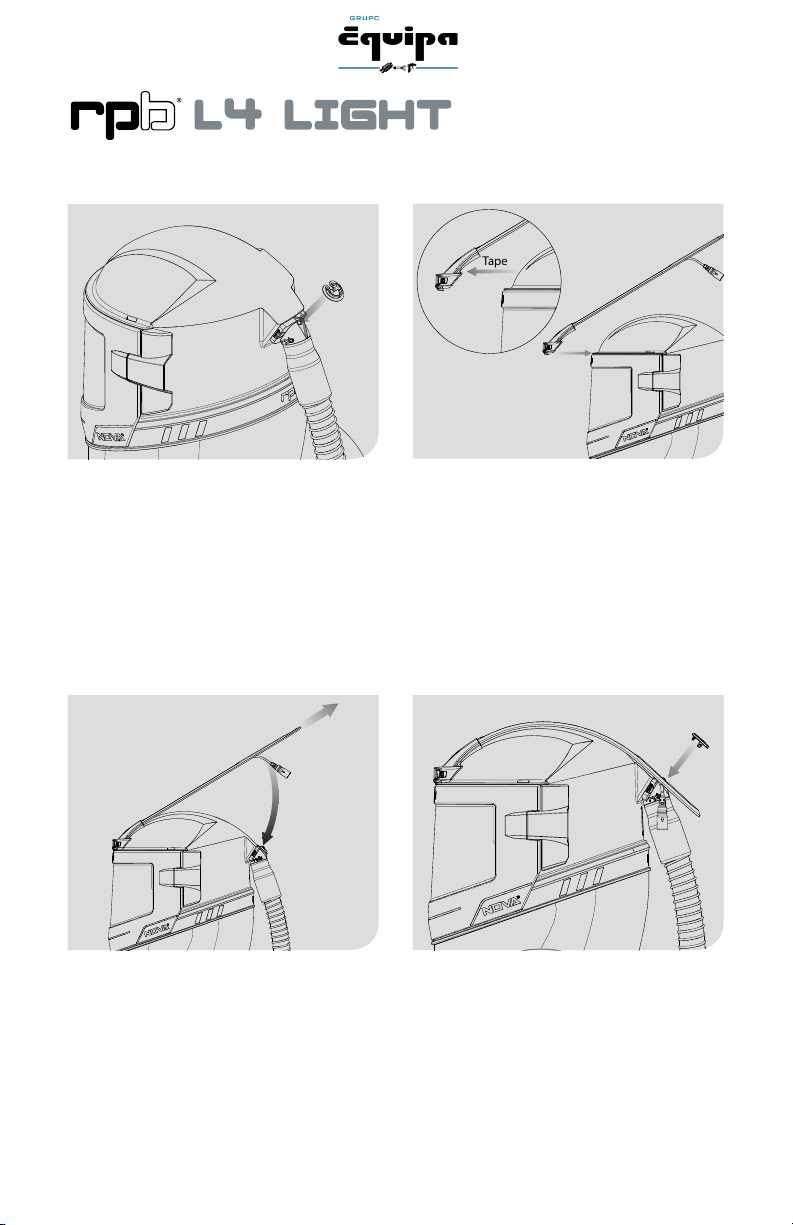
Holding the L4 Light Band in place, push
t the Locking Clip over to secure the
band to the helmet, making sure that
the band is sitting neatly on the center
of the helmet and that the light is held
securely in place.
Tape
Remove the backing from the double
sided tape on the back of the L4 Light.
Locate the L4 on the front of the Helmet
making sure that the steel clip is securely
clipped over the front of the peak and
that the L4 is centered on the helmet.
Then press rmly to make sure the tape is
adhered to the helmet .
Remove the Hand strap and ring from
the air inlet tting at the back of the
helmet. Once removed, insert the base
clip of the L4 Light.
Stretch the L4 Light Band over the top of
the helmet and draw it tight to connect
the second hole in the band over the clip.
INSTALLATION AND USE
55
Press the Power button to set the
brightness you require. 1Push sets all
4 lights on at full brightness. 2Pushes
sets all 4 lights to medium brightness. 3
Pushes sets all 4 lights to low brightness.
4 Pushes sets outer lights to medium and
inner 2 lights to o. 5 Pushes sets outer
lights to low and inner 2 lights to o.
Hold Power button to turn unit o.
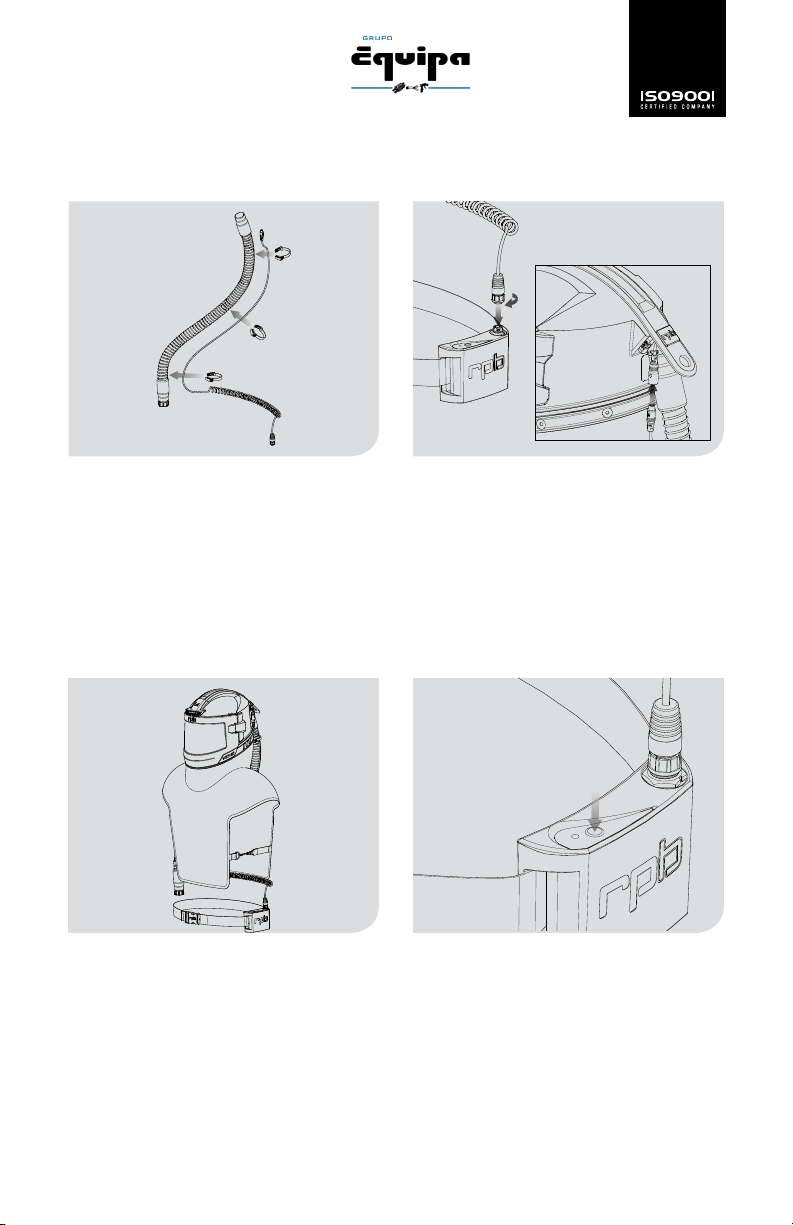
Attach the straight section of the Power
Cable to the Breathing Tube with Cable/
Hose Clips so that the Connector is
positioned to connect to the connector
on the back of the L4 Light unit and the
coiled section is hanging o the bottom
of the breathing tube.
Thread on the Breathing Tube to the
Helmet and then connect the cables
together at the back of the helmet.
Connect the other end of the power
cable to the Belt Mounted Battery Pack.
Put on the Respirator according to the
respective User Instruction Manual for
the Respirator being used (i.e. Nova3).
Fit the Belt Mounted Battery Pack to
your waist.

66
Clean the L4 Lights Unit with a damp
cloth and mild detergent.
Warning: Do not use Volatile Chemicals
or submerse the L4 Lights in water as it
may cause injury or death from electric
shock.
To recharge the battery, disconnect it
from the light power cable, and connect
the charging cable provided. Now plug
the charging cable to the Main Power
outlet and press the power button on the
battery pack. This will charge the unit.
Remove the old Outer lens from the
light unit by unclipping it from the sides.
Excessive wear of this item will eect the
eciency of the brightness of the light
and format of the light.
Place the new Outer Lens onto the
front of the L4 Light unit and press
rmly into place so that the side clips
snap lock into position.

77
PARTS LIST
Item Description Part Number
1 Light Assembly 09-510
2 Light Cable 09-524
3 Battery Pack and Belt 4hrs. 09-530-4
Battery Pack and Belt 8hrs. 09-530-8
4 Cable / Hose Clips 07-122
5 Top and Bottom Mounting Clips 09-520
6 Outer Lens 09-522
7 12v DC Power Supply and Power Cable US 09-526
12v DC Power Supply and Power Cable AU 09-526-AU
12v DC Power Supply and Power Cable EU 09-526-EU
12v DC Power Supply and Power Cable UK 09-526-UK
8 Power Cable US 09-021
Power Cable AU 09-021-AU
Power Cable UK 09-021-UK
Power Cable EU 09-021-EU
9 12v DC Power Supply 09-525
1
6
4
2
3
5
9
8
7
AIRLINE FILTRATION
The RPB®RADEX AIRLINE FILTER™ oers
increased capacity, versatility and ltration.
This optional equipment combines the
versatility of either oor or wall mounting
with increased ltration capacity, enabling
customization to meet worker’s needs and
working environments.
AIR TEMPERATURE CONTROL
The RPB®4000-01 Cool Air Tube cools
compressed breathing air coming into
the respirator by up to 30°F while the
RPB®4000-20 Hot Air Tube will heat the
compressed air by up to 30°F. These
maximize worker comfort and increase
productivity in hot or cold climates.
AIR QUALITY MONITORING
The RPB®RADEX CO MONITOR™ helps
ensure worker safety with a unique
traceability feature that monitors and
records carbon monoxide levels, and
temperature. This data that provides
certainty of monitor functioning and can
be stored for up to two years allowing
analysis of plant and eld air quality.
OTHER PRODUCTS
Table of contents


