ergochair Ergo - Scoot Low-Profi le Creeper User manual
Ergo - Scoot™ Low-Profile Creeper Assembly and User Guide
P/N 5900300 - Rev. A - May 2023
1645 Lemonwood Drive
Santa Paula, CA 93060 USA
(800) 253-2363 bendpak.com
Copyright ©2023 BendPak Inc. All rights reserved.
The Ergo-Scoot™ (5160118) is a reclining low-profile creeper seat. Providing
increased mobility on a stable plaorm as you work on, around and under
Vehicles. A gas spring supports the backrest allowing posions from ≈5° to 60°
while four 360° swivel casters allow freedom of movement and comfort while
working.
California ProposiƟon 65: This product can expose you to chemicals including styrene and vinyl chloride, which are on the list of over
900 chemicals idenfied by the State of California to cause cancer, birth defects, or other reproducve harm. Always use this product in
accordance with BendPak Ergochair’s instrucons. For more informaon, visit www.p65warnings.ca.gov.
Ergo-Scoot SpecificaƟons:
Copyright. Copyright ©2023 BendPak Inc. All rights reserved. You may make copies of this document if you agree that: you will give full
aribuon to BendPak Inc., you will not make changes to the content, you do not gain any rights to this content, and you will not use the
copies for commercial purpose.
Trademarks. Ergochair and the Ergochair logo, BendPak and the BendPak logo are registered trademarks of BendPak Inc. All other company,
product, and service names are used for idenficaon only. All trademarks and registered trademarks menoned in this Manual are the
property of their respecve owners.
LimitaƟons. Every effort has been made to ensure complete and accurate instrucons are included in this Guide. However, product updates,
revisions, and/or changes may have occurred since this Guide was published. BendPak reserves the right to change any informaon in this
Guide without incurring any obligaon for equipment previously or subsequently sold. BendPak is not responsible for typographical errors in
this Guide. You can always find the latest version of the Assembly and User Guide for your product on the BendPak website.
Warranty. The BendPak warranty is more than a commitment to you: it is also a commitment to the value of your new product. Contact your
nearest BendPak dealer or visit www.bendpak.com/support/warranty for full warranty details.
Go to bendpak.com/support/register-your-product/ and fill out the online form to register your product (be sure to click Submit).
Safety. Your Ergo-Scoot was designed and manufactured with safety in mind. However, your safety also depends on proper training and
thoughul operaon. Do not install, operate, maintain, or repair the unit without reading and understanding this Assembly and User Guide and
the labels on the unit. Do not use the Ergo-Scoot unless you can do so safely!
Ergo-Scoot DescripƟon
• Assembly and User Guide
• 2 Tool/Parts Trays
• Spacer Kit (increases ground clearance to ≈1.2 in. / 30 mm)
• Riser Kit - Adds ≈8 to 12 in. (200 to 300 mm) Riser Kit Installed
Ergo-Scoot Safety InformaƟon
• Please read this enre guide prior to use. Failure to follow the instrucons and safety precauons in this guide can result in serious
injury. By proceeding with setup and operaon, you agree that you fully understand the contents of this guide and assume full
responsibility for the use of this product. Always inspect the Scoot for loose or damaged components prior to each use. If a problem
exists resolve the issue. If the issue cannot be resolved, cease all use and contact your authorized Ergochair parts provider.
• Always be alert and aware of dangers around you while using this equipment.
• Only use the Scoot on hard, flat surfaces.
• Always sit down on the Ergo-Scoot gently. Avoid shock loads caused by jumping or falling onto the seat.
• Never stand on the Ergo-Scoot or use it for a purpose for which it was not designed.
• Do not allow unsupervised children or persons to use this product.
• This product is not a toy. Never use as a skateboard or dolly.
• Beware of pinch and crush hazards when using or adjusng the seat posion on this product. When making seat
adjustments, keep hands clear.
• Be aware of the Maximum Weight limit for the Ergo-Scoot. Do not remove Vehicle components that, when combined with your own
weight, exceed the maximum weight rang of 350 lbs. / 159 kg.
• Replace warning labels that are damaged or illegible.
• Do not operate your Ergo-Scoot if you find maintenance issues or it operates in an abnormal manner. Take it out of service, then contact
Assembly and User Guide
Guide P/N: 5900300 Rev. A- May 2023
Included with the Scoot:
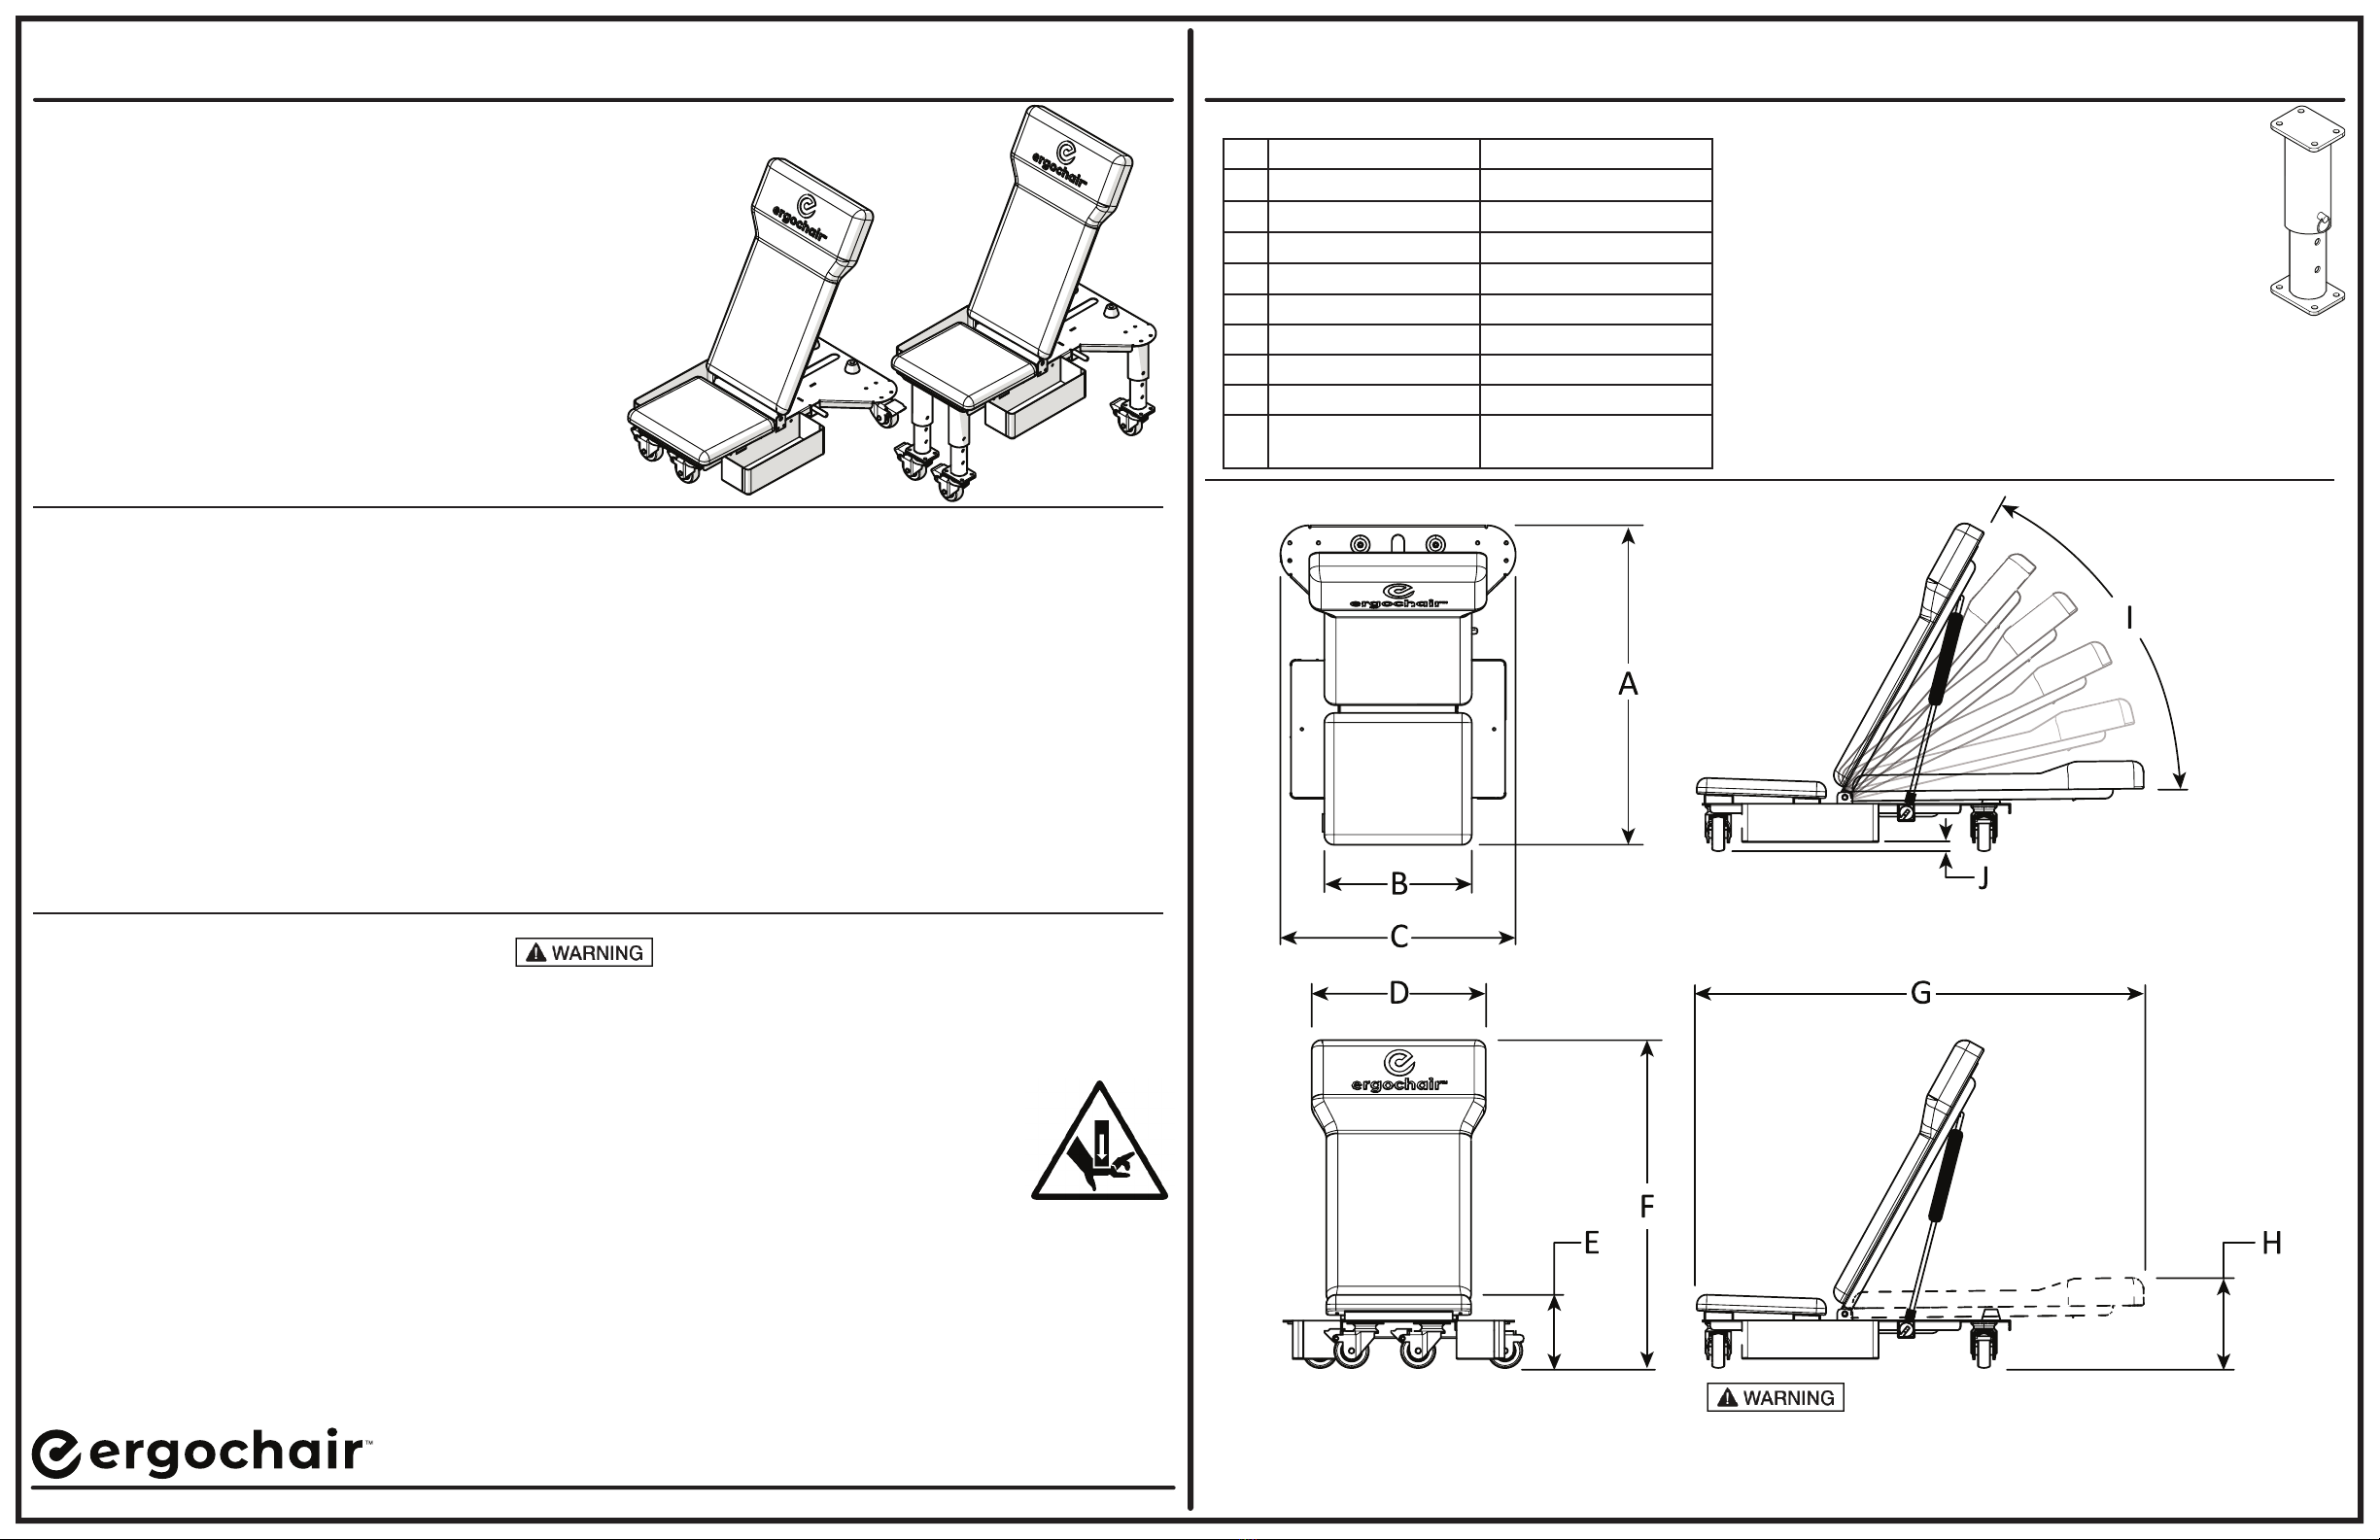
• Ergo-Scoot Weight: 87 lbs. / 39.5 kg.
• Backrest Adjustment Angle: 0° to ≈60°
• Backrest Locking Mechanism : Gas Spring
• Casters: Four 360° Casters (2 locking), Ø75 mm x 25 mm, sleeve
bearings, oil resistant, non-marking rubber wheels
• Seat Materials: Padded Marine Vinyl Backrest and Seat. Marine
Vinyl is abrasion, chemical and oil resistant
• Frame Materials: Full powder coated, welded tubular steel
A Length (backrest up) 32 in. / 813 mm
B Seat Width 14.8 in. / 376 mm
C Max. Width 23.6 in. / 600 mm
D Headrest Width 17.75 in. / 451 mm
E Seat Height 6.9 in. / 175 mm*
F Height (backrest up) 31.5 in. / 800 mm*
G Length (backrest down) 45.7 in. / 1,160 mm
H Height (backrest down) 9.5 in. / 241 mm*
I Backrest Angle ≈5° to 60°
J Ground Clearance .4 in / 10 mm*
(3 in./ 76.2 mm w/o Trays)
*Caster Kit adds ≈1.2 in. / 30 mm.
Riser Kit adds ≈8 to 12 in. Max. (200 to 300 mm max.)
Three locking pin posions allow ≈2 in. / 50 mm riser adjustments.
Riser
All specificaons subject to change without noce.
• Tool Box inside dimensions: 13.75 x 4.6 x 3.75 in. / 349 x 117.4 x 95.2 mm
Assembly and User Guide
P/N 5900300 - Rev. A - May 2023
1645 Lemonwood Drive
Santa Paula, CA 93060 USA
(800) 253-2363 bendpak.com
Copyright ©2023 BendPak Inc. All rights reserved.
Ergo - Scoot™ Low-Profile Creeper
Item
No.
DescripƟon Qty.
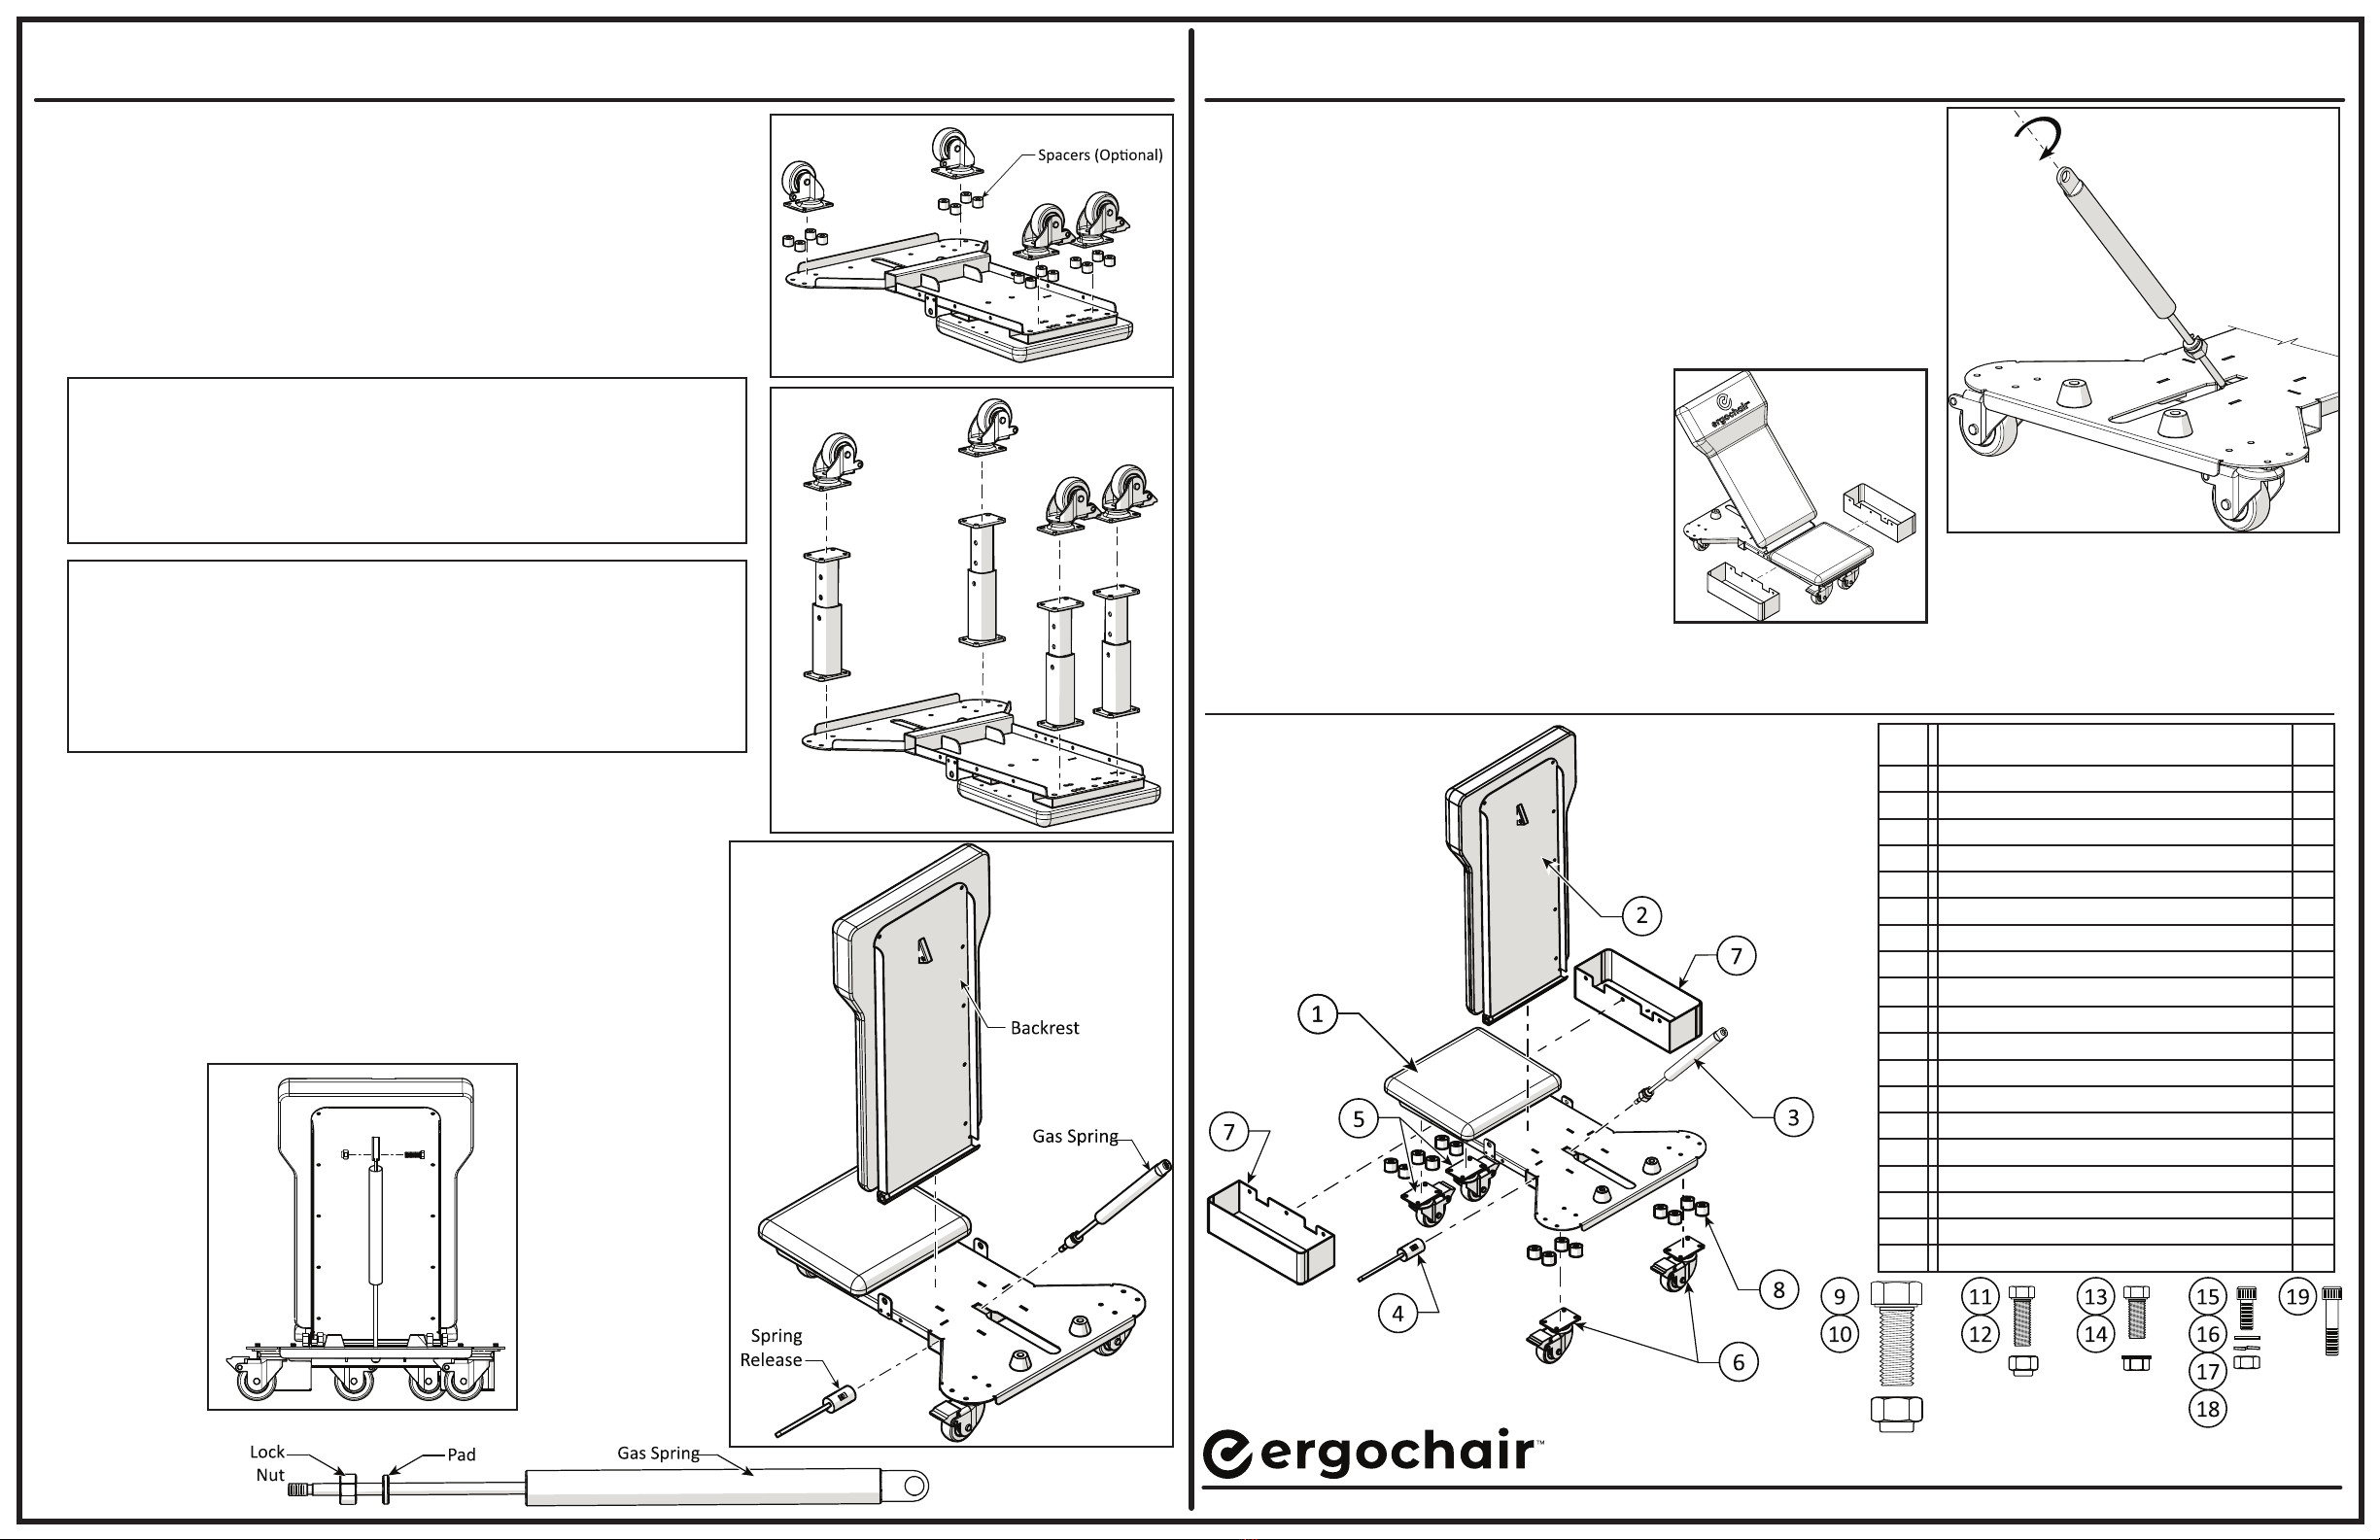
1 SCOOT SEAT 1
2 SCOOT BACKREST 1
3 SCOOT BACKREST GAS SPRING 1
4 SCOOT SPRING RELEASE 1
5 LOCKING CASTER 2
6 SWIVEL CASTER 2
7 TOOL TRAY 2
8 Spacer 20 mm (Oponal) 16
9 HHB M14 X 50 (Backrest Pivot Fasteners) 2
10 NUT, NYLOC M14 (Backrest Pivot Fasteners) 2
11 HHB M8 X 25 (Secures Backrest Gas Spring) 1
12 NUT, NYLOC M8 (Secures Backrest Gas Spring) 1
13 HHB M6 X 12 (Secures Tool Trays) 6
14 NUT, FLANGED LOCKING M6 (Secures Tool Trays) 6
15 SHCS M8 X 20 (Secures Casters) 32
16 WASHER, FLAT M8 (Secures Casters) 32
17 LOCK WASHER M8 (Secures Casters) 32
18 NUT, M8 (Secures Casters) 24
19 SHCS M8 x 40 (Spacer Kit) 16
To clean the Ergo-Scoot:
1. While Marine Vinyl is water, stain and abrasion
resistant, it is sll a porous material which can
become clogged with dirt. Wash the
Scoot vinyl frequently using soap and water.
2. Wipe the Vinyl and the Frame of the Scoot and dry
aer cleaning.
3. If a more powerful cleaner is required, use a gentle
cleaner, similar to Simple Green® or a small amount
of dish soap and a sobristle brush.
Parts List:
Ergo-Scoot Assembly:
1. Open the box and remove the protecve packing foam.
2. Carefully cut away the plasc holding the backrest to the seat. Do NOT damage the
foam seat or backrest with the knife.
3. Set the backrest aside where it will not be lost or damaged.
4. Carefully remove the protecve plasc from both side tool trays and remove the
casters, fasteners, spring release and the gas spring. Place the components where
they will not be lost or damaged.
5. Leave the seat on the cardboard shipping box.
6. Verify all the components are present using the parts list.
7. Configure the Scoot with or without spacers and oponal risers.
15. The backrest should now recline. Sit on the Scoot and trigger the
spring release handle while pushing against the backrest. If the backrest does
not recline:
a. Remove the M8 HHB and nut securing the spring to the backrest.
b. Loosen the lock nut and then aempt to ghten the gas spring an addional
rotaon.
c. Reghten the lock nut onto the release mechanism.
d. Reaach the gas spring to the backrest mounng flange and aempt to recline
the backrest.
e. If the backrest does not recline, contact Ergochair.
16. Aach one tool tray to each side of the Scoot using three HHB M6 x 12 and
M6 flanged lock nuts on each tool tray.
8. Turn the seat onto its casters.
9. Install the backrest using two hex head bolts (HHB) M14 x 50 and two M14
nyloc nuts. Do not overƟghten. The backrest must be able to move freely
about the pivot points created by the fasteners.
10. Insert the spring release assembly into the square channel under the seat
unl the threaded opening is visible in the middle slot. The backrest spring
release handle may be installed on either the right or le-hand side of the seat.
11. Thread the backrest gas spring all the way into the release mechanism.
12. Thread the lock nut and pad down the spring rod unl it contacts the
spring release mechanism. Make finger ght.
13. Insert the top of the gas spring into the backrest mounng flange.
14. Secure the spring to the mounng flange with the HHB M8 x 25 and nyloc nut.
a. Without Risers
i. Turn over the seat and aach the two locking casters and spacers (oponal) to
the front of the seat using four SHCS M8 x 20, flat washers, and lock washers
on each caster. (If using the oponal spacers use the M8 x 40 SHCS.)
ii. Aach the two swivel casters (without locks) and spacers (oponal) to the rear
of the seat using four SHCS M8 x 20 with flat washers, lock washers, and hex
nuts on each caster. (If using the oponal spacers use the M8 x 40 SHCS)
b. With Risers
i. Aach four risers to the seat using four SHCS M8 x 20 with flat washers, lock
washers, and hex nuts (verify the riser side with one hole is closest to the seat
as shown to the right).
ii. Aach the two locking casters to the front two risers using the SHCS M8 x 25
with flat washers, lock washers, and hex nuts.
iii. Aach the two swivel casters (without locks) to the rear two risers using the
SHCS M8 x 20 with flat washers, lock washers, and hex nuts.
Step 7a
Step 7b
Steps 9 - 13
Step 14
Steps 15 a-e
Step 16
4. Rinse with water and wipe dry, then allow to air dry fully.
5. Do not use bleach, vinegar, alcohol or excessivly acidic or basic cleaners. These can dry out the vinyl and cause cracking.
6. Store the Scoot in a clean, well venlated and dry area.
Other ergochair Indoor Furnishing manuals


Popular Indoor Furnishing manuals by other brands

Regency
Regency LWMS3015 Assembly instructions

Furniture of America
Furniture of America CM7751C Assembly instructions

Safavieh Furniture
Safavieh Furniture Estella CNS5731 manual

PLACES OF STYLE
PLACES OF STYLE Ovalfuss Assembly instruction

Trasman
Trasman 1138 Bo1 Assembly manual

Costway
Costway JV10856 manual


