ERGOTECH ET-300 Instruction Manual
INSTRUCTION MANUAL AND WARRANTY INFORMATION
ONE YEAR LIMITED WARRANTY
ET-300 MASSAGECHAIR

DO NOT operate where aerosol (spray) products are being used or where oxygen is being administered.
IMPORTANT SAFETY INSTRUCTIONS
WHEN USING ELECTRICAL PRODUCTS, BASIC SAFETY PRECAUTIONS SHOULD ALWAYS BE FOLLOWED,
INCLUDING THE FOLLOWING:
READ ALL INSTRUCTIONS BEFORE USING
DANGER
– TO REDUCE THE RISK OF ELECTRIC SHOCK:
• Always unplug this appliance from the electrical outlet immediately after using and before cleaning.
• Never use pins or other metallic fasteners with this appliance.
WARNING
– TO REDUCE THE RISK OF BURNS, FIRE, ELECTRIC SHOCK, OR INJURY TO PERSONS:
• An appliance should NEVER be left unattended when plugged in. Unplug from outlet when not in use,
and before putting on or taking off parts or attachments.
• NOT for use by children.
• Close supervision is necessary when this appliance is used by, on, or near children, invalids, or
disabled persons.
• Use this appliance only for its intended use as described in this manual. DO NOT use attachments not
recommended by Cozzia; specifically, any attachments not provided with the unit.
• NEVER operate this appliance if it has a damaged cord or plug, if it is not working properly, if it has
been dropped or damaged, or dropped into water. Return the appliance to Cozzia Service Center for
examination and repair.
•
• Keep the cord away from heated surfaces.
• NEVER drop or insert any object into any opening.
• DO NOT use this massager in close proximity to loose clothing, jewelry.
•
• DO NOT operate under a blanket or pillow. Excessive heating can occur and cause fire, electric shock,
or injury to persons.
• DO NOT carry this appliance by supply cord or use cord as a handle.
• To disconnect, turn all controls to the “off” position, then remove plug from outlet.
• DO NOT use outdoors.
• NEVER operate the appliance with the air openings blocked. Keep the air openings free of lint, hair
and the like.
1
Use heated surfaces carefully. May cause serious burns. DO NOT use on sensitive skin areas or in the
presence of poor circulation. The unattended use of heat by children or incapacitated persons may be
dangerous.

2
FCC STATEMENT
1.This device complies with Part 15 of the FCC Rules.
Operation is subject to the following two conditions:
(1)This device may not cause harmful interference, and
(2)This device must accept any interference received, including interference that may cause undesired
operation.
2.Changes or modifications not expressly approved by the party responsible for compliance could void the
user’s authority to operate the equipment.
FCC Radiation Exposure Statement:
NOTE
– This equipment has been tested and found to comply with the limits for a Class B digital,
pursuant to Part 15 or the FCC Rules. These limits are designed to provide reasonable protection against
harmful interference in a residential installation. This equipment generates, uses and can radiate radio
frequency energy and, if not installed and used in accordance with the instructions, may casue harmful
interference to radio communications, However, there is no guarantee that interference will not occur in a
particular installation. If the equipment does cause harmful interference to radio or television reception,
which can be determined by turning the equipment off and on, the user is encouraged to try to correct the
interference by one or more of the following measures:
- Reorient or relocate the receiving antenna.
- Increase the separation between the equipment and receiver.
- Connect the equipment into an outlet on a circuit different from that to which the receiver is connected.
- Consult the dealer or an experienced radio/ TV technician for help.
The device has been evaluated to meet general RF exposure requirement.
The device can be used in portable exposure condition without RF striction.
½öÓÃÓÚÆÀ¹À¡£
°æȨËùÓÐ (c) by Foxit Software Company, 2004
ÓÉ Foxit PDF Editor ±à¼-

SAVE THESE INSTRUCTIONS
CAUTION
– PLEASE READ ALL INSTRUCTIONS CAREFULLY BEFORE OPERATING.
• This product is not intended for medical use. It is intended only to provide a luxurious massage.
• Consult your doctor prior to using this product, if
- You are pregnant
- You have a pacemaker
- You have any concerns regarding your health
• NOT recommended for use by diabetics.
• NEVER leave the appliance unattended, especially if children are present.
• DO NOT use this product for more than 30 minutes at a time.
• Extensive use could lead to the product’s excessive heating and shorter life. Should this occur,
discontinue use and allow the unit to cool before operating.
• NEVER use this product directly on swollen or inflamed areas or skin eruptions.
• DO NOT use this product as a substitute for medical attention.
•
This product should NEVER be used by any individual suffering from any physical ailment that would
limit the user’s capacity to operate the controls or who has sensory deficiencies in the lower half of
their body.
•
This appliance is intended for household use only.
3
MAINTENANCE
TO STORE
Place massage chair in its box or in a safe, dry, cool place. Avoid contact with sharp edges or pointed objects
which might cut or puncture the fabric surface. To avoid breakage, do not wrap the power cord around the
unit. Do not hang the unit by the hand control cord.
TO CLEAN
Unplug the unit and allow it to cool before cleaning. Clean only with a soft, slightly damp sponge. Never
allow water or any other liquids to come into contact with the unit.
• DO NOT immerse in any liquid to clean.
• NEVER use abrasive cleaners, brushes, gasoline, kerosene, glass / furniture polish or paint thinner to clean.
• DO NOT attempt to repair the ET-300. There are no user-serviceable parts. For service, call the
consumer relations telephone number listed in the warranty section.
4
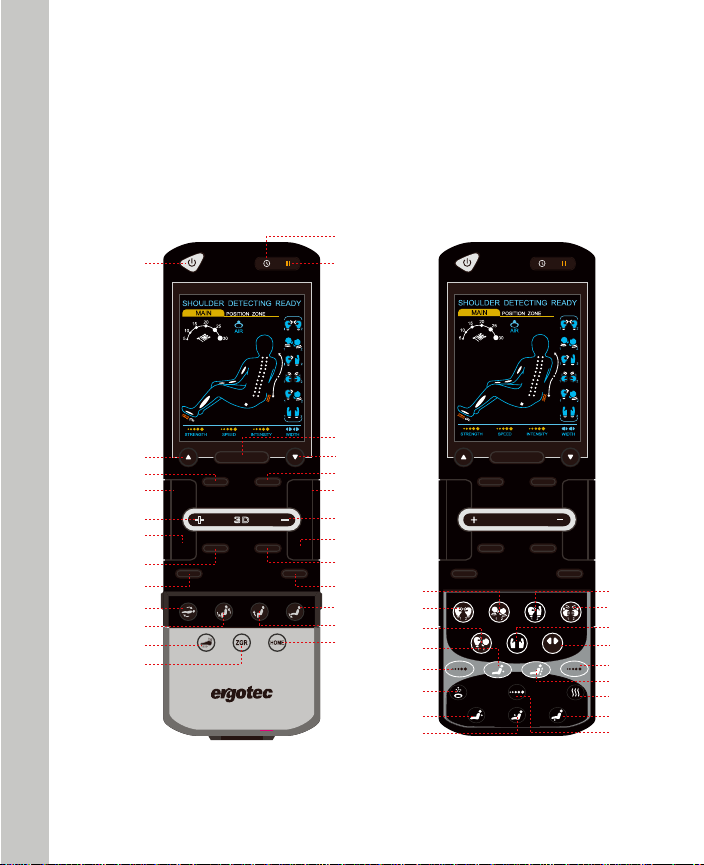
HOW TO USE
1
4
2
3
加 脚滚
Strength Speed
Intensity
Air
Spot Partial
Full Air
Arms
Heat
Shoulders
Width
Calves
Shoulder Position
Shoulder Position
Demo Relax
Gentle
Neck &
Shoulder
Swedish Balinese
Vigorous
Stretch
Upper Back Lower Back
9
11
19 26
34
33
37
38
40
30
27
20
23
24
17
15
13
7
5
10
12
22 29
32
36
41
42
39
35
31
28
21
25
16
18
14
8
6
Connect the chair to a power supply, then turn switch to the “I” position. The chair is now in idle mode.
During idle, the on/off button will blink.
During idle, only the on/off, pause, legrest recline/restore, and chair recline/restore buttons can be
operated.

5
6. SHOULDER POSITION
The Shoulder Position Button
When you press this button, the chair will adjust to your shoulder position.
1. ON/OFF
The Start/Stop Control Button
Press this button to light up the LCD screen. Press any massage function button to start massage. This
will initiate the timer function. Press this button again to stop all massage functions, massage chair will
return to its original position.
2. PAUSE
Press this button once to halt current massage function and count down timer. During pause mode, the
pause button will be blinking.
Press this button again to cease the “Pause” function and resume previous massage function as well as
countdown timer.
3. TIMER
Time Interval Control Button
When a massage function is activated, the timer is preset at 15 minutes. Every single press on this button
will change the timer interval in the sequence of 20>25>30>5>10>15>20" minutes.
4/5. UPWARD/DOWNWARD ADJUSTMENT
The Position Adjustment Button for Spot/Partial Massage and Shoulder Position
When the spot/partial massage or shoulder position function are activated, this button can be used to
move the massage rollers.
Hold this button to move the massage rollers upward/downward respectively. Release the buttons when
reaching desired position.
7. DEMO
This massage will quickly demonstrate all of the massage features in 5 minutes.
8. RELAX
A program designed to provide a mild massage that is great for deep relaxation, best used before going
to sleep.
9. GENTLE
A program designed to provide a quiet, gentle massage that is good for beginners or those that prefer a
soft touch.
Shoulder Position
Demo
Relax
Gentle

18. LOWER BACK
This massage will focus on your lower back with a deep massage that includes air compression.
19/20. CHAIR RECLINE AND RESTORE
Angle Adjustment Button for Backrest
Keep pressing to comfortably lay flat or to restore the chair to its original position.
21/22. LEGREST RECLINE AND RESTORE
Angle Adjustment Button for Legrest
Keep pressing either button until the legrest reaches your desired position.
6
10. VIGOROUS
This massage will combine vigorous tapping on your back and an air massage focused on your arms
and legs.
11/12. 3D+/-
The 3d Strength Adjustment Buttons.
When you want to adjust 3D strength, these buttons can be used to adjust 3D strength respectively.
13. NECK&SHOULDER
This massage will focus on your shoulders and neck using a combination of keading and shiatsu
techniques.
14. STRETCH
This massage will stretch your legs and back with a combination of gentle tapping, kneading, rolling,
and air compression.
15. SWEDISH
This is a Swedish style massage program.
16. BALINESE
This is a Balinese style massage program.
17. UPPER BACK
This massage will focus on your neck, shoulders, and legs with a slow massage that incorporates
soothing heat.
Vigorous
Neck &
Shoulder
Stretch
Swedish
Balinese
Upper Back
Lower Back

23. FOOT ROLLING
Foot Rolling Function Start/Stop Contol Button
Press this button once to activate rhythmic rolling massage at soles, press again to stop rolling massage
at soles.
Note: During Auto Program mode, pressing this button can also disable/enable the Foot Rolling function.
25. HOME
Press this button to restore the chair to its home position.
26. KNEADING
Kneading function Start/Stop control button - 5 levels of strength to be adjusted
Press this button to activate rhythmic mode 1 Kneading function for a full back massage at medium
strength. Press again to activate mode 2 Kneading function. Press for the third time to stop Kneading
function and switch to mode 1 Swedish function.
27. TAPPING
Tapping Function Start/Stop Control Button - 3 levels of width, 5 levels of speed to be adjusted
Press this button to activate rhythmic mode 1 Tapping function for a full back massage at medium speed.
Press the button again to activate mode 2 Tapping function. Press the button for the third time to stop
Tapping function and switch to mode 1 Shiatsu function.
28. SWEDISH
Swedish Function Start/Stop Control Button - 5 levels of speed to be adjusted
When mode 2 Kneading function is engaged, press this button to activate rhythmic mode 1 Swedish
function for a full back massage at medium speed. Press again to activate mode 2 Swedish function.
Press once more to stop the Swedish function. To activate Swedish function directly, press this button 3
times during idle mode.
29. SHIATSU
Shiatsu Function Start/Stop Control Button - 3 levels of width, 5 levels of speed to be adjusted
When mode 2 Tapping function is engaged, press this button to activate rhythmic mode 1 Shiatsu function
for a full back massage at medium speed. Press again to activate mode 2 Shiatsu function. Press once
more to stop the Shiatsu function. To activate Shiatsu function directly, press this button 3 times during
idle mode.
24. ZGR
Press this button to activate the ZG function.
Note: ZGR button IS NOT controllable during auto programs of Swedish and Thai.
7

30. KNEADING-TAPPING
Kneading-tapping Function Start/Stop Control Button - 5 levels of strength to be adjusted
When mode 2 Kneading-Tapping function is engaged, press this button to activate rhythmic mode 1.
Kneading-Tapping function for a full back massage at medium speed. Press again to activate
mode 2 Kneading-Tapping function. Press once more to stop the Kneading-Tapping function. To activate
Kneading-Tapping function directly, press this button 3 times during idle mode.
31. ROLLING
Rolling Function Start/Stop Control Button - 3 levels of width to be adjusted
When mode 2 Clapping function is engaged, press this button to activate Rolling function for a full back massage.
Press this button again to stop the Rolling function. To activate Rolling directly, press this button 3 times during
idle mode.
Note: This function cannot perform "Spot" massage function
32. WIDTH
The Width Adjustment Button for Tapping, Clapping, Shiatsu and Rolling Function
When Tapping, Clapping, Shiatsu or Rolling function is engage, every single press on this button will change
the massage width interval in the sequence of “Narrow > Medium > Wide” in cycle.
33. STRENGTH
The Strength Adjustment Button for Kneading Function
When Kneading function is engaged, every single press on this button will change the massage speed
strength interval in the sequence of “Lv1 > Lv2 > Lv3 > Lv4 > Lv5” in cycle.
34/35. SPOT/PARTIAL
The Spot or Partial Back Massage
Press this button once to activate localize Spot massage while the original massage mode continues to run
at the latest position. Press again to switch to Partial massage function.
Note: Partial Massage will take the latest position as the center to perform Partial massage with the
distance approx. 8cm.
36. SPEED
The Speed Adjustment Button for Tapping, Clapping, Swedish and Shiatsu Function
When Tapping, Clapping, Swedish or Shiatsu function is engaged, every single press on this button will
change the massage speed interval in the sequence of “Lv1 > Lv2 > Lv3 >Lv4 >Lv5” in cycle.
8
Width

9
37. FULL AIR
Press this button to activate the air massage function for full body (CALF&FOOT/ARM/SHOULDER). Press
this button again to stop the function.
38. SHOULDERS
ShoulderAir Squeeze Massage Control Button - 5 levels of intensity to be adjusted
Press this button once to activate rhythmic air massage at shoulder. Press again to stop the function.
39. AIR INTENSITY
The Intensity Adjustment Button for Air Pressure Massage - 5 levels of intensity to be adjusted
When Air massage function is engaged, every single press on this button will change the air intensity
in the sequenceof "Lv1> Lv2>Lv3> Lv4> Lv5" in cycle.
40. ARMS
Arms Air Squeeze Massage Control Button - 5 levels of intensity to be adjusted
Press this button once to activate rhythmic air massage at arms. Press again to stop the function.
41. HEAT
Lumbar Heat Function Start/Stop Control Button
Press this button to activate lumbar heat function, press again to stop the heat function.
Note: During Auto Program mode, pressing this button can also disable/enable the heat function.
42. CALVES
Calf Air Squeeze Massage Control Button - 5 levels of intensity to be adjusted
Press this button once to activate rhythmic air massage at calves. Press again to stop the function.
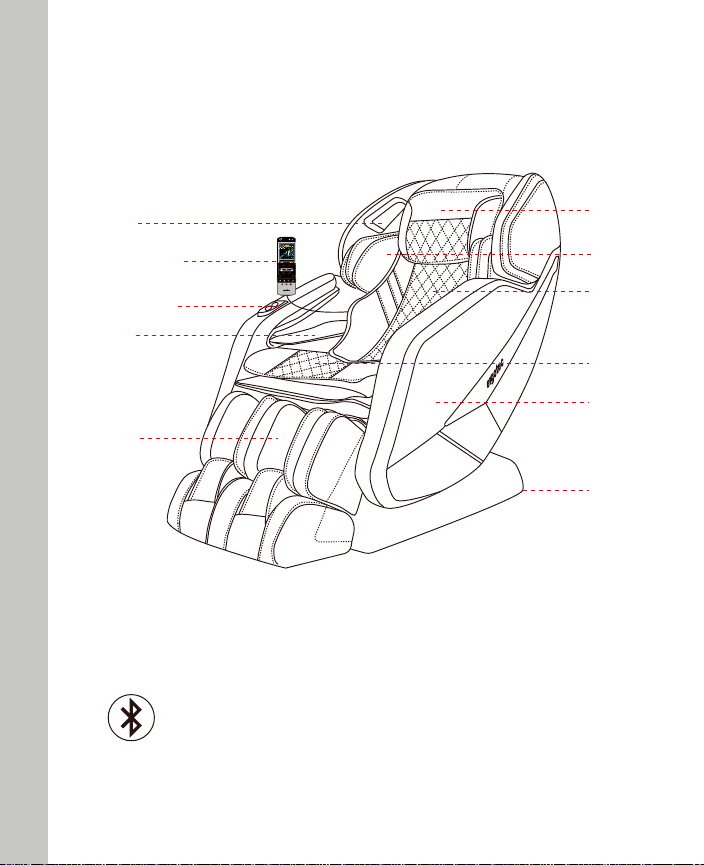
FEATURES
Pillow
Shoulder
Backrest
Pad
Seat Pad
Side Panel
Castor
Quick Buttons
Armrest
Speaker
Footrest
10
Remote Control
Note: The speaker will only operate when the massage chair is in operation
To play music using your massage chair’s speakers please connect your
smartphone, tablet, or other electronic device to your chair using bluetooth.
ShoulderPosition
Demo Relax
Gentle
Neck&
Shoulder
Swedish Balinese
Vigorous
Stretch
UpperBack LowerBack

FOR SUPPORT IN THE USA:
Get Help at www.cozziausa.com/support
Monday-Friday 9:00am-5:00pm PST
1.877.977.0656
Cozzia USA, LLC sells Ergotec Massage Chair Model No. ET-300 (the “Ergotec Massage Chairs”) with the intent that they are free
of defects in manufacture and workmanship for a period of one year from the date of original purchase, except as noted below.
Cozzia USA,LLC warrants that the Ergotec Massage Chairs will be free of defects in material and workmanship under normal use
and service. This warranty extends only to consumers and does not extend to Retailers.
Ergotec Massage Chairs have the following warranty:
The Ergotec Massage Chair ET-300 has a one year labor and parts . Cozzia's customer service will not issue Return Material
Authorizations (RMAs) for products. Ergotec Massage Chairs will be either repaired by the consumer or by an in-home technician.
Cozzia will not issue Return Material Authorizations (RMAs) for buyer's remorse.
ONE YEAR LIMITED WARRANTY
Consumers may contact Cozzia's customer service department at 1-877-977-0656 between 9:00 am and 5:00 pm PST, Monday
through Friday or Get Help at www.cozziausa.com/support
Consumers are required to provide the unit serial number and dated proof of purchase (sales receipt) when they contact the Cozzia
service department regarding a repair.
A Cozzia customer service representative will attend to most consumer inquiries, but in some cases a technical service specialist
will provide advanced support.
Non-warranty repair is provided on a "per incident" basis. Cozzia customer service will verify that the unit has failed and provide
instructions for repairing a unit. All applicable repairs, parts, shipping, handling, local tax and a "per incident" fee will be charged
for non-warranty repairs and support calls.
Proof of purchase (original receipt) is required for all warranty repairs or service.
Service And Technical Support
11

Table of contents


