Erickson 07496 User manual
1
Item no: 07496
MANUAL
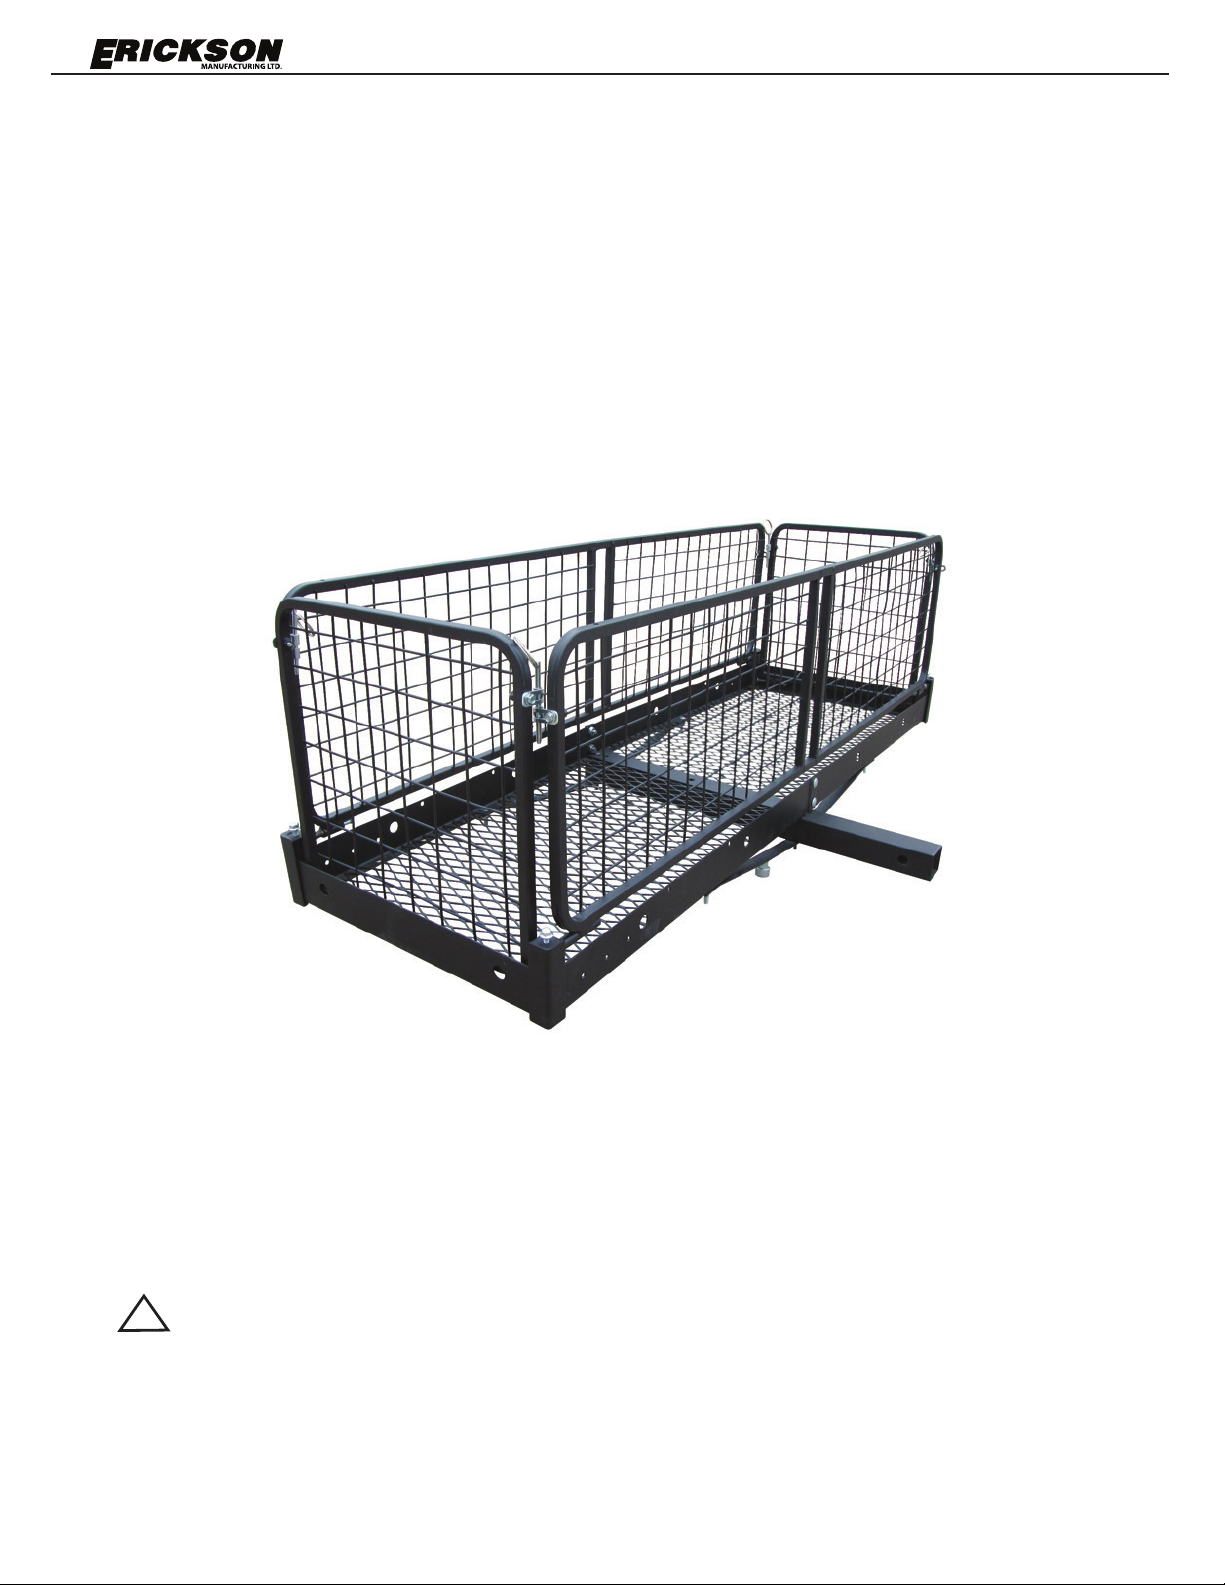
60 IN. CARGO HAULER WITH BASKET
Item# 07496
WARNING:
Read carefully and understand all ASSEMBLY AND OPERATION
INSTRUCTIONS before operating. Failure to follow the safety
rules and other basic safety precautions may result in serious
personal injury.
!

2
Item no: 07496
TECHNICAL SPECIFICATIONS
SAFETY WARNINGS AND PRECAUTIONS
WARNING: When using product, basic safety precautions should
always be followed to reduce the risk of personal injury and damage to equipment.
Only use the cargo carrier with a properly installed 2 in hitch receiver capable of supporting the
Cargo Carrier and its load. Refer to Hitch Manufacturers specifications and load capacities before
using.
Read all instructions before using this product!
1. Keep work area clean. Cluttered areas invite injuries.
2. Observe work area conditions. Keep work area well lighted.
3. Store idle equipment. When not in use, the Carrier must be stored in a safe and clean location.
Always lock up products and keep out of reach of children.
4. Use the right product for the job. There are certain applications for which the Cargo Carrier was
designed. Do not modify the Cargo Carrier and do not use the Cargo Carrier for a purpose for which
it was not intended.
5. Check for damaged parts. Before using any product, any part that appears damaged should
be carefully checked to determine that it will operate properly and perform its intended function.
Check for any broken or damaged parts and any other conditions that may affect its operation.
Replace or repair damaged or worn parts immediately.
6. Replacement parts and accessories. When servicing, use only identical replacement parts.
Use of any other parts will void the warranty.
7. Do not exceed the product’s maximum load capacity of 500 lbs.
8. Only use the Cargo Carrier with a properly installed 2 in. hitch receiver capable of supporting
the Cargo Carrier and its load. If the Cargo Carrier is installed on a Class II receiver, total
weight, including carrier, is limited to 350 lbs.
9. Use eye protection. Always wear ANSI-approved impact safety goggles when setting up, loading
and unloading the Cargo Carrier. Wear gloves and avoid sharp edges when assembling and when
loading and unloading the Cargo Carrier.
10. Do not allow children to play on, stand upon or climb into the Cargo Carrier. The Cargo Carrier
is not for carrying people or animals.
11. Always check hardware and assembled parts after assembling. All connections should be tight
and hardware tightened.
12. Always distribute objects in the Cargo Carrier evenly. Uneven weight distribution could cause
tipping.
13. Be aware of dynamic loading! Suddenly dropping or bouncing a load on the Cargo Carrier may
create, for a brief instant, an excess load, which may result in damage to the product and/or personal
injury. Additionally, if the vehicle hits a bump, a slight play in the receiving hitch or a movement in the
load could result in a momentary dynamic loading effect that could dramatically increase the actual
weight load. Check the hitch-to-carrier connection for any looseness. This momentary dynamic loading
effect could result in damage to the Cargo Carrier, the load and possible personal injury.
14. WARNING: Be aware of the possible risk of fire and damage to property resulting from
the vehicle’s exhaust system pointing at or running near the cargo loaded on the Cargo Carrier. Before
installing the Cargo Carrier, check to make sure that the exhaust pipe is not pointing in the direction
of the cargo. Flammable cargo can ignite from exposure to heat. Other cargo can be damaged from
the heat. Always be aware of this potential danger, and never use the Cargo Carrier if the risk exists.
15. Follow DOT/MOT guidelines for installation and use.
16. Do not exceed 65 MPH while carrier is attached.
Carrier dimensions 60 in. x 20 in. x 18 in.
Load Weight Capacity 500 lbs.
Required Receiver Fits 2 in. receivers
!
!
3
Item no: 07496
ASSEMBLY FOR CARGO CARRIER
It is important that you read the entire manual to become familiar with the product BEFORE you
assemble and use the Cargo Carrier. Before assembling and operating the Cargo Carrier, be sure
that you have all parts described in the Parts List and Assembly Diagram located on the last pages
of this manual.
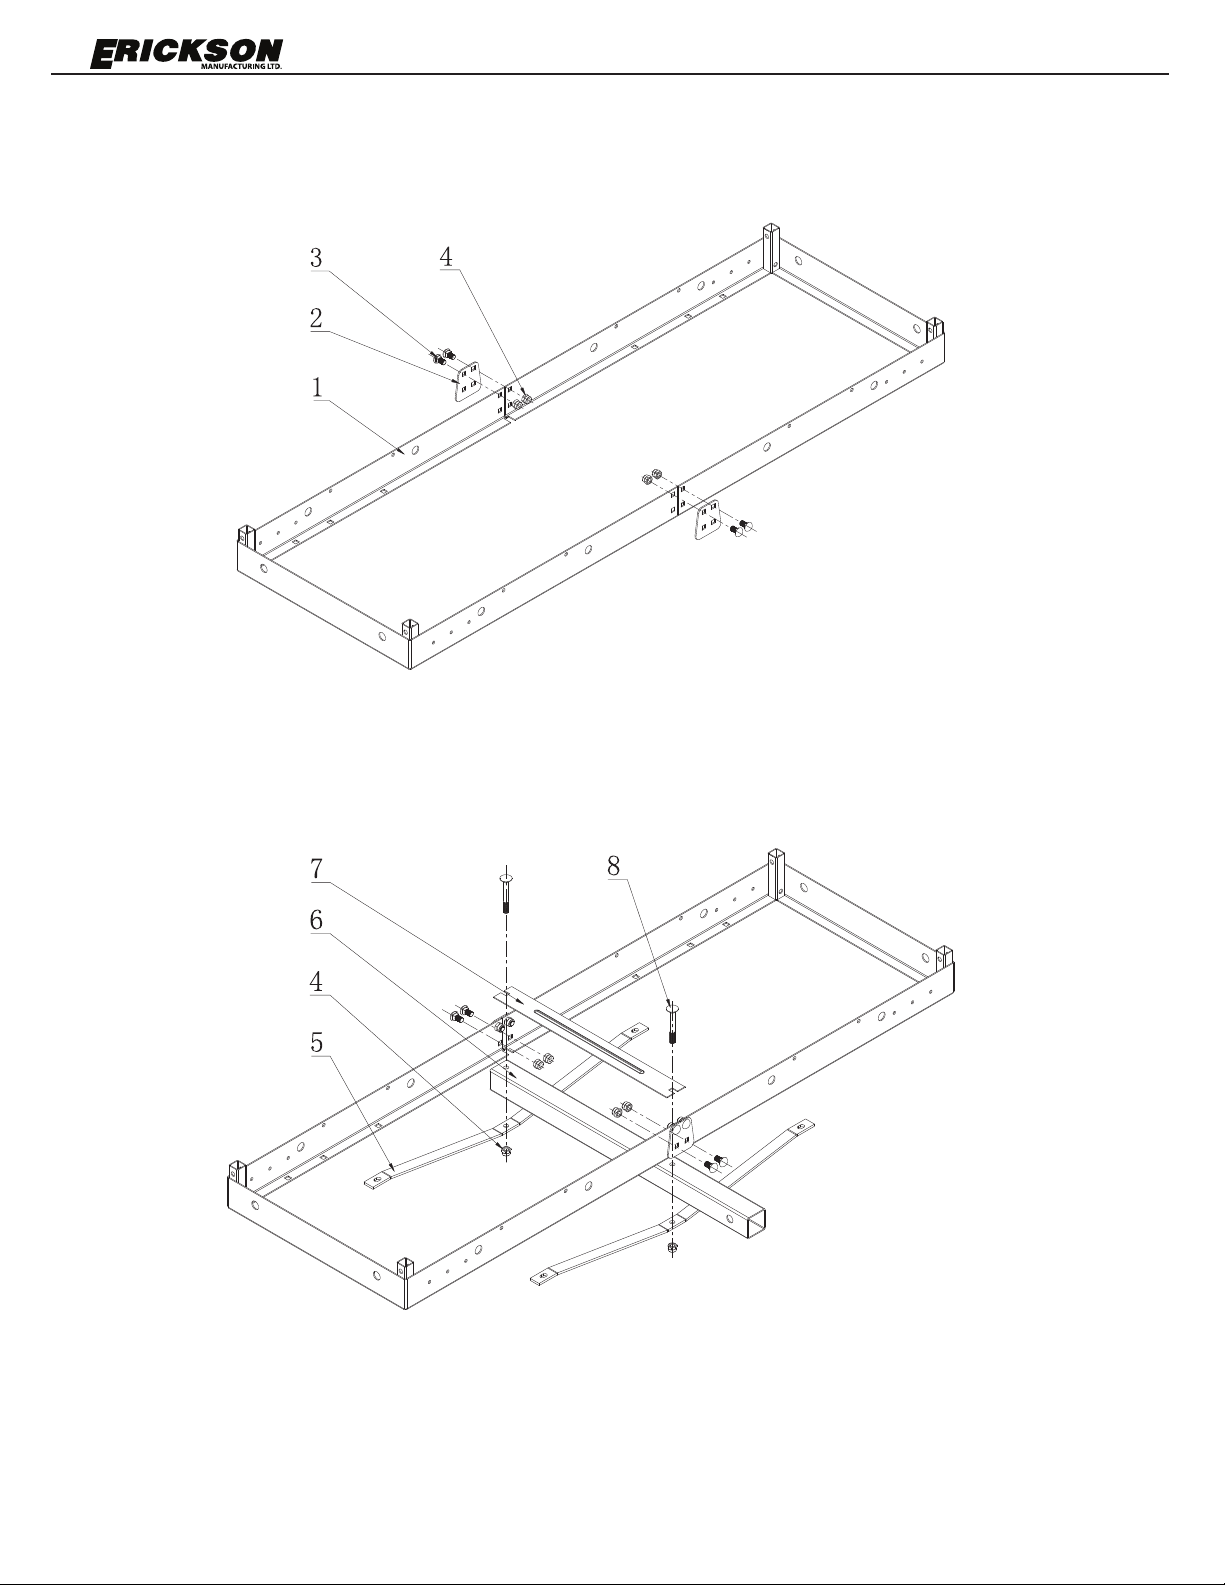
FIG. 1
STEP 1 Connect the two supporting frames (1) using the connecting piece (2); line up the corresponding
square holes; use 2 of the M10*20 carriage bolts (3) and install in top 2 holes only; Secure with 2 of the
M10 locknuts (4). Continue the same configuration for the other side. Do not tighten completely. Details
shown in Fig 1.
FIG. 2
STEP 2 Place the tie plate (7) on the middle of the assembled supporting frame (1), then place the frame
(1) over the square tube (6) and the two support braces (5) under the frame; connect using the two bolts
M10X83 (8) and two lock nuts (4). Install 4 remaining M10*20 (3) carriage bolts into connecting pieces and
secure with M10 Locknuts (4). Do not tighten completely. See Fig 2.

4
Item no: 07496
FIG. 3
STEP 3 Secure both sides of the two support braces (5) to the frame (1) with 4 of M10*20 carriage
bolts (3), and 4 of M10 lock nuts (4). Do not tighten fully. See Fig 3.
STEP 4 Check that the two frames sides align horizontally, then tighten all bolts and nuts.
FIG. 4
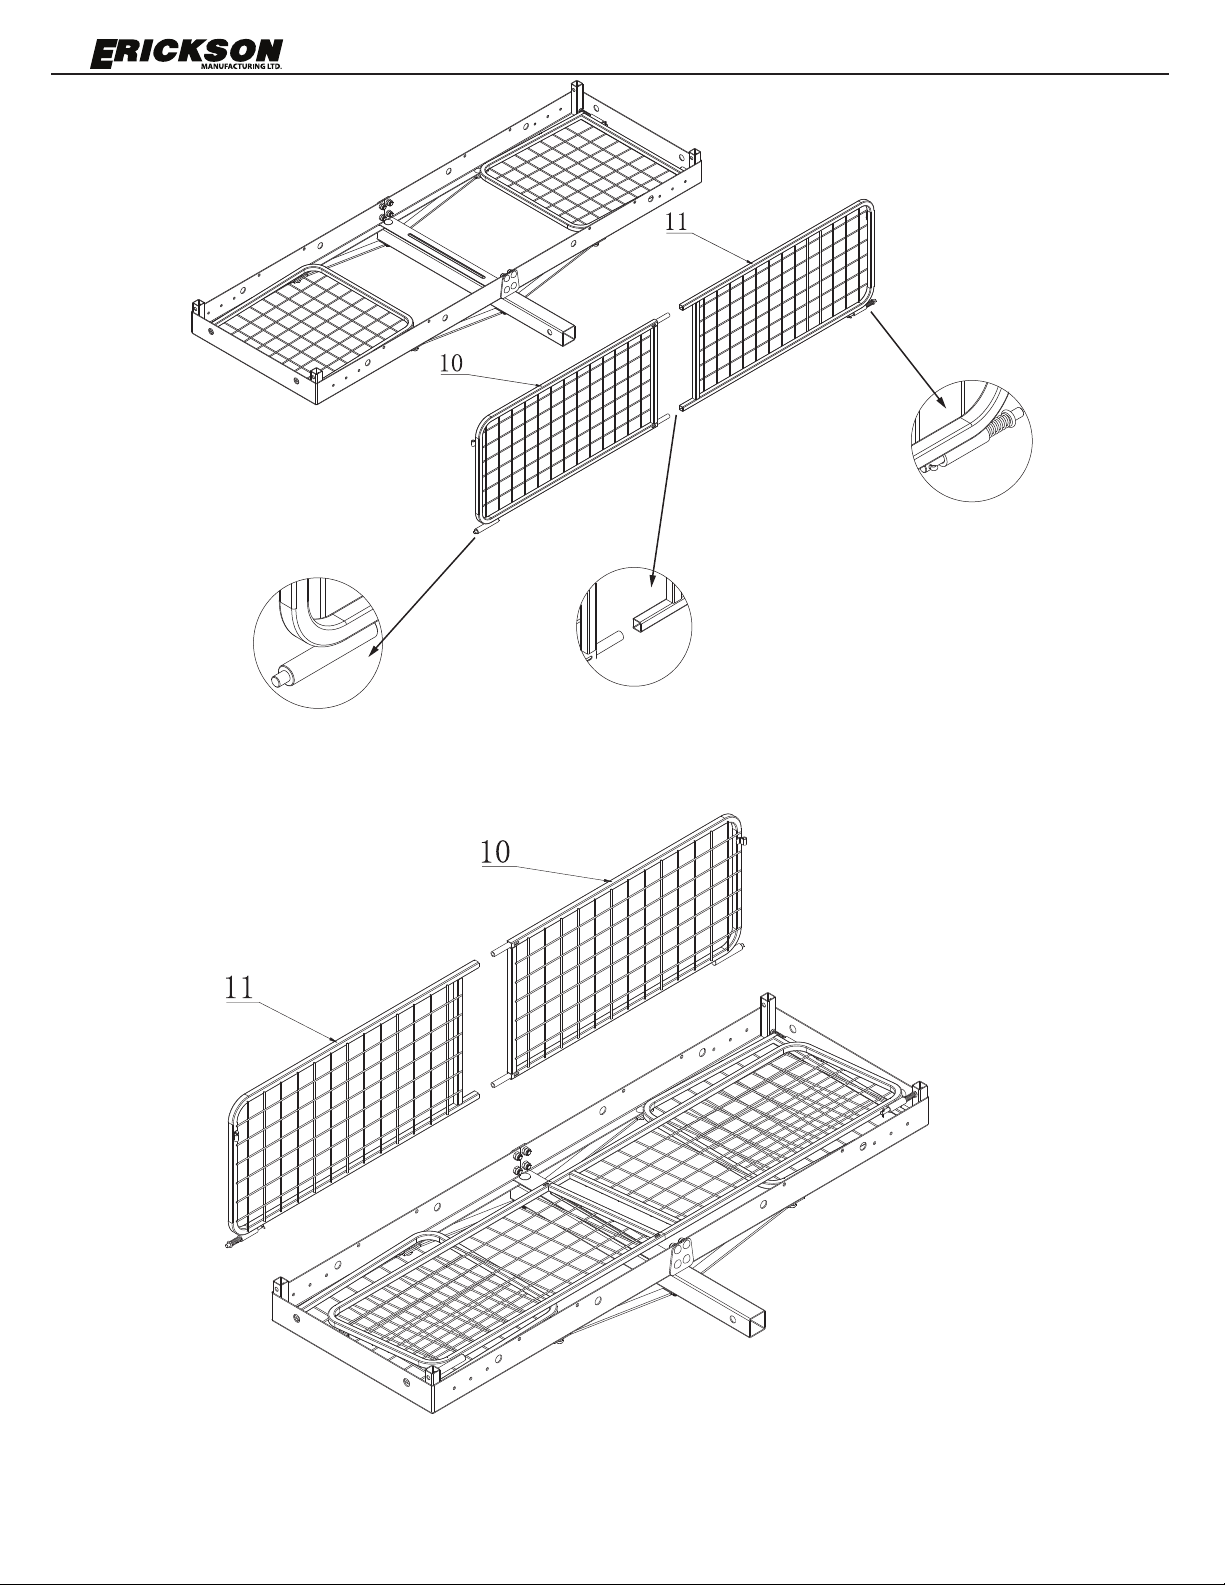
STEP 5 Insert the cylindrical pins with spring on the bottom of the side fencing (9) into the bottom holes
on corner fixtures of supporting frames (1). See Fig 4 (place the fencing flat within supporting frames).
See Fig 5. NOTE: Fencing MUST face inward for all ends and sides.
5
Item no: 07496
FIG. 5
STEP 6 Insert front left and right fencing (10 and 11) together, and assemble them into top holes
on corner fixtures of supporting frames (1). (place fencing flat within supporting frames). See Fig. 6.
FIG. 6
STEP 7 Insert back left and right fences (10 and 11) together, and assemble them into top holes on corner
fixtures of supporting frames (1). (For ease with the next step, place with the fencing inside). See Fig 6.

6
Item no: 07496
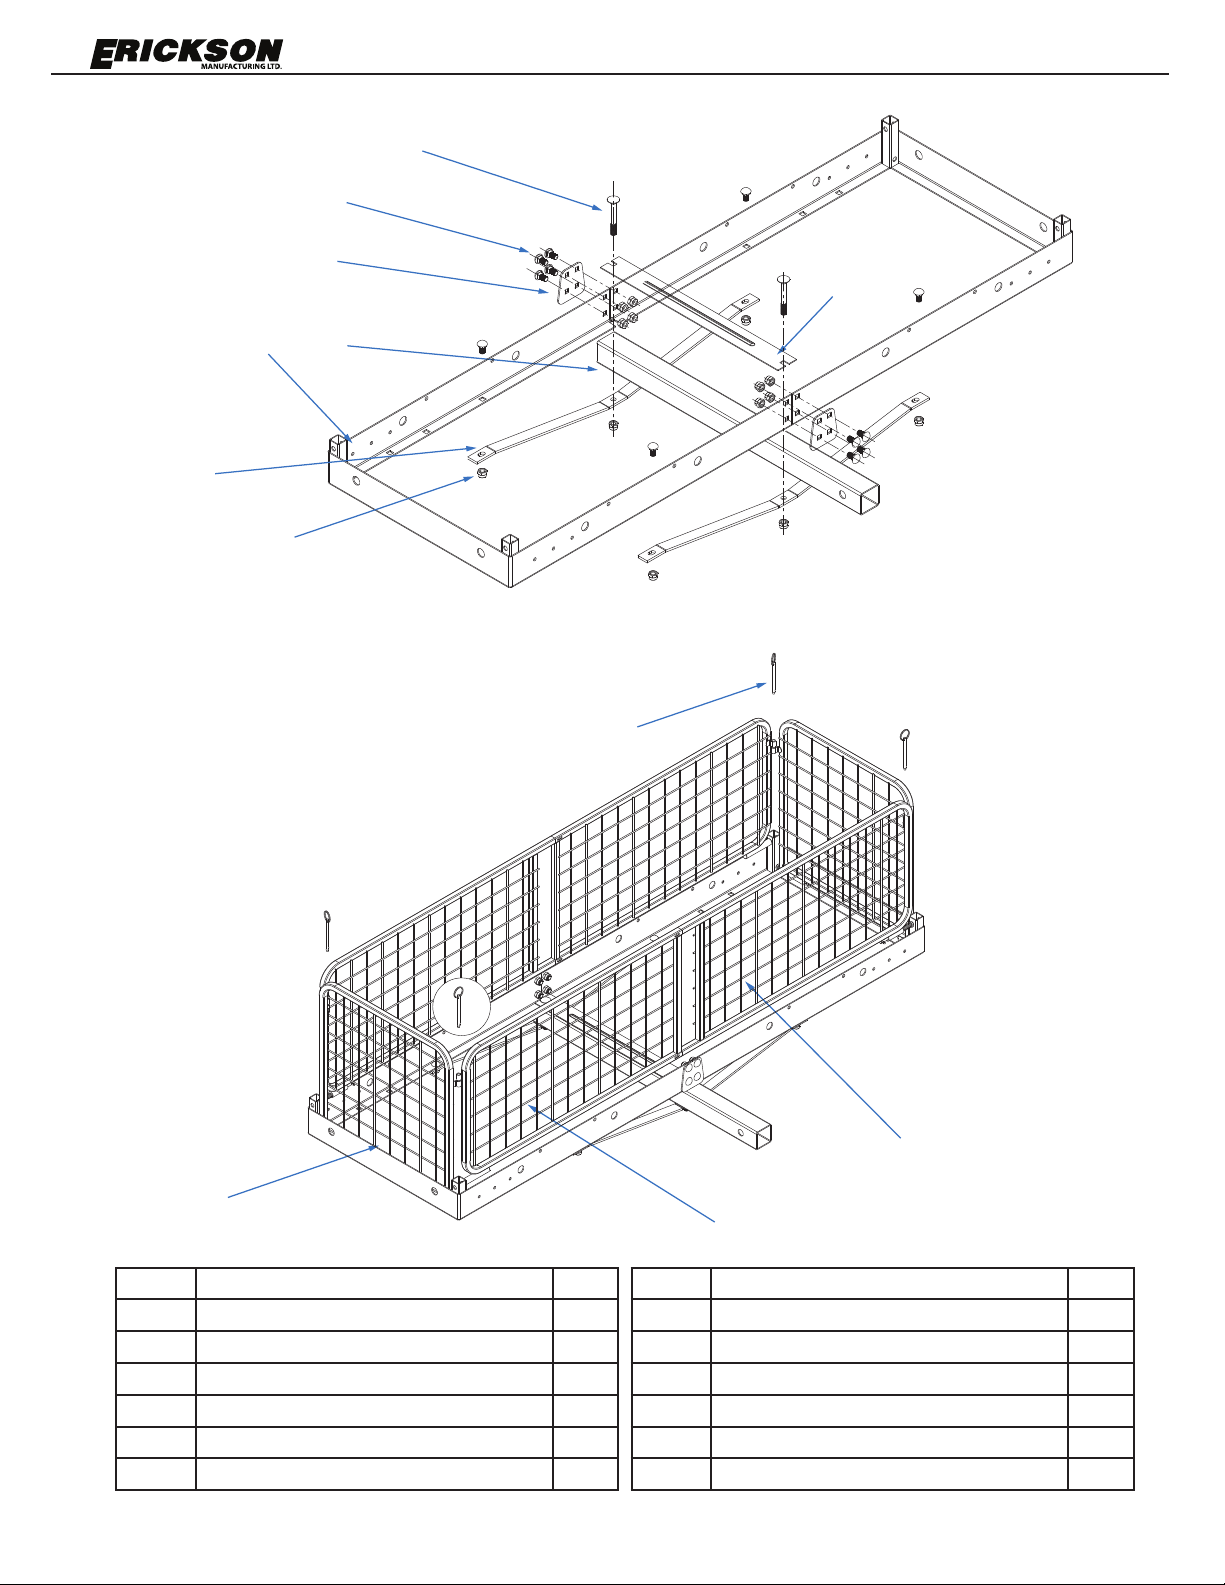
FIG. 7
STEP 8 Align all hinges and connecting bars on hinges then insert the ring pins (12). (The connecting
corner hinges should be positioned on the inside of the fences).
See Fig 7.
OPERATION
WARNING: The load weight must be centered or evenly distributed across the Carrier
platform. Always use appropriate tie-down restraints to securely attach any cargo loaded onto
the Cargo Carrier before moving your vehicle any distance. Do not leave loose items on the
platform while operating the vehicle. Always use Reflectors. Make certain to use the appropriate
red flags when moving a load. Check with your local traffic enforcement agency to make certain
that you are correctly following all local laws.
Your Cargo Carrier can be loaded with up to 500 lb. of evenly distributed cargo
(Class 3 Hitch = 500 lb. maximum tongue weight)
if an appropriately rated hitch is used.
Always use Reflectors. Make certain to use the appropriate red flags when moving
a load. Check with your local traffic enforcement agency to make certain that you
are correctly following all local laws.
MAINTENANCE
• Maintain your cargo carrier. It is recommended that the general condition of the carrier be examined
before it is used. Check all nuts and bolts to make sure they are tightened on a regular basis as part
of a maintenance schedule. If you hear any abnormal vibrations or noise, have the problem corrected
before further use. Have necessary repairs made by qualified service personnel.
!
!
7
Item no: 07496
PARTS DIAGRAM
1
2
3
4
12
9
10
11
5
6
8
7
Part# Description Qty
1 Supporting frame 2
2 Connecting piece 2
3 M10*20 carriage bolt 12
4 M10 lock nut 14
5 Support brace 2
6 50 square tube 1
Part# Description Qty
7 Tie plate 1
8 M10*83 carriage bolt 2
9 Left and right side fencing 2
10 Front/Back Left fencing 2
11 Front/Back Right fencing 2
12 Ring bolt 4

8
Item no: 07496
WARRANTY
Warranty Qualifications
Effective from the day you purchase the product. Please keep your dated purchase invoice as proof.
Repair/Replacement Warranty
Erickson Manufacturing Ltd. warrants to the original purchaser that the mechanical components
will be free of defect in material and workmanship for 90 days from the original date of purchase.
Transportation charges on product submitted for repair or replacement under warranty are the sole
responsibility of the purchaser. This warranty only applies to the original purchaser and is not transferable.
Do Not Return The Unit to the Place of Purchase
Contact Erickson Manufacturing Ltd’s Technical Service and service people will troubleshoot any issue
via phone or email. Repairs or replacements without prior authorization, or at an unauthorized repair
facility, will not be covered by this warranty. Warranty Exclusions This warranty does not cover the
following repairs and equipment:
Normal Wear
This warranty does not cover the repair when use has exhausted the life of a part or the
equipment as a whole.
Installation, Use and Maintenance
This warranty will not apply to parts and/or labor if this product is deemed to have been misused,
neglected, involved in an accident, abused, loaded beyond specifications, modified, or installed
improperly. Normal maintenance is not covered by this warranty.
Other Exclusions
This warranty excludes:
• Cosmetic defect such as paint, decal etc.
•Wear items
•Accessory parts
•Failures due to acts of God and other force majeure events beyond
the manufacturer’s control.
•Problems cause by parts that are not Erickson Manufacturing Ltd. parts.
Limits of implied Warranty and Consequential Damage
Erickson Manufacturing Ltd. disclaims any obligation to cover any loss time, use of this product,
freight, or any incidental or consequential claim by anyone from using this product. THIS WARRANTY
IS IN LIEU OF ALL OTHER WARRANTIES EXPRESS OR IMPLIED, INCLUDING WARRANTIES OF
MERCHANTABILITY OR FITNESS FOR
A PARTICULAR PURPOSE.
A unit provided as exchange will be subject to the warranty of the original unit. The length of the warranty
governing the exchanged unit will remain calculated by reference to the purchase date of the original unit.
This warranty gives you certain legal rights which may change from state to state. Your state and/or
province may also have other right you may be entitled to that are not listed within this warranty.
Contact Information
Marine City, Michigan 48039
Thamesville, Ontario N0P 2K0
Toll Free: 1-888-546-4668
Table of contents
Other Erickson Carrier Board manuals


