ES EYE Hera Series Service manual

Hera 604v5 Configuration
Administrator Guide
Document: 8792 v1.0

Copyright
Copyright 2024 Eseye Ltd. All rights reserved.
You may not reproduce or use this document or any portion thereof without prior written permission
of Eseye Ltd. Eseye Ltd retains the right to change this document or related product specifications and
descriptions, at any time, without notice. Eseye Ltd makes no warranty for the use of this document
and assumes no responsibility for any errors that may appear in the document, nor does it make a
commitment to update the information contained herein. For the most current product information,
please visit www.eseye.com.
Eseye® and its logos, Eseye Intelligently Connected® and Hera 300™ are trademarks of Eseye Ltd in the
United Kingdom and/or other countries. All other marks and names mentioned herein may be claimed
as the property of others.
Last updated: 09 February 2024
ii Hera 604v5 Configuration Administrator Guide v1.0

Contents
About this guide vi
Extra reading vi
Standards and conventions vii
About configuring the Hera series router 1
How to connect to the Hera 2
Connect using an Ethernet (wired) connection 2
Connect using WiFi 2
Logging in to the Hera Series Router 2
Configuring the cellular connection 2
About the front panel indicators 3
About the end panel connectors 4
Top panel functions 4
Bottom panel functions 5
Using the Hera series router web interface 7
Viewing the System Status 8
Router 8
Local area network (LAN) 9
Mobile network 9
Connected devices 10
Using the Setup Wizards 11
Configuring a cellular connection 11
Configuring an Ethernet connection 11
Configuring a cellular connection protected by an Ethernet connection 12
Configuring an Ethernet connection protected by a cellular connection 12
Configuring Basic Settings 14
Configuring the Router 14
Status 14
Name and location 14
Configuring the Local Area Network (LAN) 15
Status (read only) 15
LAN IP address 15
Hera 604v5 Configuration Administrator Guide v1.0 iii

DHCP server 15
DHCP fixed hosts 16
DHCP allocated addresses 17
Configuring the Wireless Network 18
Access points 19
Configuring the Mobile Network 21
Status (read only) 21
Configuring the mobile connection 21
Configuring the Ethernet WAN 23
Configuring Routing 25
Active and static routes 25
Configuring Security 27
Firewall status and filters 27
IP redirections 29
Configuring the Health Monitor 32
Configuring general settings 32
For interface tests that fail 34
For interface tests that receive zero packets 35
Configuring ping requests 36
Configuring DNS requests 36
Configuring settings for each WANinterface 37
Configuring overrides for each WAN interface 37
Performing File Management 39
Creating a backup configuration file 39
Uploading a new configuration 39
Uploading a new Hera software version 39
Configuring System Settings 41
Configuring the Network time protocol (NTP) 41
Configuring User Management 42
Changing the administrator password 42
iv Hera 604v5 Configuration Administrator Guide v1.0


About this guide
This guide is designed to help you configure the Hera 604v5 device to work with your existing network
infrastructure, using the Hera user interface. You can also configure the Hera by directly editing the
device configuration files, or using a TR-069 management platform. Eseye can provide a TR-069
management platform as a service.
You must have a good understanding of 3G and WiFi router products, including the requirements for
your specific IoT business application.
You can find the latest guide here: https://docs.eseye.com/Content/Resources/Files/8792-Hera-604v5-
Configuration-Administrator-Guide.pdf
Extra reading
For Hera specifications, see:
https://docs.eseye.com/Content/Resources/Files/8823-Hera-600v5-Series-Router-Datasheet.pdf
For Hera installation instructions, see:
https://docs.eseye.com/Content/Resources/Files/8435-Hera-600-Series-Router-Quick-Start-Guide.pdf
For general information, see the online help: https://docs.eseye.com/Content/Home.htm
You can also manage your SIM estate and account through the Infinity web portal. For more
information, see https://docs.eseye.com/Content/Infinity/Introduction.htm.
vi Hera 604v5 Configuration Administrator Guide v1.0

Standards and conventions
This guide uses consistent visual cues and standard text styles to help you locate and interpret
information easily.
Style Description
Note
Extra information or a recommendation related to the current topic.
Tip
Good-to-know information that helps users complete a procedure or
understand a topic.
Warning
Information that alerts the user about significant or critical actions or
outcomes.
Title names Window or section names, denoting a title, appear in italics.
Field or button name Element names in a user interface, for example fields and buttons, appear
in bold.
Ctrl+X; Ctrl+click A key combination with a plus sign separating two key names or a key
name and a mouse action, indicates that you hold down the first key
while pressing the second key or performing the mouse action.
Cross reference Title and
page
Cross references appear in italics, for example: For more information, see
Copyright on pageii. Select the cross reference to view it.
Hyperlinks Underlined cross references are hyperlinks to electronic forms of the
document. Select the hyperlink to open the cross reference.
ATCommands
Commands Command formats are displayed in monospaced typeface.
<Parameter> Angle brackets enclose the AT Command parameter, for example <topic>.
The brackets do not appear in the command line.
"ParameterString" Quotation marks enclose parameter strings.
CommandValue Italics in a command depicts values or examples that need replacing with
your specific parameters.
[CommandOptionalEntry] Square brackets display optional entries.
ATCommandResponse Returned responses to ATCommands are displayed in monospaced bold
typeface.
<ASCIICHARACTERS> Returned ASCII characters are in uppercase.
Hera 604v5 Configuration Administrator Guide v1.0 vii

About configuring the Hera series router
The Hera series router provides a secure and reliable gateway to cellular networks, to enable
connectivity across your IoT devices, particularly in areas where wired internet is unreliable or
unavailable.
All Hera series routers are preconfigured before shipping, unless otherwise requested. You can make
changes to the configuration using an internet browser.
Using the web interface, you can:
•View connected devices in real-time
•Configure network connections, either using a setup wizard or manually
•Modify a variety of wireless network settings
•Configure port forwarding and port triggering
•Configure the Health Monitor to monitor network performance and maintain connectivity
•Manage the Hera configuration and upgrade the Hera software
•Configure clock synchronisation
•Update the Administrator password
Back up the Hera configuration before making changes to it.
1 Hera 604v5 Configuration Administrator Guide v1.0
About configuring the Hera series router

How to connect to the Hera
Connect to the Hera with an Ethernet cable or over WiFi.
Eseye may include a unique Configuration Information Sheet with each Hera Series Router. Use
this information to connect, log into, and configure the Hera. If the sheet is not included, your
service provider or reseller will advise you of the contents.
Connect using an Ethernet (wired) connection
•Use an Ethernet cable to connect from the Hera Ethernet port Link2 to a PCor laptop, either
directly or via an Ethernet switch.
Connect using WiFi
If there is no SSID information supplied, use a wired connection to the Hera Series Router.
1. Ensure the Hera WiFi LED is illuminated.
2. Search wireless networks on your WiFi-enabled device. Connect to the network that matches
the SSID.
3. At the prompt, type the WiFi username and passphrase exactly as supplied.
Logging in to the Hera Series Router
1. Using a browser on your device, type the supplied Web Interface IP into the address bar. For
example:
http://192.168.0.1
2. Press return.
3. At the prompt, enter the supplied credentials, then select OK.
The Hera Series Router web interface appears.
Configuring the cellular connection
The Hera is preconfigured to connect to a cellular network using an Eseye AnyNet SIM.
Hera 604v5 Configuration Administrator Guide v1.0 2
How to connect to the Hera

About the front panel indicators
LED State Description
Power Solid red Unit is powered, software is not operating
yet
Solid green Unit is powered and software is operating
normally
Flashing green in sync with another LED Error on the port that is also flashing
Flashing green independently after boot up
period
Internal error
Off No mains power or product failure
LAN Solid green – on LAN connection available
Flashing green (regular pattern) in sync with
Power LED
Error on the LAN port
Flashing green (irregular) Data transfer
Off No LAN connection available
WiFi Solid green – on WiFi connection available
Flashing green (regular pattern) in sync with
Power LED
Error on the WiFi port
Flashing green (irregular) WiFi data transfer
Off No WiFi connection available
WAN Solid green – on WAN connection available
Flashing green (regular pattern) in sync with
Power LED
Error on the WAN port
Flashing green (irregular) WAN data transfer
Off No WAN connection available
Signal Brief flash of red every five seconds No signal detected
Solid red Cellular signal strength WEAK
Solid orange Cellular signal strength MEDIUM
Solid green Cellular signal strength STRONG
Off The modem is off
3 Hera 604v5 Configuration Administrator Guide v1.0
About configuring the Hera series router

About the end panel connectors
Top panel functions
Function Front
panel
LED
Description
WPS WiFi Protected Setup (WPS) push button.
Hera 604v5 only. This function is no longer supported.
Reset Reset button. A single press reboots the Hera.
To perform a factory reset, power cycle the Hera and as you restore power,
press and hold the Reset button for 15 seconds.
WiFi 1 WiFi WiFi antenna port 1.
For optional 802.11 WiFi.
For more information, see Configuring the Wireless Network on page18.
WiFi 2 WiFi WiFi antenna port 2.
We recommend you always install both supplied antennas in order to
optimise performance.
For information about configuring 2x2 MIMO (2T2R) on the Hera, see
Configuring the Wireless Network on page18.
SIM1 Cellular Slot for the first SIM card. SIM size: Mini (2FF) 25 x 15 x 0.76 mm. For more
information, see Configuring the Hera to use a SIM on page21.
If you are using a 3FF/4FF adapter for your SIM card, ensure that the
card is correctly seated within the adapter. This prevents the SIM
card from catching on the Hera socket when you eject the SIM card.
SIM2 Cellular Slot for the second SIM card. SIM size: Mini (2FF) 25 x 15 x 0.76 mm. For more
information, see AnyNet SIMs in the online help.
Service For engineering use only. A service serial port that enables CLI access to the
Hera.
Hera 604v5 Configuration Administrator Guide v1.0 4
About configuring the Hera series router
Function Front
panel
LED
Description
Primary Signal Primary transmit (Tx) and receive (Rx) cellular antenna port.
We recommend you attach both supplied antennas for improved
connectivity. The signal quality is always dependent on the
environment.
Rx Div Signal Diversity receive antenna connector.
The Hera has a Cat 6 LTE module that can fallback to 3G. In 3G mode, this is an
Rx-only antenna, which improves the receiving signal quality.
In LTE mode, this antenna provides Rx and Tx diversity for improved
connectivity, or Rx and Tx LTE MIMO for improved throughput.
Using both cellular antennas enhances signal performance while also reducing
interference. For optimal signal strength, mount the antennas high up and as
far away from the Hera and each other as possible.
For information about the front panel LEDs, see About the front panel indicators on page3.
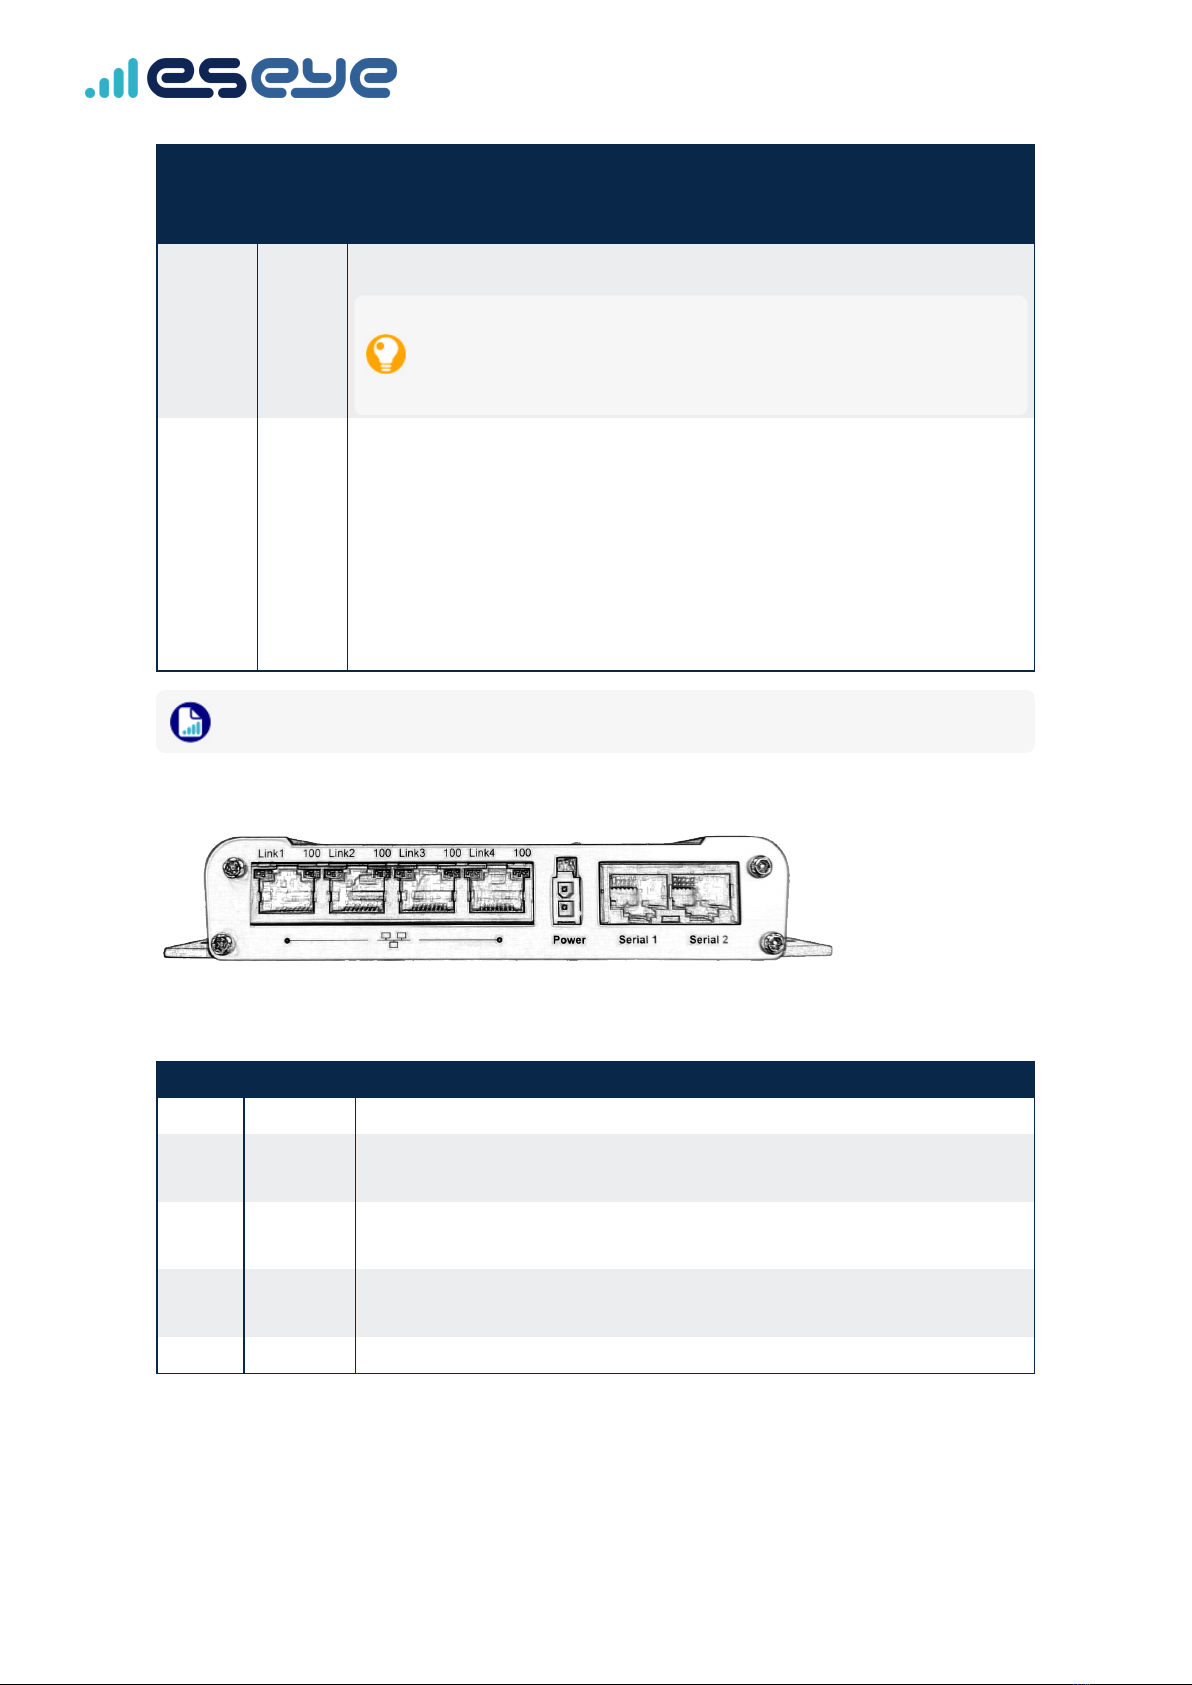
Bottom panel functions
Link indicators
LED State Description
None The port connection is not available.
Orange Solid – on The Ethernet cable is attached between the Hera and the Ethernet client
device. The port is available and can transfer data.
Flashing
(irregular)
Port data transfer.
Green Solid – on When the orange Link LED is on, indicates the maximum data rate is 100
Mbps.
Off When the orange Link LED is on, indicates the maximum data rate is 10 Mbps.
5 Hera 604v5 Configuration Administrator Guide v1.0
About configuring the Hera series router
Available ports
You can use one or more ports as the Ethernet LAN.
For information about setting up an Ethernet WAN port, see Configuring the Ethernet WAN on page23.
While you can set up any Link port as the Ethernet WAN port, we recommend you use Link 4 for
this purpose.
Should you require additional LAN or WAN configurations, contact Support.
Function/Port Description
Link1 Ethernet Local Area Network (LAN) port 1.
Link2 Ethernet LAN port 2.
Link3 Ethernet LAN port 3.
Link4 Ethernet LAN port 4.
Power The power connector. For power specifications, see the 8823 Hera 600v5 Series
Router Datasheet in the About this guide on pagevi section.
Serial 1 RS-232 serial port 1.
Serial 2 RS-232 serial port 2.
Hera 604v5 Configuration Administrator Guide v1.0 6
About configuring the Hera series router
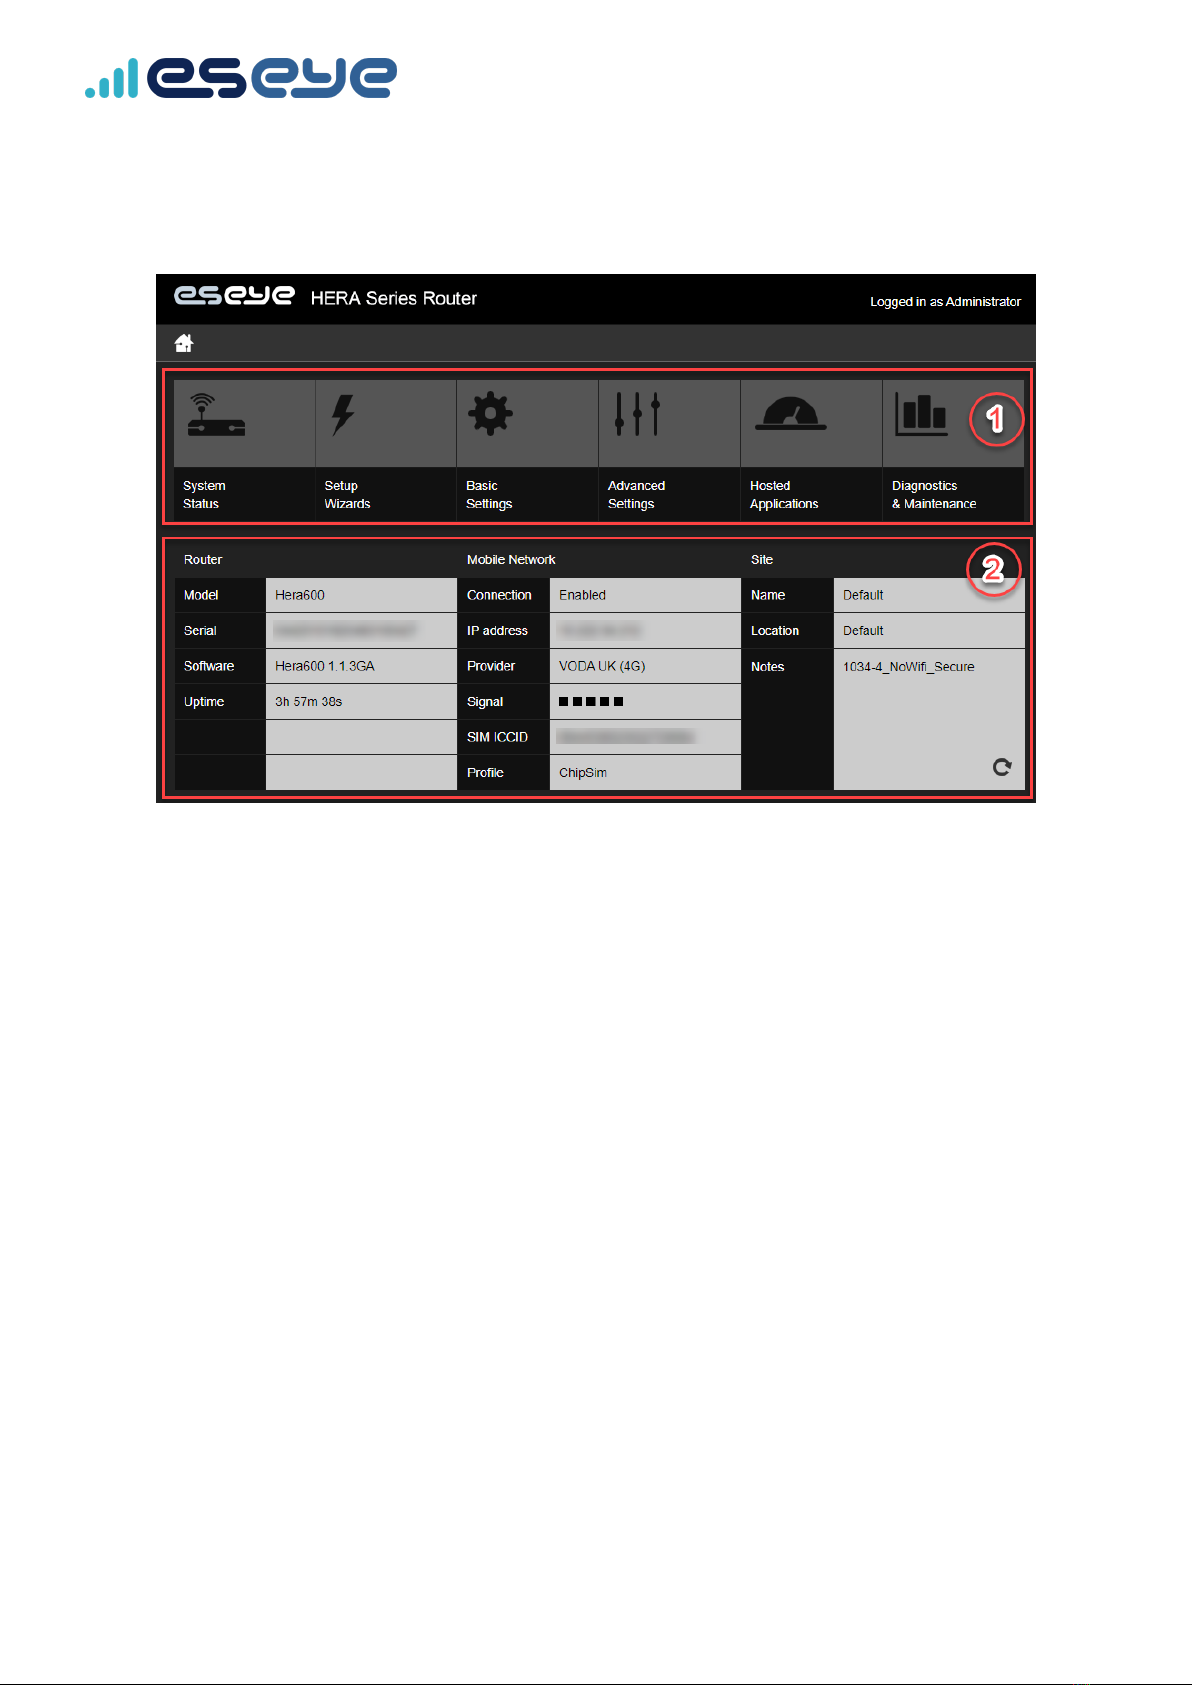
Using the Hera series router web interface
The Hera series router welcome page is divided into two sections:
1. Lists different menus for configuring the Hera:
•System status – for read-only information detailing the router settings, LAN, mobile
network, and connected devices.
•Setup wizards – to help you configure cellular and Ethernet connections, and the Health
Monitor to maintain these connections.
•Basic Settings – to configure router, LAN, wireless network, mobile network, Ethernet
WAN, routing and security settings.
•Advanced Settings – for lower-level configuration access to the router.
•Hosted Applications – to enable and configure supplied applications for connecting to
the cloud, Serial to IP, Modbus to MQTT, or configuring and managing your own
applications.
•Diagnostics & Maintenance – for configuring the Health Monitor, creating backups and
uploading software, configuring the Network Time Protocol (NTP), changing the
password, resetting or restarting the router, and data logging.
2. Lists real-time information regarding the specific Hera you’re administering, including the
current cellular connectivity status.
7Hera 604v5 Configuration Administrator Guide v1.0
Using the Hera series router web interface
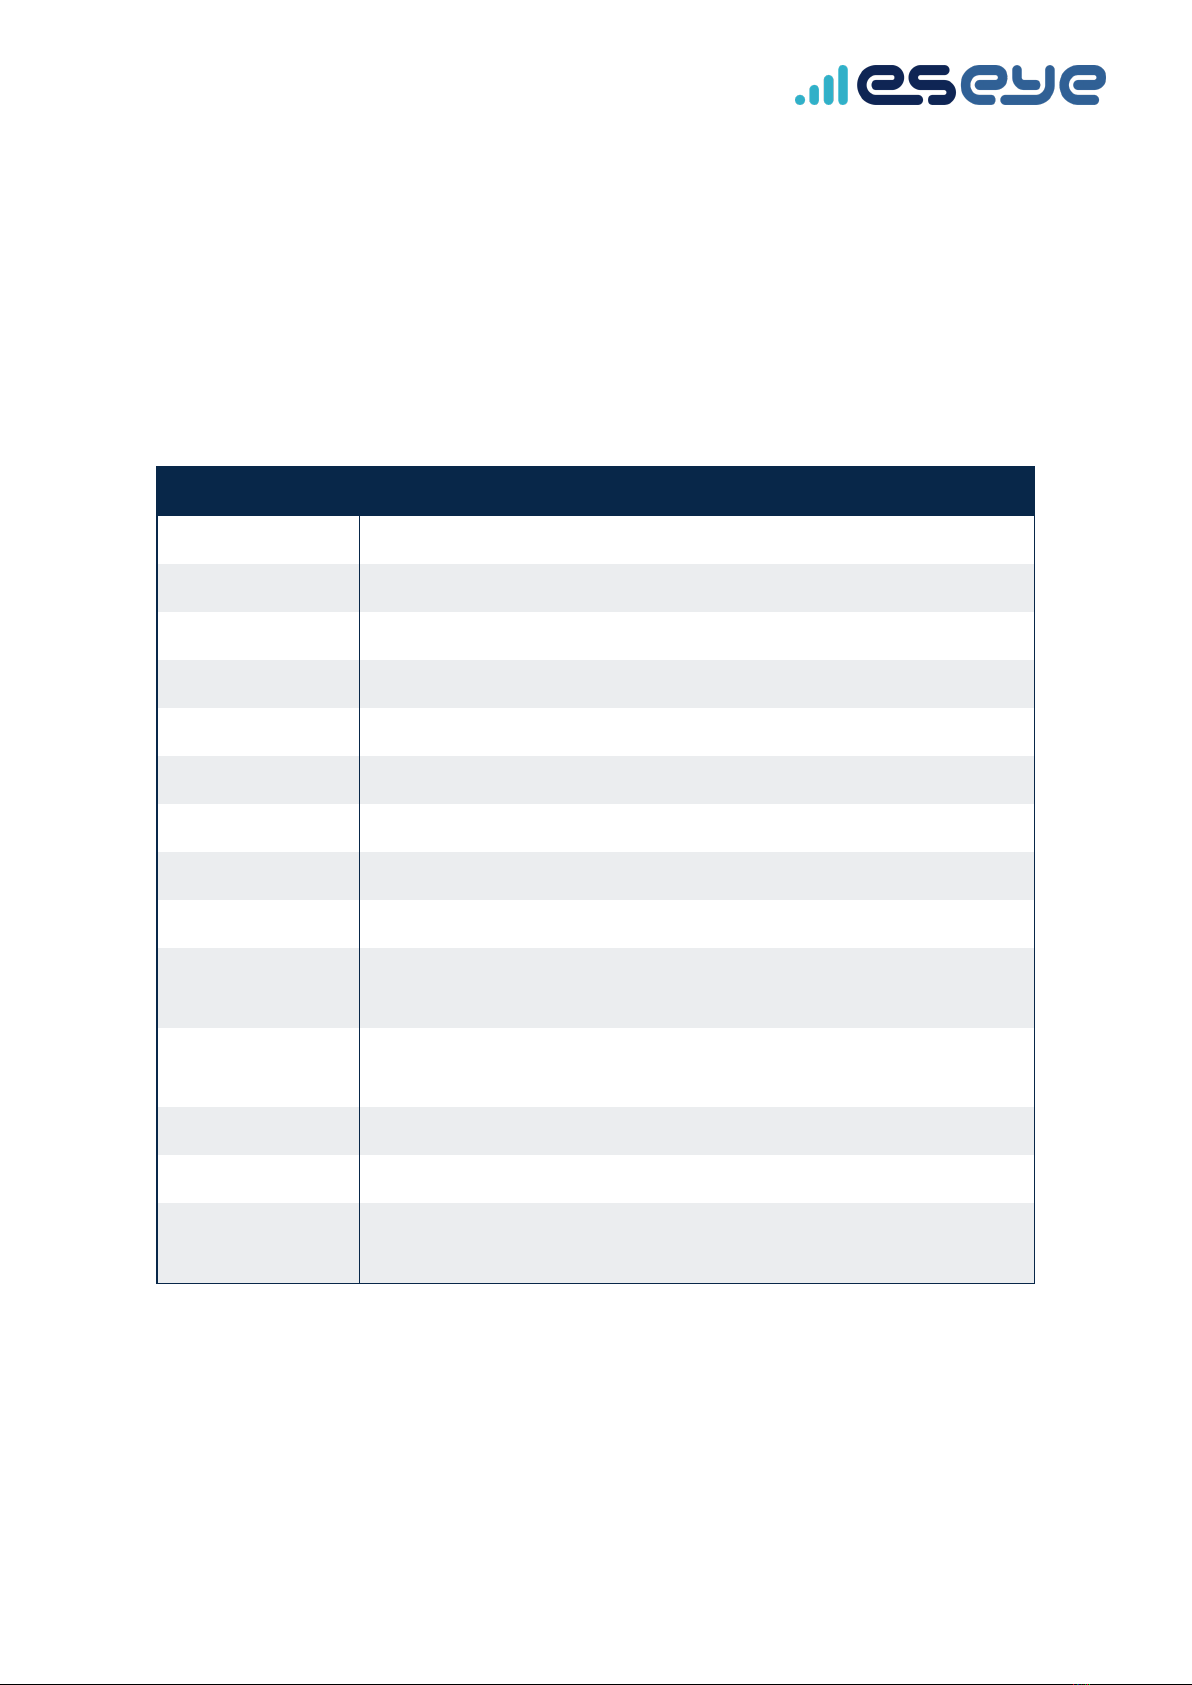
Viewing the System Status
You can view the current system status settings for the Hera. These properties are read-only.
Router
Describes general router information.
You can edit some basic router settings here:
Basic Settings >Router >Name and location
Property Description
Model The Hera Router series.
Serial number Unique identifier for the current Hera.
Software version The current software release version installed.
Hostname Assigned network hostname.
Firmware version The currently installed firmware release version.
Kernel version The currently installed kernel version.
Local time The current time, local to the Hera.
Last restart Date and time stamp of the last boot up session
Uptime Duration of the current Hera session.
Load average Router performance trends over the past minute, five minutes, and fifteen
minutes.
GPS The current GPS location, if the device hardware supports this function, and
if GPS is enabled.
Site name A user-defined setting to describe which Hera you are remotely logged into.
Site location A user-defined setting to describe where the current Hera exists.
Notes A user-defined setting containing any notes about the current Hera. For
example, the file name of the factory configuration file stored in subversion.
Hera 604v5 Configuration Administrator Guide v1.0 8
Viewing the System Status

Local area network (LAN)
Describes the current network settings. You can edit the LAN settings here:
Basic Settings >Local Area Network (LAN)
Property Description
LAN IP address The assigned Local Area Network IPv4 address.
Net mask The IPv4 subnet mask.
Address assignment How the address was assigned:
•STATIC – manual configuration
•DHCP – automatic configuration from a DHCP server on the LAN
Mobile network
Describes the current cellular network connection. You can edit Mobile Network settings here:
Basic Settings >Mobile Network
Property Description
Mobile connection Select the slider to Enable or Disable the cellular connection.
IMEI The unique 15-digit International Mobile Equipment Identity serial number
that identifies the device on the cellular network.
Active SIM Which SIM is currently in use. The Hera can have up to three SIMs installed.
For more information, see Configuring the Hera to use a SIM on page21.
IMSI of active SIM The current International Mobile Subscriber Identity number in use on the
connected SIM. For information about multi-IMSI SIMs, see Understanding
multi-IMSI functionality in the online help.
ICCID of active SIM The current Integrated Circuit Card Identifier in use on the connected SIM.
For more information, see eUICC overview - ICCID and IMSI in the online
help.
Mobile network
provider
The network operator for the network where the current SIM is subscribed.
Mobile network IP
address
The Hera's current network IPv4 address.
Mobile network
signal
Mouse over the signal strength indicator to see the current strength in
decibels. Signal strength ranges from approximately -30 dBm (very strong) to
-110 dBm (very weak).
9 Hera 604v5 Configuration Administrator Guide v1.0
Viewing the System Status

Property Description
APN The current Access Point Name used to connect the Hera to the network. For
more information, see About Access Point Names (APNs) in the online help
Connected devices
Lists any devices that are locally connected via a TCP/IP network to the Hera. You can view the
following attributes:
Property Description
IP address The assigned IPv4 address for the connected device.
MAC address The connection Media Access Control address.
Device The internal device name through which the connection is provided.
Hera 604v5 Configuration Administrator Guide v1.0 10
Viewing the System Status

Using the Setup Wizards
The Network connection Setup Wizard helps you to configure your network settings in one place.
You can access the wizard here: Setup Wizards >Network connection
Use the wizard to configure any of the following connection types.
Configuring a cellular connection
To set up a cellular connection using preconfigured settings:
1. Select Cellular connection, then select OK.
2. On the Set up the connection page, select Keep the existing user profiles to keep the listed
preconfigured SIM profiles.
Eseye preconfigures your SIM profiles for you, unless you request otherwise.
3. Select OK.
4. Configure the Health Monitor, selecting OK when you have completed each page.
All Health Monitor features ensure connectivity is maintained where possible.
Leave a numeric field blank to disable the particular check.
For more information, see Configuring the Health Monitor on page32.
5. On the Finish page, select Save to commit your changes to the Hera.
6. Select Exit Wizard to return to the Setup Wizards menu.
Configuring an Ethernet connection
To set up an Ethernet connection using preconfigured settings:
1. Select Ethernet connection, then select OK.
2. On the Set up the connection page, configure the Ethernet connection.
For more information, see Ethernet WAN Configuring the Ethernet WAN on page23.
3. Select OK.
4. Configure the Health Monitor, selecting OK when you have completed each page.
All Health Monitor features ensure connectivity is maintained where possible.
Leave a numeric field blank to disable the particular check.
For more information, see Configuring the Health Monitor on page32.
11 Hera 604v5 Configuration Administrator Guide v1.0
Using the Setup Wizards

5. On the Finish page, select Save to commit your changes to the Hera.
6. Select Exit Wizard to return to the Setup Wizards menu.
Configuring a cellular connection protected by an
Ethernet connection
To set up a cellular connection protected by an Ethernet connection using preconfigured settings:
1. Select Cellular connection protected by an Ethernet connection, then select OK.
2. On the Set up the connection – 1 of 2 page, select Keep the existing user profiles to keep the
listed preconfigured SIM profiles.
Eseye preconfigures your SIM profiles for you, unless you request otherwise.
3. Select OK.
4. On the Set up the connection – 2 of 2 page, configure the Ethernet connection.
For more information, see Ethernet WAN Configuring the Ethernet WAN on page23.
5. Select OK.
6. Configure the Health Monitor, selecting OK when you have completed each page.
All Health Monitor features ensure connectivity is maintained where possible.
Leave a numeric field blank to disable the particular check.
For more information, see Configuring the Health Monitor on page32.
7. On the Finish page, select Save to commit your changes to the Hera.
8. Select Exit Wizard to return to the Setup Wizards menu.
Configuring an Ethernet connection protected by
a cellular connection
To set up an Ethernet connection protected by a cellular connection using preconfigured settings:
1. Select Ethernet connection protected by a cellular connection, then select OK.
2. On the Set up the connection – 1 of 2 page, configure the Ethernet connection.
For more information, see Ethernet WAN Configuring the Ethernet WAN on page23.
3. Select OK.
4. On the Set up the connection – 1 of 2 page, select Keep the existing user profiles to keep the
listed preconfigured SIM profiles.
Eseye preconfigures your SIM profiles for you, unless you request otherwise.
Hera 604v5 Configuration Administrator Guide v1.0 12
Using the Setup Wizards

5. Configure the Health Monitor, selecting OK when you have completed each page.
All Health Monitor features ensure connectivity is maintained where possible.
Leave a numeric field blank to disable the particular check.
For more information, see Configuring the Health Monitor on page32.
6. On the Finish page, select Save to commit your changes to the Hera.
7. Select Exit Wizard to return to the Setup Wizards menu.
13 Hera 604v5 Configuration Administrator Guide v1.0
Using the Setup Wizards
This manual suits for next models
1
Table of contents
Other ES EYE Network Router manuals


