Escapod TOPO Series User manual

Escapod Essentials Manual
Original TOPO Series
—
TONGUE
●Trailer comes standard with a 2” ball coupler unit with a ⅝” hitch pin which connects
the coupler to the open receiver. Additionally, you can opt to add an anti-rattle
tightener to your setup to ensure a secure and quiet tow. There’s also a ¼” pin for the
coupler latch. You may want to thread the trailer wiring harness through this ¼” pin to
keep it from dragging on the ground when connecting to your tow vehicle. For optimal
maintenance, wipe any debris o your hitch ball and grease the hitch ball before every
trip.
●Chains are attached to the tongue of the trailer now instead of just to the coupler so it
is easier to remove the coupler for security purposes and ensure that if any trailer
disconnect happens you have a safety backup that is securely attached to the trailer
body. For increased security, you may opt for a locking hitch pin: CURT 23518 Black
Trailer Hitch Lock,Master Lock 377KA Trailer Hitch Lock.
●Trailer comes standard with a 10” jack stand, and a 15” version for those with our
Freeride Suspension Upgrade. You can add blocks underneath the foot of the jack if
necessary, based on the terrain of your campsite.
●VIN & info plates are on the A-frame arms of the tongue for reference. One plate lists
the gross vehicle weight rating (GVWR), rim size, tire size, and suggested cold PSI for
your tires. The other plate lists the VIN and date of manufacture. For models after July
2021, the VIN plates are consolidated into one plate located on the passenger side of
the A-Frame.
●The tongue box and storage deck are firmly bolted to the frame with galvanized
hardware and lock washers, which should be torqued occasionally (hand tighten bolts
and ensure that the lock washer is fully compressed) to ensure a properly secured
load. Both storage options sit atop an A-frame tongue construction made out of 3/16”
square steel tube. The base weight of one battery is ~75 lbs. Additional batteries or
storage can be added until you reach the maximum recommended load capacity of 250
lbs.
●Older frames are powder-coated and reinforced with Raptor bed liner in high-impact
areas, which you can touch up with a two-part Raptor aerosol as needed. Newer
frames are galvanized, which coats the inside and outside of the frame with molten
zinc to protect from rust.
1

Batteries
●Interstate Lead Acid Batteries
o Single: 12V battery (88 AmpHours)
o Double: two 6V batteries (225 AmpHours)
o Avoid storing the battery at a low charge (re-charge after each trip)
o Charge fully at least every two months
o Charge fully a few days prior to a trip in case you need a replacement battery
o Charge the battery until full (all bars lit up or 13.2+V on the indicator - this will
vary depending on what device is providing the reading).
o Take the battery o charge for at least half an hour, then check the voltage.
12.7+ and you’re good to go with a full charge!
●Prior to fully disconnecting and removing the batteries for maintenance or
replacement, please unplug the solar panel to prevent a solar panel controller error.
●On/O disconnect switch is located in the battery area of the tongue box, or on top of
the plastic battery box if you don’t have a tongue box. For customers with the Xantrex
power inverter, it is located in the headboard storage compartment. Turn the switch to
green when in use. When powering down the entire system, you can turn the switch to
red to leave o while in transit to save power (charge from solar will still flow into the
battery during transit). Switch must be in the “on” position when charging through the
shore power port.
●Cables: positive, negative, & grey duplex (solar). The solar panel is wired separately and
charges the battery. The solar controller is behind the cutting board in the galley.
Check battery terminals for secure fit before each trip, and ensure no corrosion is
forming at the site of the connection.
●If you choose to switch to a dierent battery type (AGM/Lithium), you’ll need to verify
that all components are compatible: battery chargers, solar controllers, fittings,
terminal connections, etc.
Air compressor
●Our Air compressor is a low-maintenance unit that comes with a simple on/o switch,
a ½ gallon tank (used for things that require a blast of air, like seating tubeless
mountain bike tires). Max pressure on the unit is 150 PSI, and when in the on position
the compressor will shut o once fully pressurized. The fuse for this unit is an on-wire
fuse located under the black cap on the rope wire. If the unit isn’t working, check for a
blown fuse, and replace if necessary.
2

EXTERIOR ELEMENTS
●Keys - Doors - Purple keys for both the handle lock (on the handle) and the dead bolt
(on the handle frame)
●Keys - Tongue Box - number varies & should match the lock face
●Keys - Galley T-Handle - number varies & should match the lock face
●Keys - Rhino Rack cross bars - number varies & should match the lock face
●Windows have weep holes at the bottom as a water management system. Starting with
trailers built in September 2021, Escapod installs a custom gasket into the window
track to improve water-tightness. This makes closing the windows a little more
dicult, so be sure to press down until you hear an audible “click” indicating the
window levers are engaged & locked in place. If windows are not fully closed, water
may enter the trailer. For trailers built prior to September 2021, it may be helpful to
drive slower when traveling at speed in rain or snow and/or add towels behind the
doors for any excess water that may overwhelm the system due to the negative
pressure created inside the cabin when travelling at speed.. *If you have a trailer built
before September 2021, reach out to support@escapod.us to receive your
complimentary window gasket.
●Fenders are coated with Gardit, which is a more durable coating than powder for areas
like this that experience high exposure to road debris
●Regularly Inspect your tires for damage, uneven wear, and adequate tire pressure.
Check the sidewall of your tire for the manufacturer recommended PSI, and use this
setting as the max pressure. With the lighter weight of the trailer you can choose to
run the tires at a lower PSI if desired.
●Grease wheel bearings once a season:
○To do this yourself you’ll need an allen wrench to remove the hubcap and a
grease gun. Pick these up at your local hardware or auto parts store.
○YouTube - How to Get Your Escapod Adventure Ready
●It is important to tighten the lug nuts in a star pattern (12 o’clock then 6 o’clock, 2
o’clock then 8 o’clock, 10 o’clock then 4 o’clock) with a 19 mm, thin-walled socket and
atorque wrench set to 100 ft.lbs. after the first 200 miles and/or the first drive, and
then at least every 2,000 miles and at least once per season.
●Rear stabilizers
○Make sure to put them up before travel
○Hand-crank comes with your trailer and can be found in the cabin or tongue
box. A 19 mm impact driver is faster than the 3/4” hand crank, if you’re looking
for an optimal solution.
○24” of extension (c-jack stabilizers) gives you an available 4”-6” of trailer lift on
each side depending on suspension option. 30” of extension (ARK stabilizers)
gives you an available 10”-12” of trailer lift on each side depending on
suspension option.
3

○Adding blocks below the feet oers a wider, more stable base
○Each stabilizer is rated to 3,000 lbs.
○We recommend using wheel chocks in addition to stabilizers for extra security.
FREERIDE SUSPENSION
●Steel trailing arm style suspension with a pre-loaded spring and integrated shock
manage compression & rebound.
●Damped travel of up to 4.5" of independent movement on each wheel.
●See below for the maintenance schedule required for suspension. This suspension
system performs incredibly well when maintained, but neglect can lead to serious
performance and safety issues.
Suspension Maintenance Schedule
Item
Function Required
Every
Use
3 Months
or 3,000
Miles
6 Months
or 6,000
Miles
Suspension
Alignment*
Visually inspect for wheel straightness
X
Brakes
Test that they are operational
X
Trailer Brake
Wiring
Inspect wiring for bare spots, fray, etc
X
Tire Inflation
Pressure
Inflate tires to mfg's specifications
X
Tire Condition
Inspect for cuts, wear, bulging,
screws/nails, etc
X
Wheel Nuts
and Bolts
Tighten to specified torque values*
X
Suspension
Parts
Inspect for bending and wear
X
Suspension
Bolts
Inspect for loose fasteners
X
4

Extreme Duty
Bushings
Pump grease into zerk fitting
X
Brake Magnets
Inspect for wear and current draw
X
Brake Linings
Inspect for wear or contamination
X
Hub / Drum
Inspect for abnormal wear or scoring
X
Wheel Bearings
and Cups**
Inspect for corrosion or wear. Clean and
repack bearings with grease.
X
Seals
Inspect for leakage. Replace if removed.
X
Springs
Inspect for wear, loss of ride height
(measure distance to bump stop)
X
Hangers
Inspect welds
X
Wheels
Inspect for cracks, dents, or distortion
X
*For a detailed guide about how to check & maintain the alignment of your Freeride
Suspension, please click here.
**For a detailed guide about how to properly lubricate your bearings, see page 52 of Dexter’s
service manual.
*Suspension Torque Specifications
Fastener
Torque Spec.
Axle Bolts (Torsion)
150 foot-pounds
Upper Shock Bolt
60 foot-pounds
Lower Shock Bolt
60 foot-pounds
Control Arm Hanger Bolt
60 foot-pounds
Spindle Bolt
180 foot-pounds
Wheel Lug Nuts
100 foot-pounds
CABIN INTERIOR
●Always have the exhaust fan at least cracked open for ventilation when inside even
when it’s cold or the weather is bad. When it’s cold out, you may want to keep a towel
handy for condensation that develops around the stargazer window. Leaving the fan on
5
a low exhaust setting will help manage condensation as well (note: all trailers in 2020
and beyond are unidirectional and only operate as exhaust fans). If you hear squeaking
from the fan, we recommend running it on high for 12 hours to loosen the bearings,
(even the highest setting won’t solely run down your battery overnight).
●Angled headboard for ergonomic recline includes:
o Four standard USB ports
o One 12V cigarette style charger
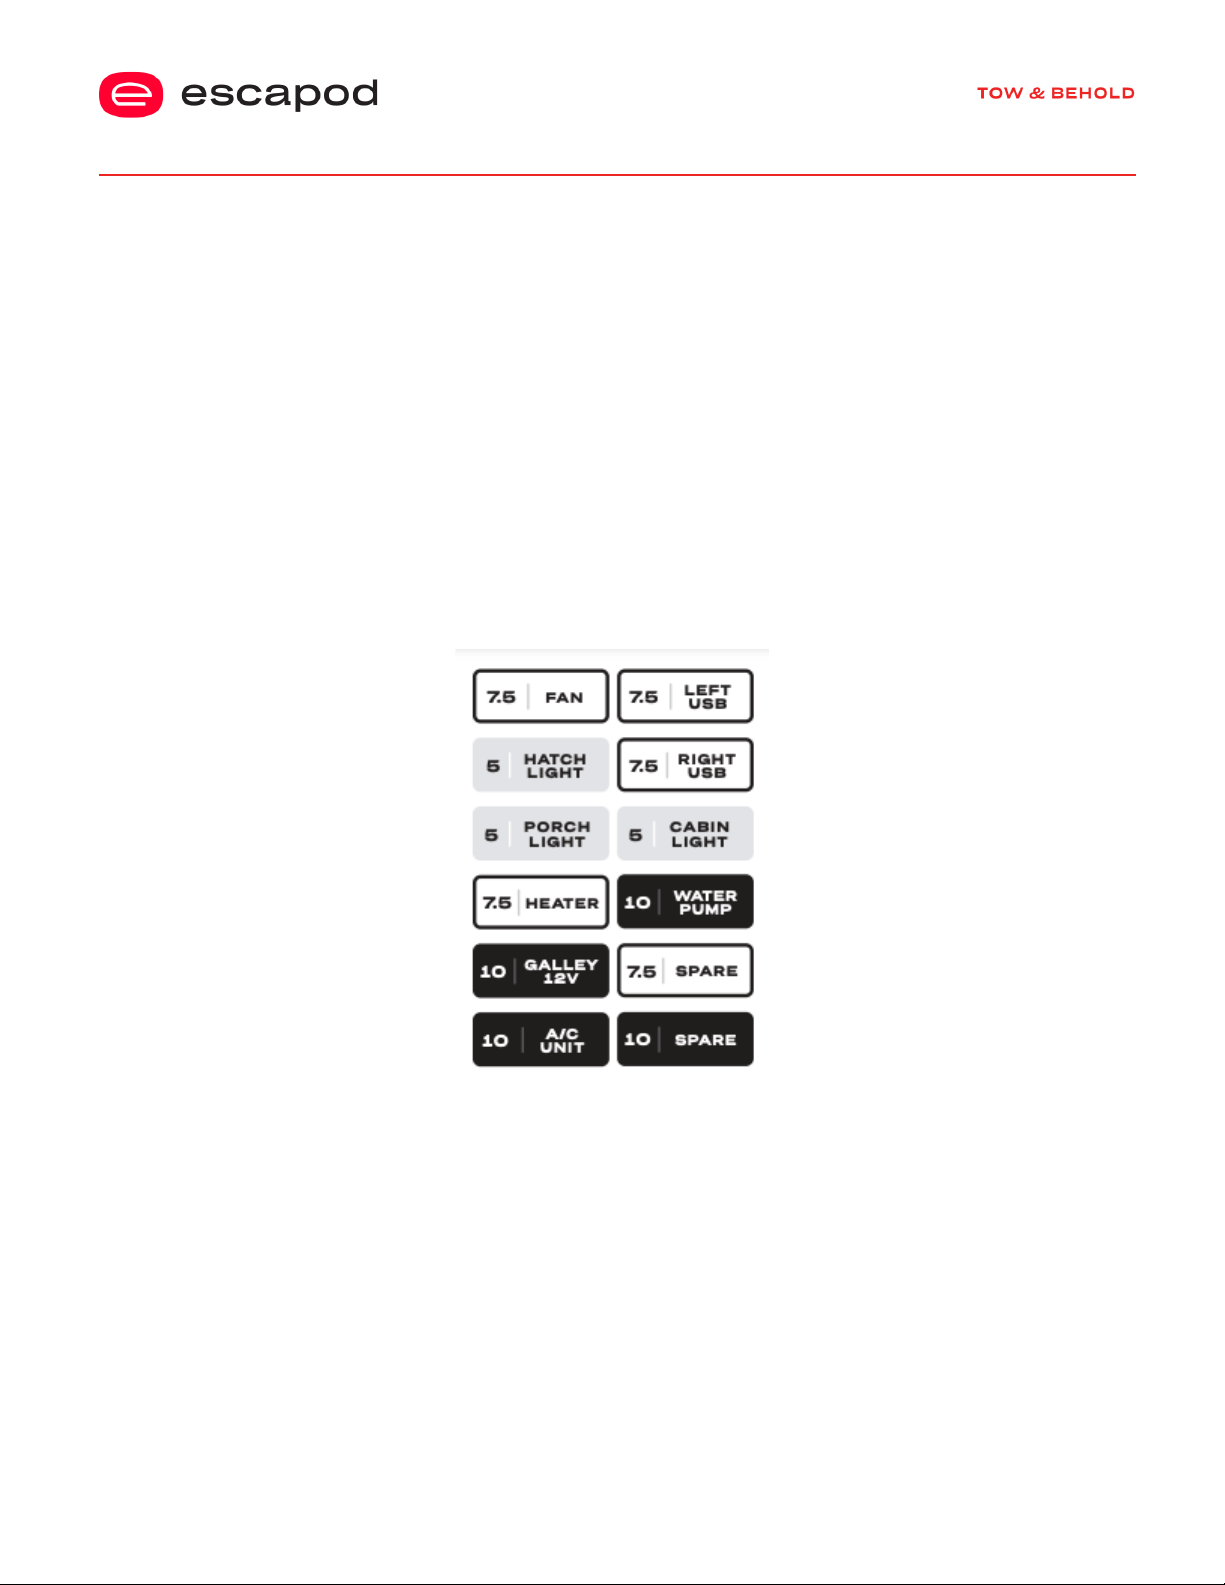
o Fuse block (Standard ATO Fuses):
▪ Error alerts - check for a broken fuse if there are electrical issues
▪ To replace a fuse, just pop o the front, remove the fuse, and replace
▪ 12V/USB are the most common to blow if overloaded
▪ Fuse block layout:
*Please note, trailers prior to September 2021 may have had a 7.5 Amp fuse. We recommend
changing that to a 10 Amp fuse for increased water pump reliability.
●Interior lighting is controlled by the wall-mounted remote, which has settings ranging
from 10% - 100% brightness. Low settings of 2% light can be achieved by hitting the
10% button, then continuing to hit the minus button until the lowest setting is
achieved.
●Wall-mounted light switch controls both porch lights in a single on/o position.
●When storing items in the cabin interior It’s best to pack your gear tightly in one place
at a time to reduce rattling in transit. Then you can always reorganize at base camp!
●Make sure cabinet door knobs are pressed in (to the “locked” position) before travel.
6

Heater
●Propex Manual is included with this option, along with the Propex Thermostat Manual.
●Refer to page 7 of the Propex HS2000 manual for common fault codes.
●Heater will operate as fan alone or on heat setting (blue flame icon).
●Blue/red gauge sets desired temperature - turn to full red when starting
●Air starts first while it checks the temperature
●Green light illuminates when heater is activated
●Red = error (flashes are code for the type of error)
●To reset the device to dismiss an error code, start the dial at 12 o’clock and rotate
clockwise as far as you can, then back to 12 o’clock, then repeat this cycle one more
time. After two cycles the red error button should stop flashing and you can re-start.
Inverter
●If you have the Xantrex Freedom XC 1000W Inverter Manual you will have a printed
manual in the drawer in your galley. You can view a digital version by clicking here.
●The display of the Xantrex oers a LCD screen with navigation buttons to the right
●There are three dot lights to the right of the screen: 2 green and 1 red
●Top green dot light indicates shore power is being pulled from the exterior plug
●Middle green dot light indicates power is being pulled from your on-board battery
●Bottom red light indicates an error
●There are four buttons to the right of the screen (note: these rectangular buttons are
unrelated to the dot lights to the left of them)
●Top button is ‘ESC’ which will default the LCD back to the home screen
●Mid button is ‘^’ arrow that allows you to navigate options
●Bottom button is ‘OK’ selector button
●Lowest circular button is your ON/OFF button
●Breaker switches are installed to the left of the unit, and can always be left in the ON
position, even when the unit is o. If you see one of the breakers in the OFF position,
check your system for errors, reset, and try again.
●To charge your trailer through the shore power port, the master power switch (red
knob) must be in the “on” position (arrow pointing toward green). Breakers should be in
the “on” position as well.
●Turn o the unit when not in use. This is useful for power conservation as well as to
limit the noise of the unit when it’s function is not needed.
Air Cooling
●If you have the Fresair S7i you will have a printed manual in the drawer in your galley.
You can view a digital version by clicking here.
●The 4 buttons on the unit are as follows:
7

o Fan ON/OFF - This turns on the fan only
o Water ON/OFF - This activates the pump to add cooling water to the system. If
this button is turned o, your unit simply operates as a fan to circulate air.
o Dome light ON/OFF
o Change fan speed (5 speeds)
●Indicator lights illuminate when the water is low, when the pump is ON, and when the
fan is ON
●Water fill/drain opposite of the water system. Right = OUT, Left = IN - opposite of the
main water system
●To winterize this system, first you’ll need to drain the water from your system. Simply
run the unit until the low water indicator comes on and both pumps automatically
shut o. This is recommended when your Fresair will not be in use for an extended
period of time. Any temperatures that are sustained below freezing risk damage to the
unit if the tank contains water.
NOCO Battery Charger
●If you have the NOCO Genius 10 Onboard Battery Charger you will have a printed
manual in the drawer in your galley. You can view a digital version by clicking here.
●Just plug your trailer into the shore power port on the driver’s side using a standard
extension cord.
●The unit has a display that shows when it is charging.
●A graduated bar chart lights up according to battery level
●All standard batteries that come with the Escapod should be charged on 12V mode (our
single and double battery systems are wet/flooded)
●If you upgrade aftermarket to an AGM, Lithium, or other battery type, please consult
the manual for the proper settings
GALLEY
Hatch
●Check that cam latches are parallel to trim prior to closing, and that there are no
items on the counter too tall or long for the hatch to clear. This protects your locks,
trim, personal items, and the Baltic birch that composes the ceiling of the hatch.
●These cam latches are the locking mechanism of the t-handles on each corner of the
hatch. Should these get bent or loosen with time adjustment or replacement may be
necessary. To adjust, simply loosen the screw, adjust position, and tighten the screw
into place. Overtightening may strip the fitting. Additionally, using a small drill bit to
8

pilot a hole for the screw once the proper adjustments have been made can ensure no
future movement of the latch.
●90 pound gas struts assist with opening the hatch and provide a soft close (after a few
years grease may need to be replaced).
Table
●The large cabinet face in the galley doubles as an adjustable table, easily removed
from the galley and set up on either side of the trailer.
●The table mounts at a 45-degree angle into the mounted channel and is then lowered
into position (do not attempt to mount the table into the channel by sliding in any
direction).
●The table has two mounting positions
o One counter height o the fender on the driver side (better for prep work and
dishwashing)
o One table height o the rear passenger wall (great for dining)
●The mounting channel is made of aluminum, which won’t rust, but is a soft metal, and
if anything is forced in the mounting process you may bend it. As a general rule, if it
doesn’t mount easily then it’s not properly aligned. Abort, and try again.
Cabinet construction
●All cabinet dividers feature a mortise & tenon construction, using additional fasteners
only as reinforcements. This makes for an incredibly durable structure.
Stove
●One 6,000 BTU (British Thermal Unit) burner & one 8,500 BTU burner
●To ignite, make sure the propane tank is fully open. Press & hold knob down, turn to
the flame icon on the left, then click the ignitor button until the flame ignites (may
need to hold the knob down for a few seconds to ensure the flame holds)
●Always turn the propane tank o when not in use, and if you smell propane gas at any
time, check for leaks and discontinue use until the leak is resolved.
●The ignitor is powered by a AA battery which is located behind the drawers, and will
need to be replaced if you do not hear an audible *click, click, click* upon pressing the
button (see ‘Drawers’ below to access this area).
YETI
●Bear-resistant, Yeti Tundra 65L cooler included
●Drain on the right side should be hand tightened before loading.
●If melt water accumulates, the cooler should be removed from the galley temporarily
and be drained.
●Locking drawer slides can support up to 500 pounds
o Press down yellow levers to release the lock and slide the cooler drawer out.
9

o Make sure yellow levers are fully depressed as you guide the drawer back in so
it doesn’t slam the lock closed, which can lead to broken compontry over time.
Drawers
●To remove drawers, and access the ignitor battery for the stove you’ll need to locate a
small black lever on the middle exterior of each slide. Pull up on the left side and push
the right side down to unlock and remove the drawer.
●The ignitor battery will either be mounted to the floorboard or on top of the heating
unit (if you have one). If the ignition switch on your stove is not *clicking* when
pressed, you’ll need to replace this battery with a new AA.
Packing the Galley
●It’s best to pack your gear tightly in one place at a time to reduce rattling in transit.
Then you can always reorganize at base camp! Also consider purchasing some bins for
galley storage or surface protectors to limit scung or scratching from harder
materials.
SOLAR PANEL & CONTROLLER
Lightleaf Solar Panel
●Lightleaf panel mounts onto the back hatch of your TOPO Series trailer.
●Make sure the mounting knobs are turned to hold the panel in place while driving.
●You can add a mini padlock to the center toggle latch for security
●12’ extension cord allows you to park in the shade and use the kickstand to set the
solar panel up in the sun
●Daisy-chaining additional panels is not recommended because it can overwhelm the
solar controllers, which are designed for 10 amps.
Solar Controller
●Either the Zamp Solar Controller or Renogy Wanderer Solar Controller is included with
your solar panel
●Renogy Wanderer Solar Controller Manual or Zamp Solar Controller Manual will be
provided
●Unit is mounted in the rear galley cutting board compartment
●If you need to remove the gray wire from the batteries on the tongue, be sure to
unplug the panel prior to doing this for risk of triggering an error code on the solar
controller (known to cause permanent issues with Renogy controllers).
●Renogy Controller:
10

o Built-in voltage meter (ranges from 11.6V-12.8V)
▪ 12.6+ = 100%
▪ 11.9V ~ 20-30%
▪ 11.6V = dead battery
o The display cycles between your voltage meter and how many amps the solar is
charging the battery with, also shows errors
WATER SYSTEM & SHOWER
●“Come right on in, don’t be left out!” - R side is water in (fill); L side is water out (use)
●Valves:
o Perpendicular to the PEX pipe is the OFF position
o Parallel to the PEX pipe is the ON position
o Be sure these are closed when not in use, especially before travel
●Switch - this is only needed when using water output (left side), and not when filling
up. Be sure you know where the water will come out before flipping this on!
●BPA-free hose comes with the trailer
o Quick connects on both sides
o Can remove the quick connect on the end with the thicker collar to connect to
standard hose bib on house/building/campground to fill your tank
●You’ll know the tank is full when water begins to flow out of this tube. Overflow tube
is located under the fender. It is possible to “overfill” the tank, so as soon as water
starts coming out of the overflow, simply turn o the flow, close the valve, and remove
the hose.
●If cold water is needed, connect the hose to the output (left) side, open the valve, and
turn on the pump. Hose will pressurize and then you can use the spray nozzle.
●If hot water is needed connect the hose to the output (left) side and then the other
quick connect end to the water heater ‘elbow’ quick connect fitting.
●If water is not flowing, first ensure that the left-side valve is parallel with Pex. If it is
and water is still not flowing, check your battery’s charge. If they’re charged, then
check the fuse. Fuse should be 10 amps (if your trailer has a 7.5 amp, you will want to
replace it with a 10 amp fuse)
Water Heater
●If you have the Gasland 6L Water Heater you will have a printed manual in the drawer
in your galley. You can view additional product information by clicking here.
●There is no ON/OFF switch on the unit. The ignitor kicks on with pressurized water into
the system.
●Propane tank needs to be open to utilize hot water function
11

●Flame knob adjusts water temperature
●Water drop knob adjust water pressure
●For hottest setting turn flame all the way up, and keep pressure low
●Snowflake/sun knob indicates a seasonal-use setting. The snowflake will give hotter
water as this is the “cold-weather” setting. The sun will give less warm water as this is
the “summer” setting. Takeaway: If you want hotter water, keep it set to the snowflake.
●Digital temperature reading at the bottom - water gets hot quickly, stay safe!
●Door Handle is a compression latch. To loosen, press handle in & turn counter
clockwise, then release. When closing, align the inner latch with the handle so that
they’re parallel and the inner latch is at the end of the screw. Push in while rotating
the handle 90 degrees clockwise. Once the handle has latched the door closed, release
pressure & continue to rotate the handle clockwise to compress the door against the
gasket, firmly sealing the compartment. If you’re having issues getting the door to
latch, rotate the handle counterclockwise until the latch is all the way to the end of
the screw.
●Don’t forget to fully empty the hose before storing by holding vertically and letting
gravity drain the contents.
●Always empty the water on cold nights to prevent freezing, which can expand and
crack the housing of your pump. You can use the passenger side rear stabilizer to jack
up the trailer to get all of the water out. This also works in warmer weather to get full
use of the 21-gallon tank by pushing the water towards the output pipes!
●You can fill the tank more fully by jacking up the trailer with the driver’s side stabilizer
as well, making full use of the tank capacity that exists above the fill pipe.
Winterization
●If you live in a 4-season climate, you’ll want to prepare your trailer for winter annually,
and de-winterize it for seasonal use in the spring, summer, and fall. In Utah, we keep
our trailers winterized from October through April.
o Blog & Video: How to Winterize Your Teardrop Trailer
AWNING & ANNEX ROOM
Awning
●Roam Awning Manual is found here only as a digital version.
●Care:
o When zipping up, place your index finger behind the zipper (with non-zipping
hand) to prevent fabric from catching in the zipper.
o Use zipper lube a few times per season to ensure smooth movement
o WD40 can be used to clean the zipper when debris builds up
●Setting up:
12

o This is best done as a two-person job
o Unroll the awning with one person holding each end
o Unfold the poles tucked into the end of the awning for vertical support. Extend
to desired height and give them a twist to lock in place (twist the bars
themselves, not the connection piece where the bars join).
o Unfold the horizontal poles on the trailer side and insert into the hole near the
outside hinge. Extend until the awning is pulled tight, then twist to lock. (be
sure to support the poles while extending into place, and don’t let them hang
unsupported. This could risk a break at the hinge point).
o Secure the upper arms to the awning with velcro straps.
o Stake down the awning to the ground using integrated guy-lines.
●Packing away the awning:
o Position one person to support the awning while poles are collapsed and folded
into the awning housing
o Once poles are packed away, have one person at each side to roll the awning
back up and into the vinyl case. Straps hold the awning in place while you zip
the case closed.
o Note: when rolling, be sure to keep consistent speed so as to maintain
alignment of the fabric with the awning ends, and keep black plastic pieces at
the end of the guy lines parallel with the end to avoid straining the fabric when
rolling up
Annex Room
●Remove the zippered front top portion of the annex and install onto the awning
housing (into the circular channel).
●Install the rear top insert into the circular channel on the trailer side housing of the
awning
●Extend annex towards front of awning and attach via zipper component, then use the
integrated straps to secure to the awning poles
●A separate rubberized floor attachment can be attached to the base of the annex room
via a zipper on all sides
●When mounting additional aftermarket products to the roof bars, simply pop o the
end caps and slide mounting hardware into the channel of the bar. Once the new
product is securely mounted (be sure to keep clearance for the fan to open!) simply
pop the cap of the bar back on and you’re good to go.
●Watch our set-up video here.
13

TENT
●If you have either the 55” or 63” FSR High Country tent you will have a printed manual
inside the shoe storage of your tent. You can view a digital version by clicking here.
●You can watch our setup video here: https://www.youtube.com/watch?v=QA7Vk5_x0gs.
●You can watch our stowing away video here:
https://www.youtube.com/watch?v=-H8rUX9F0Y4&t=44s
●Setup:
○Unbuckle and remove the tent cover. Fold and store away from the tent area
○Grab the feet of the ladder and extend fully out and away from the tent
(standing on the fender step for the first part of this step is helpful)
○Pull down on the ladder, swinging it 90 degrees in towards the trailer door, so
the tent is now ½ unfolded
○Bring your hands up a couple of rungs, and then walk backward until the ladder
feet hit the ground, and the ten is fully unfolded
○Press the black buttons toward each other to drop the ladder rungs down until
the tent base is parallel with the ground, and micro-adjust as needed
○Climb the ladder and hinge outward the tent awning and secure it by raising the
side extender arm(s), and locking in with the top tension pole
●To close, simply reverse the steps:
○Close the awning, and stow away the tension pole
○Lift the ladder and walk toward the trailer until the ladder is vertical and
pressed onto the tent base
○Then allow ladder to raise parallel to the ground as you slowly fold the tent
back into the collapsed position
○Shorten the ladder and secure it with the red rubber strap
○Add the cover and secure - reflectors should point forward and backward for
travel safety
HOOKING UP
●Video: https://www.youtube.com/watch?v=yrg4m0uoS24
Hitch height
●Standard Suspension: 24” to top of ball (vehicle side)
●Freeride Suspension System: 26” to the top of the ball (vehicle side)
●With each tow vehicle being a bit dierent in terms of squat, and the trailer weight
and tongue weight varying so much, it's impossible to get an exact measurement in
advance. We recommend adjustable options for this reason, and here are a couple of
14

examples that will be compatible with your fully articulating hitch since they have a
removable ball:
○MaxxHaul 70067 8-Position Adjustable Ball Mount
○CURT 45901 Adjustable Trailer Hitch Ball Mount
●Please note that it's also fine to be within an inch or two in either direction - you’ll still
get a great tow!
●After setting up, step back and eyeball it: the bottom trim should be parallel to the
ground
Steps for hooking up
●Grease the hitch ball to ensure a smooth ride. Use a thin film of wheel bearing grease
to prevent wear. Doing this each time you tow will keep things running smoothly.
●Lower the coupler onto the ball hitch by cranking the jack. Check to ensure proper fit
to your hitch ball. You want to make sure it’s latching securely on the underside of the
ball (not sitting on top) and that there isn’t too much play.
●Ensure a few inches of clearance, then pull the jack stand pin, rotate the jack stand 90
degrees forward, then drop pin all the way through the top and bottom holes
●Clamp down the latch on top of the coupler (pull up first if it resists), and secure with
¼” safety pin through the latch handle
●Cross the chains under the hitch (twist to shorten if needed - aim for about 6”
clearance)
●Connect the wiring: 4 flat / 7 blade – wrap cable if necessary (you want some wiggle
room but no drag) and put it through the ¼” pin for added security
●Triple check pins
o Vehicle hitch receiver to the ball hitch
o On top of the coupler latch
o Coupler to the trailer tongue
o Jack stand pin - be sure it’s through the bottom as well
●Check the left & right turn signals, brakes, running lights, and hazards. If something
isn’t working, check the connection between the trailer and tow vehicle for corrosion.
ELECTRIC BRAKES
●These are self-adjusting brakes with the following process:
○Go in reverse at 5 mph
○Hit the brakes firmly
○The mechanism inside self-adjusts
15

○Do this once per season
●Controller will check on its own and give alerts for any wiring issues
PRE-TRAVEL CHECKLIST
●Do a 360° around the trailer to ensure everything is secure & ready
●Lock:
○Doors
○Hatch
○Tongue Box
○Optional: Solar panel, Roam box, Propane
●Close:
○Windows
○Fan
○Propane
●Water system is o & red valves are perpendicular to PEX pipe (closed position)
●Rear stabilizers are up
●It is important to tighten the lug nuts in a star pattern (12 o’clock then 6 o’clock, 2
o’clock then 8 o’clock, 10 o’clock then 4 o’clock) with a 19 mm thin-walled socket and
torque wrench set to 100 foot pounds after the first 200 miles and/or the first drive,
and then at least every 2,000 miles and at least once per season.
●Visual check for wheel/tire alignment, adequate air pressure, and damage
●Secure gear in:
○Cabin
○Galley
○Tongue box
○Roam box
●Connection - check running lights, brakes, blinkers, and hazards. If something isn’t
working, check the connection between the trailer and tow vehicle for corrosion.
●For optimal maintenance, wipe any debris o your hitch ball and grease the hitch ball
before every trip to ensure a smooth ride. Use a thin film of wheel bearing grease to
prevent wear. Doing this each time you tow will keep things running smoothly.
●Jack is up, pin is all the way through
●Chains are crossed, secure, and about 6 inches above the ground
●Three locks from tow vehicle to trailer
○Vehicle hitch receiver to the ball hitch
○On top of the coupler latch
○Coupler to the trailer tongue
16

KEY TAKEAWAYS
●Always go through the pre-travel checklist before a trip
●Torque lug nuts regularly (after first 200 miles, every 2,000 miles, and before every trip)
●Suspension maintenance - Visual check for wheel/tire alignment and see “Suspension
Maintenance Schedule” for recommended frequency of additional checks
●Ventilation - always have the fan and/or windows open when inside the pod
●Winterize & de-winterize annually
●Check ahead for low temperatures during shoulder months, and empty tank if
necessary
●Battery care - Do not store at low charge or cold temperatures for extended periods
●Always unplug the solar panel before removing batteries
●Purchase additional security options - mini padlocks for Roam & solar panel, wheel
lock, hitch lock, anti-rattle hitch lock, locking ⅝ hitch pin
●Check all locks, pins and electrical when hitching up
17
Table of contents
Other Escapod Motorhome manuals


