Esonic memoQ MR-250 User manual

Model No. : MR-250
MSIP-REM-ESO-MR-250
P/No:6311-250-01B
REC /
II
REC
PLAY /
II
POWER
STOP
ERASE
User's Manual
Design and accessories can be changed without prior notice to improve the quality of product.
We appreciate your purchasing of this product.
* Please read the manual before use, understand all functions, and use it.
* Please write purchasing date and purchasing place, etc. in warranty card and keep it.
* Without warranty card, free after-sale service is not possible.

1. Caution for safety ................................................................... 3
2. Name of each part .................................................................. 4
3. Composition ............................................................................ 4
4. LCD explanation ..................................................................... 5
5. Preparation before use ........................................................... 5
6. Power on/off ........................................................................... 6
7. Using external power ............................................................ 6
8. Connecting to PC(file copy/save/delete) ................................ 7
9. Date and time setup .............................................................. 7
10. Changing VOICE/MUSIC
..................................................... 8
11. Recording ............................................................................. 8
12. Playing................................................................................... 9
13. Adjusting volume .................................................................. 9
14. Checking recording time ....................................................... 9
15. Checking recording remains................................................ 10
16. Deleting recording file ......................................................... 10
17. Setting mode........................................................................ 11
17-1. Setting recording mode(MODE) .................................... 12
17-2. Setting low-pass noise cancellation(LCF) ..................... 12
17-3. Setting mic sensitivity(MIC) .......................................... 13
17-4. Setting folder to save recording(FOLD) ......................... 13
17-5. Setting voice operated recording system(VOS) ............ 14
17-6. Setting VOS level(VL).................................................... 14
17-7. Setting repetition(REP) ................................................. 15
17-8. Setting LCD ................................................................... 15
17-9. Setting EQ ..................................................................... 16
17-10. Deleting all files/files in folder(CLEAN) ........................ 17
18. Recording by connecting to external device ........................ 18
>> Contents <<
2
3
* This manual is about contents for user's safety and for the prevention of property
loss and be sure to read it before use and to keep for safety.
* We are not responsible for the damage caused by the use of this product and for
the third party's claim for compensation.
* We are not responsible for the damage caused by the loss of recordings by
breakdown, repair, etc.
* Recordings can be deleted by the abnormality of product memory caused by
computer virus and be sure to treat computer virus.
* Please save important recordings in computer often.
* Do not use it illegally.
1. Caution for safety
* Do not disassemble and remodel body. That can be the cause of fire and breakdown.
* Hearing loudly for a long time by using earphone can be a bad influence on hearing.
* Do not use it in low temperature and high temperature. That can be the cause of fire
and breakdown by short circuit caused by dew condensation.
* Do not leave it alone at the humid place or oily place. That can be the cause of fire
and breakdown.
>> Caution and warning for body <<
Warning
Caution
* Do not impact or drop product. That can be the cause of breakdown.
* Do not wash the surface of product by using alcohol, benzene, thinner, etc.
* Do not hear by using earphone or operate product during driving or walking due to
the risk of traffic accident.
* Do not cut, disassemble, heat, impact battery.
* Do not put it with metallic object. That can be the cause of fire due to friction.
* Use prescribed battery(AAA Alkaline) after checking polarity(+,-) exactly.
* Do not charge battery. That can be the cause of fire or injury by rupture.
* When it is not used for a long time(more than 1 month), separate battery from
product and keep it. That can be the cause of fire or injury by lachrymal fluid.
>> Caution and warning for battery <<
Warning
Caution
In case that the lachrymal fluid of battery is stained with skin and clothes, wash it
with clean water immediately and in case of contact with eyes, do not rub eyes and
wash it with running clean water immediately and be sure to seek medical advice.

① Mic terminal
② Earphone/USB terminal
③ LCD
④ Jog button((+, -,
◀◀
,
▶▶
,M)
2. Name of each part
4
① ②
③④ ⑤ ⑥ ⑦
⑧ ⑨
④Jog button details
.....
3. Composition
Body
REC /
II
REC
PLAY /
II
POWER
STOP
ERASE
REC /
II
REC
PLAY /
II
POWER
STOP
ERASE
⑤ Record/Pause
⑥ Play/Pause - Power
⑦ Stop - Erase
⑧ Speaker
⑨ Battery cover
USB cable Stereo earphone User's manual Battery
5
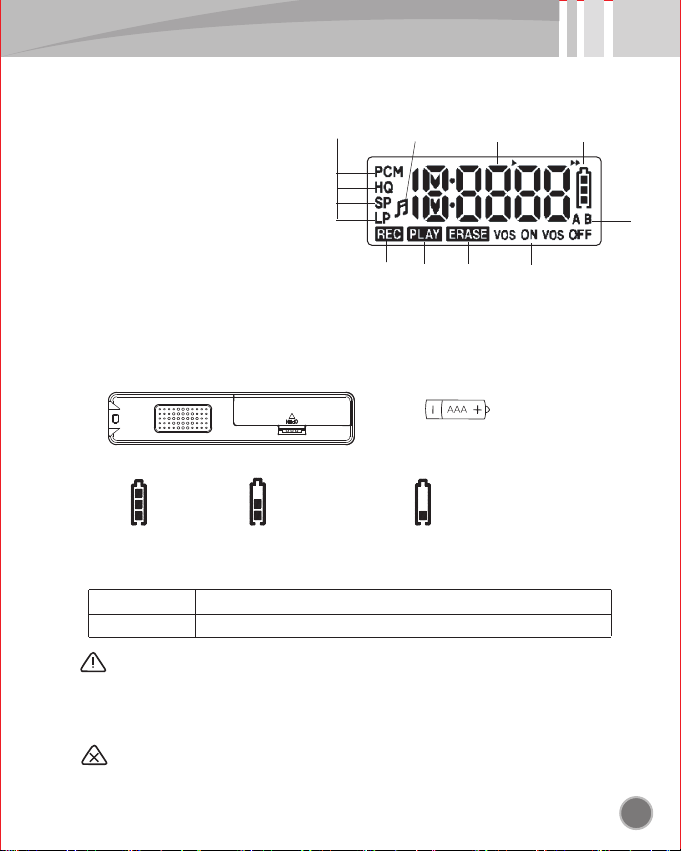
4. LCD explanation
* Open the battery cover of body, put one battery according to polarity, close cover.
* Use battery of "AAA" type, LR03, UM-4 or equal product.
Caution
Enough
① Voice recording mode/play mode
② Music play mode
③ Time and file no. mark
④ Battery remains mark
⑤ Recording mark
⑥ Play mark
⑦ Erase mark
⑧ Voice operated recording system mark
⑨ Recording folder mark
①② ③ ④
⑤ ⑥ ⑦ ⑧
⑨
5. Preparation before use
■ Inserting battery
■ Battery indication icon
Slight consumption Much consumption
(Time to change battery)
* Hours of battery use in recording is by the state of earphone separation.
■ Hours of battery use
Recording
Play
about 25 hours
* When you put battery, check the polarity of battery like above picture.
* Attached battery is for testing and its life can be short.
* When you remove battery during operation like recording, pause, play,
deletion, recordings can be damaged and never remove battery.
Warning
(direction to insert battery)
about 23 hours(In hearing with earphone : volume 20, MP3, 1kHz, 128kbps)

7. Using external power
6
You can operate it without battery by using external power(PC power/USB AC adaptor).
■ Using the USB port power of PC
■ Using the power of AC/DC adaptor(5V)
6. Power on/off
● When you press and hold the button of play more than
3 seconds, power is turned on.
■ Turning on power
● When you press and hold the button of play more than
3 seconds in the state of standby, power is turned off.
● If there is not any operation for about 3 minutes
in state of stop, power is turned off automatically.
■ Turning off power
● When you press and hold the button of record more than
3 seconds, power is turned on and recording starts right away.
● Connect USB cable to the earphone/USB terminal of product and then connect it
to the USB port of PC.
● After a while, LCD is changed to
● When you press and hold the button of play more than 3 seconds, it is changed
to standby status, you can use the function of "record and play".
● In case of using external power, file upload/download can not be used.
● Connect USB cable to the earphone/USB terminal of product and then connect it
to USB AC adaptor.
● After a while, LCD is changed to
● When you press and hold the button of play more than 3 seconds, it is changed
to standby status, you can use the function of "record and play"
● In case of using external power, file upload/download can not be used.
7
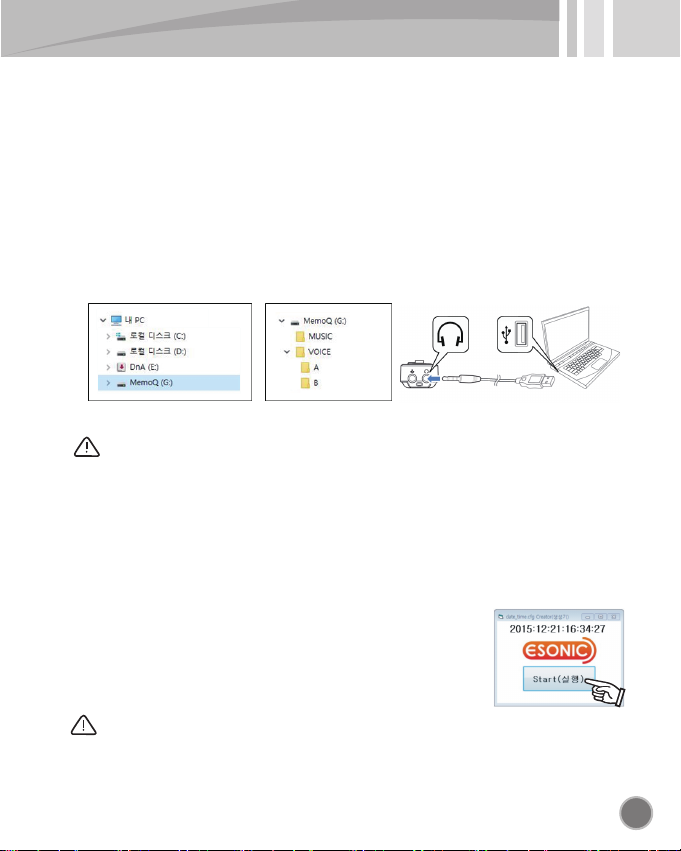
8. Connecting to PC(file copy/save/delete)
● Connect USB cable to the earphone/USB terminal of product and then connect it
to the USB port of PC.
● You can use the function of "copy, delete, play, format' in PC in the same way as
general USB memory.
● When it is connected to PC, "MEMOQ(removable disk) is created. when you
double-click it, there are the folders of VOICE, MUSIC.
● When you double-click the folder of VOICE, there are the folders of A, B.
recordings are saved in the folder(basically A) set in the product.
● You can save MP3 music files in the folder of MUSIC and play back music in the
MUSIC mode of product.
Caution
* When battery is separated or discharged, date is initialized
Before recording, perform time setup again and use it.
9. Date and time setup
<Folder structure of recorder><Screen of removable disk>
Caution
* When you separate product from PC, perform "safe removal of hardware"
to prevent the data damage.
● Connect USB cable to the earphone/USB terminal of product and then connect it
the USB port of PC.
● When you double-click "MEMOQ(removable disk)", there is "Time Setup".
● When you double-click and run Time Setup, the window of
"date_time.cfg creator" is open in the wallpaper.
Click the button of Start.
● Check whether date_time.cfg file is created and change it
to standby status by pressing and holding the button of play,
and "date and time setup" is completed automatically.

10. Changing VOICE/MUSIC
8
● When you push and hold jog button to the direction of volume(+) more than
3 second in standby status, it is changed from VOICE mode to MUSIC mode,
from MUSIC mode to VOICE mode.
● You can play back or delete a recording file saved in the folder of VOICE in
VOICE mode.
● You can play back or delete music saved in the folder of MUSIC in MUSIC mode.
11. Recording
● After turning on power by pressing and holding the button of play more than
3 seconds, press the button of record shortly, and recording starts.
(or press and hold the button of record more than 3 seconds in the state of power-off, and recording starts right away.)
● When you press the button of record during recording, it pauses and when you
press the button of stop, recoding ends.
● Initial recording mode is set to PCM(super high quality sound). You can change it
to HQ(high quality sound), SP(middle quality sound), LP(low quality sound) by set-up.
● Recording files are saved in the set folder(A,B) and basic folder is set to "A".
● In case of battery shortage during recording, power is turned off after saving
automatically.
● In case of the shortage of memory capacity or maximum file numbers, "FULL"
is indicated.
(Delete unnecessary files or delete after backup into PC, and secure memory capacity.)
<Screen of recording progress>
Folder saving recordings(A folder)
Voice operated recording system(turned off)
Sound quality being recorded
(PCM sound quality)
Time being recorded
Icon indicating recording
Caution
* Recording files can be saved in the folders of A, B up to 999 files each.
* When recording function is abnormal or you want to set back to initial value,
perform "CLEAN". (refer to 17th page)
(warning : all date are deleted in performing "CLEAN".)
* When you change the recording file name of recorder randomly by PC,
it can not work normally.
* File you have changed its name or have downloaded in PC should be saved in
the folder of MUSIC and be played back in the mode of MUSIC.
* Do not separate battery during recording. That can be the cause of breakdown.
→
←

9
12. Playing
● Select the wanted file number by pushing jog button to the direction of
previous(<<), next(>>) shortly in the screen of standby.
● When you press the button of play shortly at the selected file number,
the file indicated on screen is played back.
13. Adjusting volume
● You can adjust volume level by pushing jog button to the direction of volue(+),
volume(-) shortly.
● When you turn off and on power, volume 20 is reset in case of more than
volume 21 to protect hearing.
<Minimum volume> <Maximum volume>
<How to operate
volume(-)>
Push job button down
<How to operate
volume(+)>
Push jog button up
14. Checking recording time
● When you press mode button(M) shortly in the screen of standby,
the recording time of selected file is indicated.
(Error of 1~3 seconds or so can be made according to file)
<Screen to indicate recording time>
Mode button(M)
(Push the center)
● When you press the button of play one more time during playback, it pauses
and when you press it again, it is played back.
● When you push and hold jog button to the direction of previous(<<), next(>>)
during playback, you can make fast movement(rewind, fast-forward)
<Screen indication during playback>
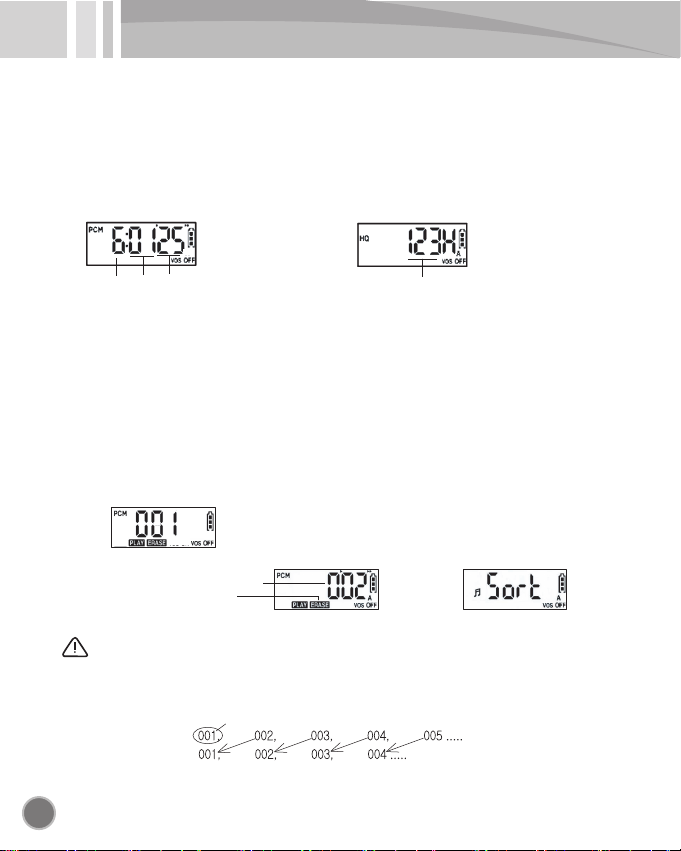
15. Checking recording remains
10
● When you push and hold jog button to the direction of volume(-) more than
3 seconds in the screen of standby, recording remains time is calculated and
indicated automatically according to the set recording sound quality.
● When recording remains are more than 10 hours, "minute", "second" is not
indicated and "hour" only is indicated as "H"
<Recording remains
less than 10 hours>
<Recording remains
more than 10 hours>
Hour Minute Second Hour
16. Deleting recording file
● Select the file to delete by pushing jog button to the direction of previous(<<),
next(>>) shortly.
● When you press and hold the button of stop more than 5 seconds at the selected
file, the mark of ERASE blinks and this file is played back for 10 seconds to prevent
deleting error. When you press the button of stop shortly one more time while it is
played back for 10 seconds, file is deleted.
● If you press other button during deleting or you do not press the button of stop
within 10 seconds, deleting is canceled automatically.
<Screen to enter deletion>
Mark notifying deletion standby
Time(10 seconds) standing by deletion
<Screen standing by deletion> <Screen sorting file out after deletion>
Caution
* Deleted file can not be restored and be sure to delete it after checking.
* When file is deleted, next file of the number you deleted is pulled up automatically.
(File before deleting)
(File after deleting)
Deletion

11
17. Setting mode
You can set recording sound quality(MODE), noise cancellation(LCF),
microphone sensitivity(MIC), recording saving folder(FOLD),
voice operated recording system(VOS), VOS level(VL), repeat(REP), LCD,
equalizer(EQ), file deletion(CLEAN) in mode.
● When you press and hold mode button(M) more than 3 seconds in standby screen, it is moved to setting screen.
● You can move to mode to set by pushing jog button to the direction of volume(+), volume(-) shortly.
● You can select option by pushing jog button to the direction of previous(<<), next(>>) shortly.
(-)Direction (+)Direction (
◀◀
)Direction (
▶▶
)Direction
Jog button
(use by pressing center)
Jog button(use by pushing to the direction of top, bottom, left, right shortly)
Mode button(M)
<Changing mode>
<Changing option>
Setting recording mode (PCM,HQ,SP,LP)
Setting low-pass noise cancellation (ON, OFF)
Setting microphone sensitivity (L,H)
Setting folder to save recording (A,B)
Setting voice operated recording system (ON,OFF)
Setting VOS level (-2,-1,0,1,2)
Setting repetition (NO,1,F)
Setting LCD (ON,10,30,60)
Setting equalizer (FL,RO,HO,DA,JA,BA,RB,CL)
Deleting folder/all files (ALL,FOLD A,B, MUSIC)
<LCD mark per mode>
(-)Direction
(+)Direction
DirectionDirection

17-1. Setting recording mode(MODE)
12
You can select recording mode among PCM(super high quality sound), HQ(high quality sound),
SP(middle quality sound), LP(low quality sound).
● When you press and hold mode button(M) more than 3 seconds in standby screen,
it is moved to setting screen.
● You can select option(PCM, HQ, SP, LP) by pushing jog button to the direction of
previous(<<), next(>>) shortly.
Caution
* Recording saving time can be different according to the number of folder, file, etc.
17-2. Setting low-pass noise cancellation(LCF)
It is a function to record with clearer sound quality by removing low-pass noise.
● When you press and hold mode button(M) more than 3 seconds in standby screen,
it is moved to setting screen.
● You can move to the mode of LCF by pushing jog button to the direction of
volume(+), volume(-) shortly.
● You can select option(on, oF) by pushing jog button to the direction of
previous(<<), next(>>) shortly.
● When you move to next mode or press mode button(M) more than 3 seconds in
the setting screen you selected, set-up is saved and it is moved to standby screen.
<PCM> <HQ> <SP> <LP>
● When you move to next mode or press mode button(M) more than 3 seconds in
the setting screen you selected, set-up is saved and it is moved to standby screen.
Memory saving time per recording mode
Mode 4GB 8GB 16GB
PCM(super high quality)
HQ(high quality)
SP(middle quality)
LP(low quality)
<Noise cancellation ON> <Noise cancellation OFF>
about 12 hours about 24 hours about 48 hours
about 72 hours about 144 hours about 288 hours
about 288 hours about 576 hours about 1152 hours
about 576 hours about 1152 hours about 2304 hours
2GB
about 6 hours
about 36 hours
about 144 hours
about 288 hours
→
←→
←→
←
→
←

13
17-3. Setting mic sensitivity(MIC)
You can set mic sensitivity according to the distance of sound source and size of sound.
● You can move to setting screen by pressing and holding mode button(M) more than
3 seconds in standby screen.
● You can move to MIC mode by pushing jog button to the direction of volume(+),
volume(-) shortly.
● You can select option(L, H) by pushing jog button to the direction of
previous(<<), next(>>) shortly.
● When you move to next mode or press mode button(M) more than 3 seconds in
the setting screen you selected, set-up is saved and it is moved to standby screen.
17-4. Setting folder to save recording(FOLD)
You can select folder(A, B) to save recording file.
● You can move to setting screen by pressing and holding mode button(M) more than
3 seconds in standby screen.
● You can move to FOLD mode by pushing jog button to the direction of volume(+),
volume(-) shortly.
● You can select option(A, B) by pushing jog button to the direction of
previous(<<), next(>>) shortly.
Caution
* Set it to suit the distance of sound source you want to record
* It is useful when you record long distance or low sound.
● When you move to next mode or press mode button(M) more than 3 seconds in
the setting screen you selected, set-up is saved and it is moved to standby screen.
Caution
* It is convenient if you sort and manage folder according to place.
<Mic sensitivity basics> <Mic sensitivity amplification>
→
←
→
←

17-5. Setting voice operated recording system(VOS)
14
VOS is a function to record when sound more than certain size is detected and to
save memory.
● You can move to setting screen by pressing and holding mode button(M) more than
3 seconds in standby screen.
● You can move to VOS mode by pushing jog button to the direction of volume(+),
volume(-) shortly.
● You can select option(VOS ON, VOS OFF) by pushing jog button to the direction
of previous(<<), next(>>) shortly.
17-6. Setting VOS level(VL)
You can set VOS level to be insensitive or sensitive.
● You can move to setting screen by pressing and holding mode button(M) more than
3 seconds in standby screen.
● You can move to VL mode by pushing jog button to the direction of volume(+),
volume(-) shortly.
● You can select option(-2, -1, 0, 1, 2) by pushing jog button to the direction of
previous(<<), next(>>) shortly.
Caution
* Adjust sensing level to suit place and situation and use after testing.
● When you move to next mode or press mode button(M) more than 3 seconds in
the setting screen you selected, set-up is saved and it is moved to standby screen.
Caution
* In VOS, battery consumption is same as general recording.
* In VOS, saved file can be different from real recording time.
<Response to high sound> <Response to low sound>
<Basics>
● When you move to next mode or press mode button(M) more than 3 seconds in
the setting screen you selected, set-up is saved and it is moved to standby screen.
→
←
→
←
→
←
→
←
→
←

15
17-7. Setting repetition(REP)
You can set repetition to no repeat(NO), file(1), current folder(F).
● You can move to setting screen by pressing and holding mode button(M) more
than 3 seconds in standby screen.
● You can move to REP mode by pushing jog button to the direction of volume(+),
volume(-) shortly.
● You can select option(NO, 1, F) by pushing jog button to the direction of
previous(<<), next(>>) shortly.
17-8. Setting LCD
You can set LCD to be turned off automatically during recording.
● You can move to setting screen by pressing and holding mode button(M) more
than 3 seconds in standby screen.
● You can move to LCD mode by pushing jog button to the direction of volume(+),
volume(-) shortly.
● You can select option(ON, 10, 30, 60) by pushing job button to the direction of
previous(<<), next(>>) shortly.
● When you move to next mode or press mode button(M) more than 3 seconds in
the setting screen you selected, set-up is saved and it is moved to standby screen.
REP NO : It plays back from the file of current position to the last file of folder
one time and stops.
REP 1 : It repeats a file indicated in current screen until it stops.
REP F : It repeats files in selected folder until it stops.
● When you move to next mode or press mode button(M) more than 3 seconds in
the setting screen you selected, set-up is saved and it is moved to standby screen.
LCD ON : turned on all the time.
LCD 10, 30, 60 : LCD is turned off after 10, 30, 60 seconds during recording.
→
←
→
←
→
←
→
←
→
←

17-9. Setting Equalizer(EQ)
16
In playing back music file saved in the folder of MUSIC, it makes sound effect.
● You can move to setting screen by pressing and holding mode button(M) more
than 3 seconds in standby screen.
● You can move to EQ mode by pushing jog button to the direction of volume(+),
volume(-) shortly.
● You can select option by pushing job button to the direction of
previous(<<), next(>>) shortly.
Caution
* It is not applied in VOICE mode.
* EQ is applied only in playing back with earphone.
FL(FLAT) ro(ROCK) Ho(HOUSE) dA(DANCE)
JA(JAZZ) bA(BALLAD) rb(R&B) CL(CLASSIC)
● When you move to next mode or press mode button(M) more than 3 seconds in
the setting screen you selected, set-up is saved and it is moved to standby screen.
→
←
→
←
→
←
→
←
→
←
→
←
→
←
17
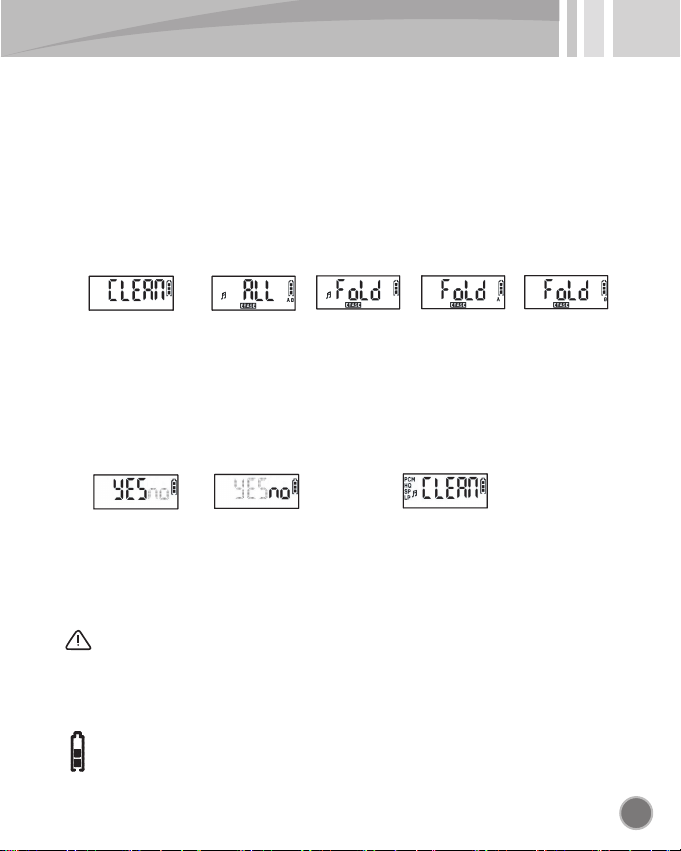
17-10. Deleting all files/files in folder(CLEAN)
You can delete all data and set back to initial value or delete files in the selected
folder(A,B,MUSIC) at a time.
● You can move to setting screen by pressing and holding mode button(M) more than
3 seconds in standby screen.
● You can move to CLEAN mode by pushing jog button to the direction of volume(+),
volume(-) shortly.
● You can select option(ALL, ♬, A, B) by pushing job button to the direction of
previous(<<), next(>>) shortly.
● When you press mode button(M) shortly in selected option, the screen of
"YES", "NO" is indicated to confirm deletion.
ALL : all data(recording files, music files, etc.) saved in memory are deleted,
setting value is initialized.
♬ FOLD : all data saved in MUSIC folder are deleted.
FOLD A : all data saved in A folder are deleted.
FOLD B : all data saved in B folder are deleted.
● To proceed deletion, select "YES" by pushing jog button to the direction of
previous(<<), next(>>) shortly and press mode button(M) shortly.
● To cancel, select "NO" and return to the previous screen by pressing
mode button(M) shortly.
Caution
* Before performing CLEAN, be sure to save important files in PC.
* Deleted files can not be restored and be sure to delete after confirmation.
* In case that there are many saved files, run time can be long.
* CLEAN is performed only in case that battery remains are on more than 2 levels
to protect system.
* In case that battery remains are on 1 level, perform CLEAN after changing battery.
* Never separate battery during CLEAN. That can be the cause of breakdown.
<All data> <MUSIC folder> <A folder> <B folder>
<Deleting>
<NO blinking> <YES blinking>
→
←
→
←
→
←
→
←
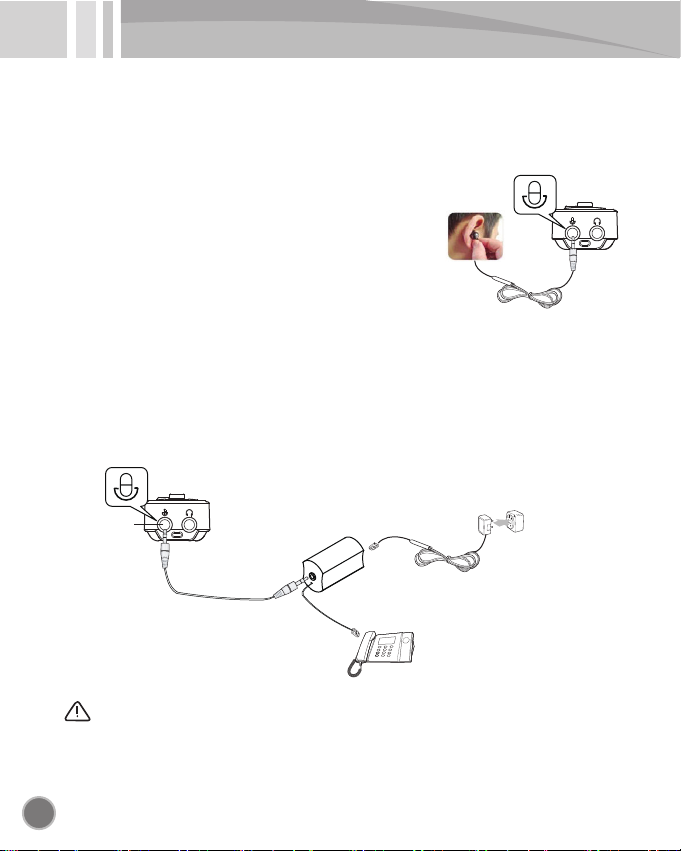
18. Recording by connecting to external device
18
● It is a function to record by using external device l
ike external mic, wired telephone, etc.
■ Recording phone call by using tel adaptor(option)
● Connect audio cable to mic terminal and connect other end to tel adaptor.
Connect the line cable of telephone to tel adaptor and telephone like below picture.
● Press the record button of body shortly, and recording starts.
● Press stop button shortly, and it stops and recording is saved.
■ Recording phone call by using ear mic(option)
● After putting ear mic in ear and connecting its plug
to the mic terminal of product, when you hold the
receiver or cellphone to ear next to ear mic and talk,
press recording button, and phone conversation is
recorded.
Caution
*The design of tel adaptor can be changed without prior notice.
* Keyphone, internet phone, or some phones can not be recorded according to model.
Telephone terminal
Line cable
External telephone line
Tel adaptor
Mic terminal
Audio cable
Telephone

19
MEMO

- Defect caused by careless use.
- Defect caused by user's internal modification.
- Defect caused by natural disasters like fire,
salt damage, flood, earthquake, etc.
- Defect caused by the infection of computer virus.
- Without warranty card or purchase receipt.
- Defect out of warranty period.
Model MR-250
Memory 4GB 8GB 16GB
Recording time
per sound quality
PCM
about 12 hours about 24 hours about 48 hours
HQ
about 72 hours about 144 hours about 288 hours
SP
about 288 hours about 576 hours about 1152 hours
LP
about 576 hours about 1152 hours about 2304 hours
Hours of
battery use
Recording
about 25 hours
Playback
about 23 hours {earphone, MP3(1kHz,128kbps, 44.1kHz), Vol 20}
Recording folder
VOICE 999 Files(A) + 999Files(B)
Practical maximum output(earphone)
3.5mW + 3.5mW / 16 ohm
Dimension
Power 1.5V (AAA Alkaline x 1)
Usage environment Temperature: 0 ℃~40 ℃, Humidity: 20~80%
Accessory Earphone, Battery, USB cable, Manual
Speaker output 100mW(17mm, 8ohms)
W x H x D = 105.5 x 22.5 x 14.5 (mm)
Manufacturer : ESONIC Co., Ltd
Country of origin : Made in Korea
Website : http://www.esonic.co.kr
MR-250
2GB
about 6 hours
about 36 hours
about 144 hours
about 288 hours
Product Specification
Warranty Card
Warranty period
Purchasing date
Purchasing place
Tel
Others
Product name
Model No.
Customer
Name
Address
Tel
Purchasing amount
1 year
Digital Voice Recorder
Paid service
Table of contents
Other Esonic Voice Recorder manuals


