Esonic MR-750 User manual
Model No. MR-750
Certification No : R-R-ESO-MR-750
Main body Auxiliary
battery pack
Use jog button by pressing center and by pushing
up and down and left and right.
USB Cable
Earphone
Clip
Charger
Audio cable
Ear microphone
Pin microphone
Preparation before use (charging and device setting)
How to connect auxiliary battery pack (long hours of recording)9.
Recording
Setting sound detection recording (VOS)
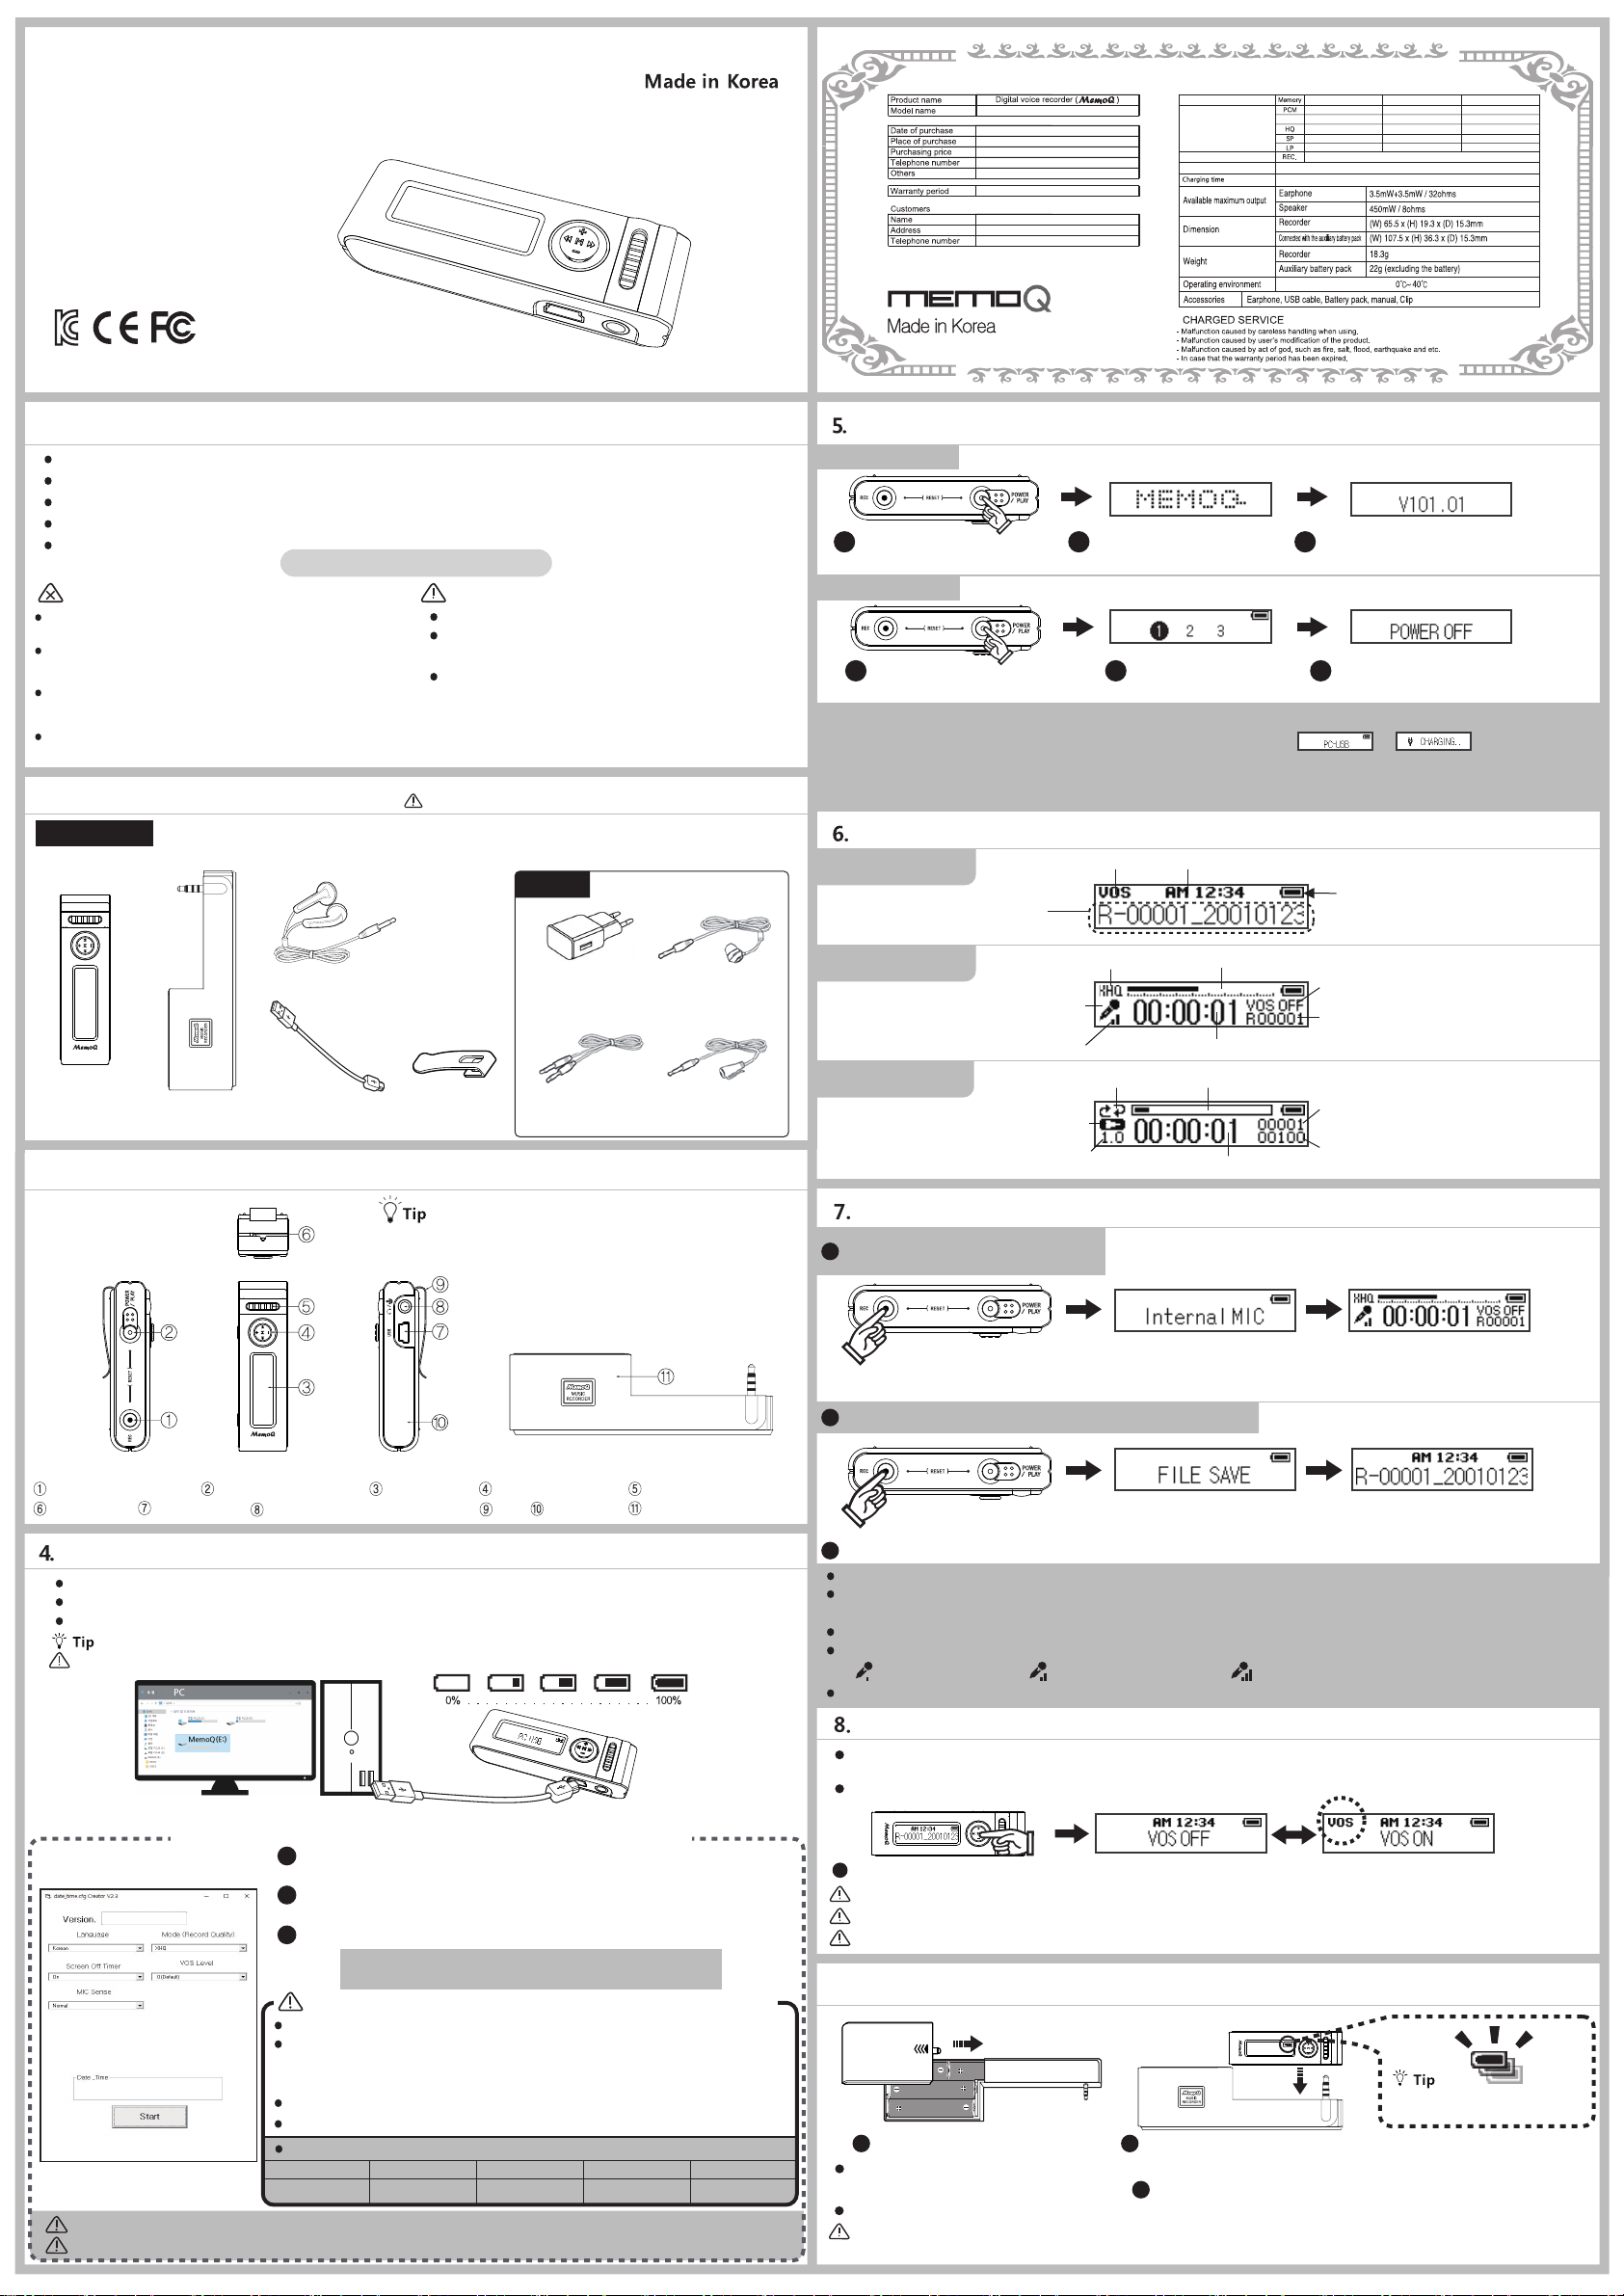
Power On/Off
Turning on power
Turning off power
Press the button of POWER/PLAY
for 3 seconds at length.
1The logo of MEMOQ is displayed.
2Firmware version is displayed in sequence.
it is moved to stop screen after displaying firmware.
3
It starts countdown.
2"POWER OFF" is displayed after 3 seconds
and then power is turned off.
3
Explanation on LCD screen display
LCD screenRecording button Power/Play button Built-in speaker
Microphone External mic/Earphone terminal
Recording in the state of power-off:
When you press recording button more than 3 seconds, power is turned on and recording starts right away.
Recording in the state of power-on: When you press recording button in short, recording starts.
After displaying "Saving completion", "file name" is displayed.
After displaying "Internal mic" on LCD screen, recording starts.(The state of power-off)-at length
(The state of power-on)-in short
As internal mic is closer to a sound source, recording quality gets better.
Recorded file is created in order from R-00001, "year/month/date/hour/minute" is displayed after number.
In recording long time, it is divided in unit of 5 hours and saved.
You can change the setting of mic sensitivity by pushing jog button to the direction of +/- at length during recording.
Caution : When you use charger(option), please check whether rated voltage is 5V.
-It takes about 2 hours for battery to be charged completely.
In the state of stop screen, press mode button(M) at length(about 5 seconds) to change the setting of sound detection recording(VOS).
Sound detection recording(VOS) : When there is no sound during recording, it pauses,
and when sound is detected after this, recording starts again.
If there is no sound in sound detection recording, VOS icon flickers.
Connect USB cable into the USB terminal of product body and the USB port of PC or charger(option).
You can check charging status by the battery icon displayed on LCD screen.
This product has built-in rechargeable battery.
Caution : In case of sound detection recording(VOS), the time of saved recording file differs according to detected sound.
Caution : Even though you use sound detection recording(VOS), hours of battery use are not increased.
Caution : You can not change the setting of mic sensitivity during sound detection recording(VOS).
<Picture of battery combination> <Picture for the connection of auxiliary battery pack>
After inserting batteries(AAA, 4pcs.) into auxiliary battery pack according to direction,
combine it with main body like picture , and charging of recorder starts.
In case of using auxiliary battery pack, continuous recording is possible for about 5 days (standard of HQ, SP, LP).
Caution : Auxiliary battery pack is for charging the built-in battery of main body,
and it can be used after some minutes in case of complete exhaustion.
1
1
2
2
2
When you press play button during recording, recording pauses and when you press it again, recording progresses subsequently.
3
In recording
In playing
Stop screen
Jog(Mode) button
ClipUSB terminal Auxiliary battery packMain body
To stop recording, press recording button in short again.
Current time
Sound detection recording
Battery remains
Recording sound quality
Internal/external mic icon
Recording time
Level meter
File number being recorded
Sound detection recording(ON/OFF)
Play icon
Play speed icon
Play time
Progress indication line
Total file number
File number being played
Repeat setting
Mic sensitivity
Changing time setting and sound quality setting
Recording and playing back by using external power (PC, Charger)
1. When product is connected to PC or adaptor, all ongoing operations stop and or is displayed.
2. At this time, recording starts by pressing recording button more than 3 seconds at length, or it is moved to stop
screen by pressing play button more than 3 seconds at length.
3. After this, you can use it in the same instructions with main body.
If it is connected normally,
battery remains indication flickers.
( )low mic sensitivity, ( )normal mic sensitivity, ( )high mic sensitivity
Caution : It is set to the date and time set in PC. (It is set to the time to click Start button and at the time to separate product.)
Caution : If battery is discharged, date and time is initialized and perform time setting again after charging for use.
After connecting USB cable into the USB terminal of PC,
perform by double-clicking 'TIME SETUP' program saved in product.
After adjusting each setting indicated in performed program suitably,
press START button and the file of DATA_TIME.CFG is created.
Separate product from PC and setting value is saved.
<Instructions of Time Setup program>
<Window of Time Setup program>
1
2
3
LANGUAGE : [KOREAN], ENGLISH, JAPANESE
MODE(Recording sound quality) : PCM(no compression original sound)
[XHQ](High sound quality), HQ(Middle sound quality),
SP(Long time sound quality), LP(Ultra long time sound quality)
SCREEN OFF TIMER : [ON], 60sec, 30sec, 10sec, 3sec
MIC SENSE : HIGH, [NORMAL], LOW
VOS LEVEL : You can set detection level in sound detection recording.
0 +1 +2-2 -1
insensitive sensitive very sensitivebasic settingvery insensitive
Product setting is possible only in the program of 'TIME SETUP' connected to PC.
2020:01:01:13:00:00
V101
1
If battery is used out during recording, recording in progress is saved automatically and power is turned off.
Sound detection recording(VOS):R-00001_2001011200_VOS.mp3)(General recording:R-00001_2001011200_REC.mp3,
User's Manual ESONIC CO., LTD.
ESONIC CO., LTD.
1. Caution for safety
2.Product composition
3.Name of each part
This manual is for user's safety and the prevention of property loss and be sure to read it before use.
We are not responsible for the damage or third party's claims caused by the usage of this product.
We are not responsible for the loss of recordings caused by breakdown, repair, other reasons.
Please save important recordings into PC immediately.
Do not use it illegally.
Caution and Warning on main body
Warning Caution
Do not decompose, remodel main body.
That can be the cause of fire and failure.
If you listen to the contents loudly and
long time by using earphone, hearing ability
can be damaged.
Do not use at low and high termperature.
That can be the cause of fire or failure by a leak by
condensation phenomenon.
Do not leave it alone in humid place or in place exposed to oil.
That can be the cause of fire and failure.
To shock or drop the product can be the cause of failure.
Do not wash the surface of product with
alcohol, benzene, thinner, etc.
Please avoid listening with earphone or product
operation during driving or walking because of the
risk of traffic accident.
Caution : Be sure to check components before using product.
Basic composition
Option
MR-750
9,999 files
About 2Hrs
PCM, XHQ : About 12Hrs / HQ, SP, LP : About 16Hrs
Model No : MR-750 8GB 16GB 32GB
About 24Hrs
About 144Hrs
About 288Hrs
About 576Hrs
About 1152Hrs
About 48Hrs
About 288Hrs
About 576Hrs
About 1152Hrs
About 2304Hrs
About 96Hrs
About 576Hrs
About 1152Hrs
About 2304Hrs
About 4608Hrs
XHQ
Recording Time per Mode
Max Number of Recording Files
Hours of Battery Use
Product SpecificationWARRANTY CARD
In the state of power-on,
press the button of POWER/PLAY
for 3 seconds at length.
1
Recorded file name
Recorded date and time
(YY/MM/DD/HH/MM)
Setting value indicated in bracket [ ] is basic value.
If memory is initialized, it is set to basic value.
One year from purchasing date

16. Resetting
1
1 2
12
2
Connecting audio cable
(recording of external device) Connecting ear mic
(recording of mobile phone talks)
Playback, copy, deletion or memory format is possible by connecting PC and main body with USB cable.
Caution : In case of progressing memory format in PC, progress it by file system FAT32 for hereafter normal operation.
Caution : In formatting, the program of 'Time Setup' is deleted and keep the program of 'Time Setup' separately.
3
Connecting telephone adaptor (recording of telephone talks)
Telephone line
External
telephone line
Telephone
terminalAudio cable
10. Recording by external input
11. Playing
Operable function in playing
12. Setting section repeat (A B)
13. Deleting
14. Initializing(formatting) memory
15. Connecting USB into PC
<Picture example>
Selecting file Deletion confirmation
Deletion
cancellation
Deletion practice
Entering the menu of
initialization Initialization confirmation Initialization practice
Press mode button(M) at length.
Accessories required for recording by external input are optional. (audio cable, ear mic, pin mic, telephone adaptor)
Caution : In case of recording by external input, if earphone is connected, it is recorded with silence.
Caution : In formatting,'Time Setup' is deleted together and keep the program of 'Time Setup' separately for use.
Caution : If you reset it during recording, recording in progress is not saved and lost.
Caution : Even though you reset it, recording files and data saved before are not deleted.
Caution : If external input device (audio cable/external mic) is connected, sound does not come out even in playback.
How to set internal mic / external mic
Press mode button(M) more than 3 seconds during recording, and internal mic / external mic is changed.
(Only in case that external input device is connected to mic/earphone terminal)
At the stop screen, select the file you want by
pushing jog button to the direction of previous( ) / next( ) in short.
At the stop screen, select the file you want to delete by
pushing jog button to the direction of previous( ) / next( ) in short.
At the stop screen, move to the menu of
memory initialization by pushing jog button
to the direction of ( ) at length
(about 5 seconds).
Caution : Data deleted once can not be restored.
You can check the current status of mic with internal mic icon and external mic icon during recording.
Select the item you want by pushing jog
button to the direction of ( ) / ( ) in short.
Play the selected file by pressing play button in short.
You can adjust the volume by pushing jog button to the direction of ( ) / ( ) in short during playback.
(volume 0~31)
You can adjust play speed by pushing jog button to the direction of ( ) / ( ) at length during playback.
(0.8 speed, 0.9 speed, 1.0 basic speed, 1.1 speed, 1.2 speed)
You can move to previous file / next file by pushing jog button to the direction of previous( ) / next( ) in short during playback.
Select the starting point(A) of section repeat by pushing mode button(M) in short during playback.
If you press mode button(M) once more, section repeat is released.
Select the ending point(A) of section repeat by pushing mode button(M) in short.
After this, it is played with section repeat from starting point(A) to ending point(B).
You can rewind / rewind fast by pushing jog button to the direction of previous( ) / next( ) at length during playback.
If you want to stop playing, press play button in short again.
If you want to cancel deletion, push jog button to the
direction of previous( ) in short.
In case of progressing deletion,
after selecting "Yes",
press mode button(M) in short.
In case of progressing deletion,
press mode button(M) in short.
In case of progressing
initialization, after selecting
"Yes", press mode button(M) in short.
It moves to the screen of
"no file"
1 2 3
1 2 3
Initialization
cancellation
If you want to cancel initialization,
push jog button to the direction of previsou( ) in short.
If problems as main body does not work or power is
not turned off occur, you can reset the system of main body.
Press play button and recording button at the same time,
and system is reset.
1
1
2
132
Select the item you want by pushing jog button
to the direction of ( ) / ( ) in short.
Perform initialization by
pushing mode button(M) in short.
Caution : Data deleted once can not be restored.
1
1
2
3
1
2
Caution : keyphone, internet phone or some models of telephone can not be recorded.
Caution : The design of telephone adaptor can be changed without prior notice.
Caution : all files and setting values are initialized.
Telephone
adaptor
'Time setup' program Recorded file folder
PC MemoQ
MemoQ
Time Setup
V2.3.exe
VOICE
In case of recording by external input, low mic sensitivity and middle level meter makes the clearest recording.
Recommended recording sensitivity : low
Recommended recording sensitivity : normal
Recommended recording sensitivity : low
pushing jog button to the direction of ( ) at length.
Move to the deletion menu of selected file by
Other Esonic Voice Recorder manuals


