etherFAX A2E User manual

Guide Version 1.0.1
2015-05-29
etherFAX A2E
User Guide

etherFAX A2E User Guide | 2
© 2015 etherFAX LLC.
Contents
General Overview.................................................................................................................................................4
Device Status Lights........................................................................................................................................5
Device Registration & Initial Setup ....................................................................................................................6
Device Operation .................................................................................................................................................8
Sending a Fax ..................................................................................................................................................8
Receiving a Fax................................................................................................................................................8
Device Configuration ...........................................................................................................................................9
Management via Local Device Web Portal ....................................................................................................9
System Settings ....................................................................................................................................... 10
Advanced Configuration...................................................................................................................... 11
Network Settings...................................................................................................................................... 12
Device Information................................................................................................................................... 13
Service Information ................................................................................................................................. 14
Service Logging.................................................................................................................................... 14
Service Control..................................................................................................................................... 14
System Tools ............................................................................................................................................ 15
System Firmware ..................................................................................................................................... 15
Installing New Firmware ..................................................................................................................... 15
System Reboot ......................................................................................................................................... 16
Management via etherFAX Client Portal .................................................................................................... 17
Multi-Device Edit ...................................................................................................................................... 17
Device Inventory Report .......................................................................................................................... 17
Single Device Edit..................................................................................................................................... 18
Assigning DID’s/TFN’s to a device ..................................................................................................... 18

etherFAX A2E User Guide | 3
© 2015 etherFAX LLC.
This page intentionally left blank.

etherFAX A2E User Guide | 4
© 2015 etherFAX LLC.
General Overview
Organizations transitioning to IP-based networks need a cost-effective solution to integrate existing fax
machines. etherFAX analog-to-etherFAX (A2E) offers a simple, plug-and-play device that allows any
traditional fax machine to be extended to the etherFAX network. The etherFAX A2E, manufactured by
MultiTech, connects existing analog fax machines to the etherFAX network, allowing faxes to be sent
and received via the cloud, instead of the PSTN. The device allow organizations to leverage existing IT
infrastructure and eliminate the cost and maintenance of fax lines.
etherFAX A2E User Guide | 5
© 2015 etherFAX LLC.
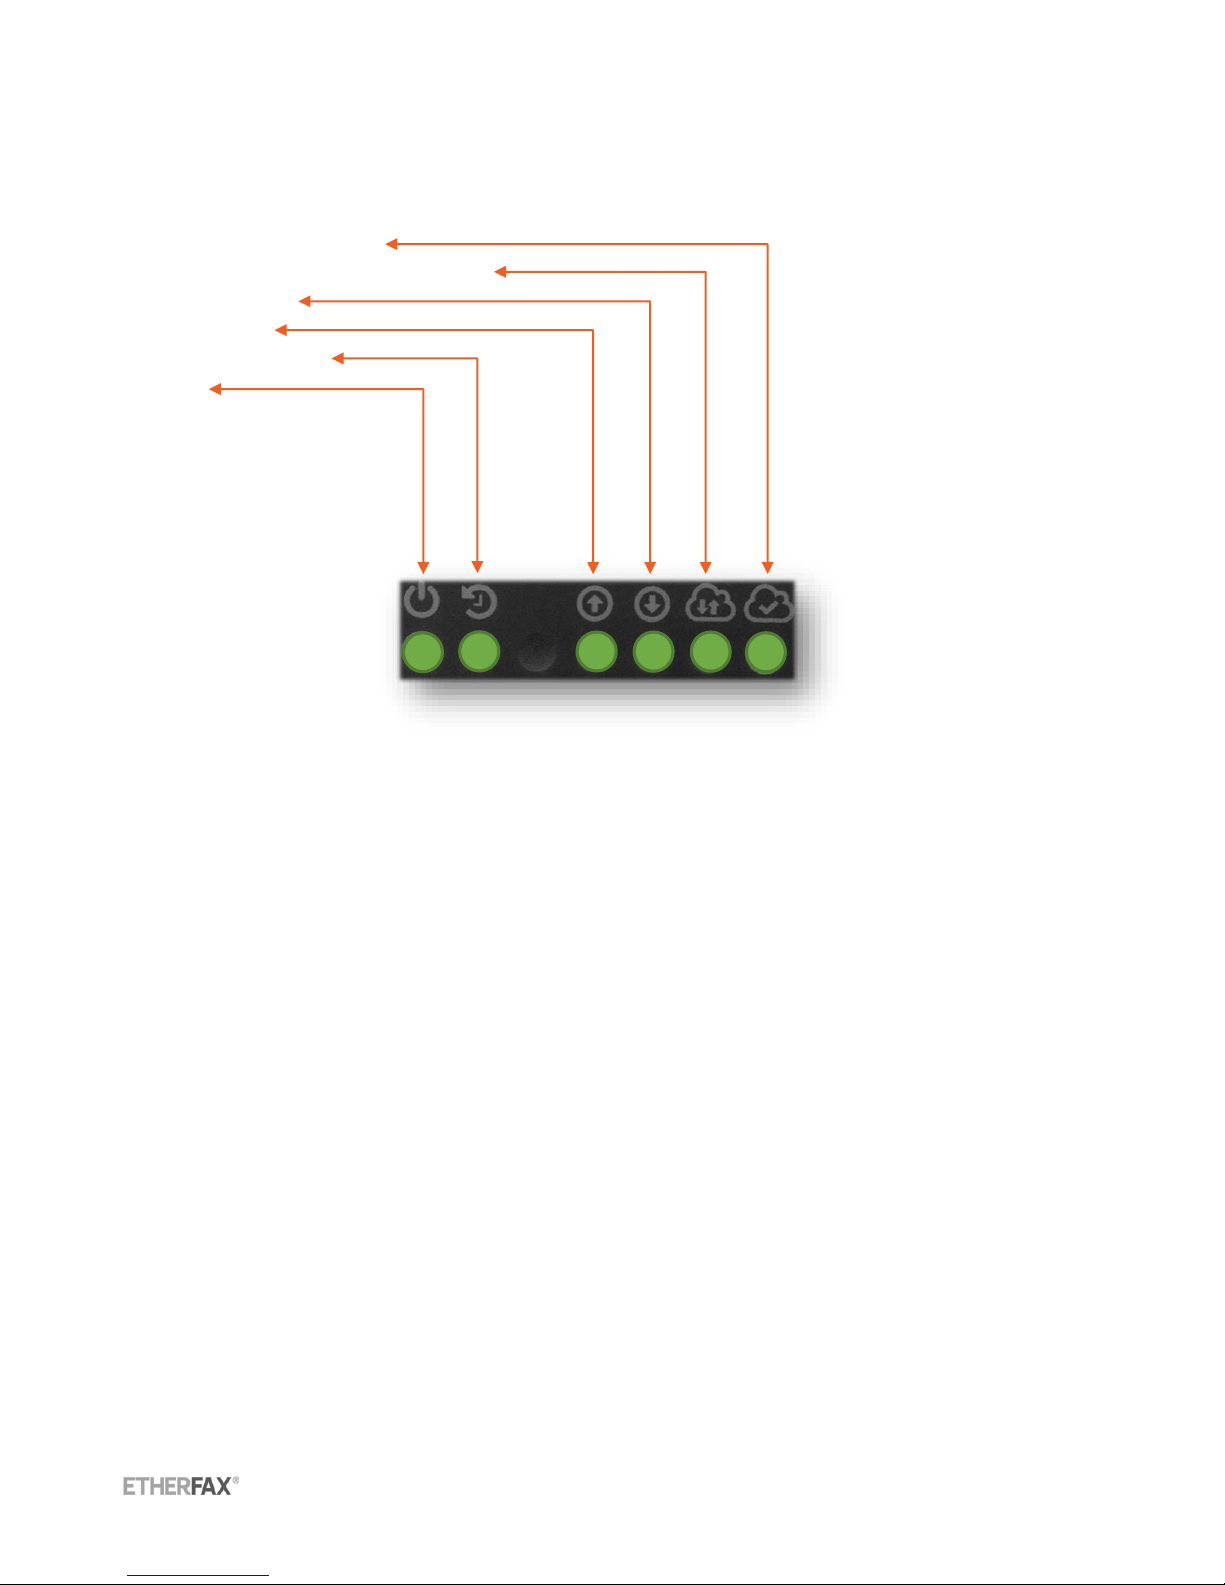
Device Status Lights
Connected to etherFAX
Polling/Communication with etherFAX
Receive Activity
Send Activity
Device Initialization
Power

etherFAX A2E User Guide | 6
© 2015 etherFAX LLC.
Device Registration & Initial Setup
When shipped from etherFAX the device will be provisioned to your etherFAX account. Before
connecting the device to a power source and network you will want to ensure that it has been assigned
correctly to your etherFAX account and the desired DID’s or TFN’s (Toll-Free Numbers) have been
provisioned to the etherFAX A2E.
Using the supplied cabling connect the RJ-11 telephone cable to the RJ-11 port on the back of the
etherFAX A2E and the other end into the Line port on the analog fax device you wish to use. Connect
the supplied Ethernet cabling to the RJ-45 port on the back of the etherFAX A2E and the other end into
an active network jack. When ready to power on the device use the supplied power adapter to attach to
the power port on the etherFAX A2E and plug into an available power outlet.
The etherFAX A2E is configured for DHCP. If your network supports DHCP the device will be assigned a
local IP address which will appear in the etherFAX Client Portal. To access this navigate to
https://clients.connect.etherfax.net in an internet browser. Provide your client portal login credentials
to sign in. Once logged in select A2E Devices from the navigation menu on the left side of the screen.
From the Device Management page you will be able to determine if your device has received an IP
address from the DHCP server in your local network. Further configuration of the device from the
etherFAX Client Portal is discussed later in this guide.
If your network does not support DHCP or the etherFAX A2E is not able to obtain an IP address through
DHCP the device will timeout after two minutes and revert to a local IP of 192.168.2.1. The device can
then be accessed through a direct network connection with a computer. The computer connected
directly with the device will need to have its IP parameters set manually to the following settings:
Local IP Address: 192.168.2.10
Subnet: 255.255.255.0
Gateway: 192.168.2.1
etherFAX A2E User Guide | 7
© 2015 etherFAX LLC.
After the settings are configured on the computer and a direct network connection is made via Ethernet
cable between the etherFAX A2E and the computer the etherFAX A2E local device portal will be
accessible through an internet browser by navigating to http://192.168.2.1. Login using the default
credentials:
Username: admin
Password: password
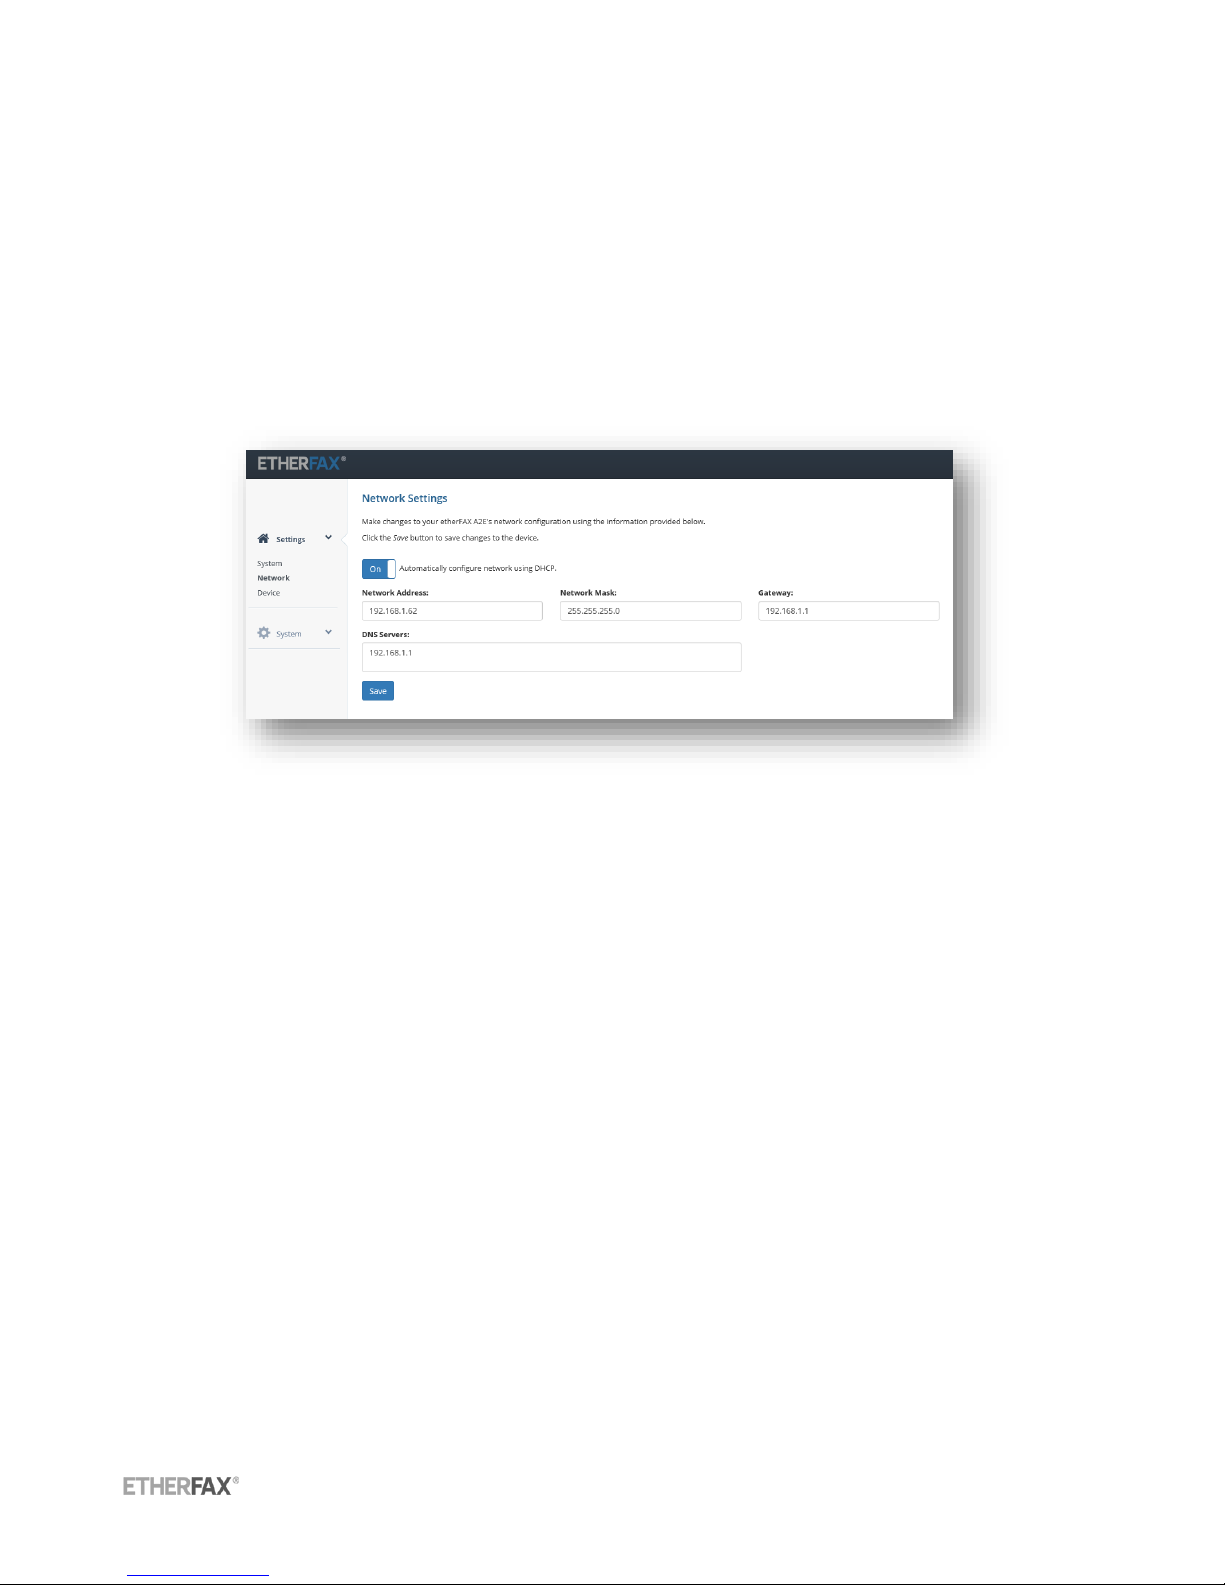
To configure the device’s network settings manually select Settings then Network from the navigation
menu on the left side of the screen. See figure on next page.
From the Network Settings configuration page you can disable DHCP and assign a static IP, network
mask, gateway, and DNS servers. Once configured hit Save.

etherFAX A2E User Guide | 8
© 2015 etherFAX LLC.
Device Operation
The etherFAX A2E preserves the traditional user experience while extending the reliability and security
of the etherFAX network to an analog fax device.
Sending a Fax
Users will load a fax into the document feeder and dial the number as they normally would. The analog
fax device will connect to the etherFAX A2E via the RJ-11 cable and transmit the fax image. Once the
image is received at the etherFAX A2E it will securely push the image to the etherFAX network where
the document will be transmitted to its final destination.
Upon completion of sending, the device administrator can elect receive a transmission report when the
fax was sent successfully, an error occurred, both on a success or error, or never. These options can be
configured via the etherFAX Client Portal. Configuration steps are covered in the Device Configuration
section of this guide.
Note: It is important to ensure that transmission reports are disabled on the analog fax device as the
etherFAX A2E will generate the reports.
Receiving a Fax
When a fax is received to a number on the etherFAX network that is assigned to a specific A2E device
the etherFAX A2E will securely retrieve the image file and then begin communication with the local
analog fax device. The fax image will be transmitted and received to the local fax device just as it would
if it was connected to a traditional analog fax line. For more information on provisioning a number to an
etherFAX A2E device please see the ‘Management via etherFAX Client Portal’ section later in this
document.
Note: It is important to ensure that auto-answer is enabled on the analog fax device. This will allow the
analog fax device to receive all communication from the etherFAX A2E.

etherFAX A2E User Guide | 9
© 2015 etherFAX LLC.
Device Configuration
The etherFAX A2E device can be managed from two different locations. The device itself has a local
device portal that can be accessed via a standard HTTP connection to the device’s IP address on port
80. The local device portal assists in configuring the device for network communication and device
specific updates such as firmware. It also provides a logging interface and basic network utilities to
assist in troubleshooting.
Other functions of the etherFAX A2E such as DID provisioning are managed from the etherFAX Client
Portal at https://clients.connect.etherfax.net. Multi-device configuration is also available from the
etherFAX Client Portal allowing some settings to be applied to multiple devices at one time.
Management via Local Device Web Portal
The etherFAX A2E local device portal can be accessed by launching a web browser and navigating to
the IP address of the device (ex: http://10.0.0.100). If the IP address of the device is not known or a
DHCP address was not assigned please refer to the ‘Device Registration and Initial Setup’ section in
this guide to manually configure network settings.
Default Username: admin
Default Password: password
Note: For security, please update your password once logged in by clicking the ‘System Administrator’
profile in the top right of the device portal and choosing ‘Change Password’.
etherFAX A2E User Guide | 10
© 2015 etherFAX LLC.
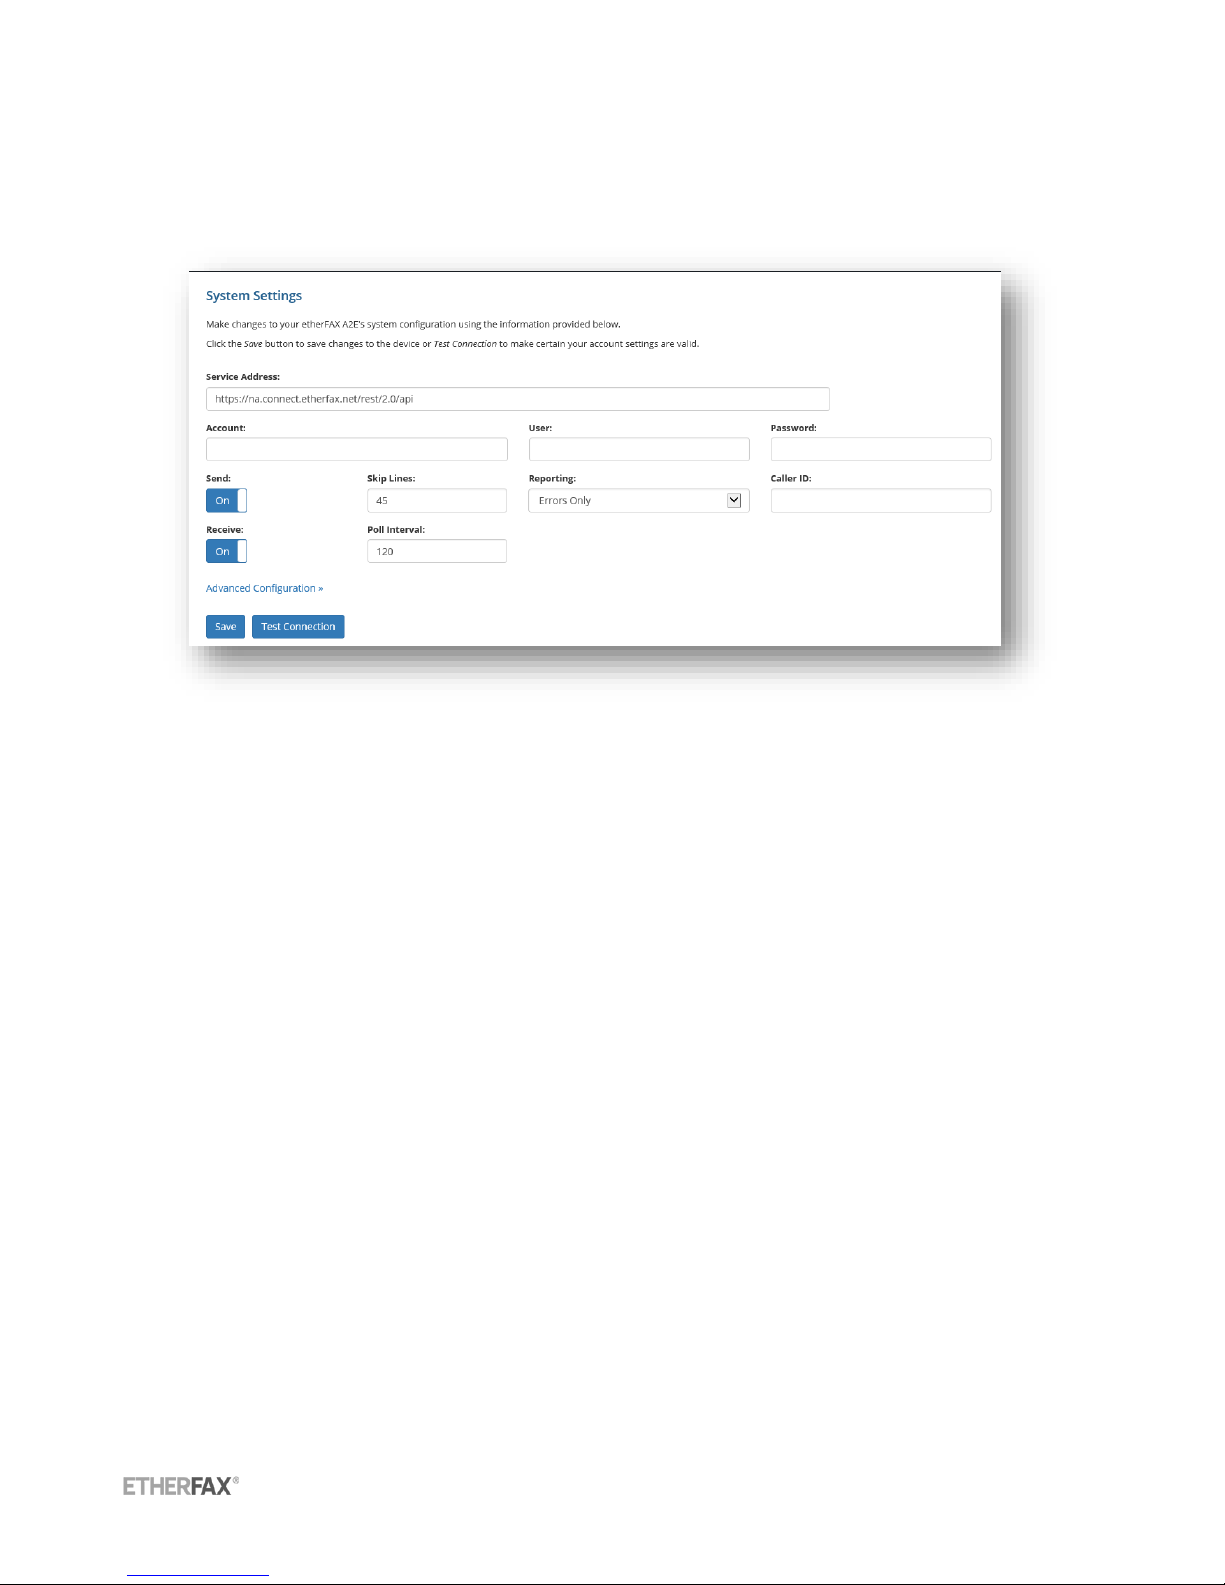
System Settings
The system settings allow you to update the device configuration locally. Ensure to click Save button
after updating any settings and then select Test Connection to validate any updated settings.
Service Address: Connection string used by the device to connect to the desired etherFAX POP (Point
of Presence) Available options:
https://na.connect.etherfax.net/rest/2.0/api
https://ca.connect.etherfax.net/rest/2.0/api
Account: etherFAX account the device is configured to use. In most cases this will be left blank since
the device securely communicates and registers via an authentication token, thus not needing the
account number.
User: etherFAX user account the device is configured to use. In most cases this will be left blank since
the device securely communicates and registers via an authentication token, thus not needing the
account number.
Password: etherFAX account password the device is configured to use. In most cases this will be left
blank since the device securely communicates and registers via an authentication token, thus not
needing the account number.
Send: Enables the device for send fax functionality.
Receive: Enables the device for receive fax functionality.
Skip Lines: Defines number of raster lines that will be removed from top of page. This allows the fax
header placed on the image by the analog fax machine to be skipped and replaced with the header
supplied by etherFAX.
Reporting: Configures the desired type of reporting for device send transmissions.
etherFAX A2E User Guide | 11
© 2015 etherFAX LLC.
Errors Only: Local analog fax device will print transmission report if send transmission fails.
Always: Local analog fax device will print transmission report for every send transaction.
Never: Local analog fax device will never print transmission report. Failed transactions can be
viewed in the etherFAX Client Portal under the reporting section.
Caller ID: Configured caller ID for the etherFAX A2E to use when sending a fax.
Note: Caller ID should be configured as a valid 10 digit toll number. Failure to do so will result in higher
transmission failure rates.
Poll Interval: Integer value, in seconds, that the etherFAX A2E will poll the etherFAX service for inbound
faxes.
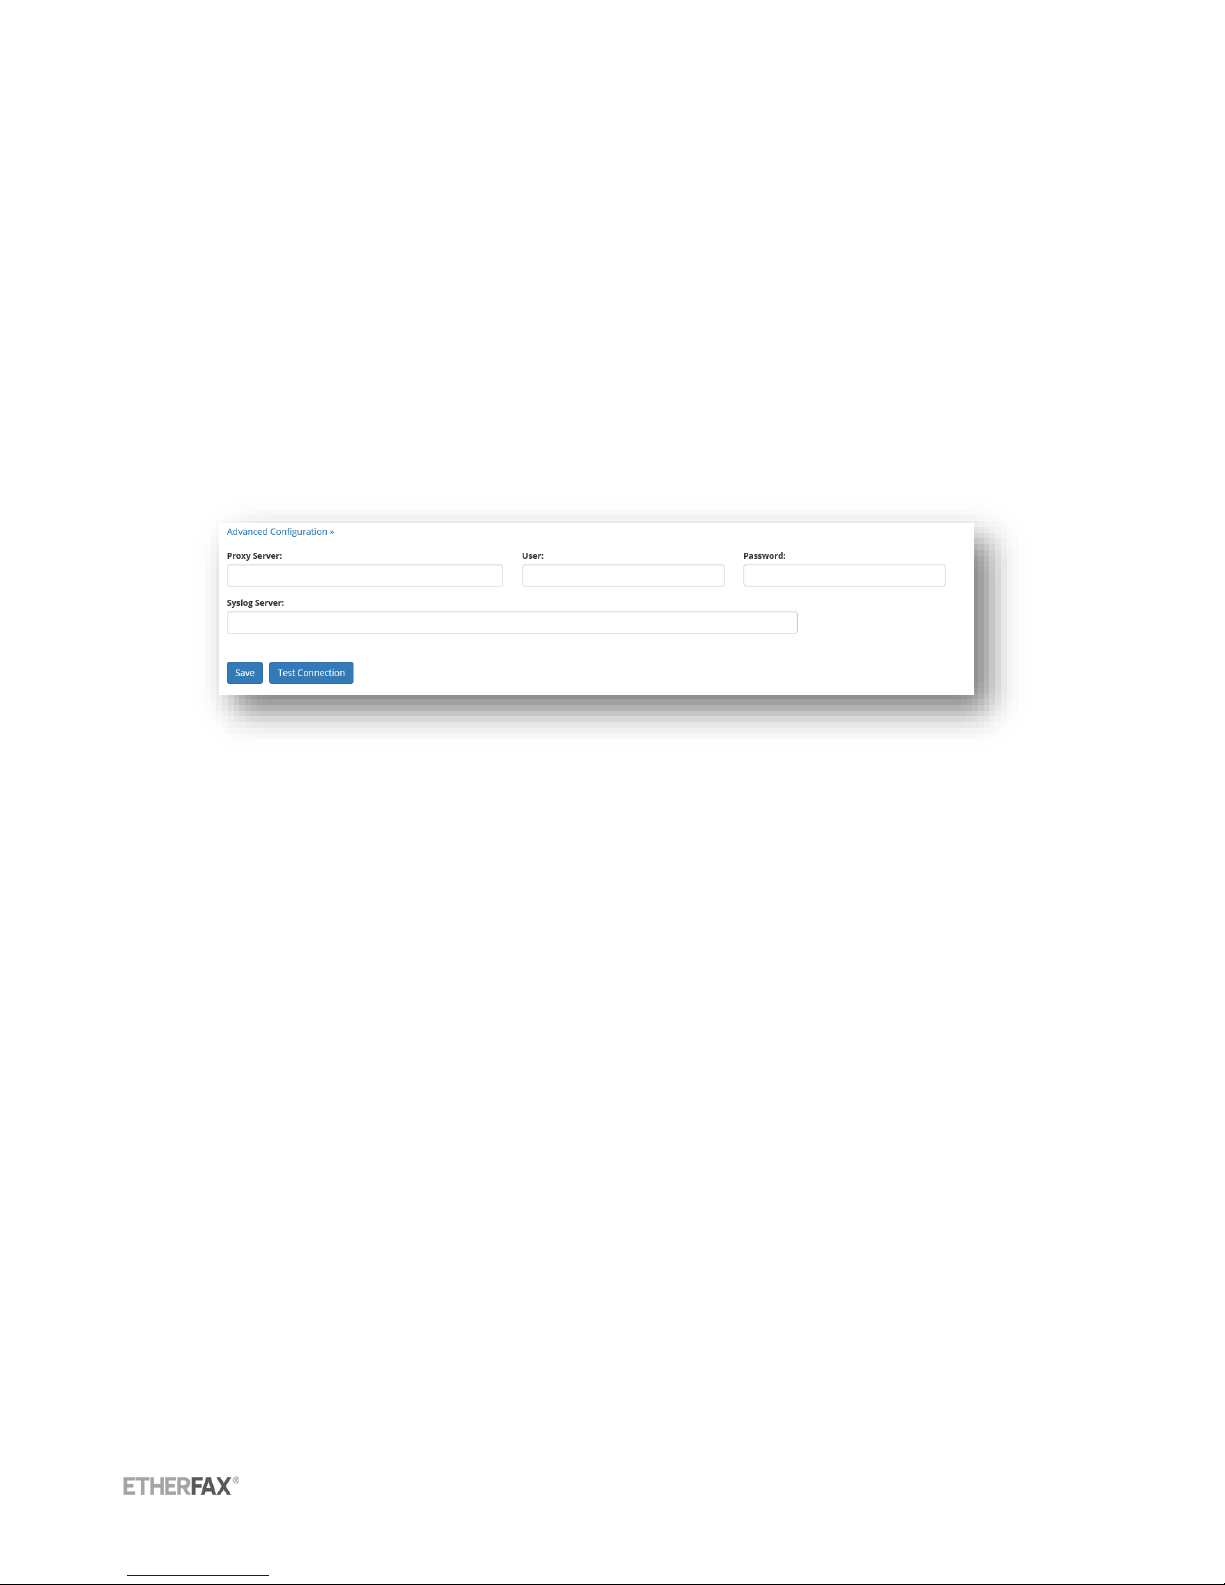
Advanced Configuration
Proxy Server: IP or hostname address to use for connection if proxy server is required.
User: User name to supply if connection through proxy server is required.
Password: Password to supply if connection through proxy server is required.
Syslog Server: IP or hostname address to use for output of etherFAX A2E device syslog messages.

etherFAX A2E User Guide | 12
© 2015 etherFAX LLC.
Network Settings
The etherFAX A2E is configured to use DHCP if available. However if DHCP is not available for use the
device can be configured to use a static or manual IP configuration.
Automatic DHCP: Enable or Disable use of DHCP
The following options are available if DHCP is disabled.
Network Address: Local IP address of etherFAX A2E device
Network Mask: Subnet mask of network
Gateway: IP address of network gateway the etherFAX A2E device should route traffic to
DNS Servers: Domain Name Servers the etherFAX A2E device should use. Multiple DNS servers can be
specified by using a comma (,) between entries.

etherFAX A2E User Guide | 13
© 2015 etherFAX LLC.
Device Information
The device information section provides the device serial number as well as its registration status on
the etherFAX network.
etherFAX A2E User Guide | 14
© 2015 etherFAX LLC.
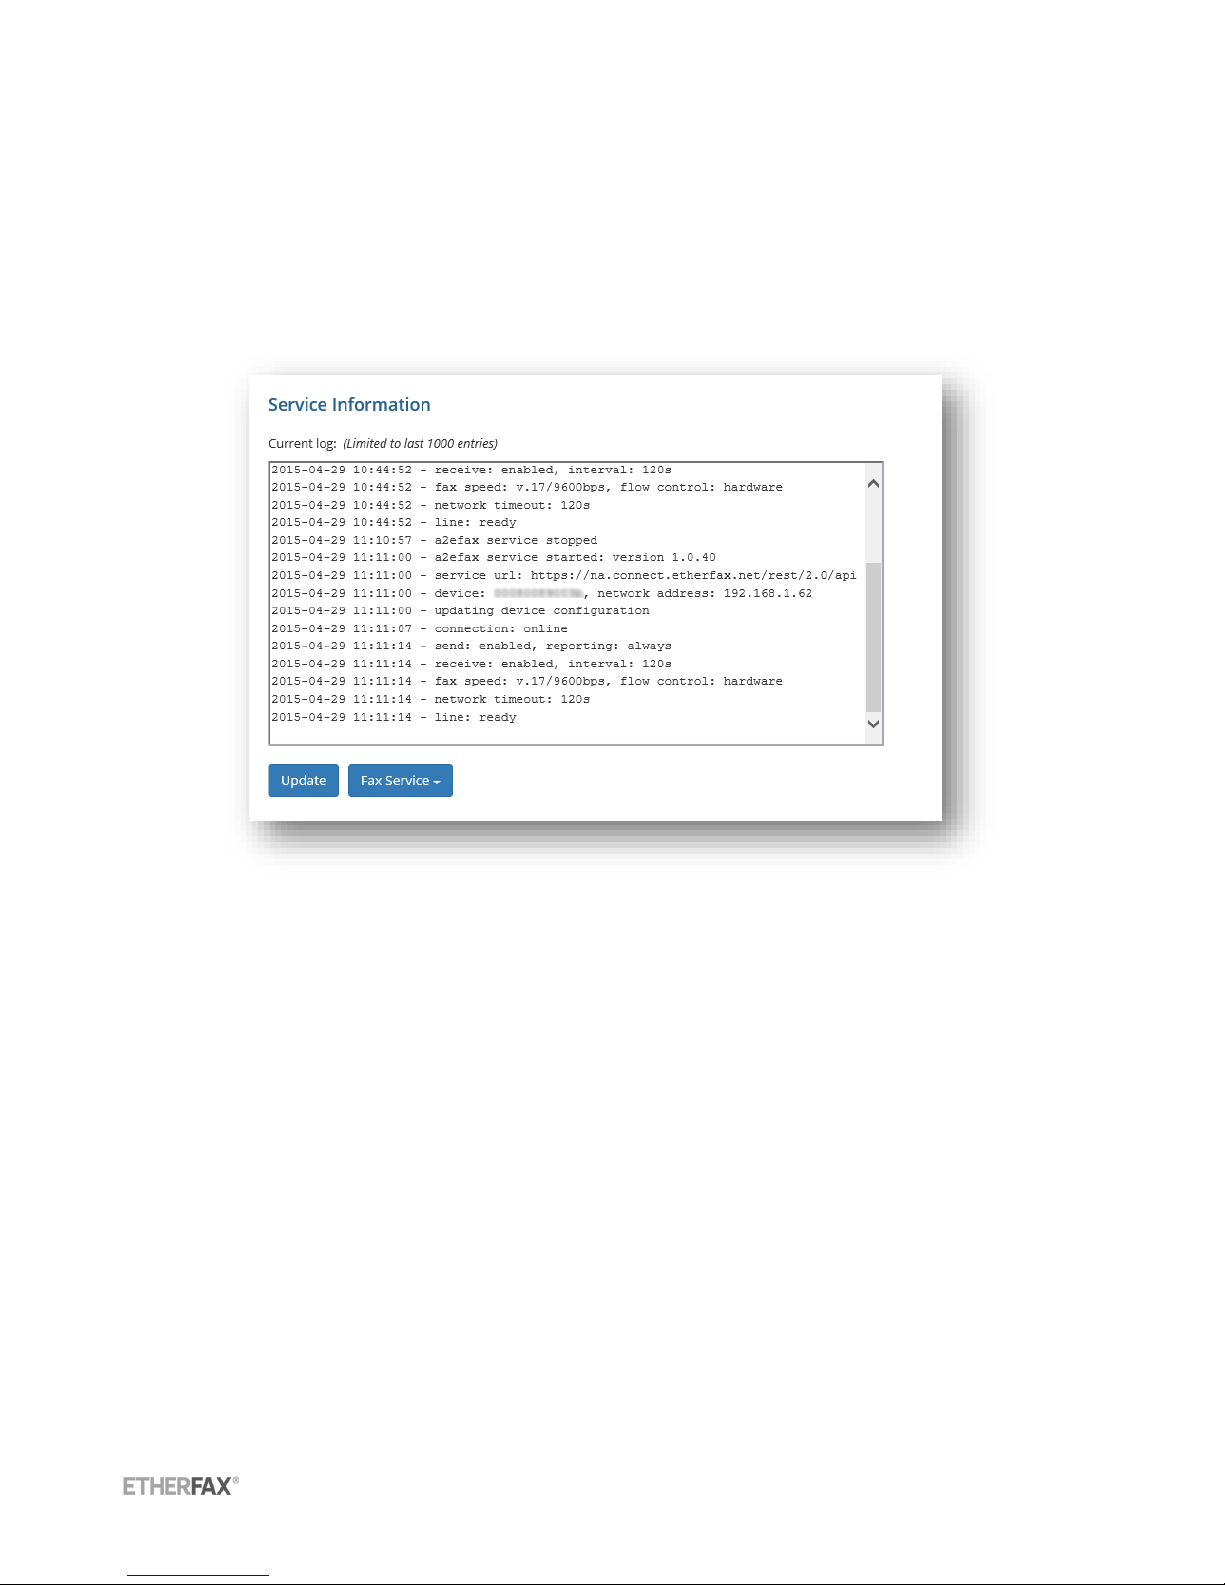
Service Information
Service Logging
The service information section displays the last 1000 entries of the etherFAX A2E log. The log can be
refreshed by selecting ‘Update’. When submitting a support ticket please include the contents of the
current log window along with your issue description.
Service Control
The etherFAX A2E device service can be controlled by selecting ‘Fax Service’. Available service
commands are:
Start
Stop
Restart
After a given command has been issued the current log can be updated to view the etherFAX
A2E status.
etherFAX A2E User Guide | 15
© 2015 etherFAX LLC.
System Tools
Basic network utilities are provided in the etherFAX A2E local device portal to assist in verifying and
troubleshooting network connectivity.
Available utilities:
free –Display RAM details
oLine1 - Indicates Memory details like total available RAM, used RAM, Shared RAM, RAM used for buffers, RAM
used of caching content.
oLine 2 - Indicates total buffers/Cache used and free.
oLine 3 - Indicates total swap memory available, used swap and free swap memory size available.
ping - Sends ICMP ECHO_REQUEST packets to specified network host.
netstat - used to print network connections, routing tables, interface statistics, masquerade
connections, and multicast memberships.
nslookup - Query internet name servers interactively for information. By default, nslookup will
translate a domain name to an IP address (or vice versa).
traceroute - Prints the route that packets take to a network host.
Note: Not all standard command switches are available within the etherFAX A2E device portal.
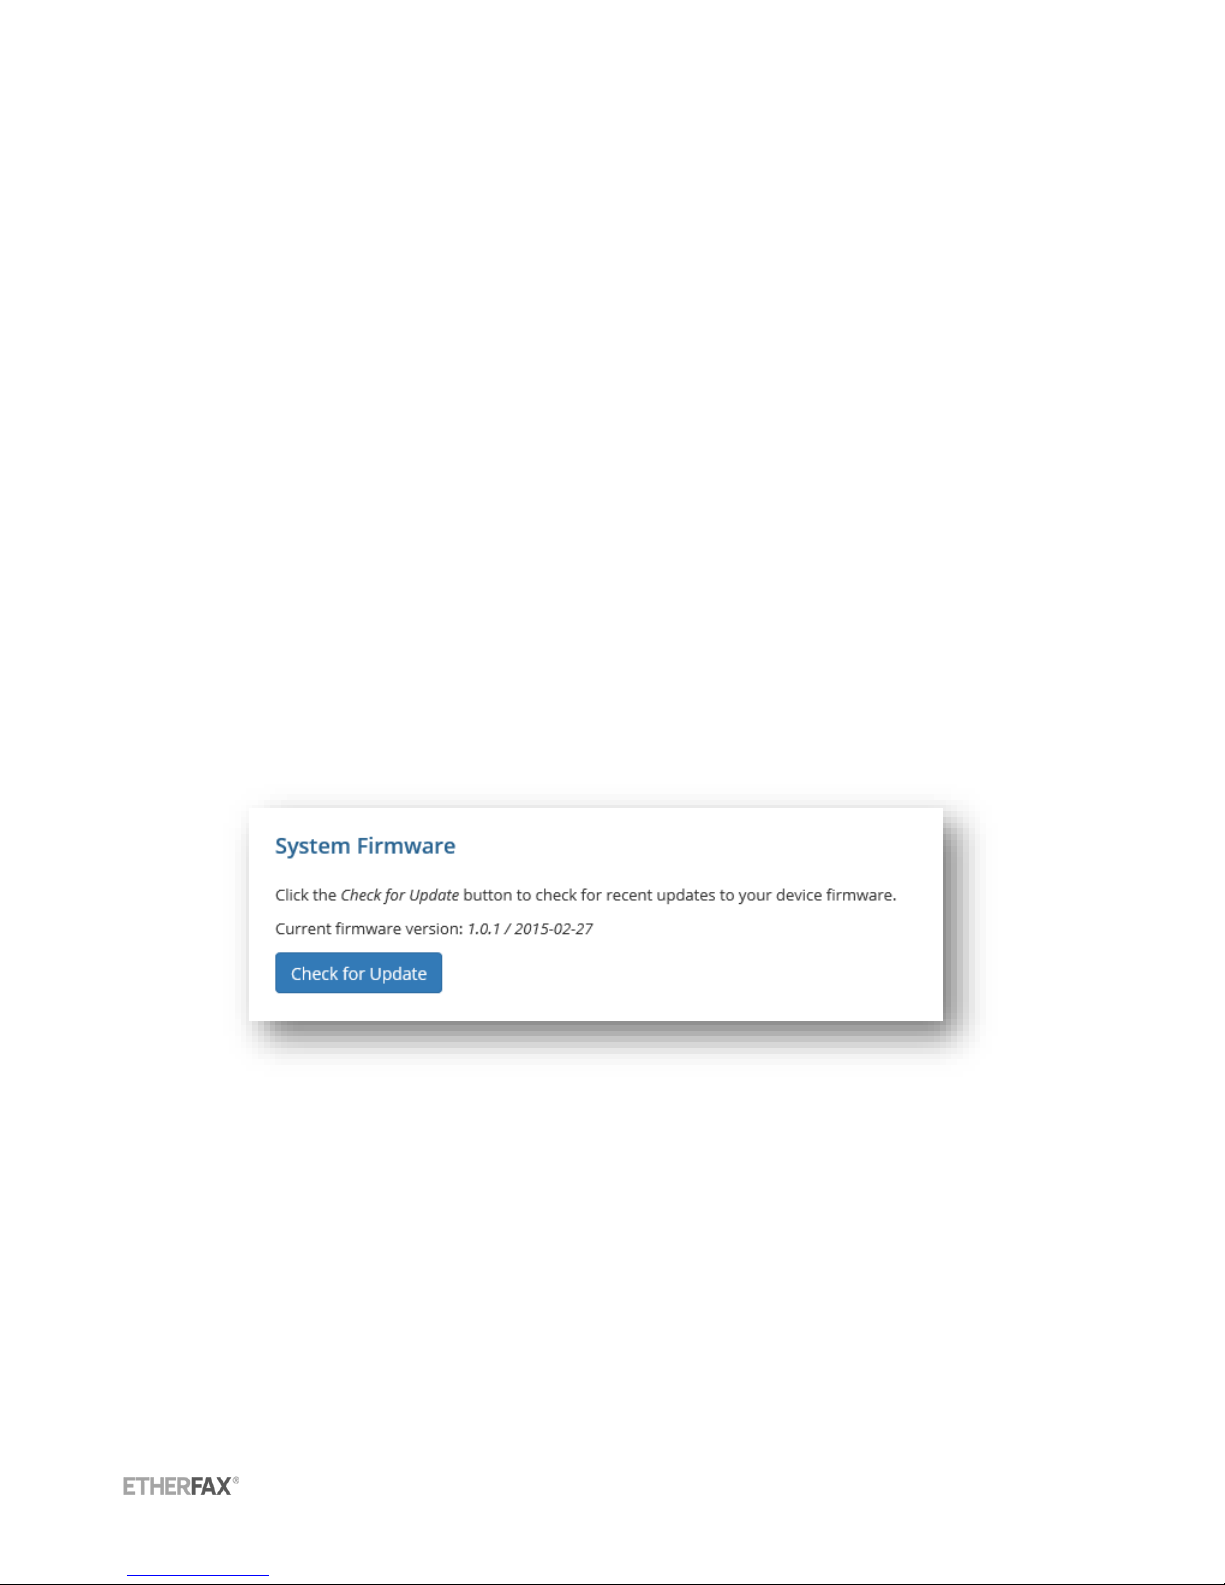
System Firmware
The current firmware loaded on the device can be verified from this menu. A check for the latest
firmware can also be performed as well as the ability to install the latest firmware if a new version is
available.
Installing New Firmware
1. From the System Firmware menu select ‘Check for Update’. The etherFAX A2E device will contact
the etherFAX service to determine if a newer firmware version is available. If a newer firmware is

etherFAX A2E User Guide | 16
© 2015 etherFAX LLC.
available you will be notified and given the option to ‘Install Now’.
2. After selecting ‘Install Now’ the etherFAX A2E will download and install the latest firmware. The
device will automatically reboot once complete.
3. Once the device has rebooted you will need to refresh your internet browser and sign in to the
device.
4. Verify that the device has been updated by checking for an update.
System Reboot
Through the local device portal a reboot can be initiated by selecting ‘Reboot Now’
etherFAX A2E User Guide | 17
© 2015 etherFAX LLC.
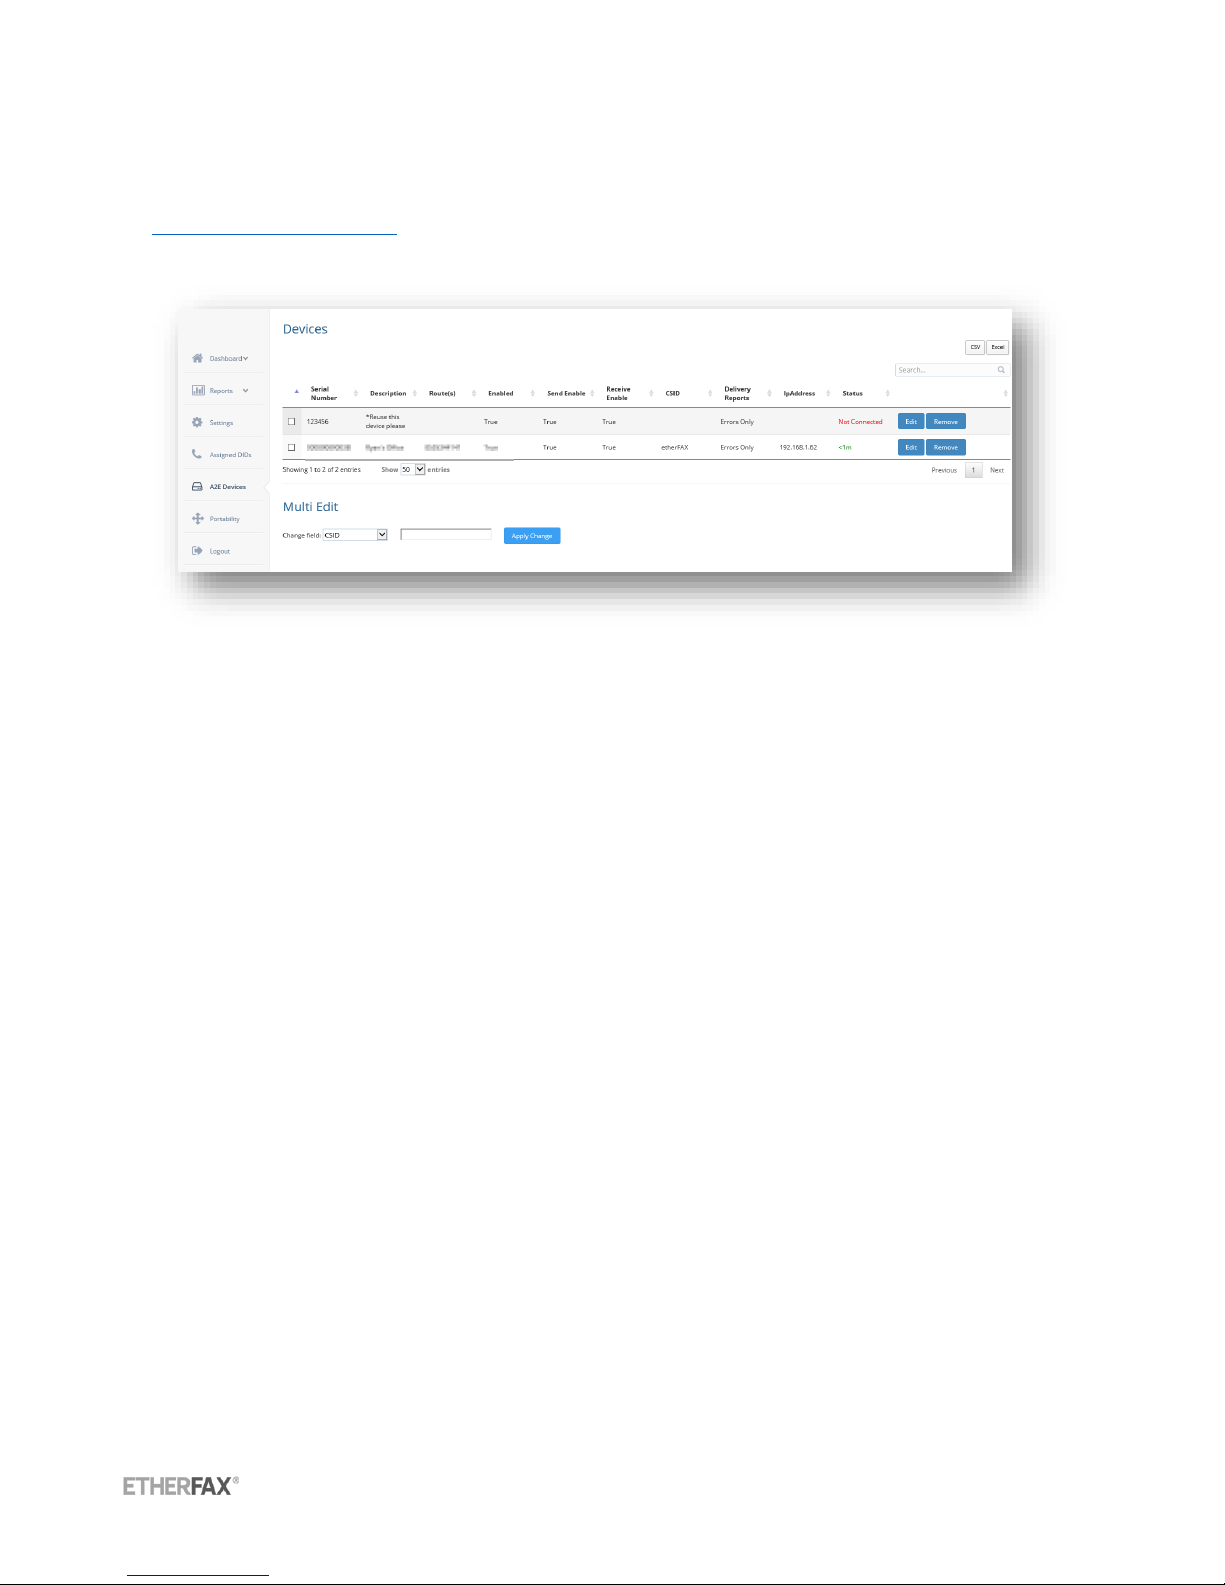
Management via etherFAX Client Portal
The etherFAX A2E can be managed remotely from the etherFAX Client Portal
(https://clients.etherfax.net). Once logged into the etherFAX Client Portal, select A2E Devices from the
navigation menu. Any devices currently assigned to your account will be displayed here.
Multi-Device Edit
From the etherFAX Client Portal you can manage specific settings on multiple devices at once. The
available settings to apply to multiple devices are:
CSID –Called Subscriber Identification, text or numeric value, usually company name or fax
number.
Delivery Report –Set delivery report to print out on errors only, always, or never.
Enabled –Enable devices
Send Enabled –Enable devices for send functionality
Receive Enabled –Enable devices for receive functionality
Select which devices you would like to apply settings to by selecting the checkbox to the left of the
device. Choose the setting from the dropdown, select/input the appropriate setting value, then select
Apply Change.
Device Inventory Report
A device inventory report can be exported to a CSV or Excel file. To obtain a device inventory for all
etherFAX A2E devices provisioned to your account choose CSV or Excel from the top right of the A2E
Devices portal section. You will be prompted for the desired save location on your local computer.
etherFAX A2E User Guide | 18
© 2015 etherFAX LLC.
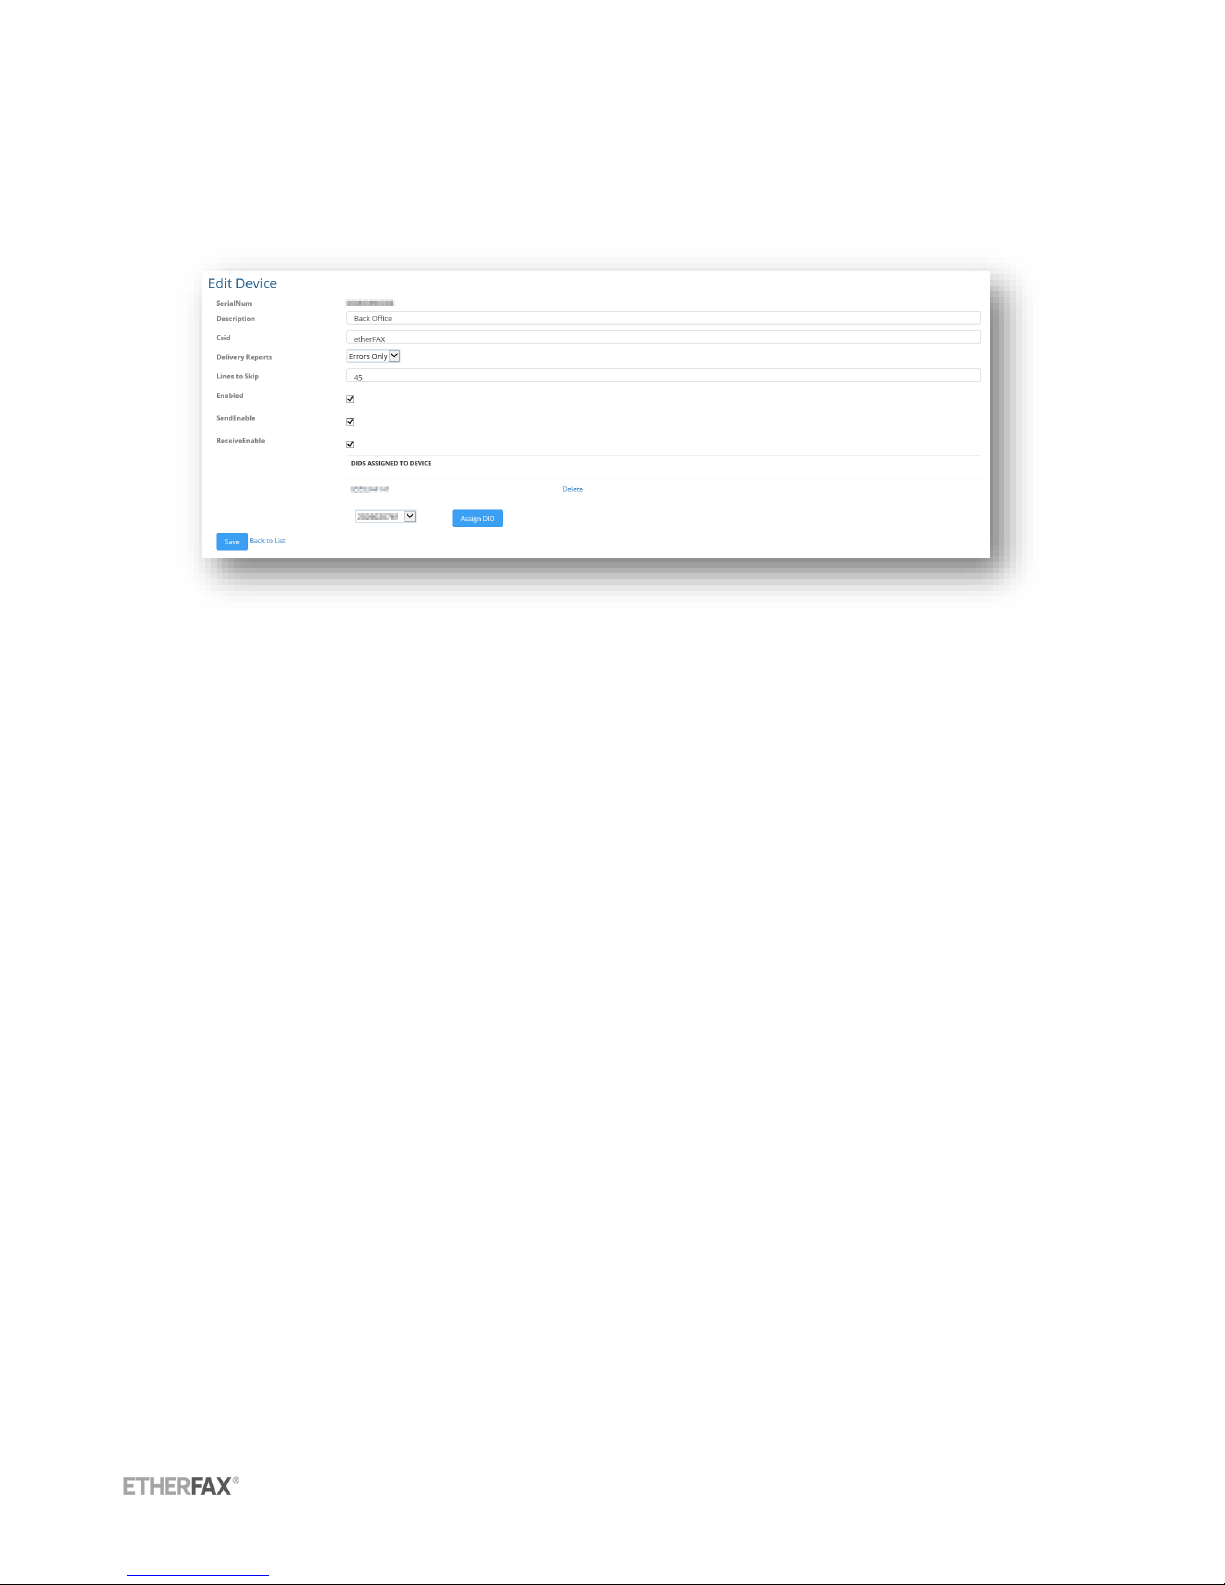
Single Device Edit
To configure a single device select Edit on the right corresponding to the device you would like to
configure.
SerialNum –Serial number of the etherFAX A2E Device
Description –Text value which can describe location or function within the environment
CSID –Called Subscriber Identification, text or numeric value, usually company name or fax
number
Delivery Reports –Set delivery report to print out on errors only, always, or never
Lines to Skip –Value defines number of raster lines that will be removed from top of page. This
allows the fax header placed on the image by the analog fax machine to be skipped and
replaced with the header supplied by etherFAX.
Enabled –Choose to enabled or disable the etherFAX A2E device completely
Send Enabled –Enable device for send functionality
Receive Enabled –Enable device for receive functionality
Assigning DID’s/TFN’s to a device
Any number currently provisioned to your etherFAX account can be assigned to an etherFAX A2E
device. Assigning a number to the A2E device allows it to receive faxes sent to the specified number(s)
and print them out via the attached analog fax device.
To assign a DID or TFN to an etherFAX A2E device, first select and edit the device from the A2E Devices
section of the etherFAX Client Portal. A dropdown will be visible that lists all available numbers on the
etherFAX account. Choose the desired number and select Assign DID. The number is now attached to
the A2E device. Multiple numbers can be assigned to one A2E device.
Note: If faxes are not retrieved from the etherFAX Account Inbox by the etherFAX A2E within 15 minutes
or receipt the fax will be downloaded by the associated fax server application on the account if one
exists.

etherFAX A2E User Guide | 19
© 2015 etherFAX LLC.
Support
For support questions regarding etherFAX implementation with Windows Fax and Scan please contact
etherFAX Support.
+1.877.384.9866
http://www.etherfax.net/support

etherFAX A2E User Guide | 20
© 2015 etherFAX LLC.
This page intentionally left blank.
Table of contents
Popular Modem manuals by other brands

Zoom
Zoom X5 Firmware upgrade

BEC
BEC M2M MX-200e Quick install guide

axing
axing EoC 2-01 Premium Line Operation instructions

TP-Link
TP-Link TD-W8980 Application guide

US Robotics
US Robotics USR5600 installation guide

Planet Networking & Communication
Planet Networking & Communication VC-301 Quick installation guide


