Etisalat Travel Router User manual
User Guide
2
Etisalat Travel Router USER GUIDE
Table of Contents
1–PREFACE......................................................................... 3
2–PLACEMENT.................................................................... 4
2.1 ROUTER PLACEMENT ............................................. 5
2.2 AVOID OBSTACLES AND INTERFERENCE ................ 5
2.3 CORDLESS PHONES ............................................... 6
2.4 CHOOSE THE “QUIETEST” CHANNEL FOR YOUR
WIRELESS NETWORK........................................... 6
3–GETTING STARTED .......................................................... 7
3.1 CONNECTING YOUR DEVICE TO THE ROUTER ........ 9
3.2 DEFAULT SETTINGS ............................................... 9
3.3 CONFIGURING YOUR ROUTER AND SETTING UP
YOUR COMPUTER..............................................10
4–ADVANCED ................................................................... 12
5–WIRELESS..................................................................... 18
5.1 BASIC.................................................................. 19
5.2 ADVANCED.......................................................... 19
5.3 SECURITY ............................................................ 20
5.4 WPS .................................................................... 22
6–FIREWALL ..................................................................... 23
7–ADMINISTRATION......................................................... 27
8–TROUBLE SHOOTING......................................................31
9–ESTABLISHING YOUR WIRELESS CONNECTION ............. 34

3
Etisalat Travel Router USER GUIDE
Preface
Your Etisalat Travel Router Congratulations on the purchase of your Etisalat Travel Router.
Etisalat’s Travel Router is a versatile and portable solution
for wireless mobile broadband for the home, office or on
the road. This device creates an instant Wireless N hotspot
allowing you to share an Internet connection across
multiple devices like smart phones, gaming consoles or other
computers. With wireless data speeds of up to 150Mbps it is
300% faster than Wireless G technology.
Connection to the Internet is achieved through either
a 3G USB modem or via a fixed line (DSL/Cable/Satellite)
connection to the routers WAN port. The integrated Lithium-
Ion battery delivers networking power for up to 5 hours in
one power-charge-cycle, which means you can set up your
own Wireless network without searching for a power point.
Featuring automatic Internet failover, this device will keep
you connected. In case the DSL/Cable/Satellite connection
drops out, it activates the 3G connection. The WAN port
can also be configured optionally as a LAN port for a wired
connection to a network client.
The device also features advanced security such as VPN pass-
through, a full complement of wireless security options and a
built in firewall. The setup is simple via a web browser interface.
The Etisalat Travel Router is compatible with Mac OS X,
Windows OS and Linux.
Package Contents
1. Etisalat Travel Router
2. 5VDC~2A Power Adapter
3. Ethernet CAT5E Crossover Cable
4. Quick Install Guide
5. CD-ROM (User’s Manual)
6. Li-lon Battery
Key Features
• Stylish and compact Travel Router with internal Wi-Fi
antenna and battery
• CreatesinstantWirelesshotspotstosharetheInternet
connection of a 3G USB modem or DSL/Cable modem
• Supports Wireless N standard with data speeds up to
150Mbps
• 1USB2.0hostportsupports3Gmodems
• 1 WAN port for alternate wired Internet connection
(DSL/Cable/Satellite via Ethernet)
• Ensuresconnectivityandbusinesscontinuitywithauto-
Internet-failover from WAN port to 3G USB modem
• Mains-operated or up to 5 hours battery power if no
power point is available
• Hassle-freeinternalWi-Fiantenna(1Transmit/1Receive)
• EasyWirelessProtectedSetup(WPS)bythesingletouch
of a button to establish a secure wireless connection
• FullWirelesssecurity-WEP,WPA,WPA2
• Browser based interface for configuration and
management: OS independent and easy to use

Placement

5
Etisalat Travel Router USER GUIDE
Placement
PLACEMENT
Just like your mobile phone, a 3G USB Modem’s location will affect its signal strength to
the 3G Mobile Base Station (Cell Tower). The data speed achievable from a 3G USB modem
is relative to this signal strength, which is affected by many environmental factors. Please
keep in mind that the 3G USB Modem will need adequate signal strength in order to provide
Internet connectivity whilst choosing a location to place your Travel Router.
Similarly to the 3G USB Modem, the wireless connection between the Router and your
Wi-Fi devices will be stronger the closer your connected devices are to your Router. Your
wireless connection and performance will degrade as the distance between your Router
and connected devices increases. This may or may not be directly noticeable, and is greatly
affected by the individual installation environment.
If you have concerns about your network’s performance that might be related to range or
obstruction factors, try moving the computer to a position between three to five meters
from the Router in order to see if distance is the problem. If difficulties persist even at
close range, please contact Etisalat Technical Support.
Note: While some of the items listed can affect network performance, they will not prohibit your wireless network
from functioning; if you are concerned that your network is not operating at its maximum effectiveness,
please contact Etisalat Technical Support.
Router Placement
Place your Router as close as possible to the centre of your wireless network
devices. To achieve the best wireless network coverage for your “wireless clients”
(i.e., computers with built-in or USB Wireless Adapters, Laptops with built-in Wireless,
Wireless PDA / iPhone, etc):
•In multi-storey homes, place the Router on a floor that is as close to the centre of the
home as possible. This may mean placing the Router on an upper floor.
•Avoid placing the Router near a cordless telephone that operates at the same radio
frequency (2.4GHz).
Avoid obstacles and interference
Avoid placing your Router near devices that may emit radio “noise,” such as microwave
ovens. Dense objects that can inhibit wireless communication include:
• Refrigerators
• Washers and/or dryers
• Metal cabinets
• Large aquariums
• Metallic-based, UV-tinted windows
If your wireless signal seems weak in some spots, make sure that objects such as these are
not blocking the signal’s path (between your devices and the Router).

6
Etisalat Travel Router USER GUIDE
Placement
Cordless Phones
If the performance of your wireless network is impaired after considering the above issues,
and you have a cordless phone:
•Try moving cordless phones away from your Travel Router and your wireless-enabled
computers.
•Unplug and remove the battery from any cordless phone that operates on the 2.4GHz
band (check manufacturer’s information). If this fixes the problem, your phone may be
interfering with the Wi-Fi Router.
•If your phone supports channel selection, change the channel on the phone to the
farthest channel from your wireless network. For example, change the phone to channel
1 and move your Travel Router to channel 11. See your phones user manual for detailed
instructions.
•If necessary, consider switching to a 900MHz or 5GHz cordless phone.
Choose the “Quietest” Channel for your
Wireless Network
In locations where homes or offices are close together, such as apartment buildings or
office complexes, there may be wireless networks nearby that can conflict with your
wireless network.
Use the Site Survey capabilities found in the Wireless Utility of your wireless adapter to
locate any other wireless networks that are available (see your wireless adapter’s user
manual), and switch your Router and computers to a channel as far away from other
networks as possible.
•Experiment with more than one of the available channels, in order to find the clearest
connection and avoid interference from neighbouring cordless phones or other wireless
devices.

Getting Started

8
Etisalat Travel Router USER GUIDE
Getting Started
GETTING
STARTED
The LED Indicators of the 3G Travel Router
The Travel Router has been designed to be placed on a desktop.
The LED indicators are easily visible on the top of the Router
to provide you with information about network activity and
status. See below for an explanation of each of the features.
LED Icon Description
Power Lights up when powered ON.
3G Lights up when the router is connected via 3G.
Wireless Lights up when WLAN is enabled. Blinks on traffic.
WAN /
LAN
Light up when specific Ethernet connection is
established, Blinks on WAN / LAN traffic and Blinks on
Temporarily overridden to LAN mode.
The Power LED - Displaying Power and Battery Status
When Router is switched on and battery inside
Green: power adapter is plugged in and battery is fully charged
Green in flashing: power is provided by battery
Amber: power adapter is plugged in and charging the battery
RED: Battery power is low
When device is on without battery inside
Amber: Power adapter is plugged in
When device is off and with battery inside
Amber: power adapter is plugged in and charging the battery
The Connectors and Buttons of the 3G Travel Router
Side Ports
Reset Press once to initiate LAN port function. Hold this button
down for 10 seconds to reset to factory defaults.
WPS Button Press once to initiate Wireless Protected Setup
3G USB Modem USB port for connecting a compatible 3G USB Modem
WAN / LAN RJ45 WAN Ethernet port for a Fixed Line (ADSL/Cable/
Satellite) network connection (factory default) or LAN
port for wired Ethernet clients (computers, laptops etc.)
Power Power connector, connects to DC 5V 2A Power Adapter
Network and System Requirements
Before continuing with the installation of your Travel Router,
please confirm that you comply with the minimum system
requirements below.
•Compatible 3G USB Modem with an Active SIM/Data
Service if you want to use 3G Broadband service.
Note: Subject to terms and conditions from your 3G Mobile Broadband
Service Provider.
•Computer with Windows, Macintosh, or Linux-based
operating systems with a working Ethernet network
adapter with TCP/IP Protocol installed.
•A web browser such as Internet Explorer, Netscape
Navigator, Mozilla Firefox, Opera, Safari etc.
Wireless Computer System Requirements
•Computer with a working IEEE 802.11b, 802.11g or
802.11n wireless adapter.
Modem Requirements
In order to use the WAN Ethernet port for Internet
connectivity your fixed line service (Cable/xDSL/Satellite)
modem must be equipped with an RJ45 Ethernet port. Many
modems have both an RJ45 Ethernet port and a USB port.
If you have a modem with both Ethernet and USB, and are
using the USB port at this time, you will be instructed to use
the RJ45 Ethernet port during the installation procedure. If
your modem only has a USB port, you can request a different
type of modem from your Internet Service Provider, or you
can purchase a modem that has an RJ45 Ethernet port on it.
9
Etisalat Travel Router USER GUIDE
Getting Started
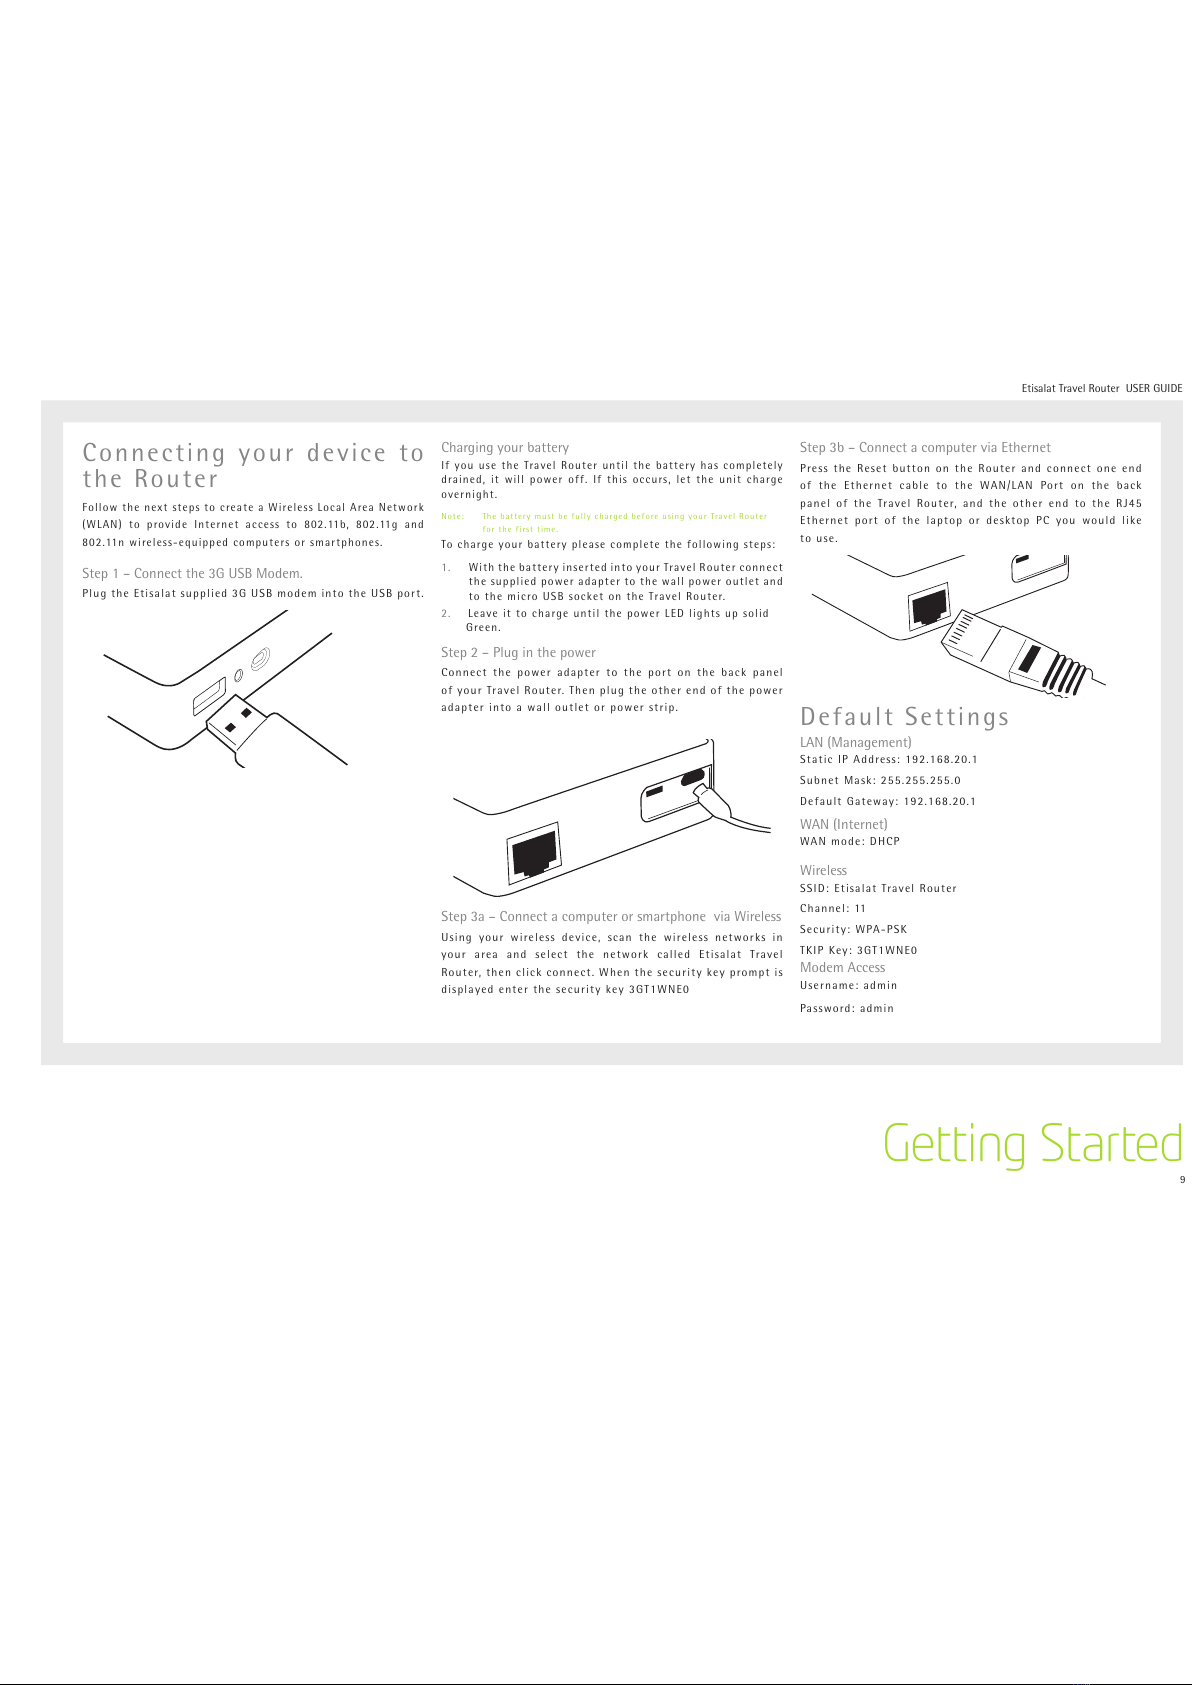
Connecting your device to
the Router
Follow the next steps to create a Wireless Local Area Network
(WLAN) to provide Internet access to 802.11b, 802.11g and
802.11n wireless-equipped computers or smartphones.
Step 1 – Connect the 3G USB Modem.
Plug the Etisalat supplied 3G USB modem into the USB port.
Charging your battery
If you use the Travel Router until the battery has completely
drained, it will power off. If this occurs, let the unit charge
overnight.
Note: The battery must be fully charged before using your Travel Router
for the first time.
To charge your battery please complete the following steps:
1. With the battery inserted into your Travel Router connect
the supplied power adapter to the wall power outlet and
to the micro USB socket on the Travel Router.
2. Leave it to charge until the power LED lights up solid
Green.
Step 2 – Plug in the power
Connect the power adapter to the port on the back panel
of your Travel Router. Then plug the other end of the power
adapter into a wall outlet or power strip.
Step 3a – Connect a computer or smartphone via Wireless
Using your wireless device, scan the wireless networks in
your area and select the network called Etisalat Travel
Router, then click connect. When the security key prompt is
displayed enter the security key 3GT1WNE0
Step 3b – Connect a computer via Ethernet
Press the Reset button on the Router and connect one end
of the Ethernet cable to the WAN/LAN Port on the back
panel of the Travel Router, and the other end to the RJ45
Ethernet port of the laptop or desktop PC you would like
to use.
Default Settings
LAN (Management)
Static IP Address: 192.168.20.1
Subnet Mask: 255.255.255.0
Default Gateway: 192.168.20.1
WAN (Internet)
WAN mode: DHCP
Wireless
SSID: Etisalat Travel Router
Channel: 11
Security: WPA-PSK
TKIP Key: 3GT1WNE0
Modem Access
Username: admin
Password: admin
10
Etisalat Travel Router USER GUIDE
Getting Started
Configuring your Router and setting up your
computer
Having physically connected your Router, the next step is to
configure the Router to establish a broadband connection.
Depending on your computers current settings you may first
need to reconfigure the TCP/IP (Network Settings) to access
your Router. Follow the instructions for your operating
system.
Windows Vista computers
1. In the Windows task bar, click on Start and then click
Control Panel.
2. Click on Network and Sharing Center. (Classic view only)
3. Click on Manage Network Connections on the left menu.
4. Right click on Local Area Connection and click on
Properties
5. The Local Area Connection dialog box will display a list of
currently installed network items. Ensure that the check
box to the left of the item labelled Internet Protocol
Version 4 (TCP/IPv4) is checked. Select Internet Protocol
Version 4 (TCP/IPv4) and click on Properties.
6. In the Internet Protocol Version 4 (TCP/IPv4) properties
dialog box, click the radio button labelled Obtain an
IP address automatically. Also click the radio button
labelled Obtain DNS server address automatically.
7. Click OK twice to confirm your changes and close the
Control Panel.
Windows® XP computers
1. In the Windows task bar, click the Start button, and then
click Control Panel.
2. Click on Network & Internet Connections icon. (Category
mode only).
3. Click the Network Connections icon.
4. In the LAN or High-Speed Internet window, right-click
on the icon corresponding to your network interface
card (NIC) and select Properties. (Often, this icon is
labeled Local Area Connection).
5. The Local Area Connection dialog box displays with a
list of currently installed network items. Ensure that
the check box to the left of the item labelled Internet
Protocol (TCP/IP) is checked. Select Internet Protocol
TCP/IP and click on Properties.
6. In the Internet Protocol (TCP/IP) Properties dialog box,
click the radio button labelled Obtain an IP address
automatically. Also click the radio button labelled
Obtain DNS server address automatically.
7. Click OK twice to confirm your changes, and close the
Control Panel.
Mac OSX 10.4
1. Click the Apple icon and choose System Preferences.
2. Click on the Network icon.
3. Set Location to Automatic and Show to Built In Ethernet.
4. Click on the TCP/IP tab.
5. In the Configure option, choose Use DHCP with automatic
address.
6. Click on Apply Now.
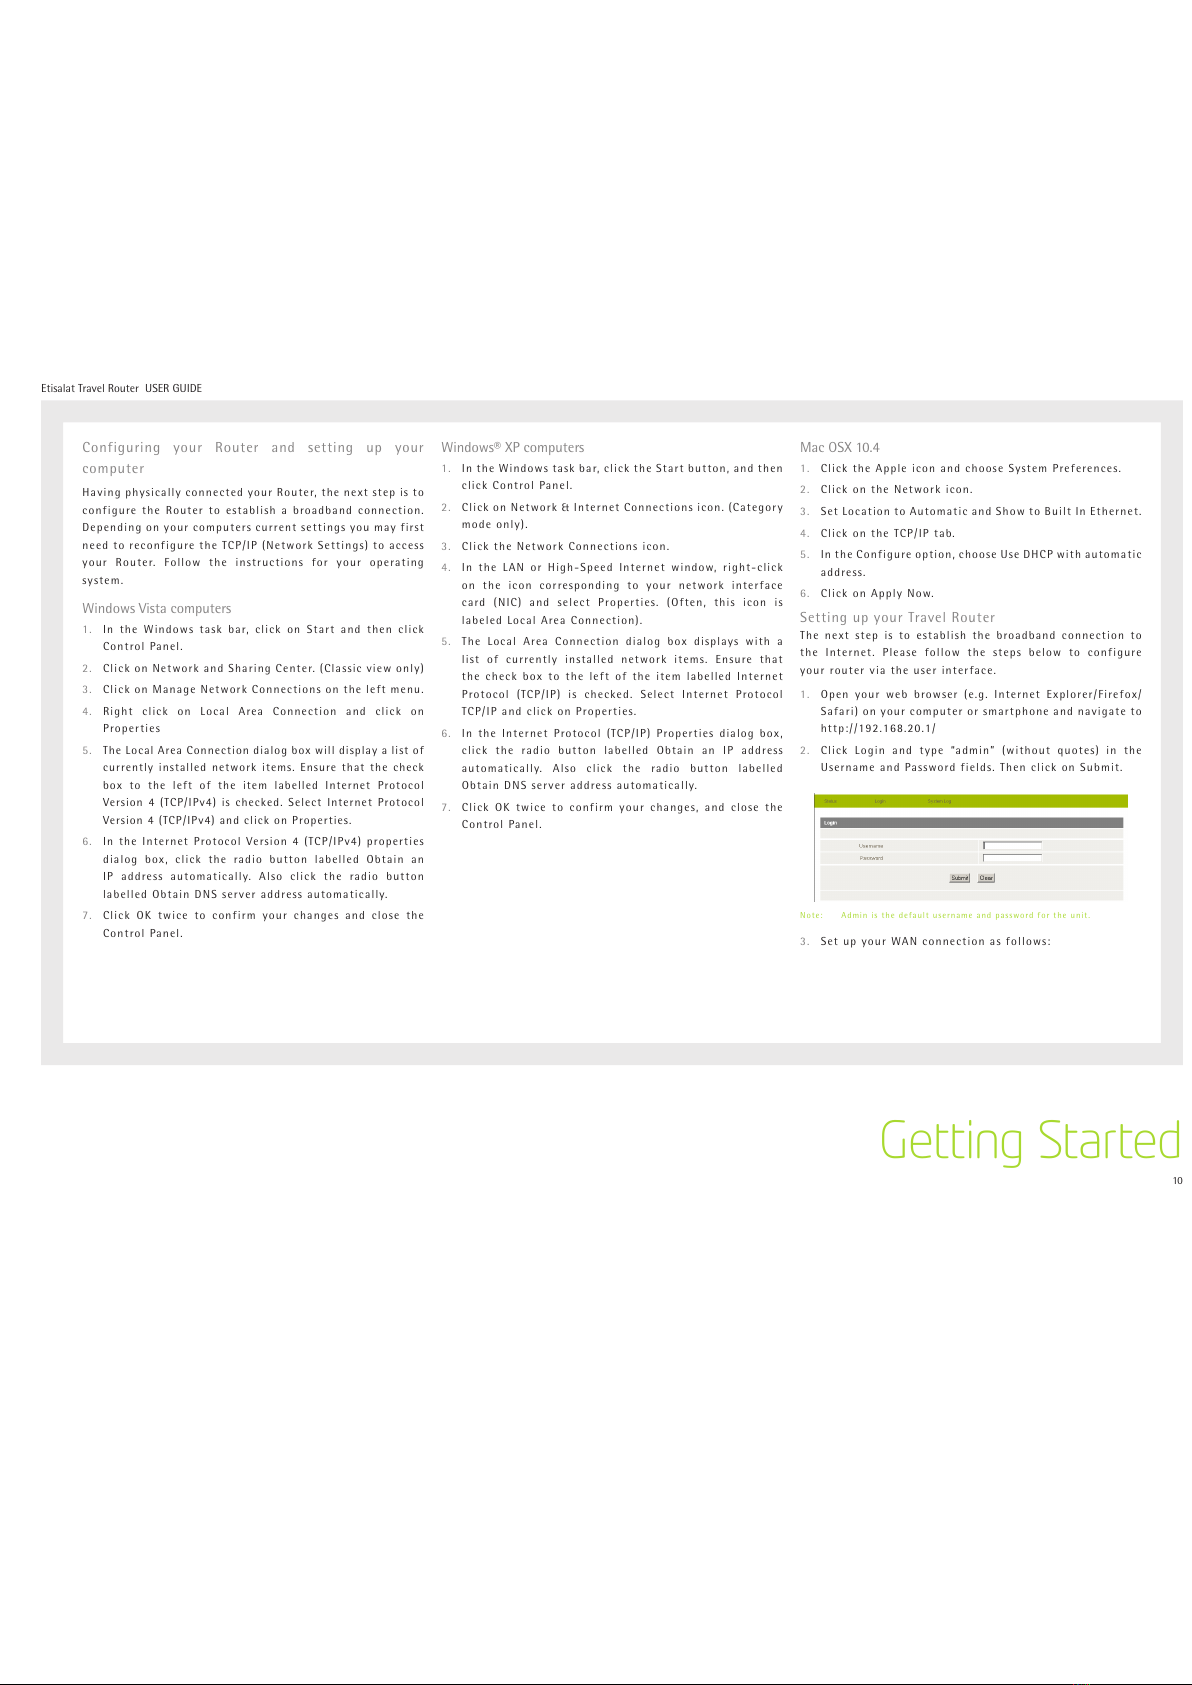
Setting up your Travel Router
The next step is to establish the broadband connection to
the Internet. Please follow the steps below to configure
your router via the user interface.
1. Open your web browser (e.g. Internet Explorer/Firefox/
Safari) on your computer or smartphone and navigate to
http://192.168.20.1/
2. Click Login and type “admin” (without quotes) in the
Username and Password fields. Then click on Submit.
Note: Admin is the default username and password for the unit.
3. Set up your WAN connection as follows:

11
Etisalat Travel Router USER GUIDE
Getting Started
Using the Router with the Etisalat 3G Mobile Broadband
Internet Service
Note: Before proceeding with this step, ensure that your 3G USB Dongle
has been plugged into the USB port of your Travel Router
To configure a 3G WAN connection, please follow these
steps:
•Mouseover Internet Settings an d c l i c k on WWAN
• TheappropriateEtisalatprofileandAPNareselectedbydefault
• IfyouwishtoenteradifferentAPNtouse,clickonthe“Profile
Name” pull down menu and select an unused profile
•Click in the “APN” section and enter: etisalat.ae
(or your provided APN if necessary)
Otherwise if:
• Your S I M c a rd re q uires a PIN c o d e
•Your 3G broadband service provider requires you to
input the username/password for your 3G connection.
•You wish to use other alternate 3G connection details
(such as a special APN)
Please enter any other relevant information on this screen
as provided by Etisalat
• Click Apply to save the settings
•If everything is configured properly, the Status page will
show that your 3G service is online and the WAN IP
address that has been assigned.
Using the Travel Router with a fixed line Broadband
Internet Service (DSL/Cable)
Note: Before proceeding with this step, ensure that your WAN connection
has been plugged into the WAN port of your Travel Router
To configure a non WAN connection (Static, DHCP, PPPoE,
PPTP), please follow these steps:
•Mouseover Internet Settings and click on WAN
•Select your WAN Connection type from the dropbox
(Static, DHCP, PPPoE, PPTP)
•Enter the relevant information on this screen as supplied
by your Broadband ISP
•Click Apply to save the settings
•If everything is configured properly, the Status page
will show that your WAN service is online and the WAN
IP address that has been assigned. Non-3G connection
status page example:

Advanced

13
Etisalat Travel Router USER GUIDE
Advanced
ADVANCED
FEATURES
This section explains other features that you may want to
enable depending on your application. Some features can
add extra stability and error recovery. Other features are
available to assist with integrating the Travel Router with
your application.
Login Procedure
1. Open your web browser (e.g. Internet Explorer/Firefox/
Safari) and navigate to http://192.168.20.1/
2. Click Login and type “admin” (without quotes) in the
Username and Password fields. Then click on Submit.
Note: admin is the default username and password for the unit.
Status
The status page provides system related information. It is
shown on login to the Router, and can also be accessed by
selecting Status from the top menu.
By default, the status page will show System Info, Local
Network, WWAN, Connection Status and Ethernet Status. To
view either WAN, PPPoE or PPTP individually, click on their
relevant buttons. To view them all, click on the All Status
button
Ethernet Port Status
The default setting for the Router’s Ethernet port is set
to operate as a WAN port. But the Travel Router allows
the Ethernet port to be changed from WAN to LAN or LAN
to WA N .
Ethernet Port status Description
Current Current port status, either WAN or LAN
LAN Change the current port status to LAN
WAN Change the current port status to WAN
3G Internet Settings
This page allows you to setup your WWAN (Wireless Wide
Area Network) connection. Enter the relevant settings as
provided by Etisalat.
Note: The 3G connection fields may not be necessary for your connection
The information on this page will only be used when your service
provider requires you to enter a User Name and Password to connect
to the 3G network.
Name Description
APN: Enter the APN as supplied by Etisalat
User Name: Enter your 3G username
Password: Enter your 3G password
3G NAT: Enables network address translation on your 3G connection
WAN NAT: Enables network address translation on your WAN connection
Operation Mode; There are 3 options:
‘Always On’ Keeps the Internet connection alive, does not disconnect.
‘OFF’ Does not connect to the Internet.
‘Automatic
3G Backup’
The Automatic 3G Backup feature of the Travel Router is
designed to provide a backup 3G Internet connection in case
your primary connection should fail. To use this feature, you
will need both an Ethernet WAN connection (from an xDSL
modem/ISDN/Satellite etc) and a 3G WAN connection.
PIN: Enter the Pin Code for your SIM card

14
Etisalat Travel Router USER GUIDE
Advanced
WAN
Select the WAN connection type suitable for your environment and configure parameters
according to the selected connection type.
STATIC (FIXED IP)
If your WAN connection uses a static IP address, please select Static IP Address and fill in
the required information in the fields provided.
Name Description
IP Address: Type in the IP address assigned by your Internet Service Provider
Subnet Mask: Type in the Subnet mask assigned by your Internet Service Provider
Default Gateway: Type in the WAN Gateway assigned by your Internet Service Provider
Primary/ Secondary DNS: Type in the DNS address assigned by your Internet Service Provider
MAC Clone: Please input the MAC address of your computer here if your service provider only permits
computers with a certain MAC address to access the Internet. If you are using the computer
which used to connect to the Internet via a cable modem, you can simply press the ‘Default’
button to fill the MAC address field with the MAC address of your computer.
NAT Configuration Allows you to enable or disable network address translation (NAT) for this WAN connection type
Click Apply to save the settings.
DHCP (AUTO CONFIG)
This connection will get the IP address from the Internet service provider. Choose this
connection if you are connecting the router to a Cable Modem service. Leave everything as
default unless instructed by your Internet Service Provider.
Name Description
Hostname Please input the host name of your computer. This is optional, and only required if your service
provider asks you to do so.
MAC Clone Please input the MAC address of your computer here if your service provider only permits computers
with a certain MAC address to access the Internet. If you are using the computer which used to
connect to Internet via a cable modem, you can simply press the ‘Default’ button to fill the MAC
address field with the MAC address of your computer.
NAT Configuration Allows you to enable or disable network address translation (NAT) for this WAN connection type
Click Apply to save the settings.

15
Etisalat Travel Router USER GUIDE
Advanced
PPPOE (ADSL)
Most ADSL services use the PPP over Ethernet protocol. Use
this if you connect your Travel Router to a bridged ADSL
modem.
Name Description
Username/Password Type in your PPPoE account username and password.
Operation Mode; There are 3 options:
‘Keep Alive’ Keeps the Internet connection alive, does not
disconnect.
‘On Demand’ Only connects to the Internet when there’s a connect
attempt
‘Manual’ Only connects to the Internet when the ‘Connect’
button on this page is pressed, and disconnects when
the ‘Disconnect’ button is pressed.
MAC Clone Please input the MAC address of your computer here
if your service provider only permits computers with
a certain MAC address to access the Internet. If you
are using the computer which used to connect to the
Internet via cable modem, you can simply press the
‘Default’ button to fill the MAC address field with the
MAC address of your computer.
NAT Configuration Allows you to enable or disable network address
translation (NAT) for this WAN connection type
Click Apply to save the settings.
PPTP
PPTP (Point to Point Tunneling Protocol) allows for a secure
connection over the Internet by simply dialing in a local
point provided by your ISP. The following screen allows
client PCs to establish a normal PPTP session and provides
hassle-free configuration of the PPTP client on each client
PC.
Name Description
Server IP address: Type in the server IP address assigned by your PPTP
Provider.
PPTP Account/
Password:
Type in the username and password assigned by your
PPTP provider.
Address Mode: Select Dynamic if your service uses a DHCP server, or
select Static and type in the IP address, Subnet Mask
and Default Gateway assigned by your Internet Service
Provider.
Operation Mode; There are 3 options:
‘Keep Alive’ - Keeps the Internet connection alive, does not disconnect.
‘On Demand’ - Only connects to the Internet when there’s a connect
attempt
‘Manual’ - Only connects to the Internet when the ‘Connect’ button
on this page is pressed, and disconnects when the
‘Disconnect button is pressed.
MAC Clone: Please input the MAC address of your computer here,
if your service provider only permits computers with a
certain MAC address to access Internet. If you’re using
the computer which used to connect to Internet via cable
modem, you can simply press ‘Fill My MAC’ button to
fill the MAC address field with the MAC address of your
computer.
NAT Configuration Allows you to enable or disable network address
translation (NAT) for this WAN connection type
Click Apply to save the settings.
16
Etisalat Travel Router USER GUIDE
Advanced
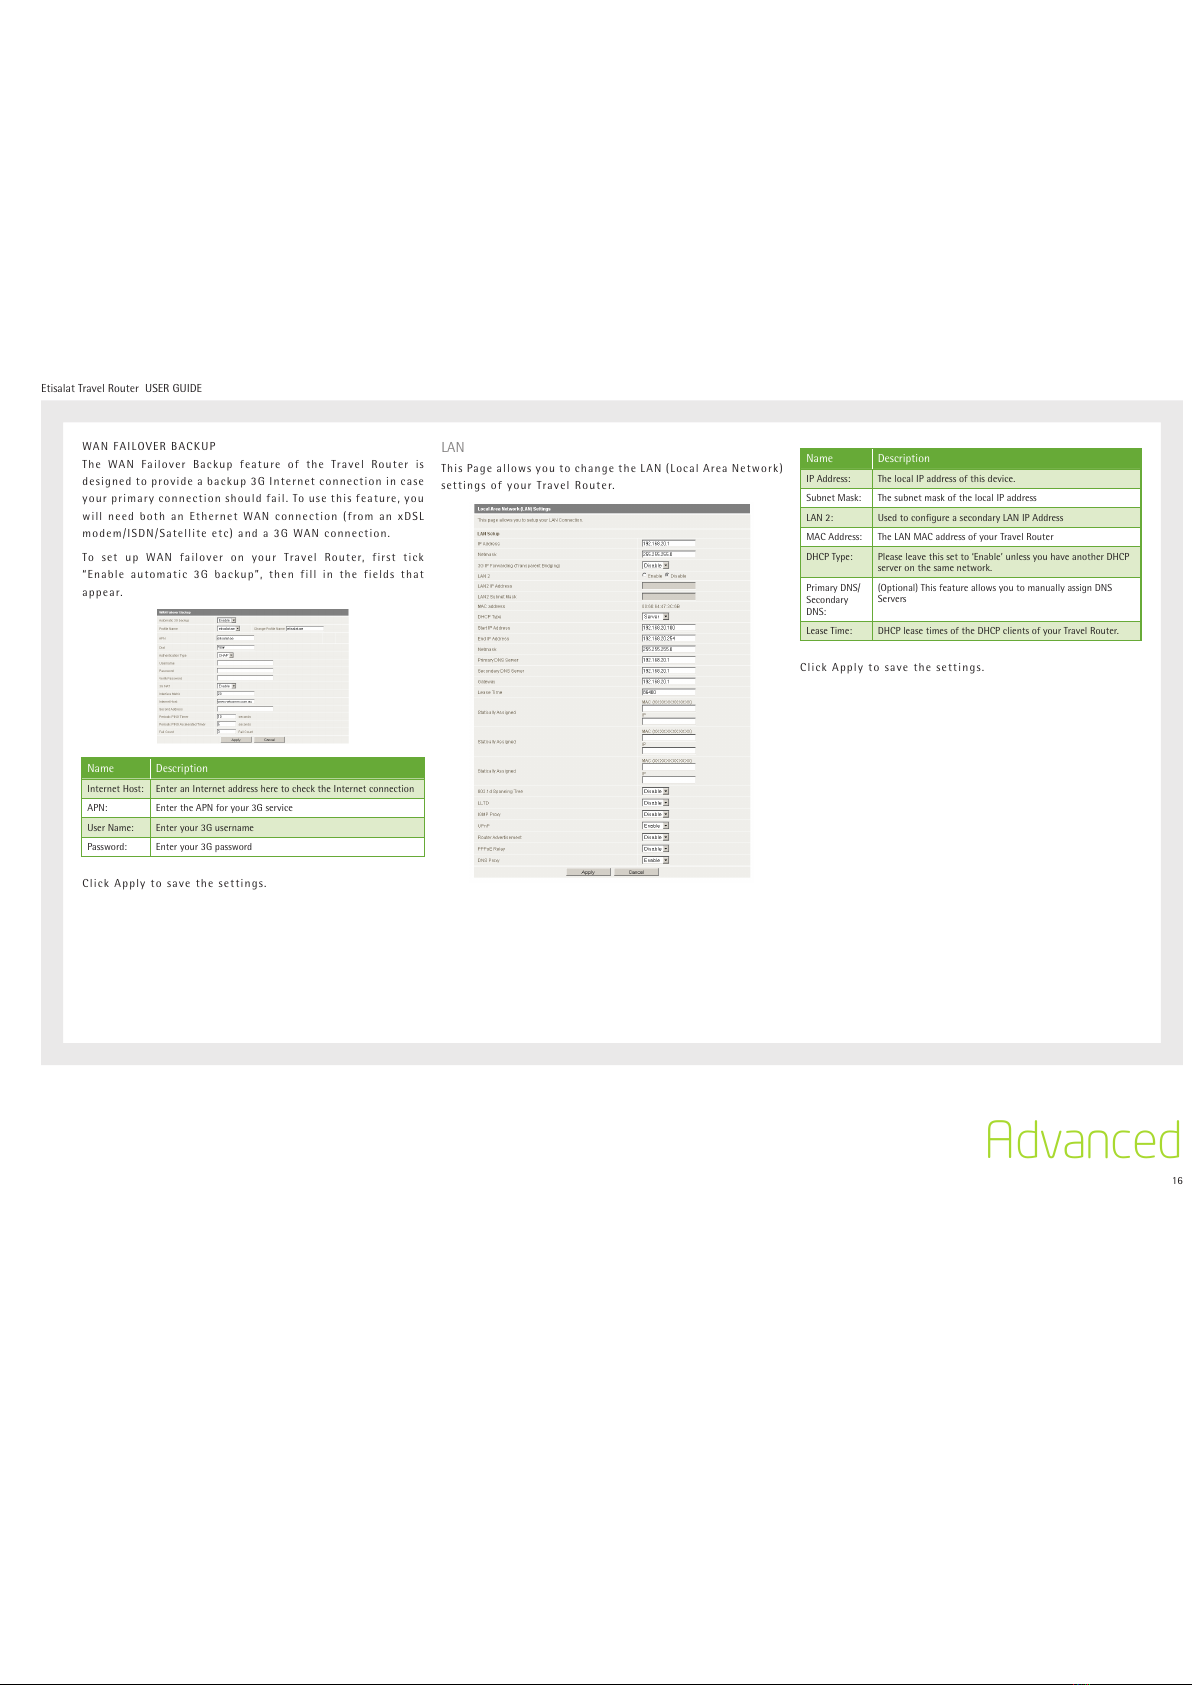
WAN FAILOVER BACKUP
The WAN Failover Backup feature of the Travel Router is
designed to provide a backup 3G Internet connection in case
your primary connection should fail. To use this feature, you
will need both an Ethernet WAN connection (from an xDSL
modem/ISDN/Satellite etc) and a 3G WAN connection.
To set up WAN failover on your Travel Router, first tick
“Enable automatic 3G backup”, then fill in the fields that
appear.
Name Description
Internet Host: Enter an Internet address here to check the Internet connection
APN: Enter the APN for your 3G service
User Name: Enter your 3G username
Password: Enter your 3G password
Click Apply to save the settings.
LAN
This Page allows you to change the LAN (Local Area Network)
settings of your Travel Router.
Name Description
IP Address: The local IP address of this device.
Subnet Mask: The subnet mask of the local IP address
LAN 2: Used to configure a secondary LAN IP Address
MAC Address: The LAN MAC address of your Travel Router
DHCP Type: Please leave this set to ‘Enable’ unless you have another DHCP
server on the same network.
Primary DNS/
Secondary
DNS:
(Optional) This feature allows you to manually assign DNS
Servers
Lease Time: DHCP lease times of the DHCP clients of your Travel Router.
Click Apply to save the settings.
17
Etisalat Travel Router USER GUIDE
Advanced
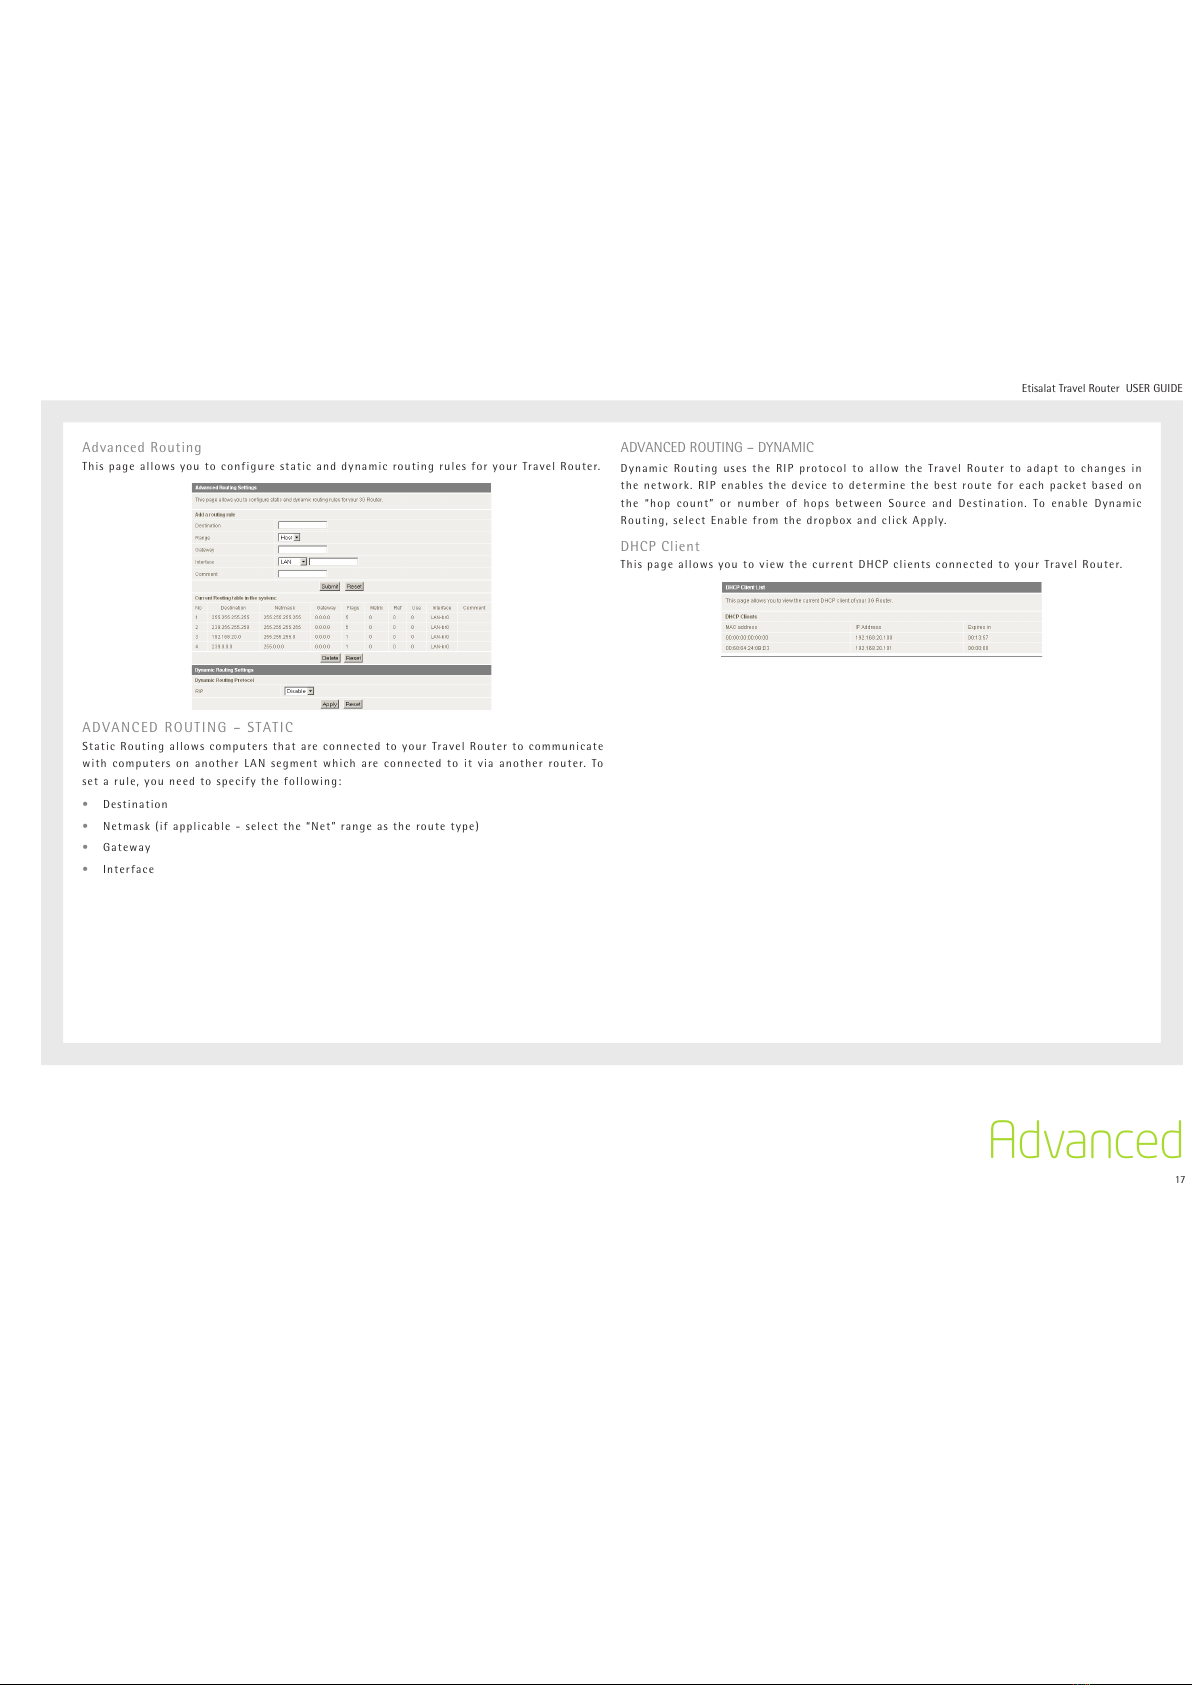
Advanced Routing
This page allows you to configure static and dynamic routing rules for your Travel Router.
ADVANCED ROUTING – STATIC
Static Routing allows computers that are connected to your Travel Router to communicate
with computers on another LAN segment which are connected to it via another router. To
set a rule, you need to specify the following:
•Destination
•Netmask (if applicable - select the “Net” range as the route type)
•Gateway
•Interface
ADVANCED ROUTING – DYNAMIC
Dynamic Routing uses the RIP protocol to allow the Travel Router to adapt to changes in
the network. RIP enables the device to determine the best route for each packet based on
the “hop count” or number of hops between Source and Destination. To enable Dynamic
Routing, select Enable from the dropbox and click Apply.
DHCP Client
This page allows you to view the current DHCP clients connected to your Travel Router.

Wireless

19
Etisalat Travel Router USER GUIDE
Wireless
Basic
This page allows you to define the basic wireless settings for this device such as the SSID
and channel.
Name Description
Radio On/Off: On by default. Changing this option to Off will turn off the wireless feature on the
unit and you will not be able to connect to your Travel Router wirelessly.
Network Mode: You can select which wireless standards are able to connect to your wireless network:
11b/g mixed mode: Both 802.11b and 802.11g wireless devices are in your network.
11b only: Select this if all of your wireless clients are 802.11b.
11g only: Select this if all of your wireless clients are 802.11g.
11n only: Select this if all of your wireless clients are 802.11n.
11/b/g/n mixed mode: Select this if 802.11b and 802.11g and 802.11n wireless devices are in your network.
Network Name (SSID): The SSID (Service Set Identifier) is the name of your wireless network. Use a unique
name to identify your wireless network so that you can easily connect from your
wireless clients. This field is case sensitive and can be up to 32 characters. You
should change the default SSID for added security.
Frequency (Channel): This setting configures the frequency that the Wireless Radio uses for wireless
connectivity. Select one channel that you wish to use from the drop down list.
WDS Mode Wireless Distribution System (WDS) enables you to connect multiple Wireless Access
Points together to extend the range of your wireless network. You can enable this
if needed
Click Apply to save the settings.
Advanced
This page allows you to modify the advanced wireless settings for your Travel Router. These
settings should not be changed unless you are aware of what effect they will have.
20
Etisalat Travel Router USER GUIDE
Wireless
Name Description
Beacon Interval: Interval of time the wireless router broadcasts a beacon, used to synchronize
the wireless network.
Data Beacon Rate (DTIM): Enter a value between 1 and 255 for the Delivery Traffic Indication Message
(DTIM). A DTIM is a countdown informing clients of the next window for
listening to broadcast and multicast messages
Fragment Threshold: This specifies the maximum size of a packet during the fragmentation of
data to be transmitted. If you set this value too low, it will result in bad
performance.
RTS Threshold: When the packet size is smaller than the RTS threshold, the wireless router will
not use the RTS/CTS mechanism to send this packet.
AP Isolation: This feature allows you to isolate clients on your wireless network. To enable
communication between the wireless clients connected to your Travel Router,
select Disabled. To prevent the communication between the wireless clients,
please choose Enabled.
TX Power: This determines the output power of the antenna
WMM Capable: WMM (Wi-Fi Multimedia) if enabled supports QoS (Quality of Service) for
experiencing better audio, video and voice in applications
WMM Parameters: Click on the WMM Configuration button to configure the WMM parameters
Broadcast Network Name (SSID): Select ‘Disabled’ to hide the SSID of your Travel Router. If disabled, other
people will not be able scan and detect this product’s SSID.
Click Apply to save any changes made to the settings.
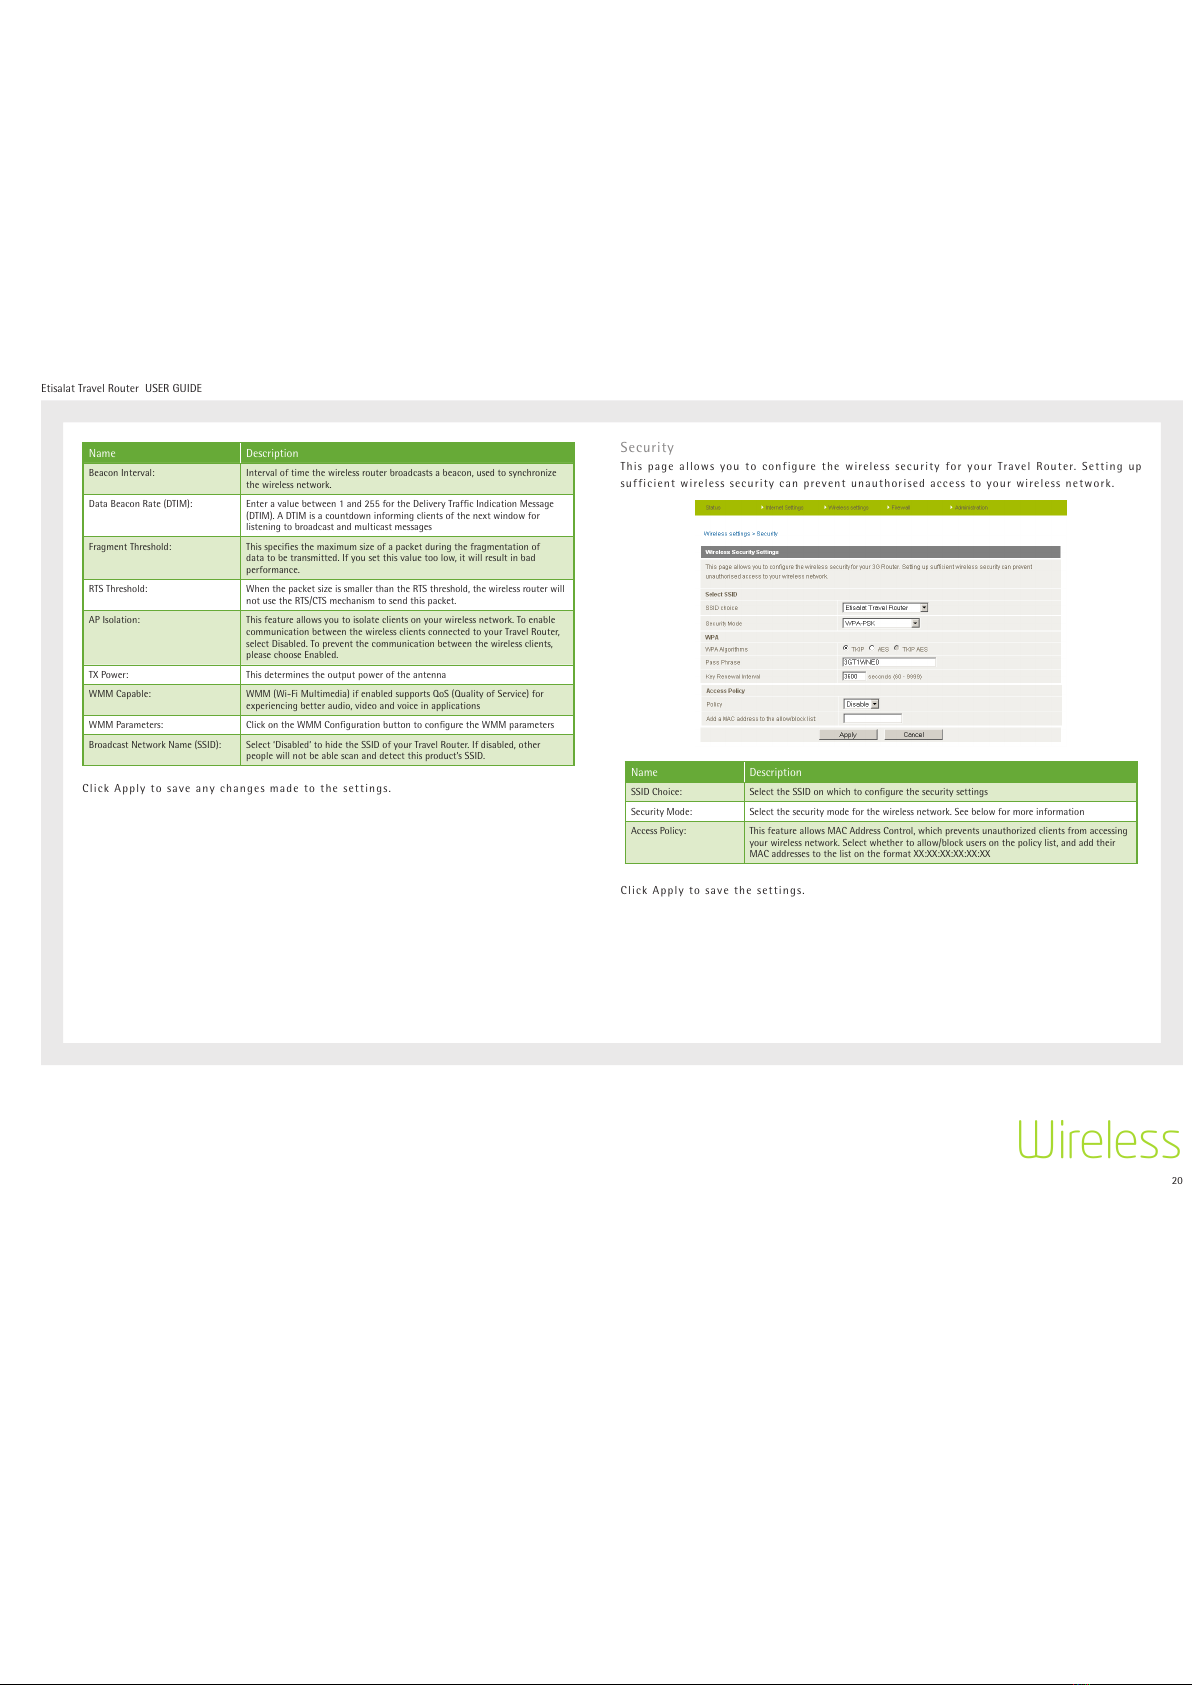
Security
This page allows you to configure the wireless security for your Travel Router. Setting up
sufficient wireless security can prevent unauthorised access to your wireless network.
Name Description
SSID Choice: Select the SSID on which to configure the security settings
Security Mode: Select the security mode for the wireless network. See below for more information
Access Policy: This feature allows MAC Address Control, which prevents unauthorized clients from accessing
your wireless network. Select whether to allow/block users on the policy list, and add their
MAC addresses to the list on the format XX:XX:XX:XX:XX:XX
Click Apply to save the settings.
Table of contents
Other Etisalat Network Router manuals


