Euhomy TWW-35 User manual

Email:support@euhomy.com Facebook:@Euhomy.Official
CAR REFRIGERATOR
SKU:TWW-35/45/55
Instruction Manual


Congratulations
Dear Customer:
Welcome to the Euhomy family. Thank you for purchasing one of our products.
Our goal is to provide you with superior service. If there is anything missing from or wrong with
your order, or if you have any questions about using our ice maker, PLEASE contact us.
Email: [email protected]
Facebook: @Euhomy.Official
The Euhomy team is available 24/7 to address your questions, comments, and concerns. Your
satisfaction is our ultimate goal. We want to make everything right so you'll share your positive
experience with other shoppers on Amazon.
Our mission:
* To be the most trusted appliance brand.
* To create practical, compact appliances that better your life.
Be sure to register at
www.euhomy.com/register
for updates, warranty, and other relevant information.


Contents
REVERSE DOOR OPENING DIRECTION 04
PRODUCT STRUCTURE 03
01
SAFETY INSTRUCTIONS 02-03
PRODUCT FEATURES 03
06-07
BATTERY OPERATION
07
CARE AND MAINTENANCE
FUNCTION AND OPERATION
WARRANTY
TECHNICAL INFORMATION
OPERATING APP
TROUBLESHOOTING
05-06
09
09
10
08

SAFETY INSTRUCTIONS
Do not operate the appliance if it is visibly damaged.
Do not block openings in the fridge with things like pins, wires, etc.
Do not expose the appliance to rain or soak it in water.
Do not place the appliance near open flames or other heat sources (heaters, direct sunlight,
gas ovens, etc.).
Do not store any explosive substances, such as spray cans with a flammable propellant, in or near the
fridge.
Ensure the supply cord is dry and not trapped or damaged. Do not place multiple portable outlets or
portable power sources at the rear of the device.
Check that the voltage specification on the type plate corresponds to that of the energy supply.
The appliance is to be used only with the power supply unit provided with the appliance.
Do not use electrical appliances inside the food storage compartments of the appliance,
unless they are of the type recommended by the manufacturer.
Once unpacked and before turning on, the appliance must be placed on a level surface for
more than 6 hours to let the refrigerant settle.
Make sure that the appliance stays horizontal when it is running. The tilt angle must be less
than 5° for long-term running and less than 45° for short-term running.
Keep the ventilation openings in the unit casing and in the built-in structure free of obstacles.
Keep the appliance stable on the ground or in the car. Do not turn the fridge upside down to drain.
Repairs may be carried out only by qualified personnel. Incorrect repair may cause danger.
The lamp and supply cord must be replaced by the manufacturer or qualified persons.
The installation of DC power in the boat must be handled by qualified electricians.
The appliance can use only our dedicated rechargeable batteries. Non-rechargeable batteries
are prohibited; otherwise, there may be a danger of fire and explosion.
If, during use or in storage, the fridge’s battery is found to have a high temperature, leakage, odor,
distortion, or other abnormalities, please stop using the fridge immediately and stay away from the
battery.
A dead battery should be immediately removed from the equipment. Please properly
dispose of dead batteries and do not put them into fire or water.
Children shall not play with the appliance. Cleaning and user maintenance shall not be done
by children without supervision.
The appliance can be used by children aged 8 years and above and by persons with
reduced physical, sensory, or mental capabilities or lack of experience and knowledge IF
they have been given supervision or instruction concerning safe use of the device and
understand the hazards involved.
WARNING!
Disconnect the power supply before any cleaning or maintenance and after every use.
Do not use sharp tools to defrost the fridge. Do not damage the refrigerant circuit.
Risk of child entrapment: Before you throw away your old refrigerator or freezer, take off the
doors and leave the shelves in place so that children may not easily climb inside.
NOTICE!
CAUTION!
02

Check that the cooling capacity of the appliance is suitable for storing food or medicine.
Food may be stored only in its original packaging or in suitable containers.
If the appliance is left empty for long periods, switch it off. Then defrost, clean, and dry it. Leave the
door open to prevent mold from forming within the appliance.
The appliance is intended to be used in households and for similar applications such as staff kitchen
areas in offices, stores, and other work environments; camping; farmhouses; by clients in hotels,
motels, bed and breakfasts, and other short-term residential environments; by caterers•; and for other
similar non-retail applications.
High-efficiency DC compressor and conversion module.
CFC-free and great heat insulation.
Lowest cooling to –20 ℃/–4 °F (based on 25 ℃/77 °F room temperature).
Intelligent battery protection system prevents your vehicle battery from draining.
LED display control panel for temperature setting; USB charging port: 5V/1A.
Detachable lithium battery: 15600mAh/11.1V.
Specific parts: interior drain plug, oversized wheels, telescoping handle, cup-holder door,
interior LED light, cutting board.
Please comply with local regulations regarding disposal of the appliance due to its flammable
refrigerant and gas.
Note: There are 2 buttons on the telescoping handle—1 on each side. Press them at the same time
to pull out the handle. The cutting board can be moved by turning the knob on the top cover. It is
suggested to clean and dry the cutting board after every use.
SAFETY INSTRUCTIONS
PRODUCT FEATURES
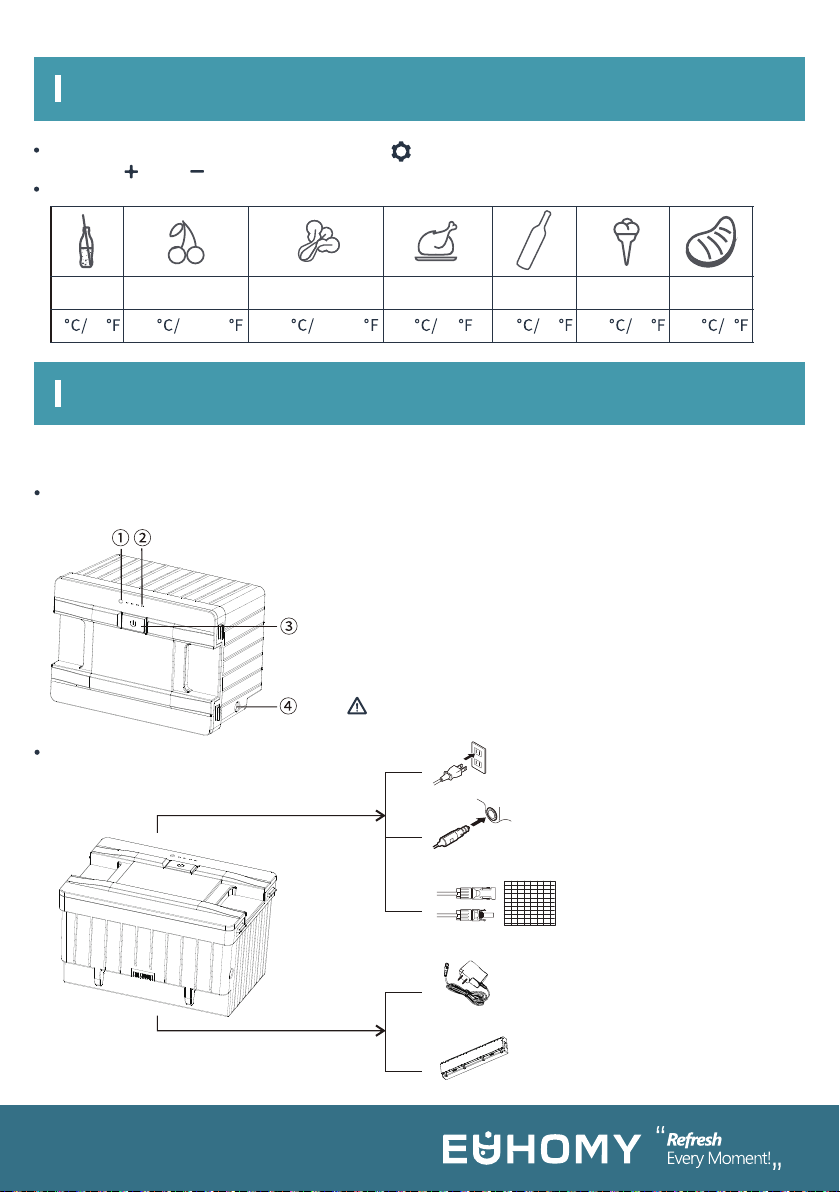
PRODUCT STRUCTURE
03
Cutting board
Left compartment
LED control panel
Telescoping handle
Button
Footpad
Machine compartment
Cutting board
Gasket
Right compartment
Handle
Charging port
Detachable battery
Wheel

The direction of the door opening can be changed according to your needs. Please follow the
instructions below.
Door disassembly:
Open the door to a 90° angle. Take off the door body vertically.
REVERSE DOOR OPENING DIRECTION
04
Door installation:
Align the door with the
compartment hole on the other
side of the unit.
Finish installation
The direction has been changed

FUNCTI0N AND OPERATION
05
Note: The right compartment is on the same side as the compressor.
Power supply: Connect to DC 12V/24V or AC 100–240V (using dedicated adapter) or solar
(12V–50V) power supply.
Display screen initialization: When the fridge is powered on, you will hear a long beep. The display
will come on for two seconds and then enter standby mode.
Power on/off: Press once to switch ON. Press and hold for 3 seconds (long press) to switch
OFF.
Temperature setting: While fridge is running, press and hold and at the same time for
three seconds (long press) to switch the left compartment on or off. Press and hold and at
the same time for three seconds (long press) to switch the right compartment on or off. Both
compartments cannot be switched off at the same time.
When both left and right compartments are set in the running state, press or to increase or
decrease the temperature setting for the left compartment. Press to switch between left and
right compartments. The setting will be saved after 4 seconds. (Note: The temperature displayed is
the current temperature of the compartments. It takes some time for the compartments to reach the
set temperature.)
Temperature setting range: –20 to 20 °C(–4 to 68°F)
Cooling mode: While fridge is running, press to switch between MAX (fast cooling) and ECO
(energy-saving mode). (*Factory setting is MAX.)
Battery-protection mode: While fridge is running, press and hold for 3 seconds until
screen flashes. Then press again to select protection mode: H (high), M (medium), or L (low).
(*Factory setting is H.)
Voltage reference:
* The voltage is a theoretical value. There may be a deviation in different locations.
* Set the fridge on H when connected to car power. Set the fridge to M or L when connected to a
portable battery or other back-up battery.
Temperature setting: Switch off the fridge. Press and hold for 3 seconds until displays
E1. Switch to E5 by pressing again. Then press or to switch between Celsius and
Fahrenheit.
(*Factory setting is °C .)
INPUT
CUT OUT
8.5V
10.1V
11.1V
10.9V
11.4V
12.4V
21.3V
22.3V
24.3V
22.7V
23.7V
25.7V
L
M
H
DC 12V DC 24V
CUT IN CUT OUT CUT IN
MODE
WARNING: Do not disassemble the battery!
Battery ON/OFF: Long-press the power button on the battery to switch ON/OFF. When the battery
is OFF, short-press the power button to show current amount of battery power.
Sku: AKDC-01
Capacity: 15600mAh/173Wh
Rated voltage: 11.1V
Charging limited voltage (DC): 12.6V
Charging limited current (DC): 3A
①Power indicator (green = charging; blue = discharging)
②Battery indicator (shows current amount of battery power)
③Power Button ④DC charging port
Reset: Switch off the fridge. Press and hold for 3 seconds until displays E1. In E1 mode, press
and hold and at the same time for 3 seconds to reset the settings.
Recommended temperatures for common foods:
Batteries are not included in the car refrigerator, you need to purchase additional, if you
have purchased, please read the following.
Battery charging (for reference only): Wall outlet AC 100–240V
(using dedicated adapter)
(Charging time≈8h)
Car cigarette lighter DC12/24V
(When the Input voltage>13.5V,charg-
ing time≈8h)
Battery charger (optional)
(Connect to the DC charging port of
the battery)(Chargingtime≈8h)
Charging station (optional)
(Charging time ofa single battery≈4h)
Solar 12-50V
(Connect to the "SOLAR" port of
the refrigerator)
(When using 100W solar
panel,chargingtime≈5h)
charge in the refrigerator
charge separately
(in standby mode)
FUNCTI0N AND OPERATION
BATTERY OPERATION
06
Drinks Fruits Vegetable Delicatessen Wine Ice cream Meat
5 5-8 3-10 4 10 -10 -18 014503937-5041-4641

Note: It is suggested to switch off the fridge when charging the battery. (The power
supply mainly powers the compressor when the fridge is running.)
When the fridge is connected to a solar panel, please place the fridge in a cool place to dissipate heat.
The charging input power should be higher than the working power of the refrigerator (about 40–45W),
or else switch off the refrigerator. Otherwise, the battery will run out.
It is suggested to use a 100W solar panel.
MAX solar inp ut voltage: 50V; MAX solar input current: 10A.
Note: The output of the solar panel is unstable, so it cannot power the refrigerator directly.
When using a solar panel, the battery should be put into the refrigerator.
■ Cleaning:
Discharging time (for reference only): In the low battery-protection mode, the battery can
last about 4 hours after being fully charged. When the temperature of the refrigerator is set
between 35.6-46.4 F (ambient temperature 77 F), it can last 12 hours after the internal temperature
stabilizes. Remove or switch off the battery to prevent self-discharge when not in use.
Switch off and unplug the device first to avoid electric shock.
Remove the cover and drain water from the hole at the bottom of the device.
Use a wet cloth to clean the device and a separate cloth to dry it.
Do not immerse the fridge in water, pour or spray water over the fridge, or wash the fridge with a
dripping-wet cloth.
Do not use abrasive cleaning agents during cleaning as these can damage the device.
■ Storage:
Switch off and unplug the device.
Take out all items stored in the device.
Wipe off excess water with a soft rag.
Put the device in a cool and dry place.
Leave the lid slightly open to prevent odors from forming.
Recommended storage environment: •ambient temperature: 77℉, ambient humidity: ≤75%.
If the device will not be in use for a long time, please follow these instructions.
■ Defrosting:
Switch off and unplug the device first to avoid electric shock.
Take out all items stored in the device.
Keep the lid open.
Wipe out the water.
Humidity can cause frost to form in the interior of the cooling device or on the evaporator.
This reduces the cooling capacity. Defrost the device promptly to avoid this.
BATTERY OPERATION
CARE AND MAINTENANCE
07
Never use hard or pointed tools to remove ice or to loosen items which have frozen in place.
*For models with AKDC-01 detachable battery, if code F1 displays, unplug or turn off the battery, or
connect to DC12/24V AC100-240V (using the adapter) power supply to power the compressor and
battery in time to avoid long-term microcurrent draining the battery.
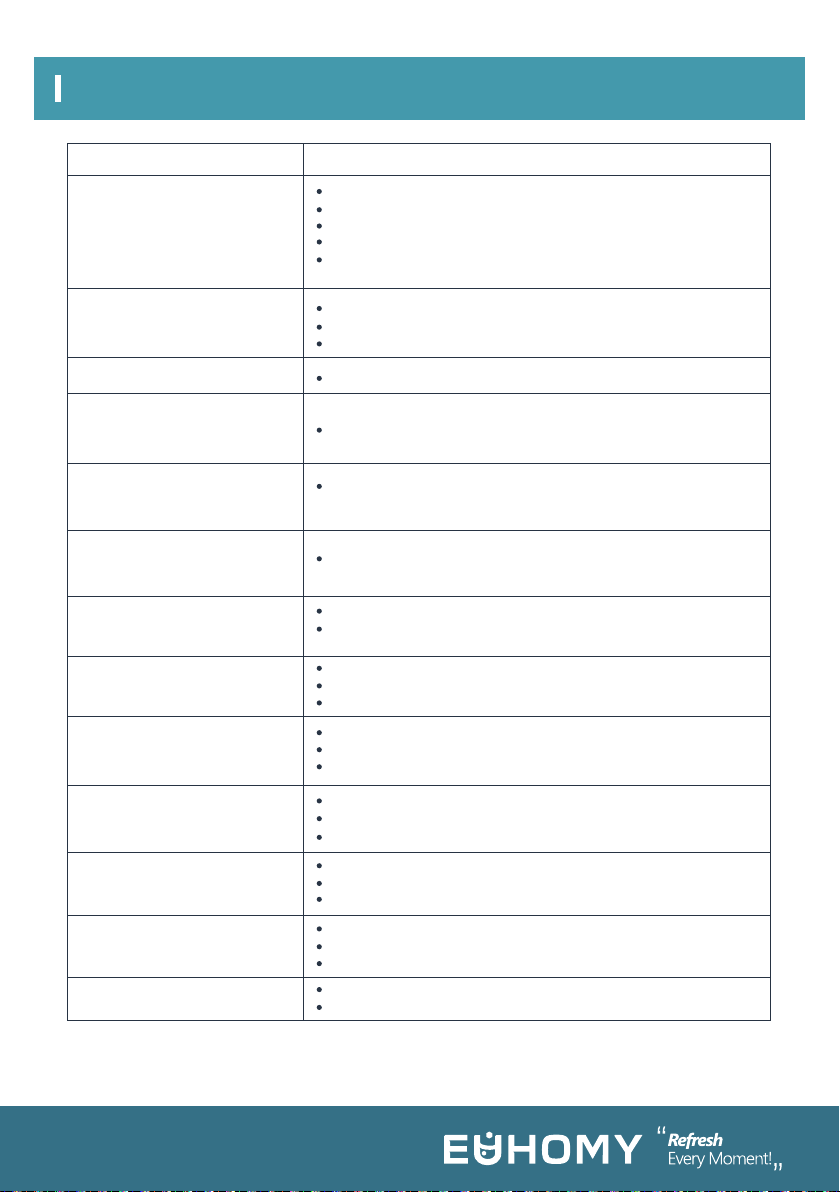
Problem
Refrigerator does
not work
Check if the switch is on.
Check if the plug is fully inserted into the socket.
Check if the fuse has burned out.
Check if the power supply has malfunctioned.
Switching the fridge on and off frequently may cause start delay
of the compressor.
The door is opened frequently.
A large amount of warm or hot food was stored recently.
The refrigerator has been disconnected for a long time.
The temperature was set too low.
It's a normal phenomenon, caused by the flow of refrigerant.
It's a normal phenomenon. Moisture in the air will condense on
the cold surface of the refrigerator.
It's a normal phenomenon. The noise will be reduced
after the compressor stabilizes.
Possible cause: Low voltage to fridge.
Adjust the battery protection from High to Medium or from
Medium to Low.
Possible cause: Condenser fan is overloaded.
Disconnect power to fridge for 5 minutes and restart.
If the code shows again, contact the manufacturer for service.
Refrigerator
compartments
are too warm
There is a sound of
water flowing inside
the refrigerator
There are drops of water
around the refrigerator
casing or door gap
The compressor is
slightly noisy when
starting
Code F1 displayed
Code F2 displayed
Code F3 displayed
Code F4 displayed
Code F5 displayed
Code redisplayed
Code F7 or F8 displayed
Food is frozen
Causes/Suggestions
TR0UBLESH00TING
08
Possible cause: The compressor starts too frequently.
Disconnect power to fridge for 5 minutes and restart.
If the code shows again, contact the manufacturer for service.
Possible cause: Compressor not kicking in.
Disconnect power to fridge for 5 minutes and restart.
If the code shows again, contact the manufacturer for service.
Possible cause: Overheating of the compressor and electronics.
Disconnect power to fridge for 5 minutes and restart.
If the code shows again, contact the manufacturer for service.
Possible cause: No parameter can be detected by the controller.
Disconnect power to fridge for 5 minutes and restart.
If the code shows again, contact the manufacturer for service.
Possible cause: Temperature sensor is faulty.
Contact the manufacturer for service.
*Due to product improvement, the technical information might be different from actual information,
please refer to the rating label on the product.
09
WARRANTY
TECHNICAL INFORMATION
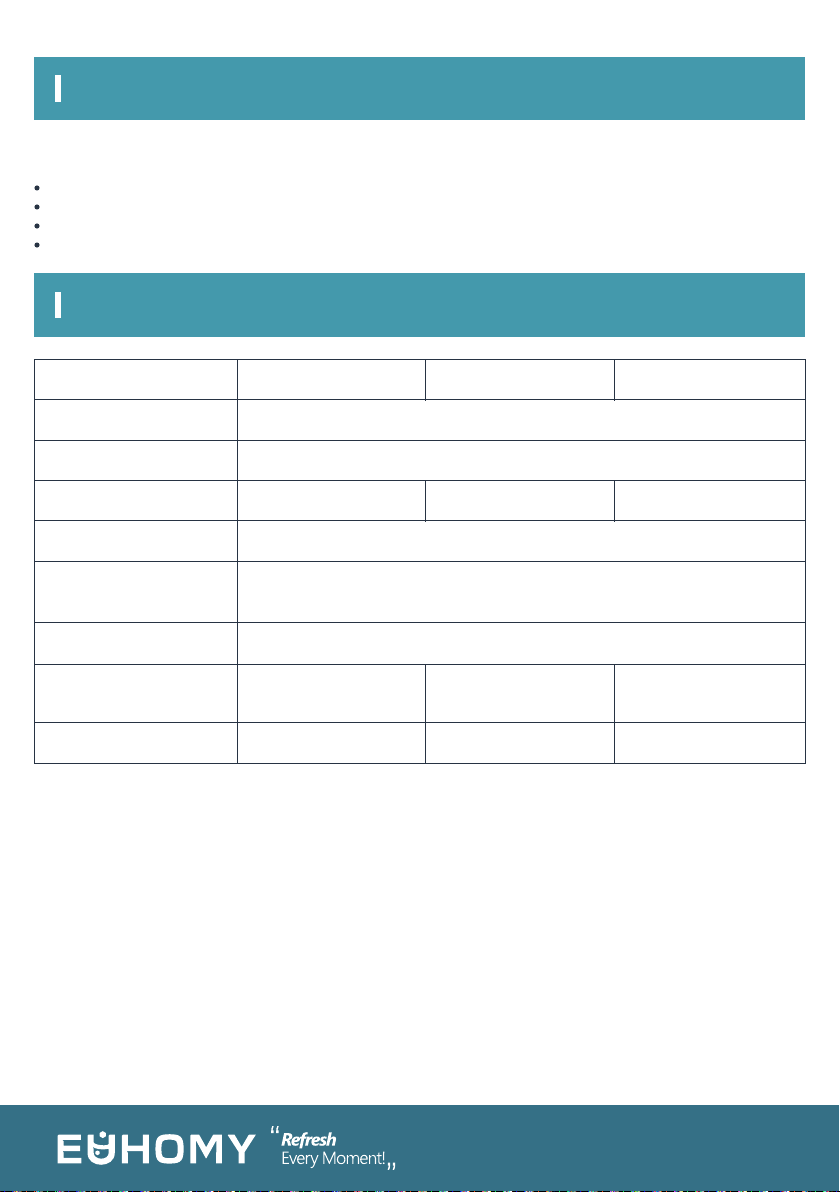
If the device malfunctions, a limited warranty will be provided for 1 year from the date of
purchase EXCEPT in the following situations:
Intentional damage.
Damage caused by force majeure such as earthquake, fire, etc.
Damage from inappropriate use or violating these instructions.
Damage or malfunction caused by disassembly.
SKU TWW-35
DC12/24V or AC100–240V (using dedicated adapter) or solar (12–50V)
60W
≤45dB
–20 to 20 °C (–4 to 68 °F)
T/ST/N/SN
TWW-45 TWW-55
35L/1.3 ft.345L/1.6 ft.355L/2.0 ft.3
711*460*441mm
28.0*18.1*17.4in.
711*460*506mm
28.0*18.1*19.9in.
711*460*571mm
28.0*18.1*22.5in.
17.5kg/38.6lb 18.4kg/40.6lb 19.0kg/41.9lb
RATED VOLTAGE
RATED POWER
CAPACITY
NOISE
TEMPERATURE
SETTING RANGE
CLIMATE CATEGORY
DIMENSIONS(L*W*H)
NET WEIGHT
OPERATING APP
10
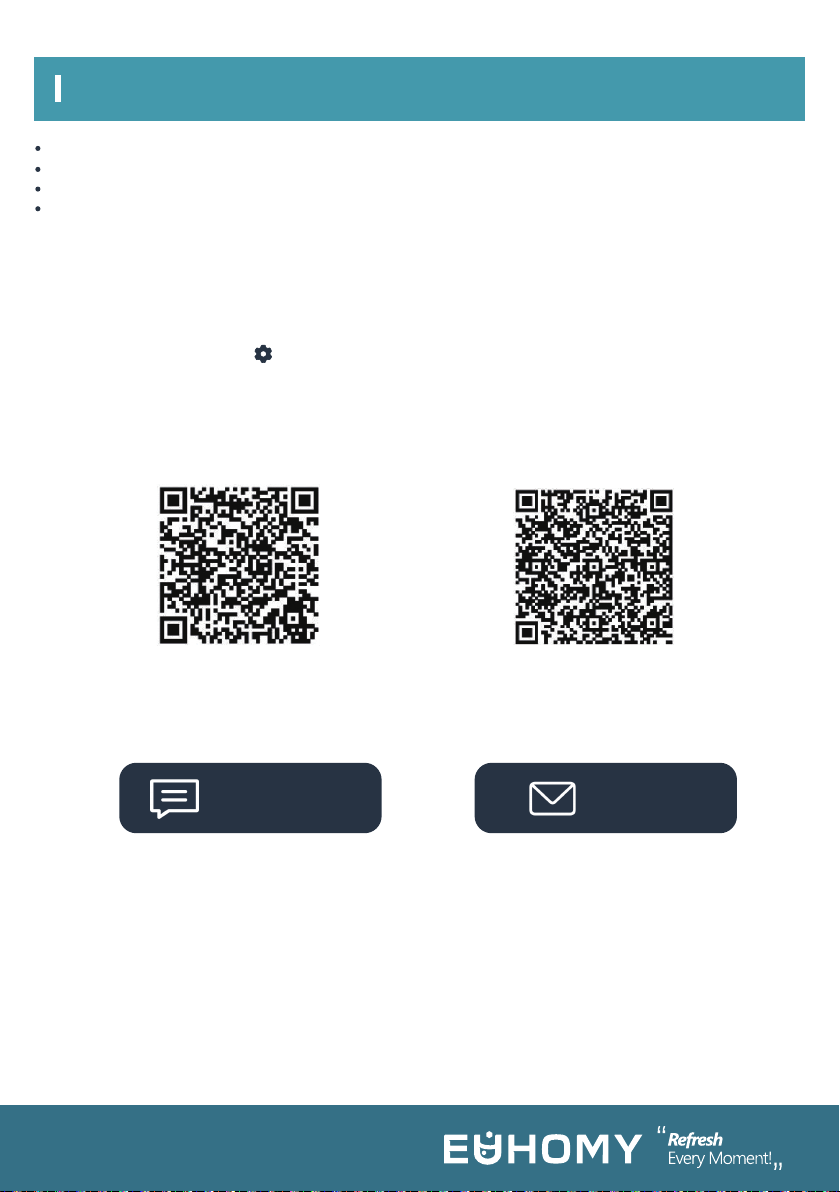
Product features are subject to real purchase.
App control is not equipped on all models.
Built-in battery is equipped for internal battery type.
Product features are subject to actual purchase.
To connect the app:
1. Download the app from the App Store or Google Play.
2. Activate Bluetooth on your device.
3. Open the "Car Fridge Freezer" app.
4. Search for local equipment and choose the fridge.
5. Check the fridge’s display panel. It should show “AP”.
6. Press the settings button “ ” to connect the fridge to your device.
TIPS AND SUGGESTIONS
euhomy.com/chat [email protected]
IOS Android
CHAT WITH US EMAIL US


Email:support@euhomy.com Facebook:@Euhomy.Official
This manual suits for next models
2
Table of contents
Other Euhomy Refrigerator manuals


Popular Refrigerator manuals by other brands


Frigidaire
Frigidaire FRT18QGF Factory parts catalog

Mitsubishi Electric
Mitsubishi Electric MR-260C operating instructions

Frigidaire
Frigidaire FRT18FS5AW4 Use & care manual

Maytag
Maytag MSD2574VEA - 25.2 cu. Ft. Refrigerator User instructions

LG
LG G -M602H M Series owner's manual

Whirlpool
Whirlpool WRF535SMBB Dimension Guide


