Euro Appliances EDV606SX User manual

-
EMBRACE EUROPEAN QUALI+PASSION
www. eu roa ppli a nces.com .au
cooking
USE AND
CARE GUIDE
MODELNO.
EDV606SX
EDV606WH

Compartment A:Compartment A:
For each wash cycle.
Compartment B:B:
For programs with pre-wash only.
(Follow the user instructions)
Mechanical indicator C.Mechanical indicator C.
Electric indicator on control panel (if provided).
Check the rinse aid level
Load the baskets
Select a programme
Running the dishwasher
Switch off the appliance
Turn off the water tap,
unload the baskets
Fill the detergent dispenser
Warning: wait a few minutes (about 15 minutes) before unloading the dishwasher to avoid scald,as
the dishes and utensils are still hot and more susceptible to break.
They could also dry better.Unload the appliance, starting from the lower basket.
Changing the programme
Add forgotten dishes in the
dishwasher.
Scrape off any large food particles. Soften remnants of burnt food in pans,
then load the baskets. Refer to the dishwasher loading instructions.
When the working cycle is finished, the buzzer of the
dishwasher will sound 8 times, then stop.
Turn off the appliance using the utton.
If the appiance was under standby mode, it will be power off automaticly after 30 minutes without any operation.
On/Off B
If the appliance is switched
off during a wash cycle.
Open the doorcarefully.
Hot steam mayescape
when the dooris opened!
WARNING!
If the appliance is switched off during a wash cycle, when switched
on again, please re-select the washing cycle and operate the dishwasher
according to the original Power-on state ).
Switch on the appliance
Quick OperationGuideQuick OperationGuide
For detailedoperating methodread thecorresponding contenton theinstruction manual.
Open the door, press the to switch on the appliance.On/Off button
Turn on the water tap and press the Start/Pause Button. The machine will start working
after about 10 seconds.
Close the door,press the Program Button until the selected program lights up.
( See the section entitled Operation instruction )
1. A running cycle can only be modified if it has been running for a short time. Otherwise the detergent
may have already been released and the water already drained. If in this case, the detergent
dispenser must be refilled.
2. Press the Start/Pause button, the machine will be in standby state, press the program
button more than 3 seconds then you can change the program to the desired cycle setting.
3. Press the Start/Pause Button, the dishwasher will run after 10 seconds.
1.Press the Start/Pause Button to stop the washing.
2.Open the door a little.
3.After the spray arms stop working, you can open the door
completely.
4.Add forgotten dishes.
5.Close the door.
6.Press the Start/Pause Button, the dishwasher will run
after 10 seconds.
AB
C


KEEP THESE INSTRUCTIONS
READ AND FOLLOW THIS SAFETY INFORMATION CAREFULLY
1.IMPORTANT SAFETY INFORMATION
READ ALL OF THE INSTRUCTIONS BEFORE USING
1.IMPORTANT SAFETY INFORMATION
READ ALL OF THE INSTRUCTIONS BEFORE USING
11
GROUNDING INSTRUCTIONS
This appliance must be grounded. In the event of a
malfunction or breakdown, grounding will reduce
the risk of anelectric shock by providing a path of
least resistance of electric current. This appliance
is equipped with a cord having an equipment-
grounding conductor and a grounding plug.
The plug must be plugged into an appropriate outlet
that is installed and grounded in accordance with
all local codes and ordinances.
WARNING!
WARNING! PROPER USE
Keep children away from detergent and rinse aid, keep
children away from the open door of the dishwasher,
there could still be some detergent left inside.
Do not abuse, sit on, or stand on the door or dish
rack of the dishwasher.
Do not touch the heating element during or
immediately after use.
(This instruction is only applicable to machines
with a visual heating element.)
Do not wash plastic items unless they are marked
dishwasher safe or the equivalent. For plastic items
not s
o m
arked, c
heck th
e m
anufacturer's
recommendations.
Use onlydetergent andrinse additives
designed foran automaticdishwasher.
Never usesoap, laundrydetergent, orhand
washing detergentin yourdishwasher.Keep
these productsout ofthe reachof children.
During installation,the powersupply mustnot
be excessivelyor dangerouslybent orflattened.
Do not tamper with controls.
Do not place any heavy objects on or stand on the
door when it is open. The appliance could tip
forward.
When loadingitems tobe washed:
1) Locatesharp itemsso thatthey arenot likely
to damagethe doorseal;
2) Warning:Knives and otherutensils with
sharp pointsmust beloaded in the basket
with theirpoints downor placedin a
horizontal position.
When using yourdishwasher, youshould
prevent plastic itemsfrom coming intocontact
with theheating element.(This instruction isonly
applicable to machineswith a visualheating
element.)
If thesupply cordis damaged,it mustbe replaced
by themanufacturer orits serviceagent ora
similarly qualifiedperson inorder toavoid a
hazard.
Please disposeof packingmaterials properly.
Use the dishwasher only for its intended function.
Remove the door to the washing compartment when
removing an old dishwasher from service or discarding it.
Dishwasher detergentsare stronglyalkaline, they
can beextremely dangerousif swallowed.Avoid
contact withskin andeyes andkeep childrenaway
from the dishwasher whenthe dooris open.
Check that thedetergent comparment isempty
after completionof thewash cycle.
The applianceis tobe connectedto thewater
mains using newhose sets andthat old hose-sets
should notbe reused.
The maximumnumber of place settingsto be
washed is
The maximumpermissible inletwater pressureis
1Mpa.
The minimumpermissible inletwater pressureis
0.04Mpa.
Children should be supervised to ensure that they do
not play with the appliance.
This appliance is not intended for use by persons
(including children )with reduced physical, sensory or
mental capabilities, or lack of experience and
knowledge ,unless they have been given supervision
or instruction concerning use of the appliance by a
person responsible for their safety.
When using your dishwasher, follow the precautions listed below:
WARNING!WARNING!
The doorshould notbe leftopen,
since thiscould increasethe riskof tripping.
Improper connection of the equipment-grounding
conductor can result in the risk of an electric shock.
Check with a qualified electrician or service
representative if you are in doubt whether the
appliance is properly grounded. Do not modify the
plug provided with the appliance; If it does not fit
the outlet. Have a proper outlet installed by a
qualified electrician.
Do not operate your dishwasher unless all
enclosure panels are properly in place. Open
the door very carefully if the dishwasher is
operating, there is a risk of water squirting out.
12.

22
Dishwasher FeaturesDishwasher Features
8
Heavy
1
2
3
4
5
6
7
Front view
Spray arms
Dispenser
Inlet pipeconnector
Drain pipe
Cup Shelf
Upper Basket
1Inner pipe
64
8
9
52
9
2.Operation Instruction2.Operation Instruction
before usingit forthe firsttime.
Toget thebest performancefrom yourdishwasher,read alloperating instructions
IMPORTANTIMPORTANT
Control PanelControl Panel
1---On/Off Button Toturn on/offthe power supply. 5---Half load functionsButton :Press thebuttonto select
Half loadfunctions. (Withthis Halfload functionyou
can onlyuse itwhen youhave onlyabout orless than
4 placesetting dishwave, andyou willsee lesswater
and energyconsumption.The cannot selectthe
halfload function.)
4---Program Button : ToPress the button to select
a wash Program:
(Intensive,Heavy,ECO,Glass,90min,Rapid).
7--- Other indicators:
rinse aid warning indicator:
Program ending indicator:
Water faucet indicator:
2---Delay Button :To press thebutton to delay
(3H/6H/9H/12H).
6---Start /Pause Button:To start theselected
washing program orpause the washingprogram
when the machineis working.
3---Extra dry Buttonand the indicator:Press the
button to selectthe Extra dryfunction.
Meanwhile, the indicator willbe brighten.
(The can notselect the extradry function)
8--- Child lockbutton: press the two buttons simultaneously
to lockthe program.
112233
88
445566
77
Back view
ECO
Filter assembly
Lower Basket
7
3

33
3.Prior to using for the first time3.Prior to using for the first time
Before usingyour dishwasherfor thefirst time:
A. Fill therinse aiddispenser
B. Fill indetergent
A. RinseAidDispenserA. RinseAidDispenser
The rinse aid is released during the final rinse to prevent water from forming droplets on your dishes, which can
leave spots and streaks. It also improves drying by allowing water to roll off the dishes.Your dishwasher is
designed to use liquid rinse aids. The rinse aid dispenser is located inside the door next to the detergent dispenser.
To fill the dispenser, open the cap and pour the rinse aid into the dispenser until the level indicator turns completely
black. The volume of the rinse aid container is about 110ml.
Rinse AidDispenser
Function of RinseAid
Rinse aid is automatically added during the last rinse, ensuring thorough rinsing, and spot and streak free drying.
Attention!
Only use branded rinse aid for dishwasher. Never fillthe rinse aid dispenser with any other substances
(e.g. Dishwasher cleaning agent, liquid detergent). This would damage the appliance.
As therinse aiddiminishes, thesize ofthe blackdot
on therinse aidlevel indicatorchanges, asillustrated below.
Full
3 /4 full
1 /2 full
1 /4 full- Shouldrefill toeliminate spotting
Empty
If thereis norinse-aid warninglight inthe controlpanel, youcan judgethe amountof rinse-aidby the color ofthe
optical level
indicator "C" located next tothe cap.When the rinse-aidcontainer is full,the whole indicatorwill bedark .Asthe
rinse-aid
diminishes, thesize ofthe darkdot decreases.Youshould neverlet therinse aidget below1 /4 full.
When to Refill the RinseAid Dispenser
How tofill theRinseAid Dispenser
To open the dispenser, turn the cap to the "open" (left) arrow and lift it out.
Pour the rinse aid into the dispenser, being careful not to overfill.
Replace the cap by inserting it aligned with "open" arrow and turning it to the closed (right) arrow.
Be careful not to overfill the dispenser, because this could cause over sudsing. Wipe away any spills
with a damp cloth. Don't forget to replace the cap before you close dishwasher door.
Attention!
Clean up any rinse aid spill during filling with an absorbent cloth to avoid excess foaming
during the next wash.
1
2
3
13
C (Rinse-Aid indicator)C

44
Adjusting RinseAid Dispenser
The rinse aid dispenser has six or four settings. Always start with the dispenser
set on "4". If spots and poor drying are a problem, increase the amount of rinse
aid dispensed by removing the dispenser lid androtating the dial to "5". If the
dishes still are not drying properly or are show spots, adjust the dial to the next
higher lever until your dishes are spot-free. The recommended setting is "4".
(Factory value is "4".)
Increase the dose if there are drops of water or lime spots on the dishes after washing.
Reduce it if there are sticky whitish stains on your dishes or abluish film on glassware or
knife blades.
Adjust lever
(Rinse)
Adjust lever
(Rinse)
during thenext wash.Don't forgetto replacethe capbefore youclose dishwasherdoor.
Clean upany rinseaid spilledwhile duringfilling withan absorbentcloth toavoid excessivefoaming
NOTE:NOTE:
NOTE:NOTE:
Detergents have chemical ingredients that are necessary to remove dirt, crush dirt and transport itout of the dishwasher.
Most of the commercial quality detergents are suitable for this purpose.
B. DetergentB. Detergent
Detergents
There are 3sorts of detergents
1.Withphosphate andwith chlorine
2.With phosphate andwithout chlorine
3.Withoutphosphate andwithout chlorine
MAXMAX
Based on theirchemical composition, detergentscan be splitin two basictypes:
The use of normal washing programs incombination with concentrateddetergents
reduces pollutionand isgood foryour dishes;these washprograms arespecifically matched
to thedirt-dissolving properties ofthe enzymes ofthe concentrated detergent.For thisreason
normal wash programs in which concentrated detergents are used can achieve the same
results thatcan otherwise onlybe achieved using intensive programs.
Detergent tablets ofdifferent brandsdissolve at different speeds. For this reasonsome
detergent tablets cannotdissolve and developtheir full cleaningpower during short
programs. Thereforeplease use longprograms when usingdetergent tablets, to
ensure the completeremoval of detergentresiduals.
The dispenser mustbe refilled beforethe start ofeach wash cyclefollowing the instructions
provided inthe washcycle table. Your dishwasheruses lessdetergent andrinse aidthan
Conventional dishwasher. Generally, onlyone tablespoonof detergentis neededfor
a normalwash load.More heavilysoiled itemsneed moredetergent.Always addthe
detergent justbefore startingthe dishwasher, otherwiseit couldget dampand willnot
dissolve properly.
Concentrated Detergent
Detergent Tablets
Detergent Dispenser
Conventional, alkaline detergentswith caustic components
Low alkalineconcentrated detergentswith naturalenzymes
Normally new pulveriseddetergent is withoutphosphate. Thusthe water softenerfunction of
phosphate is notgiven. If detergentswithout phosphate areused in thecase of hardwater
often white spotsappear on dishesand glasses. Inthis case pleaseadd more detergentto reach
better results. Detergentswithout chlorine doonly bleach alittle. Strong andcoloured spots willnot
be removed completely. Inthis case pleasechoose a programwith a highertemperature.

4.Loading the Dishwasher Baskets4.Loading the Dishwasher Baskets
Suitability ofuse inthe dishwasherSuitability ofuse inthe dishwasher
Cutlery withwooden, hornchina or
mother-of-pearl handles.
Plastic items thatare not heatresistant.
Older cutlerywith gluedparts thatare not
temperature resistant.
Bonded cutlery itemsor dishes.
Pewter or cooperitems.
Crystal glass.
Steel itemssubject torusting.
Wooden platters.
Items madefrom syntheticfibres.
Some types ofglasses can become
dull after alarge number ofwashes.
Silver and aluminumparts have a
tendency todiscolour duringwashing.
Glazed patternsmay fadeif machine
washed frequently.
Not suitablefor use Limited suitability
Dishes anditems ofcutlery mustnot lieinside oneanother,or covereach other.
To avoiddamage toglasses, theymust notbe touched.
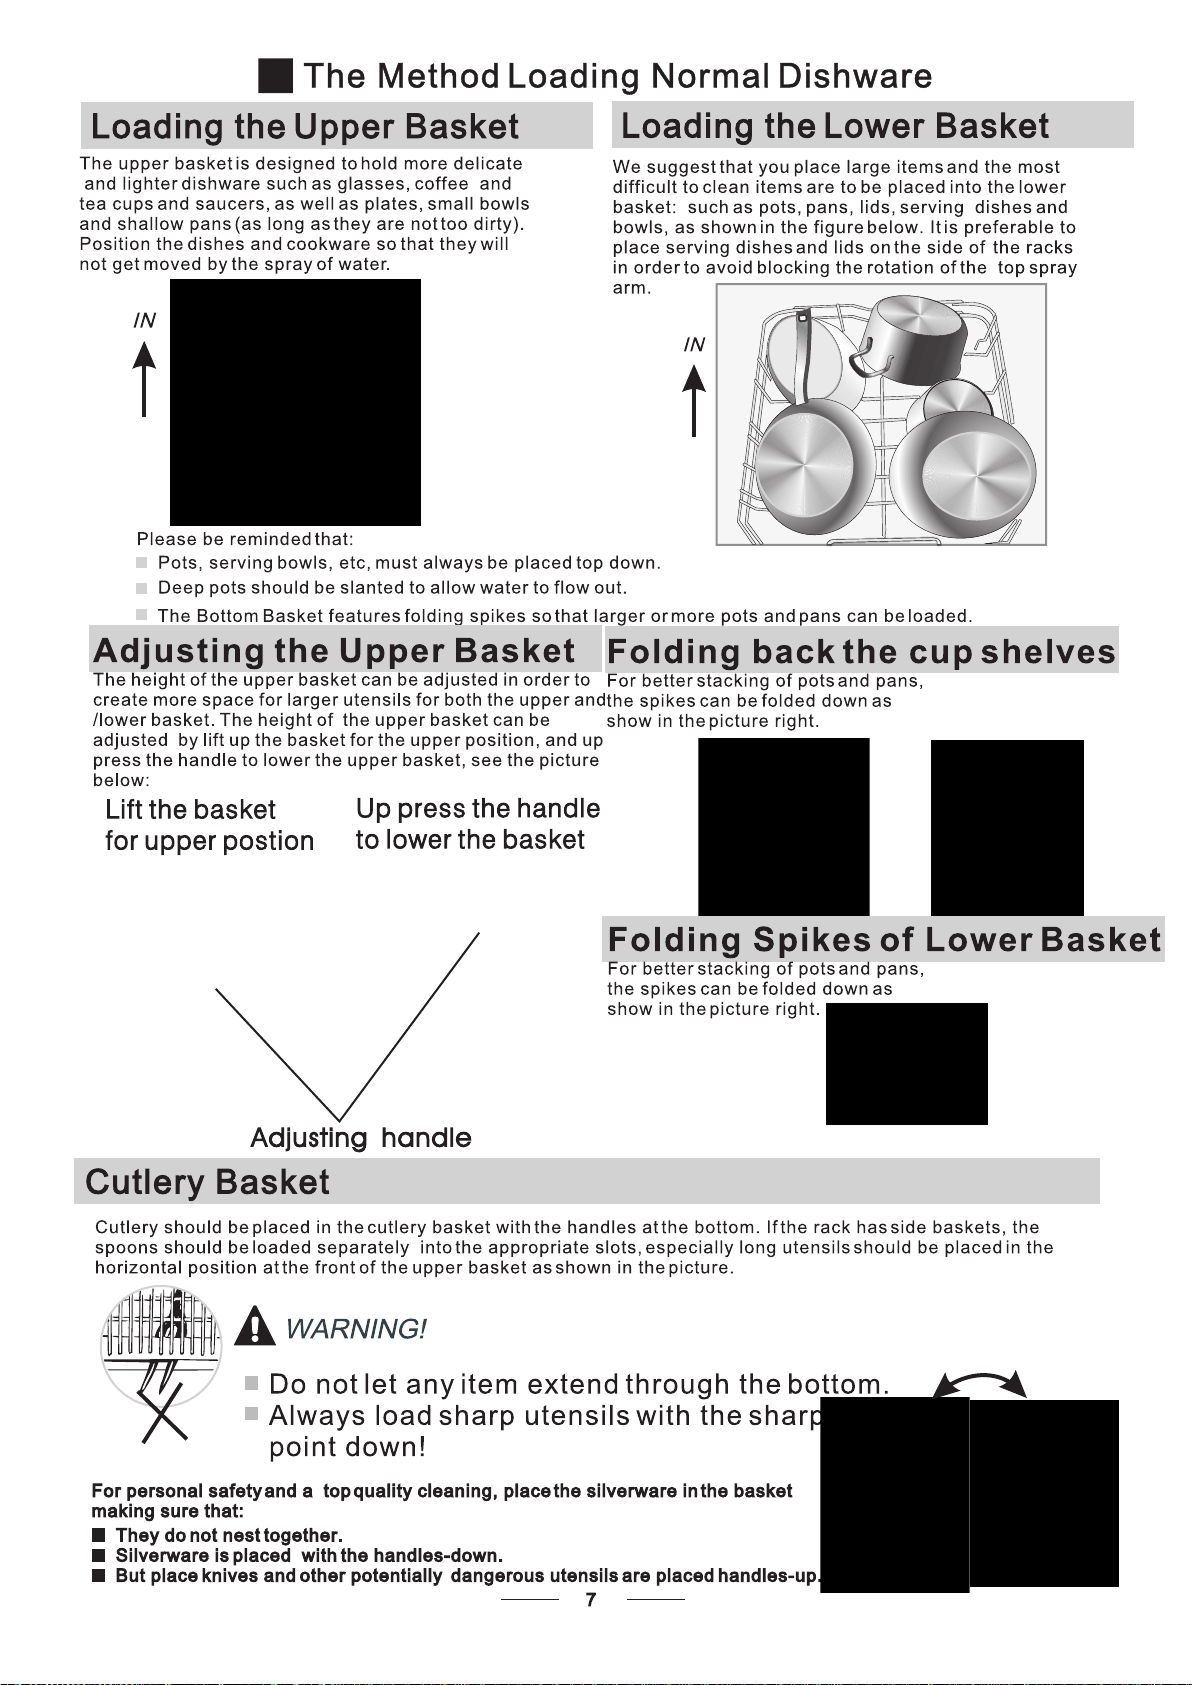
Load large itemswhich are mostdifficult toclean into thelower basket.
The upperbasket isdesigned tohold moredelicate andlighter dishwaresuch asglasses, coffee
and tea cups.
Long bladedknives storedin anupright positionare apotential hazard!
Long and/orsharp itemsof cutlerysuch ascarving knivesmust bepositioned
horizontally in theupper basket.
Please donot overloadyour dishwasher. Thisis importantfor goodresults andfor
reasonable consumptionof energy.
Load hollow itemssuch as cups,glasses, pans etc.With the openingfacing downwards sothat
water cannotcollect inthe containeror adeep base.
RecommendationRecommendation
Consider buying utensilswhich are identifiedas dishwasher-proof.
Use amild detergentthat isdescribed as'kind todishes'. Ifnecessary,seek further
information from thedetergent manufacturers.
For particularitems, selecta programwith aslow temperatureas possible.
To preventdamage, donot takeglass andcutlery outof thedishwasher immediately
after theprogram hasended.
(For thebest performance ofthe dishwasher,follow these loadingguidelines.
Features and appearanceof baskets andcutlery baskets mayvary from yourmodel.)
Scrape offany large foodparticles. Soften remnantsof burntfood in pans.
It isnot necessaryto rinsethe dishesunder runningwater.
Place objects inthe dishwasher infollowing way:
1.Itemssuch as cups,glasses, pots/pans, etc. arefaced downwards.
2.Curved items,or ones withrecesses, should beloaded aslant sothat water canrun off.
3.Allutensils arestacked securelyand cannot tipover.
4.All utensilsare placed inthe way that the sprayarms can rotate freely duringwashing.
NOTE:NOTE:
Very smallitems should notbe washed inthe dishwasher asthey could easilyfall out ofthe basket.
Attention beforeor afterloading theDishwasher BasketsAttention beforeor afterloading theDishwasher Baskets
Toprevent water drippingfrom theupper basket intothe lower basket,we recommend thatyou
empty the lowerbasket first andthen the upperbasket.
Removing theDishesRemoving theDishes
66

99
When the workingcycle has finished,the buzzer ofthe dishwasher willsound for 8seconds, then stop.Turn off
the applianceusing theON/OFF button,shut offthe watersupply andopen thedoor ofthe dishwasher.
Wait fora fewminutes beforeunloading thedishwasher toavoid scaldthe dishesand utensils
are stillhot andmore susceptibleto breakage.They willalso drybetter.
Switch Offthe Dishwasher
1.Switchoff thedishwasher bypressing the button.
2.Turnoff thewater tap.
The Ledscreen ison butthe colonicon isnot blinking,only inthis casethe programmehas ended.
ON/OFF
Open thedoor carefully.
Hot dishesare sensitiveto knocks.The dishesshould beallowed tocool downaround 15minutes
before removingfrom theappliance.
Open the dishwasher'sdoor, leaveit ajar andwait a fewminutes before removingthe dishes. Inthis way they
will becooler andthe dryingwill beimproved.
Unloading thedishwasher
It isnormal thatthe dishwasheris wetinside.
Empty the lowerbasket first andthen the upperone. Thiswill avoid waterdripping from theupper Basket onto
the dishesin thelower one.
Forgot toAdda DishForgot toAdda Dish
NOTE:NOTE:
At theEnd ofthe Wash CycleAt theEnd ofthe Wash Cycle
A forgotten dish can be added any time before the detergent cup opens.
Add forgotten dishes.
Close the door
After the spray arms stop working, you can open the door
completely.
2
3
Open the door a little .
14
5
6
Press the Start/Pause Button to stop the washing.
Press the Start/Pause Button, the dishwasher will run
after 10 seconds.
Wash thearms in soapyand warm waterand use asoft brush to
clean thejets. Replacethem afterrinsing themthoroughly.
NOTE:NOTE:
When following this procedure from step1 to step 3, the filter system will be removed;
when following it from Step 3 to Step 1, the filter system will be installed.
WARNING!WARNING! It isdangerous toopen thedoor whenwashing, becausethe hotwater mayscald you.
If youopen thedoor duringa washcycle ,the machinewill pause. The programlight will
stop blinkingand thebuzzer willmooing everyminute unlessyou closethe door. Afteryou
close thedoor,the machinewill keepon workingafter 10seconds.
Change theProgramChange theProgram
Premise:
A cyclethat is underwaycan only bemodified if ithas only beenrunning for ashort time. Otherwise,the
detergent mayhave alreadybeen released,and theappliance mayhave alreadydrained thewash water.
In thiscase, thedetergent dispensermust berefilled (seethe sectionentitled " Detergent ").
1
2 Press the Start/Pausebutton, the machinewill be instandby state, pressthe program buttonmore than
3s thenyou canchange theprogram tothe desiredcycle setting(see thesection entitled " Startinga wash" )

The filter preventslarger remnants offood or otherobjects from gettinginside the pum.
The residuesmay blockthe filter, inthis casethey mustbe removed.
The filtersystem consists ofa coarse filter, aflat (Main filter)
and amicrofilter(Fine filter).
Food andsoil particlestrapped inthis filterare pulverizedby a
special jeton thelower sprayarm andwashed downto drain.
Larger items, suchas pieces ofbones or glass,that could block
the drain aretrapped in thecoarse filter.To remove theitems
caught by thisfilter, gentlysqueeze the tapon the topof this
filter and liftit out.
This filterholds soiland foodresidues inthe sumparea and
prevents itfrom beingredeposit onthe dishesduring washcycle.
Main filter 1
Coarse filter2
Fine filter 3
2
3
1
Filter assembly
The filterefficiently removesfood particles fromthe wash water, allowing itto be recycledduring the cycle.
For best performanceand results, thefilter must becleaned regularly. For thisreason, it isa good ideato
remove the largerfood particles trappedin the filterafter each washcycle by rinsingthe semicircular filterand
cup under runningwater.Toremove the filterdevice, pull thecup handle inthe upward direction.
WARNING!WARNING! The dishwashermust neverbe usedwithout thefilters.
Improper replacementof thefilter mayreduce theperformance levelof theappliance
and damagedishes andutensils.
Step 1 Turn thefilter in anti-clockwisedirection.
Step 2 Lift the filterassy up.
6.Maintenance and Cleaning6.Maintenance and Cleaning
Filtering SystemFiltering System
NOTE:NOTE:
When following this procedure from step1 to step 2, the filter system will be removed;
when following it from Step 2 to Step 1, the filter system will be installed.
1010

The controlpanel canbe cleanedby usinga lightlydampened cloth.
After cleaning,make sureto dryit thoroughly.
For theexterior, usea good appliancepolish wax.
Never usesharp objects,scouring padsor harshcleaners onany partof thedishwasher.
Protect AgainstFreezing
1.Cutoff theelectrical powerto thedishwasher.
2.Turnoff thewater supplyand disconnectthe waterinlet pipefrom thewater valve.
3.Drain thewater fromthe inlet pipeand water valve.(Use a panto gather the water)
4.Reconnectthe waterinlet pipeto thewater valve.
5.Remove thefilter atthe bottomof thetub and usea sponge tosoak up waterin the sump.
please take frostprotection measures onthe dishwasher inwinter. Everytime afterwashing cycles,
please operateas follows
Caring forthe DishwasherCaring forthe Dishwasher
Cleaning theFilter
Cleaning TheDoor
Toclean the coarsefilter and thefine filter,use a cleaningbrush. Reassemble thefilter partsas shown inthe figures
on the lastpage and reinsertthe entire assemblyin the dishwasher, positioning itin its seatand pressing downwards.
When cleaningthe filters,don't knockon them.Otherwise, thefilters couldbe
contorted andthe performanceof thedishwasher couldbe decreased.
WARNING!WARNING!
To cleanthe edgearound thedoor,you shoulduse onlya softwarm, dampcloth.
To avoidpenetration ofwater intothe doorlock andelectrical components,do not
use aspray cleanerof anykind.
WARNING!WARNING! Never usea spraycleaner toclean thedoor panelas itmay damagethe doorlock
and electricalcomponents.
Abrasive agentsor somepaper towelsshould notbe usedbecause ofthe riskof
scratching orleaving spotson thestainless steelsurface.
Cleaning theSprayArms
NOTE:NOTE:
If your dishwasher cannot work because oftheice,
please contact professional service persons.
It is necessaryto clean thespray arms regularlyfor hard
water chemicals willclog the sprayarm jets andbearings.
- Inspectthe filtersfor blockingafter everytime thedishwasher has beenused.
- Byunscrewing the coarsefilter, youcan remove thefilter system. Removeany food remnantsand
clean thefilters underrunning water.
Notes:
The entirefilter assemblyshould becleaned oncea week.
NOTE:NOTE:
To removethe lowerspray arm,pull outthe sprayarm upward.
Toremove the upperspray arm,hold the nut,rotate thearm
clockwise to removeit.
Wash thearms in soapyand warm waterand use asoft brush to
clean thejets. Replacethem afterrinsing themthoroughly.
1111
Open

It isrecommend thatyou run awash cycle withthe
dishwasher empty andthen remove the plug fromthe
socket, turnoff thewater supply andleave the doorof
the appliance slightlyopen. Thiswill help thedoor
seals tolast longer andprevent odours from forming
within theappliance.
If theappliance mustbe moved,try tokeep itin the
vertical position.If absolutelynecessary,it canbe
positioned onits back.
One of thefactors that causeodours to formin the
dishwasher is foodthat remains trappedin the seals.
Periodic cleaning witha damp spongewill prevent this
from occurring.
Electrical Requirements
Ensure thevoltage andfrequency ofthe powerbeing correspondsto
those onthe ratingplate. Onlyinsert theplug intoan electricalsocket whichis earthed
properly.If theelectrical socketto whichthe appliancemust beconnected isnot
appropriate forthe plug, replacethe socket,rather thanusing aadaptors orthe likeas
they couldcause overheatingand burns.
Electrical Connection
Insure proper ground
exists before use
GROUNDING INSTRUCTIONS
7.Installation instruction7.Installation instruction
Please lookat therating label to knowthe ratingvoltage andconnect thedishwasher tothe appropriatepower supply.
Use therequired fuse10 amp,time delayfuse orcircuit breakerrecommended andprovide separatecircuit serving
only thisappliance.
Position the appliancein the desiredlocation. Theback should restagainst the wallbehind it, andthe sides,
along the adjacentcabinets orwalls. Thedishwasher is equippedwith watersupply and drainhoses thatcan
be positioned eitherto theright or the leftsides to facilitate proper installation.
Levelling theAppliance
Once theappliance ispositioned forlevelling, theheight ofthe dishwasher
may bealtered viaadjustment ofthe screwinglevel ofthe feet.
Positioning theAppliancePositioning theAppliance
About PowerConnectionAbout PowerConnection
WARNING!WARNING! For personal safety:
DO NOT USE AN EXTENSION CORD OR ANADAPTER PLUG WITH THIS APPLIANCE.
DO NOT, UNDERANY CIRCUMSTANCES, CUT OR REMOVE THE EARTHING
CONNECTION FROM THE POWER CORD.
Before cleaning orperforming maintenance, always
remove the plugfrom the socket.
To cleanthe exteriorand rubberparts ofthe dishwasher,
do notuse solventsor abrasivecleaning products.
Only usea clothwith warmsoapy water.
Toremove spots orstains from thesurface of the
interior,use acloth dampenedwith wateran alittle
vinegar,or acleaning productmade specificallyfor
dishwashers.
Remove thePlug
No SolventsorAbrasive Cleaning Moving theAppliance
Seals
How toKeepYour Dishwasherin Shape
After every wash,turn offthe water supplyto the
appliance andleave thedoor slightlyopen sothat
moisture andodours arenot trappedinside.
After EveryWash When notin Usefor aLongTime
This appliance must be earthed. In the event of a malfunction or breakdown, earthing will reduce the risk of
electric shock by providing a path of least resistance for the electric current. This appliance is equipped with a
cord having an equipment-earthing conductor and an earthing plug. The plug must be plugged into an
appropriate outlet that is installed and earthed in accordance with all local standards and requirements.
1212

1313
for personal safety:
DO NOT USE AN EXTENSION CORD OR ANADAPTER PLUG WITH THIS APPLIANCE.
DO NOT, UNDERANY CIRCUMSTANCES, CUT OR REMOVE THE
FROM THE POWER CORD. EARTHING
CONNECTION
WARNING!WARNING!
Improper connection of the equipment earthing conductor can result in the risk of an
electric shock.
Check with a qualified electrician or service representative if you are in doubt whether the
appliance is properly earthed.
Do not modify the plug provided with the appliance. If the plug does not fit properly to the
outlet, please have a qualified electrician to install a proper outlet.
Cold Water Connection
Connect the coldwater supply hoseto a threaded3/4(inch) connector andmake sure
that it isfastened tightly inplace.
If the waterpipes are newor have notbeen used foran extended periodof time, letthe
water run tomake sure thatthe water isclear.This precaution isneeded to avoidthe
risk of thewater inlet tobe blocked anddamage the appliance.
Please closethe hydrantafter using.
WARNING!WARNING!
WaterConnectionWaterConnection
Drain hose Connection
Insert the drainhose into adrain pipe witha minimum diameterof 40mm, orlet it runinto the sink,making sure to
avoid bending orcrimping it.The top ofthe hose mustbe less than1000mm.
MAX 1000mm
A
Counter
Front
Drain pipe
NOTE
The top of the hose
must be less than
1000mm.
40mm
B
PLEASE HANG UP THE DRAIN HOSE EITHER WAYOF A,BPLEASE HANG UP THE DRAIN HOSE EITHER WAYOF A,B

1414
The followingthings shouldbe checkedbefore startingthe dishwasher.
Start ofDishwasherStart ofDishwasher
The contentof thismanual isvery helpfulto theusers.
After installation,please makesure tokeep thismanual.
Attention:Attention:
1The dishwasheris leveland fixedproperly.
2The inletvalve isopen.
3There isa leakageat theconnections ofthe conducts.
4The wiresare tightlyconnected.
5The poweris switchedon.
6The inletand drainhoses areknotted.
7Allpacking andprint materialsshould betaken outof thedishwasher.
Extension Hose
If youneed adrain hoseextension, makesure touse asimilar drainhose.
It mustbe no longerthan 4 metres,otherwise the cleaningeffect ofthe dishwasher couldbe reduced.
WaterOutlet
Connect the waterdrain hose.The drain hosemust be correctly fittedto avoid waterleaks.
Ensure thatthe waterdrain hoseis notkinked orsquashed.
If the sinkis more than1000mm higher thanthe floor,the excess waterin hoses cannotbe drained directly
into thesink. Itwill benecessary todrain excesswater fromhoses intoa bowlor suitable
container that isheld outside andlower than thesink.
How toDrain ExcessWaterFrom Hoses
Syphon Connection
The waste connectionmust be ata height lessthan 1000 mm(maximum) from the bottom ofthe dish.
The waterdrain hoseshould befixed .

1515
8.TroubleshootingTips8.TroubleshootingTips
Problem Possible Causes What To Do
Fuse blown, or the
circuit breaker acted Replace fuse or reset circuit breaker. Remove any other
appliances sharing the same circuit with the dishwasher
Suds in the tub
Spilled rinse-aid Always wipe up rinse-aid spills immediately.
Review the charts on the following pages may save you from calling for service.
White film on
inside surface
There are rust
stains on cutlery
Knocking noise
in the wash cabinet
Rattling noise
in the wash cabinet
Knocking noise
in the water pipes
Hard water minerals
The affected items are
not corrosion resistant.
A spray arm is
knocking against
an item in a basket
Items of crockery
are loose in the
wash cabinet
This may be caused
by on-site installation
or the cross-section of
the piping.
To clean the interior, use a damp sponge with
dishwasher detergent and wear rubber gloves.
Never use any other cleaner than dishwasher
detergent for the risk of foaming or suds.
Interrupt the program, and rearrange the items
which are obstructing the spray arm.
Interrupt the program,
and rearrange the items of crockery.
This has no influence on the dishwasher function.
if in doubt, contact a suitably qualified plumber.
Stained tub interior
Detergent with
colourant was used Make sure that the detergent is the one without
colourant.
Improper detergent
Dishwasher doesn't
start
Make sure the dishwasher is turned on and the door is
closed securely.
Check that the water supply is connected properly and
the water is turned on.
Make sure to close the door properly and latch it.
Make sure the power cord is properly plugged into the
wall socket.
Power supply is not
turned on
Error code:E1;
Water pressure is low
Door of dishwasher
not properly closed.
water not pumped
dishwasherfrom
Kink in drain hose
Filter clogged
Kitchen sink clogged
Check drain hose.
Check coarse the filter
(see section titled " Cleaning The Filter ")
Check the kitchen sink to make sure it is draining well.
If the problem is the kitchen sink not draining ,you may
need a plumber rather than a serviceman for dishwashers.
Before Callingfor ServiceBefore Callingfor Service
Technical
problems
General
problems
Noise
Use only the special dishwasher detergent to avoid suds.
If this occurred, open the dishwasher and let suds evaporate.
Add 1 gallon of cold water to the tub. Close and latch the
dishwasher, then select any cycle. Dishwasher will drain
out the water at the first step. Open the door after draining
is stop and check if the suds is disappeared.
Repeat if necessary.
The items should be corrosion resistant.
Error CodesError Codes
1616
Problem Possible Causes What To Do
The dishes were not
loaded correctly. See notes in " Loading the Dishwasher Baskets ".
The dishes
are not clean
Cloudiness
on glassware
Black or gray
marks on dishes
Detergent left in
dispenser cups
The dishes
are not drying
Select a more intensive programme.
See" Wash Cycle Table ".
Use more detergent, or change your detergent.
Rearrange the items so that the sprayer can rotate freely.
Clean and/or fit the filter combination correctly.
Clean the spray arm jets. See "Cleaning the Spray
Arms".
Use less detergent if you have soft water and select
a shortest cycle to wash the glassware and to get
them clean.
Use a mild abrasive cleaner to eliminate those marks.
Re-loading the dishes properly.
Load the dishwasher as suggested in the directions.
Increase the amount of rinse-aid/refill the rinse-aid
dispenser.
Do not empty your dishwasher immediately after
washing. Open the door slightly so that the steam can
escape. Begin unloading the dishwasher only once the
dishes are barely warm by touching. Empty the low
basket first. This prevents water form dropping off
dishes in the upper basket.
In short program the rinse temperature is lower.
This also lowers cleaning performance. Choose
a program with a long high rinse temperature.
Water drainage is more difficult with these items.
Cutlery or dishes of this type are not suitable for
washing in the dishwasher.
The program was
not powerful enough.
Not enough detergent
was dispensed.
Items are blocking
the path of spray arms.
The filter combination
is not clean or
is not correctly fitted.
This may cause
the spray arm jets
get blocked.
Combination of soft
water and too much
detergent.
Aluminum utensils
have rubbed against
dishes.
Dishes block
detergent cup opens.
Improper loading
Too little rinse-aid
Dishes are removed
too soon
Wrong program
has been selected
Use of cutlery with
a low-quality coating
Unsatis
-factory
washing
result
Unsatis
-factory
drying
result
Overflow.
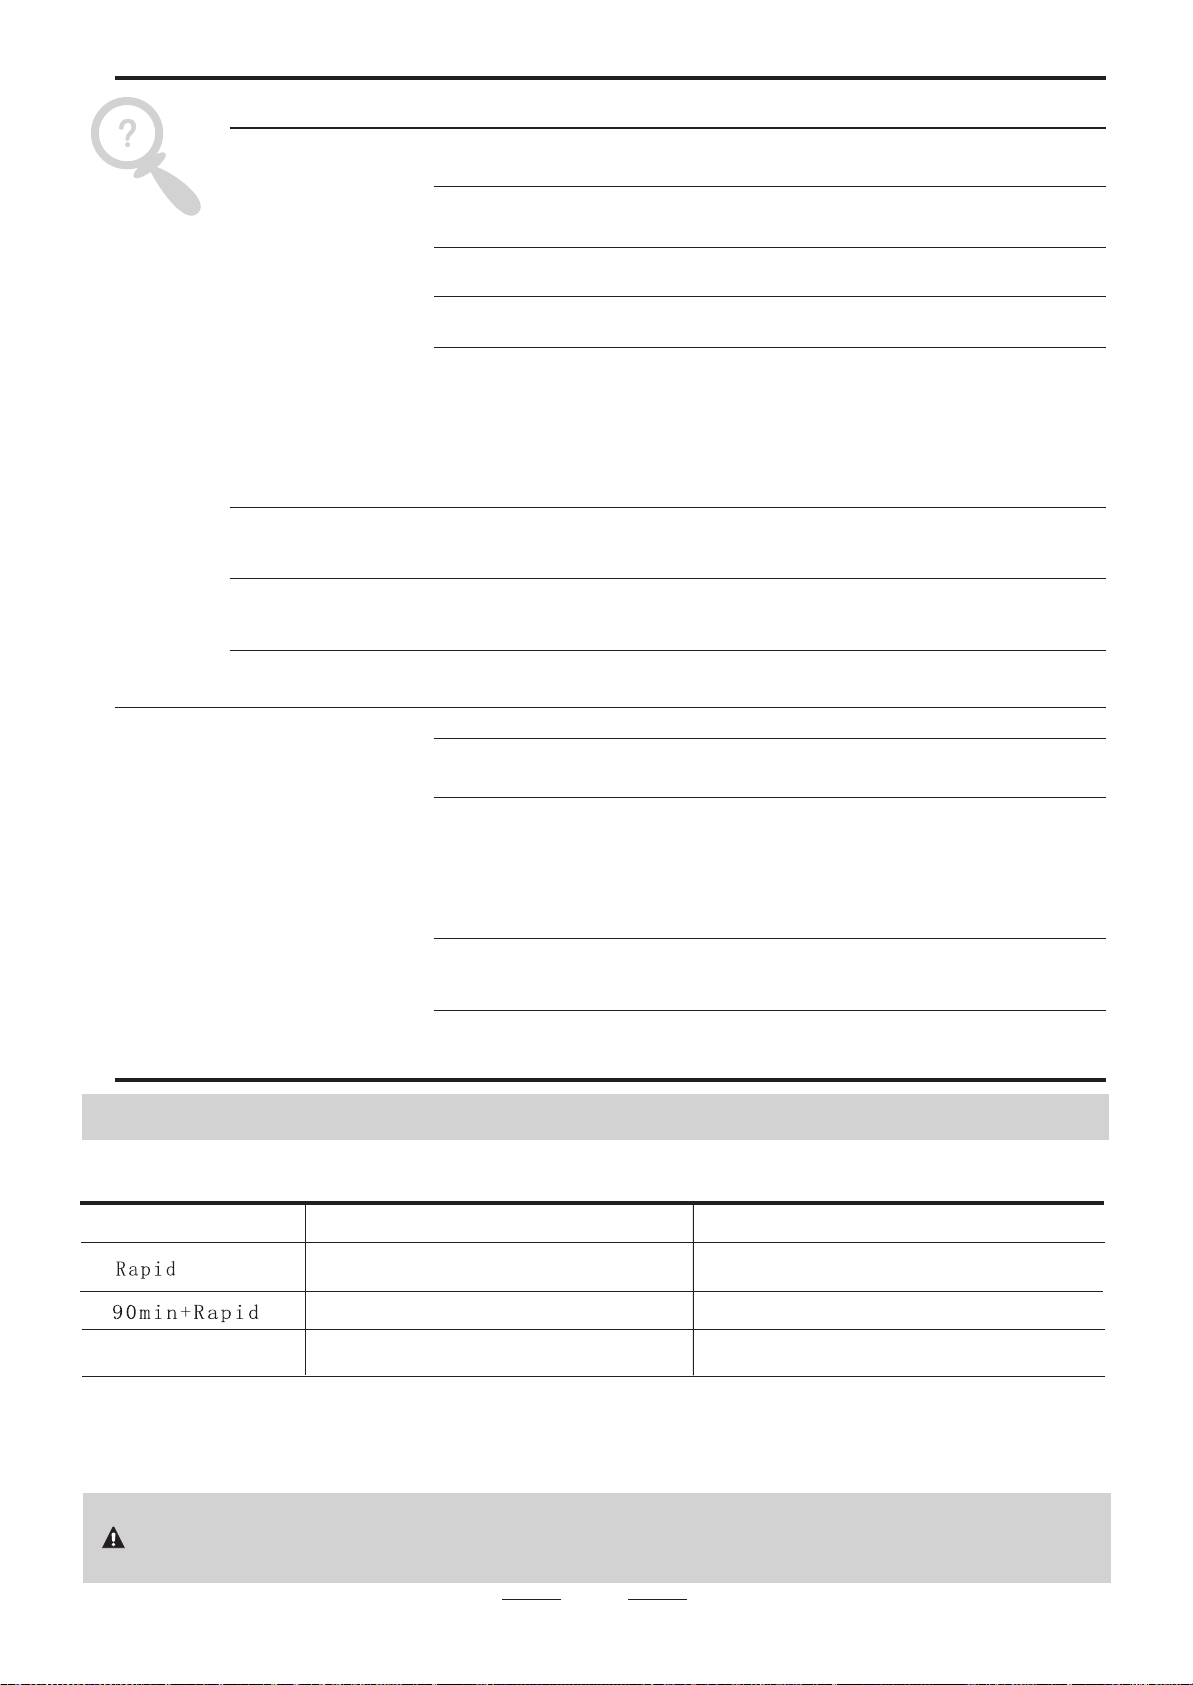
When some malfunctions occur, the appliance will display error codes to warn you:
Codes Meanings Possible Causes
Longer inlet time.
Faucet is not opened, or water intake is
restricted,or water pressure is too low.
Some element of dishwasher leaks.
ECO
WARNING!WARNING! If overflow occurs, turn off the main water supply before calling a service.
If there is water in the base pan because of an overfill or small leak,
the water should be removed before restarting the dishwasher.
Not reaching required temperature
Malfunction of heating element.

1717
Height : 845mm
Width : 598mm
Depth : 600mm(with the door closed)
Water pressure: 0.04-1.0MPa
Power supply: see rating label
Capacity: 12place settings
Technical InformationTechnical Information
WARNING!WARNING! If overflow occurs, turn off the main water supply before calling a service.
If there is water in the base pan because of an overfill or small leaks,
the water should be removed before restarting the dishwasher.
598598
845845
11751175
600(with the door closed)
This manual suits for next models
1
Table of contents
Other Euro Appliances Dishwasher manuals

Euro Appliances
Euro Appliances EDD60S User manual

Euro Appliances
Euro Appliances EDS45XS User manual

Euro Appliances
Euro Appliances EDV604SS User manual

Euro Appliances
Euro Appliances PEDM15XS User manual

Euro Appliances
Euro Appliances Vienna EDM15XS User manual

Euro Appliances
Euro Appliances FAVORIT 88060 VI User manual

Euro Appliances
Euro Appliances ED614SX User manual


