Euro Chef OE612 User manual
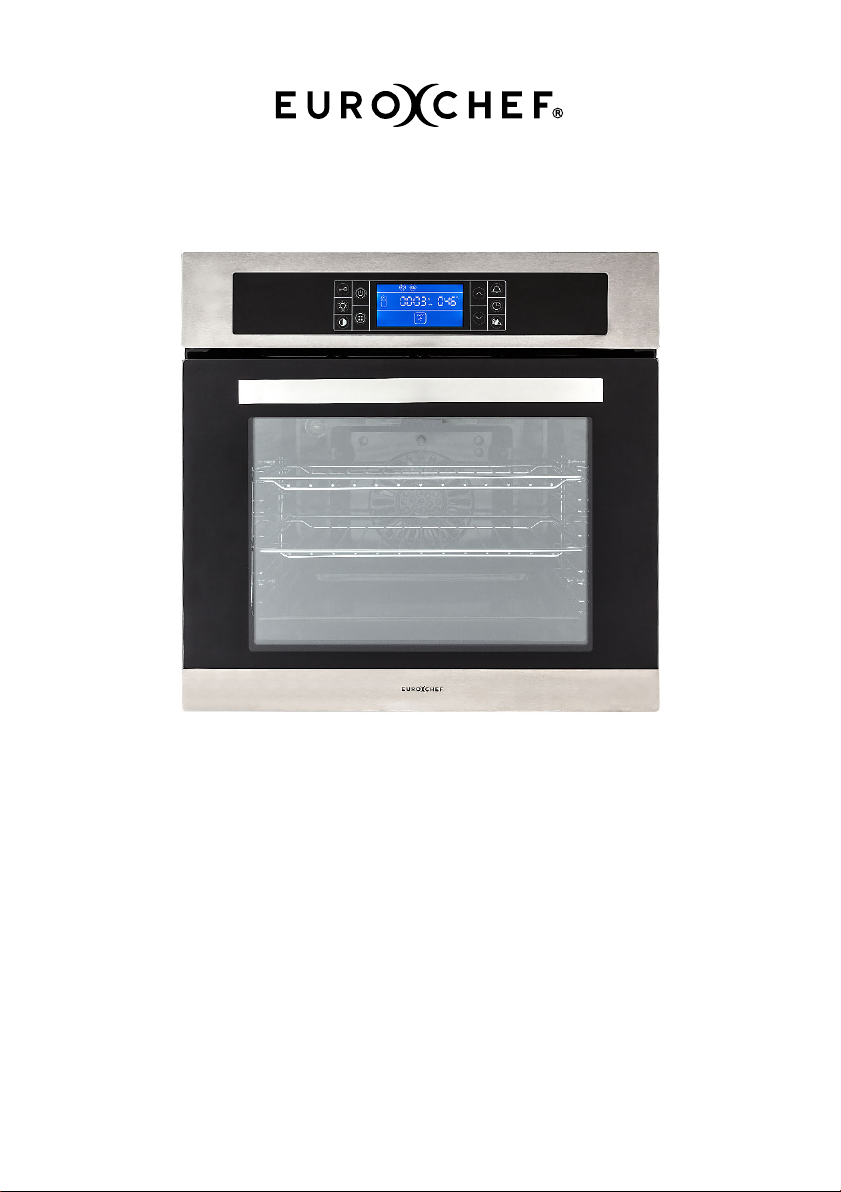
Built-in Electric Oven - OE612
User Manual
RETAIN THIS MANUAL FOR FUTURE REFERENCE
PLEASE READ THIS MANUAL CAREFULLY BEFORE USE

Built-in Electric Oven - OE612
i
Table of Contents
Safety................................................................................................................ 1
Installation ....................................................................................................... 5
Operation ......................................................................................................... 7
Oven Structure............................................................................................7
Oven Functions...........................................................................................8
Usage .........................................................................................................9
Racks........................................................................................................12
Maintenance................................................................................................... 13
Removing the packaging tap....................................................................13
Cleaning the inside of the door.................................................................13
Removing and installing the oven door ....................................................14
Specifications................................................................................................ 17

Built-in Electric Oven - OE612
1
Safety
WARNING!
For your safety, the information in this manual must be followed to minimize the risk of
fire or explosion, electric shock, or to prevent damage, personal injury, or loss of life.
READ AND FOLLOW THIS SAFETY INFORMATION CAREFULLY. SAVE THESE
INSTRUCTIONS
SAFETY PRECAUTIONS
When using electrical appliances, basic safety precautions must be followed, including
the following:
•
Use this appliance only for its intended purpose as described in this Owner’s
Manual.
•
Be sure your appliance is properly installed and grounded by a qualified technician
in accordance with the provided User’s Manual.
•
Don’t attempt to repair or replace any part of your oven unless it is specifically
recommended in this manual. All other service should be referred to a professional
qualified technician.
•
Have the installer show you the location of the circuit breaker or fuse. Make it easy
reference.
•
Before performing any service, disconnect the oven power supply at the household
distribution panel by removing the fuse or switching off the circuit breaker.
•
Do not allow anyone to climb, stand or hang on the door, this could damage the
oven, or cause severe personal injury.
•
Be sure the oven is securely installed in a cabinet that is firmly attached to the
house structure.
•
Never leave the oven door open when you are not watching the oven.
•
Always keep combustible wall covering, curtains or drapes a safe distance from
your oven.
•
Always keep dish towels, dish cloths, pot holders and other linens a safe distance
from your oven.
•
Always keep wooden and plastic utensils and canned food a safe distance from
your oven.

Built-in Electric Oven - OE612
2
•
Do not store flammable materials in an oven.
•
Items of interest to children should not be stored in cabinets above an oven;
children climbing on the oven to reach items could be seriously injured.
•
Never wear loose-fitting or hanging garments while using the appliance. Be careful
when reaching for items stored in cabinets over the oven. Flammable material
could be ignited if brought in contact with hot surfaces or heating elements and
may cause severe burns.
•
Use only dry pot holders, moist or damp pot holders on hot surfaces may result in
burns from steam. Do not let pot holders touch hot heating elements. Do not use a
towel or other bulky cloth.
•
For your safety, never use your appliance for warming or heating the room.
•
Keep cleaning. Never leave jars or cans of fat drippings in or near your oven.
•
Do not use water on grease fires. Never pick up a flaming pan. Turn the controls
off.
•
A flame in the oven can be smothered completely by closing the oven door and
turning the oven off or by using a multipurpose dry chemical or foam-type fire
extinguisher.
•
Do not store or use combustible materials, gasoline or other flammable vapours
and liquids in the vicinity of this or any other appliance.
•
Stay away from the oven when opening the oven door. Hot air or steam which
escapes can cause burns to hands, face and /or eyes.
•
Do not heat unopened food container. Pressure could build up and the container
could burst, causing an injury.
•
Keep the oven vent unobstructed.
•
Keep the oven free from grease build-up.
•
Place the oven shelf in the desired position while the oven is cool. If shelves must
be handled when hot, do not let pot holder contact the heating elements.
•
When using cooking or roasting bags in the oven, follow the manufacturer’s
directions.
•
Do not touch the heating elements or the interior surface of the oven. These
surfaces may be hot enough to burn even though they are dark in colour. During

Built-in Electric Oven - OE612
3
and after use, do not touch, or let clothing or other flammable materials contact
any interior area of the oven; allow sufficient time for cooling first.
•
Potentially hot surfaces include oven vent openings, surfaces near the openings,
crevices around the oven door, the edges of the window and metal trim parts
above the door.
•
Remember: the inside surface of the oven may be hot when the door is opened.
•
Pulling out the shelf to the stop-lock is a convenience in lifting heavy foods. It is
also a precaution against burns from touching hot surfaces of the door or oven
walls.
•
Do not use the oven to dry newspapers. If overheated, they can catch on fire.
•
Do not use the oven for storage area. Items stored in an oven can ignite.
•
Do not leave paper products, cooking utensils or food in the oven when not in use.
•
After broiling, always take the broiler pan out of the oven and clean it. Leftover
grease in the broiler pan can catch fire next time you use the pan.
•
Clean only parts listed in this User’s Manual.
•
Do not use aluminium foil to line oven bottoms, except as suggested in this
manual. Improper installation of aluminium foil may result in a risk.
•
COOK MEAT AND POULTRY THOROUGHLY: Cook meat and poultry thoroughly
- meat to at least an internal temperature of 75°C (160°F)and poultry to at least an
internal temperature of 85°C (180°F). Cooking to these temperatures usually
protects against food borne illness.
WARNING:
•
This appliance is not intended for use by persons (including children) with reduced
physical, sensory or mental capabilities, or lack of experience and knowledge,
unless they have been given supervision or instruction concerning use of the
appliance by a person responsible for their safety.
•
During use the appliance becomes hot. Care should be taken to avoid touching
heating elements inside the oven.
•
Ensure that the appliance is switched off before replacing the lamp to avoid
electric shock.
•
Accessible parts may become hot during use, young children should be kept away.

Built-in Electric Oven - OE612
4
•
Do not use harsh abrasive cleaners or sharp metal scrapers to clean the oven
door glass since they can scratch the surface, which may result in shattering of the
glass.
•
A steam cleaner should not be used.
•
Children should be supervised to ensure that they do not play with the appliance.
•
Oven must be switched off before removing the guard and that, after cleaning, the
guard must be replaced in accordance with the instructions.
•
If the supply cord is damaged, it must be replaced by the manufacturer, its service
agent or a similarly qualified person in order to avoid a hazard.
Built-in Electric Oven - OE612
5
Installation
•
Inspect the connection with the power source. Check and ensure a current of 16A
from this power source. A special junction box must be provided and connected by
a qualified person.
•
You can switch off the power of the oven after installation for maintenance
purposes. The disconnection may be achieved by having the plug accessible or
by incorporating a switch in the fixed wiring (in accordance with the wiring rules).
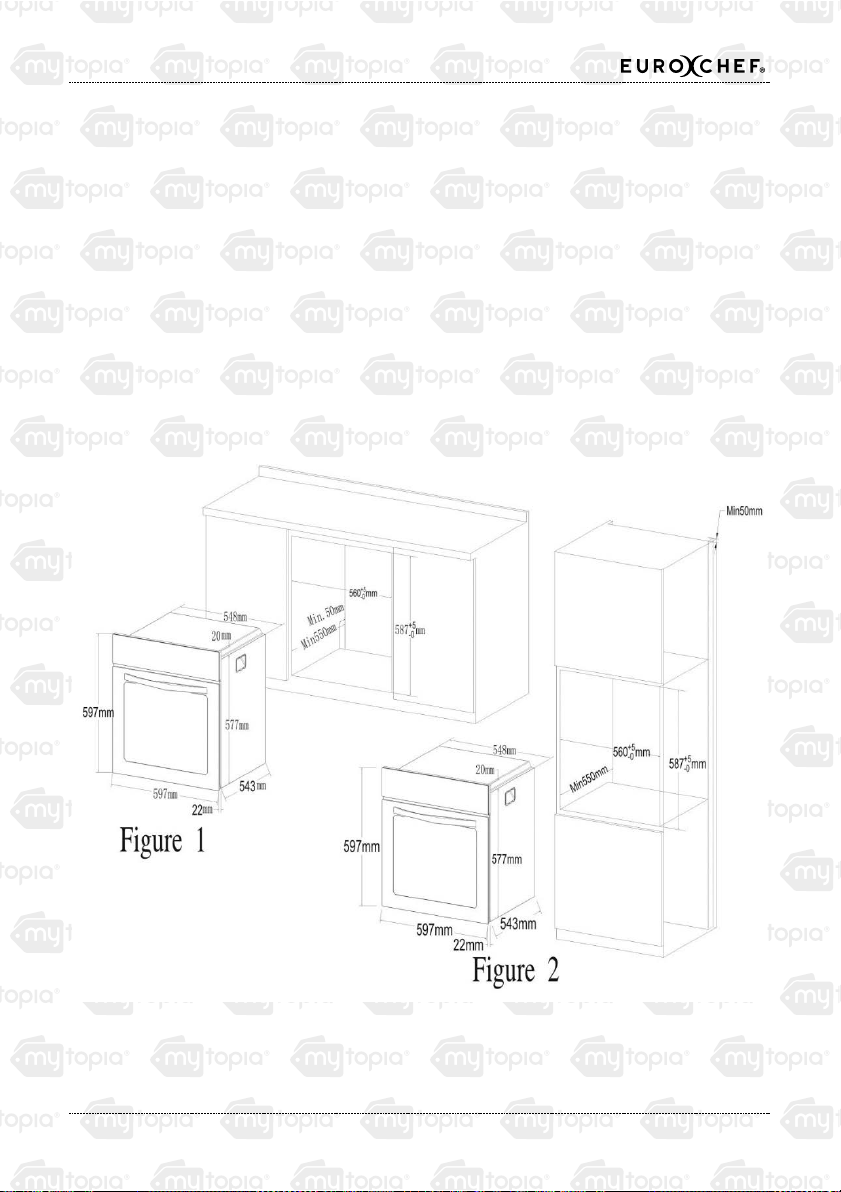
•
Carpentry: Refer to figure 1 or 2 for the appliance dimensions to your oven,
and the space necessary to install the oven. The oven support surface must be
solid plywood or similar material, and the surface must be horizontal from
side to side, left to right and front to rear.
In order to ensure adequate ventilation, the back panel of the cabinet unit must be
removed. There must be an aperture of at least 50 mm between the oven back and
cabinet back.
Built-in Electric Oven - OE612
6
NOTE:
If the oven is mixed with a different kitchen range, it must observe the rules which are
provided by the manual of the kitchen range.
In order to get the oven operating normally, the type of cabinet must be correct.
Cabinet with a veneer exterior must be assembled with glue which can withstand
temperature up to 120°C.
In accordance with the safe rules, after installation of the oven, it should not touch the
electric parts.
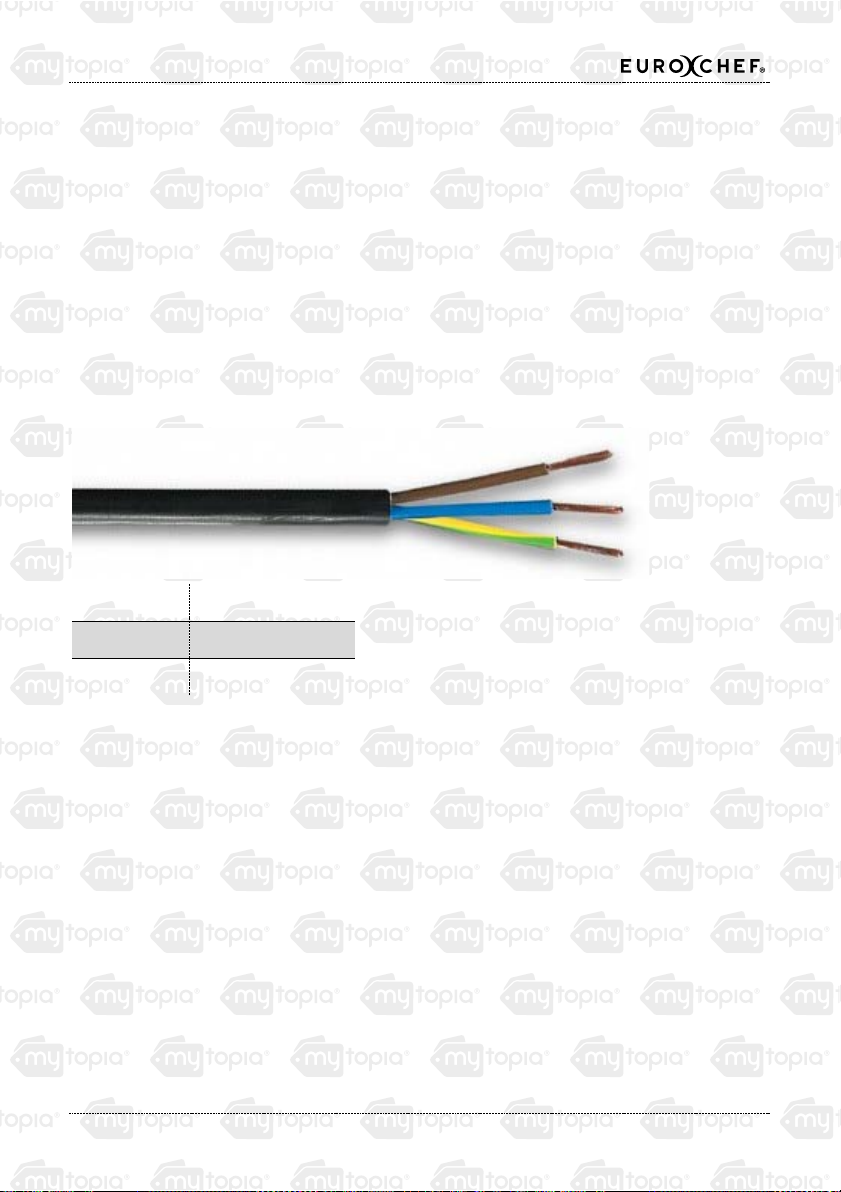
Electrical requirements
These appliances must be supplied with proper voltage and frequency (AC220-240V,
50Hz), and connected to an individual, properly grounded branch circuit, protected by a
circuit breaker (the voltage on the brand which located on the frame of oven).
Brown Live/Active
Blue Neutral
Green/Yellow Ground earth
WARNING! ELECTRICAL SHOCK HAZARD!
•
Electrical ground is required on this appliance.
•
Do not connect to the electrical supply until appliance is permanently grounded.
•
Disconnect power to the junction box before making the electrical connection.
•
This appliance must be connected to a grounded, metallic, permanent wiring
system, or a grounding connector should be connected to the grounding terminal
or wire lead on the appliance.
•
Power supply line should avoid touching the crust sheet metal of the electric oven.
When they touch each other the chances rise that the oven crust sheet metal will
mangle the insulated layer of the power supply line due to the high temperatures.
•
Do not use a gas supply line for grounding the appliance.
Built-in Electric Oven - OE612
7
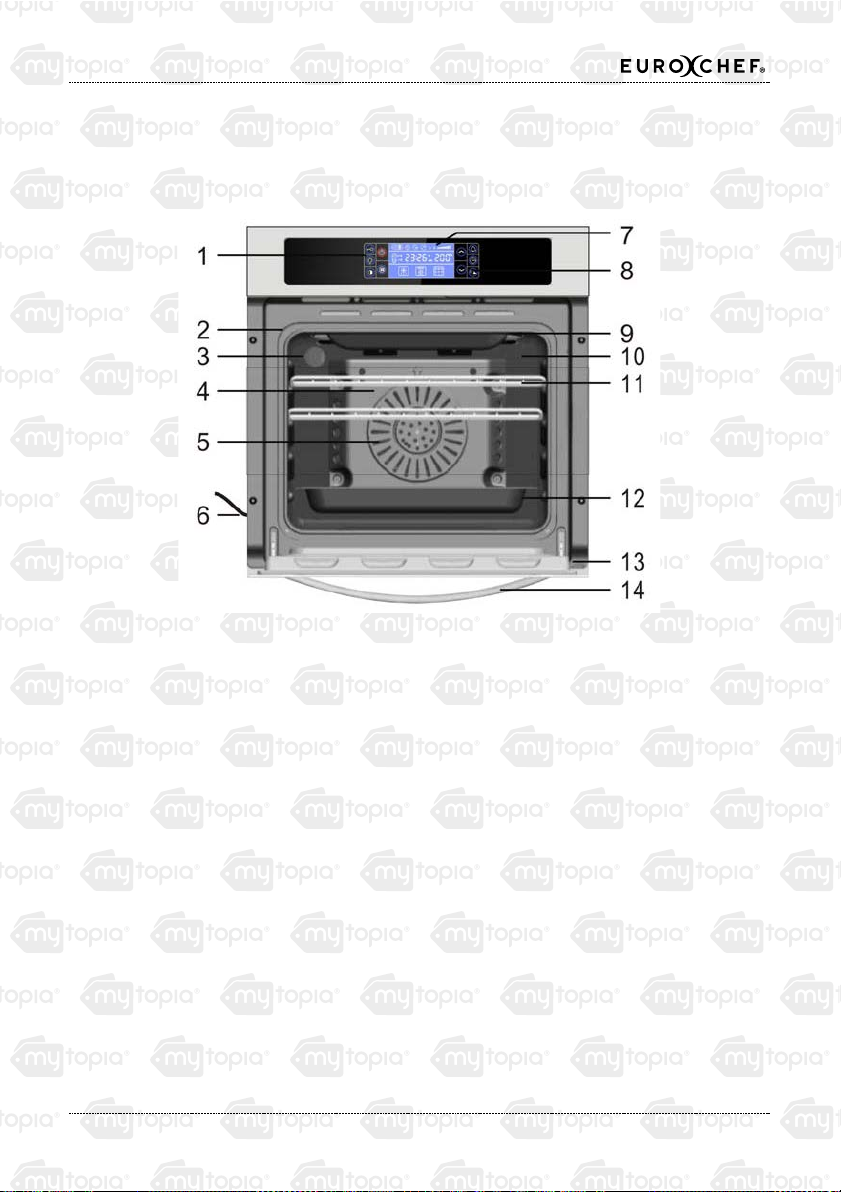
Operation
Oven Structure
1. Control panel
2. Gasket
3. Oven light
4. Convection heating element
5. Convection fan element
6. Supply cord
7. Display area
8. Touching set
9. Inside top heating element
10. Outside top heating element
11. Grill grid
12. Tray
13. Door element
14. Handles of oven door
NOTE: Please refer to the practicality functions and ovens.
Built-in Electric Oven - OE612
8
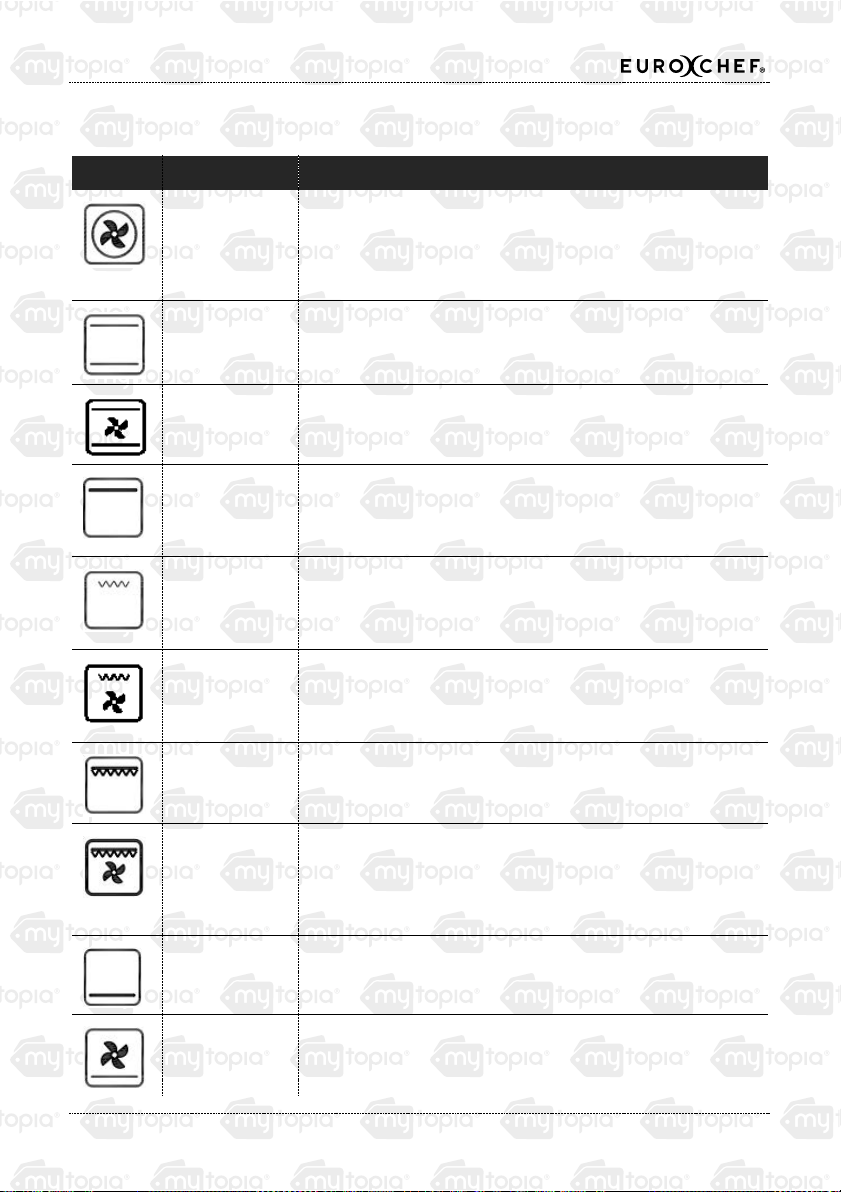
Oven Functions
Image Function Description
Fan forced This method of cooking uses the circular element while the
heat is distributed by the fan. This results in a faster and more
economical cooking process. The fan oven allow food to be
cooked simultaneously on different shelves, preventing the
transmission of smells and tastes from one dish onto another.
Conventional
oven (top and
lower element)
This method of cooking provides traditional cooking, with heat
from the top and lower elements. This function is suitable for
roasting and baking on one shelf only.
Conventional
oven and fan This method of cooking provides traditional cooking, with heat
from the top and lower elements in conjunction with the fan.
This function is suitable for roasting and baking.
Oven This method of cooking utilizes the inner sections of the top
element, which directs heat downwards onto the food. This
function is suitable for grilling portions of bacon, toast and
meat etc.
Convection This method of cooking utilizes the inner sections of the top
element, which directs heat downwards onto the food. This
function is suitable for grilling portions of bacon, toast and
meat etc.
Fan and half
grill This method of cooking utilizes the inner sections of the top
element in conjunction with the fan, which helps to provide a
quick circulation of heat. This function is suitable for grilling
portions of bacon, toast and meat etc.
Grill This method of cooking utilises the top element, which directs
heat downwards onto the food. Ideal when additional cooking
is required for the surface of the food being cooked.
Fan and grill This method of cooking utilizes the top element in conjunction
with the fan, which helps to provide a quick circulation of heat.
This function is suitable where quick browning is required and
“sealing” the juices in, such as steaks, hamburgers, some
vegetables etc.
Lower element This method of cooking utilises the bottom element, which heat
upwards onto the food. Ideal when additional cooking is
required for the bottom of the food being cooked.
Fan and lower
element This method of cooking utilizes the bottom element in
conjunction with the fan, which helps to circulate the heat. This
function is suitable for sterilizing and preserving jars.
Built-in Electric Oven - OE612
9
Image Function Description
Fan oven and
lower grill This method of cooking utilizes the top element and the
circular element in conjunction with the fan, which helps to
provide a quick circulation of heat. The fan oven allows food to
be cooked simultaneously on different shelves; This function is
suitable where quick browning is required.
Defrost mode The fan runs without heat to reduce the defrosting time of
frozen foods.
The time required to defrost the food will depend on the room
temperature, the quantity and type of food. Always check food
packaging for the defrosting instructions.
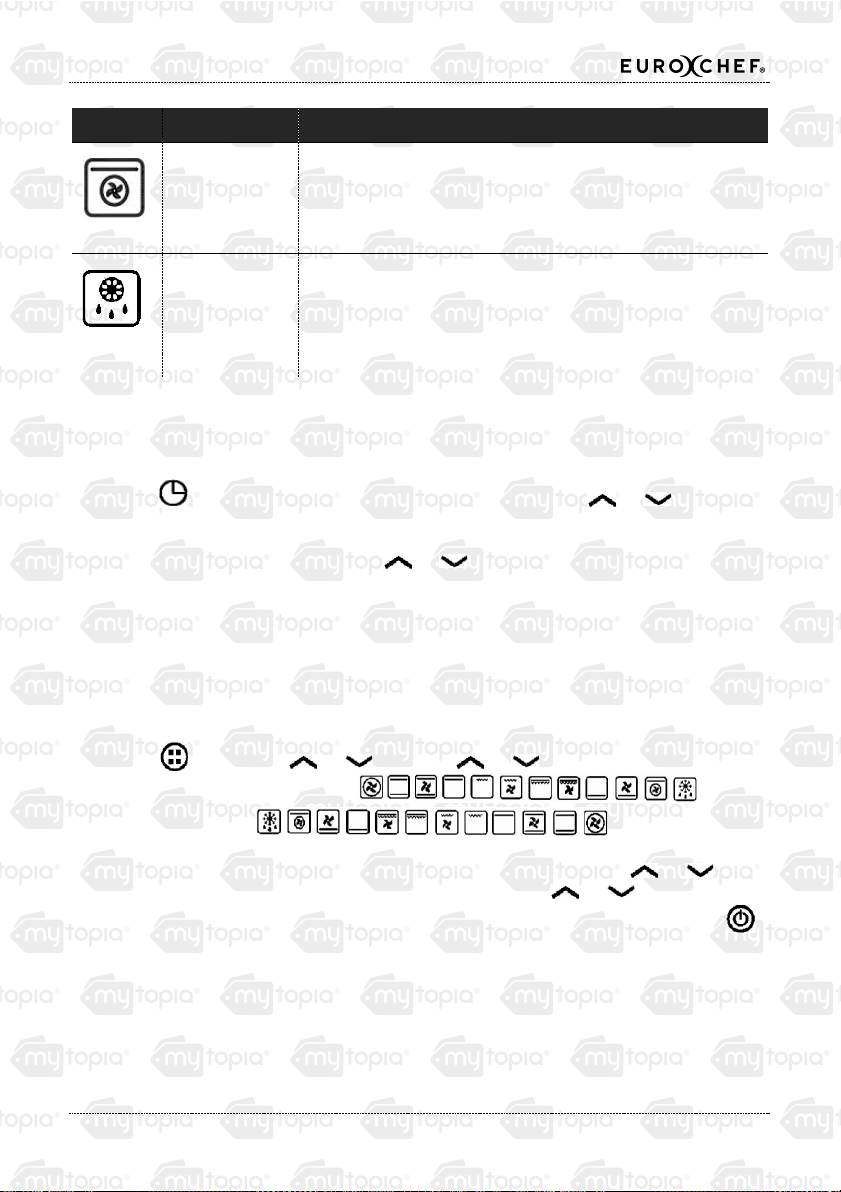
Usage
•
Clock Setting:
Press for 3 seconds to select the hour time,then press or to adjust.
Pressing the button for 3 seconds continually will make the hour time go up or
down quickly from 0 to 23. After 3 seconds, the minute time will be selected. Adjust
the minute time by pressing either or . Pressing the button for 3 seconds
continually will make the minute time go up or down quickly from 00 to 59. If no
time settings are set within 3 seconds, the clock will automatically confirm the time
and will stop blinking.
Note: When setting the timer, the timing and delayed roasting functions are
disabled.
•
Choosing a Function Setting:
Press , then press or (or press or for 3 seconds for a quick
selection of choices), choosing or
counter clockwise . When you have
chosen a function, the selected function icon will flash and the temperature marker
will show the current temperature. At this time, you can press the or
buttons to adjust the temperature settings (or press the or buttons for a
quick selection of choices). Temperature range is 40°C - 250°C. Pressing the
button will turn off the roasting function. Pressing it again will turn the roasting
function on again.
Note: The time and delay roasting functions can only be set only after the stall
mode has been selected.
Built-in Electric Oven - OE612
10
•
Timer Cooking Function Setting:
Press the button once and the icon and timer number will flash. This
setting is the same as the clock setting. At this time, enter the roasting time and it
will show as a countdown timer. Press the button once to look at the
countdown timer. When time is up, the oven will turn off automatically. For
example, if the timer is set at 01:20, the oven will turn off in 1 hour and 20 seconds
later.
Note: When setting the timer, the timing and delayed roasting functions are
disabled.
•
Delayed Cooking Function Setting:
After the timer is set, press the button again or press twice for setting the
cooking end time, displaying the icon. The setting is the same as what was
provided in the Clock Setting in the previous page. After setting the cooking end
time, it will show a delayed end time. Due to priority to display the countdown
interface of the alarm, when setting the alarm time, it will prioritise the display of
the countdown interface of the alarm. Then it will display the timer or the delayed
end time.
When the delayed time is half completed, the icon will flash, as well as the
cooking timer. In this mode, the duration and stop time must be set as follows:
Start Time = Stop Time – Set Time
Example: Current time is 7:00. Set time is 1:20. Off time is 11:20. This means that
the oven should work for 1 hour and 20 seconds from 10:00 to 11:20.
Note: When setting the timer, the timing and delayed roasting functions are
disabled.
•
Alarm Setting:
Press the button to show the hour time. The setting is the same as the Clock
Setting in the previous page. At this time, the alarm will begin counting down, until
it flashes “0:00” and the alarm will buzz 10 times.
Note: When using the alarm as a timer, the timer will not affect the other functions
when it is operating and when it stops. When setting the alarm, press the
button once to cancel the alarm function.
•
Lock Setting:
Press the button to lock all of the buttons. Pressing the button for 3
seconds will unlock the buttons.

Built-in Electric Oven - OE612
11
•
and Buttons:
Adjust the time for the hour and minute and set the temperature. Pressing either
button once will change the number setting slowly, while pressing either button for
a prolonged time will change the number setting quickly.
•
Button:
Pressing this button once will turn on the lights in the oven. Pressing it again will
turn off the lights.
•
°C / °F Interchange:
Pressing both and buttons at the same time will change the temperature
settings to either °C or °F.
•
Button:
Press this button to adjust the screen brightness.
•
Button:
Press this button to adjust the buzzer volume.
Note: E1 is the alarm for temperature sensor open circuit or short-circuit.

Built-in Electric Oven - OE612
12
Racks
To avoid possible burns, place the shelves they have been provided in the desired
position before you turn the oven on (see table for grill position below).
Place the shelves correctly on the supports
To remove a shelf, pull it towards you, lift the front end up and pull it out.
To replace a shelf, place the end of the shelf on the support, lift the front end up and
push the shelf in.
Interior with slide way:
Interior without slide way:
Built-in Electric Oven - OE612
13
Maintenance
Be sure electrical power is off and all surfaces are cool before cleaning any part of the
oven.
Removing the packaging tap
To assure no damage is done to the finish of the product, the safest way to remove the
adhesive left from packaging tape on new appliances is an application of a household
liquid dishwashing detergent, mineral oil or cooking oil.
Wipe and then apply an appliance polish to thoroughly clean and protect the surface.
Do not rub or clean the gasket of the door----because the gasket has the poor ability to
prevent abrasion.
If you find the gasket has the abrasion, chafe or dilapidation, or the gasket is shift,
please change it.
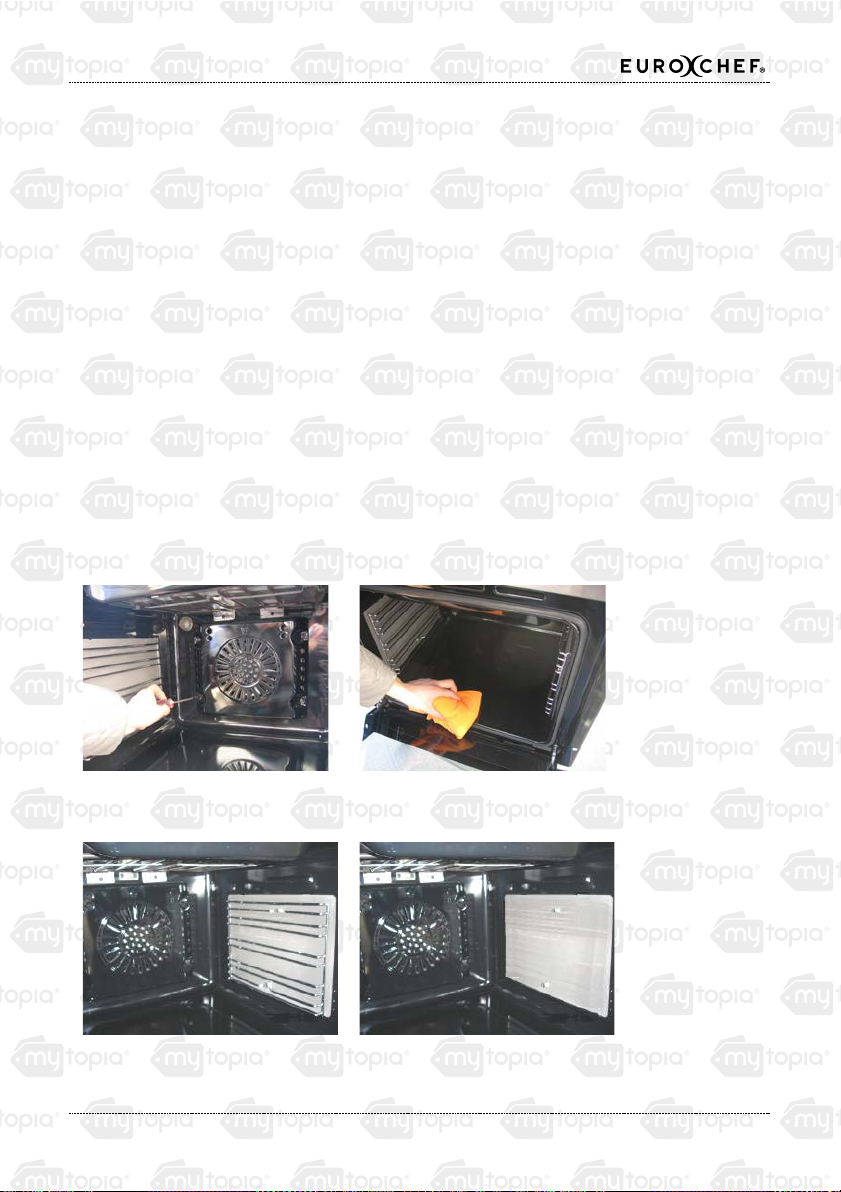
Cleaning the inside of the door
Using soap and water to clean two sides of the oven and the bottom of the oven. Take
out the ventilation cover and using the soap and water or detergent to clean.
Take out the ventilation cover
by loosen the screws
Wipe the surface with a soft towel
Take off the shelf for easy
cleaning
Remove catalytic liner and change other
spare one.

Built-in Electric Oven - OE612
14
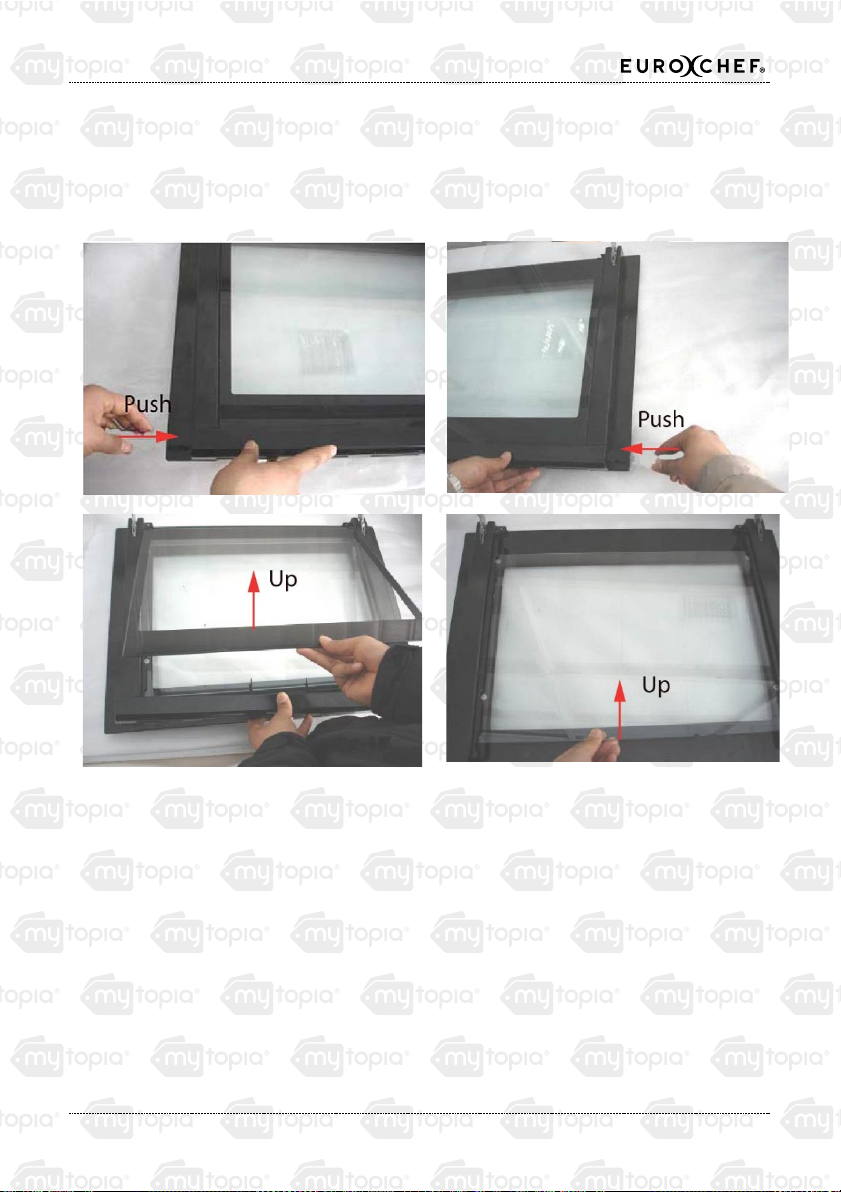
Removing and installing the oven door
1. To remove the oven door: first open the oven door utmost, open the buckle of the
hinges utmost, which locate below the door, then close the door to lock the hinge and
buckle, at last handhold two sides of the door to lift, it can remove the oven door.
2. To install the oven door: it is opposite with the remove sequence; first handhold two
sides of the door, lock the hole of the hinge in the oven, then open the door utmost, at
last close the buckle of the hinge.
NOTE: Remove and install the oven door according to the manual, to avoid increase
the difficulty or make the injury.
Disassemble the door according to the following figures:
To clean the outside of the door:
Use soap and water to thoroughly clean the top, sides and front of the oven door.
Rinse well. You may also use a glass cleaner to clean the glass on the outside of the
door. Do not let water drip into the vent openings.
Built-in Electric Oven - OE612
15
Spillage of marinades, fruit juices, tomato sauces and basting materials containing
acids may cause discoloration and should be wiped up immediately. When surface is
cool, clean and rinse.
Do not use the oven cleaners, cleaning powders or harsh abrasives on the outside of
the door.
Oven heating elements
Do not clean the bake element or the broil element. Any soil will burn off when the
elements are heated.
Clean oven bottom in warm soap-filled water.
Tray and Grid
After broiling, remove the tray from the oven. Remove the grid from the tray. Carefully
pour out the grease from the tray into a proper container. Wash and rinse the tray and
grid in hot water with a soap-filled or plastic scouring pad.
If food has burned on, sprinkle the grid with detergent while hot and cover with wet
paper towels or a dishcloth. Soaking the tray will remove burned-on foods. Do not store
a soiled tray and grid anywhere in the oven.
Built-in Electric Oven - OE612
16
Control panel
It is a good idea to wipe the control panel after each use. Clean it with dry soft cloth. Do
not use abrasive cleansers, strong liquid cleansers, plastic scouring pads or oven
cleansers on the control panel-they will damage the finish.
Glass Surfaces
To clean the outside glass finish, use a glass cleaner. Rinse and polish with a dry cloth.
Do not allow the water or cleaner to run down inside the oven door while cleaning.
Stainless steel surfaces (on some models)
Do not use the stainless steel cleaners for it will scratch the surface. Use a hot, damp
cloth with a mild detergent suitable for stainless steel surfaces. Use a clean, hot, damp
cloth to remove soap. Dry with a dry, clean cloth.
If food soil remains, try a general kitchen cleaner. For hard-to-clean soil, use a
standard stainless steel cleaner. After cleaning, use a stainless steel polish. Follow the
product instructions for cleaning the stainless steel surface.
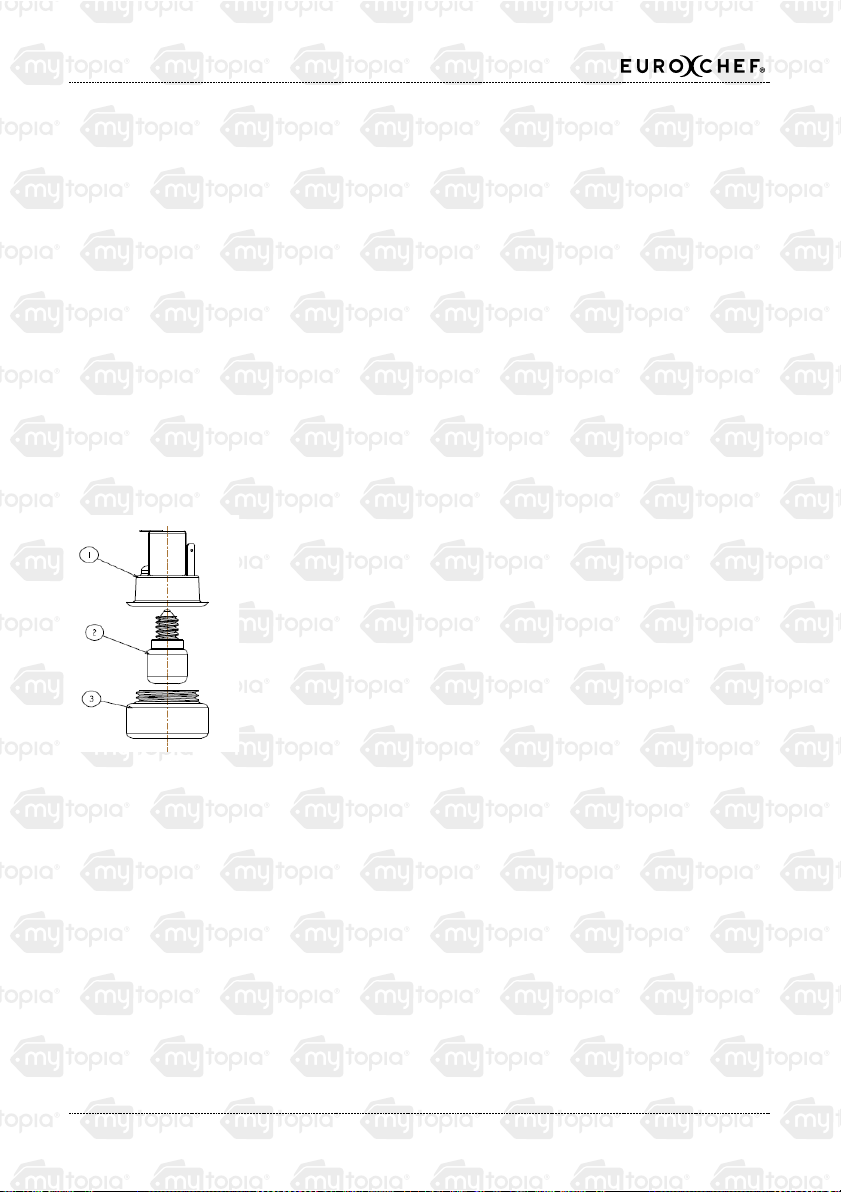
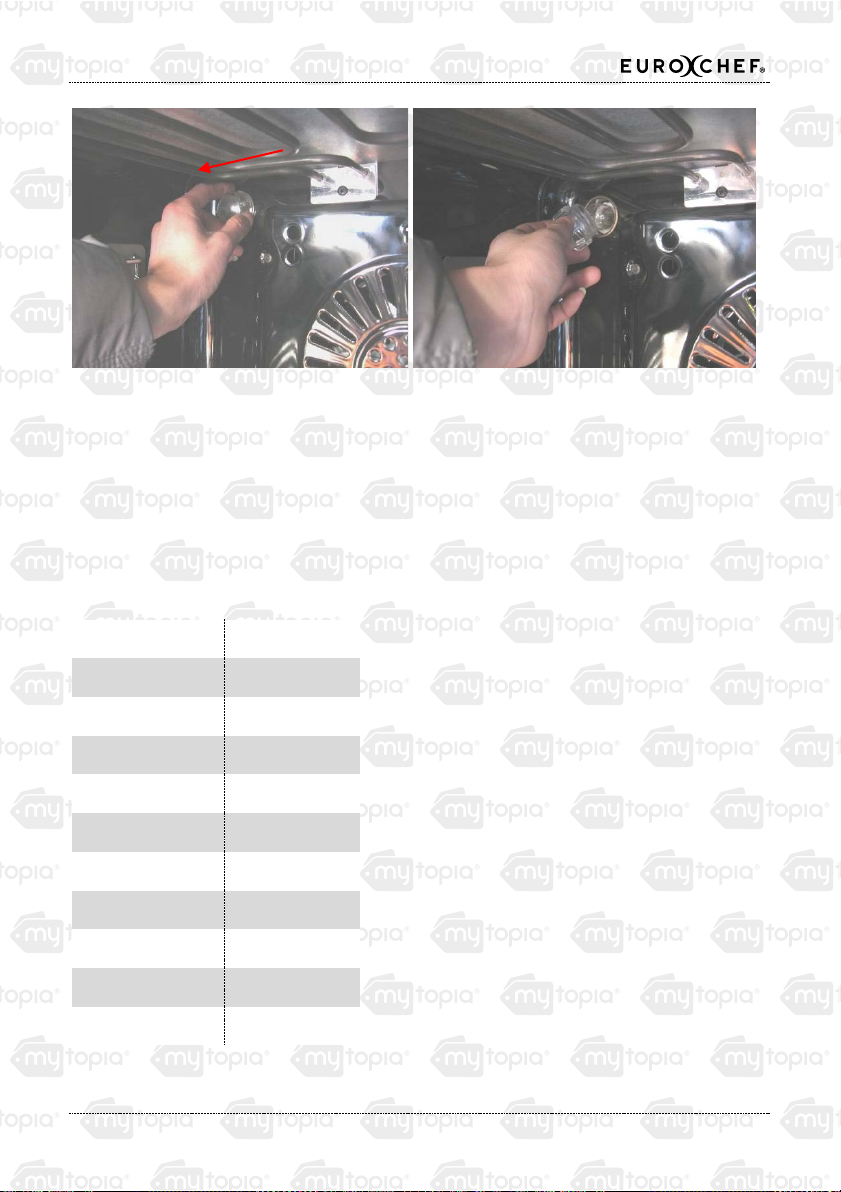
Oven light bulb
NOTE: The glass cover (on some models) should be removed
only when cold.
Wearing latex gloves may offer a better grip.
Before replacing the bulb, disconnect electrical power to the
oven at the main fuse or circuit breaker panel. Let the bulb cool
completely before removing it.
For your safety, do not touch a hot bulb with a damp cloth. If you
do, the bulb will break.
To remove:
Turn the glass cover counterclockwise1/4 turn until the tabs of
the glass cover
clear the grooves of the socket. Remove the bulb.
To replace:
Put in a new 25-watt appliance bulb. Place the tabs of the glass
cover into the
grooves of the socket. Turn the glass cover clockwise1/4 turn.
1. Bulb holder
2. Bulb
3. Glass cover
Built-in Electric Oven - OE612
17
NOTE:
A 25-watt appliance bulb is smaller than a standard 25-watt household bulb.
Install and tighten the cover clockwise.
Reconnect electrical power to the oven.
For improved lighting inside the oven, clean the glass cover frequently using a wet
cloth. This should be done when the oven is completely cool.
Specifications
Depth 60cm
Height 59.3cm
Width 60cm
Type Electric
Oven Volume 60L
Finish Colour Silver
Functions 12
Power 2900-3400W
Max Temperature 250°C
Energy Rating A
Voltage 240V 50Hz

Some experts believe the incorrect or prolonged use of almost any
product could causeserious injury or death. For information that
may reduce your risk of serious injury or death consult thepoints
below and additionally, the information available at
www.datastreamserver.com/safety
- Consult all documentation, packaging and
product labelling before use. Note that some
products feature online documentation which
should be printed and kept with the product.
- Check p roduct for loose / broken / damaged /
missing parts, wear or leaks (if applicable) be fore
each use. Never use a product with loose / b roken
/ damaged / missing pa rts, wear or leaks (if
applicable).
- Products must be inspected and serviced (if
applicable) by a qualified specialist every 6
months assuming average residential use by a
person of average weight and strength, ab ove
average technical aptitude, on a property
matching average metropolitan specification.
Intended use outside these guidelines could
indicate the product is not suitable for intended
use or may require more regular inspection or
servicing.
- Ensure all possible users of the p roduct have
completed an industry recognised training course
before being given access to the product.
- The product has been supplied by a general merchandise
retailer that may not be familiar with your specific applic ation or
your description of the application. Be sure to attain third party
approval for your application from a qualified specialist before use
regardless of prior assurances by the retailer or its representatives.
- This product is not intended for use where fail-safe operation is
required. As with any product (take an au tomobile, aircraft,
computer or ball point pen for example) there is always a small
chance of a technical issue th at needs to be repaired or may
require replacement of the product or a part. If the possibility of
such failure and the associated time it takes to rectify could in any
situation inconvenience the user, business or employee or could
financially affect the user, business or employee then the product
is not suitable for your requirements. This p roduct is not for use
where incorrect operation or a failu re of any kind, including but
not limited to a condition requiring product return, replacement,
service by a technician or replacement of parts could cause a
financial loss, loss of employee time or an in convenience
requiring compensation.
- If this item has been purchased in error considering the points
above simply contact the retailer directly for details of their
returns policies if required.
Table of contents
Other Euro Chef Oven manuals

Popular Oven manuals by other brands

Frigidaire
Frigidaire GLEB30S8A Factory parts catalog

Whirlpool
Whirlpool GH6178XPQ0 Use & care guide

GoodHome
GoodHome bamia GHMF71 manual

Electrolux
Electrolux E30EW85ESS - Icon Designer Series Electric Double... Factory parts catalog

Eurotech
Eurotech ED-BIO5FMT SS manual

Whirlpool
Whirlpool AKG 659/IX Service manual

Dometic
Dometic FO200FT Installation - use - maintenance

CANDY HOOVER
CANDY HOOVER FCXNE828X User instructions

Bosch
Bosch HBF011B 1 Series User manual and installation instructions

West Bend
West Bend Chris Freytag Countertop Oven instruction manual

Farberware
Farberware Millennium FTO320SS Use and care instructions

Westinghouse
Westinghouse WFE916 quick start guide


