EuroCase CROSS CAM EUCS-1360 User manual

EUCS-1360 User Manual

HELLO!
Thanks for acquiring our camera
EUROCASE EUCS-1360 CROSSCAM
360. Read thoroughly these operating
instructions to properly use the
product.

1- Package contents
2- Technical specifications
3- Buttons and connections
4- How to use
4.1 Memory card
4.2 Turn-on & turn-off
4.3 Charge the camera
4.4 Function mode switch
5- Menu operation
6- Connect to PC
7- Remote control
03
04
05
06
08
09
3
CONTENTS
1- PACKAGE CONTENTS
2- Technical specifications
- Video resolution: 1920x960
pixels @ 30 fps (H.264)
- Photo resolution: 5 MP
- 1" LCD Display
- TF card reader up to 32 GB
- Built-in Wi-Fi IEEE
802.11b/g/n
- Lens view angle: 220ºx2
- Built-in microphone and
speaker
- Power Battery: 1500mAh/3.7V
- Inputs: Micro USB, TF Card
EUCS-1360 CrossCam 360, Tripod, Water Resistant case, USB
cable, User manual, 2032 battery.
4
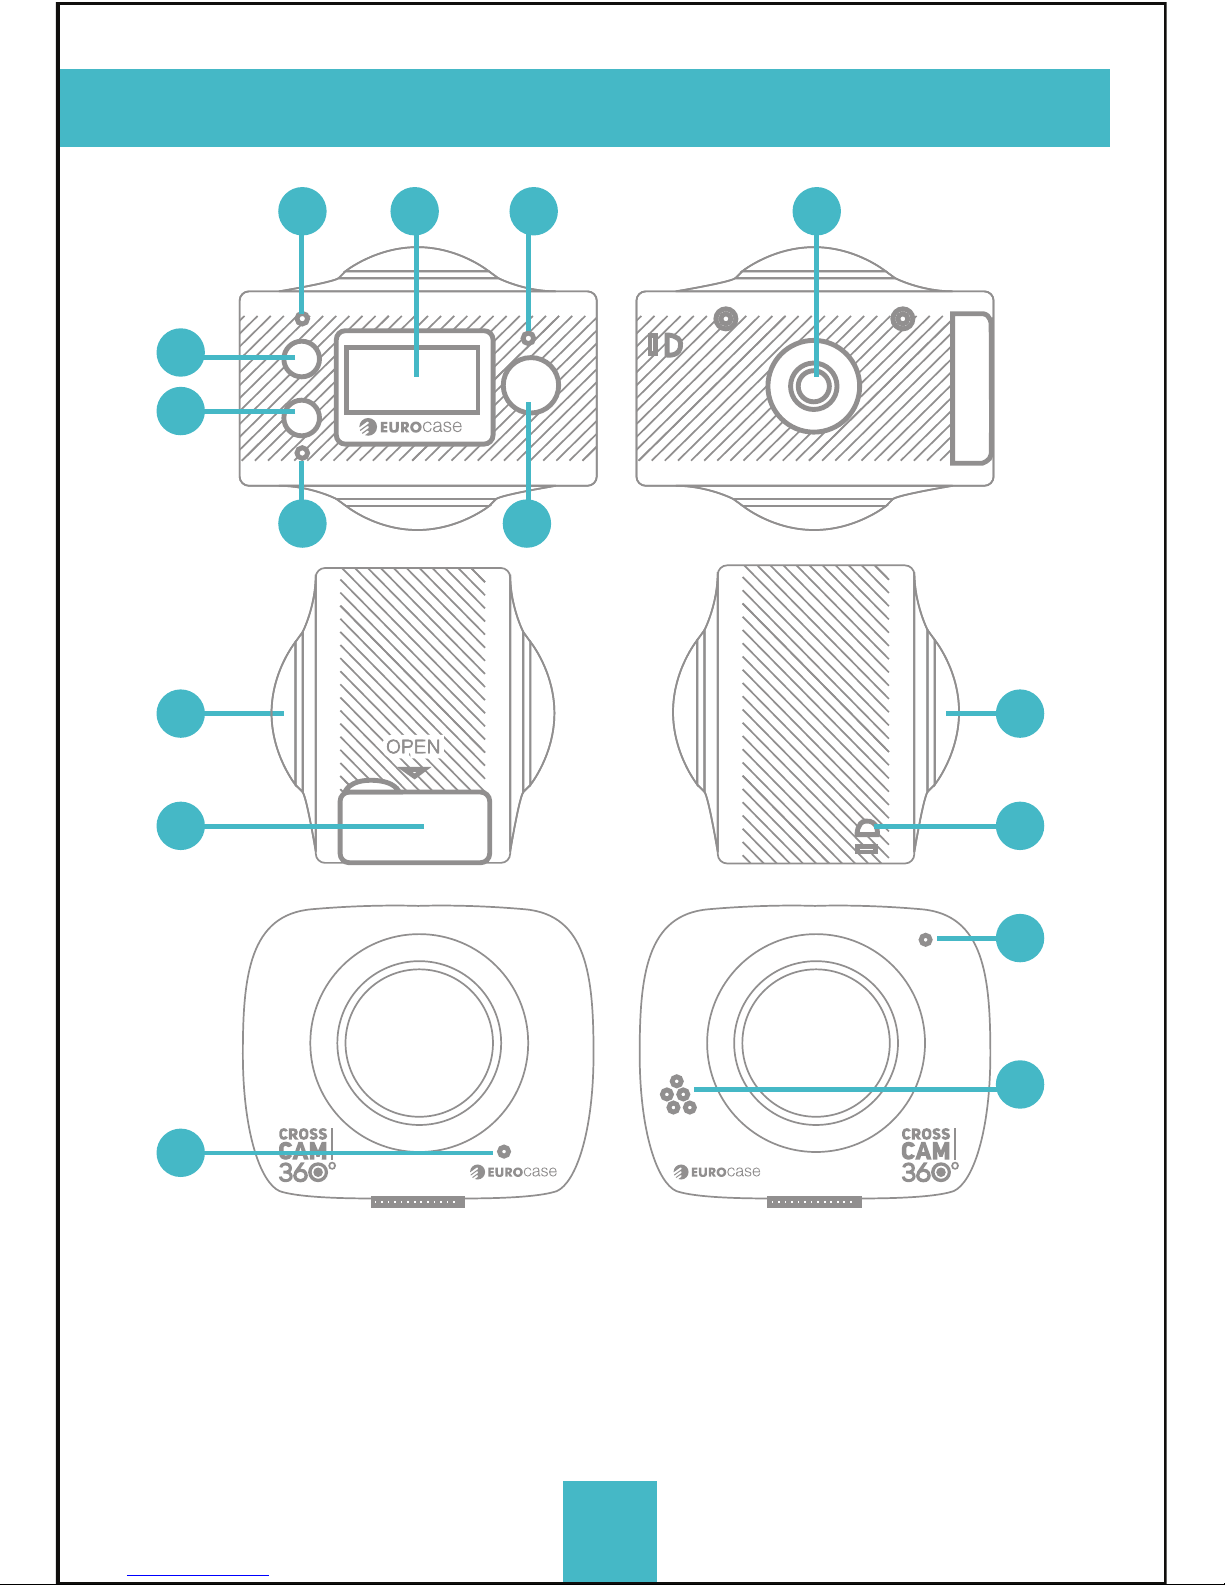
3- Buttons and connections
01
04
03
06 09
07
02
05
08 08
13
14
11
12
01. LCD display screen
02. Power/Mode
03. WIFI Indicator (red)
04. Power indicator/Charging
indicator (Blue)
05. Wifi/Menu
06. Busy (red)
07. Shutter /OK Key
08. Camera Lens*2(220°)
09.Triangle nut
10. Access flap (USB, TF)
11. Loudspeaker
12. Microphone
13. Lanyard hole
14. Reset Button
10

5
4- How to use
4.1. Memory card
First, insert a TF card; see the picture on the right.
When the professional mode is on for video recording a
Class 10 card is recommended for use.
NOTE: Please close the camera when plug-in or pull-out the card.
4.2 Turn-on & Turn-off
Turn-on: Press the on/off button and hold for about 2
seconds, the LCD display screen will be on (default mode:
video recording) and show a welcome screen. Power
indicator in red is normally on.
Power saving mode: When the camera is not under
operation for 1 minute (system default), it will enter into the
power saving mode. The LCD display screen will be off
automatically. The camera can be activated when any
button is pressed.
Turn-off: Press the button and hold for about 3 seconds
when the camera is not in operation, the camera will be off.
The camera will be automatically off when it is in power
saving mode for 3 minutes (system default). “GOODBYE” will
be on the LCD screen when it is off.
4.3 Charge the camera
Built-in rechargeable lithium battery is used for the camera:
The camera can be charged when it is connected to the
computer USB or a 5V charger with a USB cable. The power
indicator will be blue when it is charging. It shall take 4
hours because of the limited electric current of the
computer. The blue light will be off when charging is
completed.
4.4 Function mode switch
The camera has two modes, video recording and
photograph shooting. They can be converted by pressing
the button on/off /MODE or through APP.
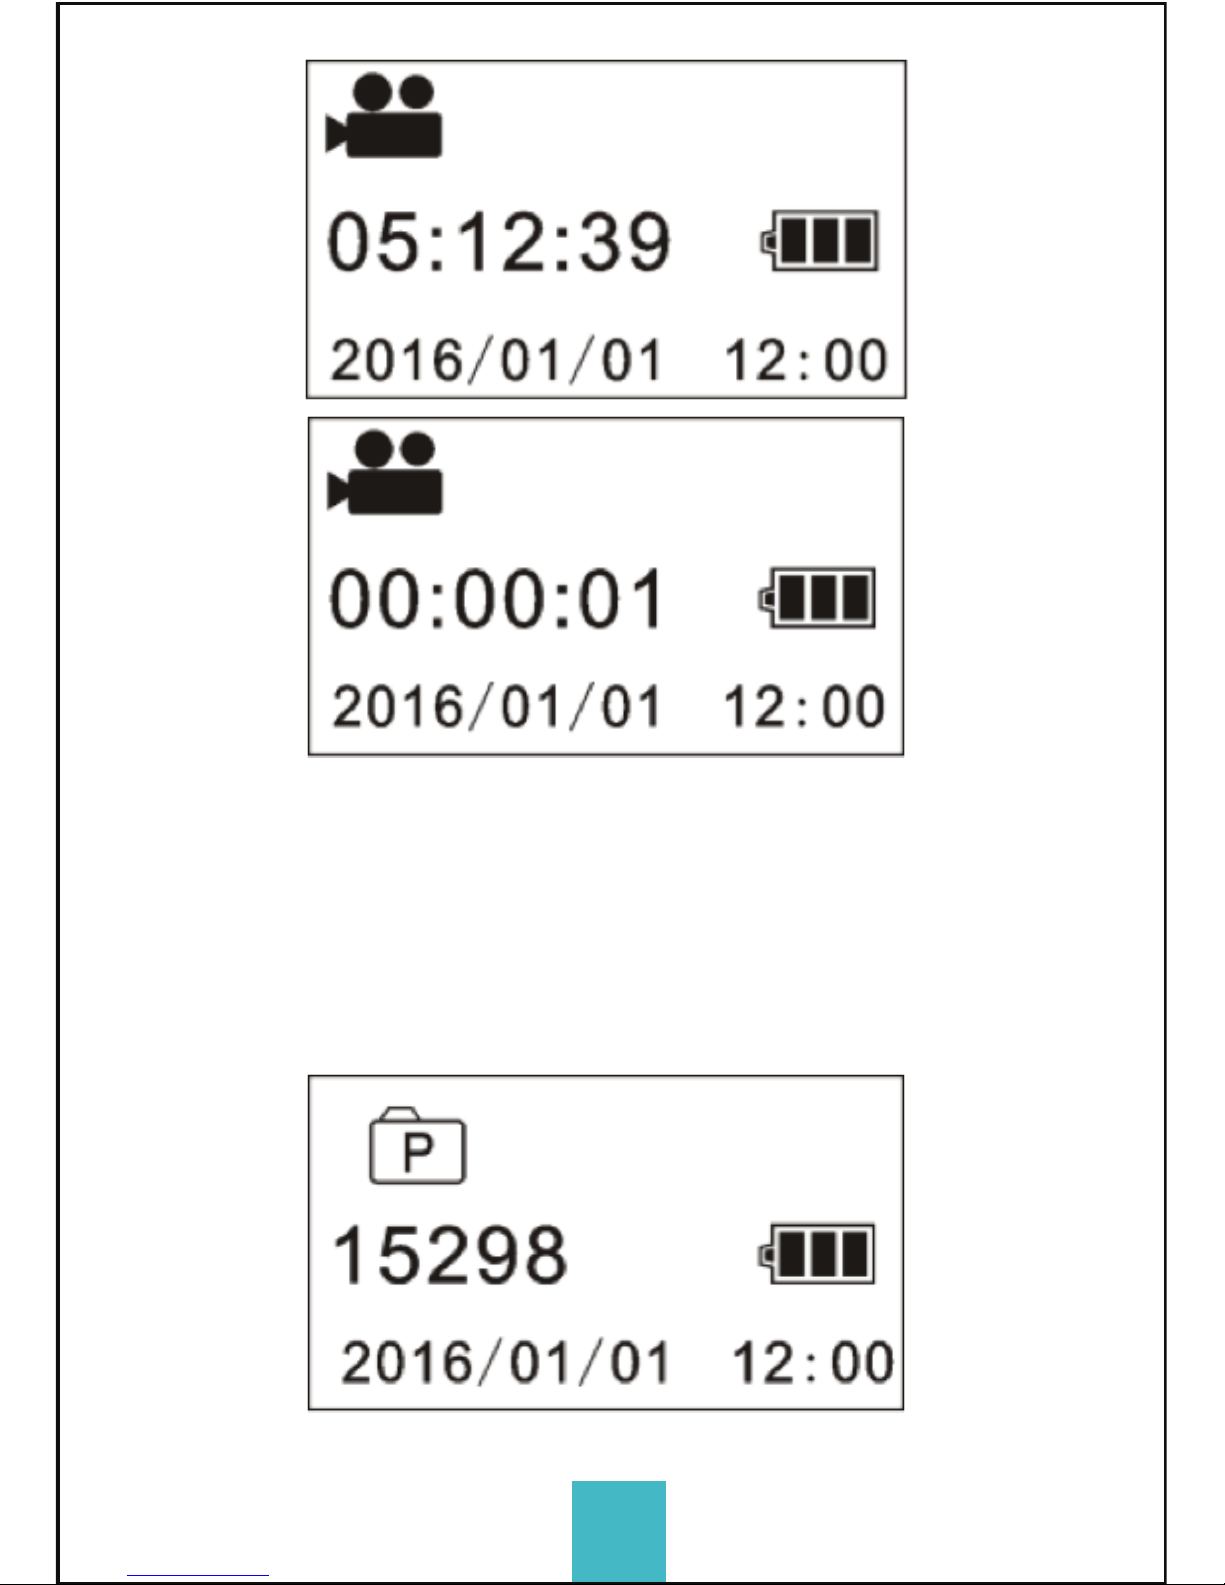
Video recording: (see the following pictures) press the
shutter to start shooting and video recording. The buzzer
will send out one sound when it starts; the busy button (red)
will be twinkling during the video recording process. LCD
timer starts timing. Press the button again when video
recording is over.
Photograph shooting: Short press the take-photo button to
shoot photographs after it is switched to the photo-shooting
mode. The buzzer will send out 1 sound and the busy
button will be on once when 1 photo is shot. The counter
will countdown the photos accordingly.
Press the WIFI button for 2 seconds to activate the menu:
Enter the menu, short press the WIFI button to move the
cursor for selection; press the shutter button for confirmation;
extended press the WIFI button to cancel the setting or exit.
Power Save: the power saving mode has 4 settings, i.e.
OFF/1min/3min/5min. When the setting-time is up, the camera
will enter power saving mode and the screen will be off.
Date & Time: system time setting
Language: language setting, English is by default.
Date Stamp: date stamp setting, OFF/Date/Date & time are
optional.
Factory Reset: factory reset, YES/NO are optional
System: check for system information (software version
number); check the information on the memory card (capacity
and available space)
Format: formatting the memory card, YES/NO are optional.
The video camera has the plug and play function. When
connected to a PC by the USB cable, it will automatically
switch to the mobile HDD mode. The removable disc icon will
appear on “My Compute r”. Your photos are stored in the folder
I:\jpg (I is removable disc for this device) in the removable disc.
And your videos are stored in the folder I:\video;
NOTE: No need to install drivers to run its mobile HDD function if your
operating system is windows 2000 or above.
The CrossCam 360 comes with a watch remote control.
For the first time put the battery in the back slot with the help
of a coin.
The remote control will be automatically linked with the
camera and will operate within a range of 10 meters.
Functions:

6
4.1. Memory card
First, insert a TF card; see the picture on the right.
When the professional mode is on for video recording a
Class 10 card is recommended for use.
NOTE: Please close the camera when plug-in or pull-out the card.
4.2 Turn-on & Turn-off
Turn-on: Press the on/off button and hold for about 2
seconds, the LCD display screen will be on (default mode:
video recording) and show a welcome screen. Power
indicator in red is normally on.
Power saving mode: When the camera is not under
operation for 1 minute (system default), it will enter into the
power saving mode. The LCD display screen will be off
automatically. The camera can be activated when any
button is pressed.
Turn-off: Press the button and hold for about 3 seconds
when the camera is not in operation, the camera will be off.
The camera will be automatically off when it is in power
saving mode for 3 minutes (system default). “GOODBYE” will
be on the LCD screen when it is off.
4.3 Charge the camera
Built-in rechargeable lithium battery is used for the camera:
The camera can be charged when it is connected to the
computer USB or a 5V charger with a USB cable. The power
indicator will be blue when it is charging. It shall take 4
hours because of the limited electric current of the
computer. The blue light will be off when charging is
completed.
4.4 Function mode switch
The camera has two modes, video recording and
photograph shooting. They can be converted by pressing
the button on/off /MODE or through APP.
Video recording: (see the following pictures) press the
shutter to start shooting and video recording. The buzzer
will send out one sound when it starts; the busy button (red)
will be twinkling during the video recording process. LCD
timer starts timing. Press the button again when video
recording is over.
Photograph shooting: Short press the take-photo button to
shoot photographs after it is switched to the photo-shooting
mode. The buzzer will send out 1 sound and the busy
button will be on once when 1 photo is shot. The counter
will countdown the photos accordingly.
Press the WIFI button for 2 seconds to activate the menu:
Enter the menu, short press the WIFI button to move the
cursor for selection; press the shutter button for confirmation;
extended press the WIFI button to cancel the setting or exit.
Power Save: the power saving mode has 4 settings, i.e.
OFF/1min/3min/5min. When the setting-time is up, the camera
will enter power saving mode and the screen will be off.
Date & Time: system time setting
Language: language setting, English is by default.
Date Stamp: date stamp setting, OFF/Date/Date & time are
optional.
Factory Reset: factory reset, YES/NO are optional
System: check for system information (software version
number); check the information on the memory card (capacity
and available space)
Format: formatting the memory card, YES/NO are optional.
The video camera has the plug and play function. When
connected to a PC by the USB cable, it will automatically
switch to the mobile HDD mode. The removable disc icon will
appear on “My Compute r”. Your photos are stored in the folder
I:\jpg (I is removable disc for this device) in the removable disc.
And your videos are stored in the folder I:\video;
NOTE: No need to install drivers to run its mobile HDD function if your
operating system is windows 2000 or above.
The CrossCam 360 comes with a watch remote control.
For the first time put the battery in the back slot with the help
of a coin.
The remote control will be automatically linked with the
camera and will operate within a range of 10 meters.
Functions:
7
4.1. Memory card
First, insert a TF card; see the picture on the right.
When the professional mode is on for video recording a
Class 10 card is recommended for use.
NOTE: Please close the camera when plug-in or pull-out the card.
4.2 Turn-on & Turn-off
Turn-on: Press the on/off button and hold for about 2
seconds, the LCD display screen will be on (default mode:
video recording) and show a welcome screen. Power
indicator in red is normally on.
Power saving mode: When the camera is not under
operation for 1 minute (system default), it will enter into the
power saving mode. The LCD display screen will be off
automatically. The camera can be activated when any
button is pressed.
Turn-off: Press the button and hold for about 3 seconds
when the camera is not in operation, the camera will be off.
The camera will be automatically off when it is in power
saving mode for 3 minutes (system default). “GOODBYE” will
be on the LCD screen when it is off.
4.3 Charge the camera
Built-in rechargeable lithium battery is used for the camera:
The camera can be charged when it is connected to the
computer USB or a 5V charger with a USB cable. The power
indicator will be blue when it is charging. It shall take 4
hours because of the limited electric current of the
computer. The blue light will be off when charging is
completed.
4.4 Function mode switch
The camera has two modes, video recording and
photograph shooting. They can be converted by pressing
the button on/off /MODE or through APP.
Video recording: (see the following pictures) press the
shutter to start shooting and video recording. The buzzer
will send out one sound when it starts; the busy button (red)
will be twinkling during the video recording process. LCD
timer starts timing. Press the button again when video
recording is over.
Photograph shooting: Short press the take-photo button to
shoot photographs after it is switched to the photo-shooting
mode. The buzzer will send out 1 sound and the busy
button will be on once when 1 photo is shot. The counter
will countdown the photos accordingly.
Press the WIFI button for 2 seconds to activate the menu:
Enter the menu, short press the WIFI button to move the
cursor for selection; press the shutter button for confirmation;
extended press the WIFI button to cancel the setting or exit.
Power Save: the power saving mode has 4 settings, i.e.
OFF/1min/3min/5min. When the setting-time is up, the camera
will enter power saving mode and the screen will be off.
Date & Time: system time setting
Language: language setting, English is by default.
Date Stamp: date stamp setting, OFF/Date/Date & time are
optional.
Factory Reset: factory reset, YES/NO are optional
System: check for system information (software version
number); check the information on the memory card (capacity
and available space)
Format: formatting the memory card, YES/NO are optional.
The video camera has the plug and play function. When
connected to a PC by the USB cable, it will automatically
switch to the mobile HDD mode. The removable disc icon will
appear on “My Compute r”. Your photos are stored in the folder
I:\jpg (I is removable disc for this device) in the removable disc.
And your videos are stored in the folder I:\video;
NOTE: No need to install drivers to run its mobile HDD function if your
operating system is windows 2000 or above.
The CrossCam 360 comes with a watch remote control.
For the first time put the battery in the back slot with the help
of a coin.
The remote control will be automatically linked with the
camera and will operate within a range of 10 meters.
Functions:

8
4.1. Memory card
First, insert a TF card; see the picture on the right.
When the professional mode is on for video recording a
Class 10 card is recommended for use.
NOTE: Please close the camera when plug-in or pull-out the card.
4.2 Turn-on & Turn-off
Turn-on: Press the on/off button and hold for about 2
seconds, the LCD display screen will be on (default mode:
video recording) and show a welcome screen. Power
indicator in red is normally on.
Power saving mode: When the camera is not under
operation for 1 minute (system default), it will enter into the
power saving mode. The LCD display screen will be off
automatically. The camera can be activated when any
button is pressed.
Turn-off: Press the button and hold for about 3 seconds
when the camera is not in operation, the camera will be off.
The camera will be automatically off when it is in power
saving mode for 3 minutes (system default). “GOODBYE” will
be on the LCD screen when it is off.
4.3 Charge the camera
Built-in rechargeable lithium battery is used for the camera:
The camera can be charged when it is connected to the
computer USB or a 5V charger with a USB cable. The power
indicator will be blue when it is charging. It shall take 4
hours because of the limited electric current of the
computer. The blue light will be off when charging is
completed.
4.4 Function mode switch
The camera has two modes, video recording and
photograph shooting. They can be converted by pressing
the button on/off /MODE or through APP.
Video recording: (see the following pictures) press the
shutter to start shooting and video recording. The buzzer
will send out one sound when it starts; the busy button (red)
will be twinkling during the video recording process. LCD
timer starts timing. Press the button again when video
recording is over.
Photograph shooting: Short press the take-photo button to
shoot photographs after it is switched to the photo-shooting
mode. The buzzer will send out 1 sound and the busy
button will be on once when 1 photo is shot. The counter
will countdown the photos accordingly.
5- MENU OPERATION
Press the WIFI button for 2 seconds to activate the menu:
Enter the menu, short press the WIFI button to move the
cursor for selection; press the shutter button for confirmation;
extended press the WIFI button to cancel the setting or exit.
Power Save: the power saving mode has 4 settings, i.e.
OFF/1min/3min/5min. When the setting-time is up, the camera
will enter power saving mode and the screen will be off.
Date & Time: system time setting
Language: language setting, English is by default.
Date Stamp: date stamp setting, OFF/Date/Date & time are
optional.
Factory Reset: factory reset, YES/NO are optional
System: check for system information (software version
number); check the information on the memory card (capacity
and available space)
Format: formatting the memory card, YES/NO are optional.
The video camera has the plug and play function. When
connected to a PC by the USB cable, it will automatically
switch to the mobile HDD mode. The removable disc icon will
appear on “My Compute r”. Your photos are stored in the folder
I:\jpg (I is removable disc for this device) in the removable disc.
And your videos are stored in the folder I:\video;
NOTE: No need to install drivers to run its mobile HDD function if your
operating system is windows 2000 or above.
The CrossCam 360 comes with a watch remote control.
For the first time put the battery in the back slot with the help
of a coin.
The remote control will be automatically linked with the
camera and will operate within a range of 10 meters.
Functions:

9
4.1. Memory card
First, insert a TF card; see the picture on the right.
When the professional mode is on for video recording a
Class 10 card is recommended for use.
NOTE: Please close the camera when plug-in or pull-out the card.
4.2 Turn-on & Turn-off
Turn-on: Press the on/off button and hold for about 2
seconds, the LCD display screen will be on (default mode:
video recording) and show a welcome screen. Power
indicator in red is normally on.
Power saving mode: When the camera is not under
operation for 1 minute (system default), it will enter into the
power saving mode. The LCD display screen will be off
automatically. The camera can be activated when any
button is pressed.
Turn-off: Press the button and hold for about 3 seconds
when the camera is not in operation, the camera will be off.
The camera will be automatically off when it is in power
saving mode for 3 minutes (system default). “GOODBYE” will
be on the LCD screen when it is off.
4.3 Charge the camera
Built-in rechargeable lithium battery is used for the camera:
The camera can be charged when it is connected to the
computer USB or a 5V charger with a USB cable. The power
indicator will be blue when it is charging. It shall take 4
hours because of the limited electric current of the
computer. The blue light will be off when charging is
completed.
4.4 Function mode switch
The camera has two modes, video recording and
photograph shooting. They can be converted by pressing
the button on/off /MODE or through APP.
Video recording: (see the following pictures) press the
shutter to start shooting and video recording. The buzzer
will send out one sound when it starts; the busy button (red)
will be twinkling during the video recording process. LCD
timer starts timing. Press the button again when video
recording is over.
Photograph shooting: Short press the take-photo button to
shoot photographs after it is switched to the photo-shooting
mode. The buzzer will send out 1 sound and the busy
button will be on once when 1 photo is shot. The counter
will countdown the photos accordingly.
Press the WIFI button for 2 seconds to activate the menu:
Enter the menu, short press the WIFI button to move the
cursor for selection; press the shutter button for confirmation;
extended press the WIFI button to cancel the setting or exit.
Power Save: the power saving mode has 4 settings, i.e.
OFF/1min/3min/5min. When the setting-time is up, the camera
will enter power saving mode and the screen will be off.
Date & Time: system time setting
Language: language setting, English is by default.
Date Stamp: date stamp setting, OFF/Date/Date & time are
optional.
Factory Reset: factory reset, YES/NO are optional
System: check for system information (software version
number); check the information on the memory card (capacity
and available space)
Format: formatting the memory card, YES/NO are optional.
6- Connect to PC
7- REMOTE CONTROL
The video camera has the plug and play function. When
connected to a PC by the USB cable, it will automatically
switch to the mobile HDD mode. The removable disc icon will
appear on “My Compute r”. Your photos are stored in the folder
I:\jpg (I is removable disc for this device) in the removable disc.
And your videos are stored in the folder I:\video;
NOTE: No need to install drivers to run its mobile HDD function if your
operating system is windows 2000 or above.
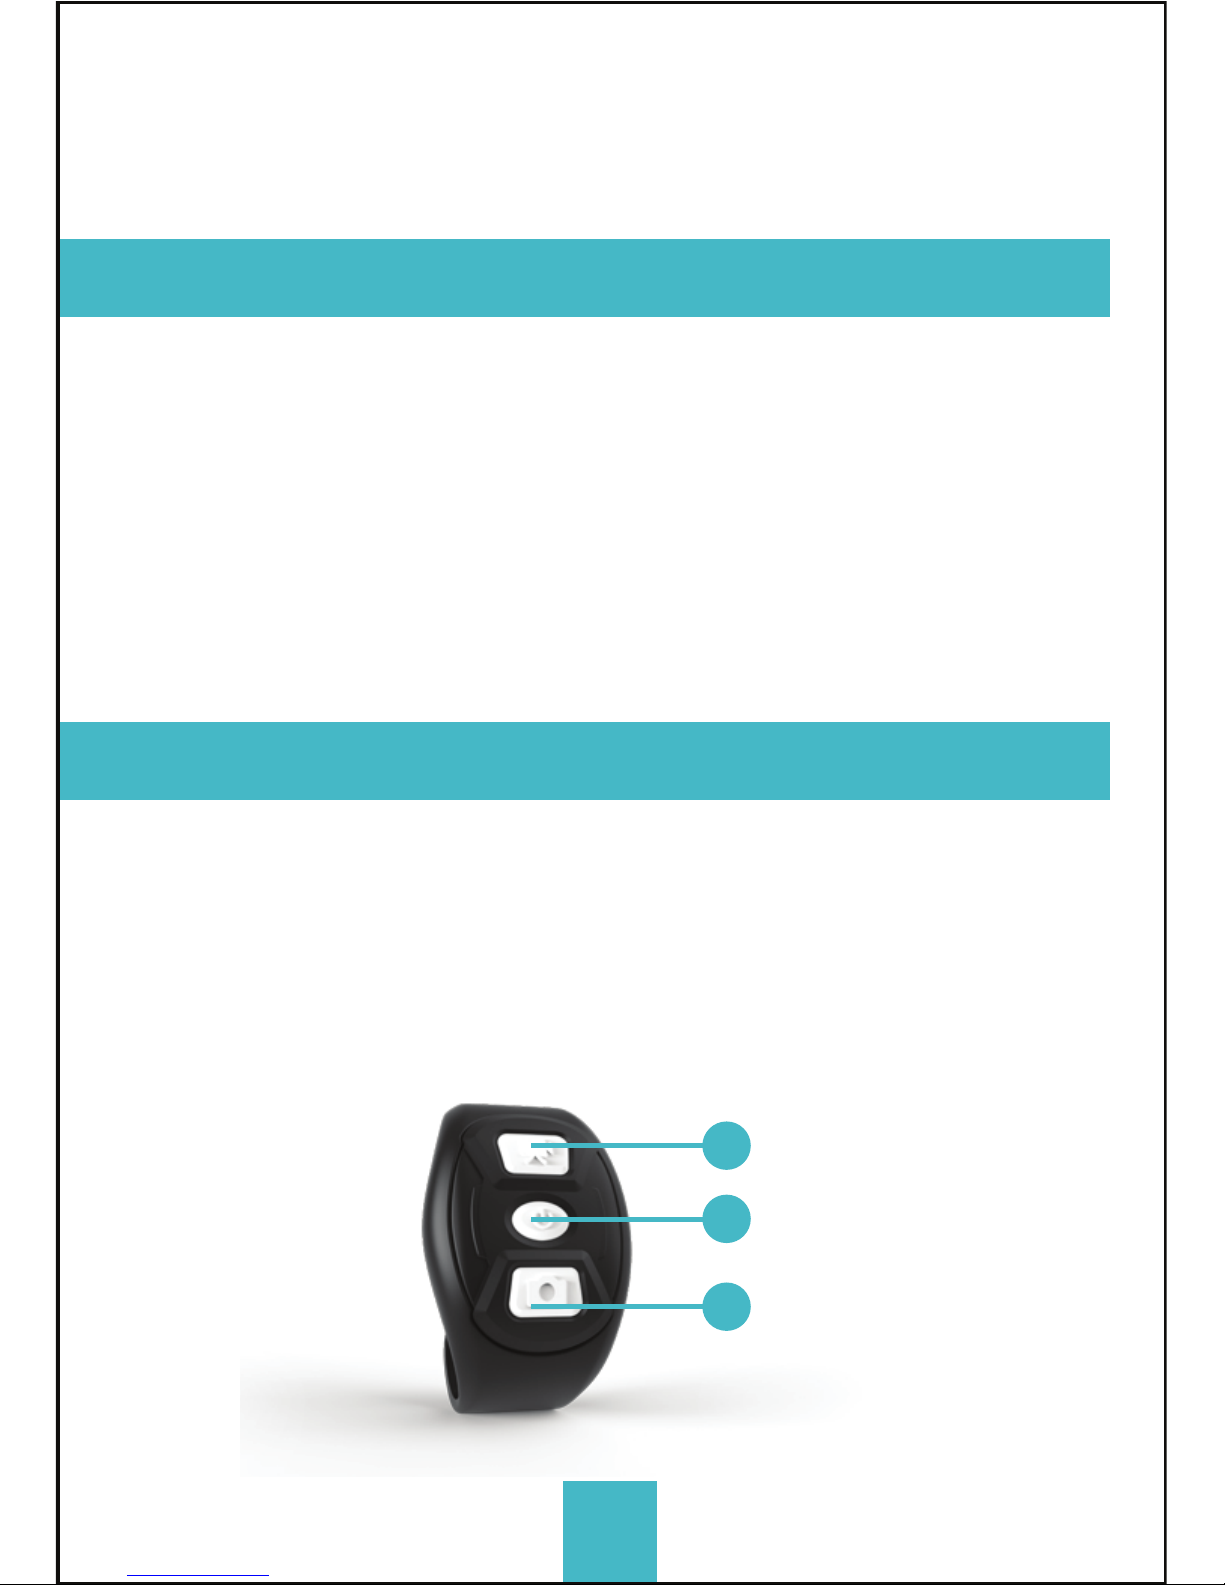
The CrossCam 360 comes with a watch remote control.
For the first time put the battery in the back slot with the help
of a coin.
The remote control will be automatically linked with the
camera and will operate within a range of 10 meters.
Functions: 01
02
03
Record a video
Camera ON/OFF
Take a picture

EUCS-1360 Manual de Usuario

HOLA!
Gracias por adquirir nuestra cámara
EUCS-1360 CROSSCAM 360. Lea
detenidamente estas instrucciones
antes de poner en funcionamiento el
equipo para utilizarlo de manera
correcta.

1- Contenido del Pack
2- Especificaciones técnicas
3- Botones y entradas
4- Modo de uso
4.1 Tarjeta de memoria
4.2 Encendido/Apagado
4.3 Carga
4.4 Modos de grabación
5- Opciones
6- Conexión a PC
7- Control remoto
3
TABLA DE CONTENIDOS
1- contenido del pack
2- ESPECIFICACIONES TÉCNICAS
- Resolución de video:
1920x960 pixeles a 30
fps (H.264)
- Resolución de imágenes:
5 MP
- Pantalla LCD de 1"
- Lector de tarjetas TF
hasta 32GB
- Wi-Fi IEEE 802.11b/g/n
integrado
- Angulo de los lentes: 220ºx2
- Micrófono y parlante incorporados
- Batería: 1500mAh/3.7V
- Entradas: Micro USB, Tarjeta TF
03
04
05
06
08
09
EUCS-1360 CrossCam 360, Trípode, Carcasa protectora de
salpicaduras, Cable USB, Manual de usuario, pila 2032.

4
3- BOTONES Y ENTRADAS
01
04
03
06 09
07
02
05
08 08
13
14
11
12
1. Pantalla LCD
2. Encendido/Modo
3. Indicador WIFI (rojo)
4. Indicador de carga (azul)
5. Wifi/Menú
6. Ocupado (rojo)
7. Disparador / Confirmar
8. Lente x 2(220°)
9. Rosca
10. Pestaña de acceso
(USB, tarjeta TF)
11. Parlante
12. Micrófono
13. Ranura para cordón
14. Reinicio
10

5
4- MODO DE USO
4.1. Tarjeta de memoria
Inserte la tarjeta TF como lo indica la siguiente imagen.
Para garantizar un óptimo funcionamiento es recomendable
usar una tarjeta clase 10 o superior.
NOTA: para realizar este procedimiento es necesario que la cámara se
encuentre apagada.
4.2 Encendido/Apagado
Para Encender el dispositivo: presione el botón encen-
dido por al menos 2 segundos hasta que encienda la
pantalla LCD y mostrará un mensaje de bienvenida (por
defecto, en modo de grabación de video)
Modo de ahorro de energía: Cuando la cámara no ha sido
usada por 1 minuto (parámetro por defecto), entrará en el
modo de ahorro de energía. La pantalla se apagará
automáticamente. Para reactivarla, presione cualquier botón.
Apagado: Presione y mantenga presionado el botón de
encendido por 3 segundos cuando la cámara no esté
operativa, la cámara se apagará. La cámara se apagará
automáticamente pasados los 3 minutos del modo de
ahorro de energía. (parámetro por defecto) La pantalla
mostrará un mensaje de despedida y luego se apagará.
4.3 Carga
La cámara posee una batería interna de Litio recargable.
Para cargar la batería utilice el cable USB incluido y conéctelo a
una PC o fuente de 5V.
El indicador de energía azul se mantendrá prendido. La carga
puede llegar a tomar hasta 4 horas dependiendo de la fuente de
energía. Cuando la carga esté completa la luz azul se apagará.
4.4 Modos de grabación
CrossCam 360 tiene dos modos, grabación de video y cámara
fotográfica. Puede cambiar entre ellos fácilmente presionando
rápidamente el botón de encendido o directamente desde la
aplicación.
Grabadora de Video: (vea las siguientes imágenes) Presione el
Disparador para comenzar a grabar. Un sonido sonara cuando
comience. Cuando este grabando la luz de ocupado destellara
en este proceso. En la pantalla podrá ver que el contador inicia,
presione nuevamente el disparador para finalizar.
Cámara fotográfica: Presione el disparador para sacar (si se
encuentra en la modalidad fotográfica), sonará un pitido
corto y destellará una pequeña luz roja.
Eso significa que una foto fue tomada, en la pantalla se
podrá ver que el contador realizo una nueva fotografía.
Presione el botón WIFI por 2 segundos para activar el menú:
Una vez dentro del menú, presione brevemente el botón WIFI
para mover el cursor a la selección deseada. Presione el botón
de disparo para confirmar la opción. Mantenga presionado el
botón WIFI para cancelar las opciones y salir.
Ahorro de Batería: El ahorro de batería se puede configurar en
4 opciones. Apagado, 1 Minuto, 3 Minutos y 5 Minutos. Una vez
transcurrido ese tiempo la cámara entrará en modo ahorro de
energía y se apagará la pantalla.
Día y Hora: Dentro del menú puede configurar el día y el horario
de su CrossCam 360.
Lenguaje: Dentro del menú puede configurar el lenguaje de su
CrossCam 360.
Fecha en pantalla: Puede configurar la fecha en sus fotos o
videos (es opcional)
Restauración de Fabrica: Dentro del menú puede restaurar su
CrossCam 360 a valores de Fábrica.
Sistema: Puede ver la información de su CrossCam 360,
versión de Software, Capacidades, estado de memoria.
Formatear: (CUIDADO) Puede borrar la tarjeta de memoria y
perder su contenido.
La CrossCam 360 posee la función de Plug and Play. Cuando
esté conectada a la PC por USB, al encenderla, automática-
mente entrará en el modo de almacenamiento externo.
El ícono de disco extraíble aparecerá. Las fotos se encuentran
almacenadas en \JPG y los videos en \VIDEO.
NOTA: Para sistemas operativos superiores a Windows 2000 no es necesario
instalar ningún Driver.
La CrossCam 360 viene con un control remoto de pulsera.
Para iniciar el uso coloque la pila en la parte posterior de este
con la ayuda de una pila.
El control remoto se vinculará automáticamente con la cámara
y operará dentro de un rango de 10 metros.
Funciones:

6
4.1. Tarjeta de memoria
Inserte la tarjeta TF como lo indica la siguiente imagen.
Para garantizar un óptimo funcionamiento es recomendable
usar una tarjeta clase 10 o superior.
NOTA: para realizar este procedimiento es necesario que la cámara se
encuentre apagada.
4.2 Encendido/Apagado
Para Encender el dispositivo: presione el botón encen-
dido por al menos 2 segundos hasta que encienda la
pantalla LCD y mostrará un mensaje de bienvenida (por
defecto, en modo de grabación de video)
Modo de ahorro de energía: Cuando la cámara no ha sido
usada por 1 minuto (parámetro por defecto), entrará en el
modo de ahorro de energía. La pantalla se apagará
automáticamente. Para reactivarla, presione cualquier botón.
Apagado: Presione y mantenga presionado el botón de
encendido por 3 segundos cuando la cámara no esté
operativa, la cámara se apagará. La cámara se apagará
automáticamente pasados los 3 minutos del modo de
ahorro de energía. (parámetro por defecto) La pantalla
mostrará un mensaje de despedida y luego se apagará.
4.3 Carga
La cámara posee una batería interna de Litio recargable.
Para cargar la batería utilice el cable USB incluido y conéctelo a
una PC o fuente de 5V.
El indicador de energía azul se mantendrá prendido. La carga
puede llegar a tomar hasta 4 horas dependiendo de la fuente de
energía. Cuando la carga esté completa la luz azul se apagará.
4.4 Modos de grabación
CrossCam 360 tiene dos modos, grabación de video y cámara
fotográfica. Puede cambiar entre ellos fácilmente presionando
rápidamente el botón de encendido o directamente desde la
aplicación.
Grabadora de Video: (vea las siguientes imágenes) Presione el
Disparador para comenzar a grabar. Un sonido sonara cuando
comience. Cuando este grabando la luz de ocupado destellara
en este proceso. En la pantalla podrá ver que el contador inicia,
presione nuevamente el disparador para finalizar.
Cámara fotográfica: Presione el disparador para sacar (si se
encuentra en la modalidad fotográfica), sonará un pitido
corto y destellará una pequeña luz roja.
Eso significa que una foto fue tomada, en la pantalla se
podrá ver que el contador realizo una nueva fotografía.
Presione el botón WIFI por 2 segundos para activar el menú:
Una vez dentro del menú, presione brevemente el botón WIFI
para mover el cursor a la selección deseada. Presione el botón
de disparo para confirmar la opción. Mantenga presionado el
botón WIFI para cancelar las opciones y salir.
Ahorro de Batería: El ahorro de batería se puede configurar en
4 opciones. Apagado, 1 Minuto, 3 Minutos y 5 Minutos. Una vez
transcurrido ese tiempo la cámara entrará en modo ahorro de
energía y se apagará la pantalla.
Día y Hora: Dentro del menú puede configurar el día y el horario
de su CrossCam 360.
Lenguaje: Dentro del menú puede configurar el lenguaje de su
CrossCam 360.
Fecha en pantalla: Puede configurar la fecha en sus fotos o
videos (es opcional)
Restauración de Fabrica: Dentro del menú puede restaurar su
CrossCam 360 a valores de Fábrica.
Sistema: Puede ver la información de su CrossCam 360,
versión de Software, Capacidades, estado de memoria.
Formatear: (CUIDADO) Puede borrar la tarjeta de memoria y
perder su contenido.
La CrossCam 360 posee la función de Plug and Play. Cuando
esté conectada a la PC por USB, al encenderla, automática-
mente entrará en el modo de almacenamiento externo.
El ícono de disco extraíble aparecerá. Las fotos se encuentran
almacenadas en \JPG y los videos en \VIDEO.
NOTA: Para sistemas operativos superiores a Windows 2000 no es necesario
instalar ningún Driver.
La CrossCam 360 viene con un control remoto de pulsera.
Para iniciar el uso coloque la pila en la parte posterior de este
con la ayuda de una pila.
El control remoto se vinculará automáticamente con la cámara
y operará dentro de un rango de 10 metros.
Funciones:

7
4.1. Tarjeta de memoria
Inserte la tarjeta TF como lo indica la siguiente imagen.
Para garantizar un óptimo funcionamiento es recomendable
usar una tarjeta clase 10 o superior.
NOTA: para realizar este procedimiento es necesario que la cámara se
encuentre apagada.
4.2 Encendido/Apagado
Para Encender el dispositivo: presione el botón encen-
dido por al menos 2 segundos hasta que encienda la
pantalla LCD y mostrará un mensaje de bienvenida (por
defecto, en modo de grabación de video)
Modo de ahorro de energía: Cuando la cámara no ha sido
usada por 1 minuto (parámetro por defecto), entrará en el
modo de ahorro de energía. La pantalla se apagará
automáticamente. Para reactivarla, presione cualquier botón.
Apagado: Presione y mantenga presionado el botón de
encendido por 3 segundos cuando la cámara no esté
operativa, la cámara se apagará. La cámara se apagará
automáticamente pasados los 3 minutos del modo de
ahorro de energía. (parámetro por defecto) La pantalla
mostrará un mensaje de despedida y luego se apagará.
4.3 Carga
La cámara posee una batería interna de Litio recargable.
Para cargar la batería utilice el cable USB incluido y conéctelo a
una PC o fuente de 5V.
El indicador de energía azul se mantendrá prendido. La carga
puede llegar a tomar hasta 4 horas dependiendo de la fuente de
energía. Cuando la carga esté completa la luz azul se apagará.
4.4 Modos de grabación
CrossCam 360 tiene dos modos, grabación de video y cámara
fotográfica. Puede cambiar entre ellos fácilmente presionando
rápidamente el botón de encendido o directamente desde la
aplicación.
Grabadora de Video: (vea las siguientes imágenes) Presione el
Disparador para comenzar a grabar. Un sonido sonara cuando
comience. Cuando este grabando la luz de ocupado destellara
en este proceso. En la pantalla podrá ver que el contador inicia,
presione nuevamente el disparador para finalizar.
Cámara fotográfica: Presione el disparador para sacar (si se
encuentra en la modalidad fotográfica), sonará un pitido
corto y destellará una pequeña luz roja.
Eso significa que una foto fue tomada, en la pantalla se
podrá ver que el contador realizo una nueva fotografía.
Presione el botón WIFI por 2 segundos para activar el menú:
Una vez dentro del menú, presione brevemente el botón WIFI
para mover el cursor a la selección deseada. Presione el botón
de disparo para confirmar la opción. Mantenga presionado el
botón WIFI para cancelar las opciones y salir.
Ahorro de Batería: El ahorro de batería se puede configurar en
4 opciones. Apagado, 1 Minuto, 3 Minutos y 5 Minutos. Una vez
transcurrido ese tiempo la cámara entrará en modo ahorro de
energía y se apagará la pantalla.
Día y Hora: Dentro del menú puede configurar el día y el horario
de su CrossCam 360.
Lenguaje: Dentro del menú puede configurar el lenguaje de su
CrossCam 360.
Fecha en pantalla: Puede configurar la fecha en sus fotos o
videos (es opcional)
Restauración de Fabrica: Dentro del menú puede restaurar su
CrossCam 360 a valores de Fábrica.
Sistema: Puede ver la información de su CrossCam 360,
versión de Software, Capacidades, estado de memoria.
Formatear: (CUIDADO) Puede borrar la tarjeta de memoria y
perder su contenido.
La CrossCam 360 posee la función de Plug and Play. Cuando
esté conectada a la PC por USB, al encenderla, automática-
mente entrará en el modo de almacenamiento externo.
El ícono de disco extraíble aparecerá. Las fotos se encuentran
almacenadas en \JPG y los videos en \VIDEO.
NOTA: Para sistemas operativos superiores a Windows 2000 no es necesario
instalar ningún Driver.
La CrossCam 360 viene con un control remoto de pulsera.
Para iniciar el uso coloque la pila en la parte posterior de este
con la ayuda de una pila.
El control remoto se vinculará automáticamente con la cámara
y operará dentro de un rango de 10 metros.
Funciones:

8
4.1. Tarjeta de memoria
Inserte la tarjeta TF como lo indica la siguiente imagen.
Para garantizar un óptimo funcionamiento es recomendable
usar una tarjeta clase 10 o superior.
NOTA: para realizar este procedimiento es necesario que la cámara se
encuentre apagada.
4.2 Encendido/Apagado
Para Encender el dispositivo: presione el botón encen-
dido por al menos 2 segundos hasta que encienda la
pantalla LCD y mostrará un mensaje de bienvenida (por
defecto, en modo de grabación de video)
Modo de ahorro de energía: Cuando la cámara no ha sido
usada por 1 minuto (parámetro por defecto), entrará en el
modo de ahorro de energía. La pantalla se apagará
automáticamente. Para reactivarla, presione cualquier botón.
Apagado: Presione y mantenga presionado el botón de
encendido por 3 segundos cuando la cámara no esté
operativa, la cámara se apagará. La cámara se apagará
automáticamente pasados los 3 minutos del modo de
ahorro de energía. (parámetro por defecto) La pantalla
mostrará un mensaje de despedida y luego se apagará.
4.3 Carga
La cámara posee una batería interna de Litio recargable.
Para cargar la batería utilice el cable USB incluido y conéctelo a
una PC o fuente de 5V.
El indicador de energía azul se mantendrá prendido. La carga
puede llegar a tomar hasta 4 horas dependiendo de la fuente de
energía. Cuando la carga esté completa la luz azul se apagará.
4.4 Modos de grabación
CrossCam 360 tiene dos modos, grabación de video y cámara
fotográfica. Puede cambiar entre ellos fácilmente presionando
rápidamente el botón de encendido o directamente desde la
aplicación.
Grabadora de Video: (vea las siguientes imágenes) Presione el
Disparador para comenzar a grabar. Un sonido sonara cuando
comience. Cuando este grabando la luz de ocupado destellara
en este proceso. En la pantalla podrá ver que el contador inicia,
presione nuevamente el disparador para finalizar.
Cámara fotográfica: Presione el disparador para sacar (si se
encuentra en la modalidad fotográfica), sonará un pitido
corto y destellará una pequeña luz roja.
Eso significa que una foto fue tomada, en la pantalla se
podrá ver que el contador realizo una nueva fotografía.
5- OPCIONES
Presione el botón WIFI por 2 segundos para activar el menú:
Una vez dentro del menú, presione brevemente el botón WIFI
para mover el cursor a la selección deseada. Presione el botón
de disparo para confirmar la opción. Mantenga presionado el
botón WIFI para cancelar las opciones y salir.
Ahorro de Batería: El ahorro de batería se puede configurar en
4 opciones. Apagado, 1 Minuto, 3 Minutos y 5 Minutos. Una vez
transcurrido ese tiempo la cámara entrará en modo ahorro de
energía y se apagará la pantalla.
Día y Hora: Dentro del menú puede configurar el día y el horario
de su CrossCam 360.
Lenguaje: Dentro del menú puede configurar el lenguaje de su
CrossCam 360.
Fecha en pantalla: Puede configurar la fecha en sus fotos o
videos (es opcional)
Restauración de Fabrica: Dentro del menú puede restaurar su
CrossCam 360 a valores de Fábrica.
Sistema: Puede ver la información de su CrossCam 360,
Ahorro de Batería
Día y Hora
Lenguaje
versión de Software, Capacidades, estado de memoria.
Formatear: (CUIDADO) Puede borrar la tarjeta de memoria y
perder su contenido.
La CrossCam 360 posee la función de Plug and Play. Cuando
esté conectada a la PC por USB, al encenderla, automática-
mente entrará en el modo de almacenamiento externo.
El ícono de disco extraíble aparecerá. Las fotos se encuentran
almacenadas en \JPG y los videos en \VIDEO.
NOTA: Para sistemas operativos superiores a Windows 2000 no es necesario
instalar ningún Driver.
La CrossCam 360 viene con un control remoto de pulsera.
Para iniciar el uso coloque la pila en la parte posterior de este
con la ayuda de una pila.
El control remoto se vinculará automáticamente con la cámara
y operará dentro de un rango de 10 metros.
Funciones:
01
02
03
Grabar video
Encendido/Apagado de la
cámara
Tomar fotografía
9
4.1. Tarjeta de memoria
Inserte la tarjeta TF como lo indica la siguiente imagen.
Para garantizar un óptimo funcionamiento es recomendable
usar una tarjeta clase 10 o superior.
NOTA: para realizar este procedimiento es necesario que la cámara se
encuentre apagada.
4.2 Encendido/Apagado
Para Encender el dispositivo: presione el botón encen-
dido por al menos 2 segundos hasta que encienda la
pantalla LCD y mostrará un mensaje de bienvenida (por
defecto, en modo de grabación de video)
Modo de ahorro de energía: Cuando la cámara no ha sido
usada por 1 minuto (parámetro por defecto), entrará en el
modo de ahorro de energía. La pantalla se apagará
automáticamente. Para reactivarla, presione cualquier botón.
Apagado: Presione y mantenga presionado el botón de
encendido por 3 segundos cuando la cámara no esté
operativa, la cámara se apagará. La cámara se apagará
automáticamente pasados los 3 minutos del modo de
ahorro de energía. (parámetro por defecto) La pantalla
mostrará un mensaje de despedida y luego se apagará.
4.3 Carga
La cámara posee una batería interna de Litio recargable.
Para cargar la batería utilice el cable USB incluido y conéctelo a
una PC o fuente de 5V.
El indicador de energía azul se mantendrá prendido. La carga
puede llegar a tomar hasta 4 horas dependiendo de la fuente de
energía. Cuando la carga esté completa la luz azul se apagará.
4.4 Modos de grabación
CrossCam 360 tiene dos modos, grabación de video y cámara
fotográfica. Puede cambiar entre ellos fácilmente presionando
rápidamente el botón de encendido o directamente desde la
aplicación.
Grabadora de Video: (vea las siguientes imágenes) Presione el
Disparador para comenzar a grabar. Un sonido sonara cuando
comience. Cuando este grabando la luz de ocupado destellara
en este proceso. En la pantalla podrá ver que el contador inicia,
presione nuevamente el disparador para finalizar.
Cámara fotográfica: Presione el disparador para sacar (si se
encuentra en la modalidad fotográfica), sonará un pitido
corto y destellará una pequeña luz roja.
Eso significa que una foto fue tomada, en la pantalla se
podrá ver que el contador realizo una nueva fotografía.
Presione el botón WIFI por 2 segundos para activar el menú:
Una vez dentro del menú, presione brevemente el botón WIFI
para mover el cursor a la selección deseada. Presione el botón
de disparo para confirmar la opción. Mantenga presionado el
botón WIFI para cancelar las opciones y salir.
Ahorro de Batería: El ahorro de batería se puede configurar en
4 opciones. Apagado, 1 Minuto, 3 Minutos y 5 Minutos. Una vez
transcurrido ese tiempo la cámara entrará en modo ahorro de
energía y se apagará la pantalla.
Día y Hora: Dentro del menú puede configurar el día y el horario
de su CrossCam 360.
Lenguaje: Dentro del menú puede configurar el lenguaje de su
CrossCam 360.
Fecha en pantalla: Puede configurar la fecha en sus fotos o
videos (es opcional)
Restauración de Fabrica: Dentro del menú puede restaurar su
CrossCam 360 a valores de Fábrica.
Sistema: Puede ver la información de su CrossCam 360,
versión de Software, Capacidades, estado de memoria.
Formatear: (CUIDADO) Puede borrar la tarjeta de memoria y
perder su contenido.
La CrossCam 360 posee la función de Plug and Play. Cuando
esté conectada a la PC por USB, al encenderla, automática-
mente entrará en el modo de almacenamiento externo.
El ícono de disco extraíble aparecerá. Las fotos se encuentran
almacenadas en \JPG y los videos en \VIDEO.
NOTA: Para sistemas operativos superiores a Windows 2000 no es necesario
instalar ningún Driver.
La CrossCam 360 viene con un control remoto de pulsera.
Para iniciar el uso coloque la pila en la parte posterior de este
con la ayuda de una pila.
El control remoto se vinculará automáticamente con la cámara
y operará dentro de un rango de 10 metros.
Funciones:
6- CONEXIÓN A PC
7- CONTROL REMOTO

All trademarks are the property of their respective owner.
Pictures are only for illustration purposes and may vary from final version.
For more information go to / Para más información ingrese a
CROSSCAM360.EUROCASE.COM

Table of contents
Languages:
Popular Security Camera manuals by other brands


VADDIO
VADDIO WallVIEW CCU HD-19 Installation and user guide

Philips
Philips LTC0240/10 installation instructions

Speco
Speco HT-7246IHR instruction manual

TBK vision
TBK vision TBK-BUL4705EIR24 operating instructions

Panasonic
Panasonic WV-X6533LN Important information

Riva
Riva RC3500 Quick installation guide