EuropAce Otimmo ECH 5141S User manual

DELUXE SLIM HOOD
ECH 5141S
Thank you for purchasing EuropAce Products.
Thank You For Purchasing EuropAce Designer Slim Hood.
DELUXE SLIM HOOD
ECH 5141S
by EuropAce
ithout
r of the

Table of Contents
From the Manufacturer 3
Specifications 3
SAFETY : Read this first ! 4. 5
Vent System Requirement 5
Description of Parts 6
Ducted vs. Re-circulating modes 7
Setting 8
Installation 9, 10
Electrical Connection 11
Operation 12
Cleaning & Maintenance 13
Troubleshooting 14
Schematic Diagram 15
3
From the Manufacturer
This appliance and it’s packaging are produced by processes
that minimize waste and respect the environment.
Please help us to continue the protection of the environment by
disposing of the packaging in a correct manner.
Safety !
Please do not allow young children to play with the plastic bag
packaging.
Before disposing of any old appliances, be sure to cut off the
power chord so that others will not be endangered by a defec-
tive electric appliance
Specifications
Input :
2 motor version :
LED Lamps :
220-240V 50Hz
2 X 85W
2 X W
Total Power
2 motor version : W
External Dimensions
90cm version : 898x508x130mm

4
SAFETY : Read this First !
Do not connect the appliance if there are obvious signs of transportation dam-
age.
Read this user manual thoroughly before attempting to use this appliance.
Installation and repair should be attempted only by qualified technical personnel.
It is dangerous to modify any part of this appliance.
The manufacturer declines all responsibility in case of failure to adopt proper
safety measures.
Ensure the location in which this appliance is installed has good, permanent ven-
tilation.
The distance between the bench top to the lower part of the hood must not be at
less than 65 cm or higher than 75 cm.
Use an electrical connector with earth that is correct for your location.
Check that the voltage in your area is correct before plugging in.
The electrical connection of this appliance must be connected as follow.
Blue = NEUTRAL
Brown = LIVE
Multiple plugs and extension cables must not be used. Overload is dangerous
and may cause a fire.
Ensure that the power supply chord is free from any heat source or sharp ob-
jects.
The appliance should be switched off and the electrical supply disconnected be-
fore any cleaning or maintenance work can be carried out.
This appliance is not intended for use by persons (including children) with re-
duced physical, sensory or mental capabilities, or lack of experience and knowl-
edge, unless they have been given supervision or instruction concerning use of
the appliance by a person responsible for their safety. Children should be super-
vised to ensure that they do not play with the appliance.
If the supply cord is damaged, it must be replaced by the manufacturer, its
Operation
The hood is equipped with 3 speed control.
Use the low speed for simmering, medium speed for light cooking.
Use the high speed for frying or heavy cooking.
It is also equipped with a light bulb to illuminate you cooking area
when needed.
Light On/Off Button (i)
On/Off switch for the light. Push the button in to turn the light ON,
push again to turn the light OFF.
Blower Off Button (ii)
Off switch for the blower. Push the button in to turn the blower OFF.
Blower On and Speed Buttons (iii, iv & v)
Button (iii) operates the blower on LOW speed.
Push button (iv) for MEDIUM speed.
Push button (v) for HIGH speed.
12
i ii iii iv v

5
SAFETY : Read this First ! (Continued)
Service agent or similarly qualified persons in order to avoid a hazard.
There shall be adequate ventilation of the room when the range hood is used at the
same time as appliances burning gas or other fuels (not applicable to appliances that
only discharge the air back into he room);
There is a fire risk if cleaning is not carried out in according with the instructions.
No flame allowed under the range hood.
The appliance supports maximum 4 hob element .
Vent System Requirements
Determine which venting method is best for your application. Vented (non-
recirculation) system must be terminate to the outside. Ductwork can extend either
through the wall or the roof. Do not terminate the vent system in an attic or other
enclosed area.
The length of the ductwork and the number of elbows should be kept to a minimum
to provide efficient performance. The size of the ductwork should be uniform. Do
not install two elbows together. Use duct tape to seal all joints in the ductwork sys-
tem. Use caulking to seal exterior wall or floor opening around the cap.
Flexible ductwork is not recommended. Flexible ductwork creates back pres-
sure and air turbulence that greatly reduces performance.
Make sure there is proper clearance within the wall or floor for exhaust duct before
making cutouts. Do not cut a joist or stud unless absolutely necessary. If a joist or
stud must be cut, then a supporting frame must be constructed.

6
Description of Parts

7
Ducted vs. Re-circulating
Your cooker hood can be configured to operate in the ducted or re-circulating
mode :-
A. DUCTED MODE (VENTED MODE)
In the ducted mode, cooking fumes are vented outdoors through suitable
connection of 125mm diameter. In this mode, only the aluminum filters
are installed, charcoal filter is optional.
B. RE-CIRCULATING MODE
Fumes are filtered for grease and odour through the aluminum grease
filters and the charcoal filters respectively and re-introduced into the
kitchen environment. In re-circulating mode, both the aluminum grease
filters and the charcoal filters must be installed.
8
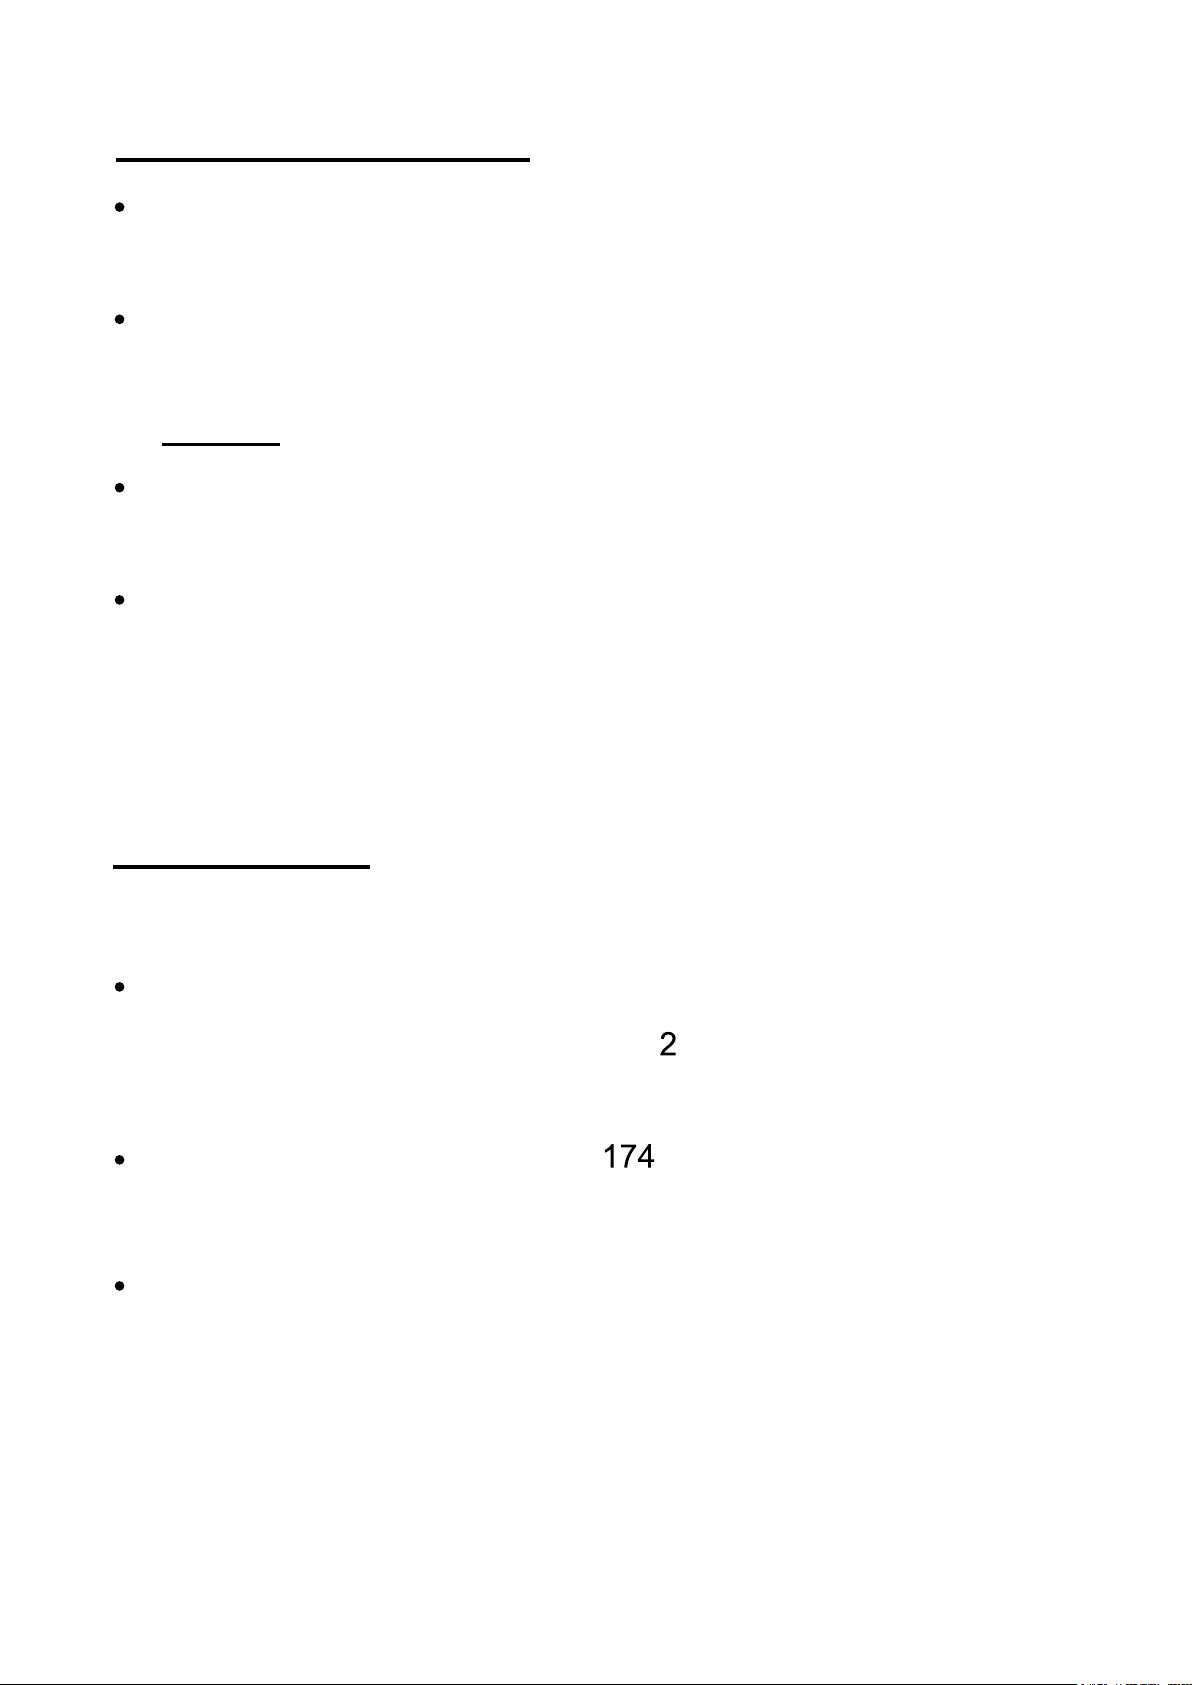
Setting
The operating mode of your cooker hood must be set before installation
A. To set your hood to operate in the ducted mode
By adjusting the plastic parts on the motor housing as per below arrow
showed.
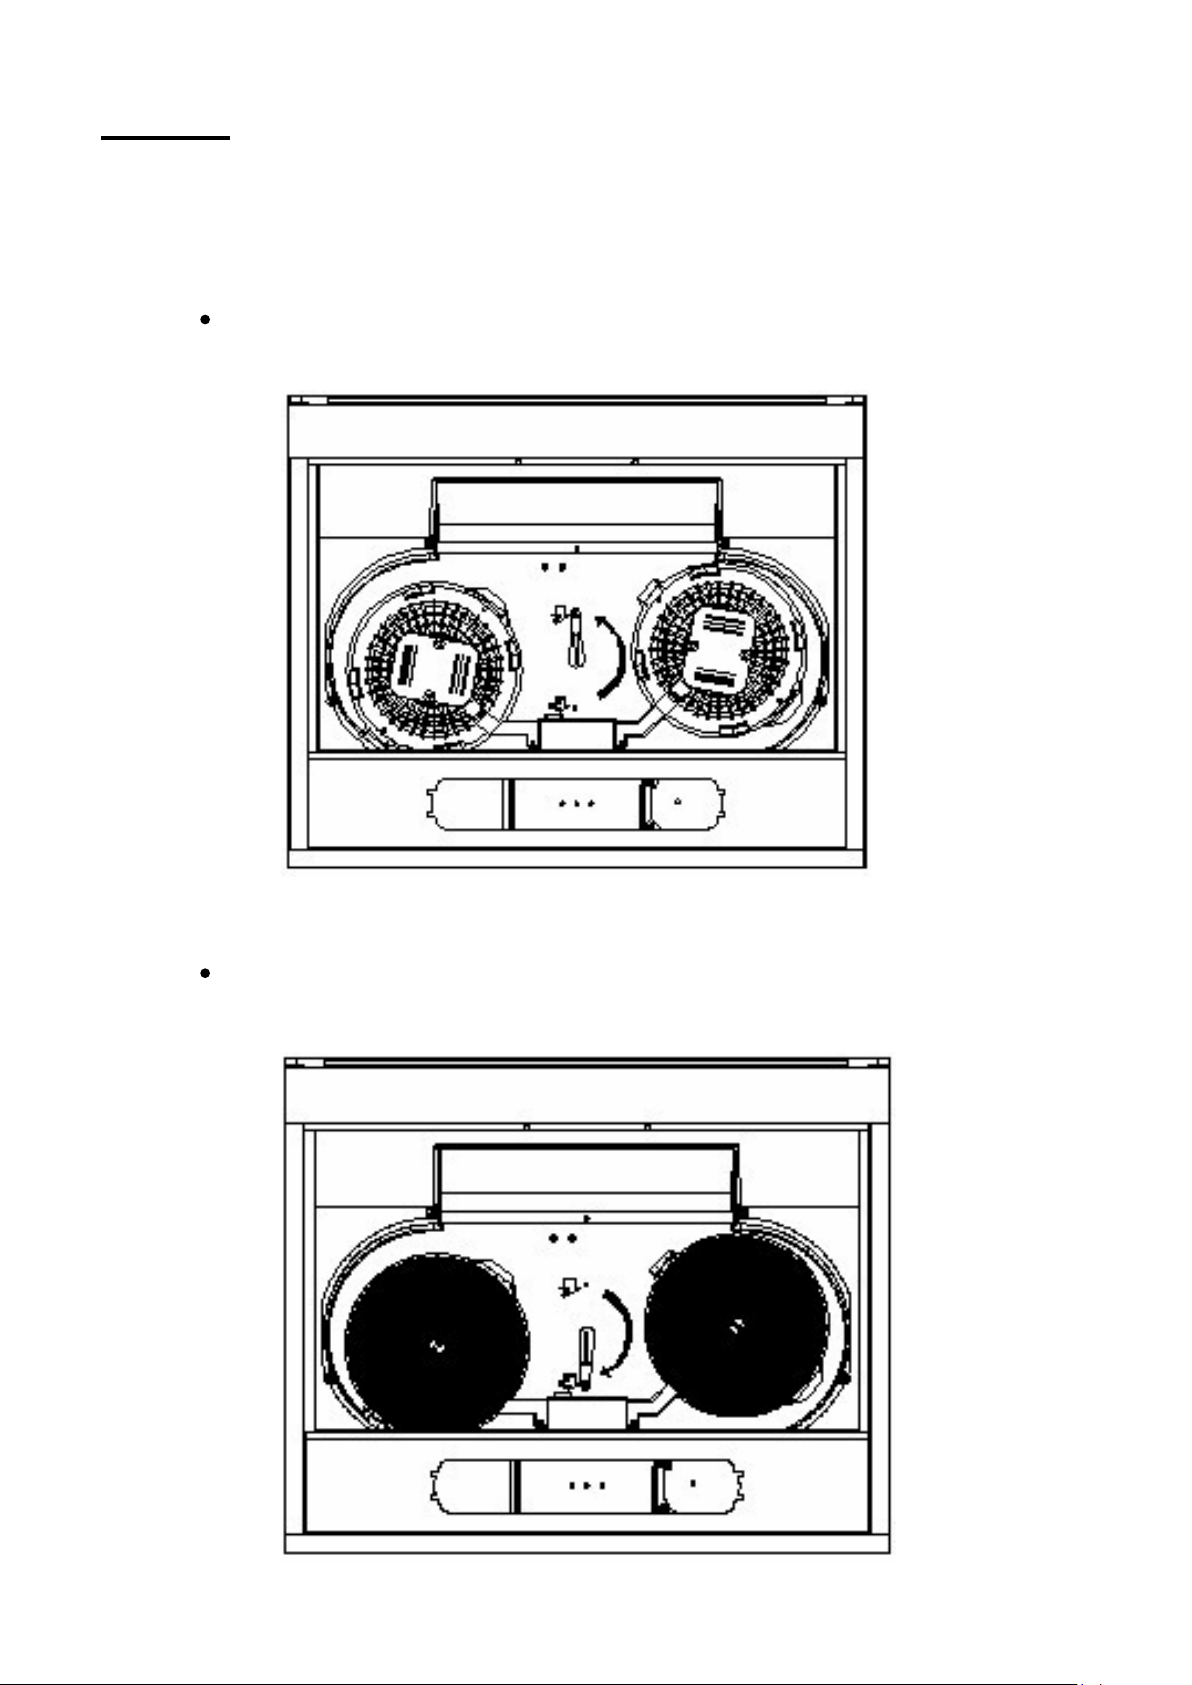
B. To set your hood to operate in the re-circulation mode
By adjusting the plastic parts on the motor housing as per below arrow
showed.

9
Installation
Mounting accessories included
4 screws 5 x 44mm
4 wall plugs (brick fixing) Ø 8mm
4 screws 4,2 x 35 mm
Installation (1) — Wall unit mounting
(1) Using the drilling temple.
(2) Make the holes on the bottom of the cupboard.
(3) If the hood is to be used in the extraction version.
(4) Make a hole for the exhaust pipe.
(5) From inside the cupboard, insert the 4 supplied screws.
(6) And tighten them in the appropriate holes on the appliance.

10
Installation (2) — Wall Mounting
(1) Mark a centre line on the wall.
(2) Fit the template onto the wall.
(3) Fix the drilling template to the wall. Make 3 Ø 8mm holes in the wall.
(4) 2 at upper points, 1 as desired at lower points. Insert the three Ø 8mm expan-
sion plugs into the wall.
(5) (brick fixing only..) Insert two 5 x 45 screws.
(6) But do not tighten them completely, hang the hood.
(7) Tighten the 2 upper screws.
(8) From inside the hood, insert the third 5 x 45 screw into the lower hole.
(9) And tighten.

11
Electrical Connection
Before completing any connection, make sure the house voltage corresponds
with the voltage indicated on the label affixed inside the hood.
It is advisable to call a qualified technician to make the electrical connection.
Appliance fitted with plug
Connect it to a socket which conforms with current regulations.
If you intend to connect it directly to the electric mains, remove the plug and fit
an approved bipolar switch with a minimum contact opening of not less than
3mm.
If the plug is not accessible once it has been inserted in the socket, it will how-
ever be necessary to fit an approved bipolar switch with a minimum contact
opening of no less than 3mm.
Appliance without plug
Fit an approved plug or an bi-polar switch with a minimum contact opening of
no less than 3mm.
The manufacturer are not liable for any problems caused by the user’s failure
to observe the above instructions
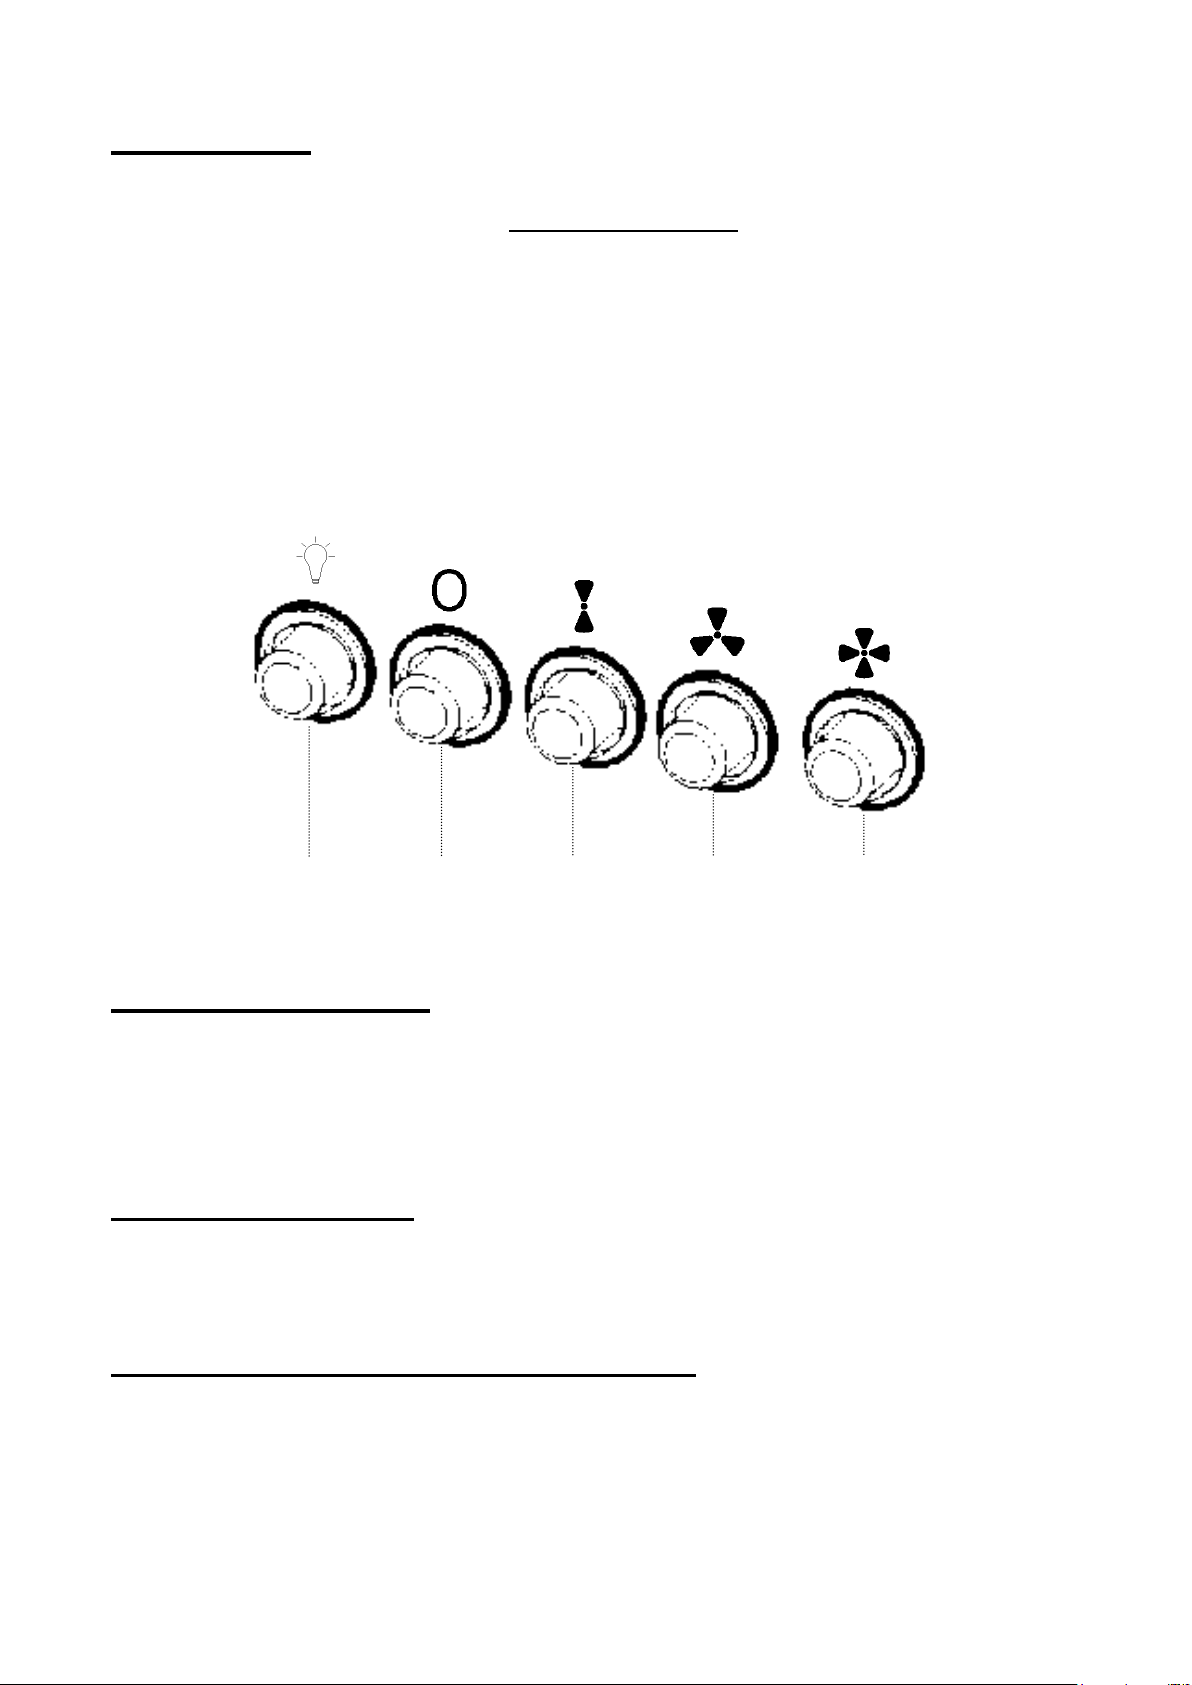
Operation
The hood is equipped with 3 speed control.
Use the low speed for simmering, medium speed for light cooking.
Use the high speed for frying or heavy cooking.
It is also equipped with a light bulb to illuminate you cooking area
when needed.
Light On/Off Button (i)
On/Off switch for the light. Push the button in to turn the light ON,
push again to turn the light OFF.
Blower Off Button (ii)
Off switch for the blower. Push the button in to turn the blower OFF.
Blower On and Speed Buttons (iii, iv & v)
Button (iii) operates the blower on LOW speed.
Push button (iv) for MEDIUM speed.
Push button (v) for HIGH speed.
i ii iii iv v
12

13
SAFETY : Read this First ! (Continued)
Service agent or similarly qualified persons in order to avoid a hazard.
There shall be adequate ventilation of the room when the range hood is used at the
same time as appliances burning gas or other fuels (not applicable to appliances that
only discharge the air back into he room);
There is a fire risk if cleaning is not carried out in according with the instructions.
No flame allowed under the range hood.
The appliance supports maximum 4 hob element .
Vent System Requirements
Determine which venting method is best for your application. Vented (non-
recirculation) system must be terminate to the outside. Ductwork can extend either
through the wall or the roof. Do not terminate the vent system in an attic or other
enclosed area.
The length of the ductwork and the number of elbows should be kept to a minimum
to provide efficient performance. The size of the ductwork should be uniform. Do
not install two elbows together. Use duct tape to seal all joints in the ductwork sys-
tem. Use caulking to seal exterior wall or floor opening around the cap.
Flexible ductwork is not recommended. Flexible ductwork creates back pres-
sure and air turbulence that greatly reduces performance.
Make sure there is proper clearance within the wall or floor for exhaust duct before
making cutouts. Do not cut a joist or stud unless absolutely necessary. If a joist or
stud must be cut, then a supporting frame must be constructed.
Cleaning & Maintenance
SURFACES : Wash with warm soapy water and a soft sponge. Never use
abrasive detergent, scouring pads, steel wool or solvents on any part of this
appliance as this will cause irreparable damage.
GREASE FILTERS - Maybe one of the following:
Aluminium Grease Filters : Wash in the dishwashers or soak the panels in a
degreasing agent for an hour, then rinse off.
Baffle Filters : The baffle grease filters should be cleaned frequently in hot
detergent solution or washed in the dishwasher. Clean exterior surfaces with
a commercially available stainless steel cleaner. Abrasives and scouring
agents can scratch stainless steel finishes and should not be used to clean
finished surfaces.
CHARCOAL FILTERS (only in re-circulating model) : Charcoal cannot be
reused. They must be replaced with the appropriate types once a year or de-
pending on the frequency of appliance usage.
For this appliance to function effectively, regular maintenance is a must.
Clogged filters restrict airflow and may cause the motor to overheat.
LIGHT BULB REPLACEMENT : Before attempting to replace the light bulb,
make sure that the light switch is turned off. Remove the grease filter to ac-
cess the lamp area. Remove the damaged light bulb and replace with an in-
candescent oval bulb maximum 40W.
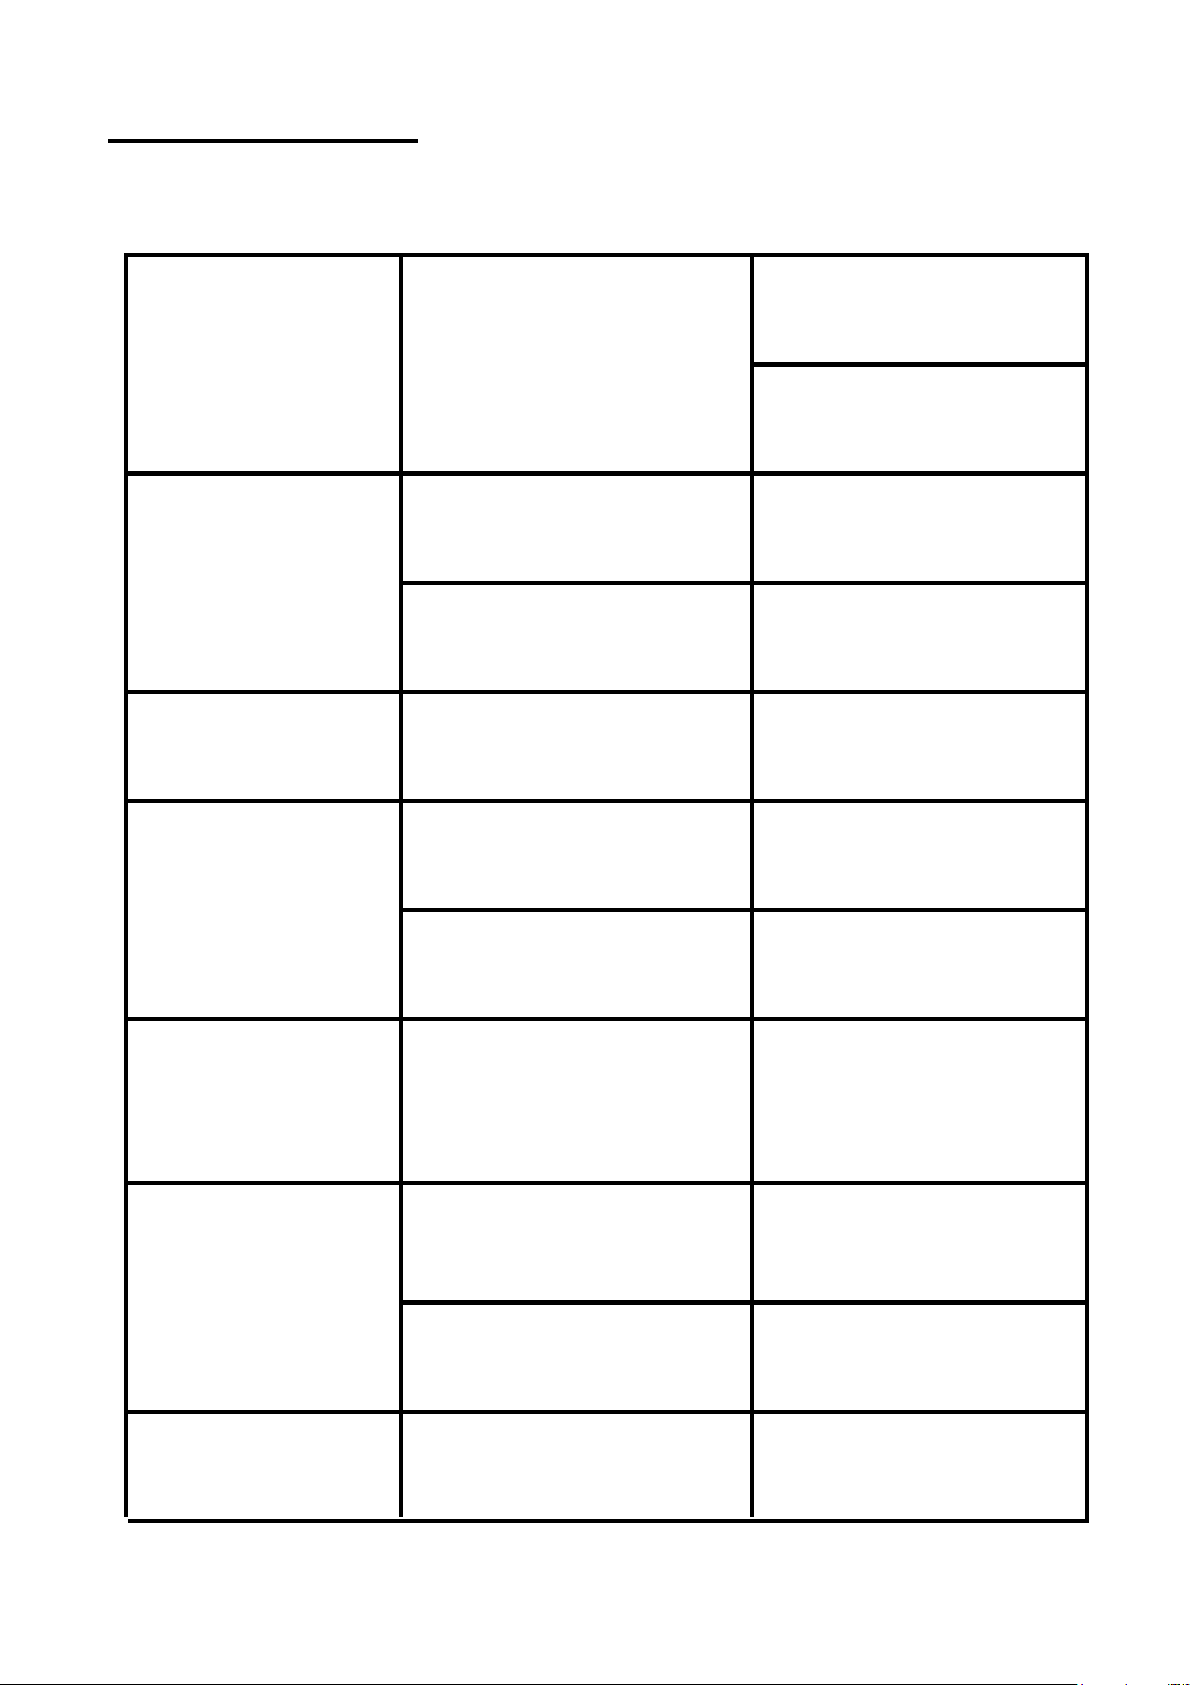
Troubleshooting
Symptoms Possible Cause Action
Check that the plug
No electrical supply is connected.
Check that the main
switch is turned on.
Aluminum grease Clean the filters and
Poor airflow filters clogged replace when dry
Charcoal grease Replace charcoal
filters clogged filters with new sets
Butterfly valve Contact technician
no airflow jammed
High temperature The kitchen is not
safety device activated sufficiently ventilated
few minutes The hood is installed too The hood must be
near the cooking stove least 65cm from stove
Charcoal filters not In re-circulating mode,
installed charcoal filters must be
smell installed
Aluminum grease filter Wash the aluminum
Oil dripping onto
stove
saturated grease filters
Aluminum grease filter Wash the aluminum
saturated grease filters
Foreign object in contact Contact technician
with fan blade
14
15
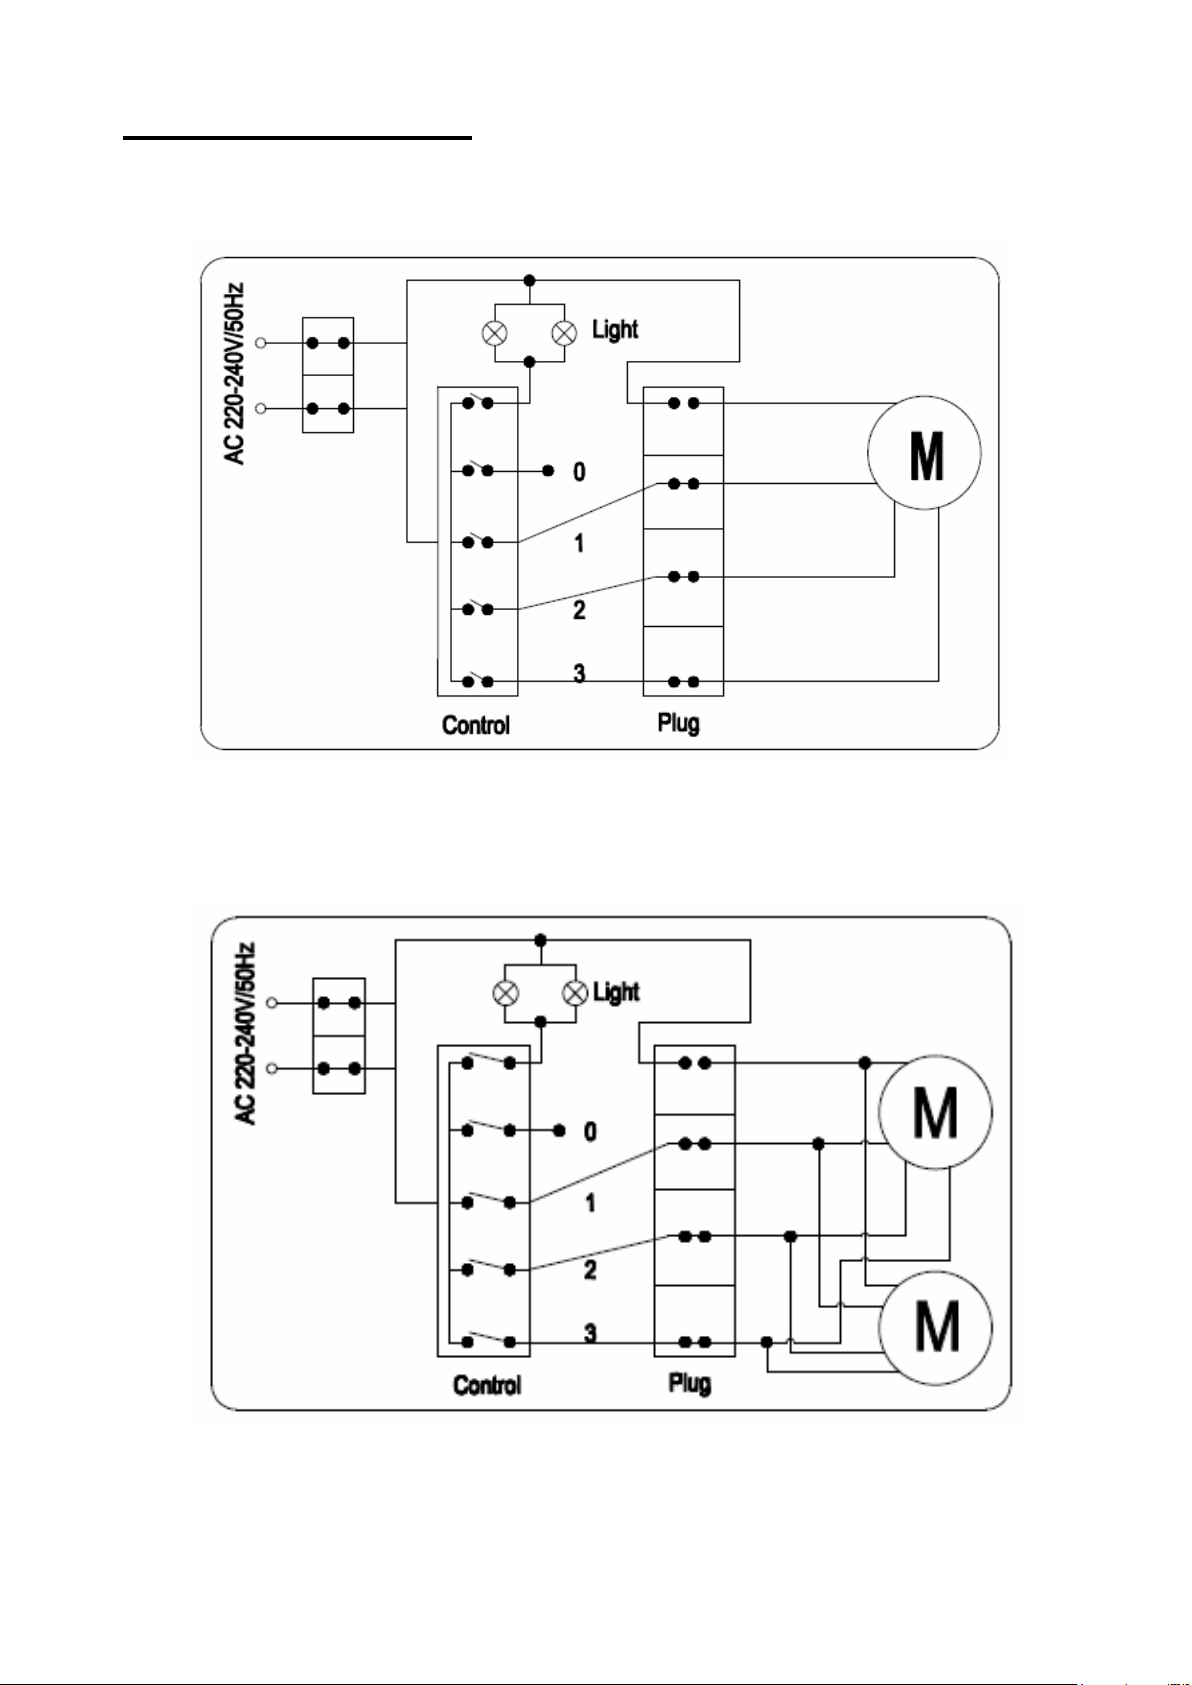
Schematic Diagram
1 motor version:
2 motor version:

Product Warranty
The Warranty Card is not provided in the product packaging. You can register the product
warranty online at our website https://www.europace.com.sg/ewarranty/ within 7 (seven)
days from the date of purchase. You will enjoy an additional 3 months of the product
standard warranty when you register online. Please produce your E-warranty registration
when requesting for repair and service at our Service Centres nearest to you.
In the event, if you are unable to register the product warranty online you must produce your
purchase receipt/tax invoice and such other documentary proof of purchase of the appliance
when requesting for repair and service.
Product Warranty Coverage
You may nd out your product warranty coverage at the link below before calling our Cus-
tomer Service Hotline (65) 6457 3678 or visiting our Service Centre.
http://europace.com.sg/ewarranty/src/cupload/settings_pd-
f/1/1-1-2c899-1563960978-WARRANTY-COVERAGE-19_0221.pdf
TERMS & CONDITIONS OF WARRANTY (THIS WARRANTY IS VALID IN SINGAPORE ONLY)
Your appliance is warranted against faulty design, workmanship or materials for a period of
12 months unless otherwise stated from the date of purchase, subject to the following terms
& conditions herein below:-
1) That the owner shall register the product warranty online at our website www.eu-
ropace.com.sg within 7 (seven) days from the date of purchase.
2) That the appliance shall be used solely for domestic purposes and not for commercial
purposes or any other purposes whatsoever and used strictly under the instruction for
operation as provided by the manufacturers or the appliance.
3) That if any time during the warranty period any part or parts of this appliance is removed,
tampered, modied, adjusted, altered, handled or repaired in any way whatsoever by any
persons other than those authorized by Strategic Marketing (S) Pte Ltd, this warranty shall
immediately cease to be valid and become void.
4) That the owner shall produce the E-warranty registration or tax invoice/receipt and such
other documentary proof of purchase of the appliance to our satisfaction as we may deem
necessary when requesting for repair and service.
5) That our decision on all queries relating to complaints as to defects either of workmanship
or of materials shall be conclusive and the owner shall agree to abide by such a decision. Any
appliance or defective part which has been replaced shall become our property.
6) The terms and conditions of this warranty shall be contained exclusively in this document
and no other presentation of provision, either written or otherwise, regardless of the origin of
the same, shall be accepted as either adding or removing from these terms and conditions.
7) That this warranty shall cease to be valid and void if the appliance is exported or
relocated from Singapore.
8) That there shall be no removal, alteration, defacement, or made illegible/tampered or any
kind of the serial number on the appliance.
9) That the owner shall be fully responsible for the due delivery and collection of the appli-
ance for any work done according to this warranty. Transportation expenses incurred for
delivery or handling the appliance are chargeable to the owner.
10) Transportation and labour charges apply after the full parts warranty expires. Refer to
https://www.europace.com.sg/ewarranty/ for more information.

In addition to the above, this warranty shall be subjected to the following limitations and
exclusions:-
a)The appliance shall be warranted by STRATEGIC MARKETING (S) PTE. LTD. from date of
purchase only for a period of:-
10 years - Heating Element warranty applies to selected models of Storage Water Heaters.
- Tank Leakage warranty applies to selected models of Storage Water Heaters.
8 years - Motor warranty applies only to selected models of Stand Fans (Walk-in warranty).
10 years - Compressor warranty applies to selected models of Refrigerators.
6 years - Motor warranty applies only to selected models of Stand Fans (Walk-in warranty).
- Compressor warranty applies only to selected models of System Air Conditioners
and Portable Air Conditioners.
5 years - Compressor warranty applies to Refrigerators, Freezers, Wine Coolers, Portable
Air Conditioners & Casement Air Conditioners (Outdoor warranty). Transportation is
chargeable from the 2nd year to 5th year.
- Compressor warranty applies to Dehumidiers (Walk-in warranty)
- Motor warranty applies only to selected models of Stand Fans (Walk-in warranty).
3 years - Full parts warranty applies only to selected models of Air Puriers & selected
models of Dehumidiers (Walk-in warranty).
- Heating Element warranty applies only to selected models of Garment Steamers
(Walk-in warranty).
- Motor warranty applies only to selected models of Jet Turbine Fans & selected
models of Air Coolers (Walk-in warranty).
2 years - Motor and internal parts warranty applies only to selected models of Stand Fans,
selected models of Oscillation Power Fans & selected models of Air Puriers
(Walk-in warranty).
- Heating Element warranty applies to selected models of Electric Ovens &
selected models of Kettle Jugs. (Walk-in warranty)
- Motor warranty applies only to selected models of Jet Turbine Fans
(Walk-in warranty).
- Full parts warranty applies only to Wine Coolers of 34 Bottles & above.
1 year - Full parts warranty applies to *Lifestyle Products (cash & carry items), Small
Kitchen Appliances, Fans, Air Coolers, Wine Coolers of 20 Bottles & below, Mini
Bar Fridge (Walk-in warranty)
- Full parts warranty apply to Refrigerators, Air Conditioners & Freezers
(Outdoor warranty).
Check out the warranty coverage of your appliance at www.europace.com.sg
b) The owner waives all or any claims to compensation monetary or otherwise which
he/she may be entitled to and shall agree to accept any compensation whatsoever by
way of additional repairs or otherwise which we in our absolute discretion may deem t
to oer. The giving of compensation shall be subjected to the other provisions of the
warranty.
c) This warranty shall not be transferable, negotiable or assignable to any third party.
d) The warranty does not include transport delivery or handling charges incurred in the
transportation of the appliance to and from Strategic Marketing (S) Pte Ltd.
e) Damage caused during transit where the appliance is transported for servicing, repair,
or in relation thereof or connection therewith.
f) In respect of refrigerator and air conditioner only, upon the expiry of 12 months from
the date of purchase, this warranty will not cover transport, refrigerant and labour to
install a new compressor.

g) This warranty will not cover chemical cleaning, maintenance service, general service and
overhaul, which if conrm is chargeable.
h) Defects or fault in the appliance which has been used for commercial purposes or which
have been rented/leased or which have been otherwise subject to other than household
use.
i) Claims for damaged/missing parts after 3 days from the original date of goods received
will not be valid.
j) This warranty and the Replacement Scheme does not particularly cover damages and/or
defects arising from
• Usage of wrong electrical supply/voltage.
• Usage not according to the Instruction Manual provided by the manufacturers.
• Misuse, accidents, negligence, abuse, improper installation, or any manner of tampering.
• Normal wear and tear.
• Corrosions rusting or stains.
• Scratches, dents on the unit body, casing or paintwork of the appliance.
• Act of God, re, ood and civil unrest.
• We shall not under any obligation, legal or otherwise to repair this appliance or one to one
exchange if the same shall be required as a result of losses, damages, and malfunctions
arising from any of the causes mentioned in the paragraph.
k) All accessories, external parts and extruded parts such as front panel, casing, door, glass
cover, glass door, cable/cord assembly, batteries, adaptor, plug, remote control, control
knob, buttons, lter, UV lamp, oven tray, wooden rack, exhaust hose, xtures, panels, cover,
lid and lever, plastic parts, fan blades, blade guard, inner pots, brushes, water tanks, attach-
ments made of glass, plastic and/or porcelain, detachable parts, and other option items are
excluded from this warranty.
All services provided after the warranty period will be chargeable at standard rates deter-
mined by STRATEGIC MARKETING (S) PTE. LTD.
The terms and conditions of this warranty shall be varied except with the written and
express consent or agreement of Strategic Marketing (S) Pte. Ltd. While Strategic Marketing
(S) Pte. Ltd. endeavours to repair any defects after the warranty period, it is subject to avail-
ability.
It is hereby expressly provided that any liability of Strategic Marketing (S) Pte. Ltd. for any
loss or damage whatsoever arising from, relating to or in connection with the purchase of
the appliance shall not exceed the purchase price (excluding installation costs) of the appli-
ance. Similarly, Strategic Marketing (S) Pte. Ltd.’s liability for any breach of this warranty shall
be limited to the purchase price (excluding installation costs) of the appliance.
* Lifestyle Products - Garment Steamer, Humidier, Dehumidier, Air Purier, Mini
Bar-Fridge.
* Walk-in warranty - Customers are obliged to bring the warranted products to Strategic
Marketing (S) Pte. Ltd. Service Centre for repair/service during the warranty period.
Ver. 20 _0312
Scan QR Code for
the online Warranty
Registration

System Split Aircons | Tel: 6858 0801| Email: systemac@strategic.com.sg (Twin City)
Portable & Casement Aircons | Tel: 6291 0800 | Email: portableac@strategic.com.sg (Jia Yue)
Refrigerators, Washing machines, Cookers & other major appliances |
RELATED PRODUCTS & MAIN CONTACT HOTLINE
Ver. 20 _0312
Table of contents
Other EuropAce Ventilation Hood manuals


Popular Ventilation Hood manuals by other brands


Hearth and Home Technologies
Hearth and Home Technologies Termination Cap ST375 installation instructions

KitchenAid
KitchenAid KWCU360JSS1 parts list

KitchenAid
KitchenAid KVWC956JSS0 Installation Instructions and Use & Care Guide

Broan
Broan E54000 Series Specification sheet

Fagor
Fagor 6CFT-90V Operation manual

Atag
Atag WV60 MS Series Instructions for use

FALMEC
FALMEC Plane Black Isola 90 instructions

AEG
AEG DS 60 i GB Installation and operating instructions

Miele
Miele DAS 4720 Operating and installation instructions

Gaggenau
Gaggenau AH360120 Operating and assembly instruction

Whirlpool
Whirlpool RH2324XJQ3 parts list

AEG
AEG DD 8390 OPERATING AND INSTALLATION Manual