EuropAce ETW 7100V User manual
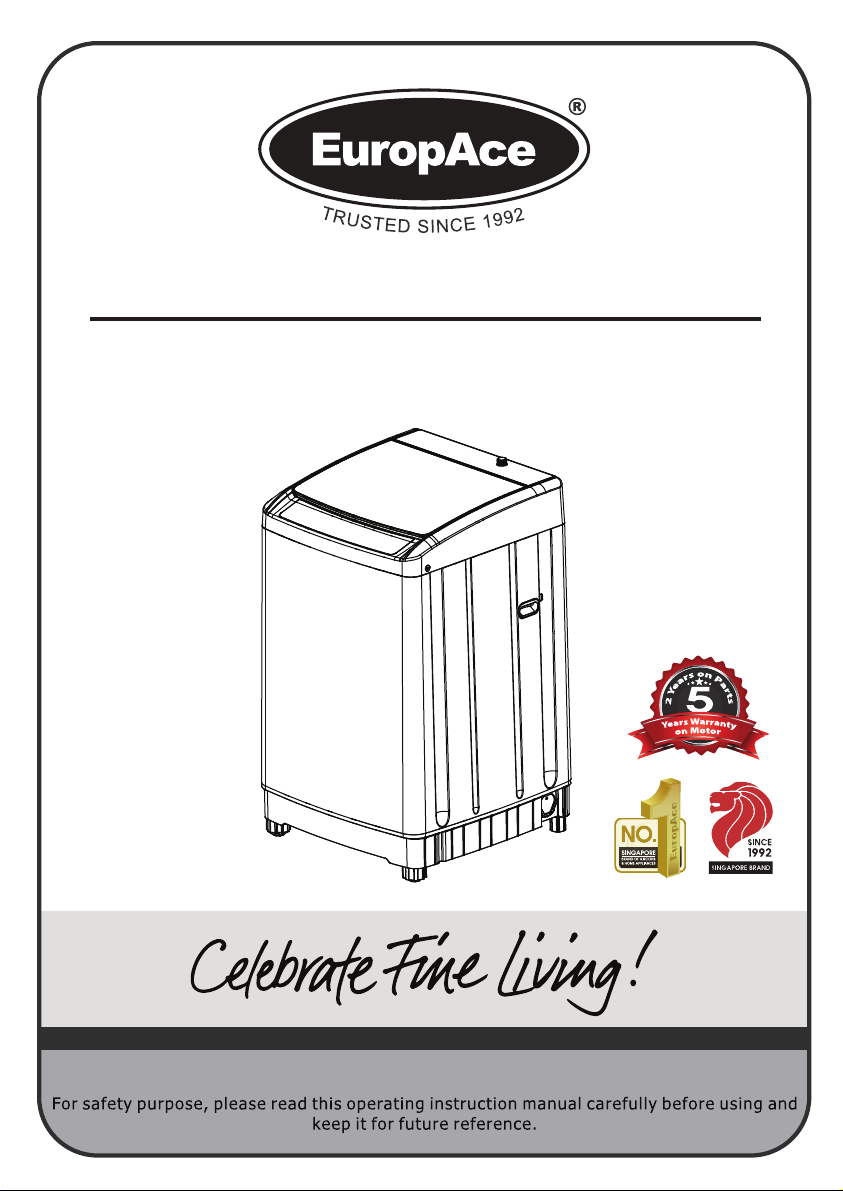
Thank You For Purchasing EuropAce Top Load Washing Machine
10KG TOP LOAD WASHING MACHINE
ETW 7100V
Contents
Name of all components
Accessories
Suggestions
Installation
Connection of the inlet hose
Connection of the drain hose
Preparation
Method
Program time table
Safety warning
Maintenance
Trouble shooting
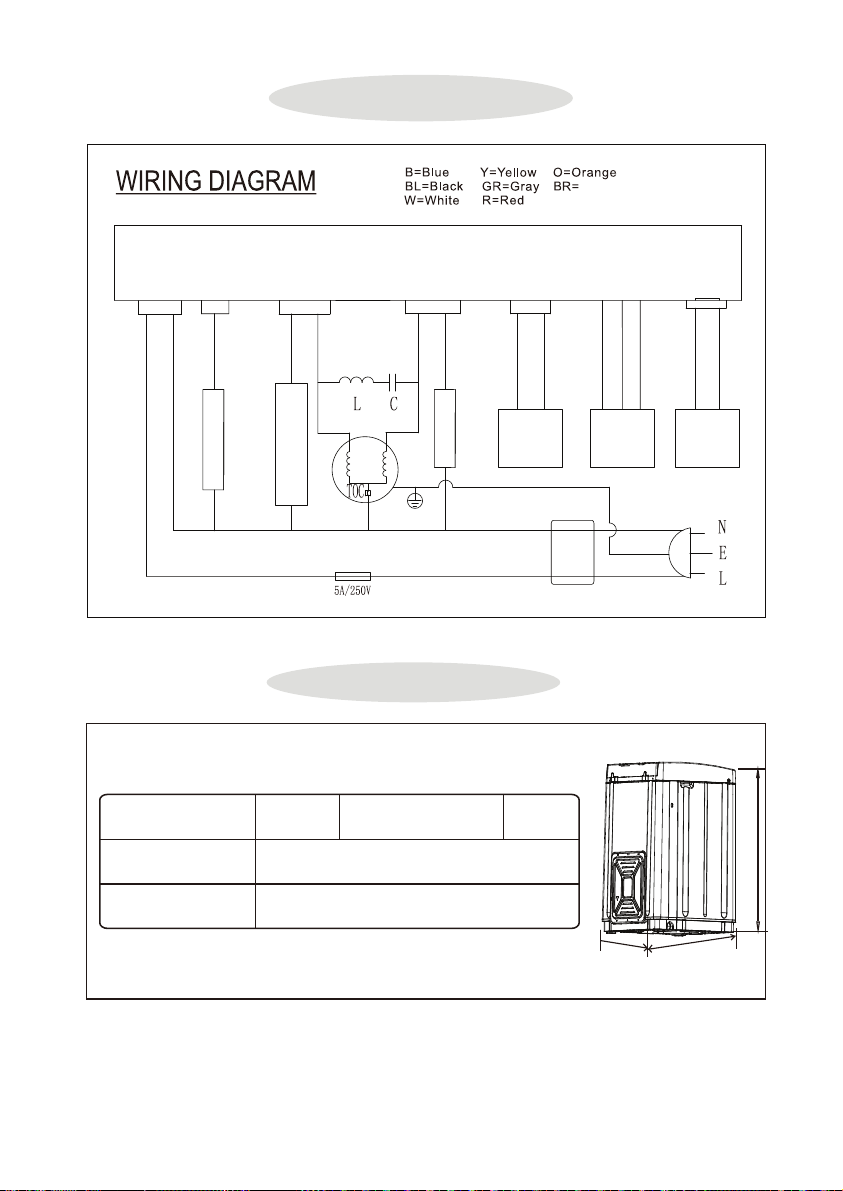
Wiring diagram
1
1
2
Control panel 3
4
5
6
7
7
11
12
13
14
16
Specifications 16
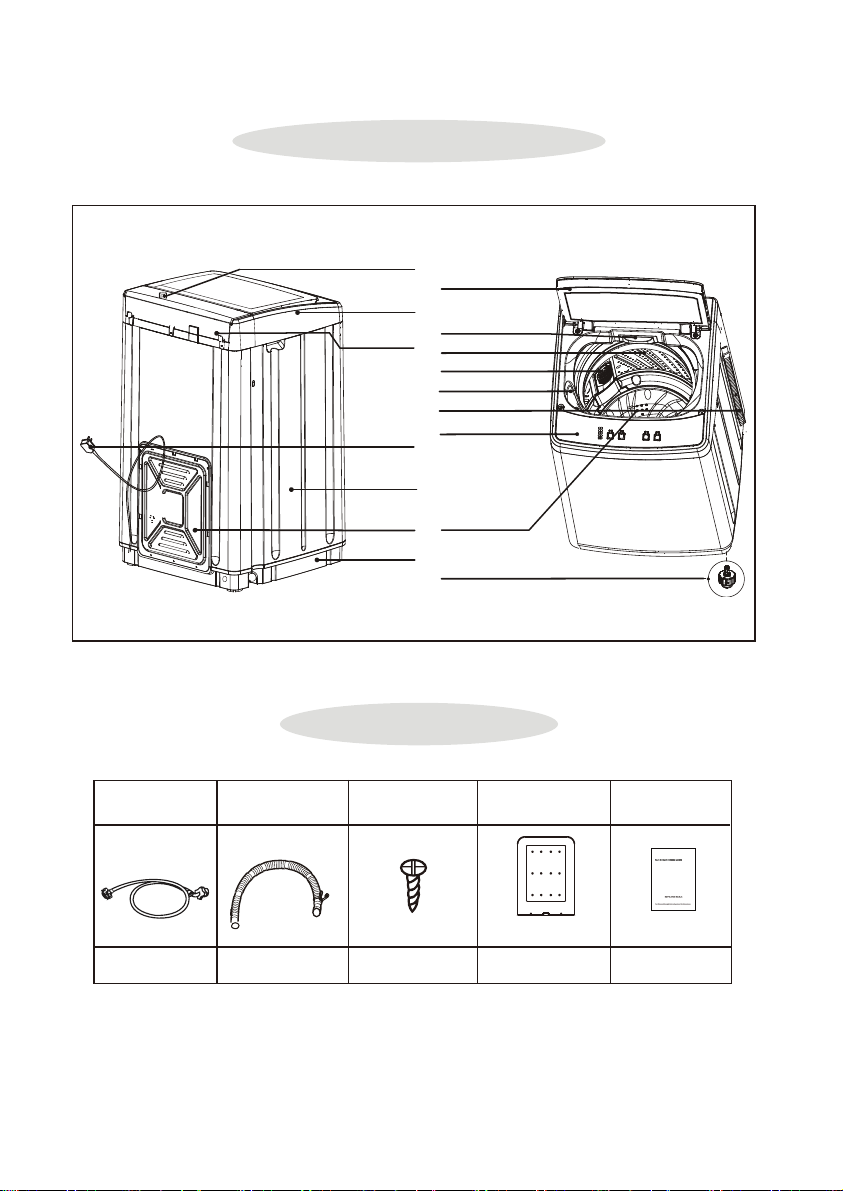
Name of all components
Installation instructions
Operating instructions
Maintenance
Wiring diagram
-1-
Name of all components
Accessories
1Pcs 1Set 2Pcs 1Pcs 1Pcs
(2set screws)
Inlet hose Drain hose
Noise and mice-
proof plate
UP
Self screw Instruction Manual
MODEL:XQB70-7036D
Waterinlet valve
Control panel
Back
control panel
Power cord
Body
Back cover
Base
Top lid
Detergent box
Inner tub
Filter
Bleach injection
Drain hose
Control film
Pulsator
Adjustable foot

Suggestions
-2-
1. Low foam detergent powder is recommended.
2. Please operate it under 0 ~ 40 , as extra-high or
extra-low ambient temperature may cause malfunction.
3. If the washing machine has been stored under 0 , it can
be used after being placed under room temperature for
about 4 hours to avoid machine damage due to residual
ice in the washing machine.
4. The washing and spinning c
5. The
apacity refers to the maximum
weight of standard laundry during two operating fashions,
which is different from that of the actual laundries. The
cloth thickness, size, and category of the laundries will
impact the washing capacity. The volume of washing items
should be appropriate for the normal turning of washing
items within the washing machine.
high water level should not be selected for washing
volume
below 1.0kg to avoid water splashing during
washing.
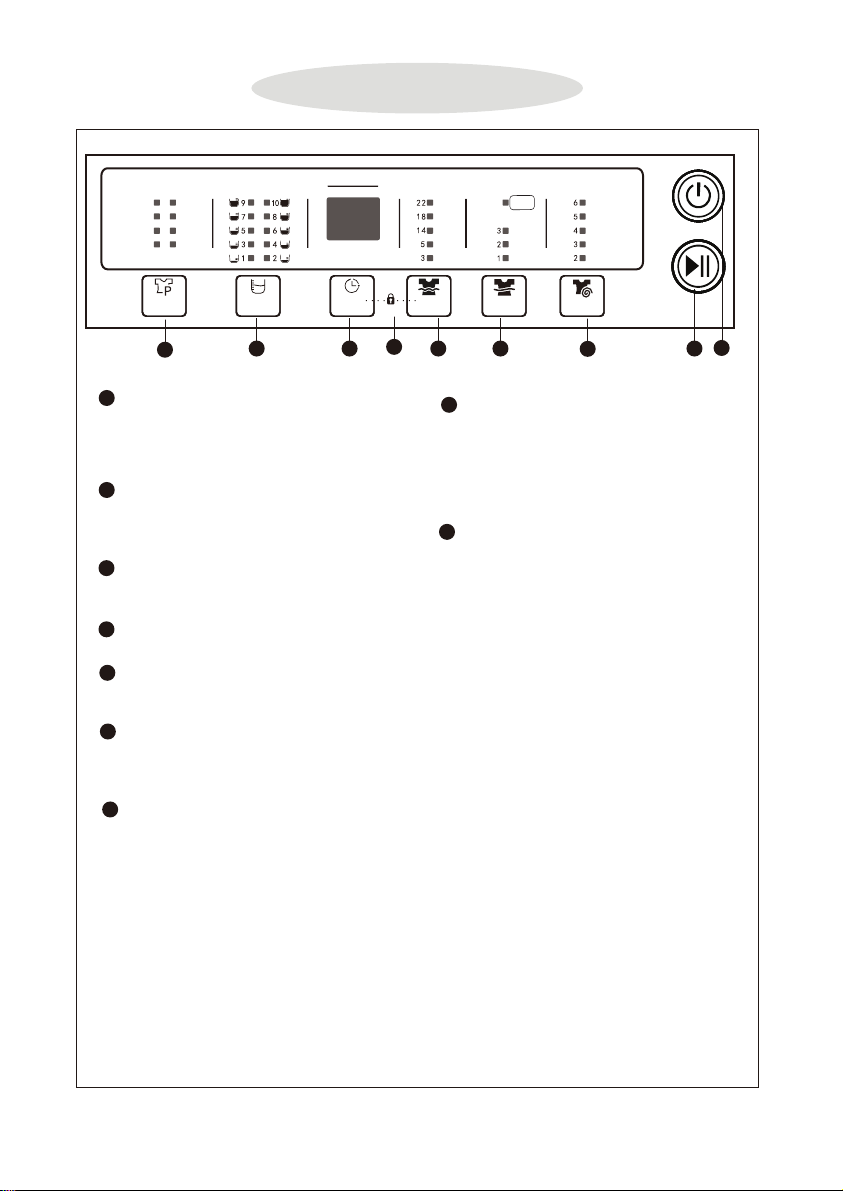
Control panel
-3-
Press power button to turn on or turn off the washing
machine. If it is turned on beyond 5 minutes, and
does not start the washing machine, or not to turn
off, the power On/Off switch will be auto turned off.
Power On/Off button
1
Press this button to start program, however press
the button when machine running, the program will
be paused.
Start/Pause button
2
Press this button to single spin. You can set the
spin time.
Spin
3
Press this button to rinse. You can set the times.
Rinse
4
Press this button to wash. You can set the washing
time.
Wash
5
Press this button preset the washing time.
Preset
7
Press this Wash and Preset button and hold on
1.5 seconds to enter Child Lock with beef sounds.
Repeat it will unlock.
Child Lock
6
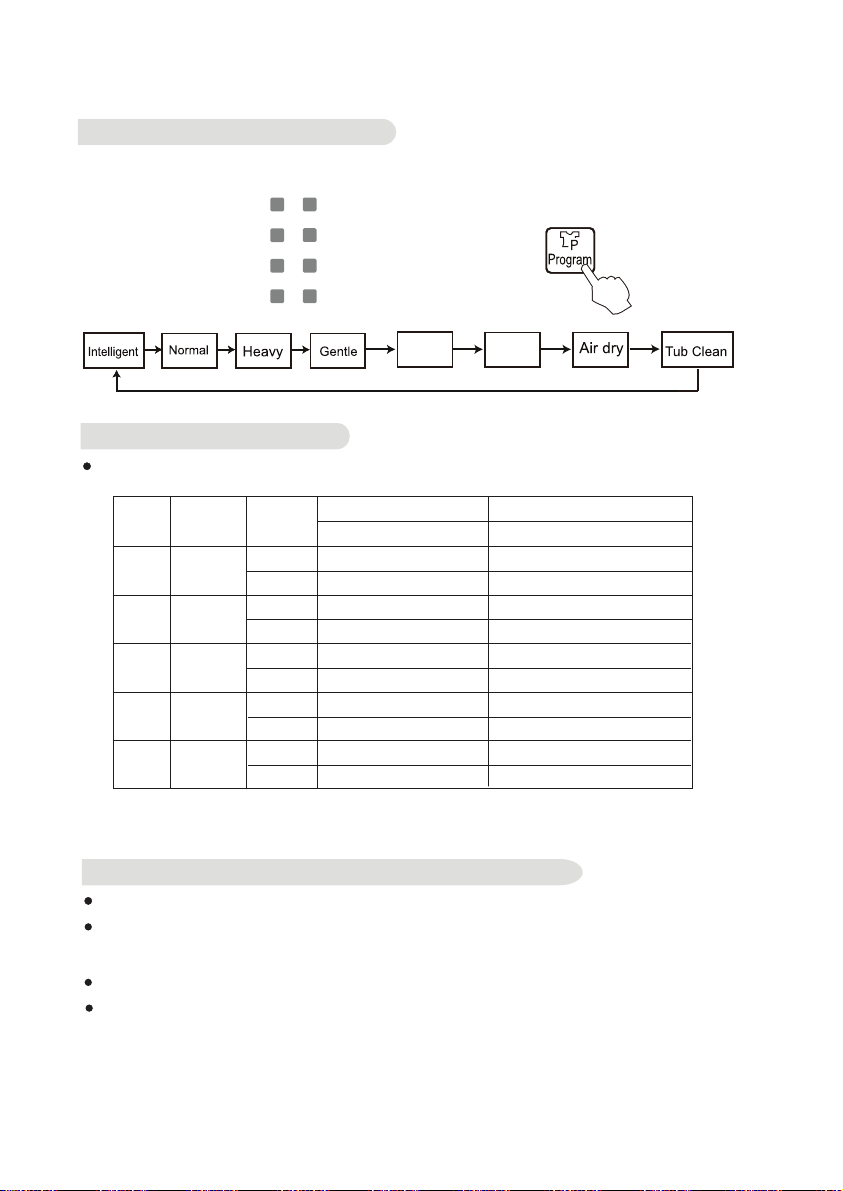
Press this button to choose the program Normal,
Heavy,Tub clean, Speedy, Gentle and Air dry.
Normal
Intelligent
: to wash normal quality clothes, can set
: to wash according to the weight of
water level from 1 to 10 according to the loading.
clothes adjusting the water level.
Heavy: to wash the coverlet, jeans and other
big clothes.
Gentle: to wash all kinds of woolens, silks and
fine quality clothes.
Water saving : to wash the slight dirty clothes.
soak&wash: to soak and wash.
Tub clean: to clean the tub itself.
Air dry: to dry the tub or clothes.
9
Program
Press this button to choose right water level
according to the weight of clothing, so as to avoid
the water waste.
In intelligent program, the machine will estimate
the weight of clothes and choose the water level
automatically.
Water level
8
﹡
1
2
3
457 6
8
9
Spin
Retain
Water
Min
Min
Min
Min
MinMin
Min
Min
Min
Min
RinsePreset Wash
Child Lock
Preset Hour
Remain Min
Time
Times
Times
Normal
Intelligent
Heavy
Gentle
Soak&
Wash
Water
Saving
Air dry
Tub clean
Water
Level
Program
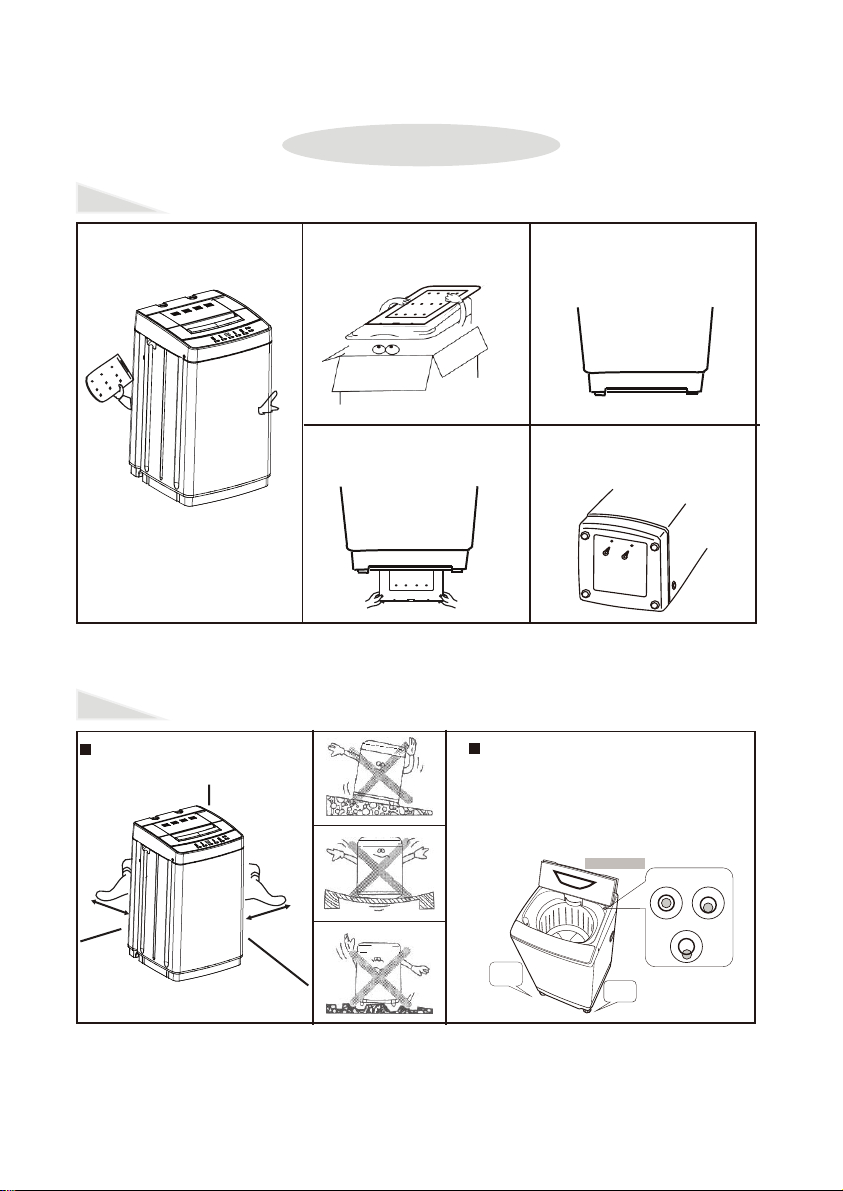
Place the washing machine at
least 5cm away from the wall.
Alteration of adjustable foot
In order to prevent vibration during wash
operation, you can loosen level adjustment
knob and change the height of the adjustable
foot until the washing machine is stable, and
then tighten it. (The inclination angle of the
washing machine should not be more than 2
degrees)
Installation
Place the washing machine on a firm and level surface, use the level adjustable
knob to adjust the washing machine to be stable.
1. Take out the mice-proof plate. 2. The entrance is in front of the
bottom part.
3. Insert the noise-proof plate
into the base.
4. Lay down the washing
machine, fasten up two screws.
-4-
Insert the mice-proof plate into the washing machine base
5cm
5cm
adjustable
foot
adjustable
foot
middlingbalance
unbalance
Level meter
-5-
When the level meter is
inclined to front, turn the
two feet left.
When the level meter is
inclined to back, turn the
two feet right.
When the level meter is
inclined to rightward, turn the
left-foot right or turn right-foot
left.
When the level meter is
inclined to leftward, turn the
left-foot left or turn right-foot
right.
Connection of the drain hose
1. Hitch the sealed loop over the
joint.
2. Press down the fix ring, and
hitch it over the drain hose.
3. Press down the fix ring, and
then push it to the drain outlet.
Clasping the fix ring to make
sure they are connected well.
joint of drain hose
sealed loop

-6-
Outlet:
Installation and connection of the inlet hose
Connection of the inlet hose
1. Select the appropriate type
of outlet as shown in the figure.
2. End of outlet spout should be more than
10mm, or the connector cannot be assembled.
3. Water leakage is
possible from here.
1. Unscrewing the part “a” from the water faucet. (As figure 1)
2. Respectively attach the water inlet hoses to the water faucet. (As figure 2)
3. Run water through both faucets and inlet hoses, into a bucket or laundry tub, to get
rid of particles in the water lines that might clog the inlet valves screens.
4. Attach the hose connected with the water faucet to the water inlet valve. (As figure 3)
5.Check for leaks
(1). Swing the water inlet hose gently to confirm if it’s suitable.
(2). Turn on the water faucets and check for leaks. A small amount of water might
enter the washers. You will drain this later.

-7-
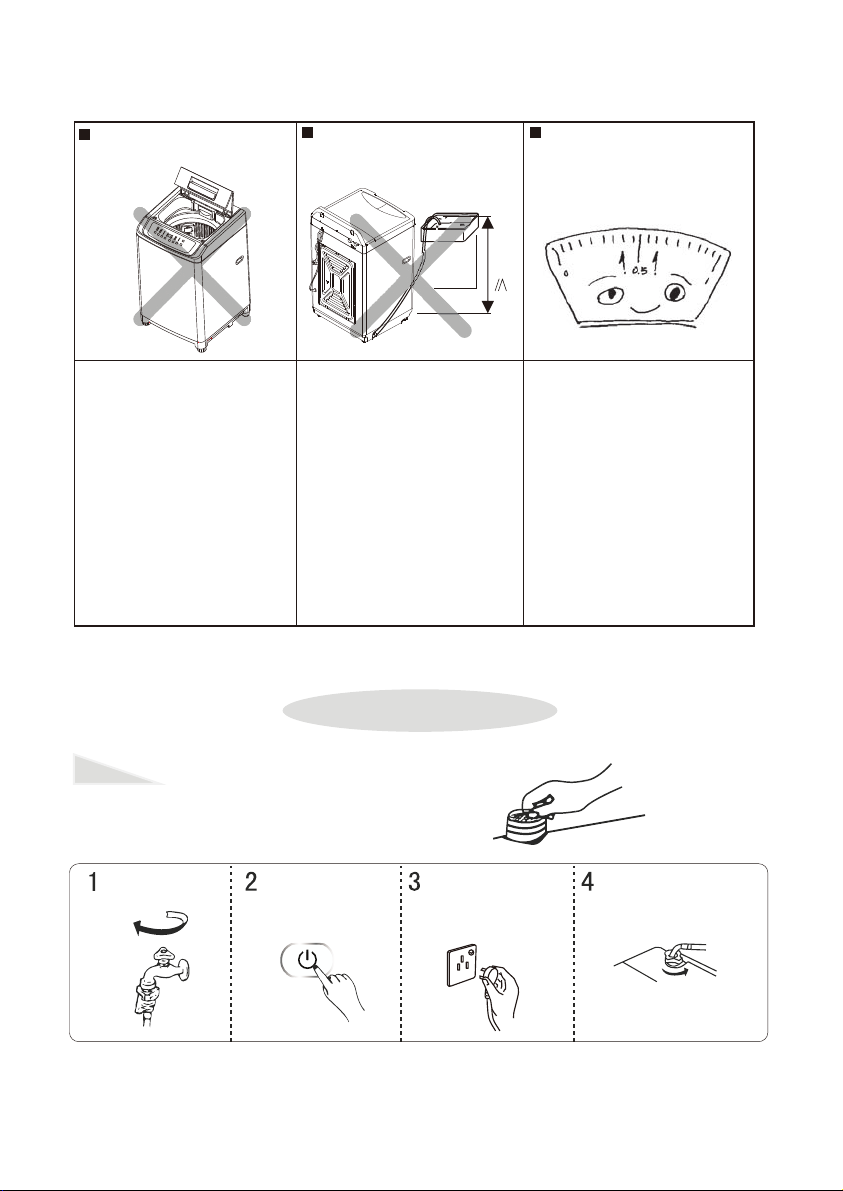
Operation
Preparation
Turn on the tap. Plug in the power cord.
Before washing, please take
out coins or other hard goods,
and pull to close the zip
fastener to prevent clothes and
barrel from damage.
Install the water inlet hose.
1. Power switch
Press the power switch to turn on the washing machine.
Method
Put suitable detergent and
wash load into the tub.
5
DETERGENT
4
Soak&
Wash
Normal
Heavy
Gentle
Intelligent
Water
Saving
Air dry
Tub Clean
-8-
2. Washing Program Selector
The model has 8 programs for different clothes quality. You can select the desired program according
to the need.
3. Water Level Switch
Choose the water level according to the wash loading, And below table offer the quantity of
the detergent or wash powder according to the wash loading. (For your reference)
Water
Level
Wash
Loading
Water
Volume
Normal wash powder Concentrated wash powder
25g / 30L
1-2
2-4
4-6
6-8
8-10
2.0-4.0Kg
4.0-6.0Kg
6.0-8.0Kg
8.0-10.0Kg
25L
32L
39L
46L
53L
60L
67L
81L
74L
88L
33g
43g
52g
61g
80g
89g
108g
99g
117g
71g
21g
27g
33g
38g
44g
50g
56g
68g
62g
73g
Less 2.0Kg
40g / 30L
4. Diy Switch To Choose Suitable Wash Way
After power on, press Program to choose a suitable program.
After setting the program, you can press Wash, Rinse, Spin, Water Level or Preset button to set
the washing time, rinsing frequency, spinning time, or if select water recycles and preset function
according to the user’s need.
Press the Start button to start.
Close the door lid.
Soak&
Wash Water
Saving

5. Preset selector
6. Saving water function to save water
8. Wash over
7. Press Start/Pause button, start the washing machine
-9-
Select an automatic process or edit process by yourself.
If the preset selector is needed, you can press the Preset button until the indicator of the preset is light up.
The indicating window indicates the needs of time for washing (hr).
Please close the wash lid completely. (otherwise, the machine will give an alarm)
The washing machine works as a program you have set and shows the left time as you preset.
After pressing the Start/Pause button, the washing machine starts to work.
If it is needed to change Program, Water level, Process, please press the Start/Pause button to pause
the washing machine and the preset mode. After the setting, the washing machine will start according to
the new setting.
When the machine at the preset mode, the Start/Pause button cannot be pressed.
Stand by Start Pause
Unless the user sets the water to recycle function, the machine will not carry out that function. If need that
function, press the Rinse button before the last water draining with the Saving water light on, if no need,
press it to let light off.
When it is on, the machine will not drain at the last wash. It will remind the user to keep the water until
the Rinse button is pressed.
During keeping water, pressing the Rinse button is available to stop or start draining.
The Buzzer will alarm after the program finish, and it will power of
Do not open the lid during the operation of the machine, especially in spinning, to avoid danger.
f automatically
Unplug the power cord.
Maintenance as shown page 12 at "maintenance".
During the process of counting down to preset time, all buttons except power switch cannot be pressed.

9. Fuzzy function
10. Child lock
The washing machine should only be used by adults. The children should not be allowed in the area
of the machine unsupervised. To keep children from touching the controls or playing with the appliance,
the child lock function is a perfect design.
Press and hold the two buttons (DIY & Adjust) simultaneously for 1.5 seconds to set the child lock. If
needs to deactivate this function, just press and hold the same two buttons for 1.5 seconds.
If there is no water in the tub, the press power switch and the Start/Pause button, it will start the function,
and the machine will set the water level according to the wash loading. If some water in the tub, the
fuzzy function cannot be started up.
Before starting the fuzzy, pressing Program, the Adjust or Water level button will result in canceling
the fuzzy function.
Before starting the fuzzy function, putting the laundry into the tub in advance is necessary, or the
water level may be improper.
-10-

Computer sequencer saves up 8 kinds of washing programs, all kinds of programs are shown as washing
“Water Saving” is the recommended program for a normally soiled load at the same capacity of this machine.
process form.
Program
Soak
(min)
Wash
(min)
Rinse (min) Spin
(min)
Tol
(min)
1st rinse 2nd rinse 3rd rinse
Intelligent
/
Inlet water
Wash
18
Drain water
Spin
3
Inlet water
Wash
3
Drain water
Spin
3
Inlet water
Wash
3
Drain water
Spin
6
42
Heavy
Wash
18
Spin
3
Wash
3
Spin
3
Wash
3
Drain water
spin
3
Inlet water
Wash
3
Spin
5
57
Gentle
Wash
5
Spin
3
Wash
2
Spin
2
Wash
2
Spin
5
28
Water
Saving
Wash
18
Spin
5
26
Soak & Wash
Inlet water
Soak
30
Wash2
2
Spin
2
Inlet water
Wash
3
Drain water
Spin
3
Inlet water
Wash
3
Drain water
Spin
3
Inlet water
Wash
3
Spin
4
80
Air Dry /
Spin
4
6
Normal /
Inlet water
Wash
18
Drain water
Spin
3
Inlet water
Wash
3
Drain water
Spin
3
Inlet water
Wash
3
Spin
6
42
Tub Clean
Inlet water
Soak
30
Wash
14
Drain water
Spin
3
Inlet water
Wash
10
Spin
7
71
-11-
Program Time Table

-12-
Safety warning
-13-
Do not switch on when the
water pressure isn't within
0.03MPa-0.85Mpa, so as to
protect the inlet valve.
Make sure the lid is closed
especially during the spin.
Maintenance
Clean the filter in the inlet valve
The appliance is not intended
for use by young children or
infirm persons unless they have
been adequately supervised
by a responsible person to
ensure that they can use the
appliance safely. Young
children should be supervised
to ensure that they do not play
with the appliance.
If the appliance is supplied
from a cord extension set or
an electrical portable outlet,
device, the cord extension set
or an electrical portable outlet
device must be positioned so
that it is not subject to
splashing or ingress of
moisture.
the power cord must be
unplugged after use.
Please use low foam powder
detergent.
The appliance is to be
connected to the water
mains using new hose-sets
and that old hose-sets
should not be reused.
The highest point of the drain
hose must be within 90cm above
the floor level.
90cm
Clean the filter in the inlet valve regularly in order
to prevent it from clogging.
Turn off the tap. Press the power
button.
Let the machine run
for 1min, and un plug
the power cord.
Take off the inlet hose
and clean the filter with
a brush.

Malfunction phenomenon
Start the washing machine from
Rinse Process, the washing
machine does not input the water.
The wash process changes
from Spin to Rinse.
The control button is useless to touch.
spin delay.
The washing machine will start from the spin process
in order to spin out the water and detergent from the
clothes, then input the water (if there is water in the tub
it will drain out the water first).
When the clothes are not even or are on a single side
of the tub, the washing machine will input the water and
make the clothes balance and even.
If want to change the program after the washing machine
started, please touch the Start/Pause button to reset the
to reset the program.
Trouble Shooting
Reason
Before maintenance
Problem Checklist
Does not work
Is electricity present?
Is the tap opened?
Is the plug loose, or fuse is broken?
Turn on the power or start button?
Fail to fill water
Is the tap opened?
Is the drain hose frozen?
Is the water supply cut?
Is the water inlet valve blocked?
-14-
Body Maintenance
Clean the lint filter
Note:
Clean the surface of the washing machine with a soft
cloth regularly.
After washing starched or bleached laundry, the inner
tub must be clear ,or deposit will appear.
The washing machine will delay 15 to 60 seconds to
enter spin process after drain.
1. Pull upward to remove
the filter assembly.
2. Take the filter from
the filter cover.
3. Clean and rinse
it thoroughly.
4. Reinstall the filter.

-15-
Trouble Shooting Method
For some troubles, the machine buzzer will ring and alarm, and the indicator will flash.
Troubles Indicator Light
No indicator
No indicator
No indicator
Possible Cause Solution
Breakdown
No indicator
No indicator
The plug is badly connected
to the socket or the switch is
not activated.
The socket is dead or the
fuse is broken.
The current process is lost
for power failure.
The voltage is too low or too
high.
Connect the plug properly or
activate the switch.
Contact the authorized
technician.
Reuse only when power failure
is eliminated.
Remove the plug and reuse it when
the voltage comes to normality.
E2
E3
E1
E5
E4
Standing
drain
Spin
malfunction
A conflict
between the
tub and the
cabinet
during the
spinning
Insufficient
water supply
Unavailable
preset
function
E6
1. The drain hose is blocked;
2. The drain hose is hung up
over 90cm.
Check the drain hose, open the
lid and then close it to continue the
draining process.
The lid is unclosed during the
spin,or use under glaring sunlight.
Close the lid or use it indoor.
The clothes are not laid evenly
in the tub. The machine will try
to make an automatic check
and adjustment for 2 times, or if
nothing available, an alarm
will be given.
The clothes are not laid evenly
othguonetontubbutehtni
.mralaehtesuac
Open the lid,
Open the lid, distribute the clothes
ottratsnehtdnabutehtniylneve
spin again.
distribute the clothes
evenly in the tub and then it.
The tap is closed, water supply
is cut off or water pressure is
too low, so the water fails to
reach the desired level for
quite a long time.
Open the tap or use the machine
after the water pressure comes
to normal. Open the wash lid,
close it and restart to input water.
The lid is unclosed during the
preset process (the process
will pause and an alarm will
be given).
Close the lid.
Abnormal
water level
sensor
The sensor fails for short or
open current, etc. and an alarm
will be given.
Contact the authorized
technician.
E7
E9
Unstoppable
Memory chips
break down It can not be read or wrote.
inlet or
automatic
drain
Abnormalities occur in PCB,
inlet valve or water level
sensor.
Cut off the power after draining,
and try to contact the
authorized technician.
Fail to power
off or power
on
Unending process
or no indicator PCB is broken. Contact the authorized technician.
Contact the authorized technician.
-16-
Wiring diagram
Specifications
640mm
630mm
mm5
101
Rated voltage
Net weight
Rated frequency220-240V~
37kg
50Hz
630mm*640mm*1015mm
Dimension
Microcomputer Programmer
LB
BR LB BL Y R W GR B B BR BR
YG
YG
BR
Softener Valve
Drain Pump
Water Inlet Valve
Fuse
Motor
Water
Level
Sensor
Lid Safety
Switch
Safety
Switch
BRO Y R BW
Brown
LB=Light Blue
YG=Yellow Green

一、 注意事项:
1.本产品属于 I类电器,请您使用时注意用电安全:本机使用单相两极带
接
地的电源插座,插座必须可靠接地,而且接地端不应与煤气管道、自来
水
管道等公用设施连接。
2. 如果洗衣机通过插座板(接线板)或便携式电源装置连接电源,插座
板
(接线板)或便携式电源装置必须放置在不潮湿且不易被水溅到的位置
。
3. 不要与其它电器合用一个插座,插头与插座配合松动时不要使用。
4.电源插头的插片及插片的安装面上若有灰尘,请仔细用干布擦净。
5.洗衣机正常使用时,电源线插头应便于用手插拔。停电、移动、不用或
清
理时,一定要把电源插头拔下并关掉水龙头。注意:请不要用湿手去插
、
拔电源线插头。
6.不要过度弯曲、拉伸、扭转、捆扎或让重物重压电源线。
7. 本机电源线连接方式为 Y连接,如果电源线或电源插头损坏,为避免危
险,
必须由我司特约维修点或我司售后服务部门专职人员更换。
8. 洗衣机不能安装在浴室等潮湿的地方,绝对不能用水冲洗,也不要将湿
衣
物等放在洗衣机的控制板上。
9. 请避免阳光直接照射洗衣机,也不要靠近暖气等热源。
10.本机请勿放置在地毯上使用,无上排水功能的机型也不要放置在无地漏
的
地方使用。
11.此产品需要与水连接,必须尽可能使用新的水管,旧的水管是不可以再
利
用的。
12.本机适用水压 0.03MPa~0.85MPa,并不要使用 50℃以上的热水。
13.请确保水龙头与进水管接头的可靠安装,并确保进水管接头与进水管切
实
插
接到位。

14. 不要将任何热的、重的物品(如盛有热水的壶等)放在洗衣机上。
15. 无人照看的儿童或残疾体弱者不得使用此机器。
16. 请绝对不要将煤油、汽油、香蕉水、酒精等易燃性物质或沾有此类物质
的
洗涤物放入或接近洗衣桶。
17. 请勿洗涤雨衣、自行车罩、羽绒制品、弹力棉制品等防水性或易浮起的
衣
物,以免在洗涤或脱水时异常振动或损伤衣物。
18. 洗衣机在脱水过程中,请勿随意打开门盖。
19. 洗衣机在工作时,不要将手伸入运转中的洗衣机桶里面,即使转速很慢
也
是危险的。要特别注意不要让儿童攀爬洗衣机,以免发生危险。
20. 请绝对不要自行分解、修理或改装本机。
二、 部件说明及装箱清单:
1:部件说明
Table of contents
Other EuropAce Washer manuals


Popular Washer manuals by other brands

Whirlpool
Whirlpool WFC 3C26 P X quick guide

Bosch
Bosch WAU28640TC Instruction manual and installation instructions

Milnor
Milnor 48040M7K Installation and service

Speed Queen
Speed Queen SCN040G2 Product specifications

Sunmax
Sunmax RT-50AC Operation guide

LG SIGNATURE
LG SIGNATURE WSS1207WHTN owner's manual


