EuropAce EWH 11C User manual
WaterHeater
EWH11C
InstructionManual
ThankyouforpurchasingEuropAceWaterHeater.
Forsafetypurpose,pleasereadthisoperatinginstructionmanualcarefullybeforeusingandkeepitforfuturereference.

ImportantSafetyInformation
WARNING!
Theproductmanufacturedbyusissafeprovidedtheyareinstalled,usedandmaintained
ingoodworkingorderinaccordancewithourinstructionsandrecommendations.
Alwaysrefertothismanualifyouhaveanydoubt.
Theproductmustbeearthed.Impropergroundingcouldcauseelectricalshock.
Ifanyofthefollowingconditionsoccurredasshownbelow,immediatelyswitchoffthe
powersupplyandcontacttheservicecenterforrepair.Neverattempttorepairthe
productbyyourself.
Iftheproductbeginstomakeanoddnoise,smellorsmoke.
POWERIndicatorLampdoesnotlightup.
Ifwatertemperaturecannotbecontrolled.
Iftheproductshowssignsofadistinctchangeinperformance.
Ifwaterleakfrominsideoftheproduct.
Whentheproductisusedbysomeonesuchaschild,elderlyperson,sickpersonor
physicallyhandicappedperson,theconcernpersonisrequestedtopayattentionand
checkthewatertemperaturebyusinghandfromtimetotime.Userisadvisedtotest
andadjustthewatertemperaturebeforeshowering.
Intimeoflightningorthunder,switchoffthepowersupplytotheproductinadvanceto
protecttheproductagainstpossibledamage.
Theearthcontinuityconductoroftheelectricalinstallationmustbeeffectively
connectedtoallexposedmetalpartsofotherappliancesandservicesintheroomwhich
theproductistobeinstalled,toconfirmtothelocalregulations.
NOTE:Whenremovingtheproductfrompackage,smallamountofwatermaybefoundinside.Thisis
normalastheproductwastestedduringmanufacturingprocess.
CAUTION!
Installationmustbecarriedoutbyaqualifiedpersonnelanditmustbeincomplianceto
thelocalauthorityregulations.
Theproductmustbepermanentlyconnectedtothedirectmainlinesupply.Aplugand
socketarenotrecommendedtobeused.
Forthecorrectsizeofwireconductorcorrespondingtodifferentelectricalloadings,
pleaserefertoWiringLoadingTable.
Theproductoperatesataminimumwaterflowrateof3.0litres/minandmaximum
workingpressureof6bars.Fordirectconnectionfromthewatertank,theproductmust
haveaninstallationofminimum1.0mbelowthewatertank.
Theproductwillnotfunctionifthereisinsufficientwaterflow(min3.0litres/min)to
triggertheflowswitch.
Thethermostatwillautomaticallycutoffthepowersupplyifithassensedanabnormal
riseinwatertemperature.
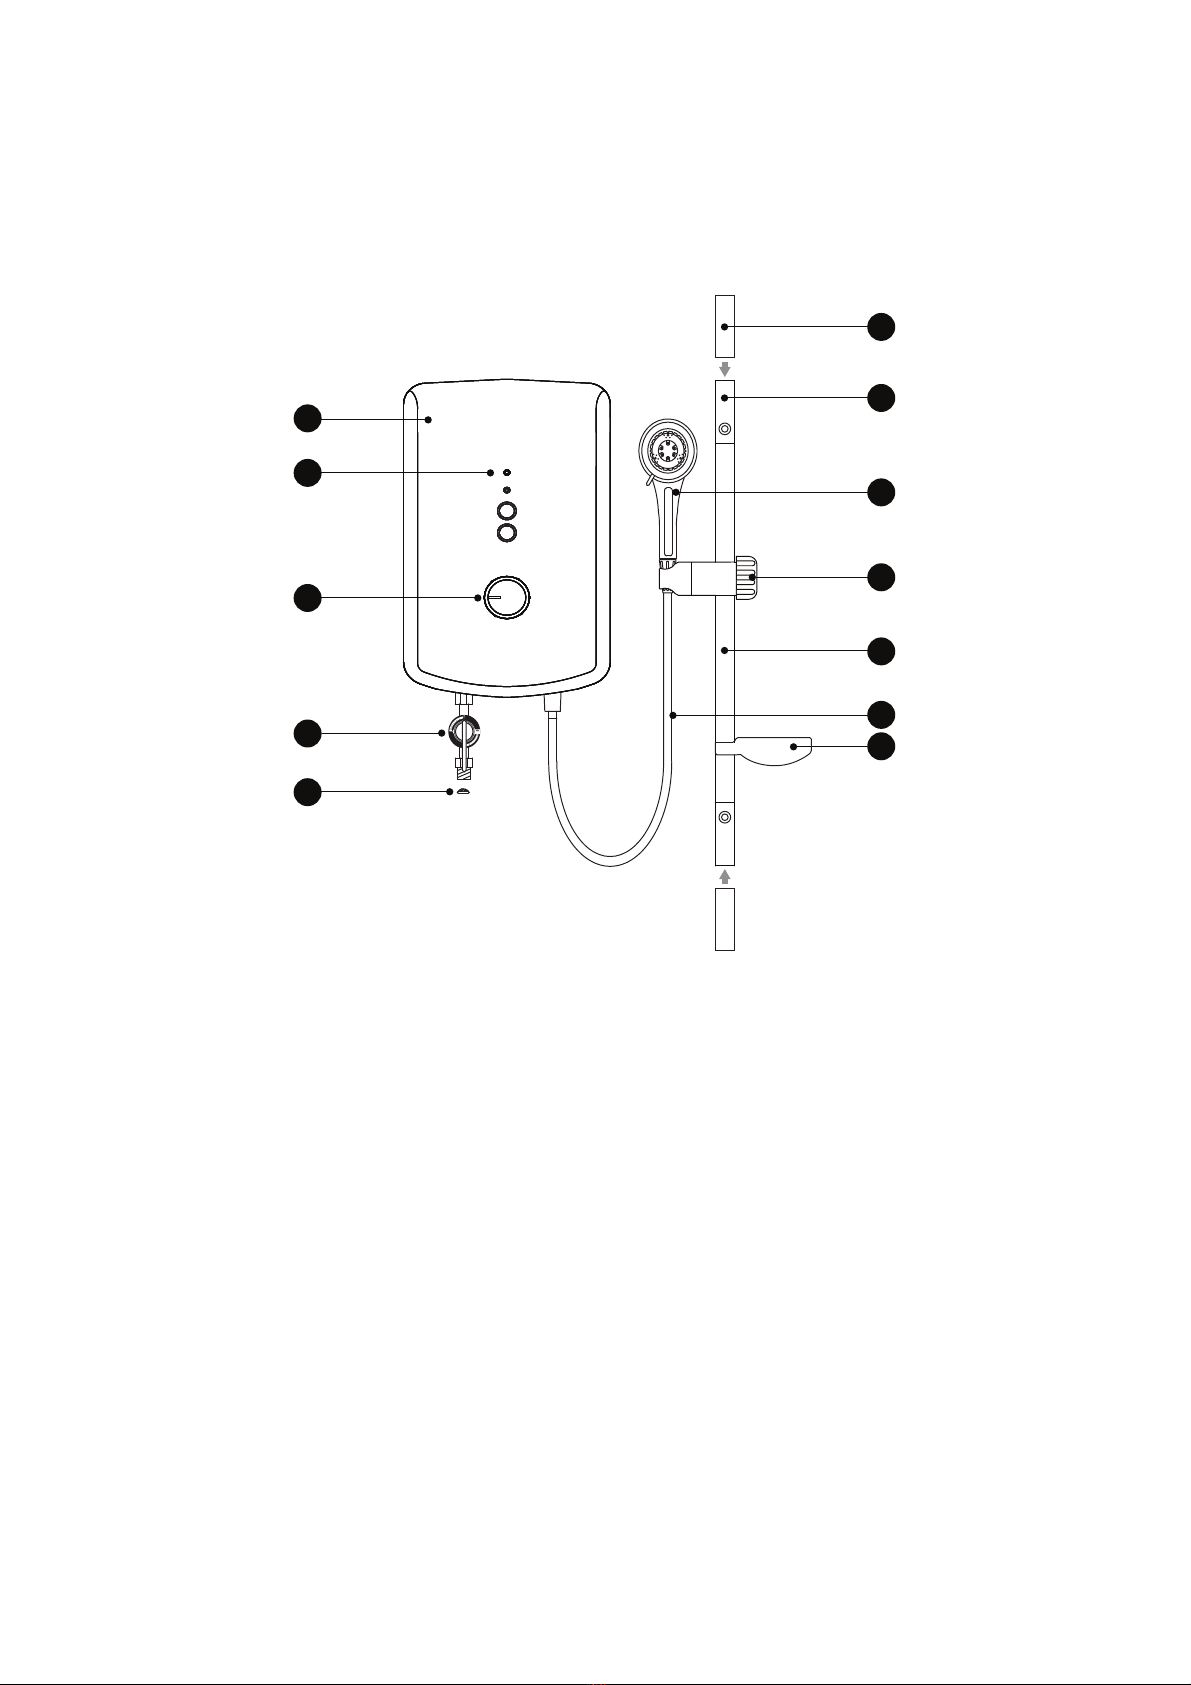
WaterHeaterOverview
3
1
2
4
5
7
8
9
10
11
12
6
1. FrontCover
2. POWERIndicatorLamp‐RED
3. TemperatureControlKnob
4. StopValve
5. MeshFilter
6. RailSupportCover
7. RailSupport
8. HandShower
9. AdjustableShowerHolder
10. SliderRail
11. PVCHose
12. SoapDish

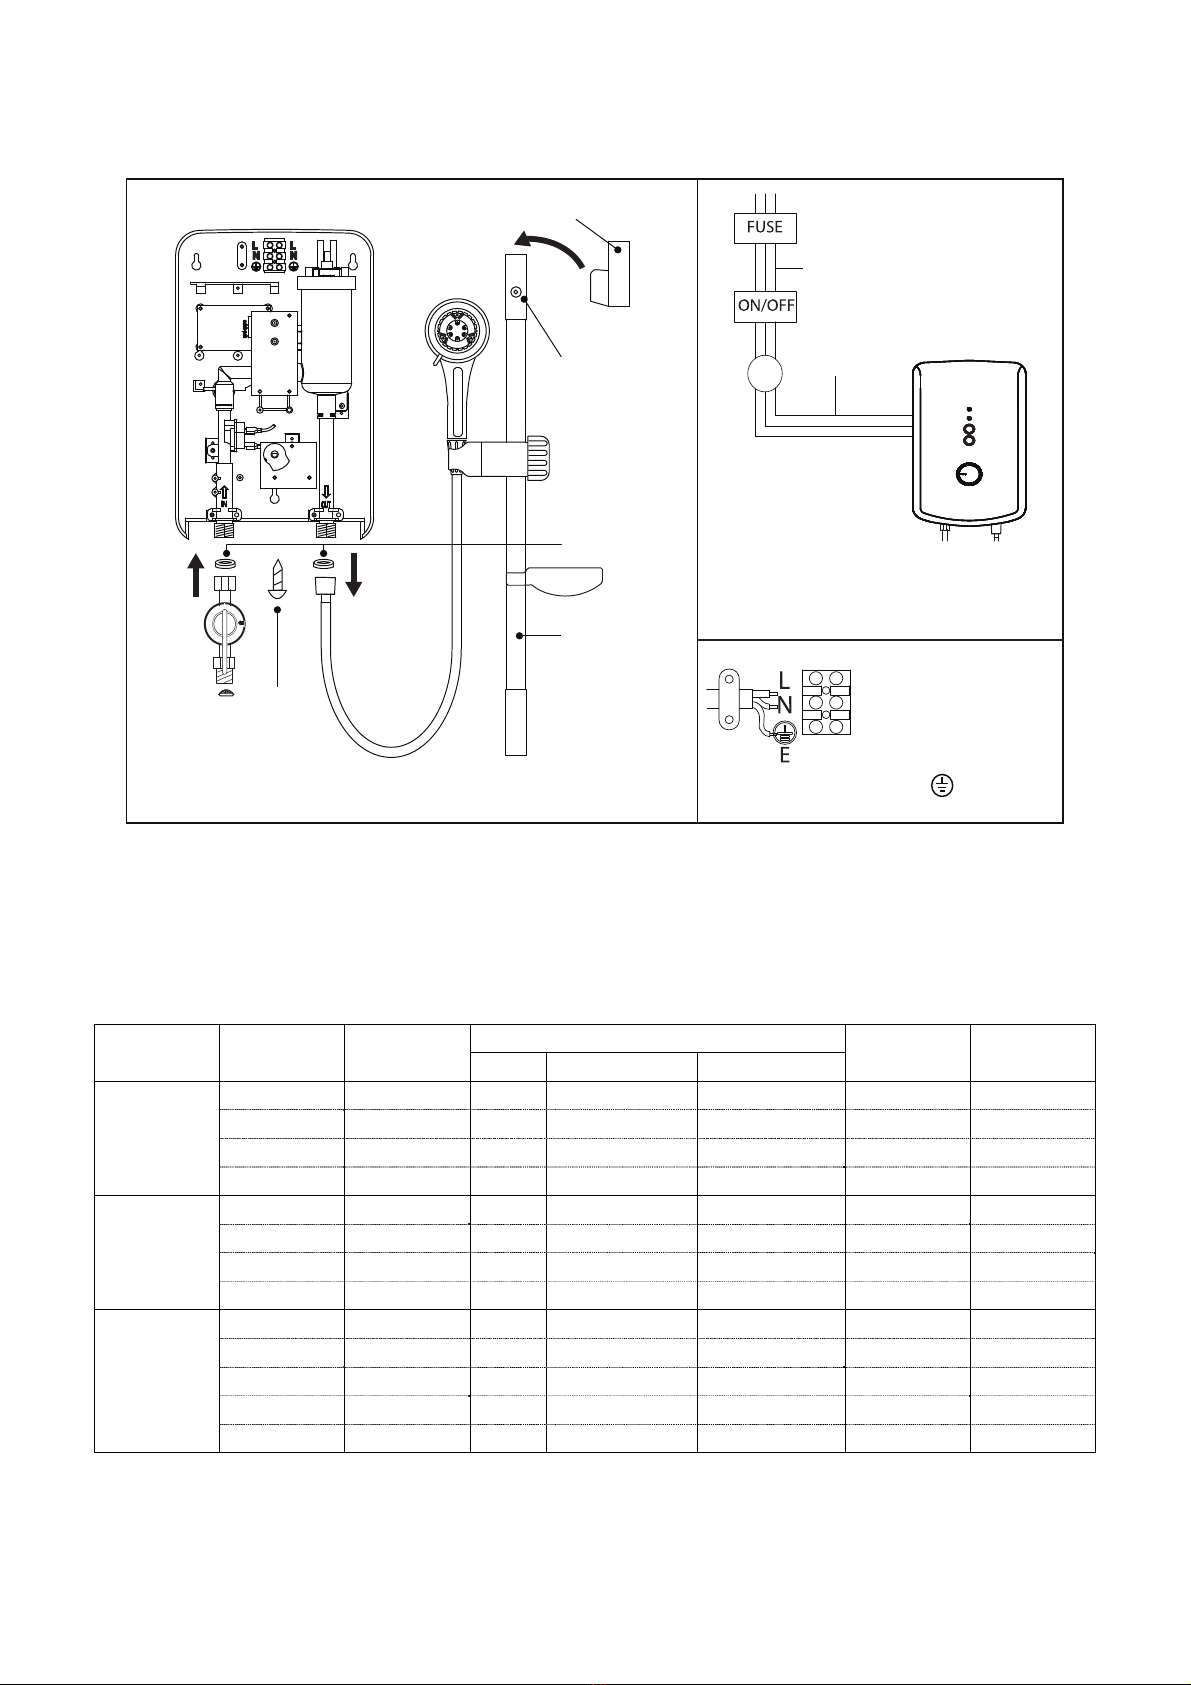
InstallationProcedures
HeaterInstallation
1. Selectasuitablepositioninthebathroom.
2. RemovethescrewatthebottomoftheHeater.
3. RemovetheFrontCoverbyliftingthebottomupward.
4. Markthe3mountingpointsoftheHeaterBaseonthewall.
NOTE:TheHeaterpositionshouldbe1.5mabovethebathroomfloor.
5. Drillthe3holesto34mmdepthwith6mmdiameterdrillbit.
6. InsertthewallplugsandmounttheHeaterfirmlyinpositionwiththescrewsprovided.
AccessoriesInstallation
1. FixtheSoapDish,AdjustableShowerHolderandRailSupports(topandbottom)ontheSliderRail.
2. Markthe2mountingpointsoftheSliderRailSetbesidetheHeater.
NOTE:ItisrecommendedthetopportionoftheRailSupportisinlevelornothigherthanthetopof
theHeater.
3. Drill2holesandmounttheShowerAccessorieswithwallplugsandscrewsprovided.
4. InserttheRailSupportCoversontotheRailSupports.
HeaterInletandOutletConnection
ThisHeaterisasinglepointsystemandtheWaterOutletcanonlybefittedtothePVCHoseandHand
Showersetprovided.
NOTE:Nocontrolvalveorfittingcanbefittedtothewateroutlet.
1. ConnecttheStopValvetotheHeaterInletwithRubberWasherprovided.Usepropertoolsto
tightentheconnectionandbecarefulnottobreakthePlasticNut.
2. Connecttheincomingwaterpipe(1/2”BSP)totheStopValve.
MakesuretoputtheMeshFilterbetweenStopValveandincomingwaterpipe.
3. Ifinanycase,theStopValveisnotusedoromitted,makesuretoputtheMeshFilterbetweenthe
heaterinletpipeandincomingwaterpipe.
4. Turnonthewatermainstodrainoutallplumbingdirtandtofilluptheheatertank.
NOTE:Donotusewhitetapeduringinstallation.
WARNING!
Theheatertankmustbefilledupwithwaterbeforethepowersupplyisswitchedon.
Thisistopreventdamagetotheheatingelement.
5. ConnectthePVCHoseandHandShowertotheheateroutlet.BesuretoputintheRubberWasher.
6. HooktheHandShowertotheAdjustableShowerHolderandadjustittoyourdesiredposition.
7. Checkforanywaterleakage.

WARNING!
Thewaterinletandoutletmustbeinstalledcorrectly,otherwisetheHeatercannot
function.
Donotuseplumbingclementonconnection.Ifnecessary,useonlythreadorsealing
tape.
ElectricalConnection
WARNING!
Theproductmustbeearthed.Impropergroundingcouldcauseelectricalshock.
Makesuretheelectricalmainsisswitchedoffbeforecarryingoutanyelectricalwork.
RefertoWiringLoadingTableforthecorrectcablesize.
Useatleast2.5mm2doublecoatedcable.
LeadthepowercablefromtheMCBtoa“ON/OFF”doublepolelinkedswitchhavinga
contactseparationofatleast3mminallpolesoutsidethebathroom,thenleadacable
connectedtoterminalblockinsidetheunit.(seeFig.2)
1. Insertthecablethroughtherubbergrommetforsideentryorwallembeddedentry.
2. Connectthecabletoterminalblockandfullytightenthemasfollow(seeFig.3):
BROWNorRED‐‐‐LIVE(L)
BLUEorBLACK‐‐‐NEUTRAL(N)
GREENorGREEN/YELLOW‐‐‐EARTH()
WARNING!
Ensurethewiringconnectioniscorrect.
3. PullouttheTemperatureControlKnobfromtheFrontCover.
4. ReplacetheFrontCover.
5. ReplacetheTemperatureControlKnobandtightenthescrewatthebottomoftheHeater.
Screw Hole
of Rail Support
NOTE:
Refer to Wiring Loading
Table for electrical loading
and correct size of wire
conductor.
Fig. 1
Fig. 2
Fig. 3
Rubber Washers
Slider Rail Set
Brown or Red = Live (L)
Fuse Distributor Board
Miniature Circuit Breaker (MCB)
Double PVC cable over 2.5mm2
ON/OFF Double Pole Switch
Cable
Green or Green/Yellow
= Earth ( )
Blue or Black = Neutral (N)
Screw
INLET OUTLET
Rail Support Cover
WiringLoadingTable
Voltage(AC)Power(kW)Current(A)ConductorSize(csa)On/Off
Switch(A)
Fuse/MCB
(A)
mm2ConduitCableFlexibleCable
240V~
50/60Hz
3.313.82.57/0.67mm50/0.25mm2016
3.615.02.57/0.67mm50/0.25mm2020
4.016.72.57/0.67mm50/0.25mm2020
5.020.84.07/0.85mm56/0.30mm3232
230V~
50/60Hz
3.013.02.57/0.67mm50/0.25mm2016
3.314.32.57/0.67mm50/0.25mm2016
4.017.42.57/0.67mm50/0.25mm3220
5.021.84.07/0.85mm56/0.30mm3232
220V~
50/60Hz
2.410.92.57/0.67mm50/0.25mm2016
3.515.92.57/0.67mm50/0.25mm2020
4.520.52.57/0.67mm50/0.25mm3232
5.525.04.07/0.85mm56/0.30mm3232
6.027.34.07/0.85mm56/0.30mm3232
TestRun
1. TurnonthewatersupplyandStopValve,thewaterwillflowthroughtheHandShower.
2. TurntheTemperatureControlKnobto“ON”,thePOWERIndicatorLamp(RED)willturnon.The
hotwaterwillcomeoutinafewseconds.Thehigherthetemperatureindicatorposition,the
warmeristhewatertemperature.
3. Theshowermightnotbehotenoughevenatthe“MAX”positioniftheincomingwatersupplyfrom
themainsistoocoldorthepressureistoohigh.Inthiscase,youcanadjusttheStopValveto
reducethewaterinflowinordertogetthedesiredwatertemperature.
4. TheheightandthedirectionoftheShowerHolderareadjustable.Bydepressingthereleasebutton
andslidetheShowerHoldertothedesiredposition.
5. MovetheHandShowertothedesiredangle.AratchetmechanismintheShowerHolderwillhold
theHandShowerinthedesiredposition.
6. ItisnotnecessarytoturntheTemperatureControlKnobto“OFF”positionwhentheHeaterisnot
inuse.
7. Switchoffthepowersupplyaftershower.
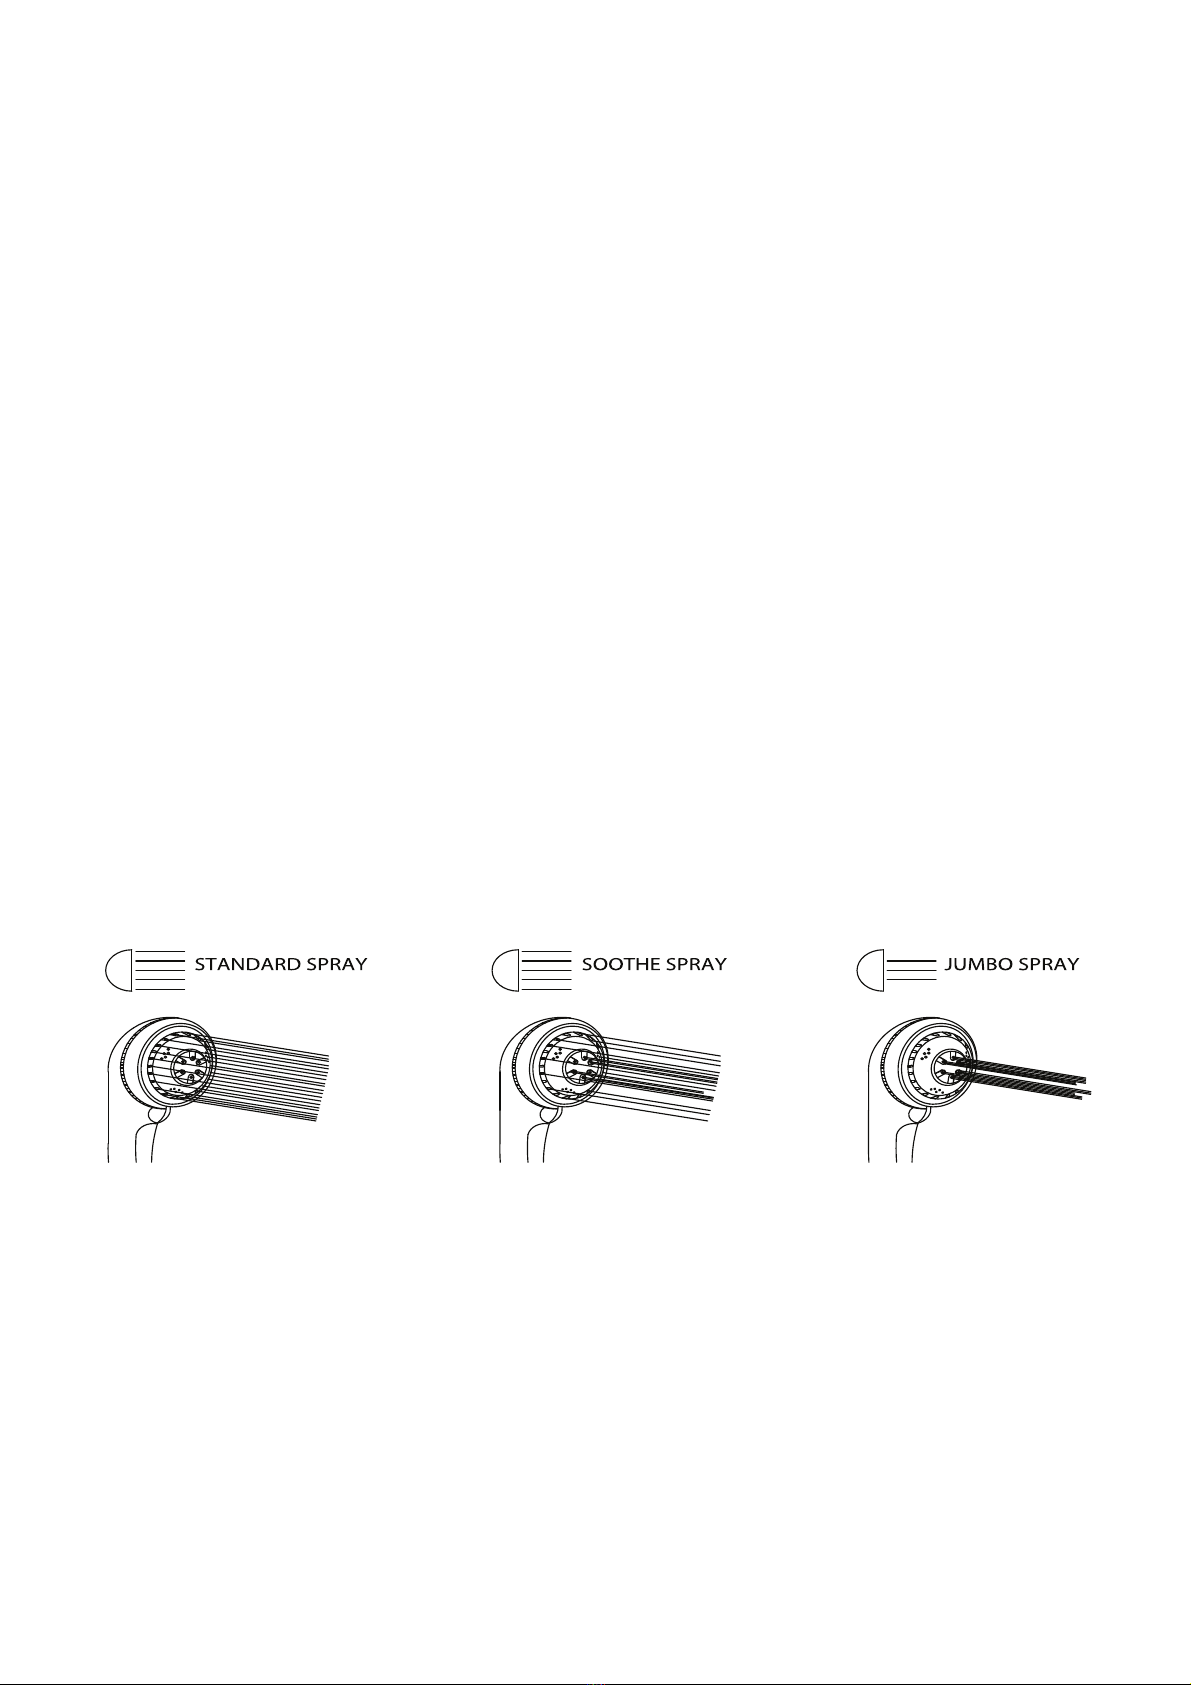
HandShowerSprayAction
TheadjustableHandShowerhas3differentsprayactions.TheyareStandard,SootheandJumbo.The
sprayactionsareillustratedasfollow.
CleaningandMaintenance
CleaningtheProduct
Useonlydampedclothwithmilddetergenttocleantheproduct.
WARNING!
Donotusethinner,benzeneorotherchemicalproducts.Usingthesesolutionsmayresultin
degradationoftheproductmaterialorcoatingremoval.
CleantheMeshFilterRegularly
CleantheMeshFilter(seeWaterHeaterOverview)regularlytopreventblockage.
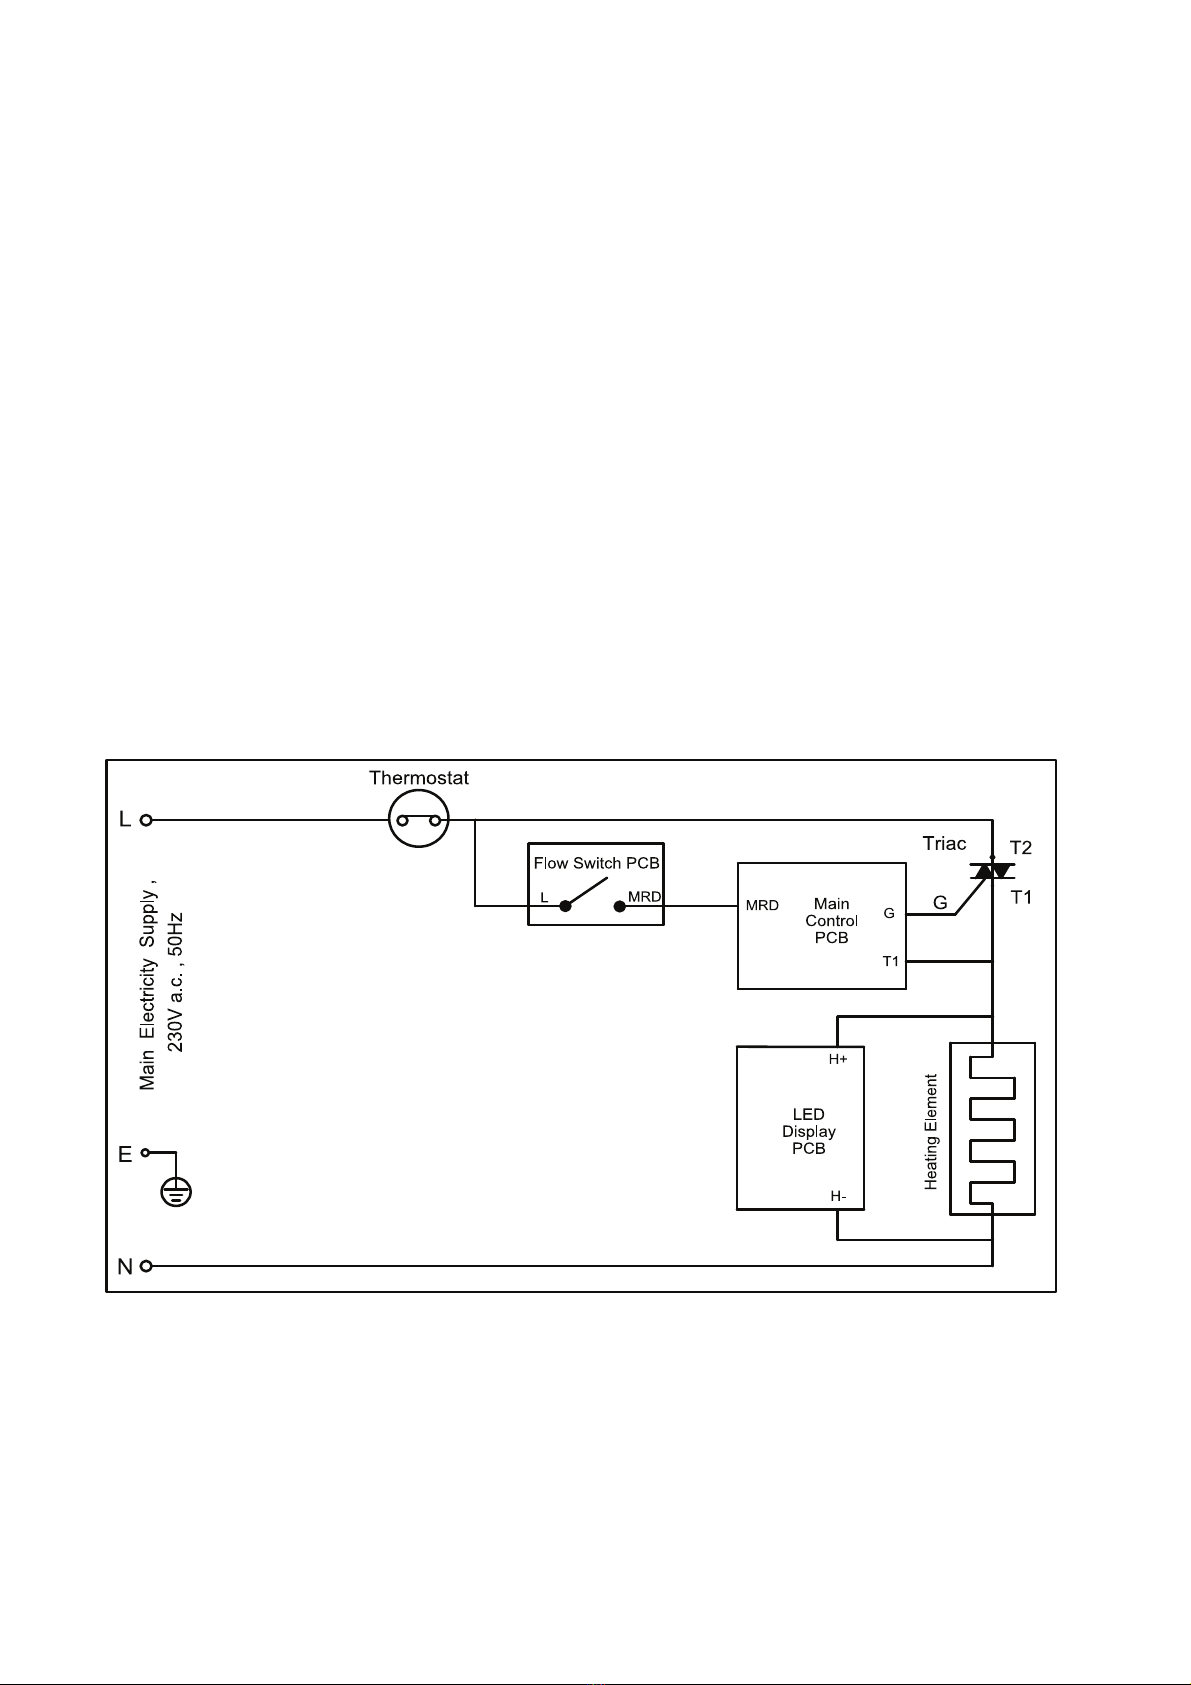
SchematicWiringDiagram

Specifications
TypeElectronicPowerControl
PowerRating3.0kW230V~50Hz
MinWaterFlowRate3.0Litres/min
MinWaterPressure0.2Bar
WaterConnection1/2”BSPSinglePointSystem
Dimension340x220x96mm
Weight3.0kg
NOTE:Thespecification,productcosmeticdesignandaccessoriespartsshownarecorrectatthetime
ofprinting.Theymaybesubjectedtochangewithoutpriornotice.

EUROPACESERVICECENTRE
No.39UbiRoad1,WorldPublicationsBuilding,#03‐00Singapore408695
Tel:(65)64573678|Fax:((65)67410728
Email:sales@strategic.com.sg
www.europace.com.sg|www.strategic.com.sg
ThisproductisdistributedbyStrategicMarketing(S)PteLtd
Ifthereisanytechnicalamendmentfortheproduct,itwillbeeditedontheupdatedversionoftheinstructionmanual
withoutpriornotice.Thepicturesshownintheinstructionmanualisonlyforillustrationpurposeonly.Iftheappearanceor
colouroftheproductismodified,pleaserefertotheactualapplianceasastandard.

Table of contents
Other EuropAce Water Heater manuals


Popular Water Heater manuals by other brands


Widney
Widney JSG12ST-S25 Installer manual

John Wood
John Wood G65 Installation, operation and maintenance instructions manual

Webasto
Webasto Thermo Top Pro 120 Workshop manual

Black & Decker
Black & Decker BD-18-DWH manual

Rinnai
Rinnai INFINITY 26 Operation & installation manual

Atlantic
Atlantic SWH 10A M-N1 instruction manual

Noritz
Noritz EcoTOUGH NRC661A-DV owner's guide

Santon
Santon PremierPlus 100 Installation and servicing instructions

ACV
ACV SmartLine SLE160 Installation instruction

UL
UL SW4D Installation and operation manual

STIEBEL ELTRON
STIEBEL ELTRON DHC-E 8/10 Operation and installation

clage
clage DCX 12 Next L Operating and installation instructions