Eurotech ED-R190-98 User manual

EUROTECH 37CM
CYLINDRICAL
RANGEHOOD
ED-R190-98
INSTRUCTION MANUAL
PLEASE READ THIS MANUAL CAREFULLY BEFORE
USING YOUR PRODUCT AND KEEP IT FOR FUTURE
REFERENCE.

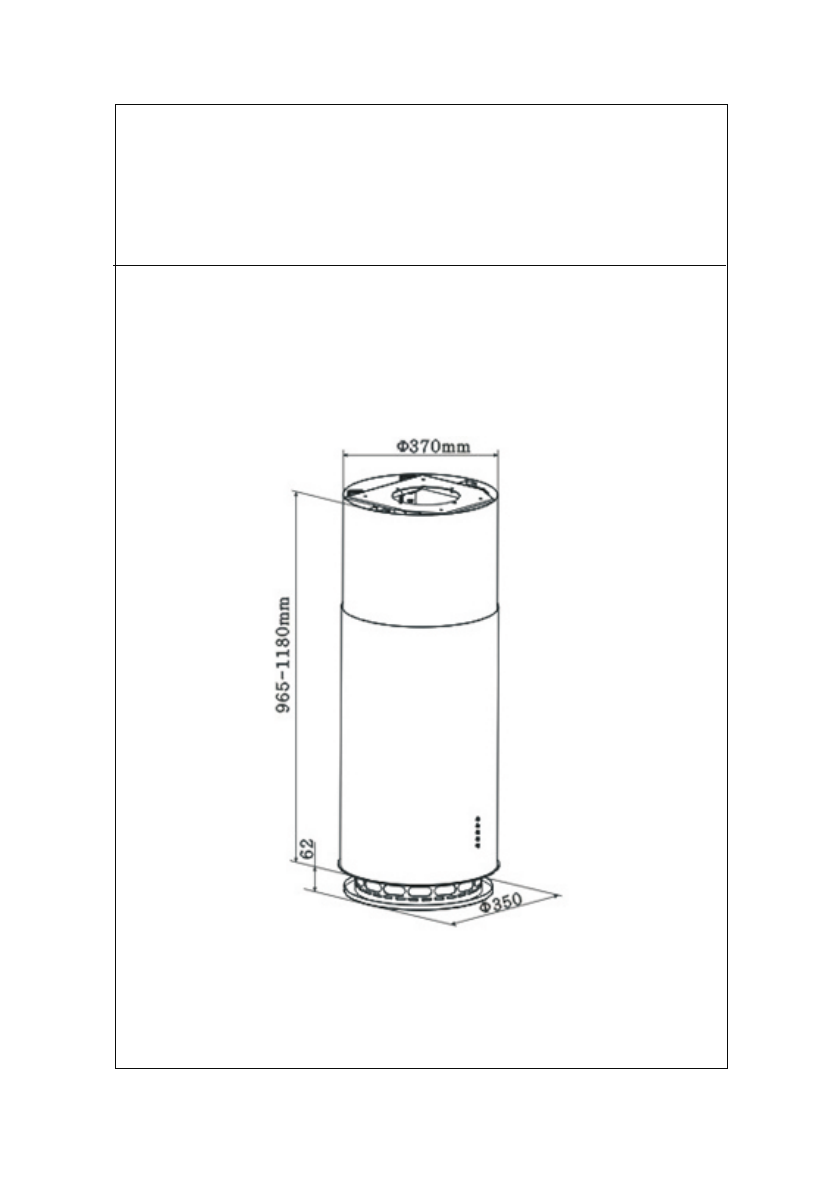
Installation Diagram

Introduction……………………............….1
Features………………………….......…...2
Installation……………………........…......2
Installation Procedure….............................4
How To Use………………….......………..5
Lamp Change………………….........…..…6
Safety Information……………............…….7
Troubleshooting……………….............…..8
Specifications……………..............……...9
Electrical Diagram
Cleaning & Maintenance………...............….10
Warranty………………….......…….…….10
..........…......................9
Contents

1
1.1 This appliance has been manufactured with materials and
processes that respect the environment. We hope that you will
continue this important consideration in the operation of this
appliance & the disposal of the packaging materials, thank you.
1.2 The installation work must be undertaken by a qualified tech-
nician experienced in cooker hood installation. Please connect
the correct power rating.
1.3 The manufacturer disclaims all liability for any damage or
injury caused as a result of not following the instructions for in-
stallation contained in the following text.
1.4 The appliance is not intended for use by young children or
infirm persons without supervision.
1.5 Young children should be supervised to ensure that they do
not play with the appliance.
1.6 The maximum number of hobs covered by range hood
should not exceed 5.
1.7 Any modifications to the appliance, electric wire and plug is
dangerous & voids the warranty.
1
Introduction

2.1 This appliance is manufactured from top quality materials,
and offers superb streamlined effects.
2.2 With high suction power and low noise, it is designed to re-
move cooking fumes from your kitchen quietly & effectively.
3.1 The range hood should be mounted at a distance of 650-
750mm from the cooking surface for safety & optimum perfor-
mance (If the instructions for installation of the gas hob specify a
greater distance, this has to be taken into account.) (see pic1). That
exhaust air must not be discharged into a flue which is used for
exhausting fumes from other appliances burning gas or other fu-
els.
12
Features
Installation
3.2 This item should be fitted by a or fitter
who should only use the right screw fixing where applies.
Competent person
3.3 Ensure that the ceiling to be installed on is sufficiently sturdy to
handle the weight of the hood.
3.4 Check that the hood is level and that it does not vibrate ex-
cessively when in operation.
3.5 Do not connect to a common vent with other appliance such as
gas heater, water heater, laundry dryer etc.

3.6 Check to make sure that the electric chord is not in contact with
sharp edges of the appliance.
3.7 Be sure that the plug is accessible after installation.
1
3
pic1

4
Installation Procedure
4.1 Take out the whole subassembly from the package box. The
hood should stand upside down (see pic 2).
4.2 Detach the lamp panel and front fixed board of glass( see pic
3).
4.3 Attach the canopy with screws which are unfastened( see pic
4).
4.4 Adjust the brackets to the desired height.
4.5 Install the duct on the air outlet( see pic5-1).
4.6 Lift up the hood and mount the ceiling frame to the ceiling
ensuring that it is sturdy enough to handle the weight of the hood.
The connect the power and ducting system ( see pic 5-2& pic5-
3).
4.7 Slide the inner flue upwards slowly & carefully to avoid
scratch. Secure the position with 2 screws onto the ceiling frame (
see pic5-4).
pic2 pic3 pic4 pic5

15
3 Speed adjustment (see pic 6)
Push the Low button, and the motor runs at low speed .
Push the Mid button, and the motor runs at mid speed .
Push the High button, and the motor runs at mid speed.
Push the Light button, and the four lighting lamps illuminate. Push
it again and the lamp will turn off
How To Use
Pic 6
Mood light (optional)—Push the Light button for 3 second long,
and the mood light will illuminate, then push it again to
change the mood light color. To turn off the mood light, push
the Light button for 3 second long again.
Push Stop button, and the motor will stop .
5

Lamp Change
16
As with any maintenance on the appliance, first turn off the power
supply by unplugging from the wall socket.
1.Take out the lamp panel.
2.Detach the low-voltage electric connector.
3.Press the lamp’s clip to take out the lamp holder (see pic 7).
4.Replace the lamp (LED Lamp Max.1.5W) and then reinstall in the
reverse manner.
pic 7

There must permanent & adequate ventilation of the room
when operating the range hood with appliances burning gas
or other fuels.
Do not check the status of the filters when the range hood is
operating, wait at least 30 minutes after switching off to avoid
scalding.
Do not touch the (Halogen) light within 30 minutes after appli-
ance use.
Avoid operating a gas cooker when there is no pan on the stove,
it is a fire hazard and may cause damage to the hood filters.
Disconnect the electrical plug prior to any maintenance.
This appliance is not intended for use by young children and
persons unless they have been adequately supervised by a
responsible person to ensure that they can use the appliance
safely.
The range hood is for home use only and is not suitable for out-
door, barbecue, and other commercial applications.
The range hood and its filter should be cleaned regularly for
best performance. Excessive grease will impede airflow and
may cause the motor to overheat.
Before cleaning, please confirm that the power is switched off.
Building regulations concerning the discharge of exhaust air
have to be fulfilled.
Don’t cook with an open flame under the range hood.
For any technical issues ensure that a suitably qualified person
effects any repairs or inspection.
17
Safety Information

If any problem occurs, please detach the plug from the socket and
contact the manufacturer or its service agent or a similarly quali-
fied person in order to avoid a hazard.
18
Troubleshooting
Detach flue and duct then
turn on the hood to check
if the valve opens
Plug another appliance
into the socket to confirm
there is power supply
Review the installation
instructions & check the
installation again for
loose screws, brackets or
connections
Check that the distance is
between 650mm to
700mm
Clean the filters from
grease residue and replace
after drying.

19
Specifications
Rated Input
Rated Power
Lighting Power
Motor Power
Capacity
Outlet diameter
220V~240V,50Hz
151W
1.5Wx4,7WX1
138W
≥760m3/h
150mm
Electrical Diagram

This cooker hood covered by a 12 months warranty
against manufacturing defects. The warranty does not
cover normal wear and tear or product abuse by the con-
sumer.
Note Removal of the plug will VOID any warranty on
your item. Please point this out to the company or per-
son fitting the item.
110
Warranty
10.1 Clean the surface of hood every week with mild soap or de-
tergent . Avoid solvents, acid, alkali, scouring pads or powders
that could irreparably damage the stainless steel surface.
10.2 The grease filters may be washed using mild soap, detergent
or degreasing agent.
10.3 Charcoal filters cannot be cleaned and must be generally
replaced after 6 months of use.
Warning: Before cleaning, please ensure that the power is
switched off by detaching the plug from the wall socket.
Cleaning & Maintenance
Table of contents
Other Eurotech Ventilation Hood manuals