EUROVAC II Installation and operation manual

EUROVAC II
OPERATING & MAINTENANCE MANUAL
COMPACT PORTABLE SANDING SYSTEM
1-800-265-3878

COMPACT PORTABLE
Operating& Maintenance Instructions
EUROVAC INC. 2
EUROVAC II 50-179 (COMPACT PORTABLE SANDING VACUUM SYSTEM)
FORWARD:
With proper care and attention, your portable vacuum will provide maximum
performance and long service. We are sure it will be one of your most valued assets. Our
interest in the successful operation of your portable continues throughout the life of the unit.
We want it to serve you well. For that reason, please feel free to discuss any problem that you
may encounter with its operation or performance. It will be a pleasure to serve you.
INTRODUCTION:
Eurovac has the perfect solution for elimination sanding dust at the source. Eurovac
construction is the most advanced self-contained dust collector in the market place to date.
The compact construction allows the operator free movement. As a result, sanding is more
efficient, cost effective and less hazardous.
INSTALLING AIR SUPPLY:
One of the best features of the 50-179 portable is an automatic activation system that
will turn the unit on and off with the air tool (not provide) used with your system. To
accomplish this, a compressed air supply must be routed through the portable. A minimum ½”
air supply line using 3/8” I.D. disconnect (not provided) is required on supply side in order to
run two tools simultaneously. Air must be free of dirt and moisture and should be lubricated
regularly (once a day). ¼” I.D. disconnects can be used where compressed air exits. It is very
important air is clean and dry. Install disconnects onto air line of vacuum hoses provided
(minimum ¼” I.D.)
OPERATION:
You are now ready to use your new portable. Plug main power cord into a dedicated
15A 120V circuit. There can be no other electrical equipment plugged into this circuit.
Vacuum system requires all of the power and additional electrical components plugged into the
circuit may blow the fuses/circuit breaker in your main power supply. Plug air tool into hose
(tool must be converted to the type used for vacuum sanding). Test function of automatic
control system by depressing and releasing trigger on your air tool. There is a manual over-
ride power switch located on top of control panel. This way the portable can be used for
straight vacuum cleaning. Since the filter will clog very quickly, it will need cleaning. Contact
factory or your local jobber for any cleaning hoses/tools you may require.
COMPACT PORTABLE
Operating& Maintenance Instructions
EUROVAC INC. 3
MAINTENANCE:
To ensure proper function and long life of your portable, it must be maintained on a daily
basis (or every 8 hours of use). Empty canister by placing foot underneath the can and
unlatching the two latches. Remove gasket and motor housing and set aside. Dump the
debris to a suitable container and then put everything back together. Make sure that gasket
lines up 100% with rim of can. Re-attach can once again ensuring that gasket lines up 100%
with rim of separator canister. Failure to follow these instructions will result in poor
performance and premature wear of gasket and latches.
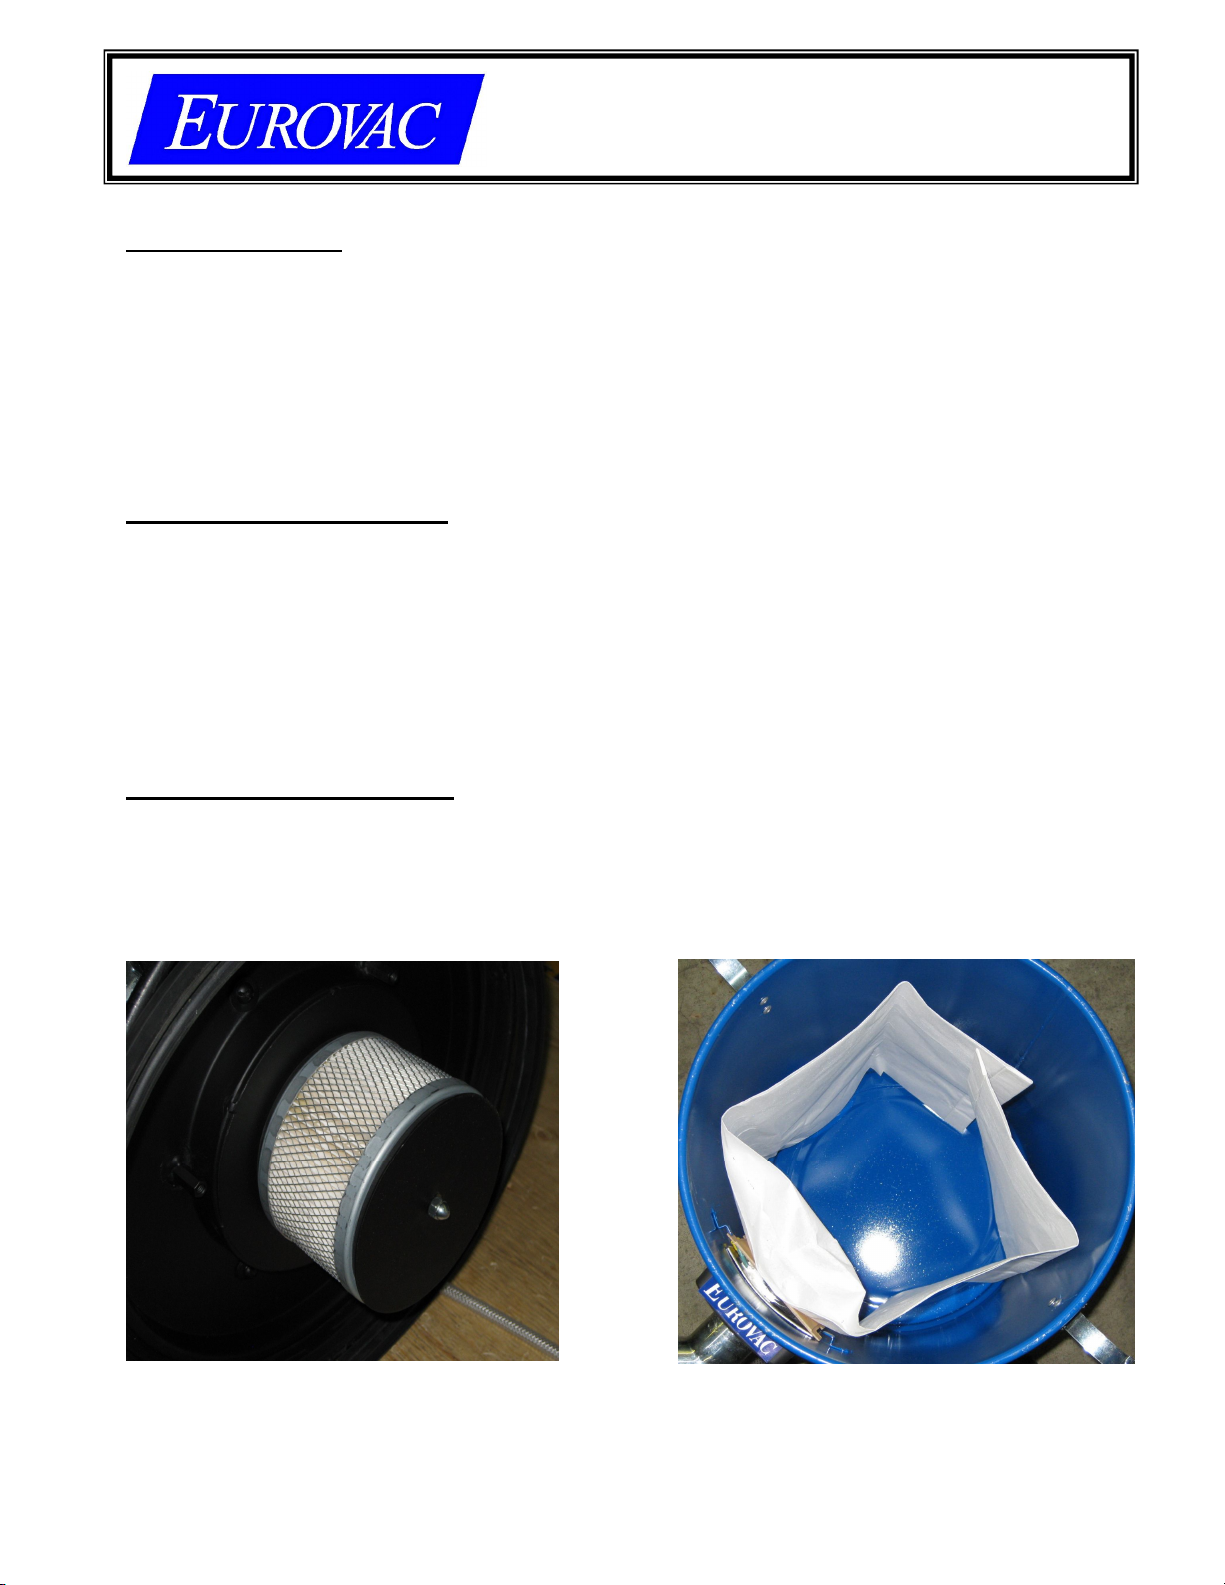
FILTER MAINTENANCE:
Before removing filter, slap side of the can to dislodge any heavy dirt particles.
Unclamp motor housing and set aside. Remove hepa filter (fig. 1) slowly and hold filter inside
a garbage can and gently bang edge of bottom of plate of filter against garbage can. Continue
until all dirt is dislodged. Filter can also be vacuum cleaned. The other filter is a disposable
bag filter (Fig. 2). Replace filter into vacuum canister making sure it is properly centered, and
re-attach motor housing. Make sure that gasket is clean and free of any debris before
reinstalling.
FILTER REPLACEMENT:
If filter becomes completely clogged and will not come clean, it will be necessary to
replace filter. It can be purchased from your Eurovac distributor or directly from factory if
necessary. Your new filter must have the same gasket as the one attached to the filter that
came with your unit. Attach filter in reverse order of removal.
Fig. 1 Fig. 2
COMPACT PORTABLE
Operating& Maintenance Instructions
EUROVAC INC. 4

COMPACT PORTABLE
Operating& Maintenance Instructions
EUROVAC INC. 5
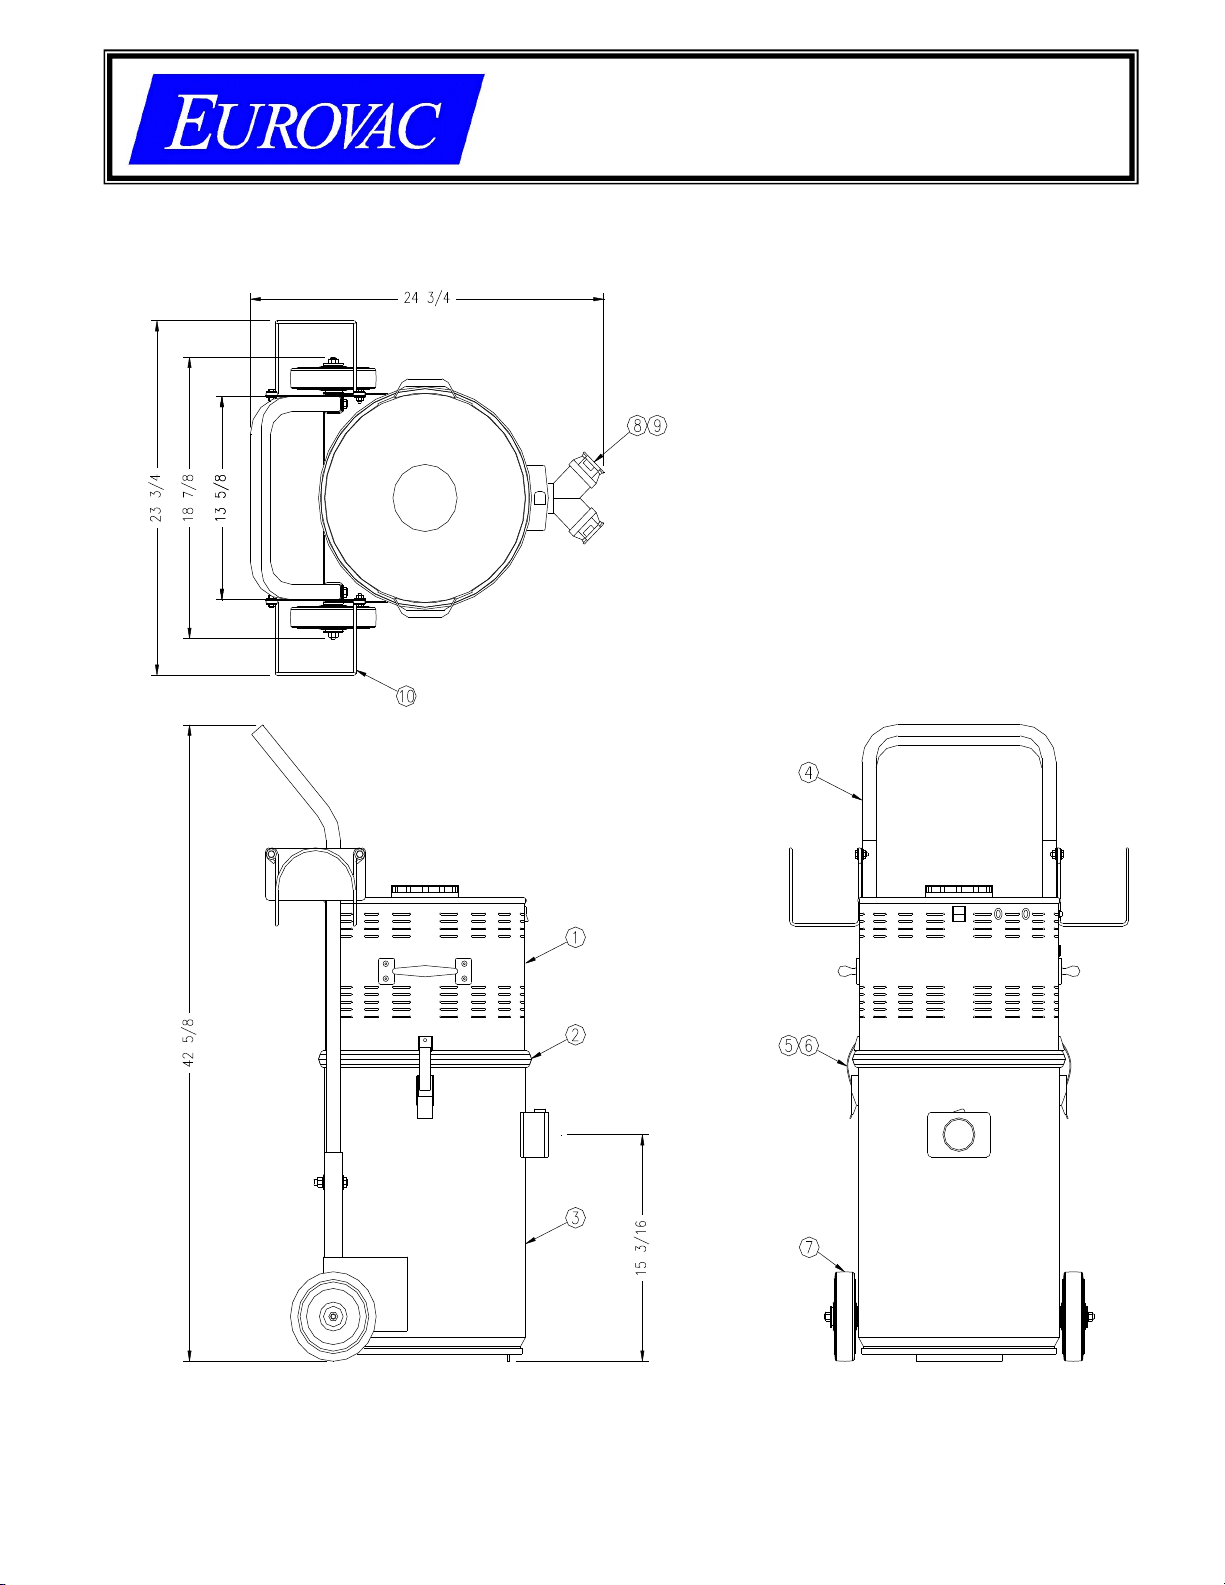
PART # DESCRIPTION QTY:
1 18000201 Motor Housing 1
2 BRECG014 Bottom 14" Can/Cone Gasket x 45" LG. 1
3 COM PORT-01 Can Assembly 1
4 COM PORT-03 1" sq. x 39" x 14" Handle 1
6 67104110 Series 60 Latch Keeper 1
7 60120110 Series 60 Overcenter Draw Latch 1
8 55014HNS Short double work station 1
9 ZE20150N 1-1/2" I.D. x 2" I.D. inlet valve 2
10 45000000 Chrome hose hanger 2
Consumable Parts:
Bag Filter 10/pkg. 57-5017910G
Hepa Filter 50-134
Motor 50-109
Carbon Brushes 50-115
COMPACT PORTABLE
Operating& Maintenance Instructions
EUROVAC INC. 6
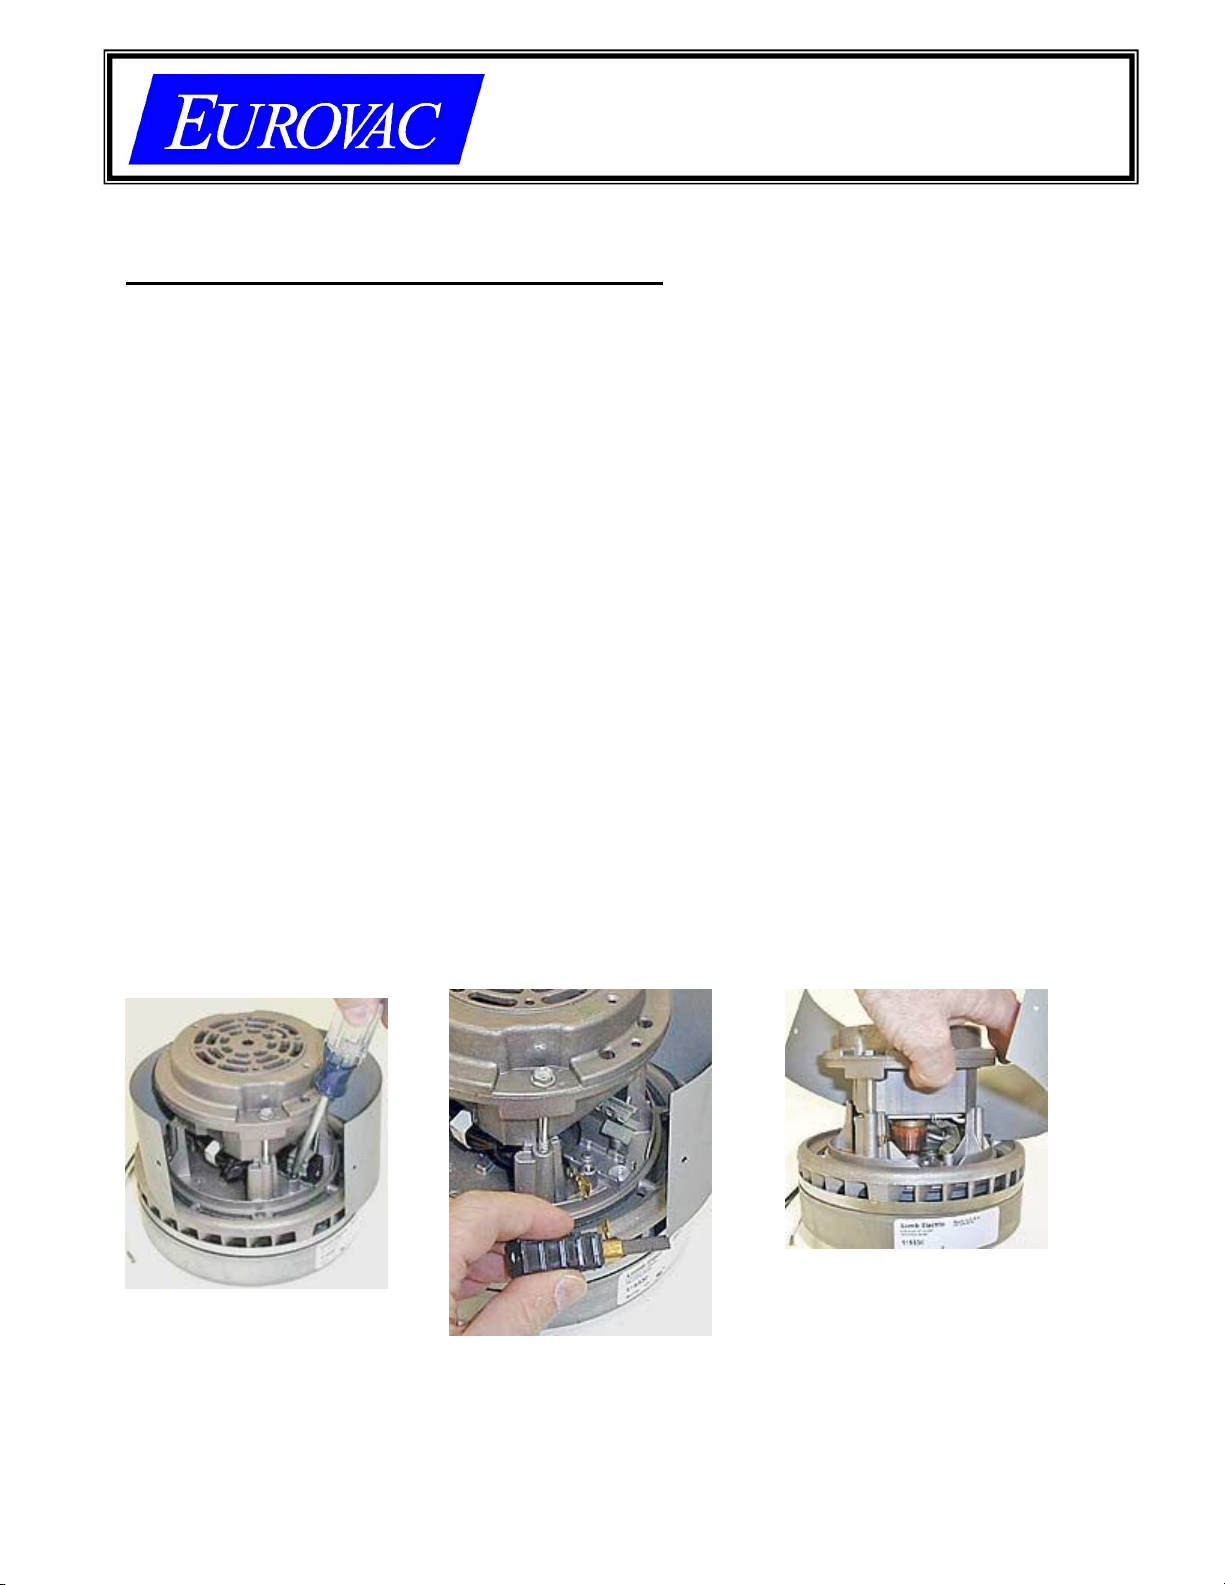
INSTALLATION OF CARBON BRUSHES:
1. Remove the top crown of motor housing, which is held by three screws.
2. Disconnect wiring to motor and mark wires noting where to reconnect wires after brush
replacement has been completed.
3. Locate the two screws that secure the top mounting cowl of the motor and mark the
position of the screws in the slots of the cow.
4. Remove top mounting cowl of motor, which is held by two screws.
5. Remove load spring.
6. Remove top bearing disc.
7. Mark the position of the field coil on one of the support posts to insure proper
reassembly.
8. Lift wrap around band up and over field coil and bearing. To get more room to lift band,
feed wires back through plastic bushing.
9. Remove two brush clamp screws and the brush clamp.
10.To remove clip from carbon brush holder. (Fig. 4, 5 & 6)
a) Use pliers on clip lead and wiggle back and forth until there is as little space in
between the carbon brush holder and the wire, which is fastened to the clip.
b) Use a flat blade screwdriver. Put blade in between holder and wire and pry
forward until you can remove clip with pliers.
11.If the above step does not work, one must break the plastic holder for the carbon brush
to retrieve clip and wire from old holder.
12.Install clip in new brush holder and reassemble in the reverse order described above
using the marks to align the field coil and top mounting cowl properly and finally mount
the filter unit to the top of the motor.
Fig. 4 Fig. 5 Fig. 6

COMPACT PORTABLE
Operating& Maintenance Instructions
EUROVAC INC. 7
This manual suits for next models
1
Table of contents


