Ever Sharp Technology ES2020 User manual

永匯豐科技有限公司
Ever Sharp Technology, Inc
INNOVATION TECHNOLOGY ADVANCES WORKFLOW
http://www.eversharp.com.tw
ES2020 Precise Glue Dispenser Manual
1. Package contains the following items:
zES2020 Precise Glue Dispenser
zPower Cord
zAir Pressure Connector
zBarrel Adapter Set
zStartup Kit
zFoot Pedal or Finger Switch
2. Hardware Setup:
a. Please connect theAir Pressure Connector on the back of the system to the nearby air compressor line.
b. Connect the Foot Pedal on the back of the system or Finger Switch on the front of the system.
c. Fill the dispensing barrel with adhesive up to 2/3 full and adapt with barrel adapter. Connect the adapter to the
front of the system.
d. If you are using Finger Switch, please stick the switch on the dispensing barrel.
e. Connect the Power Cord on the back of the system and switch the power on. Please make sure all the display
and light indicator are working properly. (110V-240V full voltage)
f. Install the dispensing barrel with appropriate needle and adjust with appropriate air pressure and vacuum.
(Please refer to Table 1)

永匯豐科技有限公司
Ever Sharp Technology, Inc
INNOVATION TECHNOLOGY ADVANCES WORKFLOW
http://www.eversharp.com.tw
Watery Low viscosity Middle to High viscosity Barrel adapter assembly
Table 1:Air pressure setting with appropriate needle
Adhesive Air Pressure Setting Appropriate Needle
Watery 0.1-1.0 kg/cm2 (7-15 psi) TD / TS / SS series metal needle
Low viscosity 1.5-2.0 kg/cm2 (22-30 psi) TD / TS / SS series metal needle
Middle viscosity 2.0-3.0 kg/cm2 (30-45 psi) All series needle
High viscosity 3.0-5.0 kg/cm2 (45-75 psi) TT / TL series plastic needle
* If you normally work with low viscosity adhesive with high precise dispensing, you will need to use low pressure dispenser (0-30 psi)
3. Control Setting:
1….. Pressure Indicator Display the currently air pressure in the system
2….. Pressure Regulator Adjust the air pressure in the system, increase with clockwise and
decrease with counter clockwise.
3….. Barrel Adapter Port Connect with barrel adapter, press down and rotate to adapt.
4….. Vacuum Knob Adjust the suck-back pressure in the barrel to prevent adhesive dripping,
decrease with clockwise and increase with counter clockwise.
5….. Dispense Button Press this button to activate the dispensing process
6….. Dispensing Indicator The indicator will light up during dispensing.
7….. Power Switch System main power, switch on and the power light will light up.
8….. Finger Switch Port Connect with finger switch, insert to adapt.

永匯豐科技有限公司
Ever Sharp Technology, Inc
INNOVATION TECHNOLOGY ADVANCES WORKFLOW
http://www.eversharp.com.tw
4. Operation:
a. Please refer to table 1 for appropriate needle and pressure setting.
b. If the adhesive is dripping from barrel, turn up the vacuum until it is not dripping.
c. Use the foot pedal to activate the dispensing until the adhesive fill up the needle and flow out the barrel smoothly.
If the adhesive cannot flow out the barrel please adjust the pressure or replace the needle and repeat step a
again.
d. Place the barrel 45 degree to the process object and fit the needle on top of the dispensing point.
e. Step on the foot pedal to activate the dispensing, remove to stop the dispensing. You can use the dispensing
button to activate the dispensing process as well.
5. Three main reasons that control the dispensing volume:
Needle type and size Air pressure volume Dispensing time
6. Maintenance and Precaution:
The dispenser is designed and built to be relatively maintenance free. To assure trouble free operation, the following
recommendations should be followed:
a. Make certain air supply is clean and dry.
b. Avoid turning barrels upside down or laying barrel so that material may run through air line to internal
components.
c. Avoid turning the vacuum to large and cause the generation of bubbles in the material or the material to run back
into the system.
d. If the piston inside the barrel is running up and down during the dispensing, it is mean the material has really high
viscosity and you will need to replace the piston with red or rigid piston.
e. Avoid connecting the unit to excessive moisture or solvent saturation.
f. Avoid connecting air supply exceeding 7 kg/cm2 (100 psi) and 2 kg/cm2 (30 psi) for low pressure dispenser.
g. Use only Amyl Alcohol to clean outside surface of the main housing.
h. Please take off the barrel with needle after use and rinse through solvent. If you want to save the barrel for further
use, please take off the needle and replace with safety tip (optional) or place the barrel on the barrel stand to
prevent solidification.
永匯豐科技有限公司
Ever Sharp Technology, Inc
INNOVATION TECHNOLOGY ADVANCES WORKFLOW
http://www.eversharp.com.tw
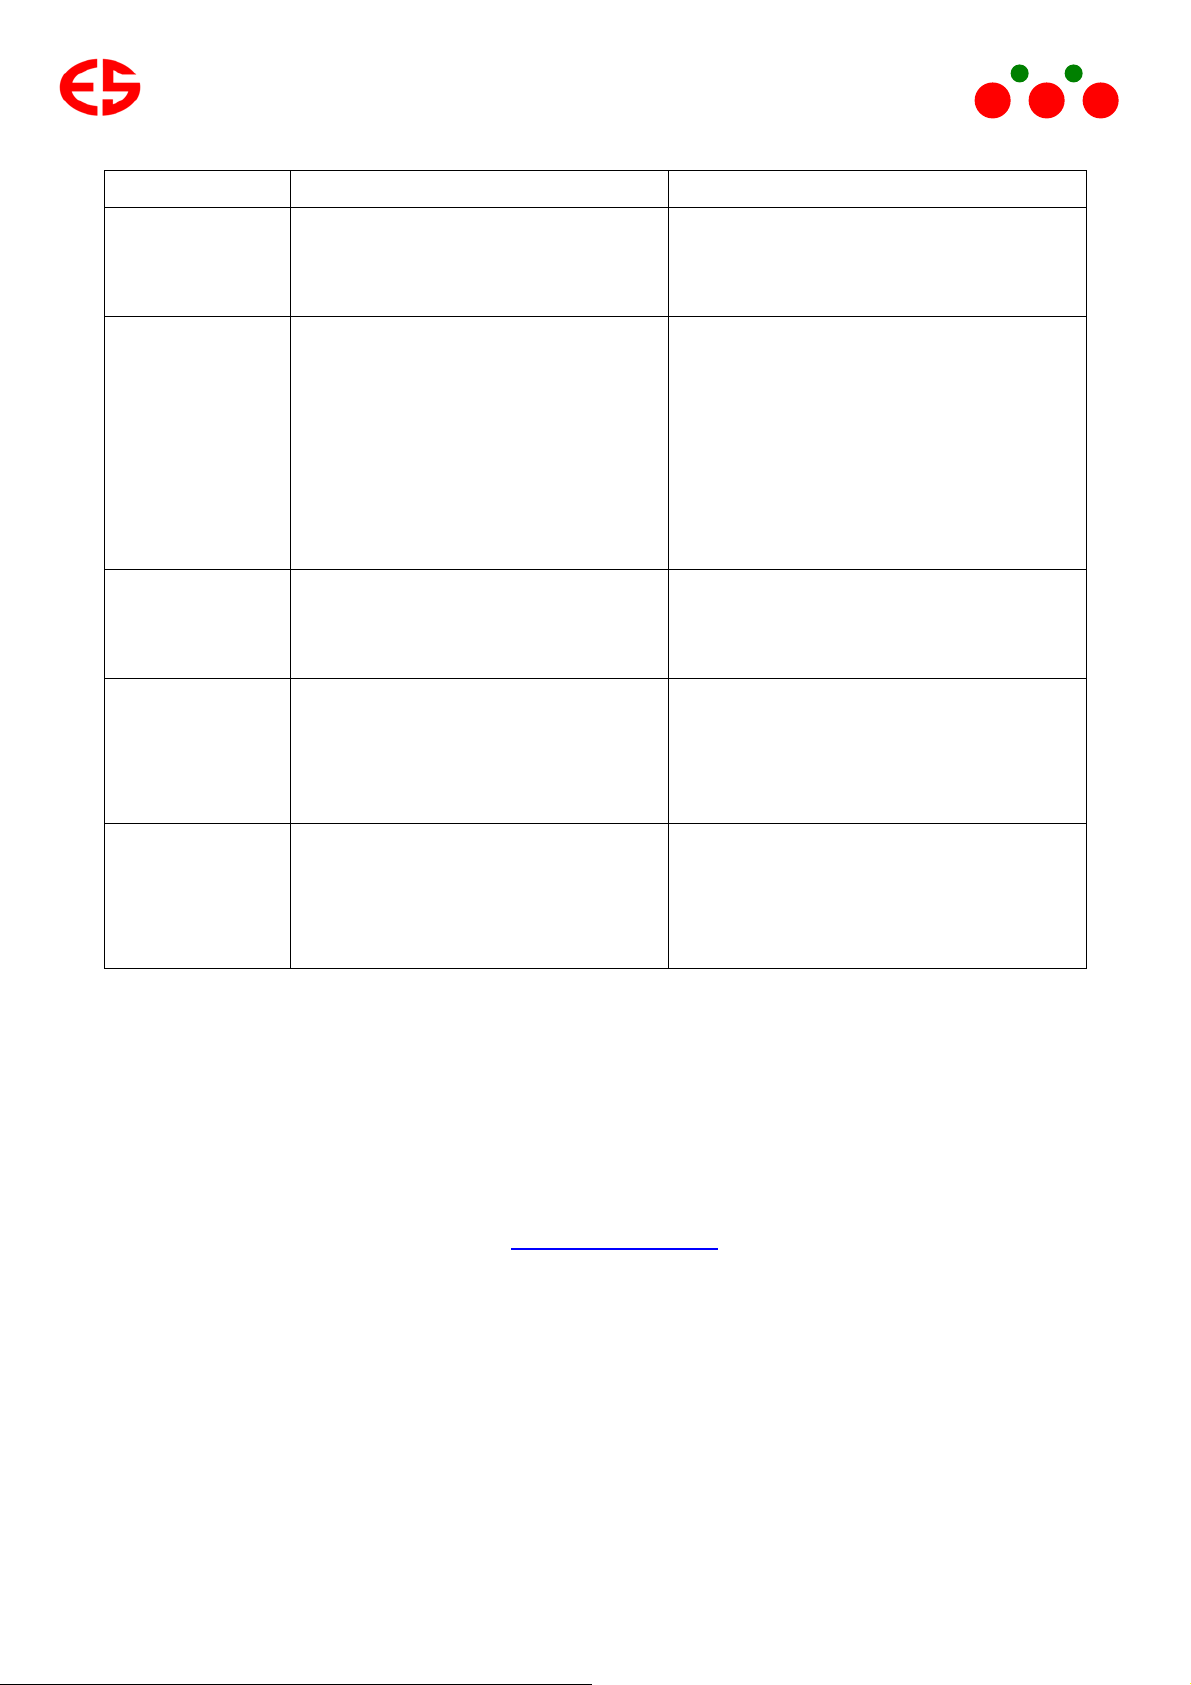
7. Troubleshooting:
Problem Possible Cause Correction
Indicator or
display does not
light
• no power input
• PCB main board damage
• check power cord connection
• turn on power
• replace new PCB main board
Cannot dispense • foot pedal not plugged in properly
• defective foot pedal
• foot pedal port broken or loosen
• defective Solenoid Valve
• check connection
• foot pedal needs to be repaired or replaced
• remove the cover and check for broken or
loosen
• replace the valve and make sure you use
the appropriate piston and do not turn the
vacuum too large
System will not
pressurize
• Insufficient air pressure
• air pressure connector not plugged in
• regulator defective
• increase air supply pressure
• check connection
• replace pressure regulator
System will not
pull vacuum
• vacuum setting is too low
• barrel piston not appropriate
• adhesive too watery or full
• increase vacuum volume
• replace with appropriate piston
• replace with different adhesive and fill only
3/4 full in the barrel
Inconsistent
dispensing
• air bubbles in adhesive
• dispensing needle not appropriate
• dispensing needle clogged
• decrease vacuum setting and de-bubble
the adhesive before filling
• replace with different type of needle
• replace needle
8. Limited warranty:
Ever Sharp warrants this product to the original purchaser for a period of one year from date of purchase to be free from
material and workmanship defects but not normal wear-and-tear, abuse and faulty installation. Defective product or
subassembly and components under warranty will be repaired or replaced (at Ever Sharp option) free of charge. Customer
with defective product under warranty must contact the nearest Ever Sharp office or distributor to secure a return
authorization prior to shipping the product to the assigned Ever Sharp authorized service center. For nearest Ever Sharp
office or distributor contact information, please visit www.eversharp.com.tw or contact our stuff. Ever Sharp reserves the
right to make engineering product changes without notice.
Other Ever Sharp Technology Dispenser manuals


Popular Dispenser manuals by other brands

Silver King
Silver King Majestic SK12MAJ Technical manual and replacement parts list

Franke
Franke F3Dn Twin Service manual

STIEBEL ELTRON
STIEBEL ELTRON UltraHot Plus Operation and installation instructions

DAN DRYER
DAN DRYER 282 installation guide

Essity
Essity Tork 473208 manual

CBS
CBS SD300BU-88 COMPONENT MAINTENANCE MANUAL WITH ILLUSTRATED PARTS LIST


