DITTING 807 User manual

www.dittingswiss.ch
807
INSTRUCTION MANUAL
807 FILTER 807
807 LAB SWEET
Overview
2
3
8
10
8
A
4
5
6
7
1
9
11
COMMERCIAL COFFEE GRINDER
2
807
807 LAB SWEET
807 FILTER

2
3
+
C
14
15
12
13
B
807 | EN
807
807 LAB SWEET
807 FILTER
E
D
16
18 17
1
COMMERCIAL COFFEE GRINDER
4

19
5
F
G
7
21
807
20
807 | EN

H
22
25
23
24
26
I
807 FILTER
COMMERCIAL COFFEE GRINDER
6
807 LAB SWEET

Contents
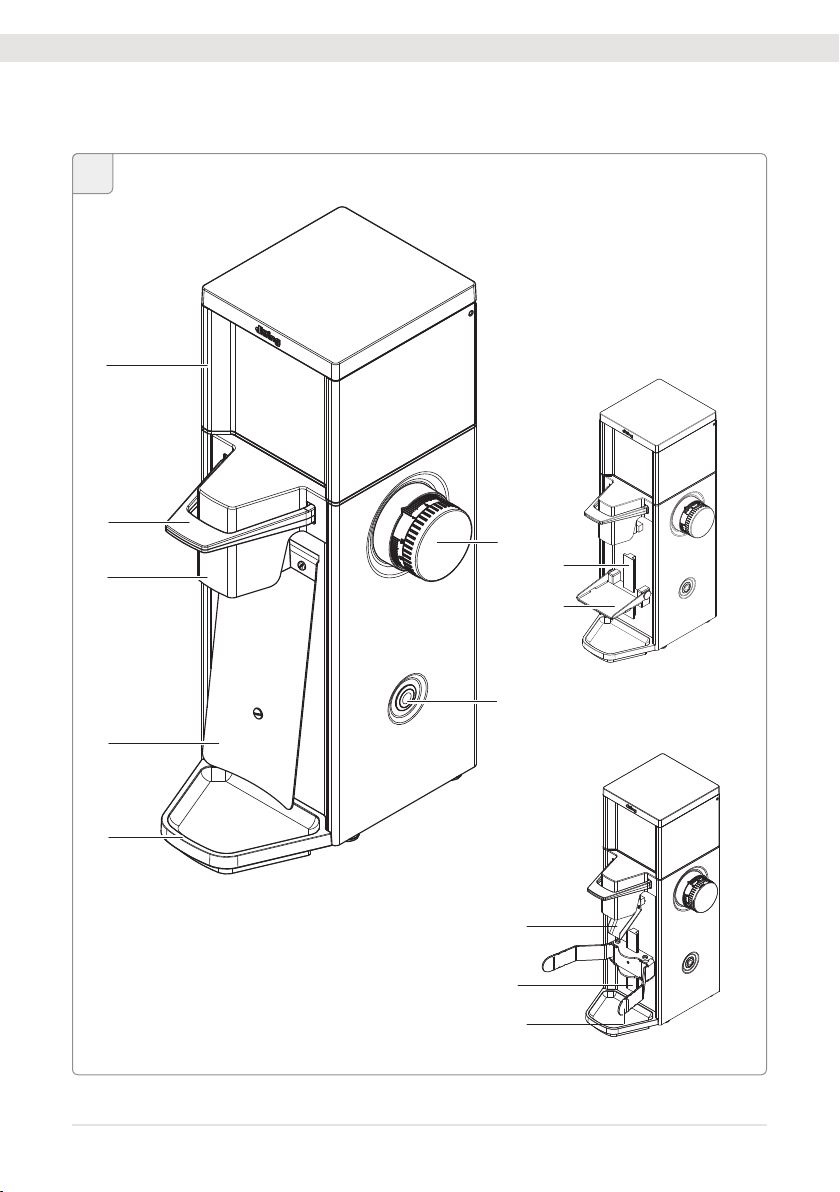
No. Name
1Bean hopper (with lid)
2Adjusng the degree of grinding
3Start buon
4Collecng tray
5Shaker plate
6Spout
7Clamping lever
8Rail
9Folding table
10 Spout guide
11 Filter basket holder
12 Fan slit
13 On/offswitch
14 Release buon (thermal overcurrent circuit-breaker)
15 Power cable (with power plug)
16 Flapper
17 Bean hopper intake
18 Integrated grinder opening
19 Locking screw for bean hopper
20 Lid holder
21 Bag holder
22 Folding table adjusng screw
23 Spout guide adjustment
24 Filter basket holder arm adjusng screw
25 Filter basket holder adjusng screw
26 Filter basket holder arm notches
7
807 | EN

Commercial coffee grinder
Inhalt
Overview ............................. 2
Package contents................. 7
General informaon ............ 9
Reading and storing the
instrucon manual........................ 9
Explanaon of symbols used ........ 9
Safety................................. 11
Intended use ............................... 11
Safety informaon ...................... 11
Before first use .................. 14
Checking the grinder and scope of
delivery........................................ 14
Seng up and connecng the
grinder......................................... 14
Seng the grinding degree ........ 16
Filling the coffee beans............... 17
Preparing the grounds container 17
Starng the grinding process...... 18
Changing the coffee variety........ 18
Cleaning............................. 19
Cleaning the surface underneath
the grinder .................................. 20
Cleaning the casing..................... 20
Cleaning the bean hopper .......... 21
Cleaning the flapper/changing the
flapper......................................... 22
Cleaning the grinding mechanism... 22
Troubleshoong ................ 24
Technical data.................... 28
Disposal ............................. 29
Disposing of the packaging......... 29
Disposing of the grinder ............. 29
Maintenance and service .. 29
EC Declaraon of Conformity 31
COMMERCIAL COFFEE GRINDER
8

General informaon
Reading and storing the instrucon manual
Before you start using the commercial coffee grinder 807, read
through this original operang manual and the safety informaon
carefully. Only then will you be able to use the commercial coffee
grinder safely and without danger. The original instrucon manual
is based on the standards and regulaons in force in the European Union.
Please also note the guidelines and laws that apply in your country.
For greater clarity, the commercial coffee grinder 807 will be referred to below
simply as the “grinder.”
Please keep this original instrucon manual safe for later quesons. Please
also pass this original instrucon manual on to subsequent owners and users
of the grinder.
Explanaon of symbols used
The following symbols and signal words are used in this original instrucon
manual, on the grinder and on the packaging.
WARNING!
This signal word/symbol indicates a moderate risk, which, if
not avoided, can lead to death or serious injury.
CAUTION!
This signal word/symbol indicates a low risk, which, if not
avoided, can lead to minor or moderate injury.
NOTE!
This signal word warns of possible material damage.
9
807 | EN

This symbol provides you with useful informaon about opera-
on or handling.
Declaraon of Conformity (see “Declaraon of Conformity”
secon):
Products marked with this symbol fulfill all applicable Community
direcves of the European Economic Area.
ETL Listed seal of approval:
Products marked with this symbol meet the requirements for
electrical product safety in the USA and Canada.
Products marked with this symbol meet the required criteria of
the NSF (Naonal Sanitaon Foundaon) in the USA and Canada
regarding cleanliness and hygiene in the food industry.
Products marked with this symbol are permied only for use
indoors.
This symbol indicates a risk of electric shock.
This symbol indicates that the grinder conforms to protecon
class I.
COMMERCIAL COFFEE GRINDER
10

Safety
Intended use
The grinder is suitable exclusively for grinding whole roasted
coffee beans. Do not use the grinder to grind other products or objects. It is
intended for commercial use and may be serviced by trained personnel only. It
may, however, be operated by other persons in a place where its use is super-
vised.
Any other use is considered unintended and can result in material damage
or even personal injury. Do not make any changes to the grinder. Neither the
manufacturer nor the supplier can accept liability for any injury or damage
resulng from failure to comply with the safety informaon.
Safety informaon
WARNING!
Risk of electric shock!
Improper use, incorrect electrical installaon or a voltage that is too
high can all lead to electric shock.
– Connect the grinder only if the supply voltage of the socket com-
plies with the informaon indicated on the type plate.
– Connect the grinder only to an easily accessible socket to allow
you to disconnect it quickly from the power supply in the event
of a malfuncon.
– Do not use the grinder if you noce any visible damage or if the
power cable or plug is faulty.
– If the grinder power cable is damaged, it must be replaced by the
manufacturer or by qualified personnel in order to avoid hazards.
– Do not operate the grinder without a ground connecon.
– Connect the grinder only to a power supply with a 16 A-slow
fuse. In the event that the power connecon at the installaon
site of the grinder is not secured in this way, have a 16 A-slow
back-up fuse fied by a qualified electrician.
– Install the grinder only in locaons where its use can be super-
vised by trained personnel.
– Do not immerse the grinder, the power cable or the power plug
11
807 | EN

in water or any other liquids.
– Do not clean the grinder with a water jet.
– Never touch the power plug with wet hands.
– Never unplug the power plug from the wall socket by pulling on
the power cable; always grip the power plug.
– Never carry the grinder by its power cable.
– Keep the grinder and power cable / power plug away from open
flames and hot surfaces.
– Do not posion the power cable in such a way that it could create
a tripping hazard.
– Do not bend the power cable and do not place it over sharp edg-
es.
– Use the grinder in indoor areas only. Never operate the grinder in
damp areas or in the rain.
– Keep children away from the grinder.
– Make sure that children do not insert any objects into the grind-
er.
– If you are not currently using the grinder, if you are cleaning it, or
if there is a malfuncon, switch the grinder offand remove the
power plug from the socket.
– Do not open the grinder casing; leave repairs to the experts. If
repairs are required, contact a specialist workshop. If unautho-
rized repairs are carried out, the connecon is not made correctly
or the grinder is operated incorrectly, all liability and warranty
claims are voided. Only parts that comply with the original appli-
ance specificaons may be used for repairs. This grinder contains
electrical and mechanical parts that are essenal for protecon
against potenal hazards.
WARNING!
Danger for children and persons with reduced physical, sensory or
mental capacies (e.g. parally disabled persons, elderly persons with
limited physical and mental capacies) or a lack of experience and
knowledge (e.g. older children).
COMMERCIAL COFFEE GRINDER
12

– This grinder may be used by children older than eight years and
by persons with reduced physical, sensory or mental disabilies
or a lack of experience and knowledge if they are supervised or
instructed on the safe use of the grinder and have understood
the resulng dangers. Children are not permied to play with the
grinder. Cleaning and user maintenance may not be carried out
by children without supervision.
– Do not leave the grinder unsupervised when in operaon.
– Do not let children play with the packaging film.
Children can become entangled in it and suffocate while playing.
– Do not let children play with the small parts. They can be
life-threatening if swallowed.
CAUTION!
Risk of pping and injury!
Incorrect handling of the grinder can result in injury.
– Lay out the power cable in such a way that nobody can become
entangled in it and cause the grinder to fall.
– Place the grinder on a level and stable surface to prevent it from
falling off.
13
807 | EN

Before first use
Checking the grinder and scope of delivery
NOTE!
Risk of damage!
Opening the packaging carelessly with a sharp knife or other pointed
objects can damage the grinder.
– Proceed very carefully when opening.
1. Remove the grinder from its packaging.
2. Check that the delivery is complete (see Fig. A, C, D, F, G, H, and I).
3. Check for damage to the grinder or any of the individual parts.
If there is any damage, do not use the grinder. Contact your supplier (see
“Maintenance and service” secon).
Please note that the grinder has undergone a comprehensive
funconal test prior to delivery and may contain ground coffee
residue.
Seng up and connecng the grinder
1. Place the grinder on a level and stable surface that does not vibrate.
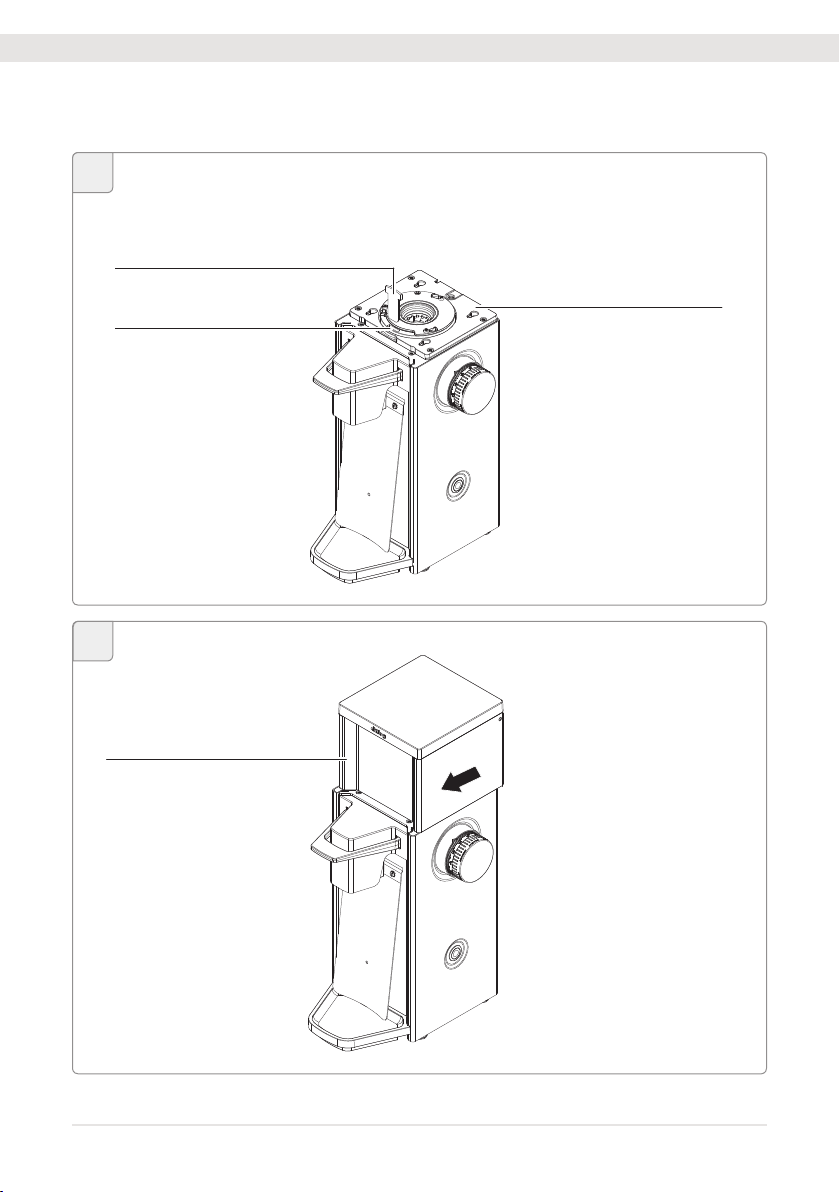
2. Posion the flapper (16) in the opening in the integrated grinder (18). (Fig. D)
3. Posion the bean hopper (1) on the bean hopper intake (17). When
posioning the bean hopper intake, ensure that the posioning pin of the
bean hopper is located in the corresponding recess in the bean hopper
intake.
4. Push the bean hopper down slightly into the bean hopper intake and push
the bean hopper forwards to lock it into place on the grinder. (Fig. E)
5. Push down the locking screw (19) for the bean hopper and ghten it clock-
wise using an appropriate tool.
6. Insert the power plug (15) into a properly installed wall socket.
COMMERCIAL COFFEE GRINDER
14

807 LAB SWEET:
Adjust the folding table (9) to the desired height using the adjusng screw (22)
(see Fig. H).
1. To do so, fold open the table vercally upwards.
2. Loosen the adjusng screw underneath the folding table and push the
table either upwards or downwards along the rail.
3. The folding table is connuously adjustable.
Aer adjusng to the desired height, secure the adjusng screw and fold
the table downwards.
Please note that the dispersion of the grounds depends on the
distance between the spout and the hopper:
The less the spacing, the less the dispersion of the coffee
grounds.
807 FILTER:
Move the filter basket holder (11) to the desired posion using the adjusng
screws (24, 25) (see Fig. I).
1. Loosen the adjusng screw of the filter basket holder in the middle and
push the holder (8) upwards or downwards along the rail.
The filter basket holder is connuously adjustable.
2. Aer adjusng to the desired height, secure the filter basket holder adjust-
ing screw.
3. Loosen the adjusng screws on both sides of the arms of the filter basket
holder.
4. Adjust the arms symmetrically according to the size of the filter holder and
secure the adjusng screw on both sides.
5. If the filter holder has a wide rim, e.g. made of plasc, loosen the adjusng
screw of the filter basket holder in the middle and pull up the holder to
remove it from the top.
6. Rotate the holder 180° degrees and put it on the rail.
7. Aer adjusng to the desired height, secure the adjusng screw.
To prevent the filter holder slipping out and/or to reduce
vibraon noise, place one O-ring in each of the notches
(26) on the filter basket holder arms.
Move the spout guide (10) from the boom to the top using gentle pressure. The
spout guide will lock into the defined posion by means of the locking mechanism.
15
807 | EN

Operaon
NOTE!
Risk of overheang!
Exceeding the maximum permissible operang cycle can cause the grinder to
overheat.
–Do not exceed the maximum operang cycle
(see “Technical data” secon).
–Observe the recommended break when the maximum permissible oper-
ang cycle is reached (see “Technical data” secon).
• The grinder has a thermal overcurrent circuit-breaker which
interrupts the electric circuit of the grinder in the event of an
electrical overload.
To put the grinder back into operaon, first set the On/Off
switch (13) to switch posion 0(off) and disconnect the power
plug (15).
Then push the release buon (14) in.
You can now plug the power plug back into the socket and put
the grinder into operaon (see “Seng up and connecng the
grinder” secon).
• The grinder also has a motor protector, which switches off
the grinder when the motor becomes too hot. As soon as
the motor has cooled down, the grinder can be put back into
operaon (see “Troubleshoong” secon).
Seng the grinding degree
• The grind adjustment’s grinding degree scale (2) displays the
desired grinding degree.
The finest seng is “1”.
1. Make sure that you have inserted the power plug (15) into a properly
installed safety socket.
2. Turn the grind adjustment (2) towards “1” for fine coffee grinding and in
the opposite direcon for coarse coffee grinding (see Fig. B).
COMMERCIAL COFFEE GRINDER
16

Filling the coffee beans
1. Open the lid of the bean hopper (1).
2. Pour whole roasted coffee beans into the bean hopper from above.
The maximum filling quanty should be approx. 1 cm below the edge of
the bean hopper.
3. Close the lid of the bean hopper.
Preparing the grounds container
Depending on the model of your grinder, prepare the right container for
collecng the coffee grounds:
807:
1. Clamp a coffee bag in the bag holder (21) between the shaker plate (5)
and the spout (6) by pulling up and holding the clamping lever (7).
2. Now put a coffee bag over the spout.
3. Release the clamping lever.
The coffee bag is clamped between the clamping lever and the shaker
plate.
4. Connue with the subsecon “Starng the grinding process”.
807 LAB SWEET:
1. Fold the folding table (9) downwards, if required, and place a grounds
container on it.
2. Adjust the height of the folding table to suit the grounds container, if re-
quired, using the adjusng screw (22) (see “Seng up and connecng the
grinder” secon).
3. Connue with the subsecon “Starng the grinding process”.
807 FILTER:
1. Place a suitable paper filter in the filter basket.
2. Adjust the posion of the filter basket holder to suit the filter basket, if
necessary using the adjusng screw (24, 25) (see “Seng up and connect-
ing the grinder” secon).
3. Hang the basket in the filter basket holder (11).
4. Connue with the subsecon “Starng the grinding process”.
17
807 | EN

Starng the grinding process
1. Start the grinding process by pressing the start buon (3).
2. The grinding is completed as soon as the grinder is idling and no grinding
noises are audible.
3. Now pump the clamping lever (7) several mes in succession by pulling up
on the clamping lever and releasing it.
Remove any grind residue scking to the grinder.
4. Switch offthe grinder by pressing the Start buon.
If you do not press the Start buon for more than 5 minutes, the grinder
will switch offautomacally.
Changing the coffee variety
1. Grind the coffee beans that remain in the grinding mechanism unl the
grinder runs idle.
2. Pour the new coffee beans into the bean hopper (1).
3. Grind 2 grams of the new coffee variety to remove any residues from the
old coffee beans and to warm up the machine.
COMMERCIAL COFFEE GRINDER
18

Cleaning
CAUTION!
Risk of injury!
The grinder can fall over and cause injury when it is being moved.
– Always place the grinder on a stable surface that will not lt.
– Ask another person for help if the grinder is too heavy.
NOTE!
Risk of short-circuit!
Water penetrang the grinder can cause a short-circuit.
– Never immerse the grinder in water or any other liquids.
– Never clean the grinder with a water jet.
– Ensure that no water or other liquids enter the casing in any
other way.
NOTE!
Risk of damage!
Improper handling can damage the grinder.
– Do not use any harsh cleaning agents or sharp or metallic clean-
ing tools such as knives, metal scouring pads or similar. These can
scratch the surface.
– Do not clean the grinder with compressed air
(e.g. with a compressed-air blow gun).
– Do not put the spill tray or the bean hopper into the dishwasher.
Otherwise, the color may fade.
– Do not lithe grinder by the bean hopper; lionly by the casing
and always with both hands.
19
807 | EN

Cleaning the surface underneath the grinder
1. Switch offthe grinder and remove the power plug (15) from the socket.
2. Lithe grinder by its casing with both hands and place it on another sur-
face that is clean.
3. Use a damp cloth to clean the surface on which the grinder is used and
the underside of the grinder (parcularly the feet of the unit); then dry
both surfaces.
They must be dry and free from oil and grease.
4. Place the grinder back onto the cleaned surface.
Cleaning the casing
1. Switch offthe grinder and remove the power plug (15) from the socket.
2. Use a brush to clean the following parts:
• Spout (6),
• Folding table (9),
• Spout guide (10),
• Filter basket holder (11),
• Adjusng screw Folding table (22), Filter basket holder adjusng screw
(25) and Spout guide adjustment (23).
3. Wipe the casing and the collecng tray (4) with a damp cloth as necessary,
but at least once a week.
807 LAB SWEET Cleaning the folding table:
1. Loosen the adjusng screw (22) underneath the folding table and pull off
the folding table (9) downwards from the rail (8).
2. Remove the an-slip mat from the folding table.
3. Clean the folding table with a brush.
4. Clean the folding table and the an-slip mat with a damp cloth and then
dry them.
5. Clean the rail with a damp cloth and then place the folding table back onto
it.
6. Aer adjusng to the desired height, secure the adjusng screw.
7. Put the an-slip mat back on the folding table.
COMMERCIAL COFFEE GRINDER
20
Other manuals for 807
1
This manual suits for next models
2
Table of contents
Popular Dispenser manuals by other brands

MTP
MTP 1700 Series user manual

Alpine
Alpine ASPEN 427-L-GRY Operation & installation manual

Grainger International
Grainger International Tough Guy 40CA23 Operating instructions manual
Kimberly-Clark PROFESSIONAL
Kimberly-Clark PROFESSIONAL ICON user guide

Bradley
Bradley Verge Crestt Series Installation and maintenance manual

FROST
FROST 135 Series specification

Grundfos
Grundfos Vaccuperm VGS-141 Installation and operating instructions

ARCA
ARCA ArcaCash 2600 Work Instruction

rosseto
rosseto EZ-SERV quick start guide

Georgia Pacific
Georgia Pacific GP PRO 59488A reference guide

Newstripe
Newstripe AeroVent 3X product manual

Brulin
Brulin SCS2 BLACK SHADOW SERIES manual


