EverDesk+ Lite Frame User manual
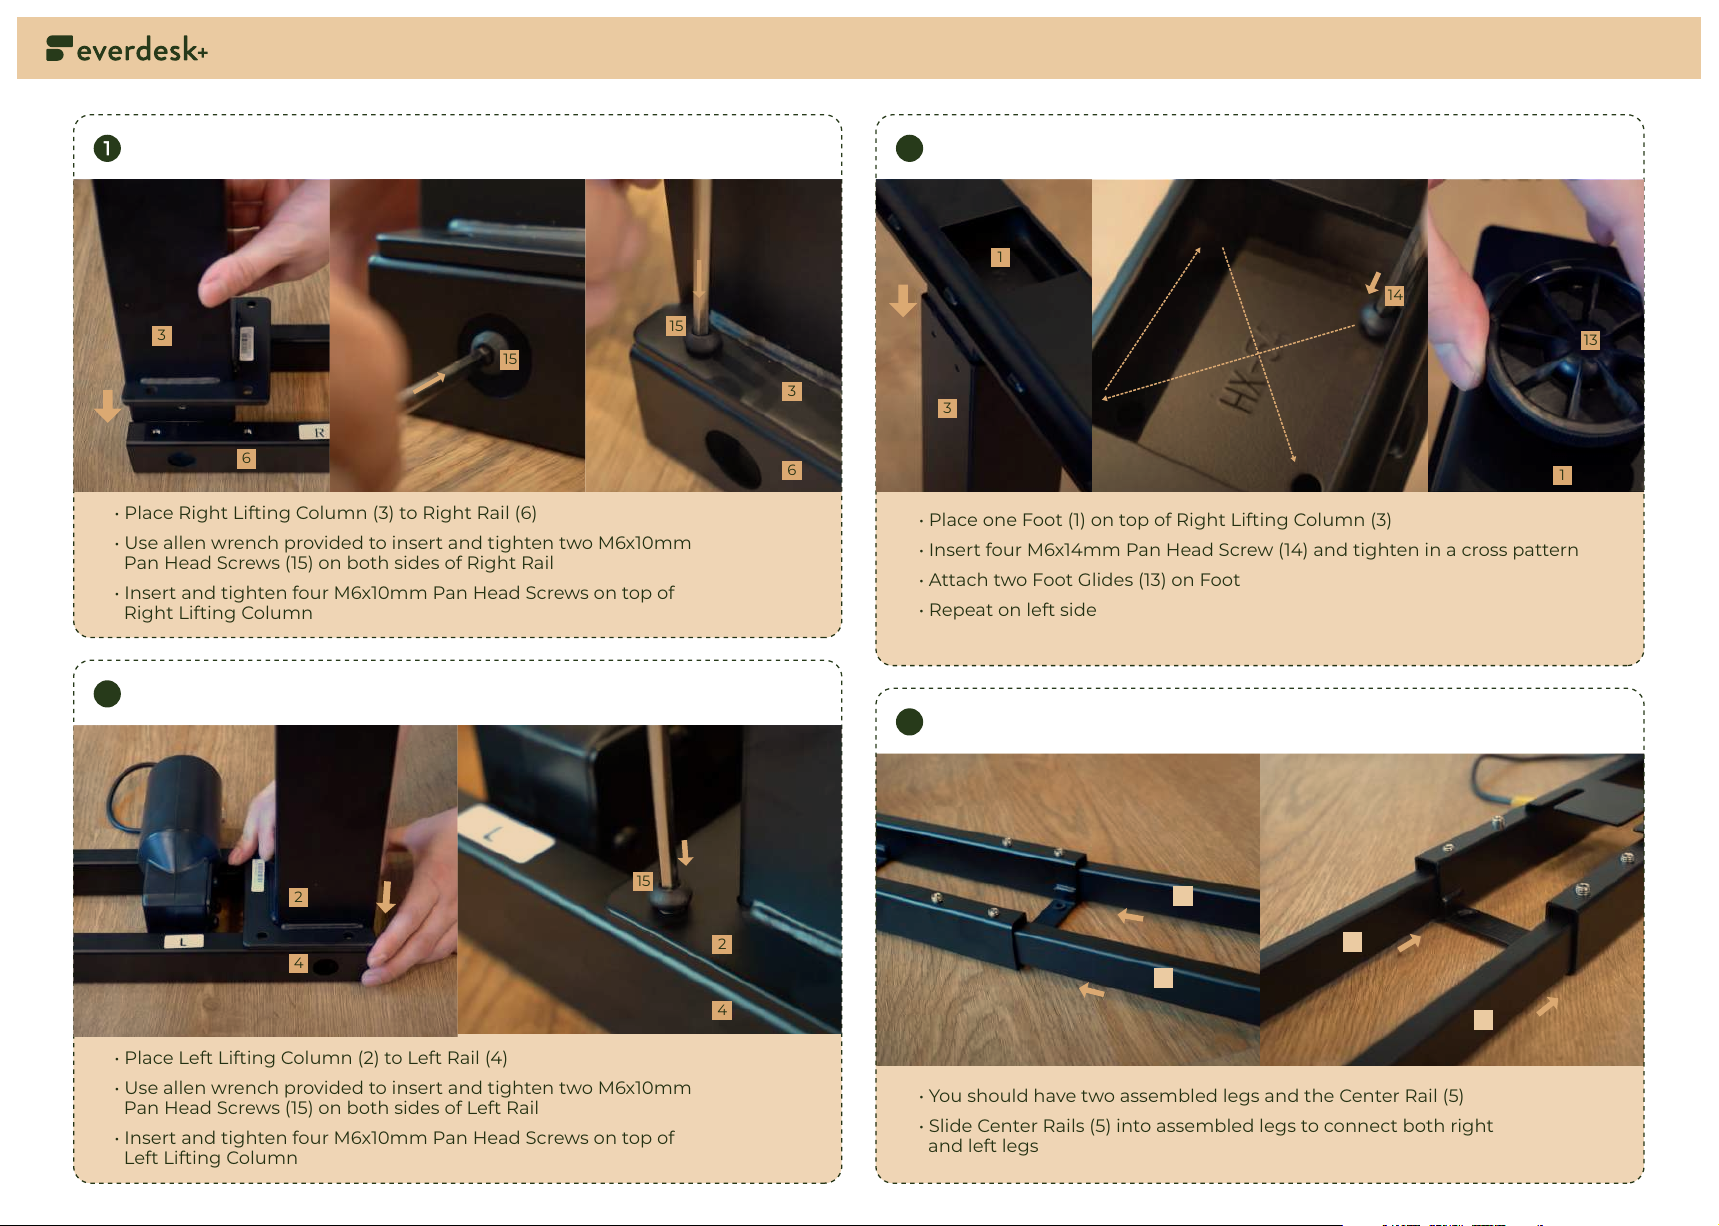
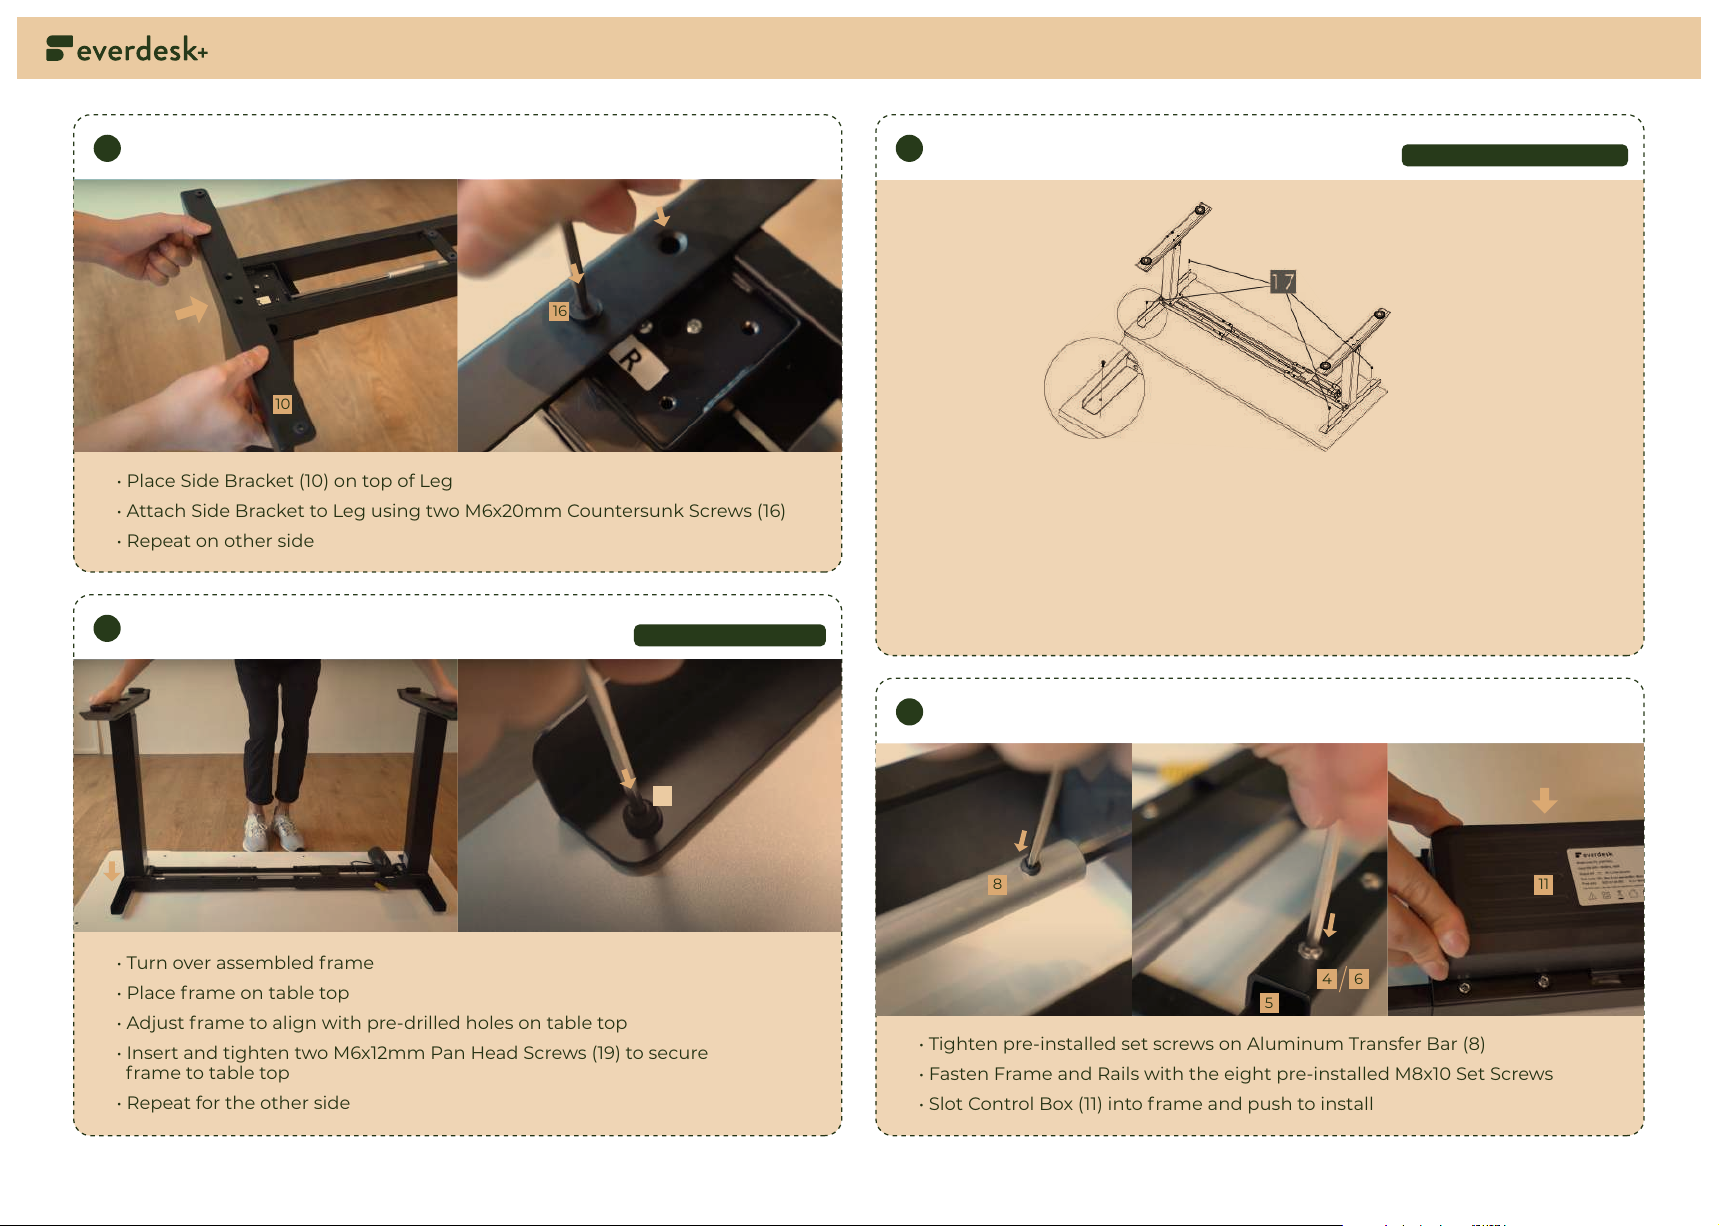
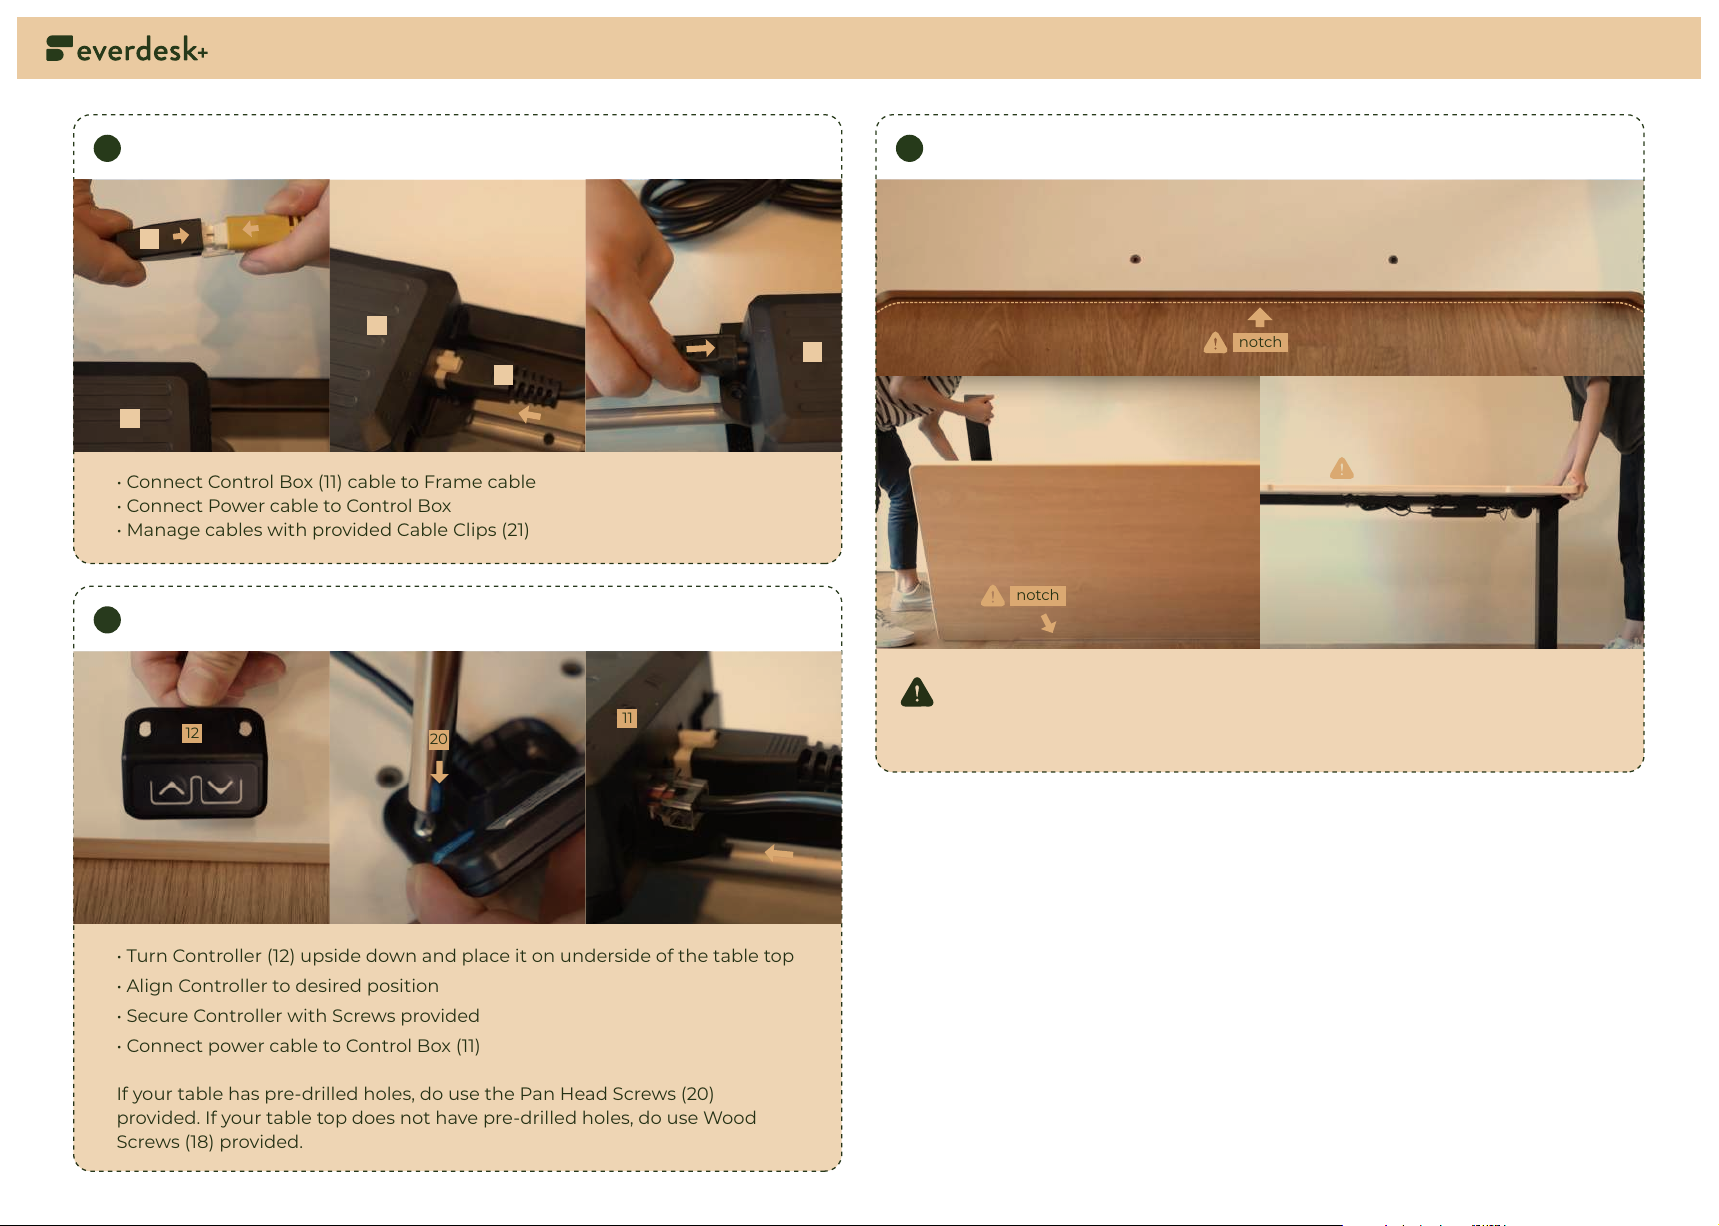
assembly manual
Lite Frame
Lite Frame Assembly Information

19
20
or
Tools and Parts List
Left Rail
41
Center Rails
51
Foot
12
Left Lifting Column
21
Right Lifting Column
31
Right Rail
61
Short Hexagon Rod
71
Aluminum Transfer Bar
81
Long Hexagon Rod 1
9
Side Bracket
10 2
Control Box
11 1
Controller
12 1
M6x14mm Pan Head Screw
14 8
13 Foot Glide 4
M6x10mm Pan Head Screw 12
15
M6x20mm Countersunk Screw 4
16
ST5x20mm Wood Screw 10
17
ST5x16mm Wood Screw
18 2
M4x10mm Pan Head Screw
20 2
19 M6x12mm Pan Head Screw 4
Cable Clip 10
21
Parts Qty Parts Qty Parts Qty
Tools

Attaching The Foot
3STEP THREE:
Connecting with Center Rails
4STEP FOUR:
• You should have two assembled legs and the Center Rail (5)
• Slide Center Rails (5) into assembled legs to connect both right
and left legs
assembly
Right Lifting Column and Rails
STEP ONE:
Left Lifting Column and Rails
2STEP TWO:
• Place Right Lifting Column (3) to Right Rail (6)
• Use allen wrench provided to insert and tighten two M6x10mm
Pan Head Screws (15) on both sides of Right Rail
• Insert and tighten four M6x10mm Pan Head Screws on top of
Right Lifting Column
• Place Left Lifting Column (2) to Left Rail (4)
• Use allen wrench provided to insert and tighten two M6x10mm
Pan Head Screws (15) on both sides of Left Rail
• Insert and tighten four M6x10mm Pan Head Screws on top of
Left Lifting Column
• Place one Foot (1) on top of Right Lifting Column (3)
• Insert four M6x14mm Pan Head Screw (14) and tighten in a cross pattern
• Attach two Foot Glides (13) on Foot
• Repeat on left side
5
5
5
5
1
1
4
2
4
2
3
3
3
66
15
15
15
14
13
4
2

Connecting Transfer Bar to Short Hexagon Rod
5c
STEP FIVE(c):
assembly
Installing Long Hexagon Rod
5d
STEP FIVE(d):
Preparing to Install Transfer Rod
5a
STEP FIVE(a):
• Turn over assembled frame
• Prepare the provided 6mm Wrench, Short Hexagon Rod (7) and Aluminum
Transfer Bar (8)
• Take Aluminum Transfer Bar and pull out the Long Hexagon Rod (9) from
within the bar.
Installing Short Hexagon Rod
5b
STEP FIVE(b):
• Insert Short Hexagon Rod (7) into Left Leg from outwards in
• Use 6mm wrench to fine tune and push Short Hexagon Rod through the
hexagonal hole
• Push Short Hexagon Rod through the hexagonal hole as far as possible or
until it is no longer sticking out from Left Leg
• Insert Long Hexagon Rod (9) into Right Leg from outwards in
• Connect end of Long Hexagon Rod to Aluminum Transfer Bar (8)
• Push Long Hexagon Rod through Right Leg as far as possible or until it is no
longer sticking out from the leg
4
23
7
7
7
78
8
8
8
9
9
9
9
• Insert Aluminum Transfer Bar (8) under the assembled frame
• Connect Aluminum Transfer Bar to the end of Short Hexagon Rod (7),
making sure the Transfer Bar slides over the Hexagon Rod fully.

Installing Side Brackets
6STEP SIX:
• Place Side Bracket (10) on top of Leg
• Attach Side Bracket to Leg using two M6x20mm Countersunk Screws (16)
• Repeat on other side
assembly
Secure Frame, Rod and Control Box
STEP EIGHT:
8
Attaching Frame To Table Top
7a
STEP SEVEN(a):
• Turn over assembled frame
• Place frame on table top
• Adjust frame to align with pre-drilled holes on table top
• Insert and tighten two M6x12mm Pan Head Screws (19) to secure
frame to table top
• Repeat for the other side
For Pre-Drilled Table Tops
Attaching Frame To Table Top
7b
STEP SEVEN(b):
For Non Pre-Drilled Table Tops
If your table is not pre-drilled:
• Lock the position of the Center Rails (5) using eight M6x10mm
Pan Head Screws (15)
• Double-check the Frame is properly positioned on the underside
of the Table Top
• Attach Frame to underside of Table Top using seven ST5x20mm Wood
Screws (17) provided
• Tighten pre-installed set screws on Aluminum Transfer Bar (8)
• Fasten Frame and Rails with the eight pre-installed M8x10 Set Screws
• Slot Control Box (11) into frame and push to install
5
8
10
11
16
19
46

Flipping Everdesk+ Over
11 STEP ELEVEN:
assembly
6
7
• Connect Control Box (11) cable to Frame cable
• Connect Power cable to Control Box
• Manage cables with provided Cable Clips (21)
Connecting Cables to Control Box
9STEP NINE:
notch
notch
11
11
11
11
11
Installing the Controller
10 STEP TEN:
• Turn Controller (12) upside down and place it on underside of the table top
• Align Controller to desired position
• Secure Controller with Screws provided
• Connect power cable to Control Box (11)
If your table has pre-drilled holes, do use the Pan Head Screws (20)
provided. If your table top does not have pre-drilled holes, do use Wood
Screws (18) provided.
11
20
12
Make sure to turn the table on the side with the Notch - do not
turn the table on the side with the controller installed
• Grab desk base and flip assembled table right side up

Technical Information
WARNING! Failure to follow
these instructions may result
in serious injury.
Make sure no obstacles are in the desk’s path.
Make sure the desktop is not touching any walls.
Make sure all cords are an appropriate length to
accommodate the changes in height.
This height adjustable desk has electric motors and is designed for
use in dry work areas only. The desk height is adjustable so that it can
be positioned at the most ergonomically suitable height. Any other
use is at the user’s risk. Under no circumstances does EverDesk+
accept warranty claims or liability claims for damages caused from
improper use or handling of the desk frame.
Keep Children away from electric height-adjustable
desks, control units and handsets. There is a risk of
injury and electric shock.
Do not sit or stand on the desk frame.
Do not crawl or lie under the desk frame.
Do not place any objects taller than 20”
underneath the desk.
Do not open or dismantle any of the components -
the Legs, Control Box, or Switch. There is a danger of
electric shock.
This product is designed with a duty cycle of 10%.
(2 minutes on, 18 minutes off.
i
In the event of a power outage or if the power cords
is unplugged, a manual reset may be necessary.
i
Please scan the QR code for a video
version of our Assembly Manual, or visit
www.everdeskplus.link/lite-assembly
for more information.
Lite Frame Assembly Information
Reset Up-Down Controller
Ensure that the desk it at its lowest height before
attempting any reset functions.
• Lower the desk to the minimum height
(lowest possible height).
• Press and hold the Down Key for about 10 seconds,
then release.
• Hold the Down Key again. The desk should lower itself
further before raising slightly.
• The table is now reset.
Table of contents
Popular Indoor Furnishing manuals by other brands

Granberg
Granberg InDIago 510 installation instructions

Walker Edison
Walker Edison ELBU2O Assembly instructions

Noble House Home Furnishings
Noble House Home Furnishings Loveseat Assembly instructions

Trasman
Trasman Bo0 1344 Assembly manual

Philips
Philips P-2055-D manual

GPM
GPM SHFURBL5O Assembly instructions

LDI
LDI Mayline Safco Focal 2250 instructions

Micasa
Micasa TILL manual

Ergoswiss
Ergoswiss TA-2 Assembly instructions

Office Star Products
Office Star Products AVENUE SIX PROVIDENCE PVD52 quick start guide

Furniture of America
Furniture of America FOA7887CK Assembly instructions

Rauch
Rauch M2611 Assembly instructions