Everlasting Comfort HD-008 User manual

Inspect Unit Before Use.
READ AND SAVE THESE INSTRUCTIONS
Heavy-Duty Boot Dryer User Manual
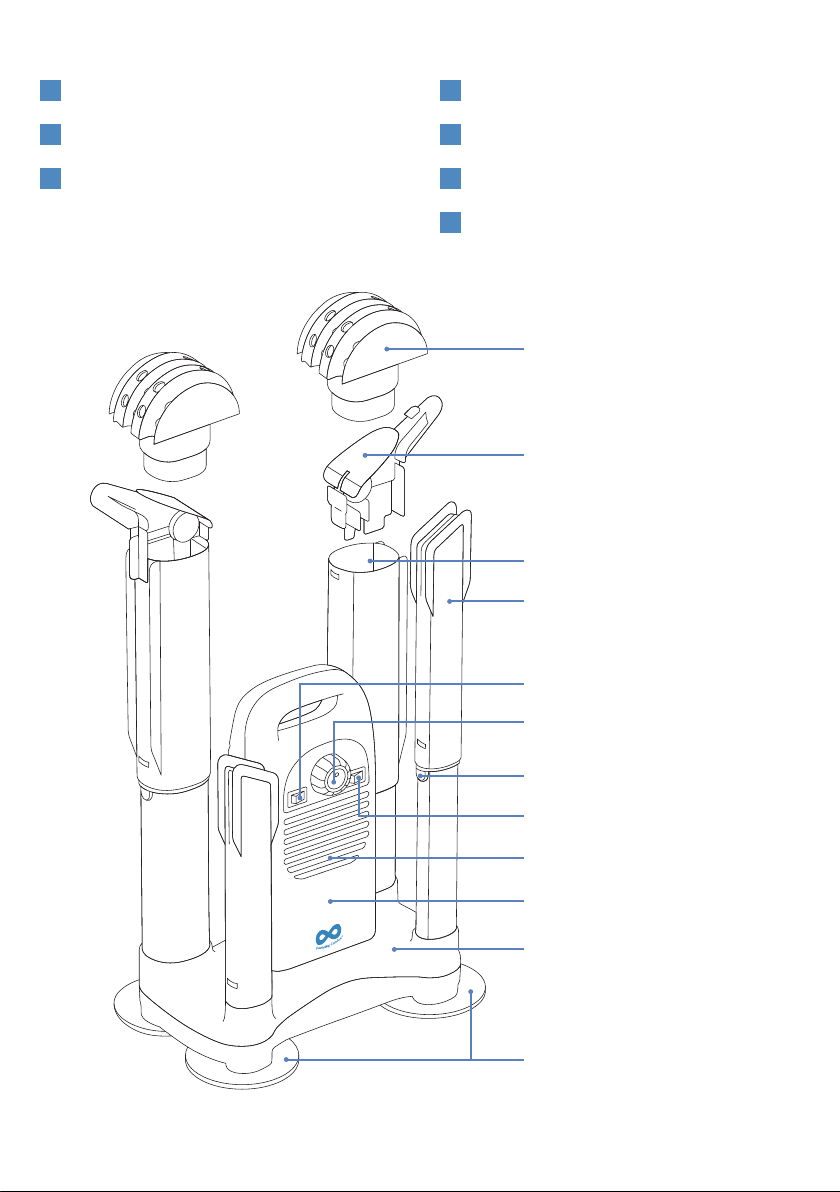
TABLE OF CONTENTS
COMPONENTS
SAFETY
OPERATION
1
2
3
MAINTENANCE
HELPFUL TIPS
TROUBLESHOOTING
SPECIFICATIONS
4
5
6
7
1. COMPONENTS
Fig. 1
FRONT VIEW
HELMET STRETCHER
SHOE STRETCHER
BACK DRYING TUBES
FRONT DRYING TUBES
LOCKING BUTTONS
BLOWER ASSEMBLY
OZONE SWITCH
MAIN BODY
BASE
DRIP TRAYS
TIMER KNOB
HEAT/NO HEAT SWITCH

Fig. 2
BACK VIEW
SHOE STRETCHER
BACK DRYING TUBES
FRONT DRYING TUBES
POWER SUPPLY CORD
CORD HOLDER
BLOWER ASSEMBLY
DRIP TRAYS
2. SAFETY
PLEASE READ CAREFULLY BEFORE USE & SAVE THESE INSTRUCTIONS
ONLY FOR USE IN A WELL VENTILATED AREA.
DO NOT use on any carpeted surface.
Use this boot dryer only as described in this manual. Any other use not recommended by the manufacturer may cause
fire, electric shock, or personal injury.
DO NOT immerse the dryer in water. Never clean this unit while it’s plugged in. To disconnect, turn controls to the OFF
position, then unplug it from the outlet.
DO NOT allow the inside of the dryer to become wet during operation or in storage. Always store in a dry area free from
potential moisture.
DO NOT use if the power supply cord is damaged. If damaged, it must be replaced by the manufacturer, a certified
service agent, or a similarly qualified person to avoid hazards and electrocution.
1
2
3
4
5
6
WARNINGS
IF YOU HAVE ANY QUESTIONS OR CONCERNS, PLEASE EMAIL US AT

11
12
13
14
Thoroughly inspect the unit in its entirety for any cracks, chips, or damage that could cause the unit to malfunction.
DO NOT use if damage is found.
Only a professional or authorized repairman should repair this appliance.
Keep the boot dryer and all of it’s packaging away from children and infants.
Before unplugging the power cord, be sure to turn off the unit’s power. When touching the unit ensure your hands are dry
to prevent electric shock.
If the unit has an abnormal sound or odor while in operation, please shut it down immediately and disconnect the power
plug. Any repairs must be done by a professional repairman.
Connect only the electric plug to a secure wall socket.
Make sure the power supply cord is positioned to not be stepped on, tripped over, or otherwise subjected to damage or
stress.
Be sure that no other appliances are in use on the same electrical circuit as your product, or an overload could occur.
To reduce the risk of damage to the power supply cord or outlet, pull the plug instead of the cord when disconnecting the
unit.
Before cleaning or moving the unit, turn off and disconnect the plug from its power source.
The unit is equipped with a polarized plug (one blade is wider than the other). To reduce the risk of electric shock, plug into
a secure wall socket only as intended. If the plug does not fit into the outlet, flip the plug 180 degrees and try again. If it
still does not fit into the socket, contact a professional electrician. DO NOT attempt to modify the plug in any way.
DO NOT block air intake in any manner.
Clean only as instructed in Section 6 Maintenance. DO NOT clean with any other cleaning agents.
DO NOT override the timer control.
DO NOT overload with garments.
DO NOT use outdoors.
Do NOT operate in water.
DO NOT use or add any attachments to the unit that do not come with the unit.
DO NOT use the ‘OZONE’ function in any fully confined spaces.
1
2
3
4
5
6
7
8
9
10
15
16
17
18
19
WHEN USING AN ELECTRICAL APPLIANCE, BASIC SAFETY PRECAUTIONS SHOULD ALWAYS BE
OBSERVED, INCLUDING THE FOLLOWING:
Place the unit on a firm, flat and dry surface, never carpeted.
DO NOT use this appliance in any kind of flammable environment.
Keep unit away from any heat source, i.e. heaters, furnaces, and avoid direct sunlight.
Industrial or household use only.
1
2
3
4
OPERATING ENVIRONMENT
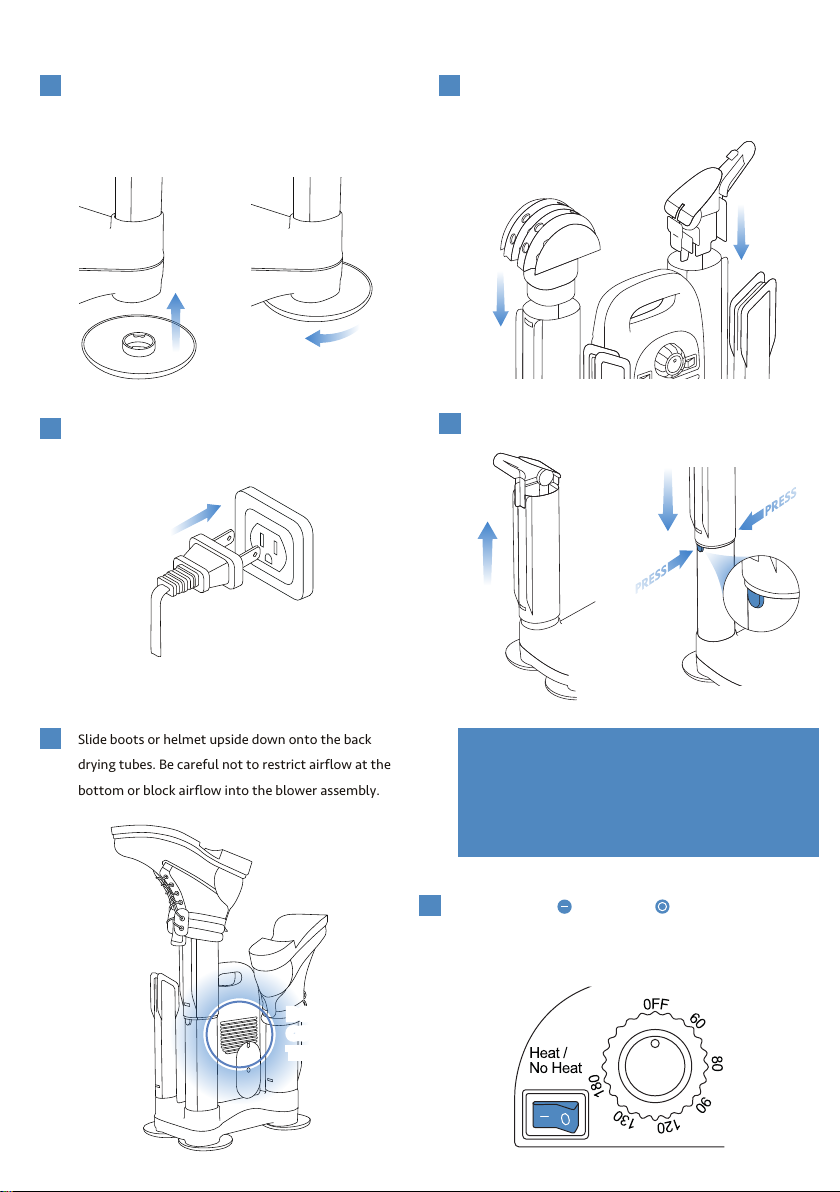
Slide boots or helmet upside down onto the back
drying tubes. Be careful not to restrict airflow at the
bottom or block airflow into the blower assembly.
DO NOT
COVER
THIS AREA
DO NOT
COVER
THIS AREA
5
Plug the boot dryer into any standard 120 Volt 60 Hz
electrical outlet.
3
3. OPERATION
Attach 4 drip trays to the bottom of the unit. Press
the tray onto the bottom feet of the unit and turn
the tray clockwise to secure it in place.
1Attach either the 2 interchangeable shoe or helmet
stretchers to the back drying tubes.
2
Select the HEAT or NO HEAT setting by pressing
the switch to either use room temperature air or to add
heat.
6
TO COMPACT
Press the two side
locking buttons on the
drying tube
simultaneously and slide
the drying tube down.
TO EXTEND
Pull the drying tubes
up to adjust the
height, accommodates
boots up to 16” tall.
Adjust the height of the drying tubes:
4
The boot dryer only heats to a safe and gentle temperature to prevent damage to garments. It is not a hairdryer and is
not designed to emit a powerful current of air through garments.
DO NOT cover air circulation whenever placing gloves, mittens, children’s boots or shoes onto the drying tubes or
drying nozzles. Always use attachments as instructed.
To prevent bacteria and fungus growth in your footwear, the primary cause of odor, make sure to dry after each use.
Smaller footwear and garments will take less time to dry.
Your energy-efficient boot dryer heats to a gentle temperature of around 122 Fahrenheit/50 centigrades based on the
room temperature and uses Forced Air technology to quickly dry wet garments, but it does not generate a forceful air
stream that might damage or deform garments.
2
3
4
5
1
5. HELPFUL TIPS
Optional: You can place gloves or a different pair of shoes on the front smaller drying tubes. The front drying tubes are
specifically designed for drying tennis shoes, socks, gloves, hats, kids’ shoes, or any other small-sized garment.
Turn off and unplug the unit from the wall before cleaning. Use mild soap on a damp cloth to clean the external surface
of the boot dryer and its components. Do not let any liquid get inside of the motor located on the main body of the unit.
To properly store the unit:
A. Wrap the power cord around the designated power cord system on the back of the unit.
B. Slide all drying tubes down to their original position.
C. Let the unit dry for 24 hours before storing. We suggest storing in a cool ventilated area away from small children
and infants.
1
2
4. MAINTENANCE
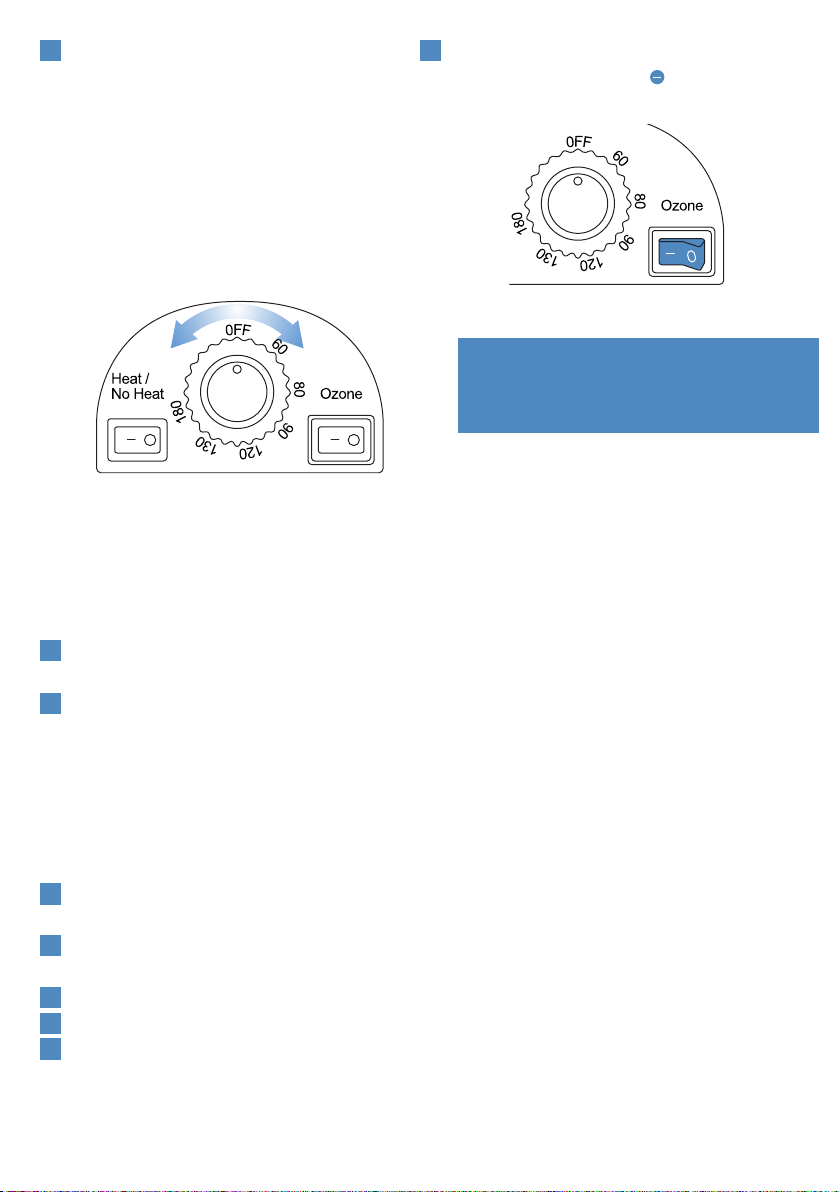
To sanitize and deodorize your footwear or garment,
flip the Ozone switch to the ON position.
HELPFUL TIP:
Open all windows or doors to enhance air circulation
whenever using this function.
8
Turn the timer knob clockwise to the 180-minute
mark to activate the timer switch, then turn the
knob counterclockwise back to the desired drying
time. The timer will automatically shut off the unit
when allotted time is reached. Drying times may vary
depending on the extent of moisture as well as the
temperature and humidity. We recommend a
minimum of 1 to 3 hours. Avoid over-drying.
7
PROBLEM PRIMARY CAUSE SOLUTION
Unit doesn’t sound
like it is on.
Unit is on but may not seem like it. Place the back of your hand near the
drying tubes to feel the gentle warm
air or place footwear and garments
onto the drying tubes for 30-minutes
then touch the inside of the garment
to feel the gentle heat.
Back drying tubes are
shaking.
The back tubes are in the extended
position.
This is normal, the drying tubes are
strong and durable and may shake
slightly when extended.
Unit has an abnormal sound
or burning odor.
You may have received a defective
unit.
Shut it down immediately and
disconnect the power plug. Any
repairs must be done by a
professional repairman.
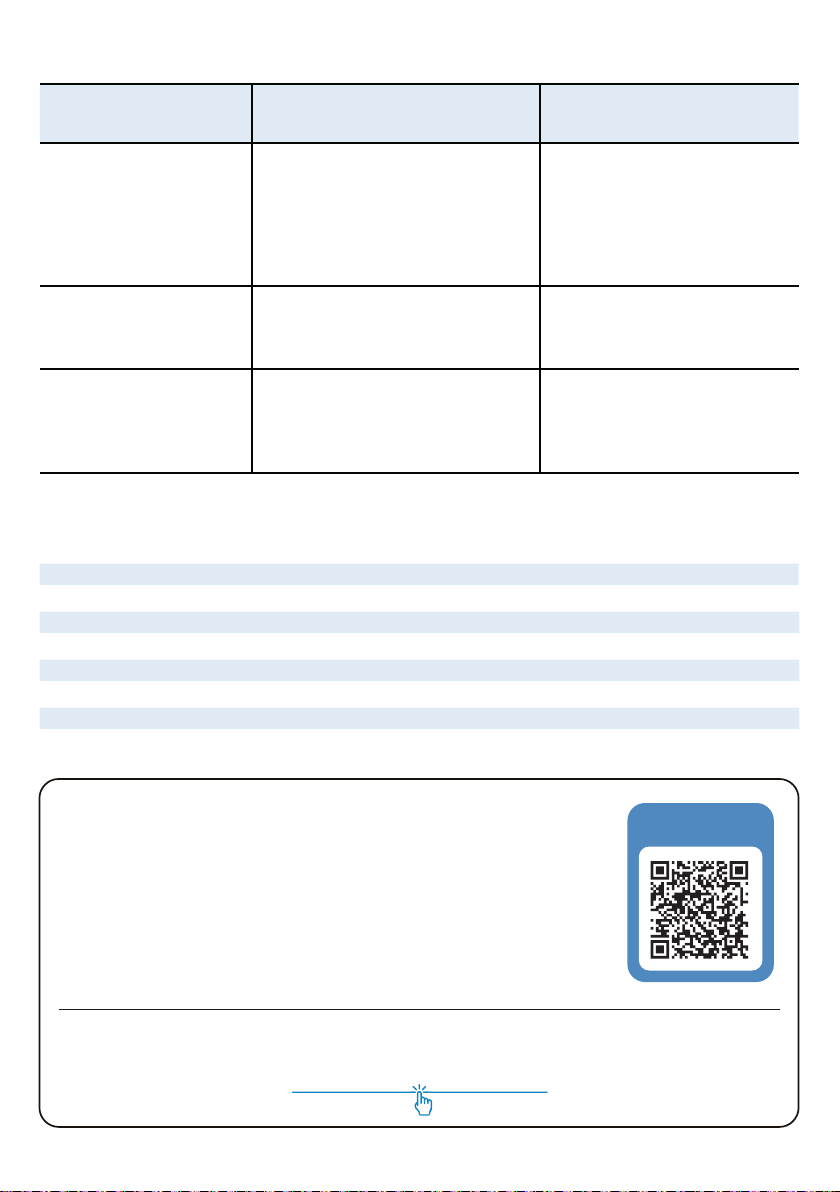
6. TROUBLESHOOTING
HAVE AN ISSUE WITH YOUR HEAVY-DUTY
BOOT DRYER?
Enjoy hassle-free replacements: if your heavy-duty boot dryer is defective or damaged,
we will ship you a new one ABSOLUTELY FREE.
For fast and knowledgeable service, get in touch with one of our customer service
experts right now!
Email: [email protected]
To check out more of the products we offer visit:
WRITE A MESSAGE
TO SUPPORT
everlastingcomfort.net
Model No.
Voltage
Power
Capacity
Conforms to
Certified to
Max Drying Time
HD-008
120V 60Hz
250 W
4.0L
UL STD.499
CSA STD.C22.2 No.64
180 minutes
7. SPECIFICATIONS

5003917
All parts have been tested
by Intertek and are ETL Certied.
Table of contents


 series user manual")


