evo Medical Solutions Aeroneb GO 7010 User manual
Follow the operating instructions that
apply to your specific model.
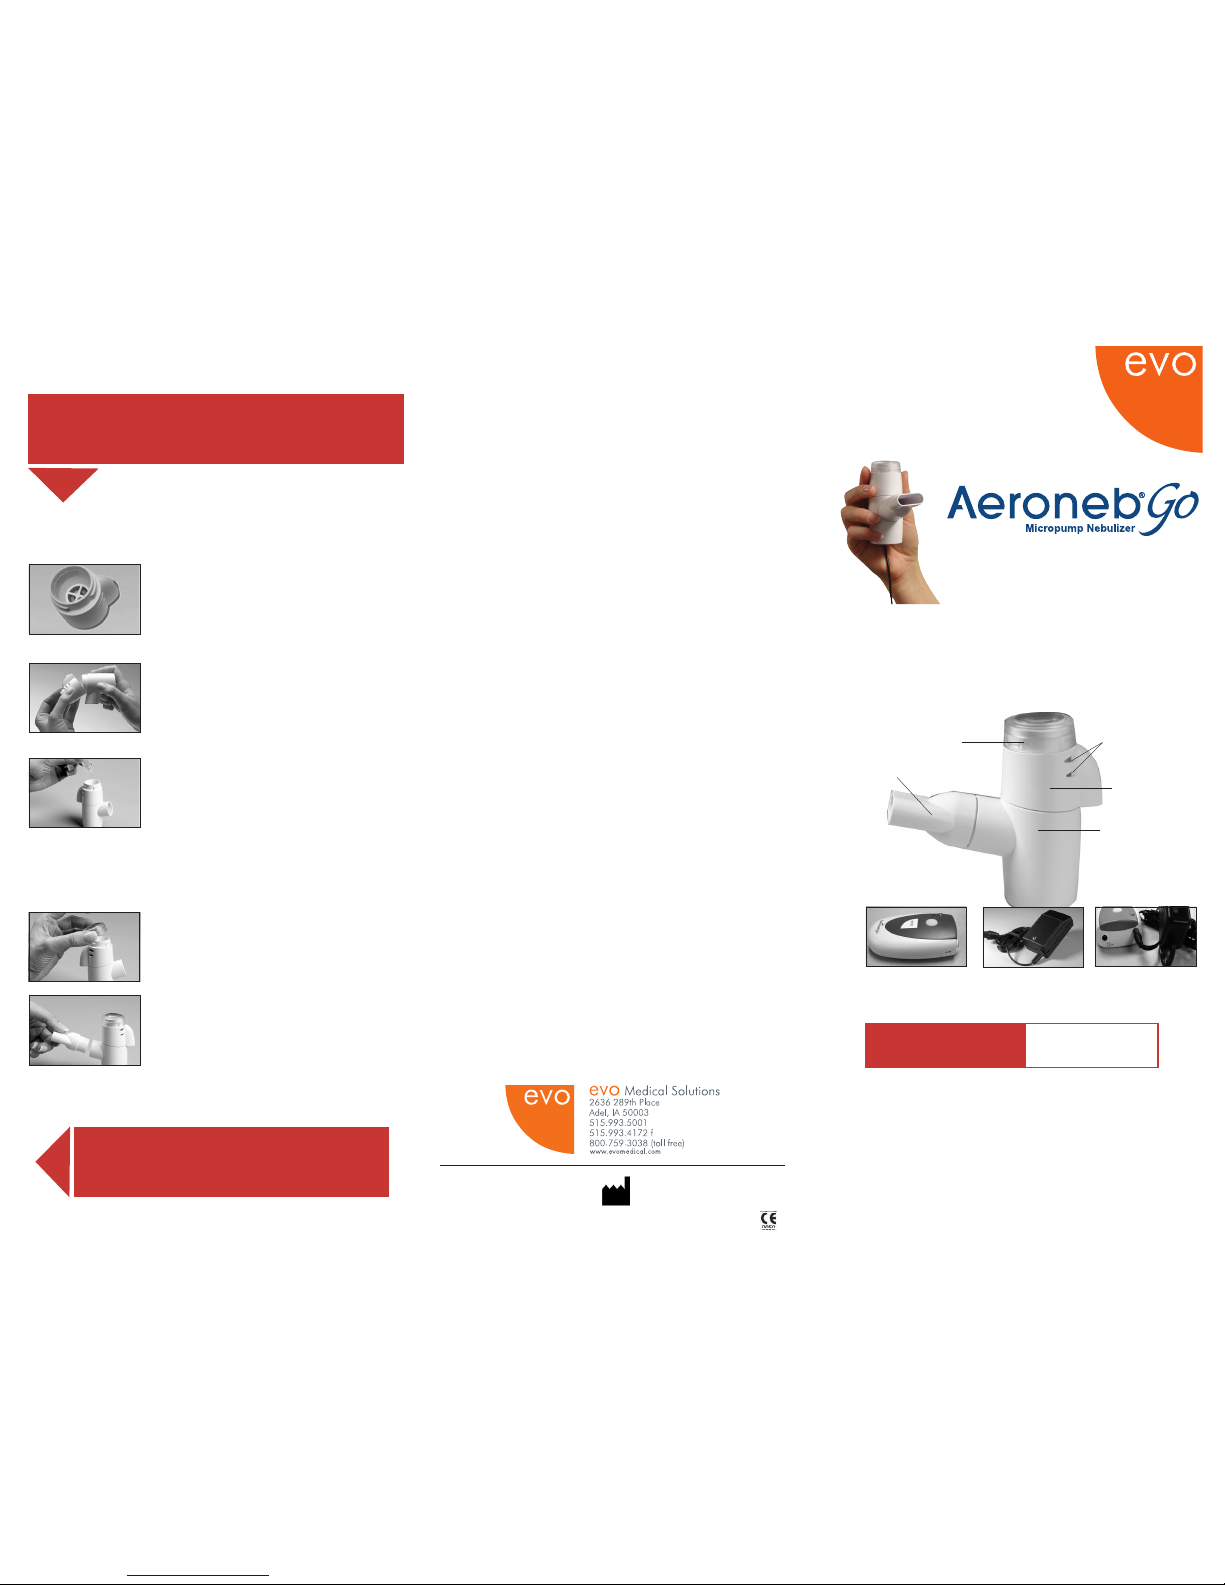
TO A EMBLE NEBULIZER UNIT
TEP 1
Before you begin, run the Medication Cup
under hotwater, then tap the cup slightly.
TEP 2
Connect the Medication Cup (containing the
On ® Aerosol Generator) to the Nebulizer Body.
NOTE: Make sure the Aeroneb Go is unplugged
before you add medication to the Medication
Cup.
TEP 3
Fill the Medication Cup with the prescribed
nebulizer medication. Never pour more than
6 mL into the cup. The continuous line on
the inside surface of the cup indicates the
maximum filling level. (When the medication
cup contains medication, the cup should
remain in an upright position). CAUTION: To
avoid damage to the nebulizer unit, do not use
a syringe with needle.
TEP 4
Securely place Cap on Medication Cup.
TEP 5
Attach Mouthpiece or Mask Connector and
mask to Nebulizer Body. NOTE: Masks are an
optional accessory and may be purchased
through evo Medical Solutions or your
Aeroneb®Go dealer.
Aerogen and Aeroneb are registered
trademarks of Aerogen, Ireland Ltd.
©2007 evo Medical Solutions
P/N 22262 Rev D Rx On y
Aerogen (Ireland) Limited,
Galway Business Park,
Dangan,
Galway.
www.aerogen.com
Medication Cup Cap
Mouthpiece
Medication Cup
(with On ®Aerosol
Generator)
Ventilation Holes
Nebulizer Body
As with any mechanical device, this product may become
unusable due to an electrical outage, battery depletion, or
mechanical failure. We recommend that you have spare
batteries and have a backup device available to you.
If this product is being used to treat a life threatening
condition, a backup device is necessary.
IMPORTANT CAUTION
Quick Start Card
ATTENTION: To optimize the performance and life
expectancy of your Aeroneb Go device, follow the
cleaning instructions carefully as instructed on
page 11 of your Aeroneb Go Instruction Manual.
Battery Powered Controller
with detachable power cord
Model 7010
AC/DC Adapter
with attached power cord
Model 7090
AC/DC Controller
with attached power cord
Model 7030
CONTINUE TO PAGE 2
QUICK START INSTRUCTION
GUIDE BEGINS HERE
1Retain this card with your device for future reference.
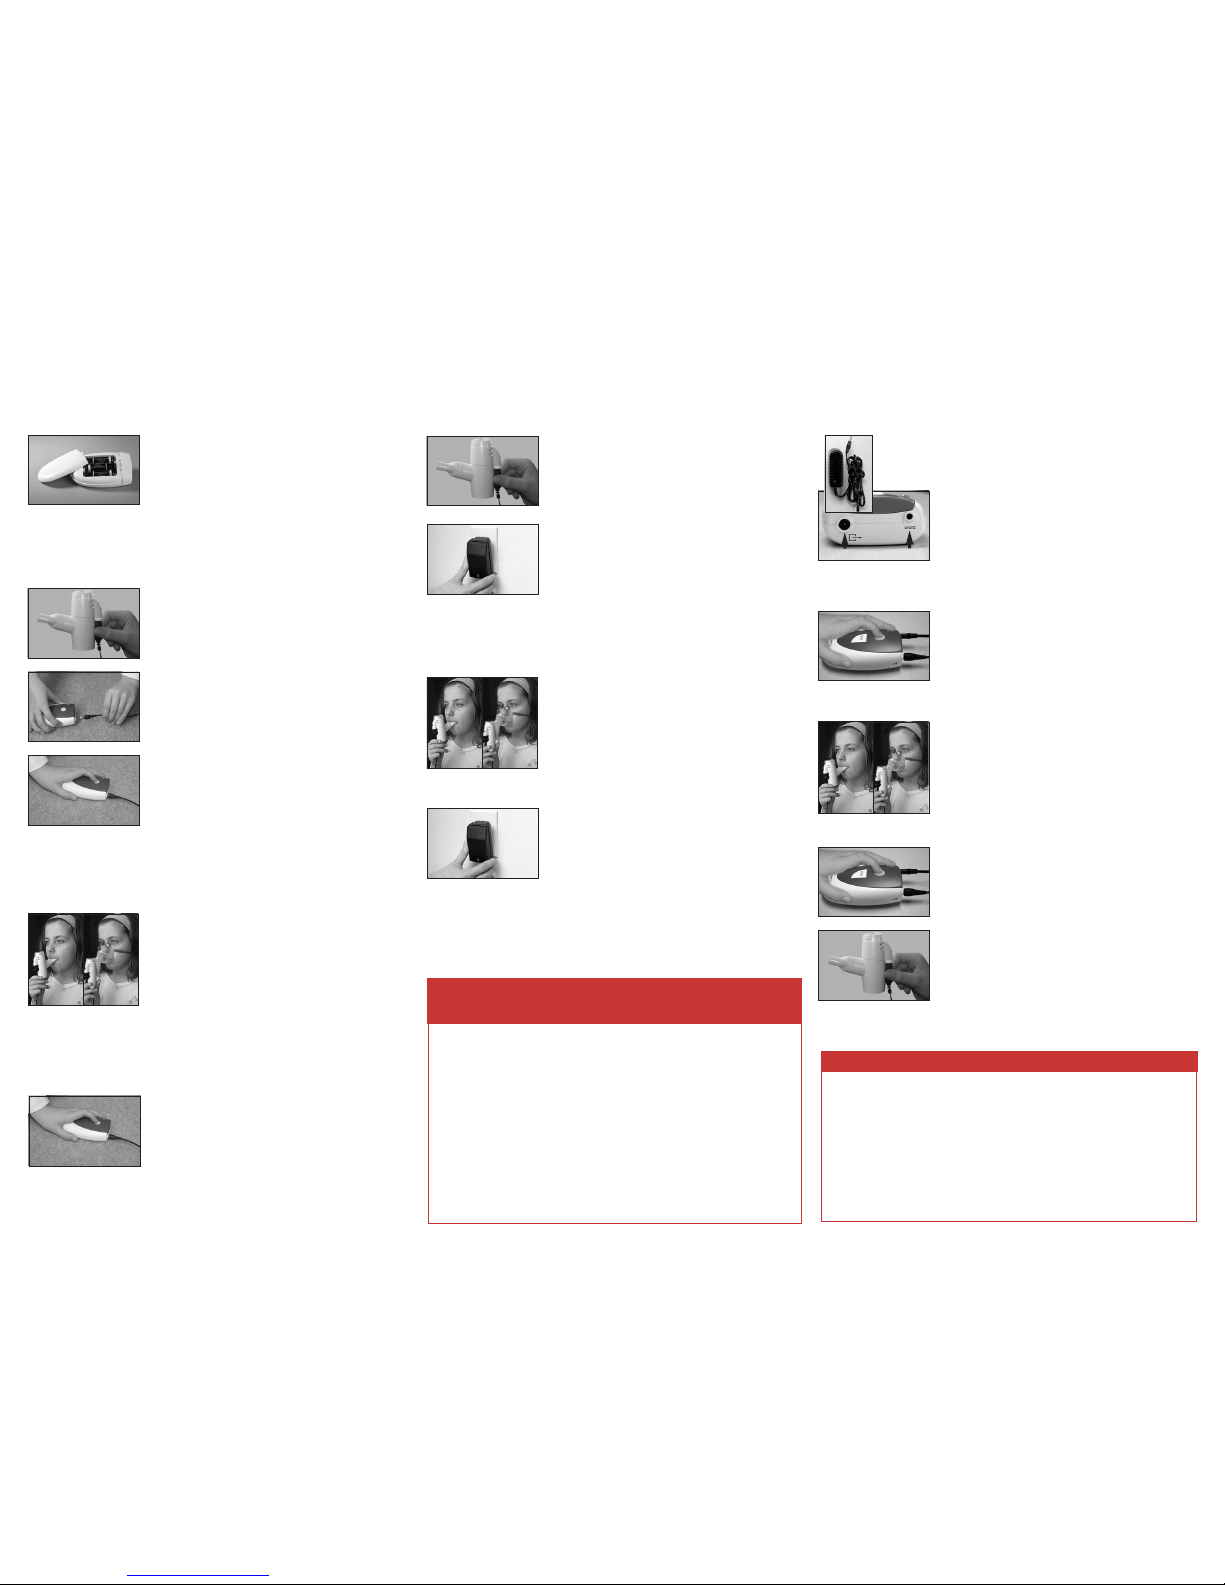
TO OPERATE WITH A BATTERY POWERED CONTROLLER
Model #7010
1. Turn the Battery Powered Controller upside
down. Slide the battery cover in the direction
of the arrow to remove the lid. Put in three
(3) "AA" disposable alkaline or lithium batteries,
matching them to the plus (+) and minus (-)
markings inside the Battery Powered Controller.
Replace the cover on the Battery Powered Controller and slide the cover
until it locks in place. You can expect at least three (3) hours of
operation from a new set of disposable batteries, (up to five (5) hours
from high performance batteries).
2. Insert the nebulizer cable connector into the
back of the Nebulizer Unit. Slide the cable
straight up the nebulizer body.
3. Connect the nebulizer cable to the Aeroneb®
Go Battery Powered Controller.
4. Turn on the unit by pressing the "on/off" button
on the Battery Powered Controller. The green
light on the Battery Powered Controller will light
up. Visually verify that aerosol is coming out of
the mouthpiece or mask to indicate that the
device is functioning properly.
NOTE: (1) If you are using batteries and the green light is flashing, your batteries
are low. You may finish your treatment, and then replace the three “AA” batteries.
(2) If the green light only comes on while depressing the button, immediately
replace the three “AA” batteries.
5. Place the mouthpiece between your teeth,
with your lips firmly sealed around the mouth
piece. If you use an aerosol mask, place the
mask over your mouth and nose. Breathe in
and out slowly through your mouth until
aerosol formation stops. Do not cover ventilation
holes. NOTE: Aerosol mask is not provided.
NOTE: (1) The Battery Powered Controller is designed to shut off after 16 minutes.
If medication still remains in the cup, press the “on/off” button on the Battery
Powered Controller to continue your treatment. (2) Battery life is dependent upon
not only the number of treatments per day, but also the length of each treatment.
It is recommended that you always have a spare set of new
batteries available to you.
6. Press the "on/off" button on the Battery
Powered Controller again to turn the nebulizer
off. Disconnect the cable from the Nebulizer
Unit by sliding the cable straight down the
handset, disassemble Nebulizer Unit and rinse
Nebulizer Unit Parts after each use. Do NOT
remove the retaining ring under the medication cup. Wipe dry the
connector end of the cable after each use. Clean the Nebulizer Unit
and associated parts daily. Do NOT remove the retaining ring under the
medication cup.
TO OPERATE WITH AN AC/DC POWERED CONTROLLER
Model #7030
1. Insert the AC Powered Controller cable
connector into the back of the Nebulizer Unit by
sliding the cable straight up the nebulizer body.
2. Plug the AC Powered Controller into a standard
AC electrical outlet using the appropriate outlet
adapter. The green light on the AC Powered
Controller will light up.
3. Visually verify that aerosol is coming out of the
mouthpiece or mask to indicate that the device
is functioning properly.
4. Place the mouthpiece between your teeth, with
your lips firmly sealed around the mouthpiece.
If you use an aerosol mask, place the mask over
your mouth and nose. Breathe in and out slowly
through your mouth until aerosol formation
stops. Do not cover the ventilation holes during
use.
5. Unplug the AC Powered Controller from the wall
to turn it off. Disconnect the cable from the
Nebulizer Unit by sliding the cable straight
down the handset, disassemble Nebulizer Unit
and rinse Nebulizer unit Parts after each use.
Wipe dry the Connector end of the cable after
each use. Clean the nebulizer unit and associated parts daily. Do NOT
remove the retaining ring under the medication cup.
After completing Steps 1-4 on page 1, continue to follow the operating instructions that apply to your model.
TO OPERATE BATTERY POWERED CONTROLLER WITH AN
AC/DC ADAPTER Model #7090
NOTE: This model has 2 modes of operation:
Battery Powered Controller on y (see pg. 2) OR
AC/DC with Battery Powered Controller.
1. Plug the AC adapter into a standard AC
electrical outlet, a green light on the adapter
indicates that the AC adapter is turned on.
Plug the AC cable into the Control Module,
indicated by the Input Symbol (See
Classifications and Markings chart in manual).
NOTE: The AC/DC Adapter does not charge batteries.
2. Turn on the unit by pressing the "on/off" button
on the Battery Powered Controller. The green
light on the Battery Powered Controller will light
up. Visually verify that aerosol is coming out of
the mouthpiece or mask to indicate that the
device is functioning properly.
3. Place the mouthpiece between your teeth, with
your lips firmly sealed around the mouthpiece.
If you use an aerosol mask, place the mask over
your mouth and nose. Breathe in and out slowly
through your mouth until aerosol formation
stops. Do not cover the ventilation holes during
use.
4. Press the "on/off" button on the Battery
Powered Controller again to turn the nebulizer
off.
5. Disconnect the cable from the Nebulizer Unit
by sliding the cable straight down the handset,
disassemble Nebulizer Unit and rinse Nebulizer
Unit Parts after each use. Do NOT remove the
retaining ring under the medication cup. Wipe
dry the connector end of the cable after each
use. Clean the Nebulizer Unit and associated parts daily.
AC Adapter
Cable
To optimize the performance and life expectancy of
your Aeroneb Go device, follow the cleaning instructions
carefully as instructed on page 11 of your Aeroneb Go
Instruction Manual.
NOTE: Remova and the improper insertion of the retaining ring
from the underside of the medication cup may cause the unit to eak
or ma function.
NOTE: P ease read a instructions before using. Refer to your
Aeroneb®Go Nebu izer Instruction Manua for more comp ete
c eaning instructions.
IMPORTANT CLEANING
INFORMATION FOR ALL MODELS
To order rep acement parts or accessories, visit your oca home medica
equipment dea er or pharmacy.
If you have any questions or prob ems regarding your Aeroneb®Go
nebu izer, contact your oca home medica equipment dea er or pharmacy.
Your Aeroneb®Go was tested and inspected at the factory and is a premium
device that has a ife expectancy of at east one year (730 treatments) with
proper care and c eaning. Lack of proper care and c eaning, disassemb y of
the retaining ring or misuse wi void the warranty.
IMPORTANT INFORMATION FOR ALL MODELS
2 34
This manual suits for next models
2
Popular Personal Care Product manuals by other brands

Johnson Plastics Plus
Johnson Plastics Plus LBKCH026 instructions

DJO Global
DJO Global DONJOY ULTRASLING III Application guide

mychway
mychway MS-54D3 user manual

Innovative Neutronics
Innovative Neutronics WalkAide Clinician manual

Hydas
Hydas Pillenschlucker manual

DeVilbiss
DeVilbiss Traveler 6910 Series Instruction guide


