Evolve DS-100-R Operating and safety instructions

PRODUCT OVERVIEW CD-DS100R-01
DS-100-R
Description The Evolve Recessed Door Sensor is battery-powered with an extremely small form factor and
aesthetical design. It’s simple – the door sensor will send radio signals to associated Evolve
devices within its own Z-Wave network when the main unit separates from the smaller unit. A bi-
directional mounting plate and push button allow for stress-free user installation and just like the
Evolve Wireless Sensor, this device has tamper prevention capabilities and low-battery alerts.
Specications • SKU: DS-100-R
• Supported Networks:
- Z-Wave – Signal (Frequency) 908.42 MHz
• Range: Up to 100 ft. indoors and 300 ft. outdoors.
• Power Requirements: 2 Year Lithium Battery (CR-2)
• Weight: 0.48 lbs. (main body)
• Dimensions: 2.5” H x 1.625” W x 0.75” D (main body)
Product Wireless Recessed Door Sensor
Installation Familiarize yourself with your door sensor.
Your Recessed Door Sensor is comprised of two parts: the larger Main Sensor and the smaller
Magnetic Sensor.
CD-DS100R-01
Recessed Door Sensor
View the expanded manual:
http://aeot.ec/spprt/recessed
From Aeotec by Aeon Labs' Intelligence series comes
the Recessed Door Sensor. Invisibly installed, it sits
within a door and its frame to provide all the
information needed by a Z-Wave system for security,
safety, and ambiance, and it does it all without altering
a room's aesthetics.
Your Recessed Door Sensor is comprised of two parts:
the larger Main Sensor and the smaller Magnetic
Sensor.
The larger Main Sensor
Separate the Main Sensor's two sections by first
removing its lid and then removing its internal
components.
Remove the clear battery insulator by pulling it away
from the Main Sensor.
Install your Recessed Door Sensor
With the Main Sensor powered and activated, it is now
time to inlay it within your selected doorframe and to also
install the Magnetic Sensor.
Top of the door
Side of the door
Prepare a space for the Main Sensor by drilling a hole
into your doorframe using a 19mm wide drill bit. The
hole should be 65 mm deep.
Step 1
65mm deep 19mm
Drill bit
Drill a corresponding hole in your door. The hole should be
15 mm deep. As stated, the position of this hole should align
exactly with the one hole you just created in the doorframe.
Again, use a 19mm wide drill bit.
Step 2
15mm deep
19mm
Drill bit
Doorframe
Door
Insert the Main Sensor into the hole you created in the
doorframe then secure it using two screws.
Step 3
With your door and doorframe prepared and the drill holes
created, it's now time to mount both parts of your Recessed
Door Sensor.
Secure with screws Done
Place a small amount of white glue (PVA) inside the hole
you created for the Magnetic Sensor. Then place the sensor
over and into the hole, and insert it by tapping gently on it
with a rubber hammer.
Step 4
Tap with hammer Done
1
3
Aeotec Recessed Door Sensor
2Familiarise yourself with your door sensor
Main Sensor
LED
Screw Hole
Z-Wave Button Hole
Magnetic Sensor
The Magnetic Sensor
A magnet in the plastic shell
Using a slot-head screwdriver, remove the Main
Sensor's lid by pressing gently against its exposed
connector.
Quick Start
The installation of your Recessed Door Sensor has two
major steps: the installation of the Main Sensor and the
installation of the Magnetic Sensor. Powered by
batteries, your door sensor will use wireless technology
to talk to your Z-Wave network once installed.
Prepare the Main Sensor
The first step in installing your Recessed Door Sensor is
to activate the Main Sensor.
1.
2.
3.
With the battery insulator removed, reinsert the
internal components into the Main Sensor's enclosure
before reattaching its lid. The Main Sensor will now
look as it did prior to step 1.
4.
Note: Ensure that the Main Sensor's button aligns with
the button hole of its lid.
Before beginning it is important to select a suitable
position for your Recessed Door Sensor. For the following
instructions, your Recessed Door Sensor should be:
Installed at the top of a door or the side of door.
Positioned away from metal that could interfere with
its magnetic functionality. This includes your door's
plate, handle or lock mechanism.
Installed in a suitable location to ensure a clear(at
least 1mm) separation when the door is closed.
Positioned exactly above or beside the hole you'll later
in your door for the installation of the Magnetic Sensor.
The rectangular areas highlighted above are the most
appropriate installation positions.
The gap between the two parts of your sensor must be
at least 1mm. If they are not, re-affix the Main Sensor
potentially by altering its hole.
Step 5
Magnetic
Sensor
Main Sensor
1mm
Magnetic
Sensor
Main Sensor
Screw Hole

PRODUCT OVERVIEW
Installation Cont’d The installation of your Recessed Door Sensor has two major steps: the installation of the Main
Sensor and the installation of the Magnetic Sensor. Powered by batteries, your door sensor will
use wireless technology to talk to your Evolve network once installed.
CD-DS100R-01
Recessed Door Sensor
View the expanded manual:
http://aeot.ec/spprt/recessed
From Aeotec by Aeon Labs' Intelligence series comes
the Recessed Door Sensor. Invisibly installed, it sits
within a door and its frame to provide all the
information needed by a Z-Wave system for security,
safety, and ambiance, and it does it all without altering
a room's aesthetics.
Your Recessed Door Sensor is comprised of two parts:
the larger Main Sensor and the smaller Magnetic
Sensor.
The larger Main Sensor
Separate the Main Sensor's two sections by first
removing its lid and then removing its internal
components.
Remove the clear battery insulator by pulling it away
from the Main Sensor.
Install your Recessed Door Sensor
With the Main Sensor powered and activated, it is now
time to inlay it within your selected doorframe and to also
install the Magnetic Sensor.
Top of the door
Side of the door
Prepare a space for the Main Sensor by drilling a hole
into your doorframe using a 19mm wide drill bit. The
hole should be 65 mm deep.
Step 1
65mm deep 19mm
Drill bit
Drill a corresponding hole in your door. The hole should be
15 mm deep. As stated, the position of this hole should align
exactly with the one hole you just created in the doorframe.
Again, use a 19mm wide drill bit.
Step 2
15mm deep
19mm
Drill bit
Doorframe
Door
Insert the Main Sensor into the hole you created in the
doorframe then secure it using two screws.
Step 3
With your door and doorframe prepared and the drill holes
created, it's now time to mount both parts of your Recessed
Door Sensor.
Secure with screws Done
Place a small amount of white glue (PVA) inside the hole
you created for the Magnetic Sensor. Then place the sensor
over and into the hole, and insert it by tapping gently on it
with a rubber hammer.
Step 4
Tap with hammer Done
1
3
Aeotec Recessed Door Sensor
2Familiarise yourself with your door sensor
Main Sensor
LED
Screw Hole
Z-Wave Button Hole
Magnetic Sensor
The Magnetic Sensor
A magnet in the plastic shell
Using a slot-head screwdriver, remove the Main
Sensor's lid by pressing gently against its exposed
connector.
Quick Start
The installation of your Recessed Door Sensor has two
major steps: the installation of the Main Sensor and the
installation of the Magnetic Sensor. Powered by
batteries, your door sensor will use wireless technology
to talk to your Z-Wave network once installed.
Prepare the Main Sensor
The first step in installing your Recessed Door Sensor is
to activate the Main Sensor.
1.
2.
3.
With the battery insulator removed, reinsert the
internal components into the Main Sensor's enclosure
before reattaching its lid. The Main Sensor will now
look as it did prior to step 1.
4.
Note: Ensure that the Main Sensor's button aligns with
the button hole of its lid.
Before beginning it is important to select a suitable
position for your Recessed Door Sensor. For the following
instructions, your Recessed Door Sensor should be:
Installed at the top of a door or the side of door.
Positioned away from metal that could interfere with
its magnetic functionality. This includes your door's
plate, handle or lock mechanism.
Installed in a suitable location to ensure a clear(at
least 1mm) separation when the door is closed.
Positioned exactly above or beside the hole you'll later
in your door for the installation of the Magnetic Sensor.
The rectangular areas highlighted above are the most
appropriate installation positions.
The gap between the two parts of your sensor must be
at least 1mm. If they are not, re-affix the Main Sensor
potentially by altering its hole.
Step 5
Magnetic
Sensor
Main Sensor
1mm
Magnetic
Sensor
Main Sensor
Screw Hole
Prepare the Main Sensor
1. The rst step in installing your
Recessed Door Sensor is to
activate the Main Sensor.
Using a slot-head screwdriver,
remove the Main Sensor’s lid
by pressing gently against its
exposed connector.
2. Separate the Main Sensor’s two
sections by rst removing its lid
and then removing its internal
components.
3. Remove the clear battery
insulator by pulling it away from
the Main Sensor.
4. With the battery insulator
removed, reinsert the internal
components into the Main
Sensor’s enclosure before
reattaching its lid. The Main
Sensor will now look as it did
prior to step 1.
Recessed Door Sensor
View the expanded manual:
http://aeot.ec/spprt/recessed
From Aeotec by Aeon Labs' Intelligence series comes
the Recessed Door Sensor. Invisibly installed, it sits
within a door and its frame to provide all the
information needed by a Z-Wave system for security,
safety, and ambiance, and it does it all without altering
a room's aesthetics.
Your Recessed Door Sensor is comprised of two parts:
the larger Main Sensor and the smaller Magnetic
Sensor.
The larger Main Sensor
Separate the Main Sensor's two sections by first
removing its lid and then removing its internal
components.
Remove the clear battery insulator by pulling it away
from the Main Sensor.
Install your Recessed Door Sensor
With the Main Sensor powered and activated, it is now
time to inlay it within your selected doorframe and to also
install the Magnetic Sensor.
Top of the door
Side of the door
Prepare a space for the Main Sensor by drilling a hole
into your doorframe using a 19mm wide drill bit. The
hole should be 65 mm deep.
Step 1
65mm deep 19mm
Drill bit
Drill a corresponding hole in your door. The hole should be
15 mm deep. As stated, the position of this hole should align
exactly with the one hole you just created in the doorframe.
Again, use a 19mm wide drill bit.
Step 2
15mm deep
19mm
Drill bit
Doorframe
Door
Insert the Main Sensor into the hole you created in the
doorframe then secure it using two screws.
Step 3
With your door and doorframe prepared and the drill holes
created, it's now time to mount both parts of your Recessed
Door Sensor.
Secure with screws Done
Place a small amount of white glue (PVA) inside the hole
you created for the Magnetic Sensor. Then place the sensor
over and into the hole, and insert it by tapping gently on it
with a rubber hammer.
Step 4
Tap with hammer Done
1
3
Aeotec Recessed Door Sensor
2Familiarise yourself with your door sensor
Main Sensor
LED
Screw Hole
Z-Wave Button Hole
Magnetic Sensor
The Magnetic Sensor
A magnet in the plastic shell
Using a slot-head screwdriver, remove the Main
Sensor's lid by pressing gently against its exposed
connector.
Quick Start
The installation of your Recessed Door Sensor has two
major steps: the installation of the Main Sensor and the
installation of the Magnetic Sensor. Powered by
batteries, your door sensor will use wireless technology
to talk to your Z-Wave network once installed.
Prepare the Main Sensor
The first step in installing your Recessed Door Sensor is
to activate the Main Sensor.
1.
2.
3.
With the battery insulator removed, reinsert the
internal components into the Main Sensor's enclosure
before reattaching its lid. The Main Sensor will now
look as it did prior to step 1.
4.
Note: Ensure that the Main Sensor's button aligns with
the button hole of its lid.
Before beginning it is important to select a suitable
position for your Recessed Door Sensor. For the following
instructions, your Recessed Door Sensor should be:
Installed at the top of a door or the side of door.
Positioned away from metal that could interfere with
its magnetic functionality. This includes your door's
plate, handle or lock mechanism.
Installed in a suitable location to ensure a clear(at
least 1mm) separation when the door is closed.
Positioned exactly above or beside the hole you'll later
in your door for the installation of the Magnetic Sensor.
The rectangular areas highlighted above are the most
appropriate installation positions.
The gap between the two parts of your sensor must be
at least 1mm. If they are not, re-affix the Main Sensor
potentially by altering its hole.
Step 5
Magnetic
Sensor
Main Sensor
1mm
Magnetic
Sensor
Main Sensor
Screw Hole

PRODUCT OVERVIEW CD-DS100R-01
Installation Cont’d With the Main Sensor powered and activated, it is now time to inlay it within your selected
doorframe and to also install the Magnetic Sensor.
Before beginning it is important to select a suitable position for your Recessed Door Sensor. For
the following instructions, your Recessed Door Sensor should be:
• Installed at the top of a door or the side of door.
• Positioned away from metal that could interfere with its magnetic functionality. This includes
your door’s plate, handle or lock mechanism.
• Installed in a suitable location to ensure a clear (at least 1mm) separation when the door is
closed.
• Positioned exactly above or beside the hole you’ll later drill in your door for the installation of
the Magnetic Sensor.
CD-DS100R-01
Recessed Door Sensor
View the expanded manual:
http://aeot.ec/spprt/recessed
From Aeotec by Aeon Labs' Intelligence series comes
the Recessed Door Sensor. Invisibly installed, it sits
within a door and its frame to provide all the
information needed by a Z-Wave system for security,
safety, and ambiance, and it does it all without altering
a room's aesthetics.
Your Recessed Door Sensor is comprised of two parts:
the larger Main Sensor and the smaller Magnetic
Sensor.
The larger Main Sensor
Separate the Main Sensor's two sections by first
removing its lid and then removing its internal
components.
Remove the clear battery insulator by pulling it away
from the Main Sensor.
Install your Recessed Door Sensor
With the Main Sensor powered and activated, it is now
time to inlay it within your selected doorframe and to also
install the Magnetic Sensor.
Top of the door
Side of the door
Prepare a space for the Main Sensor by drilling a hole
into your doorframe using a 19mm wide drill bit. The
hole should be 65 mm deep.
Step 1
65mm deep 19mm
Drill bit
Drill a corresponding hole in your door. The hole should be
15 mm deep. As stated, the position of this hole should align
exactly with the one hole you just created in the doorframe.
Again, use a 19mm wide drill bit.
Step 2
15mm deep
19mm
Drill bit
Doorframe
Door
Insert the Main Sensor into the hole you created in the
doorframe then secure it using two screws.
Step 3
With your door and doorframe prepared and the drill holes
created, it's now time to mount both parts of your Recessed
Door Sensor.
Secure with screws Done
Place a small amount of white glue (PVA) inside the hole
you created for the Magnetic Sensor. Then place the sensor
over and into the hole, and insert it by tapping gently on it
with a rubber hammer.
Step 4
Tap with hammer Done
1
3
Aeotec Recessed Door Sensor
2Familiarise yourself with your door sensor
Main Sensor
LED
Screw Hole
Z-Wave Button Hole
Magnetic Sensor
The Magnetic Sensor
A magnet in the plastic shell
Using a slot-head screwdriver, remove the Main
Sensor's lid by pressing gently against its exposed
connector.
Quick Start
The installation of your Recessed Door Sensor has two
major steps: the installation of the Main Sensor and the
installation of the Magnetic Sensor. Powered by
batteries, your door sensor will use wireless technology
to talk to your Z-Wave network once installed.
Prepare the Main Sensor
The first step in installing your Recessed Door Sensor is
to activate the Main Sensor.
1.
2.
3.
With the battery insulator removed, reinsert the
internal components into the Main Sensor's enclosure
before reattaching its lid. The Main Sensor will now
look as it did prior to step 1.
4.
Note: Ensure that the Main Sensor's button aligns with
the button hole of its lid.
Before beginning it is important to select a suitable
position for your Recessed Door Sensor. For the following
instructions, your Recessed Door Sensor should be:
Installed at the top of a door or the side of door.
Positioned away from metal that could interfere with
its magnetic functionality. This includes your door's
plate, handle or lock mechanism.
Installed in a suitable location to ensure a clear(at
least 1mm) separation when the door is closed.
Positioned exactly above or beside the hole you'll later
in your door for the installation of the Magnetic Sensor.
The rectangular areas highlighted above are the most
appropriate installation positions.
The gap between the two parts of your sensor must be
at least 1mm. If they are not, re-affix the Main Sensor
potentially by altering its hole.
Step 5
Magnetic
Sensor
Main Sensor
1mm
Magnetic
Sensor
Main Sensor
Screw Hole
1. Prepare a space for the Main
Sensor by drilling a hole into
your doorframe using a 19mm
wide drill bit. The hole should be
65 mm deep.
2. Drill a corresponding hole in
your door. The hole should
be 15mm deep. As stated, the
position of this hole should
align exactly with the hole you
just created in the doorframe.
Again, use a 19mm wide drill bit.
With your door and doorframe
prepared and the drill holes
created, it’s now time to mount
both parts of your Recessed
Door Sensor.
3. Insert the Main Sensor into
the hole you created in the
doorframe then secure it using
two screws.
Recessed Door Sensor
View the expanded manual:
http://aeot.ec/spprt/recessed
From Aeotec by Aeon Labs' Intelligence series comes
the Recessed Door Sensor. Invisibly installed, it sits
within a door and its frame to provide all the
information needed by a Z-Wave system for security,
safety, and ambiance, and it does it all without altering
a room's aesthetics.
Your Recessed Door Sensor is comprised of two parts:
the larger Main Sensor and the smaller Magnetic
Sensor.
The larger Main Sensor
Separate the Main Sensor's two sections by first
removing its lid and then removing its internal
components.
Remove the clear battery insulator by pulling it away
from the Main Sensor.
Install your Recessed Door Sensor
With the Main Sensor powered and activated, it is now
time to inlay it within your selected doorframe and to also
install the Magnetic Sensor.
Top of the door
Side of the door
Prepare a space for the Main Sensor by drilling a hole
into your doorframe using a 19mm wide drill bit. The
hole should be 65 mm deep.
Step 1
65mm deep 19mm
Drill bit
Drill a corresponding hole in your door. The hole should be
15 mm deep. As stated, the position of this hole should align
exactly with the one hole you just created in the doorframe.
Again, use a 19mm wide drill bit.
Step 2
15mm deep
19mm
Drill bit
Doorframe
Door
Insert the Main Sensor into the hole you created in the
doorframe then secure it using two screws.
Step 3
With your door and doorframe prepared and the drill holes
created, it's now time to mount both parts of your Recessed
Door Sensor.
Secure with screws Done
Place a small amount of white glue (PVA) inside the hole
you created for the Magnetic Sensor. Then place the sensor
over and into the hole, and insert it by tapping gently on it
with a rubber hammer.
Step 4
Tap with hammer Done
1
3
Aeotec Recessed Door Sensor
2Familiarise yourself with your door sensor
Main Sensor
LED
Screw Hole
Z-Wave Button Hole
Magnetic Sensor
The Magnetic Sensor
A magnet in the plastic shell
Using a slot-head screwdriver, remove the Main
Sensor's lid by pressing gently against its exposed
connector.
Quick Start
The installation of your Recessed Door Sensor has two
major steps: the installation of the Main Sensor and the
installation of the Magnetic Sensor. Powered by
batteries, your door sensor will use wireless technology
to talk to your Z-Wave network once installed.
Prepare the Main Sensor
The first step in installing your Recessed Door Sensor is
to activate the Main Sensor.
1.
2.
3.
With the battery insulator removed, reinsert the
internal components into the Main Sensor's enclosure
before reattaching its lid. The Main Sensor will now
look as it did prior to step 1.
4.
Note: Ensure that the Main Sensor's button aligns with
the button hole of its lid.
Before beginning it is important to select a suitable
position for your Recessed Door Sensor. For the following
instructions, your Recessed Door Sensor should be:
Installed at the top of a door or the side of door.
Positioned away from metal that could interfere with
its magnetic functionality. This includes your door's
plate, handle or lock mechanism.
Installed in a suitable location to ensure a clear(at
least 1mm) separation when the door is closed.
Positioned exactly above or beside the hole you'll later
in your door for the installation of the Magnetic Sensor.
The rectangular areas highlighted above are the most
appropriate installation positions.
The gap between the two parts of your sensor must be
at least 1mm. If they are not, re-affix the Main Sensor
potentially by altering its hole.
Step 5
Magnetic
Sensor
Main Sensor
1mm
Magnetic
Sensor
Main Sensor
Screw Hole
PRODUCT OVERVIEW
Installation Cont’d
CD-DS100R-01
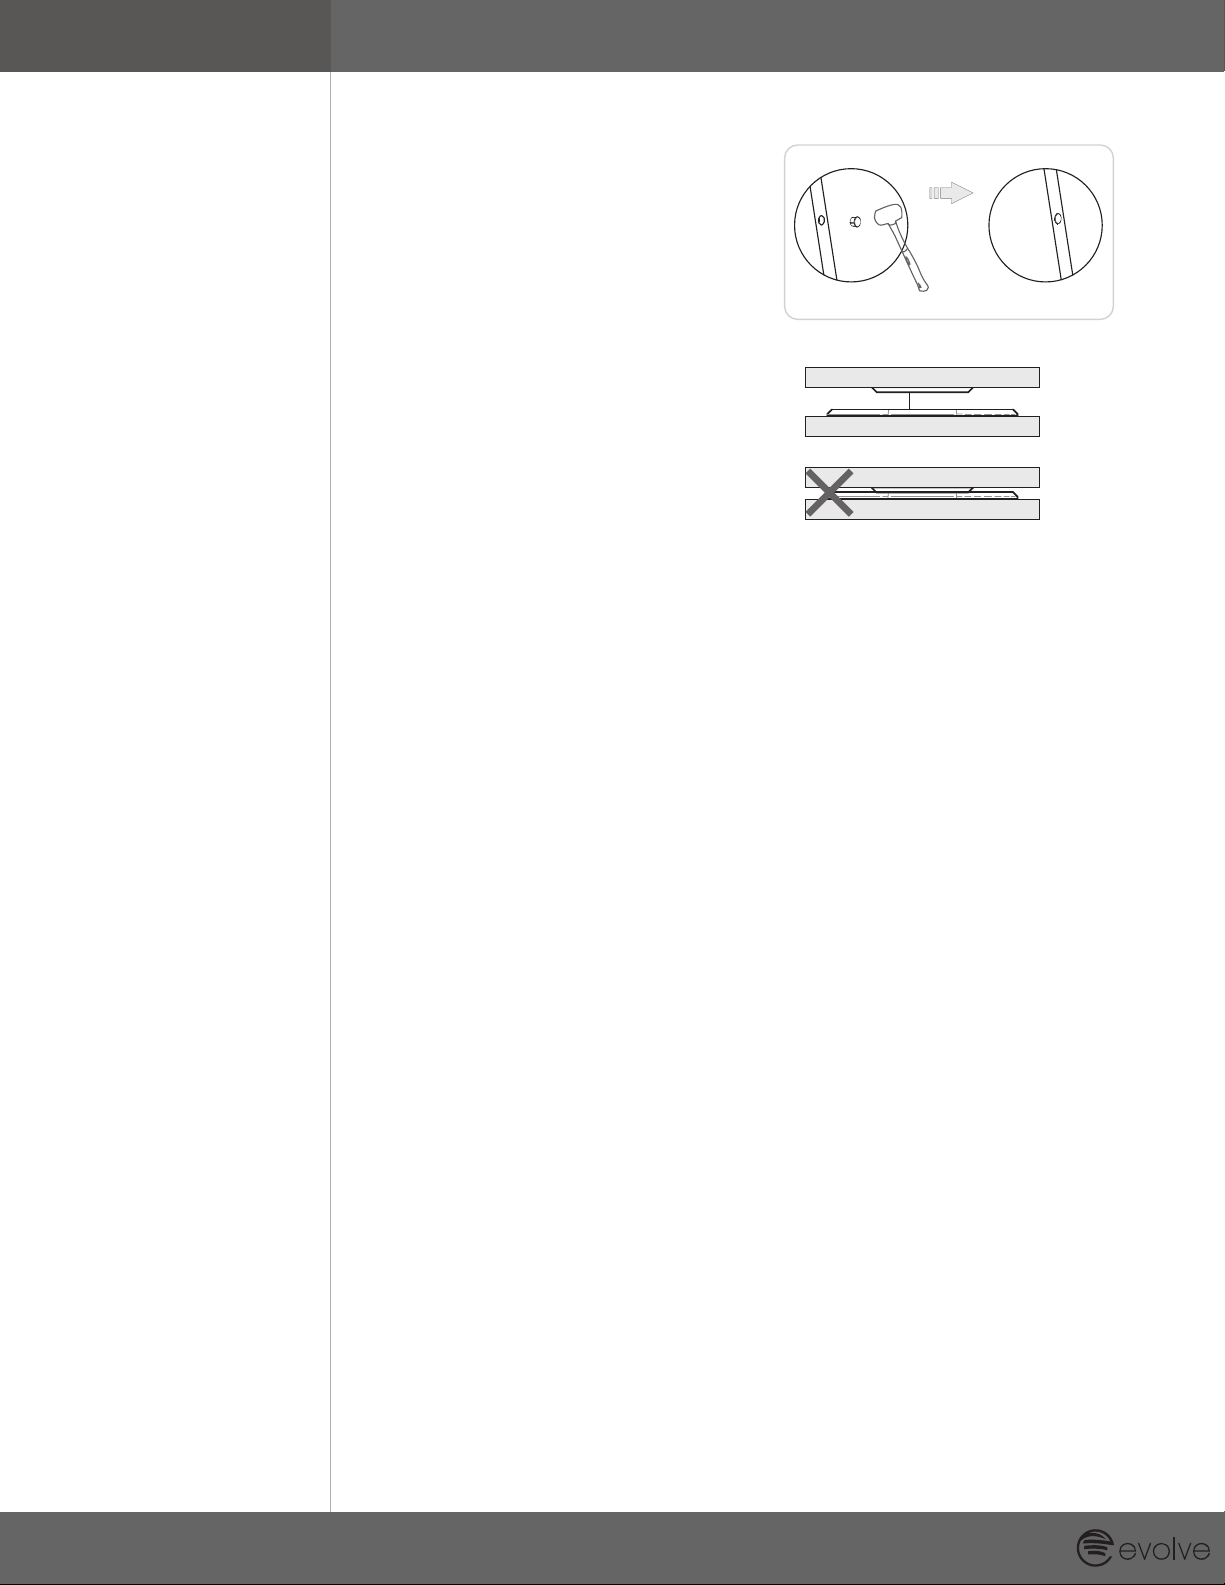
4. Place a small amount of white
glue (PVA) inside the hole you
created for the Magnetic Sensor.
Then place the sensor over
and into the hole, and insert it
by tapping gently on it with a
rubber hammer.
5. The gap between the two parts
of your sensor must be at least
1mm. If they are not, re-ax
the Main Sensor potentially by
altering its hole.
Recessed Door Sensor
View the expanded manual:
http://aeot.ec/spprt/recessed
From Aeotec by Aeon Labs' Intelligence series comes
the Recessed Door Sensor. Invisibly installed, it sits
within a door and its frame to provide all the
information needed by a Z-Wave system for security,
safety, and ambiance, and it does it all without altering
a room's aesthetics.
Your Recessed Door Sensor is comprised of two parts:
the larger Main Sensor and the smaller Magnetic
Sensor.
The larger Main Sensor
Separate the Main Sensor's two sections by first
removing its lid and then removing its internal
components.
Remove the clear battery insulator by pulling it away
from the Main Sensor.
Install your Recessed Door Sensor
With the Main Sensor powered and activated, it is now
time to inlay it within your selected doorframe and to also
install the Magnetic Sensor.
Top of the door
Side of the door
Prepare a space for the Main Sensor by drilling a hole
into your doorframe using a 19mm wide drill bit. The
hole should be 65 mm deep.
Step 1
65mm deep 19mm
Drill bit
Drill a corresponding hole in your door. The hole should be
15 mm deep. As stated, the position of this hole should align
exactly with the one hole you just created in the doorframe.
Again, use a 19mm wide drill bit.
Step 2
15mm deep
19mm
Drill bit
Doorframe
Door
Insert the Main Sensor into the hole you created in the
doorframe then secure it using two screws.
Step 3
With your door and doorframe prepared and the drill holes
created, it's now time to mount both parts of your Recessed
Door Sensor.
Secure with screws Done
Place a small amount of white glue (PVA) inside the hole
you created for the Magnetic Sensor. Then place the sensor
over and into the hole, and insert it by tapping gently on it
with a rubber hammer.
Step 4
Tap with hammer Done
1
3
Aeotec Recessed Door Sensor
2Familiarise yourself with your door sensor
Main Sensor
LED
Screw Hole
Z-Wave Button Hole
Magnetic Sensor
The Magnetic Sensor
A magnet in the plastic shell
Using a slot-head screwdriver, remove the Main
Sensor's lid by pressing gently against its exposed
connector.
Quick Start
The installation of your Recessed Door Sensor has two
major steps: the installation of the Main Sensor and the
installation of the Magnetic Sensor. Powered by
batteries, your door sensor will use wireless technology
to talk to your Z-Wave network once installed.
Prepare the Main Sensor
The first step in installing your Recessed Door Sensor is
to activate the Main Sensor.
1.
2.
3.
With the battery insulator removed, reinsert the
internal components into the Main Sensor's enclosure
before reattaching its lid. The Main Sensor will now
look as it did prior to step 1.
4.
Note: Ensure that the Main Sensor's button aligns with
the button hole of its lid.
Before beginning it is important to select a suitable
position for your Recessed Door Sensor. For the following
instructions, your Recessed Door Sensor should be:
Installed at the top of a door or the side of door.
Positioned away from metal that could interfere with
its magnetic functionality. This includes your door's
plate, handle or lock mechanism.
Installed in a suitable location to ensure a clear(at
least 1mm) separation when the door is closed.
Positioned exactly above or beside the hole you'll later
in your door for the installation of the Magnetic Sensor.
The rectangular areas highlighted above are the most
appropriate installation positions.
The gap between the two parts of your sensor must be
at least 1mm. If they are not, re-affix the Main Sensor
potentially by altering its hole.
Step 5
Magnetic
Sensor
Main Sensor
1mm
Magnetic
Sensor
Main Sensor
Screw Hole
Other Evolve Accessories manuals

Popular Accessories manuals by other brands


Mammut
Mammut PULSE Barryvox user manual

Vega
Vega VEGAFLEX 86 operating instructions

Gleason Reel
Gleason Reel Dual Hose Reel-Direct Drive K24 Installation and maintenance instructions

Byron
Byron SX-86 Installation and operation instruction

EVE
EVE Water Guard Get started

OJ Electronics
OJ Electronics MICROLINE OTD2 instructions


 Specifications")


