EWC Controls ULTRAZONE MRK Installation and operating instructions
EWC Controls Inc. 385 Highway 33 Englishtown, NJ 07726 800-446-3110 FAX 732-635-8646 E-Mail- [email protected]
Contents:
(1) MA-ND3 Motor Actuator
(1) ND/ND2 Anti-Rotation Bracket
(1) URD/RDN
(1) Shaft Adaptor
(4) 11/32 hex nuts
(2) #8 x 1/2” self tap screws
(2) Flat washers
(4) #6 phillips screws
Tools Required:
1/4” Nut Driver
5/16” Nut Driver
11/32” Nut Driver (ND/ND2)
3/32” Allen Wrench (RDN)
Medium Phillips Screwdriver
Precision Pocket Screwdriver
Anti-Rotation Bracket
(1) ND3 Anti-Rotation Bracket
The New & Versatile MRK Damper Motor
Replacement Kit is compatible with original ND &
ND2 Rectangular Dampers. It also works with any
URD damper ever produced, including RDN style
dampers.
P/N 090376A0152 REV. E Copyright C EWC Controls 2004All Rights Reserved -- AN-152
Installation and service should be performed by
qualified personnel only. Follow all local &
national, mechanical & electrical codes &
ordinances.
BEFORE YOU BEGIN
-Read all instructions and figures pertaining to the
model actuator you are replacing.
-Gather the necessary tools to complete the
replacement.
-Disconnect 24vac power supply.
-Tag and remove low voltage wires from existing
actuator.
MODEL URD & RDN STYLE DAMPERS
(Figure 2)
-
-Using 1/4” nut driver, Insert 1/2” self-tapping
screws into proper holes and tighten.
Keeping the folds on the Anti-Rotation Bracket
away from the Motor Actuator, align holes on Anti-
Rotation Bracket with holes on rear of MA-ND3.
-Follow instructions for Replacing Motor
Actuator for URD or RDN on pages 2 and 3.
CONTROLS INC.
C
EW
Excellence Without Compromise
MANUAL
GEAR
RELEASE
MA-ND3
CLOSED OPEN
UL
R
CUS
LISTED
94D5
TEMP.IND.&
REG.EQUIP.
CLASS 2 SUPPLY
17 in-lb (2Nm)
30...45s
1 4 6
24VAC
50/60Hz
3.5VA 2W
COM PO PC
ACTUATOR
CLAMP
V-BOLT
MANUAL
GEAR
RELEASE
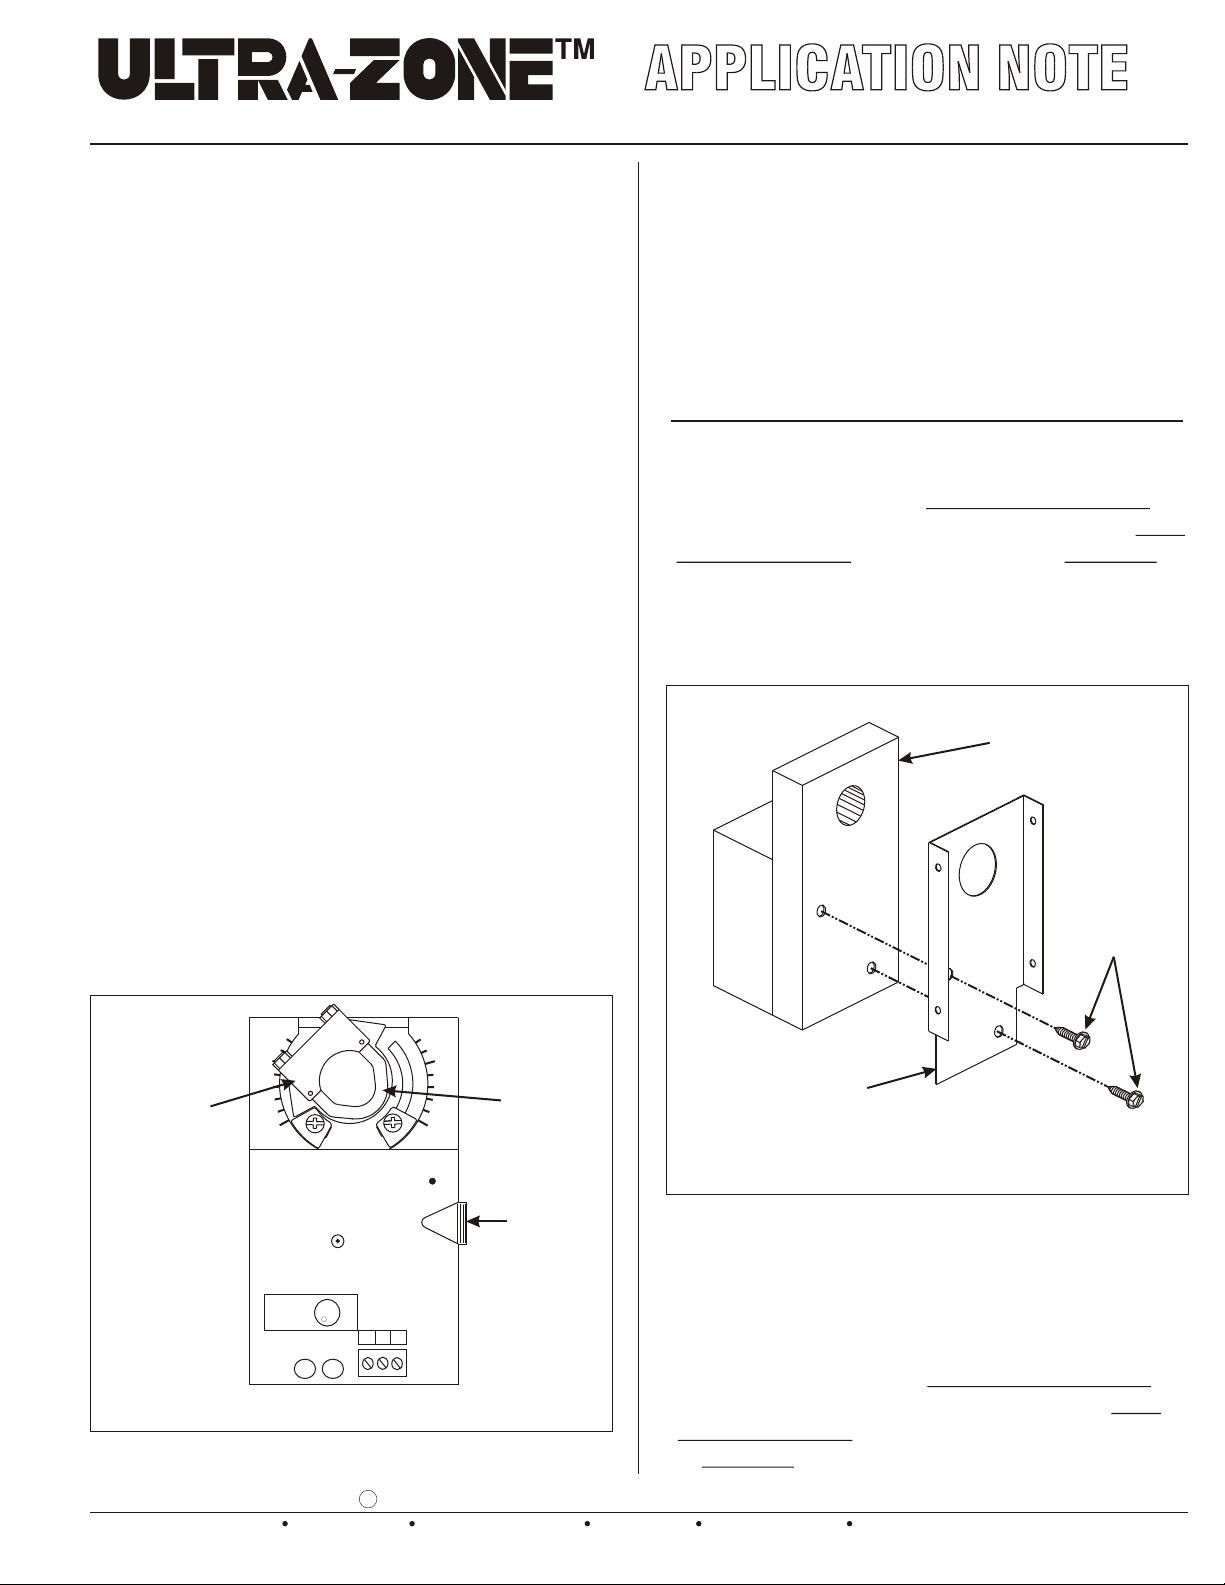
Figure 1: New MA-ND3 Motor Actuator
Figure 2: URD/RDN Anti-Rotation Bracket Assembly
MA-ND3
URD/RDN
ANTI-ROTATION
BRACKET
1/2” SELF-
TAP SCREWS
MODEL ND & ND2 STYLE DAMPERS
(Figure 3)
-Lay motor actuator on a bench with the back plate
facing up.
-Place one (1) washer over the two (2) lower
mounting holes.
-Keeping the folds on the Anti-Rotation Bracket
towards the motor actuator, align holes onAnti-
Rotation Bracket with holes and washers on rear
of MA-ND3.
ATTACHING BRACKET TO ACTUATOR
AN-152 - Model MRK - Motor Actuator Replacement Kit
1

MA-ND3
WASHERS
Figure 3: ND/ND2 Bracket AssemblyAnti-Rotation
(Continued from previous page)
-Using 1/4” nut driver, Insert 1/2” self-tapping
screws into proper holes and tighten.
-Follow instructions for Replacing Motor
Actuator for ND/ND2 on Page 3 and 4.
REPLACING MOTOR ACTUATOR
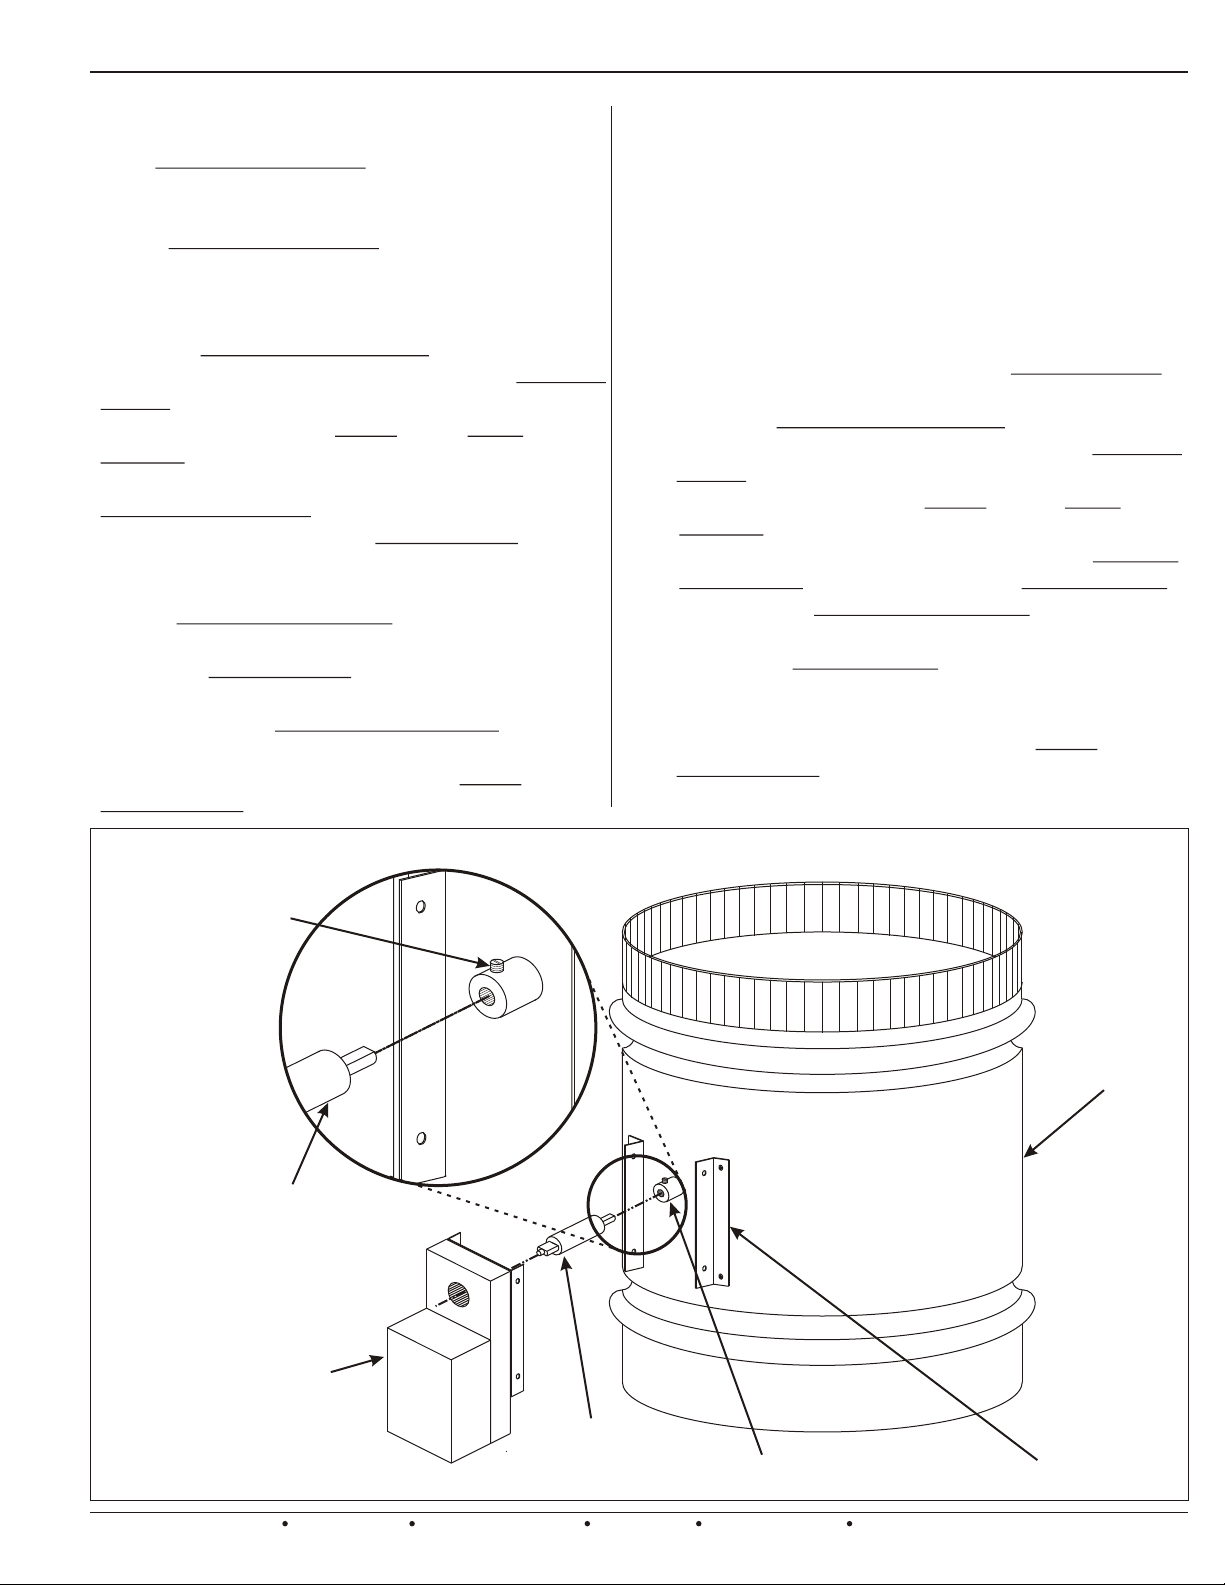
MODEL URD STYLE DAMPERS
(Figure 4)
-Remove the four (4) phillips head screws holding
the existing motor actuator to the damper.
-Pull the existing motor actuator straight off.
-Using the Manual Gear Release on the New
Actuator/BracketAssembly, position the Actuator
Clamp to the far LEFT. (OPEN Position)
-Loosen the nuts on the V-bolt so the Shaft
Adaptor will slide thru easily.
-On the URD damper, position the slot on the
Damper Blade Shaft vertically and insert the
URD/ND mating end of the Shaft Adaptor fully
into the Damper Blade Shaft.
-Align Actuator/Bracket Assembly and mounting
holes with Shaft Adaptor and mounting brackets.
-Insert Philips head screws thru mounting
brackets into the Anti-Rotation Bracket and
tighten.
-Using a 5/16” nut driver, tighten theV-bolt to the
ShaftAdaptor.
-Reconnect wiring.
Figure 4: URD Motor Actuator Replacement Assembly
ACTUATOR/BRACKET
ASSEMBLY
URD
DAMPER
DAMPER BLADE SHAFT
SHAFT
ADAPTOR
POSITION
BLADE SHAFT
SLOT VERTICALLY
SHAFT ADAPTOR-
URD/ND MATING
MOUNTING
BRACKETS
ND/ND2
ANTI-ROTATION
BRACKET 1/2” SELF-
TAP SCREWS
EWC Controls Inc. 385 Highway 33 Englishtown, NJ 07726 800-446-3110 FAX 732-635-8646 E-Mail- [email protected]
2
Model MRK - Motor Actuator Replacement Kit
**ACTUATOR CLAMP NOT SHOWN FOR CLARITY
Model MRK - Motor Actuator Replacement Kit
MODEL RDN STYLE DAMPERS
(Figure 5)
-Align Damper Blade Shaft set screw with access
opening on existing motor actuator.
-Using a 3/32” allen wrench, loosen the set screw
on the Damper Blade Shaft.
-Remove the four (4) phillips head screws holding
the existing motor actuator to the damper.
-Pull the existing motor actuator straight off.
-Using the Manual Gear Release on the New
Actuator/Bracket Assembly, position the Actuator
Clamp to the far RIGHT. (CLOSED Position)
-Loosen the nuts on the V-bolt so the Shaft
Adaptor will slide thru easily.
-On the RDN damper, position the set screw on the
Damper Blade Shaft so it is facing UP and insert
the RDN mating end of the Shaft Adaptor fully
into the blade shaft with the flat side UP.
-Using 3/32” allen wrench, tighten the set screw
on the Damper Blade Shaft.
-Align Actuator/Bracket Assembly and mounting
holes with Shaft Adaptor and mounting brackets.
-Insert Philips head screws thru mounting
brackets into the Anti-Rotation Bracket and
Tighten.
-Using a 5/16” nut driver, tighten theV-bolt to the
Shaft Adaptor.
Figure 5: RDN Motor Actuator Replacement Assembly
ACTUATOR/BRACKET
ASSEMBLY
RDN
DAMPER
DAMPER BLADE SHAFT
SHAFT
ADAPTOR
POSITION
SET-SCREW
FACING UP
ADAPTOR SHAFT-
RDN MATING
FLAT SIDE UP
MOUNTING
BRACKETS
MODEL ND/ND2 STYLE DAMPERS
(Figure 6)
-Remove the two (2) 11/32” actuator mounting
nuts holding existing motor actuator to damper
frame.
-Pull the existing motor actuator straight off.
-For ND2 dampers place one (1) of the supplied
11/32” hex nuts on each existing Mounting Post.
(Not necessary for older ND dampers).
-Using the Manual Gear Release on the New
Actuator/Bracket Assembly, position the Actuator
Clamp to the far LEFT. (OPEN Position)
-Loosen the nuts on the V-bolt so the Shaft
Adaptor will slide thru easily.
-On the damper, position the slot on the Damper
Blade Shaft vertically and insert Shaft Adaptor
fully into the Damper Blade Shaft.
-Align Actuator/Bracket Assembly and mounting
holes with Shaft Adaptor and mounting posts.
-Replace 11/32” hex nuts on mounting posts and
tighten.
-Using a 5/16” nut driver, tighten theV-bolt to the
Shaft Adaptor.
-Reconnect wiring.
-Reconnect wiring. Note: Refer to MA-ND3
Submittal sheet for proper wiring.
EWC Controls Inc. 385 Highway 33 Englishtown, NJ 07726 800-446-3110 FAX 732-635-8646 E-Mail- [email protected] 3
**ACTUATOR CLAMP NOT SHOWN FOR CLARITY

Figure 6: ND/ND2 Motor Actuator Replacement Assembly
ACTUATOR/BRACKET
ASSEMBLY
ND/ND2
DAMPER
DAMPER BLADE SHAFT
ADAPTOR
SHAFT
ADAPTOR SHAFT-
URD/ND MATING
EXISTING
MOUNTING
POSTS--ND2
EXISTING
MOUNTING
POSTS--ND
11/32” HEX NUTS
(ND2 ONLY)
POSITION
BLADE SHAFT
SLOT VERTICALLY
ACTUATOR
MOUNTING NUTS
Figure 7: Completed URD/RDN Actuator Replacement Figure 8: Completed ND/ND2 Actuator Replacement
Model MRK - Motor Actuator Replacement Kit
EWC Controls Inc. 385 Highway 33 Englishtown, NJ 07726 800-446-3110 FAX 732-635-8646 E-Mail- [email protected]
4
**ACTUATOR CLAMP NOT SHOWN FOR CLARITY **ACTUATOR CLAMP NOT SHOWN FOR CLARITY
**ACTUATOR CLAMP NOT SHOWN FOR CLARITY
NOTE: POSITION OF MOUNTING POSTS
MAY REQUIRE THEACTUATOR/BRACKET
ASSEMBLY TO BE ROTATED 180 FROM
POSITION SHOWN
°
This manual suits for next models
1
Other EWC Controls Air Conditioner manuals

Popular Air Conditioner manuals by other brands


Samsung
Samsung AS07A5MA Service manual

Panasonic
Panasonic CW-N1821EA operating instructions

INVENTOR
INVENTOR L5VI32-09WFR user manual

Panasonic
Panasonic CS-KV18UKF-5 operating instructions

Gree
Gree GWH07PA-K3NNA6E Service manual

Olimpia splendid
Olimpia splendid OS-SECFH18EI Instructions for installation, use and maintenance