Exim International Island series User manual
1
MODULAR CABINET ASSEMBLY INSTRUCTIONS
Use this manual in conjunction with your main manual to properly assemble your built-in grill. Refer to the, main
manual for operating, cleaning, and maintenance instructions. This grill is designed for NON-COMBUSTIBLE, enclosures
only, and must be installed and serviced by a qualified installer to local codes.
Exim International (Australia) Pty Ltd
24 Harrington Street, Arundel Industrial Park,
Arundel, QLD 4214
RETAIN THIS MANUAL FOR FUTURE REFERENCE.

2
EXIM PRESIDENT'S LIMITED LIFETIME WARRANTY
CONDITIONS AND LIMITATIONS
Exim warrants the following materials and workmanship in your new product against defects for as long
as you own it. This covers: stainless steel panels, stainless steel drawer fronts. Subject to the following
conditions. During the first ten years Exim will provide replacement parts at our option free of charge.
From the eleventh year to lifetime Exim will provide replacement parts at 50% of the current retail price.
Components such as the leveling feet, pivot rods, hoses and connectors, fasteners and accessories are
covered and Exim will provide parts free of charge during the first year of the limited warranty.
Exim shall not be liable for any transportation charges, labour costs or export duties.
"Exim warrants its products against manufacturing defects to the original purchaser only, provided that
the purchase was made through an authorized dealer and is subject to the following conditions and
limitations:"
This factory warranty is non-transferable and may not be extended what-so-ever by any of our
representatives.
The gas grill must be installed by a licensed, authorized service technician or contractor. Installation must
be done in accordance with the installation instructions Included with the product and all local and
national building and fire codes.
This limited warranty does not cover damages caused by misuse, lack of maintenance, grease fires, hostile
environments, accident, alterations, abuse or neglect and parts installed from other manufacturers will
nullify this warranty.
This limited warranty further does not cover any scratches, dents, painted finishes, corrosion or
discolouring by heat, abrasive and chemical cleaners, nor chipping on porcelain enamel parts, nor any
components used in the installation of the gas grill.
Should deterioration of parts occur to the degree of non-performance within the duration of the
warranted coverage, a replacement part will be provided.
In the first year only, this warranty extends to the replacement of warranted parts which are defective in
material or workmanship provided that the product has been operated in accordance with the operation
instructions and under normal conditions.
After the first year, with respect to this Limited Lifetime Warranty Exim may, at its discretion, fully
discharge all obligations with respect to this warranty by refunding to the original warranted purchaser
the wholesale price of any warranted but defective part(s).
Exim will not be responsible for the installation, labour or any other costs or expenses related to the
re-installation of a warranted part, and such expenses are not covered by this warranty.
Notwithstanding any provision contained in this Limited Warranty Exim's responsibility under this
warranty is defined as above and it shall not in any event extend to any incidental, consequential, or
indirect damages.
This warranty defines the obligation and liability of Exim with respect to the NAPOLEON or other gas grill
and any other warranties expressed or implied with respect to this product, its components or accessories
are excluded.
Exim neither assumes, nor authorizes any third party to assume, on its behalf, any other liabilities with
respect to the sale of this product. Exim will not be responsible for: over firing, blow outs caused by
environmental conditions such as strong winds, or inadequate ventilation.
Any damages to the gas grill due to weather damage, hail, rough handling, damaging chemicals or
cleaners will not be the responsibility of NAPOLEON.
The bill of sale or copy will be required together with a serial number and a model number when making
any warranty claims from Exim.
Exim reserves the right to have its representative inspect any product or part prior to honouring any
warranty claim.
Exim shall not be liable for any transportation charges, labour costs, or export duties.
3
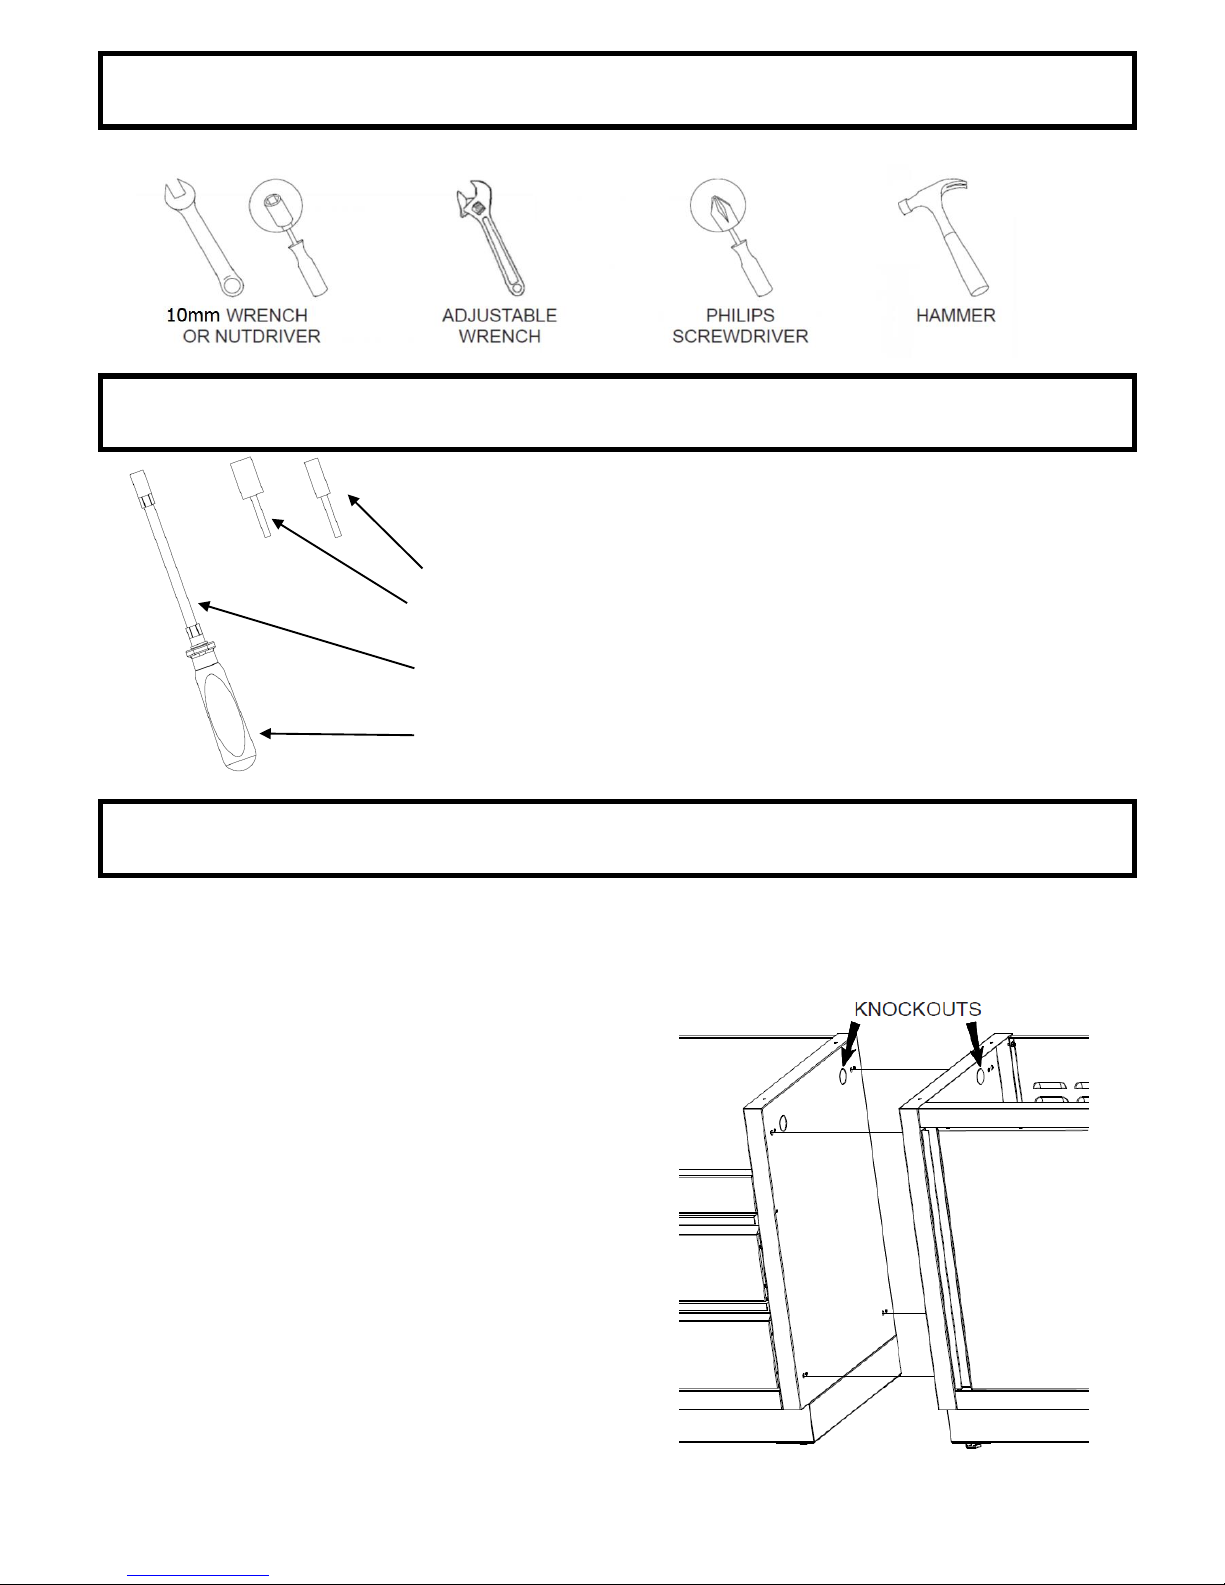
Check for missing or damaged parts before you begin and consult your local retailer if necessary.
USING AN ELECTRIC DRILL WILL SIGNIFICANTLY
M6 Hex Bit REDUCE ASSEMBLY TIME AND FACILITATE ASSEMBLY
M10 Hex Bit
Flexible extension bit holder.
Hex bit screwdriver handle.
The piping up to the gas grill is the responsibility of the installer and piping should be located as shown in the
built-in instructions. Do not use hose to connect the unit. It must be connected with either rigid pipe, copper tube or an
approved flexible metal connector. The installation must comply with AS/NZS 5601.1 Natural Gas and Propane
installations in Australia and New Zealand.
Look to the manual that came with the gas grill for further
instructions.
To ease installation and piping, removable knockouts
have been provided in the side panels and in the center of each
back panel. The knockouts in the side panels should be removed
before the cabinets are bolted in a row. Only remove the
knockouts that are required for the piping of any gas, plumbing or
electrical lines.
TOOLS REQUIRED
GAS AND ELECTRICAL PIPING
TOOLS SUPPLIED (ONLY WITH SC-UNI)

4
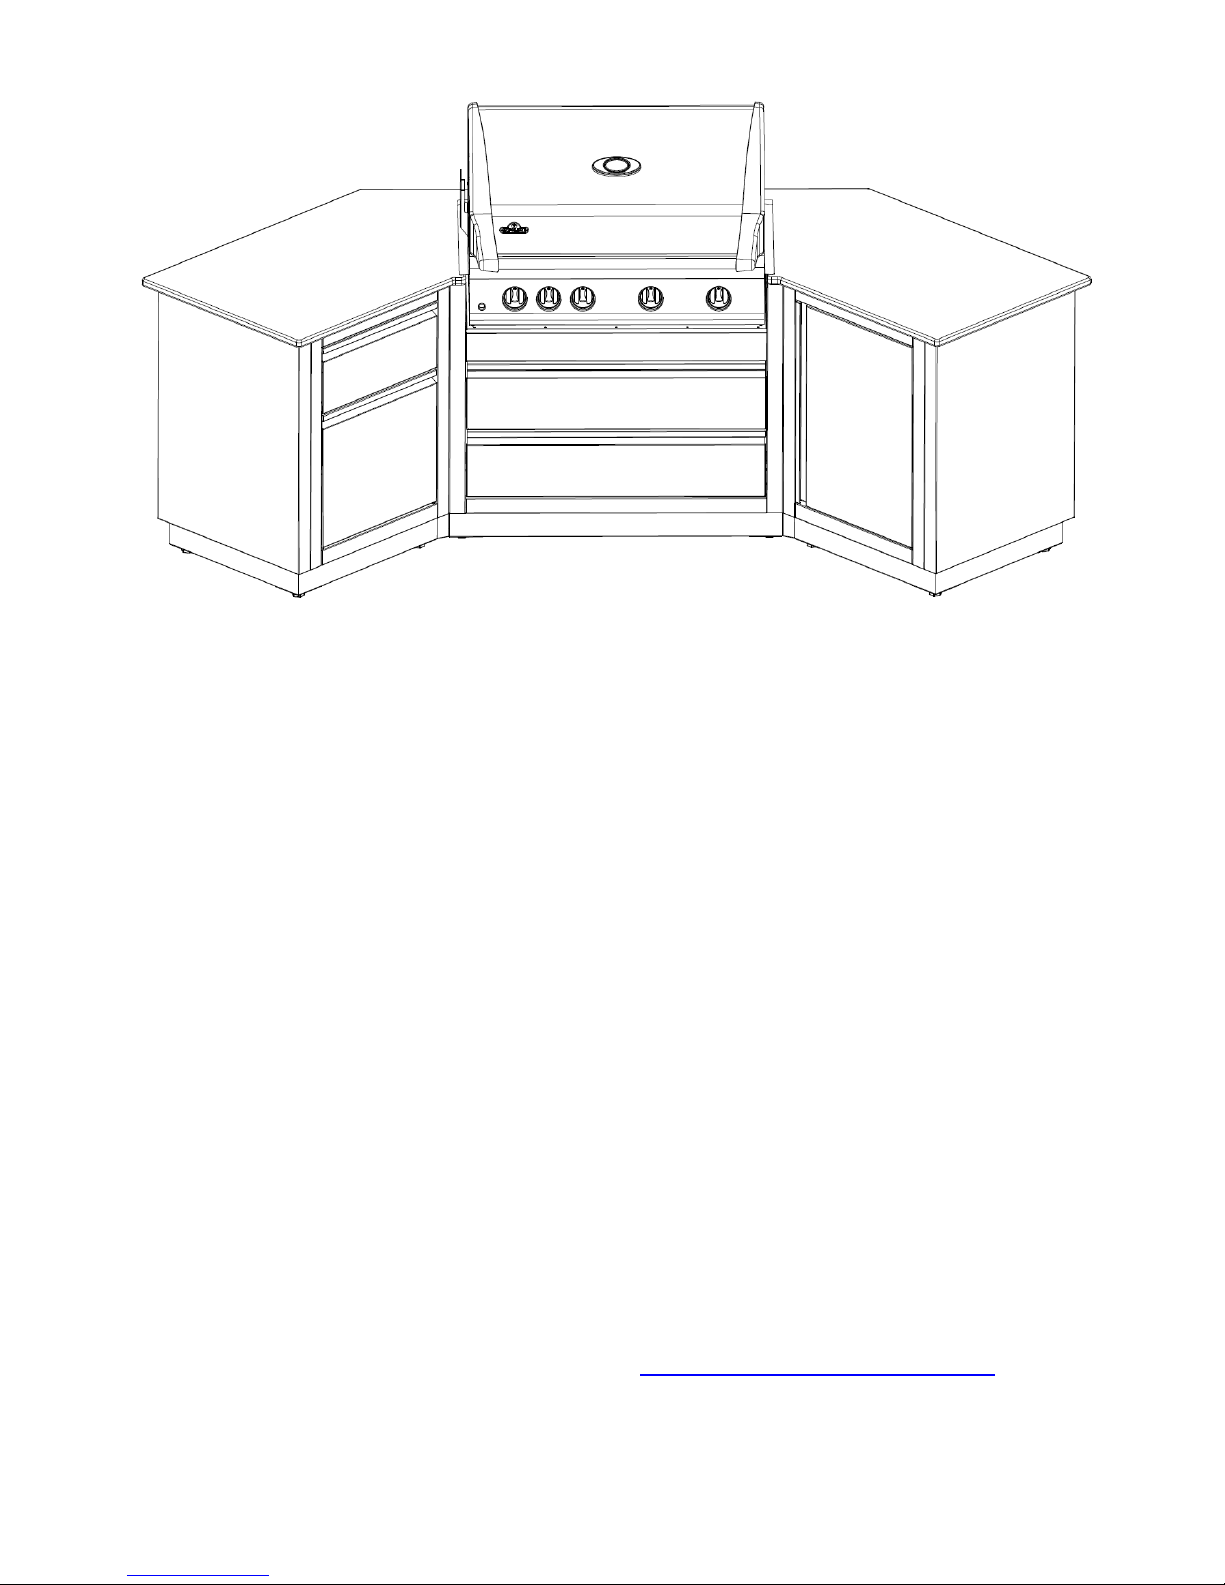
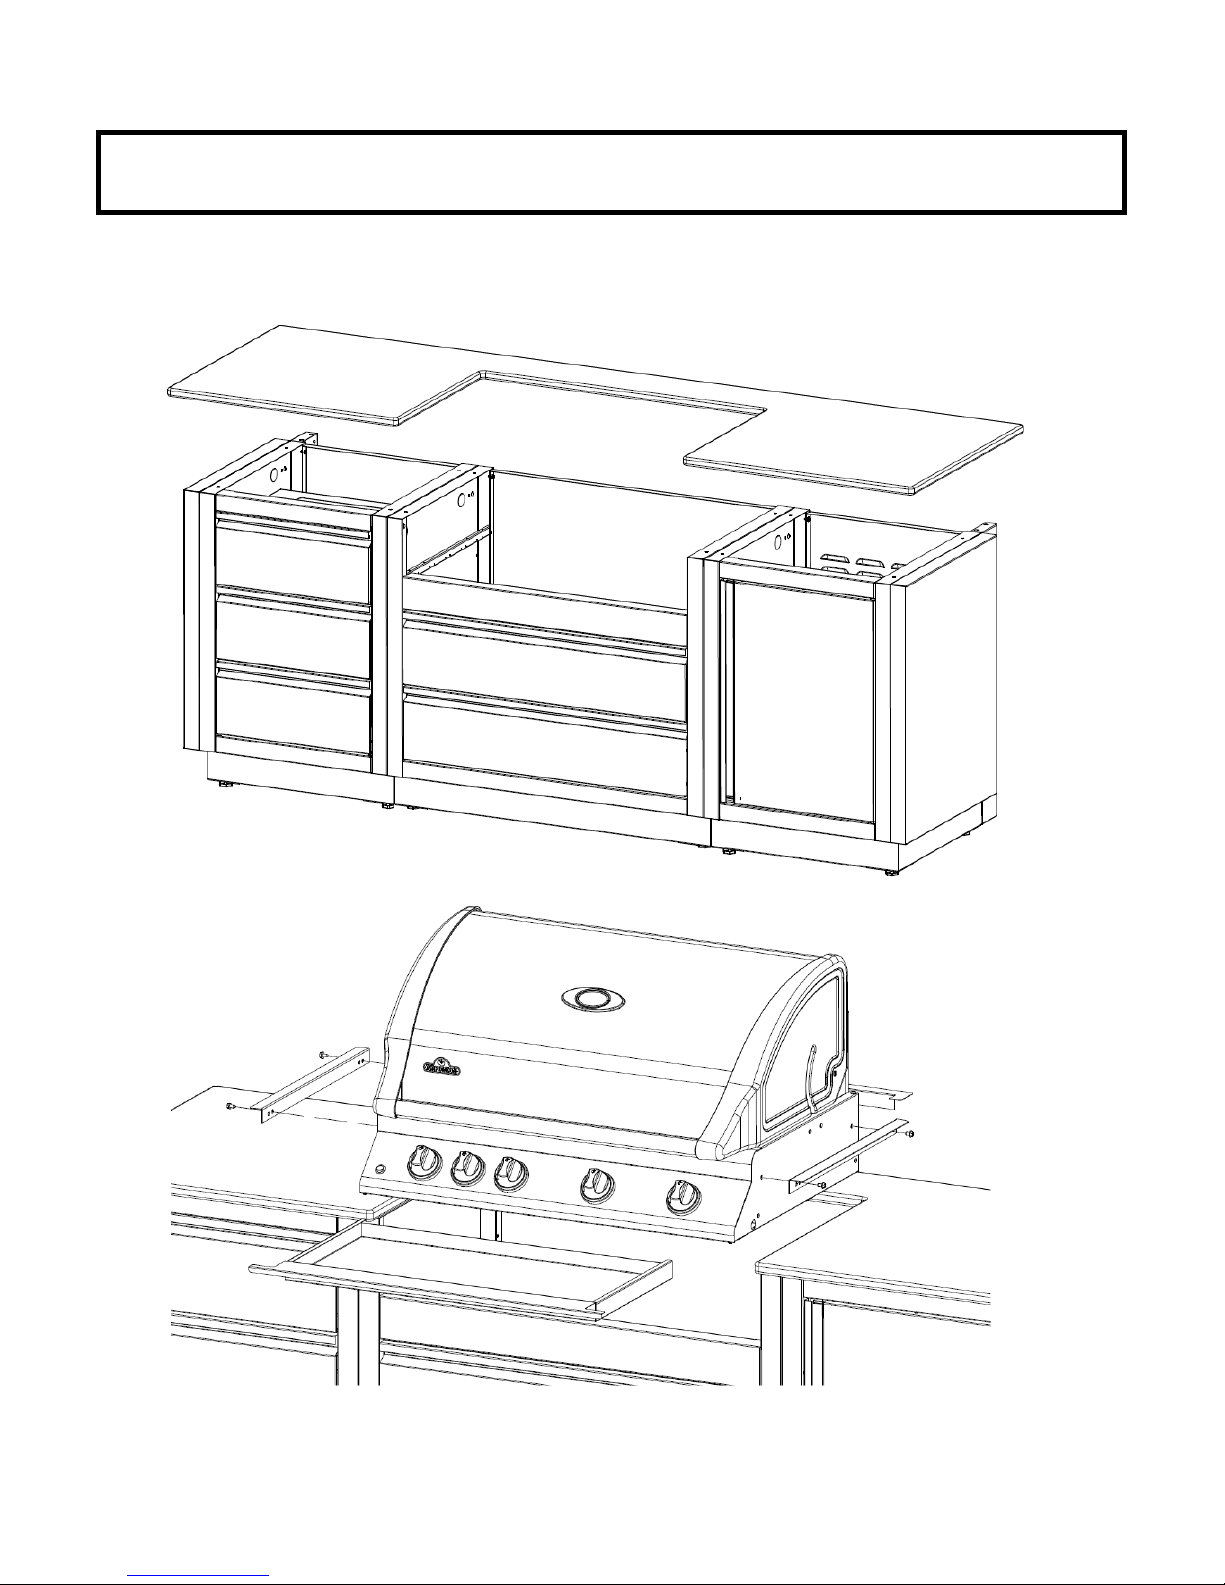
The Outdoor Modular Island series has been developed with versatility in mind. The cabinets can be assembled in virtually
any combination to suit your individual needs. They can be assembled against a house wall or as a standalone island,
becoming the focal point of your backyard. With multi-function and storage capabilities, your backyard island can be
transformed into an outdoor kitchen, placing the host in the center of the action when entertaining guests.
The cabinets are designed to be easy to assemble and install for either the home owner or private contractor. All cabinets
are 890mm tall by 710mm deep. All cabinets are 710mm wide except for the BUILT-IN grill cabinets whose width,
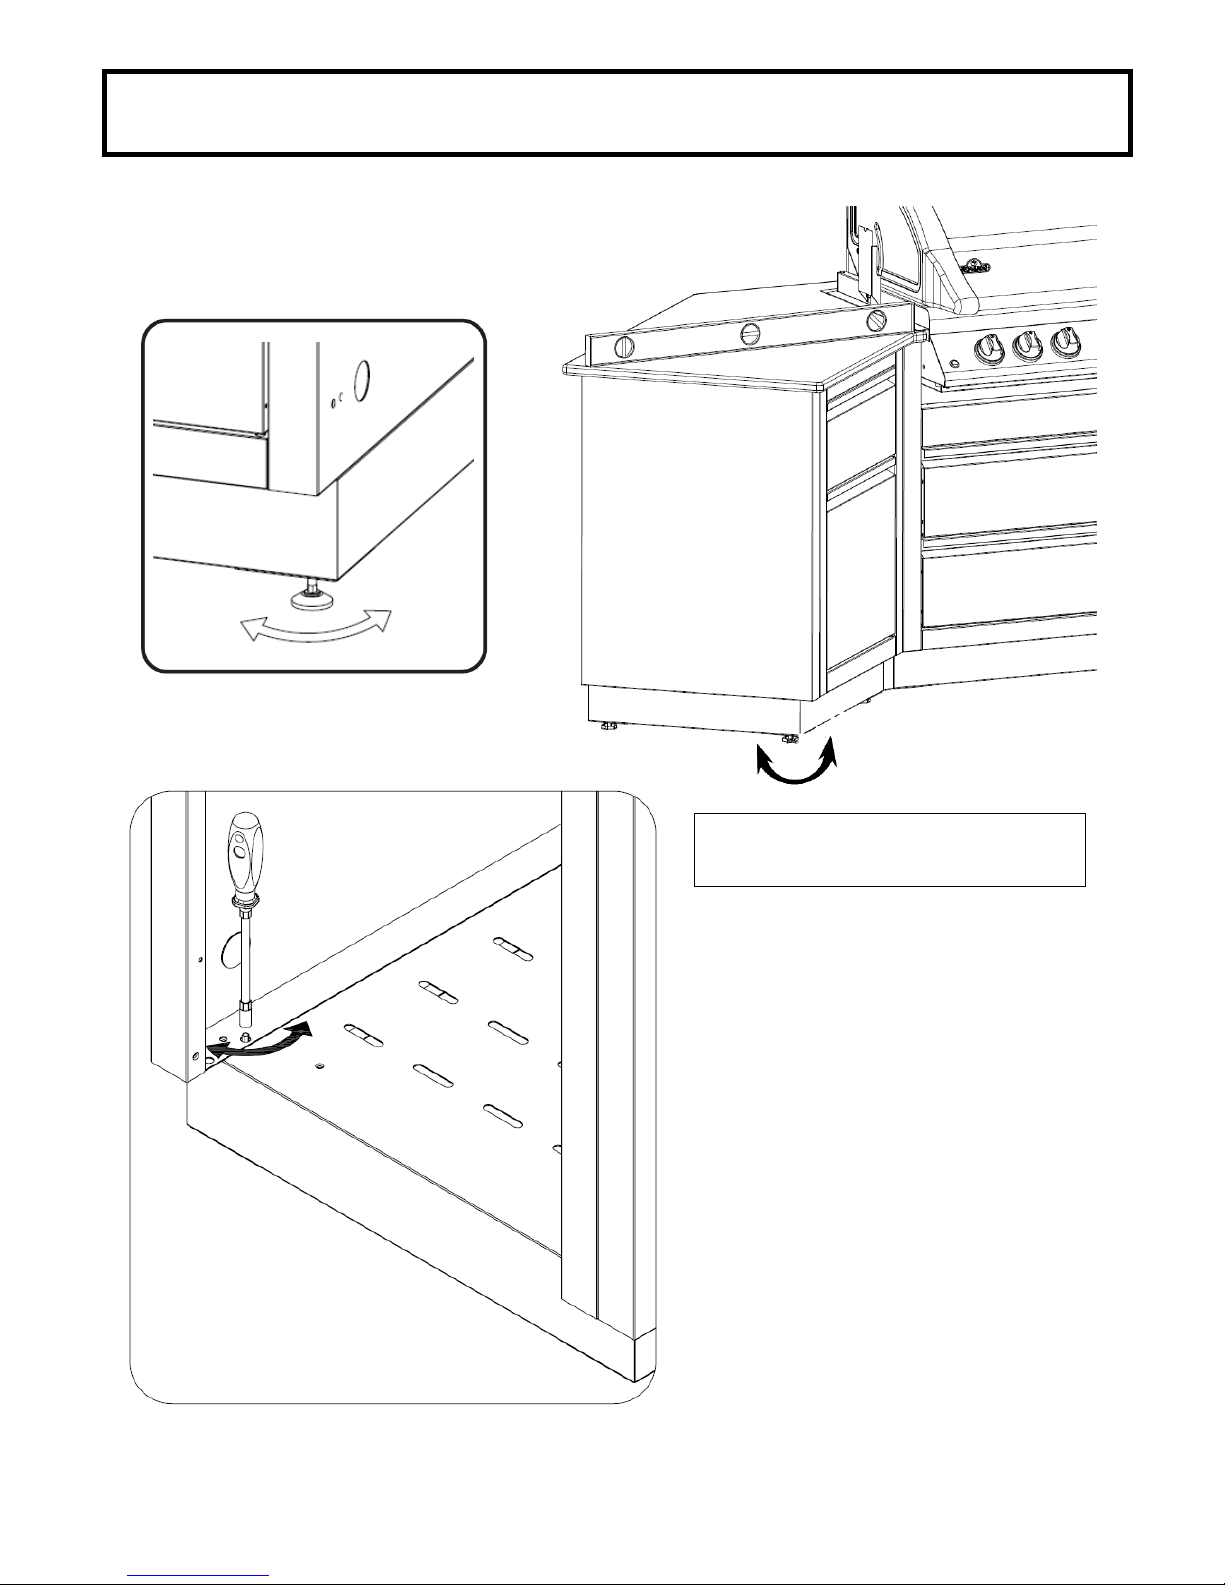
corresponds to the width of the unit it was designed for. Each cabinet has 4 leveling feet for adjustment on even surfaces.
The 2 drawer under grill cabinets are made to fit the Napoleon BUILT-IN series of grills only and are available in several
different sizes. BUILT-IN grills come in several different sizes. Refer to the installation manuals that come with the grill head
for proper installation and operating instructions.
The BUILT-IN series of grills can be ordered in your choice of propane or natural gas configuration. Natural gas is an
obvious selection for many people that already have it available in their home. All gas modifications or installations must
be done by a qualified gas installer. Knockouts are present in the side and rear panels for easy piping and installation. For
those who order a propane grill, a propane tank cabinet is available.
The cabinets can be installed against a NON-COMBUSTIBLE wall of a house, a masonry or stucco half-wall, or freestanding
in an island configuration. A powder coated 50mm wide end panel is included to cover the knockouts and mounting holes
in the outside panels in a run of cabinets, giving a more finished look.
When utilizing 45° and 90° transitions in your design, modules on either side of the transition need to be chosen, carefully.
If doors or drawers are used on either side of the transition, they will interfere with each other when opened.
If a drawer module is placed next to a grill, the control panel on the grill will prevent the top drawer from opening. Door
modules can be used with 45° transitions, but the control panel will prevent the door from fully opening and may damage
the door.
Optional built-in side burner kits or sink kits are available through your Napoleon Gas Grill dealer. These side burner kits
and sink kits are an excellent complement to the BUILT-IN series of grills. We recommend that the side burner kit or sink,
be installed over the top of the SC-UNI cabinet with SC-SK or SC-SINK kits. It has the separation panel at the top of the
cabinet which allows protection for the side burner valve and hose routing. When installing the SINK kit, it is preferable to
remove the separation panel.
Countertops can be purchased from your dealer in a modular form in black granite. You may also want to custom order
your granite top to your preferred colour and to fit your configuration. The countertop material must be
NON-COMBUSTIBLE if a grill is to be installed into it. They can be ordered in advance by drawing out the floor plan of how
the cabinets will be situated and adding up the width measurements, allowing 1-2 inches of countertop overhang. Most
countertop manufacturers are willing to come and take measurements after assembly of the cabinets is complete to
ensure a perfect fit. The built-in grill head comes with stainless steel brackets and hardware that allow the unit to rest on
the countertop above the corresponding island cabinet for that unit. Granite or Corian are excellent choices of countertop
materials. Decorative countertops made of ceramic tile set on top of cement tiling board can be made to match your
surrounding backyard furniture colors
PLANNING YOUR MODULAR OUTDOOR ISLAND

5
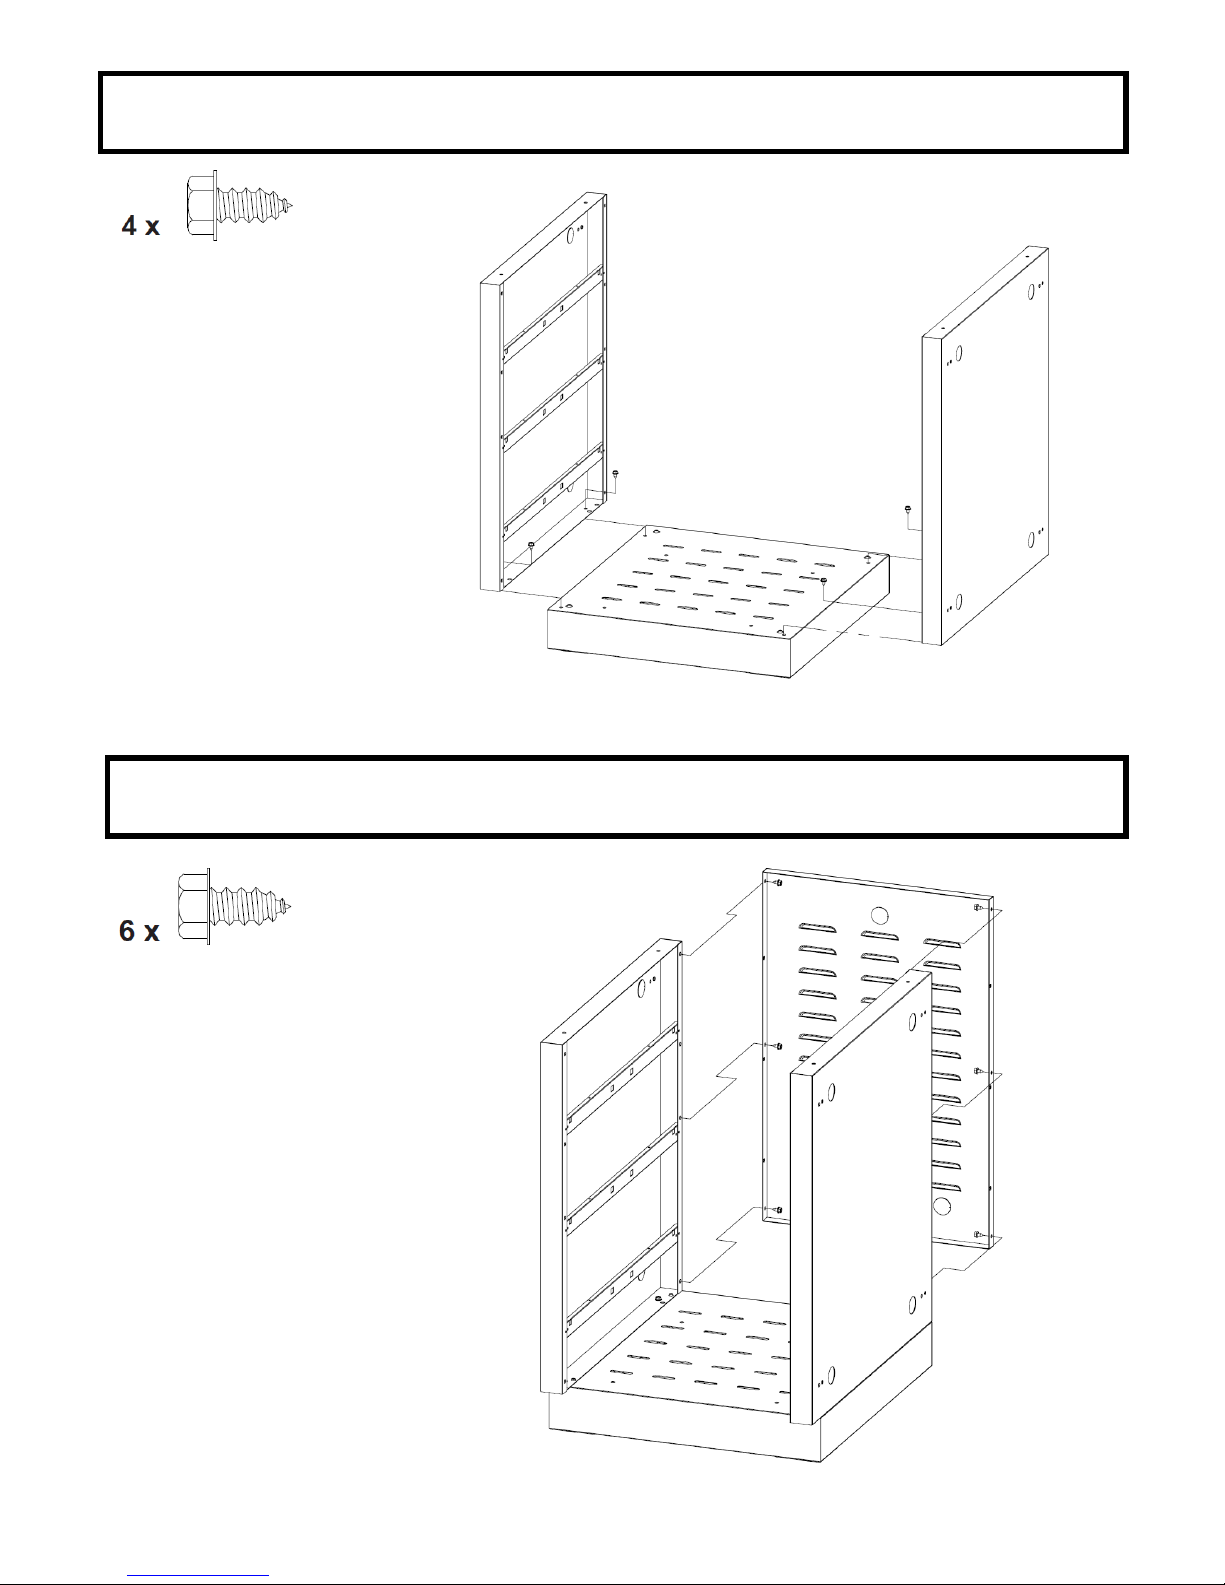
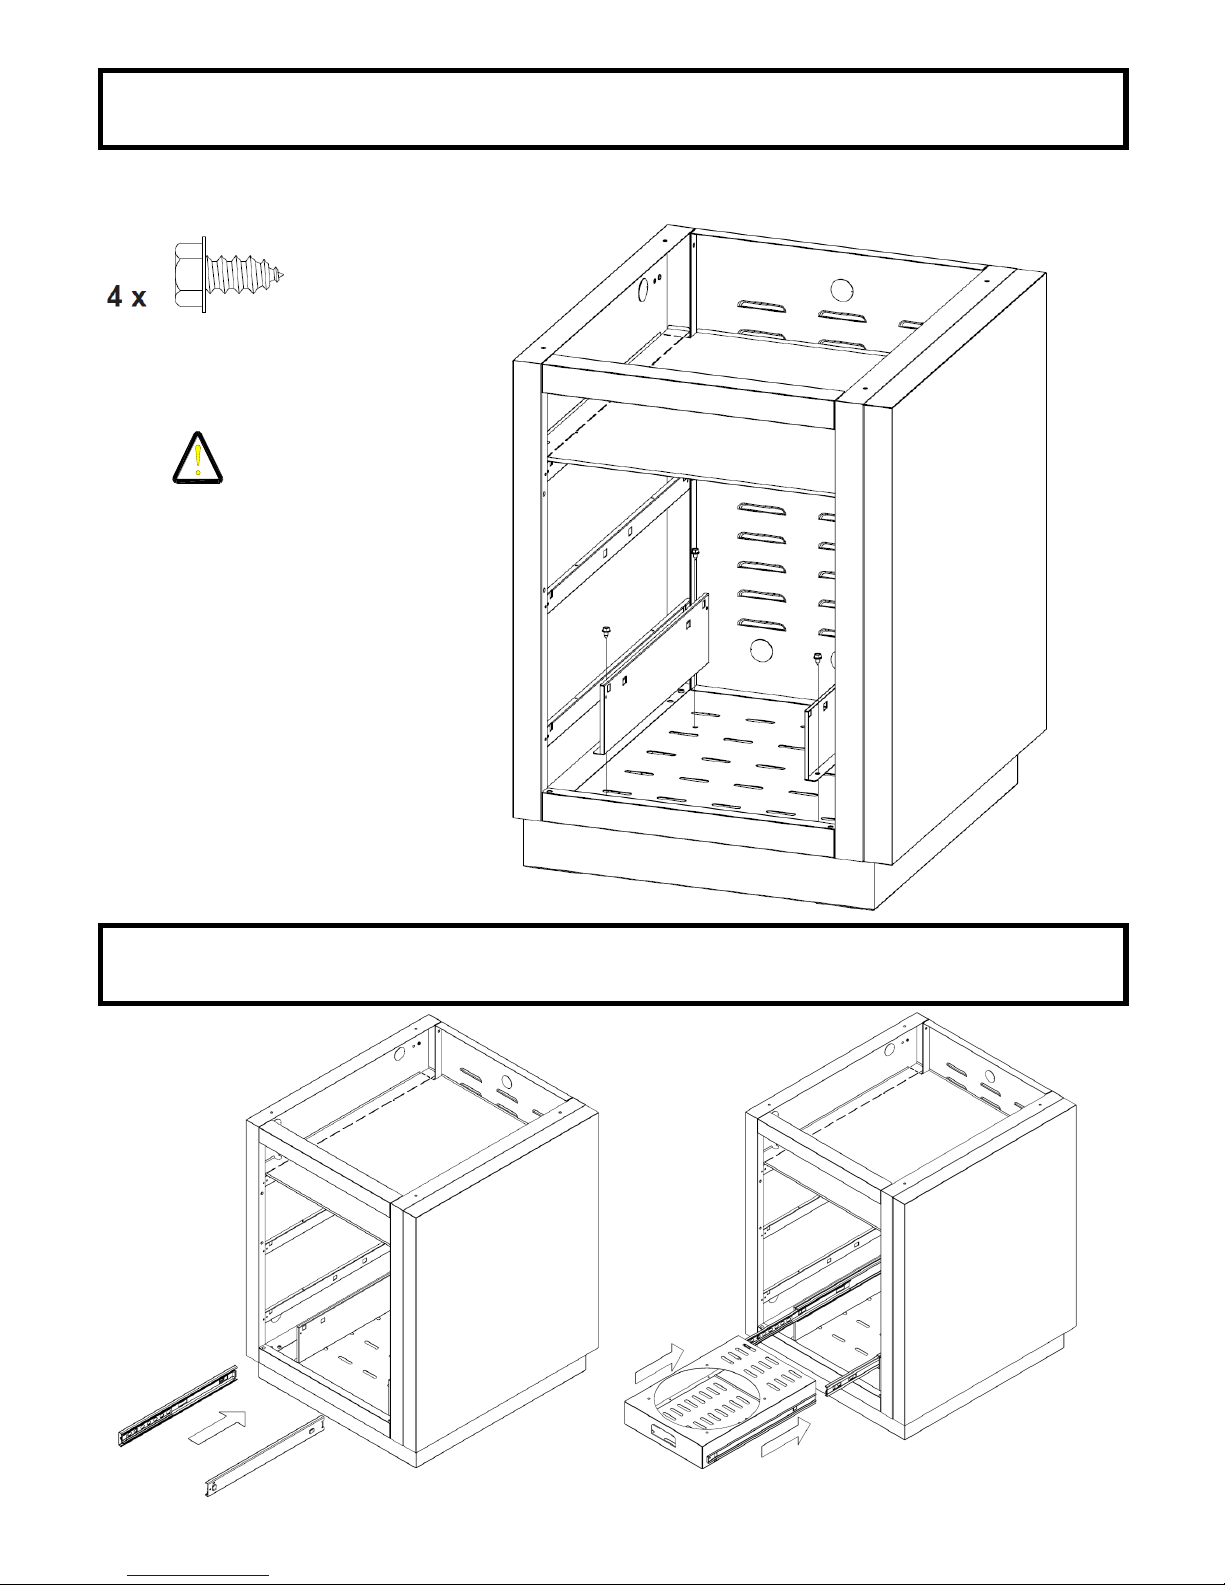
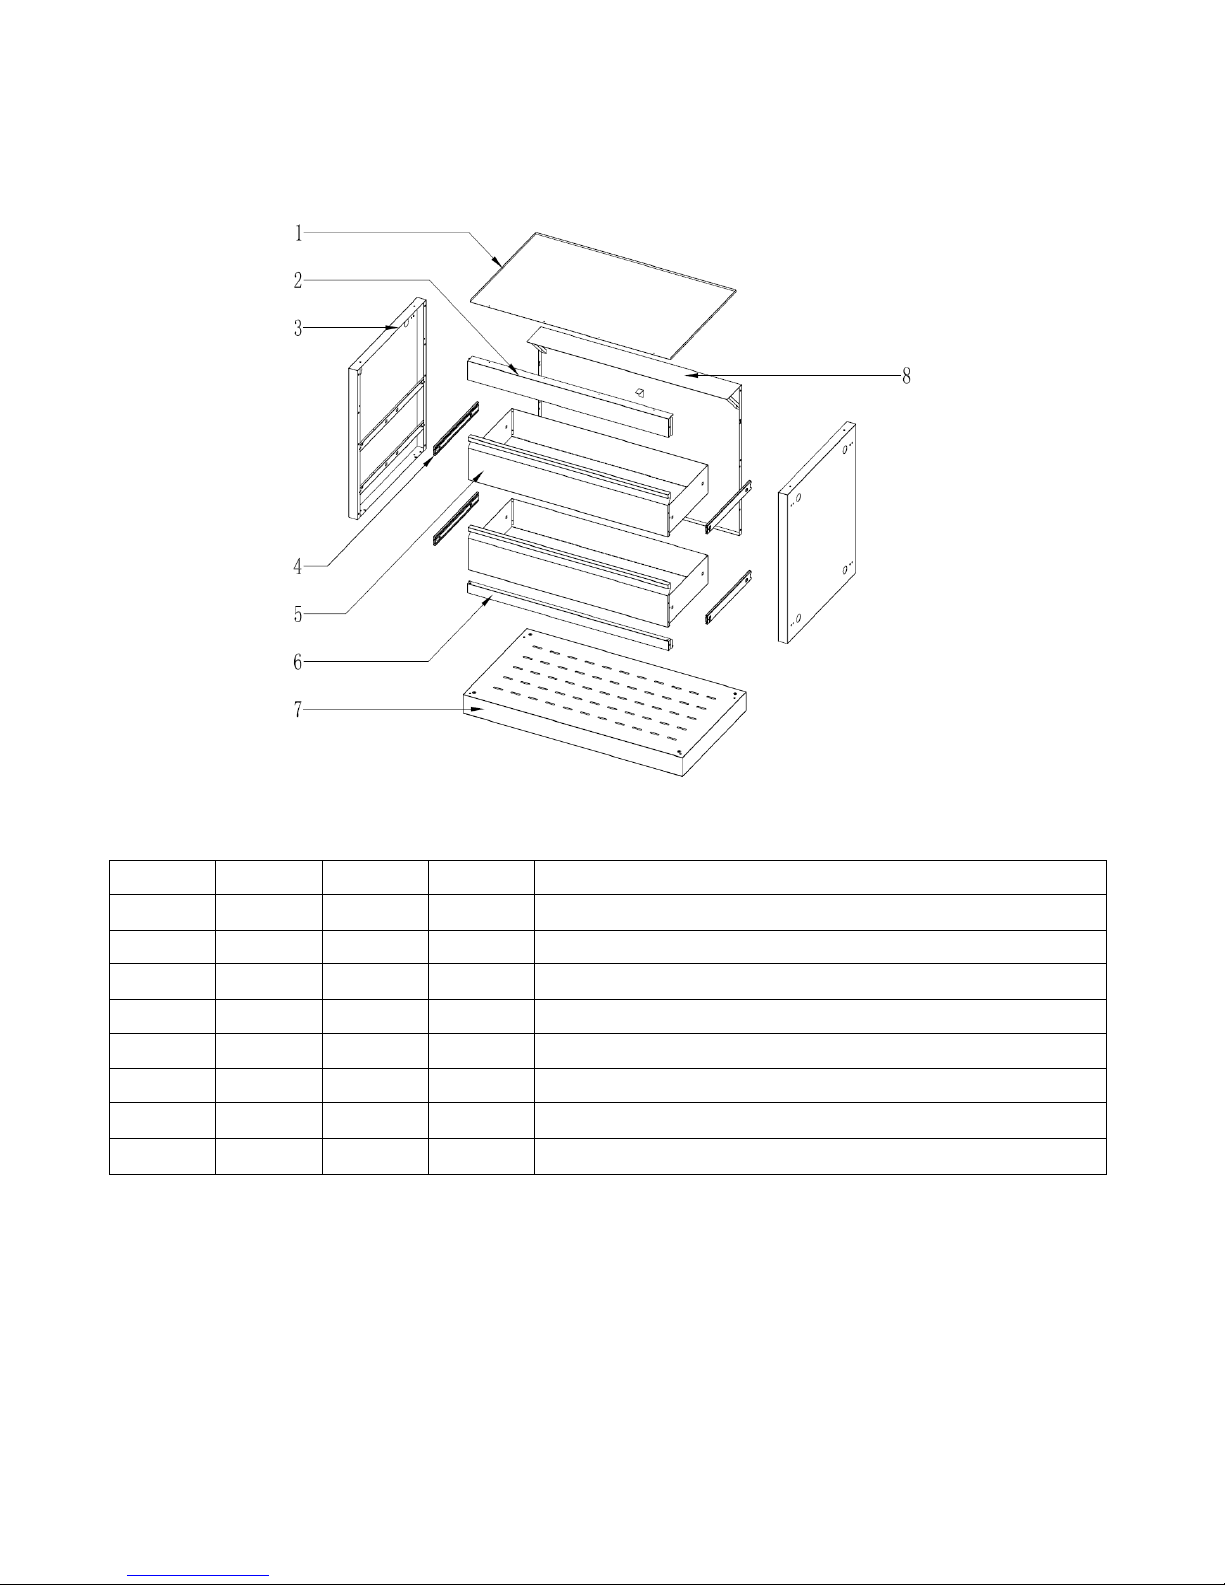
SC-UNI UNIVERSAL SIDE CABINET ASSEMBLY INSTRUCTIONS:
SC-UNI BOTTOM SHELF AND FEET ASSEMBLY
4 x
SC-UNI BOTTOM SHELF FEET ASSEMBLY
6
SC-UNI SIDE PANEL ASSEMBLY
SC-UNI REAR PANEL ASSEMBLY
7
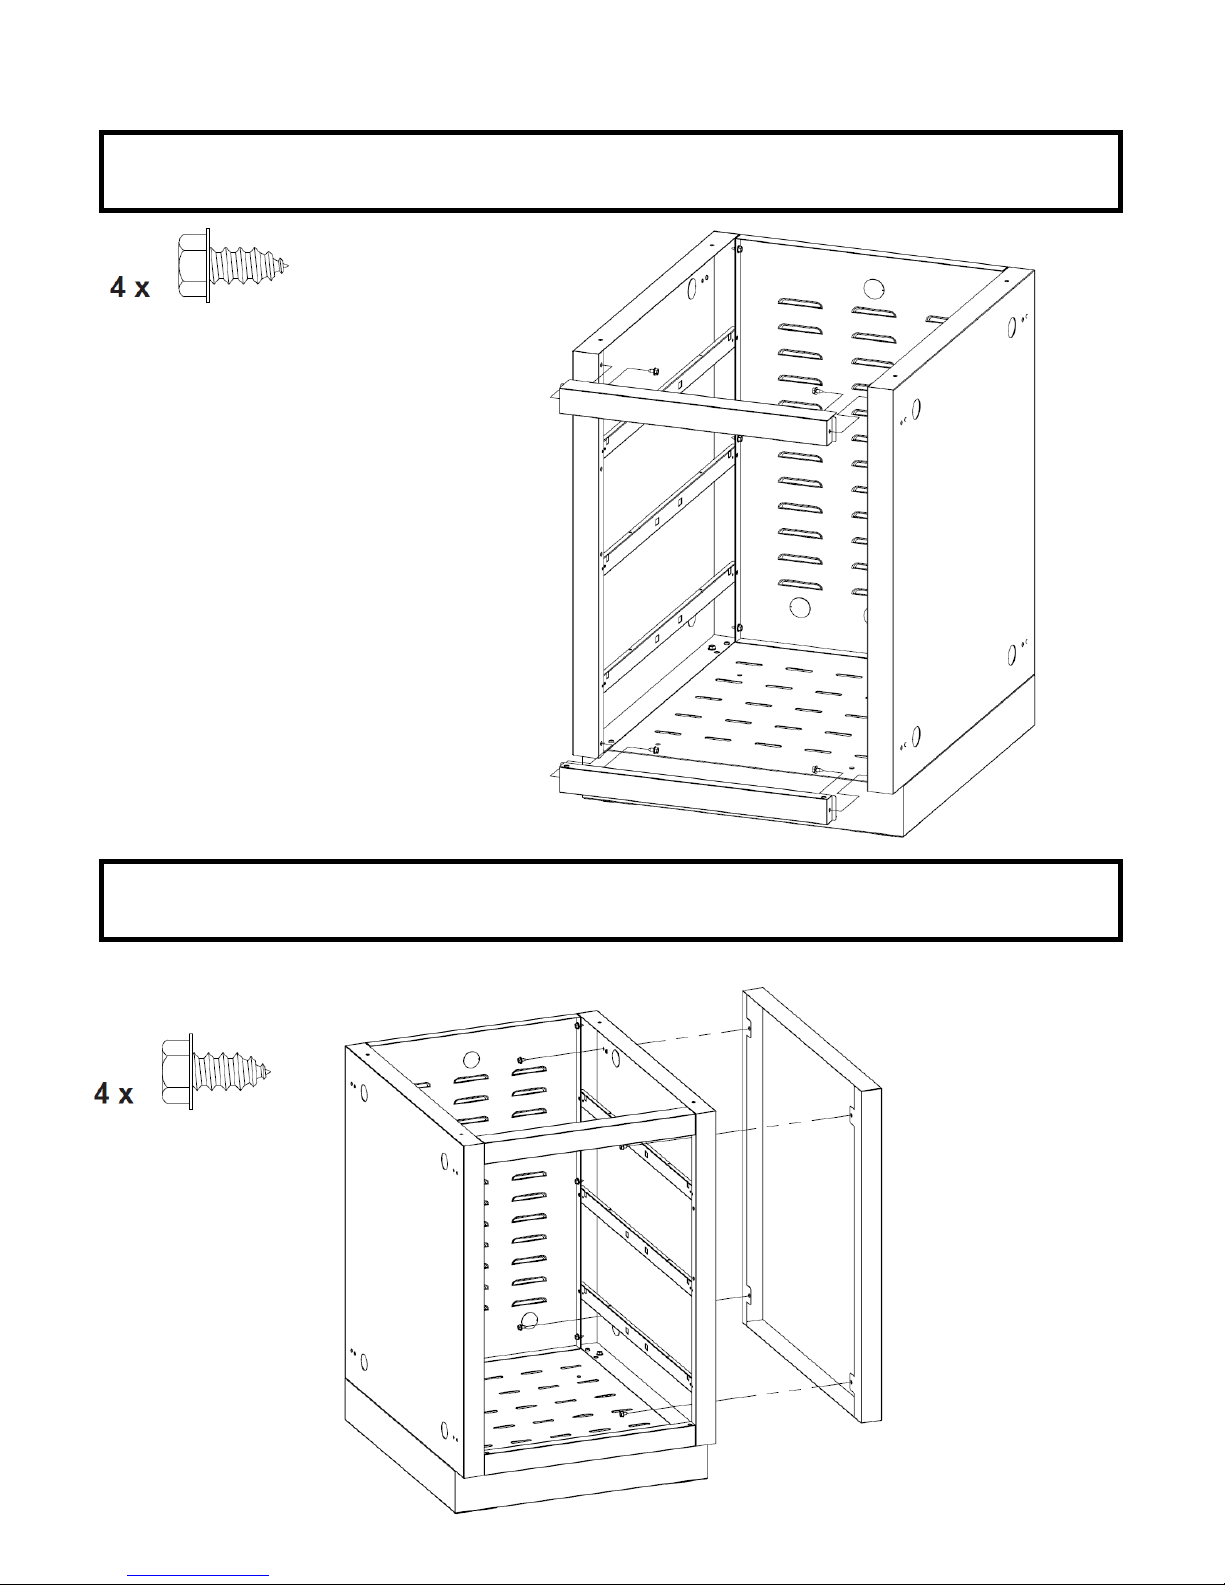
SC-UNI CABINET END PANEL ASSEMBLY
END PANEL CAN
BE INSTALLED LEFT
OR RIGHT SIDE
SC-UNI TOP/BOTTOM RAIL ASSEMBLY
8
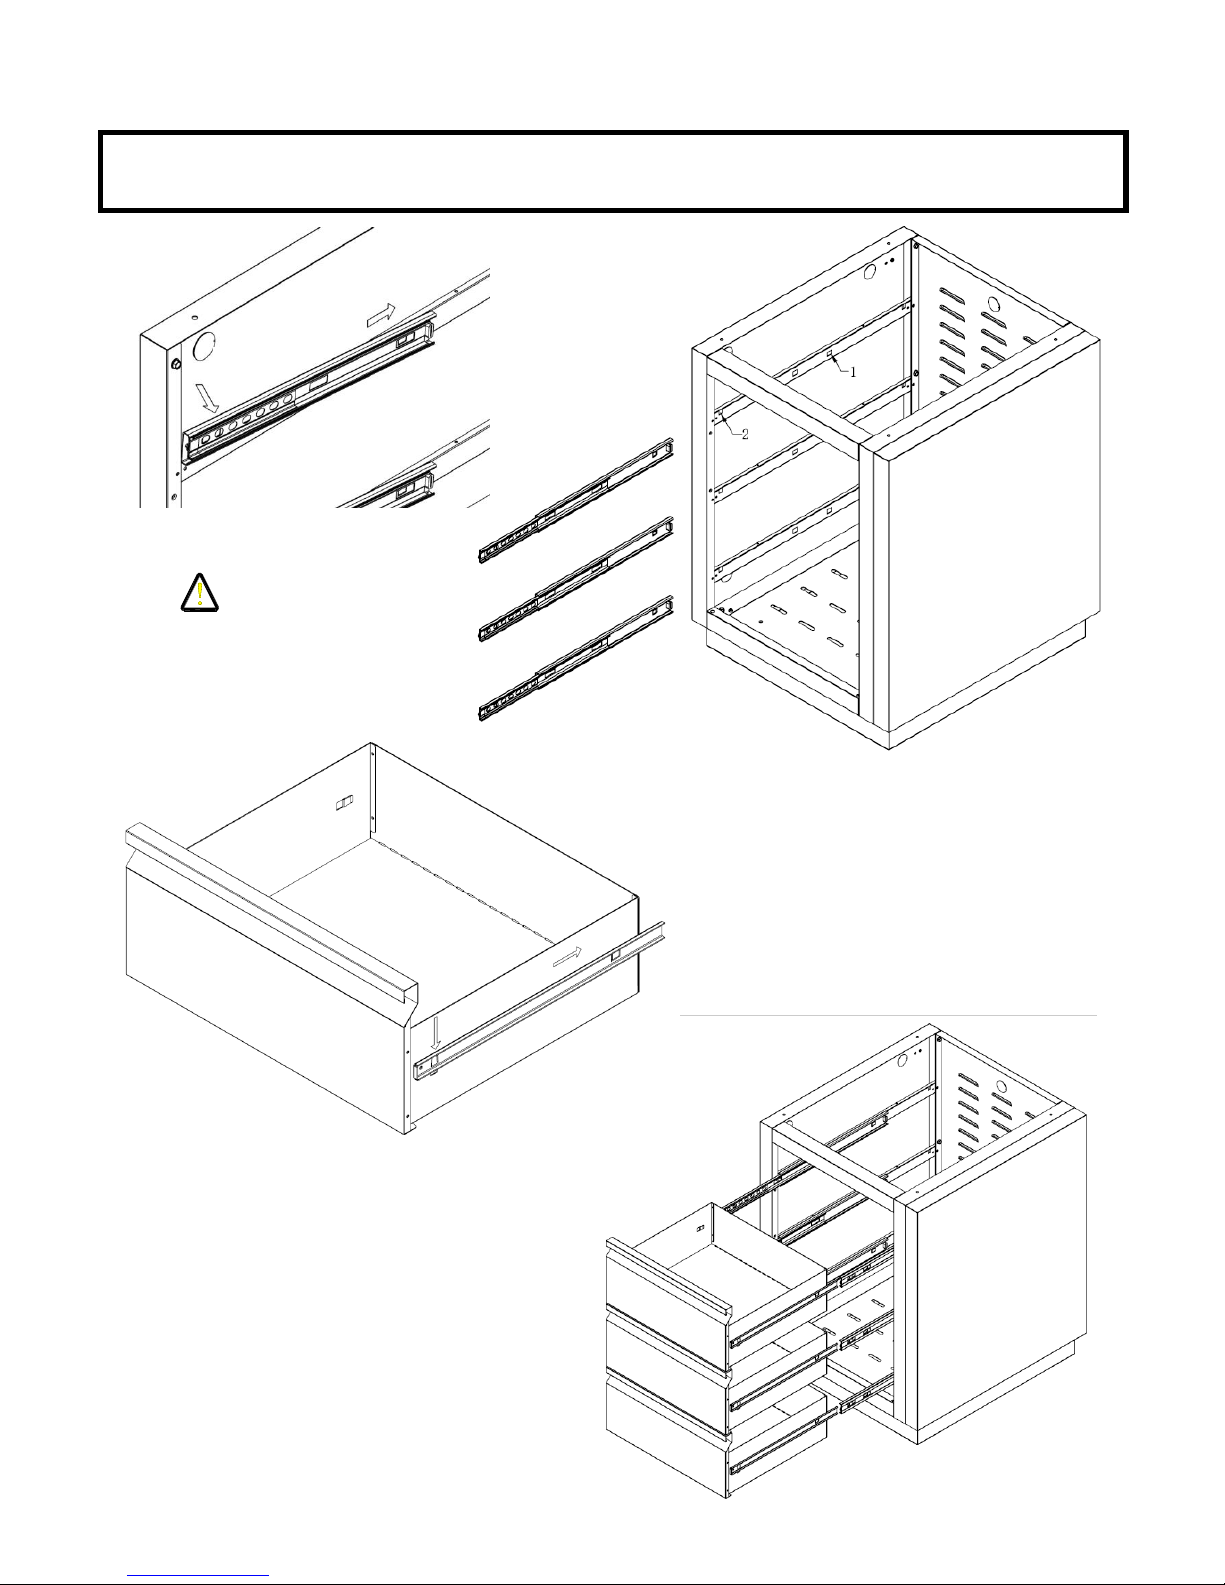
SC-DK DRAWER KIT ASSEMBLY INSTRUCTIONS
ATTENTION
Ensure sliders are put
on correct sides
SC-DK DRAWER SLIDES ASSEMBLY
#1
#2

9
SC-DK SEPERATION PANEL SHELF&DOOR KIT ASSEMBLY INSTRUCTIONS
Gas hose gap
ATTENTION!
SC-SK SEPERATION PANEL ASSEMBLY
ATTENTION
Ensure that all tabs
are bent up before
installation
SEPERATION PANEL
SHELF
SC-SK SEPERATION PANEL AND SHELF ASSEMBLY
HINT: Before bending down the left
tab of the separation panel, ensure
the gas hose is inserted through the
gas hose gap.
ATTENTION
Ensure that all tabs
are bent back down
after installation
(Place on top rail)

10
SC-PTK PROPANE TANK SLIDER KIT ASSEMBLY
SC-SK DOOR MAGNET ASSEMBLY (TOP/BOTTOM RAIL)
DOOR CAN BE
MOUNTED AS LEFT
OR RIGHT OPENING.
SC-SK CABINET DOOR ASSEMBLY
#1
#2
11
SC-PTK PROPANE TANK SLIDER ASSEMBLY
ATTENTION!
SEPERATION PANEL MUST BE
USED WHEN INSTALLING A SIDE
BURNER ABOVE THE LPG TANK.
SC-PTK PROPANE TANK SLIDER ASSEMBLY

12
The gas connection of the grills is at the right of the control panel. Placing the tank enclosure cabinet to the right
of the unit cabinet will make for easier gas piping. Knockouts have been punched in the sides and back panels to provide
easy routing of gas or electrical piping. Once the knockout has been removed a plastic bushing supplied must be installed
to prevent the gas or electrical line being cut on the edge of the hole. Gas piping and installation must be done by a
qualified gas installer.
ATTENTION
Ensure that all tabs
are bent back after
installation
SC-PTK PROPANE SUPPLY HOSE ROUTING
13
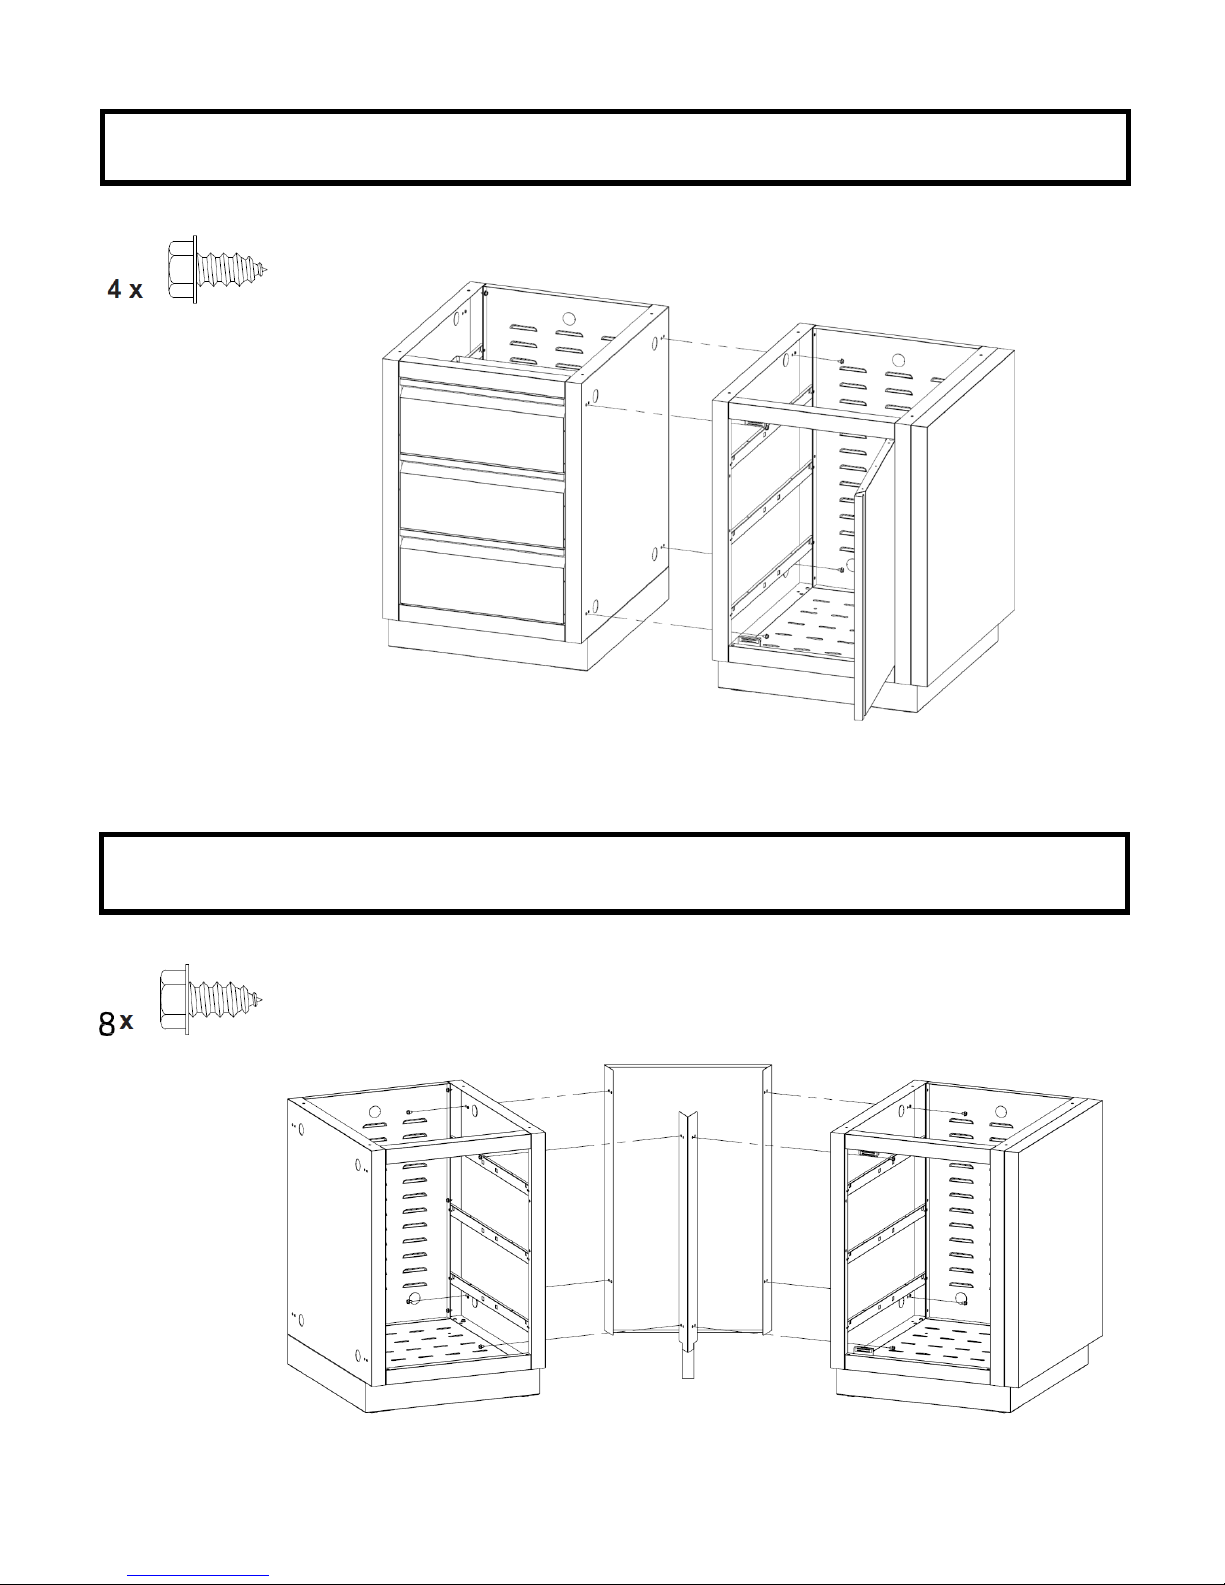
CABINET TO CABINET ASSEMBLY
SC-45T CABINET 45 DEGREE CONNECTION (OPTIONAL)
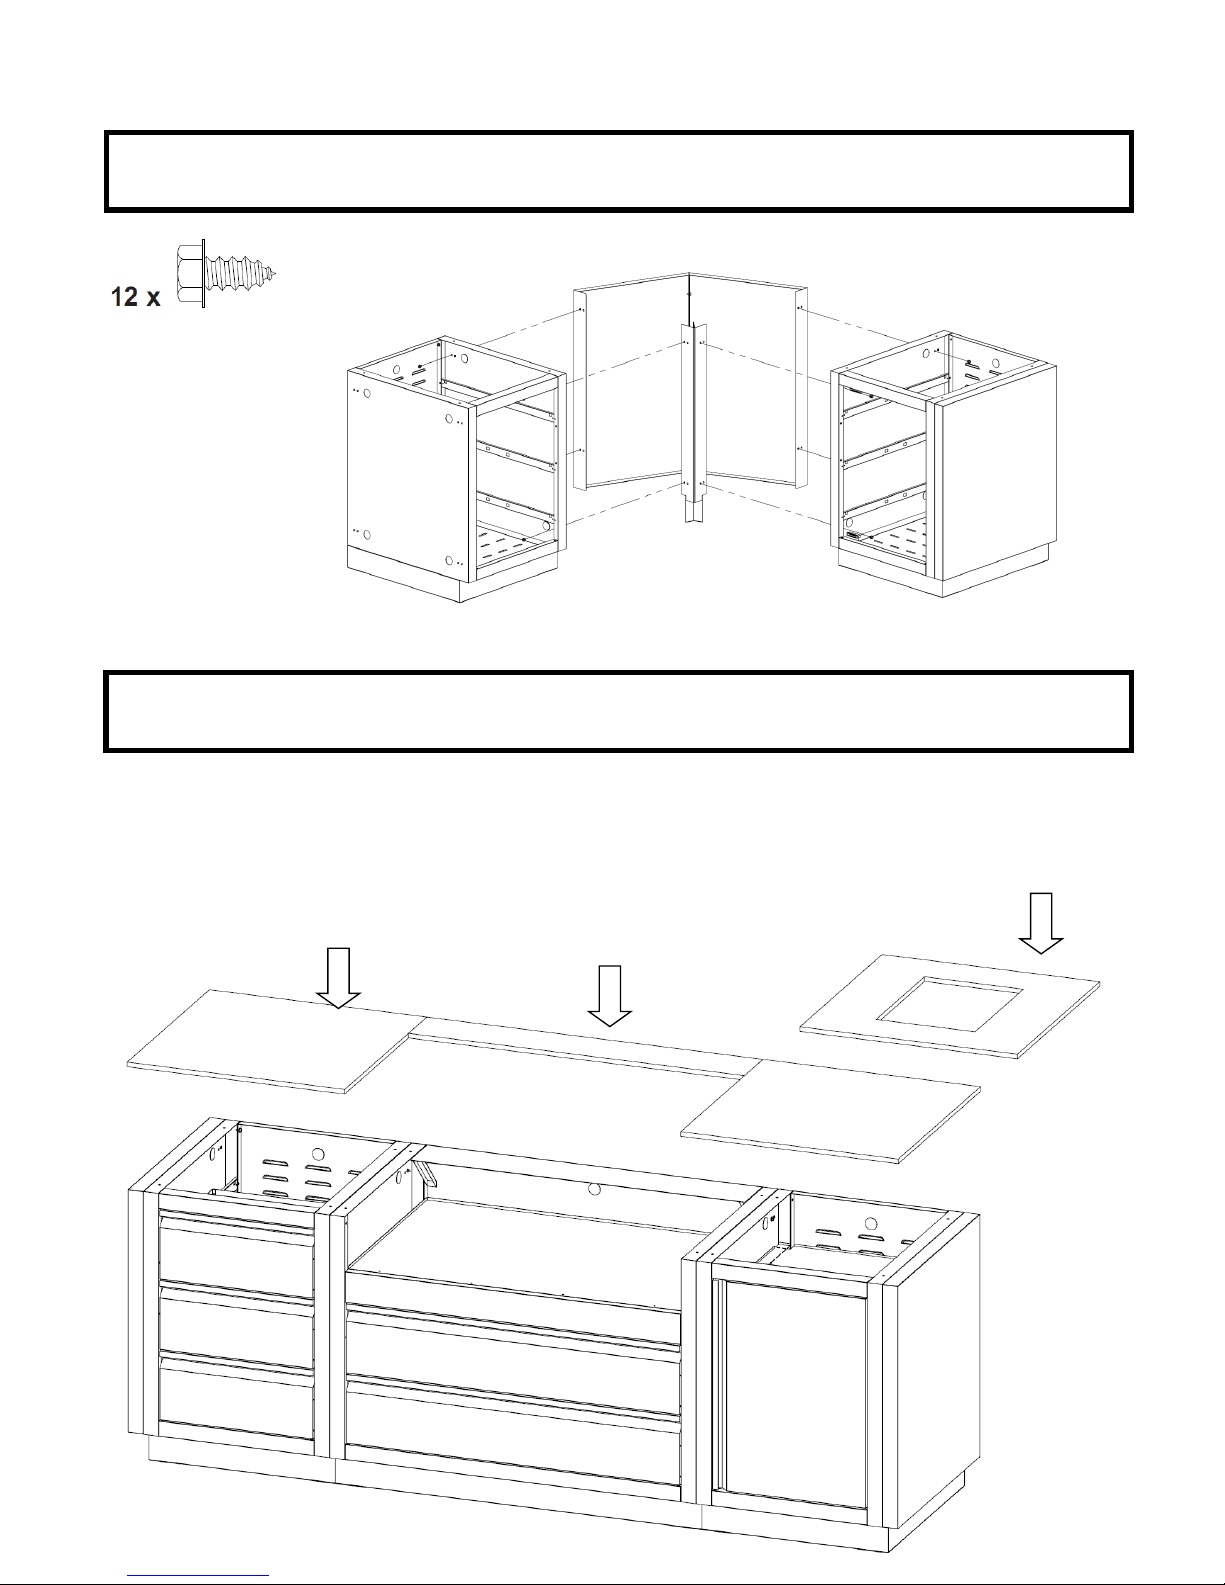
14
GRANITE COUNTER CAN BE SECURED WITH LIQUID NAILS OR SILICON. GAPS CAN BE FINISHED WITH EPOXY OR SILICON
SC-45T X 2 CABINET 90 DEGREE CONNECTION (OPTIONAL)
BLACK GRANITE COUNTERTOP ASSEMBLY
GRANITE
CABINET COUNTERTOP
GT01(712*712mm)
GT03(712*610mm)For
Extra Cabinet
GRANITE BACK STRIP
G504(780*160mm)
G506(926*160mm)
G507(1097*160mm)
OPTIONAL SIDE BURNER
OR SINK GRANITE TOP
GT02(712*712mm)
15
COUNTERTOP TO BE FASTENED AS PER MANUFACTURER’S INSTRUCTIONS. HOLES HAVE BEEN PLACED ON
THE TOP FLANGE OF THE SIDE PANELS TO ALLOW FOR FASTENERS.
REFER TO BUILT-IN MANUAL THAT ACCOMPANIES THE GRILL FOR COMPLETE INSTRUCTIONS.
GAS PIPING MUST BE DONE BY A LICENSED GAS INSTALLER.
CUSTOM MADE COUNTERTOP
16
CABINET LEVELING PROCEDURE
To adjust the feet, use M6 Hex
bit or screwdriver.
17
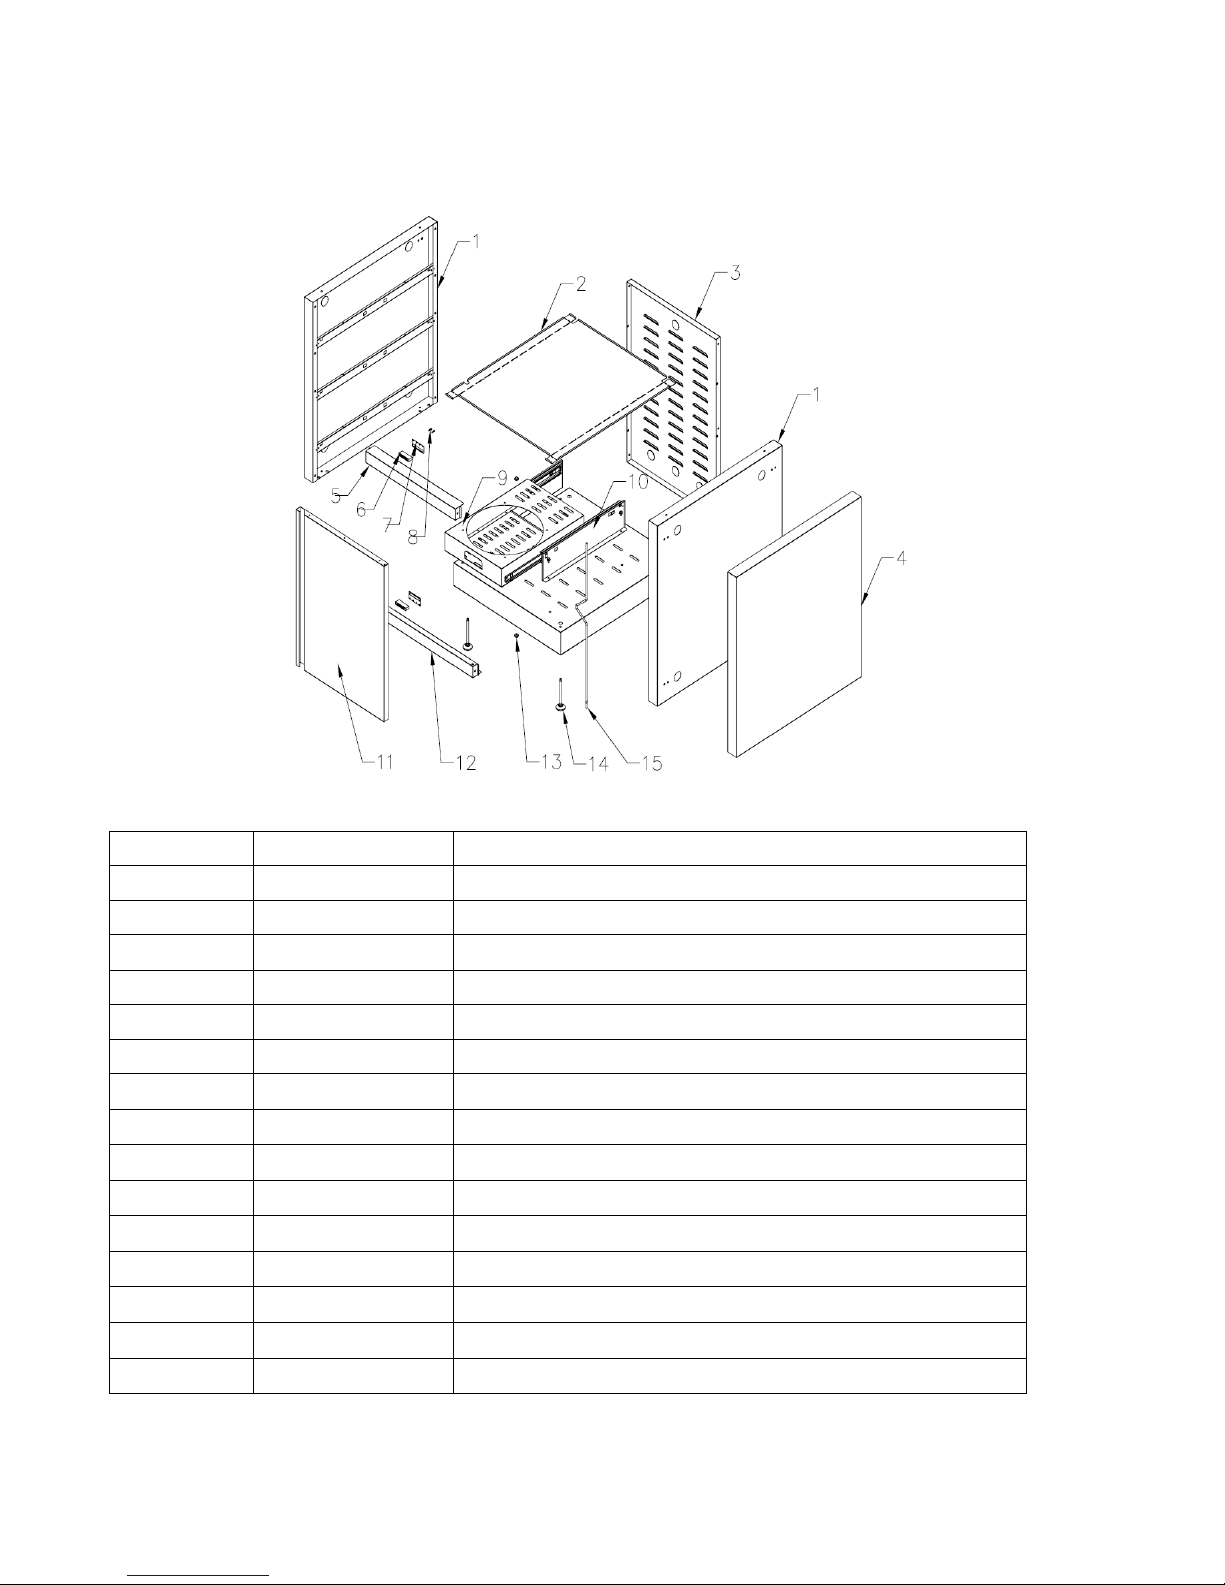
UGC-485/UGC-605/UGC-730
Part #
UGC485
UGC605
UGC730
Description
1
MC1-485
MC1-605
MC1-730
Drawer drip-shield
2
MC2-485
MC2-605
MC2-730
Top Rail
3
MC-300
MC-300
MC-300
Side Panel
4
UNI-400
UNI-400
UNI-400
Drawer Rail
5
MC5-485
MC5-605
MC5-730
Drawer
6
MC6-485
MC6-605
MC6-730
Bottom Rail
7
MC7-485
MC7-605
MC7-730
Bottom Shelf
8
MC8-485
MC8-605
MC8-730
Back Panel
18
SC-UNI/SC-SK/SC-PTK
Part #
Part Ref #
Description
1
UNI-300
Side Panel
2
UNI-200
Separation Panel
3
UNI-100
Back Panel
4
UNI-500
End Panel
5
UNI-600
Top Rail
6
UNI-601
Magnetic Catch
7
UNI-602
Door Magnet Bracket
8
P-100
Screw
9
UNI-700
Tank Drawer
10
UNI-800
Tank Drawer Support Bracket
11
UNI-900
Door
12
UNI-610
Bottom Rail
13
UNI-901
Door Bushing
14
UNI-910
Leveling Foot
15
UNI-911
Door Pivot Rod

19
SC-UNI/SC-DK
Part #
Part Ref #
Description
1
UNI-300
Side Panel
2
M10
Screw
3
UNI-100
Back Panel
4
UNI-500
End Panel
5
UNI-400
Drawer Rail
6
UNI-600
Top Rail
7
UNI-610
Bottom Rail
8
UNI-501
Drawer
9
UNI-910
Leveling Foot
Table of contents
Popular Indoor Furnishing manuals by other brands

Regency
Regency LWMS3015 Assembly instructions

Furniture of America
Furniture of America CM7751C Assembly instructions

Safavieh Furniture
Safavieh Furniture Estella CNS5731 manual

PLACES OF STYLE
PLACES OF STYLE Ovalfuss Assembly instruction

Trasman
Trasman 1138 Bo1 Assembly manual

Costway
Costway JV10856 manual


