manuals.online logo
Brands
  1. Home
  2. •
  3. Brands
  4. •
  5. Exmark
  6. •
  7. Lawn Mower
  8. •
  9. Exmark Ultra Vac Lazer Z HP Manual

Exmark Ultra Vac Lazer Z HP Manual

109-4198 Rev. A
Page 1 of 9
Loose Parts
Note: Use the chart below to verify that all parts have been shipped.
109-4187 Dealer Pack
Part # Description Qty Use
103-1309 Warranty Registration Form 1 Fill out and return to Exmark
109-4186 Literature Pack
Part # Description Qty Use
109-4196
109-4197 Manual, Operator’s
Manual, Parts 1
1 Read before operating machine
Models and Required Completing Kits
Note: Use the chart below to verify the kits required for the unit.
LHPUV4448
44” Deck Drive Kit Front Weight Kit*
All Serial Numbers 103-1315 103-5629
48” Deck Drive Kit Front Weight Kit*
SN 203376 & Higher 103-1314 103-5629
LHPUV4650
46” Deck Drive Kit Front Weight Kit
All Serial Numbers 109-1013 103-5629
50” Deck Drive Kit Front Weight Kit
All Serial Numbers 109-1014 103-5629
LHPUV5256
52” Deck Drive Kit Front Weight Kit*
All Serial Numbers 109-1185 103-5629
*Front weight Kit 103-5629 is required on any unit with a 2 post ROPS installed.
56” Deck Drive Kit Front Weight Kit
All Serial Numbers 109-1015 103-5629
LAZER Z
®
HP ULTRA VAC
SETUP INSTRUCTIONS
For Serial Nos. 670,000 and Highe
r
109-4198 Rev. A
Page 2 of 9
1. Assembly Instructions
Key Qty Description
1 Ref Engine Guard 44, 46, 48, 50 units
2 1 Bagger Mount Weldment
3 8 5/16 – 18 X 1.00 Hex Head Screw
4 1 Hood Assembly
5 2 Bag Assembly
6 1 Upper Tube
7 1 Lower Tube Assembly
8 3 #10 – 24 X .75 Hex Head Screw
9 3 #10 Flat Washer
Key Qty Description
10 3 #10 – 24 Nyloc Nut
11 1 Blower Assembly
12 Ref Rear Weight 52 and 56 units
13 Ref Spacer 52 only
14 8 5/16 – 18 X 1.75 Hex Head Screw
15 4 5/16-18 Whizlock Nut
16 2 Clevis Pin
17 2 Hair Pin
FIGURE 1
109-4198 Rev. A
Page 3 of 9
Ultra Vac Drive Kit
Key Qty Description
13 1
Spacer, Counterweight (52” and 56” decks)
(See Figure 1)
18 1 Pin, Chute Pivot
19 1 Pin, Hair
20 1
Chute Weldment (48” decks SN 203376 &lower)
21 1
2.25 OD Washer (48” decks SN203376 & lower)
22 2 Knob, Belt Shield
23 1 Sheave, Blower Drive
24 1 Belt, Blower
25 1 Cover, Belt
26 1 5/16 – 18 X .62 Hex Head Screw
27 1 Plug
Ultra Vac Weight Kit
(units with 2 post ROPS only)
Key Qty Description
28 1 Asm, Weight
29 2 Plate, Weight Mounting
30 4 5/16-18 x 1 Hex Head Screw
*30 4 5/16-18 x 1 1/2 Hex Head Screw
31~ 1 Flat Washer, 5/8
32~ 2 Carriage bolt, 5/16-18 x 1.00
33~ 1 Strap
*34 2 Pin, Hair
*35 4 5/16” Washer
*36 4 5/16”-18 Whizlock
*
~
46”, 50”, and 56” Triton units. Also 52”
units with standard weight plate bolted to
the front of the floor pan.
Units >600,000
FIGURE 2
109-4198 Rev. A
Page 4 of 9
Safety
Safety Alert Symbol
This SAFETY ALERT SYMBOL is used
both in this instruction sheet and on the machine
to identify important safety messages which must
be followed to avoid accidents. This symbol
means:
ATTENTION! BECOME ALERT!
YOUR SAFETY IS INVOLVED!
The safety alert symbol appears above information
which alerts you to unsafe actions or situations and
will be followed by the word DANGER, WARNING,
or CAUTION.
DANGER: White lettering / Red background.
Indicates an imminently hazardous situation which,
if not avoided, WILL result in death or serious injury.
WARNING: Black lettering / Orange background.
Indicates a potentially hazardous situation which, if
not avoided, COULD result in death or serious
injury.
CAUTION: Black lettering / Yellow background.
Indicates a potentially hazardous situation which, if
not avoided, MAY result in minor or moderate injury.
Drive Kit Installation
1. Identify the part number of the drive kit to be
installed on the unit.
2. For weight kit 103-5629 follow the instruction sheet
provided in the kit.
3. For drive kits, 103-1314, 103-1315, 109-1013, 109-
1014, 109-1015, 109-1185 follow the instructions
below:
Discharge Chute Replacement
1. Remove two (2) capscrews connecting the
discharge chute to the deck. Remove the
discharge chute.
2. Reinstall the discharge chute (Item 20) using
the chute pivot pin (Item 18) and hairpin (Item
19) provided as shown in Figure 3.
FIGURE 3
Blower Drive Sheave Installation
Units Below 510,000 Without Splined Blade
Driver
1. Stop engine, remove key, and wait for all
moving parts to stop.
2. Remove the right side belt shield and the
5/16 x 3 1/4 bolt that secures the shield to the
deck.
3. Remove the deck drive belt from around the
right sheave.
4. Support the right mower blade so that it will not
fall off when the right sheave nut is removed.
5. Remove the right sheave nut, spring disk
washer, and drive sheave from the spindle shaft.
NOTE: Block the blade rotation with a block of
wood between the blade and baffles as
indicated in the blade service section of the
Lazer Z HP operator’s manual. Do not use the
blade bolt to prevent rotation.
6. Apply a light coat of Mobil HTS grease (or a food
grade antisieze) to the top portion of the spindle
where the sheave mounts.
7. Install the double sheave (Item 23) onto the right
spindle shaft. Install the spring disk washer and
nut removed in Step 5). Make sure that the
spring disk washer cone is installed towards nut
(See Figure 4). Torque the sheave nut to:
3/4 -16 nut (1 ¼ Hex) – 140-145 ft. lbs.
NOTE: Block the blade rotation with a block of
wood between the blade and baffles as
indicated in the blade service section of the
Lazer Z HP operator’s manual. Do not use the
blade bolt to prevent rotation.
18
2019
109-4198 Rev. A
Page 5 of 9
FIGURE 4
Check blade bolt torque after completing this
installation:
For units with a 5/8-18 x2 3/4 blade bolt, torque to
115-120 ft-lbs (156-163 N-m)
8. Reinstall the deck drive belt in the lower
groove of the double sheave. Install plug
(Item 27) into bore of double sheave.
9. Install 5/16-18 x .62 screw (Item 26) into hole
that 5/16 – 18 x 3 ¼ bolt was removed from
on the deck. Use the whizlock nut removed in
step 2). Install bolt with head to inside of
deck.
10. Install the new belt cover (Item 25) secure
with the two belt shield knobs (Item 22) as
shown in Figure 2.
NOTE: Do not re-install the 5/16 x 3 1/4 bolt that was
removed in step 2.
Units Below 600,000 With Splined Blade
Driver
1. Stop engine, remove key, and wait for all
moving parts to stop.
2. Remove the right side belt shield and the
5/16 x 3 1/4 bolt that secures the shield to the
deck.
3. Remove the blade from the right spindle.
4. Insert special tool 109-2979 into splined end
of spindle shaft.
5. Remove the right sheave nut, spring disk
washer, and drive sheave from the spindle
shaft.
6. Use special tool 109-2979 to hold spindle from
rotating – keep hardware for re-use. Do not
use the blade bolt to prevent rotation.
7. Apply a light coat of Mobil HTS grease (or
food grade antiseize) to the top portion of the
spindle shaft where the sheave mounts.
8. Install the double sheave (Item 23) onto the
right spindle shaft. Install the spring disk
washer and nut. Make sure that the spring
disk washer cone is installed towards nut (See
Figure 5). Torque the sheave nut to
140-145 ft-lbs. Use special tool 109-2979 to
hold spindle from rotating. Do not use the
blade bolt to prevent rotation.
FIGURE 5
9. Reinstall blade on right spindle.
For units with a 1/2-20x2 blade bolt,
torque to 50-60 ft-lbs (75-81 N-m)
109-4198 Rev. A
Page 6 of 9
10. Reinstall the deck drive belt in the lower groove
of the double sheave. Install plug (Item 27) into
bore of double sheave.
11. Install 5/16-18 x .62 screw (Item 26) into hole
that 5/16 – 18 x 3 ¼ bolt was removed from on
the deck. Use the whizlock nut removed in step
2. Install bolt with head to inside of deck.
12. Install the new belt cover (Item 25) secure
with the two belt shield knobs (Item 22)
as shown in Figure 2.
NOTE: Do not reinstall the 5/16 x 3 1/4 bolt that
was removed in step 2.
Units 600,000 And Higher
1. Stop engine, remove key, and wait for all
moving parts to stop.
2. Remove the right side belt shield and the belt
shield stud that secures the shield to the deck
– save the three-pronged knob for later use.
3. Remove the blade from the right spindle.
4. Insert special tool 109-2979 into splined end
of spindle shaft.
5. Remove the right sheave nylock nut, washer,
and splined washer from the spindle shaft.
Do not remove the blade drive sheave. Retain
the nut for later use.
6. Use special tool 109-2979 to hold spindle from
rotating – keep hardware for re-use. Do not
use the blade bolt to prevent rotation.
7. Install the Ultra Vac drive sheave onto the
right spindle shaft. Install the washer that is
supplied with the Ultra Vac drive kit (Item 31)
and nut removed in step 1. Torque the
sheave nut to: 5/8-18 Nut (15/16 Hex)
90-110 ft-lbs. Use special tool 109-2979 to
hole spindle from rotating. Do not use the
blade bolt to prevent rotation.
FIGURE 6
8. Reinstall blade on the right spindle.
For units with a 1/2-20x2 1/4 blade bolt,
torque to 50-60 ft-lbs (75-81 N-m)
9. Install plug (Item 27) into bore of double
sheave.
10. Install 5/16-18 x .62 screw (Item 26) into
hole that belt shield stud was removed from
on the deck. Use the whizlock nut removed
in step 2. Install bolt with head to inside of
deck.
11. Place carriage bolts (Item 32) into square
holes on deck stiffeners. Secure loosely
with belt shield knobs (Item 22) Install belt
cover and tighten.
NOTE: Do not reinstall the belt shield
stud that was removed in step 2.
109-4198 Rev. A
Page 7 of 9
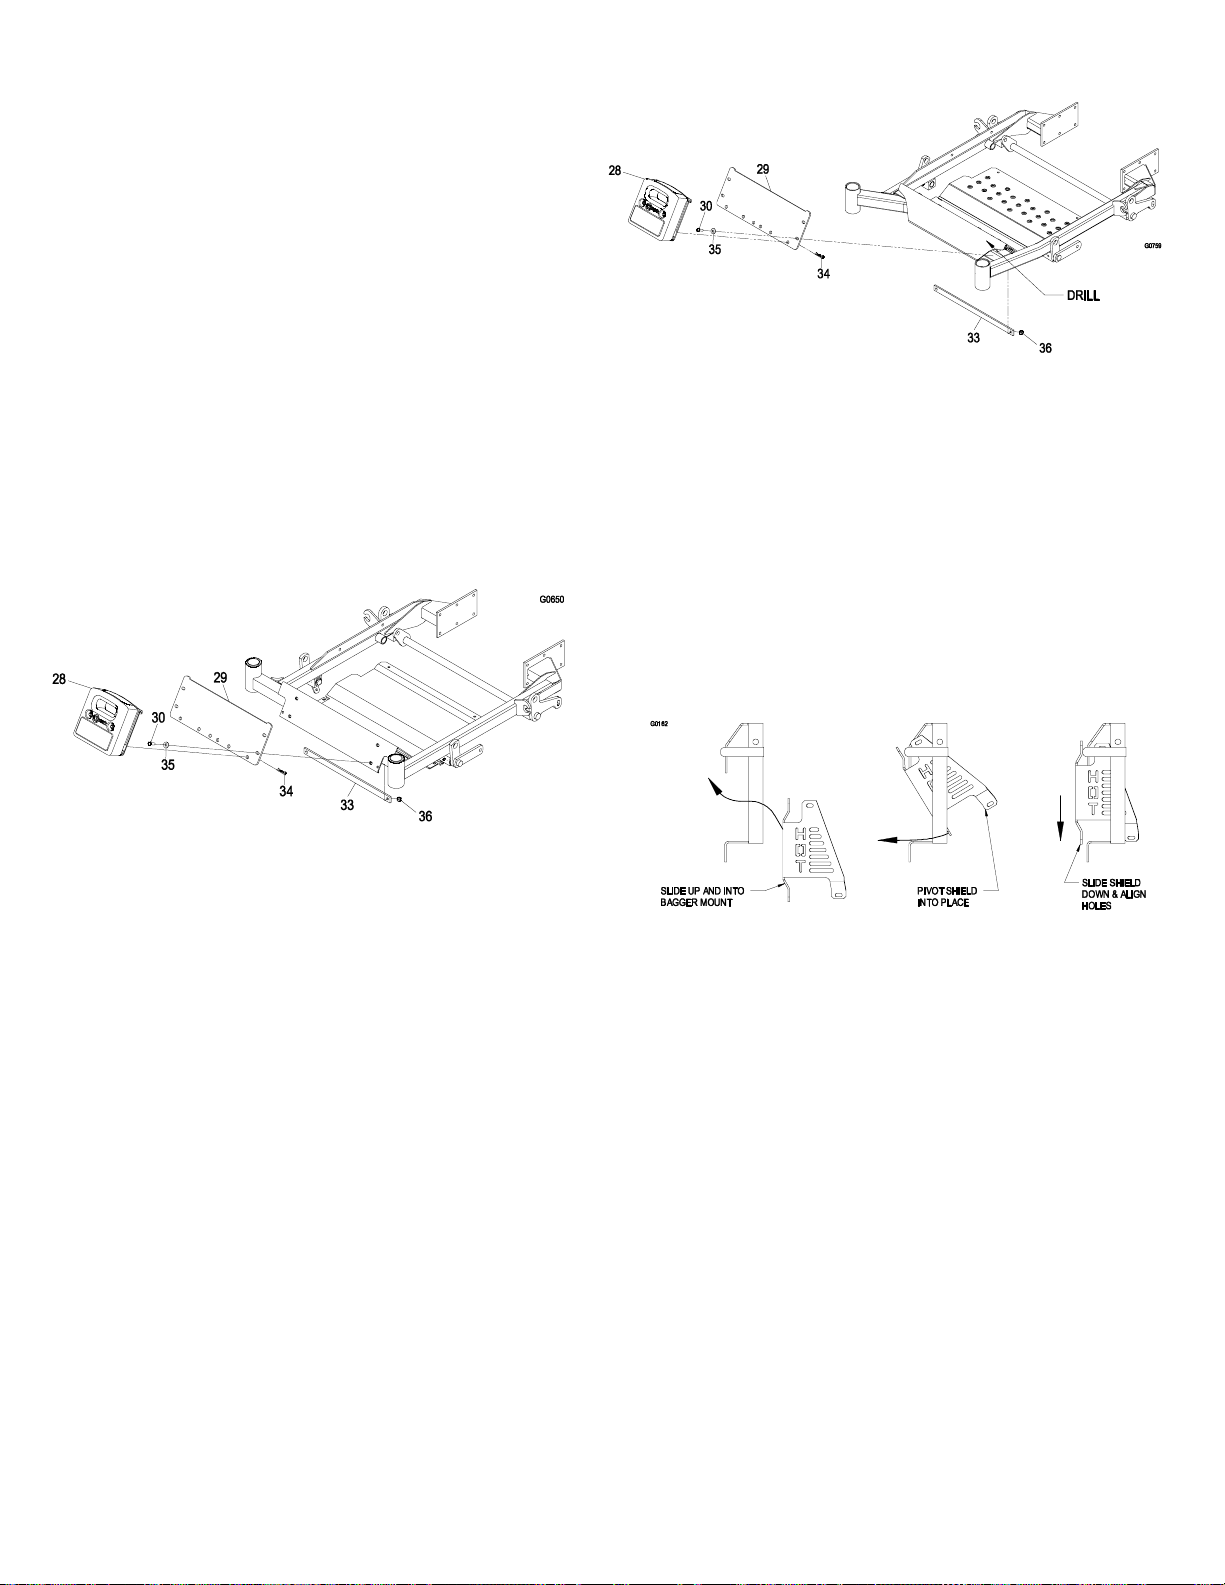
Install Weight Assembly
For units with SN 440,000 to 599,999 (also
required for units with SN 439,999 and lower
with a 2 post ROPS installed):
1. Remove the hardware from the front of the floor
pan. Discard the screws and retain the washer
and whizlock nuts.
2. Assemble the weight mounting plate (Item 29) to
the floor pan using (4) 5/16-18x1 Hex Head
Screws (Item 30) and the (4) washers and (4)
whizlock nuts removed in step 1.
NOTE: Some 52” units have a standard weight
plate bolted to the front of the floorpan. Use the
(4) 5/16-18 x 1.50” Hex Head Screws (Item 30) for
this application and the (4) washers and (4)
whizlock nuts removed in step 1.
3. Hook the weight plate assembly (Item 28) over
the top of the weight mounting plates and secure
with two hairpins (Item 34).
FIGURE 7
For units with SN 600,000 and Higher:
1. Slide mounting strap (Item 33) behind front panel
of floor pan, above the reinforcing bars that are
welded to the front frame. Attach the weight
mounting plate using (2) 5/16-18 x 1.50 hex head
screws (Item 30) (2) washers and (2) Whizlock
Nuts (Items 35 and 36) (See Figure 8).
2. Use the upper mounting holes of the weight
mounting plate to mark the location to drill the
mounting holes in the front panel of the floor pan.
Remove the weight mounting plate and drill 3/8”
upper mounting holes in the front panel of the
floorpan.
3. Permanently mount the weight mounting plate to
the front panel of the floor pan using (4) 5/16-18 x
1.50 hex head screws, (4) washers, (4) whizlock
nuts and the mounting strap (Items 30, 33, 35, 36)
4. Hook the weight plate assembly (Item 28) over
the top of the weight mounting plates and secure
with two hairpins (Item 34).
FIGURE 8
Install Hood Assembly and Bags
44, 46, 48 and 50 inch units
1. Remove the (12) bolts that retain the “HOT”
engine guard shield (Item 1). Discard (8) of
the bolts and retain (4). Keep all (12) nuts for
reuse in Step 3.
2. Working from the front side of the bagger
mount, slide the top end of the engine guard
up and into the mount. Pivot the lower end
through the bagger mount and slide it down
into place until the holes align with the holes in
the bagger mount (See Figure 9).
FIGURE 9
3. Install the Bagger Mount Weldment (Item 2) and
engine guard shield using the (8) 5/16-18 x 1
Screws provided (Item 3) and (8) whizlock nuts
removed in step 1.
4. Align the side holes in the engine guard shield to
holes in the frame on each side of the unit.
Reattach the sides of the engine guard shield
using the (4) bolts and remaining (4) whizlock
nuts retained in step 1. Continue at step 1 of the
All Units section.
52 and 56 inch units
1. Remove and discard the (8) bolts that retain
the rear weight (Item 12). Keep the whizlock
nuts for use in steps 2 and 3.
2. Install the Bagger Mount Weldment (Item 2) to
the rear of the frame using (4) 5/16-18 x 1
screws (Item 3) and (4) 5/16 – 18 whizlock
nuts (Item 15). Use only the bottom four holes
on the Bagger Mount Weldment
109-4198 Rev. A
Page 8 of 9
Align DimpleHere
3. Install the Rear Weight (Item 12) and spacer (Item
13) from the drive kit using the (8) 5/16 – 18
X1.75 screws (Item 14) and whizlock nuts
removed in step 1. Counter Weight Spacer (Item
13) should be placed between Rear Weight (Item
12) and Bagger Mount Weldment (Item 2).
All units
1. Slide tube ends of Hood Assembly (Item 4) into
the tubes of the mount weldment (Item 2). Install
(2) clevis pins (Item 16) through holes in tubes.
Retain with (2) Hair Pins (Item 17).
2. Hang the (2) Bag Assemblies (Item 5) from the
slots in the Bagger Upright (Item 4). Close and
latch hood.
Assemble Tubes
1. Slip upper and lower tubes together (Items 6
and 7).
2. Insert upper tube (Item 6) into hopper seal (Item
4) – push in then pull out so that seal is
extended outward.
3. Align dimple on upper tube (Item 6) with end of
hopper seal and position vertically between the
two screws (Item 4) as shown in Figure 10.
FIGURE 10
4. Set deck in lowest cutting position.
5. Slide lower tube (Item 7) onto blower (Item 11)
and latch (make sure that upper tube does not
move out of alignment).
6. Drill 7/32 holes in lower tube (Item 7) using
upper tube (Item 6) holes as reference. See
Figure 11.
7. Remove tubes from unit and assemble the
upper (Item 6) and lower tubes (Item 7) using (3)
#10-24 x .75 hex washer head screws (Item 8),
(3) #10 washers (Item 9) , and (3) #10-24 nyloc
nuts (Item 10). Screw head should be installed
to the inside of the tube to provide minimum
obstruction to flow. Make sure that the upper
and lower ends are oriented properly as tubes
are assembled. (Parting lines roughly lined up.)
FIGURE 11
Drill holes here
109-4198 Rev. A
Page 9 of 9
Install Blower Assembly
1. Remove the belt guide on the blower (Item 11).
(See Figure 12)
2. Install the belt (from the Drive Kit – Item 24) onto the
Blower Assembly (Item 11) as shown.
FIGURE 12
3. Reinstall the belt guide removed in step 1.
4. Remove Discharge Chute (Item 20) by pulling the
hairpin (Item 19) and chute pivot pin (Item 18) (from
the Drive Kit installed in section Discharge Chute
Replacement.).
5. Remove the Belt Cover on the right side of the deck.
Install the Blower by inserting the mounting pin into
the tube welded to the rear corner of the deck.
Pivot the blower until the front pin engages the slot
in the deck. Adjust the position of the front pin if
necessary to engage the slot. Use the latch to lock
the blower in this position (See Figure 13). Adjust
tension on latch to draw blower up to deck, yet allow
release by hand.
FIGURE 13
6. Pull the idler release handle and install the belt
in the upper groove of the deck sheave.
7. Install the Belt Cover (Item 25) using the two
knobs. Install the discharge tube assembly by
slipping the upper end into the hood, then sliding
the lower end over the blower discharge
opening. Use the latches to retain the lower
end to the blower.
For units above SN 600,000 (Triton deck):
8. Adjust dog leg baffle to match Ultra Vac blower
intake opening. Adjusting too wide may allow
objects to be thrown from under the mower deck
at high speed. Adjusting too narrow may cause
plugging issues.
WARNING
POTENTIAL HAZARD
♦If the blower intake opening is not correct it
will allow objects to be thrown in operator’s or
bystander’s direction. Also, contact with blade
could occur.
WHAT CAN HAPPEN
♦Thrown objects or blade contact can cause
serious injury or kill you or bystanders.
HOW TO AVOID THE HAZARD
♦Adjust dog leg baffle to match intake opening.
Adjust Blower Drive Belt Position
1. Read the operator’s manual for the Ultra Vac
and mower before performing this adjustment.
Make sure that you understand the controls,
their locations their functions and safety
requirements.
2. Ensure the blower, belt cover, bags, tube and
hood are in good condition, properly attached
and latched.
3. Run the unit with the PTO and blower engaged
for two minutes.
4. Disengage the PTO, stop the engine and
remove key.
5. Remove the belt cover and check to make sure
that the belt is riding near the center of the flat
idler on the idler arm. If the belt is not riding
near the center of the idler, remove the blower,
and bend the idler arm slightly.
6. Reinstall the blower and belt cover and perform
steps 3-5 again to verify belt position.

Other manuals for Ultra Vac Lazer Z HP

3

This manual suits for next models

3

Other Exmark Lawn Mower manuals

Exmark Turf tracer HP User manual

Exmark

Exmark Turf tracer HP User manual

Exmark Ultra Vac 4500-420 User manual

Exmark

Exmark Ultra Vac 4500-420 User manual

Exmark VH3615KA User manual

Exmark

Exmark VH3615KA User manual

Exmark Frontrunner User manual

Exmark

Exmark Frontrunner User manual

Exmark Ultra Vac QDS Laser Z Programming manual

Exmark

Exmark Ultra Vac QDS Laser Z Programming manual

Exmark Metro 26 User manual

Exmark

Exmark Metro 26 User manual

Exmark VANTAGE 48 Manual

Exmark

Exmark VANTAGE 48 Manual

Exmark TURF TRACER LP S Series Manual

Exmark

Exmark TURF TRACER LP S Series Manual

Exmark Lazer Z XS lXs25Kd605 User manual

Exmark

Exmark Lazer Z XS lXs25Kd605 User manual

Exmark exmark 30" Manual

Exmark

Exmark exmark 30" Manual

Exmark NAVIGATOR User manual

Exmark

Exmark NAVIGATOR User manual

Exmark Ultra Vac Laser Z User manual

Exmark

Exmark Ultra Vac Laser Z User manual

Exmark QUEST 4500-339 User manual

Exmark

Exmark QUEST 4500-339 User manual

Exmark LAZER Z X Series User manual

Exmark

Exmark LAZER Z X Series User manual

Exmark METRO User manual

Exmark

Exmark METRO User manual

Exmark QUEST SP Manual

Exmark

Exmark QUEST SP Manual

Exmark exmark 30" User manual

Exmark

Exmark exmark 30" User manual

Exmark TURF TRACER X SERIES LP Parts list manual

Exmark

Exmark TURF TRACER X SERIES LP Parts list manual

Exmark LAZER Z User manual

Exmark

Exmark LAZER Z User manual

Exmark Metro 21 M216KASPC User manual

Exmark

Exmark Metro 21 M216KASPC User manual

Exmark Navigator 4500-368 User manual

Exmark

Exmark Navigator 4500-368 User manual

Exmark VIKING HYDRO User manual

Exmark

Exmark VIKING HYDRO User manual

Exmark Lazer Z Series User manual

Exmark

Exmark Lazer Z Series User manual

Exmark Laser Z XP User manual

Exmark

Exmark Laser Z XP User manual

Popular Lawn Mower manuals by other brands

MTD 12A-98K3095 Operator's manual

MTD

MTD 12A-98K3095 Operator's manual

Toro Recycler 20349 Operator's manual

Toro

Toro Recycler 20349 Operator's manual

Craftsman 25112 instruction manual

Craftsman

Craftsman 25112 instruction manual

Webb WER16HP Operator's manual and parts list

Webb

Webb WER16HP Operator's manual and parts list

MTD series 620 parts manual

MTD

MTD series 620 parts manual

MTD 50MB Operator's manual

MTD

MTD 50MB Operator's manual

Murray 96017000900 Repair parts manual

Murray

Murray 96017000900 Repair parts manual

Jacobsen R-311T Maintenance manual

Jacobsen

Jacobsen R-311T Maintenance manual

Stiga ESTATE PRO 25 13-2563-13 Specifications

Stiga

Stiga ESTATE PRO 25 13-2563-13 Specifications

Raider RD-GLM07 user manual

Raider

Raider RD-GLM07 user manual

Troy-Bilt V809P Operator's manual

Troy-Bilt

Troy-Bilt V809P Operator's manual

Husqvarna R152SVA instruction manual

Husqvarna

Husqvarna R152SVA instruction manual

Gardena 380 AC 4026 operating instructions

Gardena

Gardena 380 AC 4026 operating instructions

Poulan Pro 424368 Operator's manual

Poulan Pro

Poulan Pro 424368 Operator's manual

Gardena PowerMax Li-40/32 Operator's manual

Gardena

Gardena PowerMax Li-40/32 Operator's manual

Jacobsen R-311 ROPS Operator's manual

Jacobsen

Jacobsen R-311 ROPS Operator's manual

Toro Greensmaster TriFlex 3300 Service manual

Toro

Toro Greensmaster TriFlex 3300 Service manual

Craftsman 28908 - Lt 2000 19.5 HP/42" Lawn Tractor Operation manual

Craftsman

Craftsman 28908 - Lt 2000 19.5 HP/42" Lawn Tractor Operation manual

manuals.online logo
manuals.online logoBrands
  • About & Mission
  • Contact us
  • Privacy Policy
  • Terms and Conditions

Copyright 2025 Manuals.Online. All Rights Reserved.