Explore Scientific 125 SCIENTIFIC CHALLENGES SET User manual

SCIENCE
125
SCIENTIFIC CHALLENGES SET
INSTRUCTIONS
8+
88-90175

P.1
Welcome to the amazing world of one of Explore Science! Explore Science is a D.I.Y
(do-it-yourself) educational science kit that provides useful knowledge about simple
physics, and is suitable for children of 8 years old and up. “You’ll be amazed” to find
what you can learn as the activity enables you to learn realistic concept of basic
physical theory.
Once you get started you will be able to build your understanding through
experimenting and maybe trying out some interesting experiments on your own. The
125 Scientific Challenges Set is smartly designed for children to connect with ease and
breeze. Simply snap all key components and modules together to start, and pull apart
once finished.
WARNING: Only for use by children aged 8 years and older.
GLOSSARY
Assembly: A group of machine parts or components that fit together to form a
complete unit.
Battery: A consumable for providing electricity. It contains chemicals which will
undergo chemical reaction that produces electricity
Motor: A device converts electricity to rotatory mechanical motion.
Power: The energy force or strength generated by a physical system or machine.
Wire: A component which is used in the electronic / electrical industry as a conductor
that is used to carry electricity or signals.
SCIENCE
125
SCIENTIFIC CHALLENGES SET

Warning ! Do not short-circuit the battery terminals and spring connectors as this may
cause overheating. Do not lock the motor or other moving parts as this may cause
overheating.
WARNING
Before setting up this unit, please double check and make sure all wiring connections
you have made are correct before inserting the batteries and switching on the unit as
failure may result in damage to components or the unit.
When experiment is finished, make sure the batteries are disconnected and switch off
the unit before you clear away the wires. Do not apply any components or parts to the
unit other than those provided with this kit.
Do not lock the motor or other moving parts. Otherwise it may cause overheating.
The toy is not to be connected to more than recommended number of power supplies.
CAUTION !
Use 7 x AA size batteries (not included).
Remove batteries when not in use.
Batteries must be inserted with the correct polarity
Non-rechargeable batteries are not to be recharged
Re-chargeable batteries are only to be charged under adult supervision
Re-chargeable batteries are to be removed from the toy before being charged
Different types of batteries or new and used batteries are not to be mixed.
Exhausted batteries are to be removed from the toy
The supply terminals are not to be short-circuited
Only batteries of the same or equivalent types are to be used
Do not dispose of the batteries in fire
Do not mix old and new batteries
Do not mix alkaline, carbon zinc and re-chargeable batteries
BATTERY INFORMATION
P.2
Adult supervision and assistance is required.
This unit is only for use by children aged 8 years and older.
Not suitable for children under age 3 years old due to small part(s) and component(s)
– CHOKING HAZARD.
Read and follow all instructions in the manual before use.
This toy contains small parts and functional sharp points on components. Keep away
from children under age 3 years.
7 x AA size batteries are required (not included)
Please retain the information and this manual for future reference.
Instructions for parents are included and have to be observed.
This product contains small ball which may break off and cause a choking hazard. Not
suitable for children under 36 months.
Do not aim at eyes and face. Do not use improvised projectiles.
Warning. Do not use close to the ear! Misuse may cause damage to hearing.
P.3
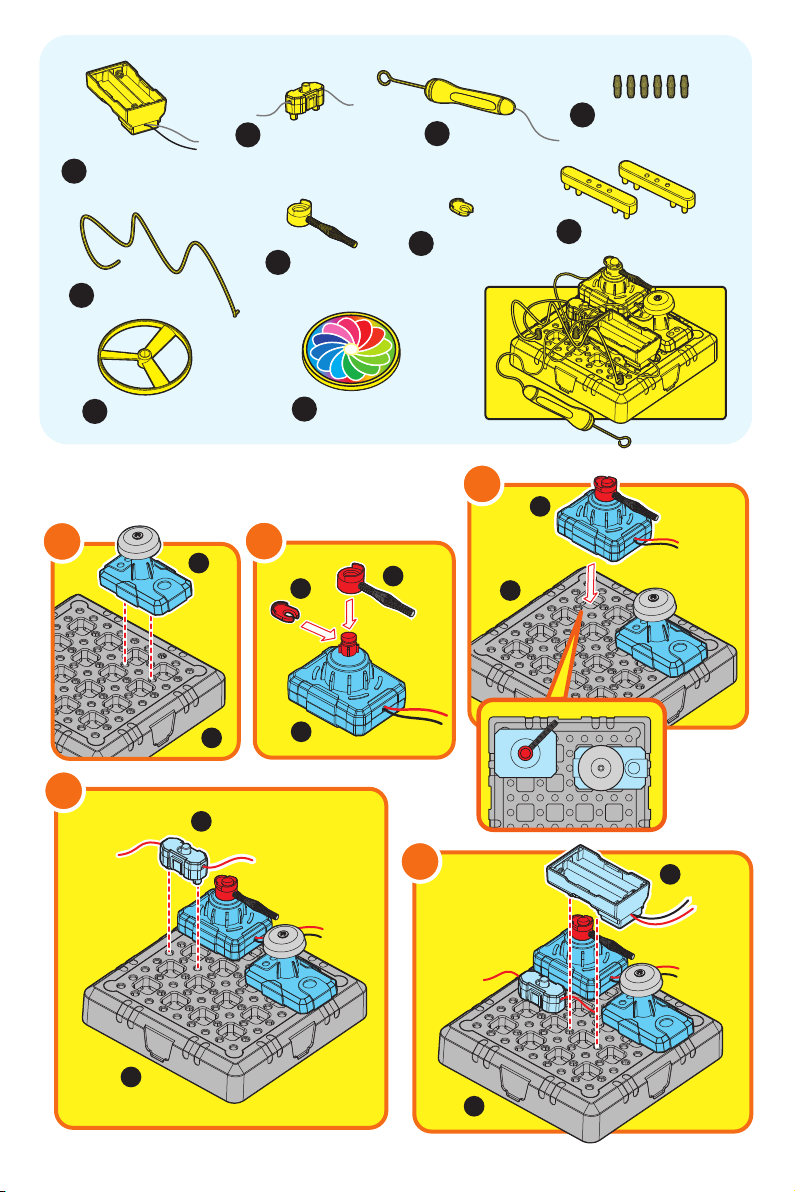
There are four basic individual units in this kit, namely AIM N SHOOT, BUBBLE
SCIENCE, ACTION DINO, and MAZE CHALLENGE.
By changing different circuit connections and combinations, it can establish play sets
of diverse function.
To ensure the success of the ASSEMBLY, be sure to read these instructions and review
the diagrams thoroughly before starting.
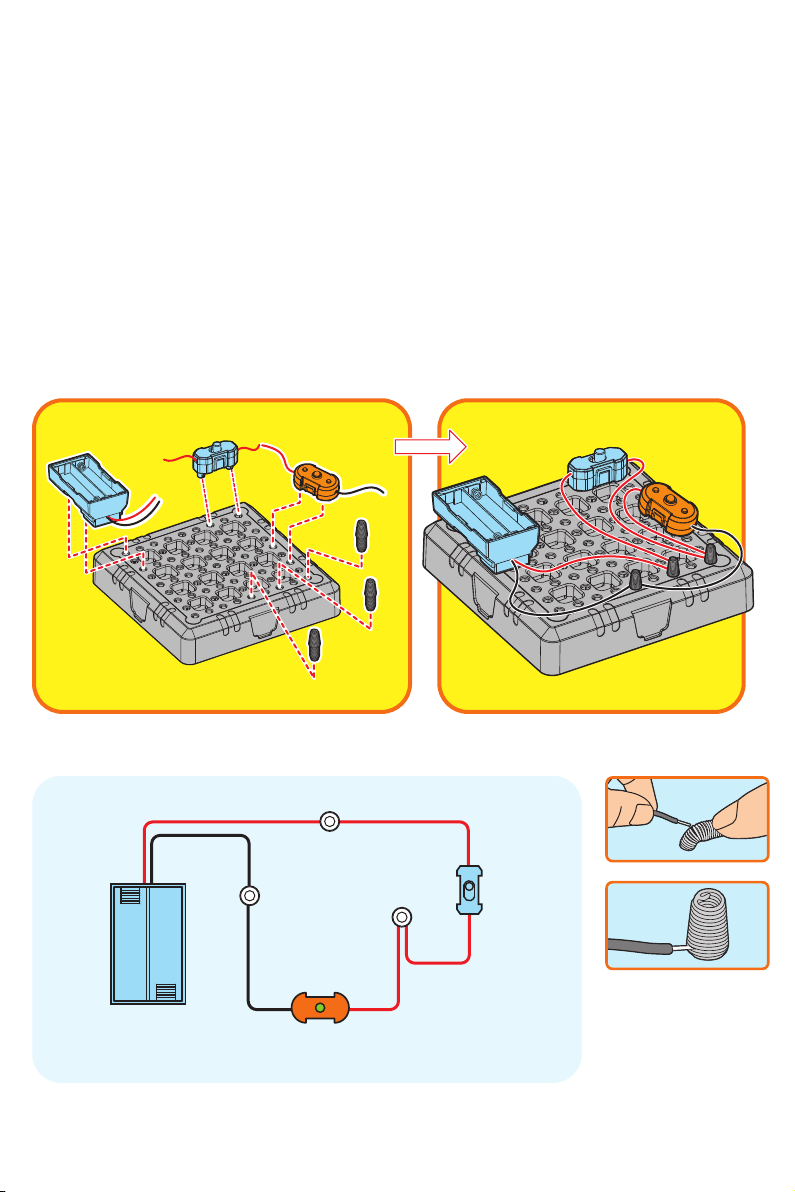
Below is a demonstration of connecting a simple circuit. You can start with this simple
circuit as a practice before moving to other advanced circuits.
First of all, take out the components shown in below diagram from your amazing
connection kit. They may be packed in different bags. Then install them like the pictures
shown.
It is now done! Insert 2pcs AA size batteries to the 3V battery compartment. Turn the
switch on. The circuit is connected and current can flow in the circuit. Then the LED
will light up!
READ & SAVE
ASSEMBLY & OPERATION INSTRUCTIONS
A practice of basic circuit connection
BASIC CONNECTION PRINCIPLE
LED
Spring
connector
Box base
with holes
ON/OFF switch
3V battery
compartment
LED
Spring connector
ON/OFF
switch
3V battery
compartment

P.4
04 Box base with holes
05 LED
14 Basketball sensor
15 Sticker
06 Gearbox
03 Spring
connector
07 Gearbox cap
08 Mini-Basketball
01 1.5V battery
compartment 02 ON/OFF switch
09 Basketball
board 10 Basketball
basket
11 Basketball base 12 Catapult body
13 Catapult sling
Aim N Shoot
1
PARTS LIST
01 1.5V battery compartment
02 ON/OFF switch
03 Spring connector
04 Box base with holes
05 LED
06 Gearbox
07 Gearbox cap
08 Mini-Basketball
09 Basketball board
10 Basketball basket
11 Basketball base
12 Catapult body
13 Catapult sling
14 Basketball sensor
15 Sticker
1pc
1pc
4pcs (1spare)
1pc
1pc
1pc
1pc
1pc
1pc
1pc
1pc
1pc
1pc
1pc
1pc
Description Quantity

P.5
02
05
0706
BASIC ASSEMBLY
07
06
01
09
10
11
03
04
06
01 03
02
04
b
a
c
b
a
c

08
8• Stick the sticker on the
basketball board. Then
insert the catapult sling
(13) onto the catapult
body (12), and place the
Mini-Basketball (08) on
the catapult to start the
game!
13
08
12
It is now done! Insert 1pc AA size battery to
the 1.5V battery compartment. Turn the
switch on. The assembled basketball stand
will start moving from the left to the right
side. Now let the game begins. To play you
need to firstly select the desired distance
between the basketball stand and the
catapult. Then aim at the basketball basket
by tapping the catapult sling with your finger.
This fun challenge requires skill as well as
luck to make a successful shot! So test
yourself and give it your best shot!
BASIC CONNECTION PRINCIPLE
How to play
06
Gearbox
02
ON/OFF switch
01
1.5V battery
compartment
Spring connectors
c
b
a
Wiring connections
1.5V battery compartment (01)
ON/OFF switch (02)
Gearbox (06)
Spring (a) Spring (b) Spring (c)
black red
red red
black red
P.6
BUBBLE SCIENCE
2
PARTS LIST
01 3V Battery compartment
02 ON/OFF switch
03 Spring connector
04 Box base with holes
05 Connecting bridge
06 Blower module
07 Spinning unit
08 Blower cover
09 Bubble plate
10 Bubble solution container
1pc
1pc
3pcs
1pc
2pcs
1pc
1pc
1pc
1pc
1pc
Description Quantity
P.7
BASIC ASSEMBLY
04 Box base with holes
05 Connecting bridge
03 Spring
connector
01 3V battery
compartment
02 ON/OFF
switch
06
Blower module
07
Spinning unit
08
Blower cover
09
Bubble plate
10
Bubble solution container
02
10
01
03
09
04
04
04
01
06 06
07
08
P.8
You need to firstly prepare some bubble solution. It may be bought from the shop, or made in the bathroom
(under adult supervision) by adding soap into water to become the bubble solution. When bubble solution is
available, fill it into the bubble solution container.
Insert 2pcs AA size batteries to the 3V battery compartment. Turn ON the switch. The bubble plate will start to
spin and the blower will blow out bubbles. You will see beautiful bubbles shooting out in continuous bubble
stream!
BASIC CONNECTION PRINCIPLE
Wiring connections
3V battery compartment (01)
ON/OFF switch (02)
Blower Module (06)
Spring (a) Spring (b) Spring (c)
black red
red red
black red
How to play
01
01
02
07
06
04
03
02
06
02
06
05
ab
c
02
ON/OFF switch
01
3V battery
compartment
Spring connectors
06
Blower module
c
b
a

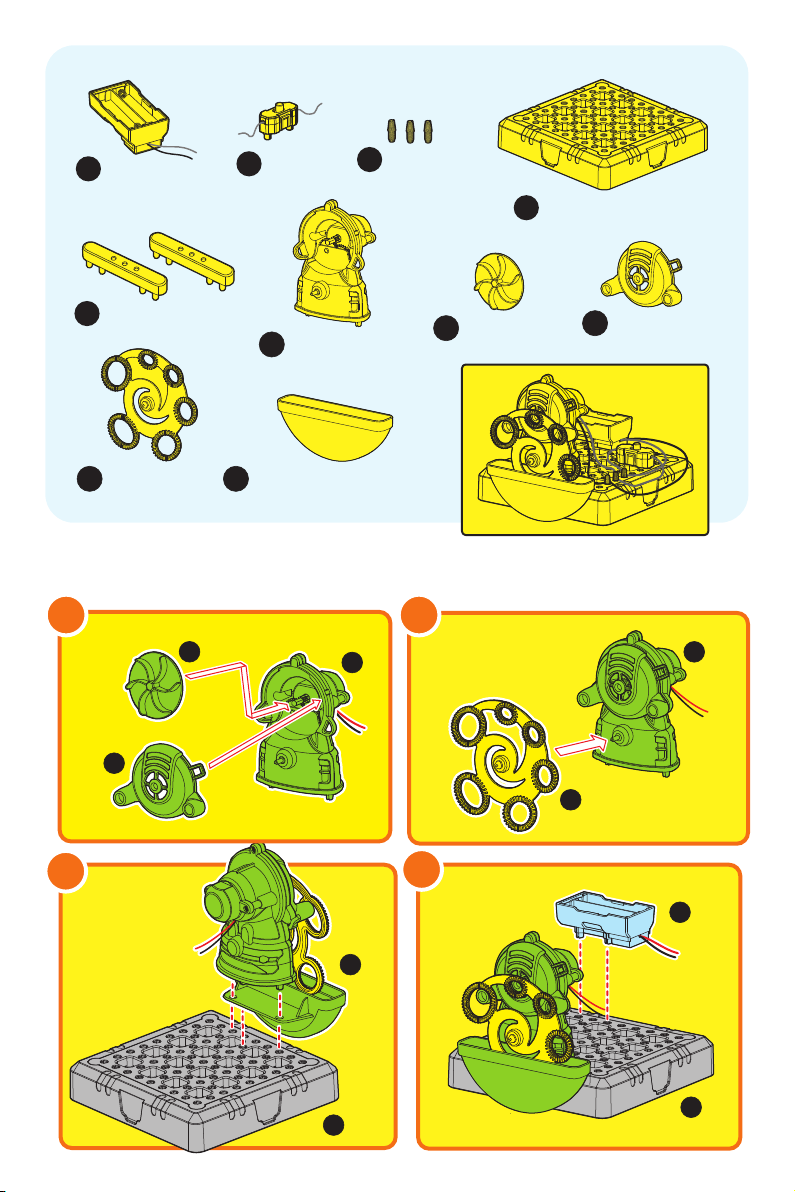
ACTION DINO
3
P.9
PARTS LIST
Description Quantity
1pc
1pc
4pcs (1spare)
1pc
2pcs
1pc
1pc
1pc
2pcs
2pcs
1pc
2pcs
2pcs
7pcs
01 3V battery compartment
02 ON/OFF switch
03 Spring connector
04 Box base with holes
05 Connecting bridge
06 Gearbox
07 Gearbox cap
08 Action rod
09 Arm
10 Main body (left and right part)
11 Jaw
12 Leg
13 Tail (left and right part)
14 Connecting joint
04 Box base with holes
01 3V battery
compartment
02 ON/OFF switch 03 Spring
connector
05 Connecting bridge
10 Main body
(left and right part)
06 Gearbox
08 Action rod 09 Arm
11 Jaw
14 Connecting joint
07
Gearbox cap
13 Tail (left and
right part)
12 Leg
BASIC ASSEMBLY
01 02
10
10
14
14
08
11
09
09
14
14
P.10
12
12
14
03 04
13
06
07
05
13 14
14
6• Gearbox (06) is needed to connect to the dinosaur
for providing action power. Fix the gearbox cap (07) to
the gearbox (06). Note that the gearbox cap (07)
should also be connected to the action rod (08).
06
10
09
07 08
14
08
04
06
02
01
04
02
06
b
a
b
a
01 02
c
c
03

P.11
It is now done! Insert 2pcs AA size batteries to the 3V battery compartment. Turn the
switch on. The assembled action dino will start moving. Watch the robotic action from this
awesome dinosaur!
How to play
Description Quantity
01. Bell module
02. Motor module
03. Box base with holes
04. 3V battery compartment
05. ON/OFF switch
06. Wand
07. Spring connector
08. Metal wire
09. Spring pole
10. C-shape plastic lock
11. Connecting bridge
12. Flying disc
13. Color filter
1pc
1pc
1pc
1pc
1pc
1pc
6pcs (1spare)
1pc
1pc
1pc
2pcs
1pc
1pc
PARTS LIST
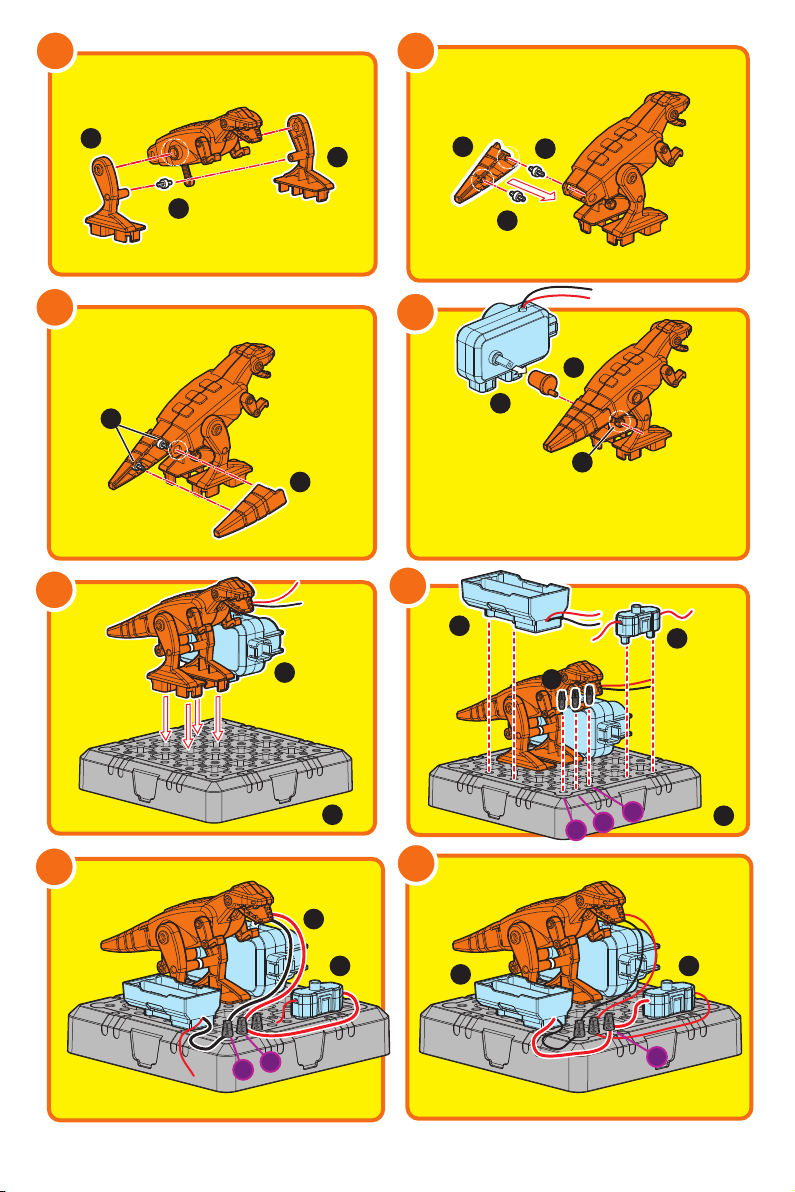
Maze Challenge
4
02 Motor module 03 Box base with holes
01 Bell module
BASIC CONNECTION PRINCIPLE
Wiring connections
3V Battery compartment (01)
ON/OFF Switch (02)
Gearbox (06)
Spring (a) Spring (b) Spring (c)
black red
red red
black red
Gearbox
06 02
ON/OFF switch
01
3V battery
compartment
Spring connectors
c
b
a
P.12
04 3V battery
compartment
05 ON/OFF switch
07 Spring connector
06 Wand
08 Metal wire
10 C-shape
plastic lock
11 Connecting bridge
12 Flying disc 13 Color filter
09 Spring pole
BASIC ASSEMBLY
03
09
10
02
01 02
03
01
03
02
05
04
05
03
03
04
10 11
11• Connect the wand (06) to the spring connector
(7a).
06 07
08 09
P.13
10• Fix the metal wire (08) on the spring
connectors (7d) and (7e).
03
7c
7d
7e
7a
7b
7b
7d
7a
08
7d
7e
06
7a
7c

P.14
It is now done! Insert 2pcs AA size batteries to the 3V battery compartment. Turn the switch on and put the ring
of the wand around the metal wire via the open area of the ring. Keep your hand steady and carefully move the
ring of the wand through the metal wire. If the ring touches the metal wire, the bell will ring and you lose!
Complete the maze to achieve the fastest time against your friends. Bend the metal wire to create different levels
of difficulty. Please ensure the switch is off and batteries are removed from battery compartment before bending
the metal wire. You can switch to use other functions by replacing the spring pole with flying disc or color filter.
How to play
BASIC CONNECTION PRINCIPLE
Wiring connections
3V battery compartment (04)
ON/OFF switch (05)
Motor Module (02)
Metal Wire (08)
Wand (06)
Spring (7a) Spring (7b) Spring (7c) Spring (7d) Spring (7e)
black red
red red
red black
silver silver
red
7b
7a
7d 7e
7c
Spring connectors
Spring connectors
04 3V battery
compartment
01 Bell module
02 Motor module
05 ON/OFF
switch
08 Metal wire
06 Wand
P.15
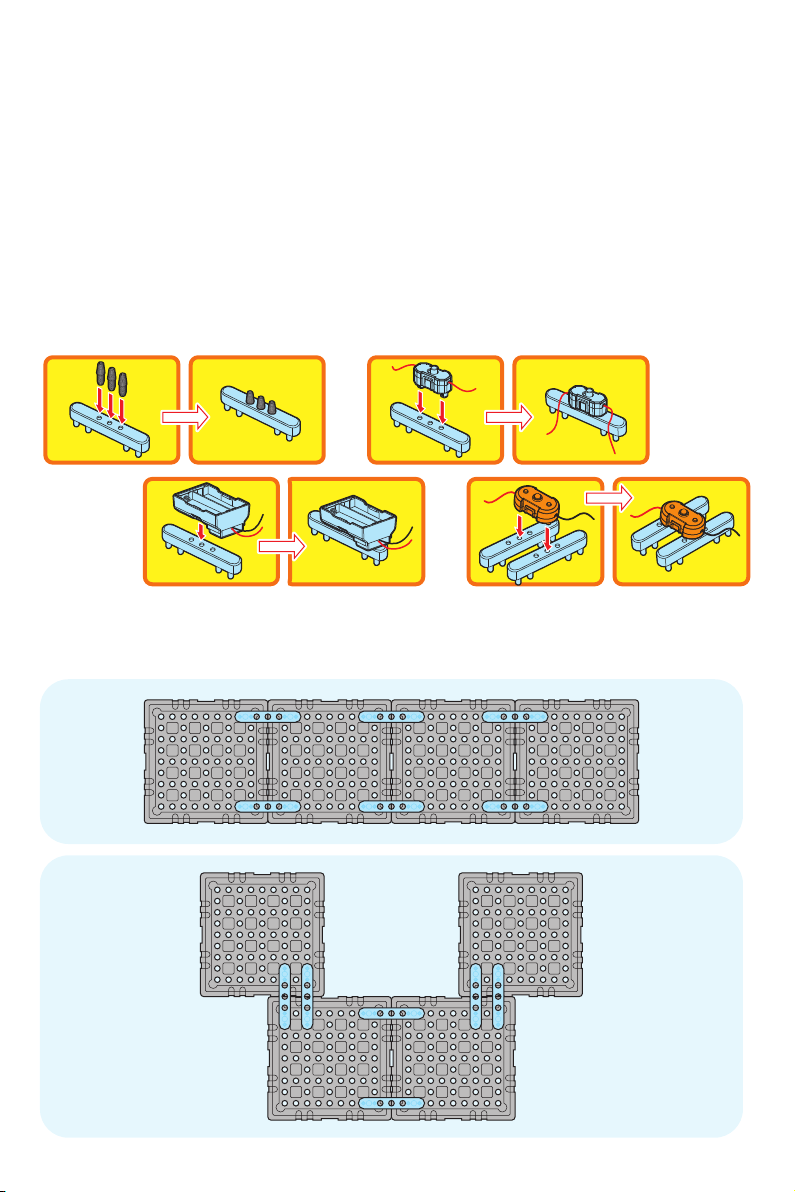
FOR MORE CONNECTING FUN!
After you have successfully assembled the basic individual units, you can create
more exciting interaction with the AIM N SHOOT, BUBBLE SCIENCE, ACTION DINO
and MAZE CHALLENGE together! Here are some basic things to note when using
connecting bridges to connect units together:
If needed, you can adjust the position of the assembled parts on the box base with
holes to suit the 2in1 or 3in1 or 4in1 connection. There is no need to keep their
position exactly as the basic assembly. You can adjust their positions as long as the
circuit connection is correct as the instruction.
There are 3 holes on each connecting bridge. Therefore switch or spring or other
things can be installed onto the connecting bridges. This is useful when you find the
box base with holes is crowded and hard to find rooms on it. These diagrams are
examples:
For 3in1 and 4in1 connections, you can have different connecting arrangements.
Below figures are examples. You can decide or modify the arrangement to make
your own style! Just make sure that the circuit connection is correct as the
instruction.

How to Connect
Put the 2, 3 or 4 box bases together. Use connecting bridges to connect them firmly.
Then follow below connecting diagrams to connect!
P.16
Connection symbols
Spring
Basketball
sensor
3V battery
compartment
LED
Gearbox
1.5V battery
compartment
ON/OFF switch
Basketball
board, basket & base
Motor module with color filter
Motor module with flying disc
Action dinoBubble blower
Bell moduleMotor module with spring pole
Metal wireWand
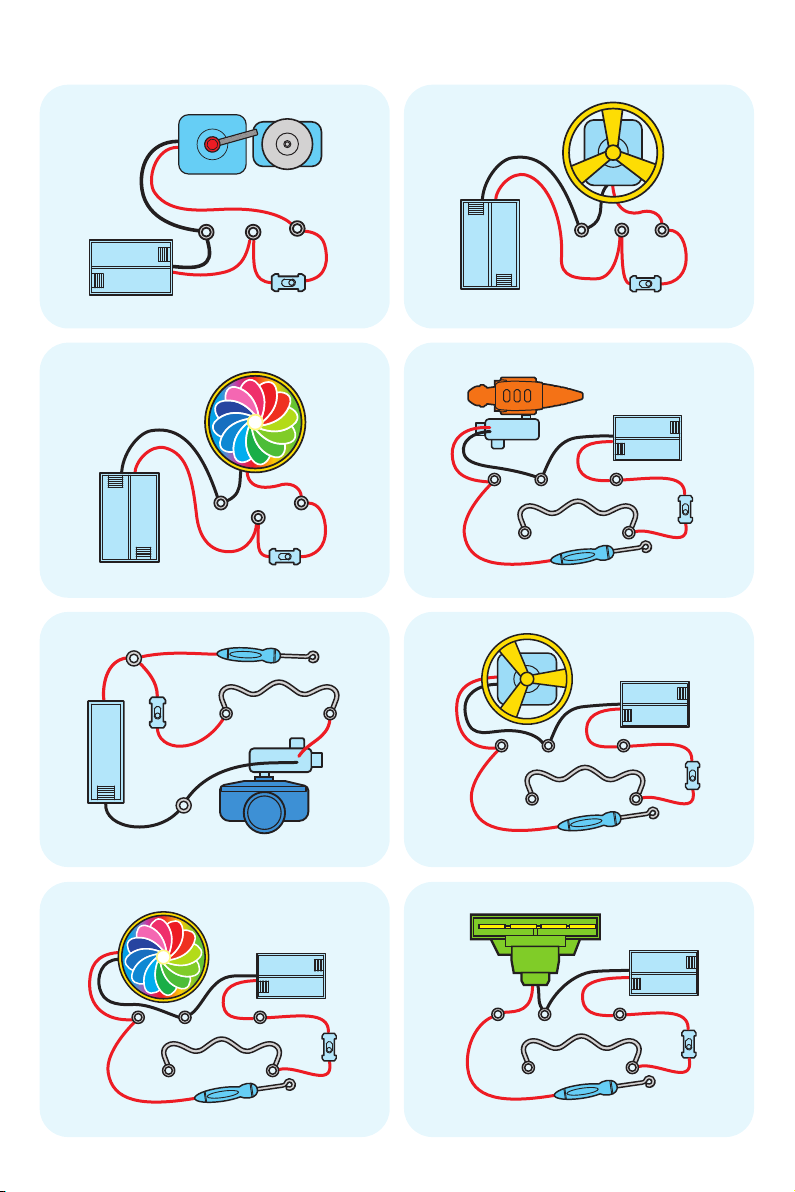
P.17
Connection diagrams

P.18

P.19
Table of contents
Other Explore Scientific Toy manuals


Popular Toy manuals by other brands


NOREV TOYS
NOREV TOYS G43010 installation instructions

RBC kits
RBC kits L39 Albatros manual

Radica Games
Radica Games Sport Bass Fishin' 71014 instruction manual

Black Horse Model
Black Horse Model B.A. EAGLE Instruction manual book

Flight Model
Flight Model F153 EXTRA 300 125" Assemble manual

TILLIG Modellbahnen
TILLIG Modellbahnen Single-Slip Turnout II quick start guide


