FABER S.p.A. FCH SLIM 94 BK KL User manual

EN
USER MANUAL
FR
MANUEL D’UTILISATION
IT
LIBRETTO DI USO
RU
РУКОВОДСТВО ПО ЭКСПЛУАТАЦИИ
ES
MANUAL DE USO
DE
GEBRAUCHSANLEITUNG
TR
KİTAPÇIK KULLANIN
GR
ΟΔΗΓΊΕΣ ΧΡΗΣΗΣ
NL
GEBRUIKSAANWIJZING
BG
РЪКОВОДСТВО НА ПОТРЕБИТЕЛЯ
PL
INSTRUKCJA UŻYTKOWANIA
SI
NAVODILO ZA UPORABO
HR
KNJIŽICA S UPUTAMA
FCH SLIM 94
BK KL

EN
.................................................................................................................................. 3
FR
.................................................................................................................................. 15
IT
.................................................................................................................................. 29
RU
.................................................................................................................................. 42
ES
.................................................................................................................................. 56
DE
.................................................................................................................................. 69
TR
.................................................................................................................................. 83
GR
.................................................................................................................................. 95
NL
.................................................................................................................................. 109
BG
.................................................................................................................................. 123
PL
.................................................................................................................................. 137
SI
.................................................................................................................................. 151
HR
.................................................................................................................................. 163

EN
1. SAFETY
INFORMATION
For your own safety and
correct operation of the
appliance, please read
this manual carefully be-
fore installation and oper-
ation. Always keep these
instructions together with
the appliance, even if it is
sold or transferred to third
parties. It is important that
users know all the appli-
ance's operating and
safety characteristics.
These hobs have induc-
tion systems that comply
with the requirements of
EMC standards and with
the EMF directive, and
they should not interfere
with other electronic
devices. Pacemaker
wearers and those using
other electronic implants
must consult their doctor
or the manufacturer of the
implanted device to as-
sess whether or not it is
sufficiently resistant to in-
terference.
Electrical connections
must be performed by a
trained technician. Before
making the electrical con-
nection, please read the
section on ELECTRICAL
CONNECTION.
For appliances with a power
supply cable, the terminals or
section of wire between the
cable anchor point and the ter-
minals must be laid out that they
allow the live wire to be extrac-
ted before the earth wire, if it
comes loose.
• The manufacturer cannot be
held responsible for any dam-
age resulting from incorrect or
inadequate installation.
• Check that the mains power
supply corresponds to the
one indicated on the rating
plate affixed to the inside of
the product.
• The cut-out devices must be
installed in the fixed system
according to wiring system
regulations.
• For Class I appliances, check
that the domestic power sup-
ply has a suitable earthing
connection.
• Connect the product to the
mains using an omnipolar
switch.
• If the power cable is dam-
aged, it must be replaced by
the manufacturer, an author-
ised service centre or a quali-
fied technician, to avoid any
risk of danger.
WARNING: Remove the
protective films before in-
stalling the appliance.
• Only use the screws and
other hardware elements
3

supplied with the appliance.
WARNING: Failure to in-
stall the screws or fixing
devices as described in
these instructions may
lead to a risk of electric
shocks.
• Cleaning and maintenance
must not be carried out by
children, unless they are su-
pervised by an adult.
• Children must be supervised
to ensure that they do not play
with the appliance.
• This appliance must not be
used by persons (including
children) with limited phys-
ical, sensory or mental abilit-
ies, or by inexperienced or un-
trained persons, unless
closely supervised and in-
structed in the safe use of the
appliance by a person re-
sponsible for their safety.
• This appliance may be used
by children over the age of
eight and by persons with lim-
ited physical, sensory or men-
tal abilities or with insufficient
experience and knowledge,
provided they are closely su-
pervised and instructed on
the safe use of the appliance
and on the dangers that it in-
volves. Do not allow children
to play with the appliance.
WARNING: The appli-
ance and its accessible
parts become extremely
hot during use.
Take great care not to touch the
heating elements.
Keep children under 8 years of
age well away from the appli-
ance, unless they are under
constant supervision.
WARNING: If the surface
shows any signs of cracking,
turn the appliance off to prevent
any risk of electric shock.
• Do not touch the appliance if
your hands or body are wet.
• Do not use steam appliances
to clean the product.
• Do not rest metal objects such
as knives, forks, spoons and
pan lids on the surface of the
hob, as they might overheat.
• Use the relevant control to
turn the hob off after use; do
not rely on the pan sensors.
WARNING: Unsupervised
cooking on a hob using oil and
grease may be dangerous and
could cause a fire. NEVER at-
tempt to put flames out with wa-
ter. Turn the appliance off and
suffocate the flames by cover-
ing them with a pan lid or a fire
blanket, for example.
CAUTION: The cooking pro-
cess must be supervised. A
short cooking process must be
constantly monitored.
• The appliance is not designed
to be started using an external
timer or a separate remote
controlled system.
WARNING: Danger of fire: do
not place objects on the cooking
surfaces.
• The appliance must be in-
stalled to allow it to be cut off
from the electrical power sup-
4

ply with a contact opening (3
mm) that ensures complete
disconnection under over-
voltage category III condi-
tions.
• The appliance must never be
exposed to the elements
(rain, sun).
• Keep the packaging away
from children and animals.
• Make sure the device is con-
nected directly to the power
outlet.
• Do not use adapters, multiple
sockets or extension cables
to connect the device.
• Never use the appliance for
purposes other than those for
which it has been designed.
• Fryers must be monitored at
all times during cooking; over-
heated oil could catch fire.
• Do not operate the appliance
using an external timer or
separate remote-controlled
system.
• The appliance must never be
installed behind a decorative
door, to prevent it from over-
heating.
• Do not stand on the appli-
ance, as this may damage it.
• Do not rest hot pots and pans
on the edge, as this may dam-
age the silicone seals.
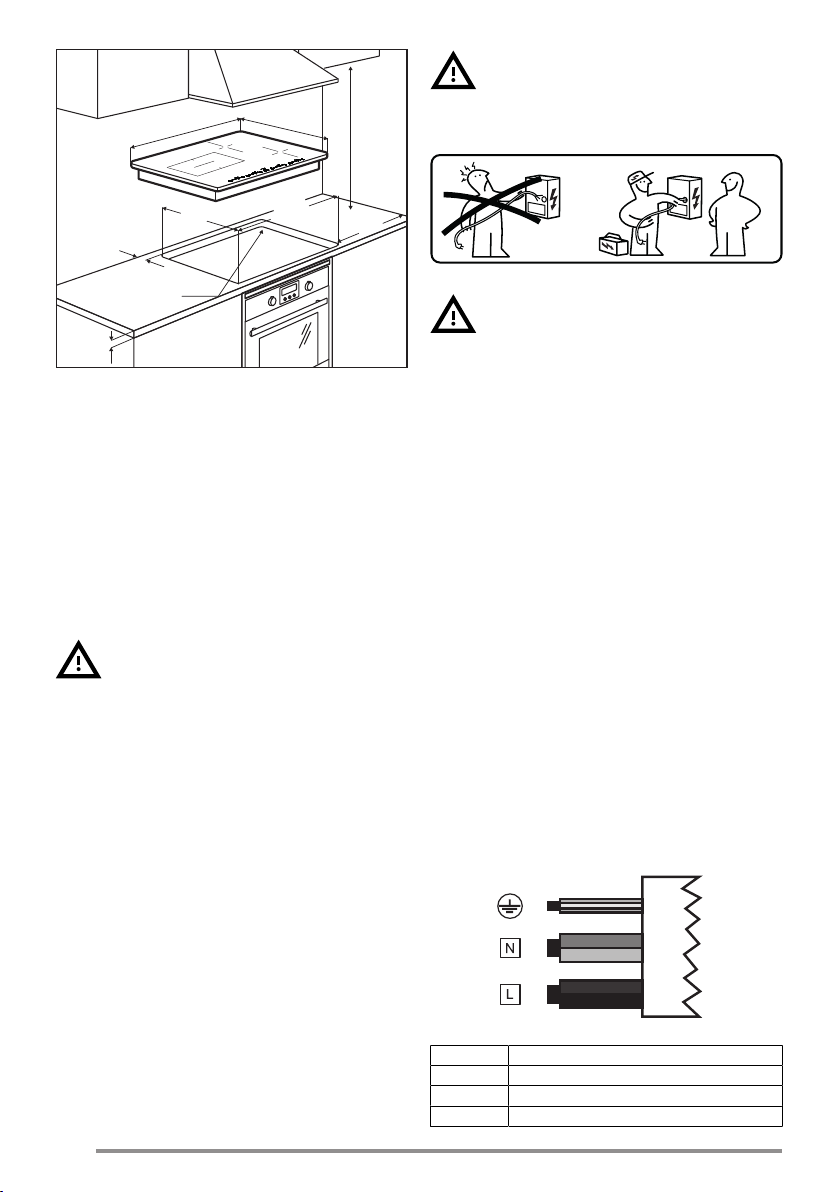
2. INSTALLATION
The installation process must comply
with the laws, ordinances, directives and
standards (electrical safety rules and
regulations, proper recycling in accord-
ance with the regulations, etc.) in force in
the country of use!
• For further information on the installa-
tion, please refer to the Assembly In-
structions.
• Do not use silicon sealant between the
appliance and the worktop.
• Make sure that there is a sufficient gap
underneath the hob for air circulation.
Please refer to the Assembly Instruc-
tions.
• The underside of the appliance can
get hot. If the appliance is installed
over drawers, install a non-combust-
ible separation panel under the appli-
ance to prevent access to the under-
side. Please refer to the Assembly In-
structions.
• Ventilation of the appliance must com-
ply with the manufacturer’s instruc-
tions.
• Create a front opening of at least 28
cm² in the kitchen unit which houses
the hob to allow correct air circulation.
Requirements for kitchen units
• If the appliance is mounted on flam-
mable materials, the guidelines and
regulations relating to low voltage in-
stallations and fire prevention must be
strictly observed.
• For built-in units, the components (in
plastic and veneered wood) must be
applied with heat-resistant adhesives
(85°C min.): the use of unsuitable ma-
terials and adhesives may cause the
components to deform or detach.
• The use of decorative hardwood bor-
ders around the worktop behind the
appliance is permitted, provided the
minimum distance always complies
with the indications indicated in the in-
stallation drawings.
5

Min.
28 mm
min.
100 mm
55 mm
max.
R 5 mm
41 0 mm
900 mm
min.
500 mm
390 +2
mm mm
880 +2
• For further information on the installa-
tion, please refer to the Assembly In-
structions.
• If there is no oven beneath the hob, in-
stall a separation panel under the ap-
pliance according to the Assembly In-
structions.
3. ELECTRICAL
CONNECTIONS
WARNING: All electrical connec-
tions must be carried out by an au-
thorised installer.
• Before making the connections, check
that the rated voltage of the appliance
indicated on the relevant rating plate
corresponds to the power supply
voltage. The rating plate is affixed to
the underside of the hob.
• Follow the connection diagram (loc-
ated on the underside of the hob).
• Only use original components sup-
plied by the spare parts service.
• The appliance is supplied with a
power cable.
• If damaged, replace the power supply
cables with original spare cables.
Contact the After Sales Service.
Caution! Do not weld any of the
cables!
Electrical connection
WARNING: The hob is already
configured for a SINGLE-PHASE
electrical connection; follow these
instructions for any changes.
• The wire connection must be per-
formed by a specialised technician.
• This device has a Y-shaped connec-
tion with an H05V2V2-F cable. Min.
wire section: 5x2,5 mm².
• Connection terminals can be ac-
cessed by removing junction box
cover.
• Make sure the specifications of the
household electrical system (voltage,
maximum power and current) are
compatible with those of the appli-
ance.
• Connect the appliance as shown in
the diagram (in accordance with the
mains voltage and country standard
reference).
Connection diagram
220V - 240V 1N ~
LBlack
LBrown
NBlue
NGrey
6

Yellow / Green
380V - 415V 2N ~
L1 Brown
L2 Black
NBlue
NGrey
Yellow / Green
380V - 415V 2N ~
L1 Brown
L2 Black
N1 Blue
N2 Grey
Yellow / Green
4. CLEANING AND
MAINTENANCE
• Never use abrasive sponges, wire
wool, hydrochloric acid or other
products that might scratch or mark
the surface.
• Do not consume any food that falls ac-
cidentally or builds up on the surface
and the functional or aesthetic ele-
ments of the hob.
• Switch off or unplug the appliance
from the mains supply before carrying
out any maintenance work.
• Clean the appliance after every use to
prevent any residual food from burn-
ing on to it. It is much harder work to
remove encrusted and burned-on dirt.
• For everyday dirt, use a soft cloth or
sponge and a suitable detergent. Fol-
low the manufacturer’s recommenda-
tions regarding detergents to be used.
The use of neutral detergents is re-
commended.
• Remove all traces of encrusted dirt ,
e.g. milk that has boiled over, using a
scraper suitable for ceramic glass,
while the hob is still hot. Follow the
manufacturer’s recommendations re-
garding the type of scraper to be used.
• Remove food containing sugar, e.g.
jam that has spilled during cooking,
using a scraper suitable for ceramic
glass, while the hob is still hot. If this
residue is not removed, it may dam-
age the ceramic glass surface.
• Remove any melted plastic using a
scraper suitable for ceramic glass
while the hob is still hot. If this residue
is not removed, it may damage the
ceramic glass surface.
• Remove limescale using a small
amount of descaler, e.g. vinegar or
lemon juice, once the hob has cooled
down. Then, clean again with a damp
cloth.
• Do not cut or prepare foodstuffs on the
surface and do not drop hard objects
onto it. Do not drag pans or plates over
the surface.
• Do not use steam cleaning equip-
ment.
Maintenance and repairs
• Make sure that any maintenance on
the electrical components is only car-
ried out by the manufacturer or by the
service technicians.
• Make sure that damaged cables are
only replaced by the manufacturer or
by the service technicians.
7

In there is a fault, try to resolve it by fol-
lowing the troubleshooting guidelines. If
the problem cannot be resolved, contact
the After Sales Service.
When contacting the After Sales Ser-
vice, please provide the following inform-
ation:
- type of fault
- appliance model (Art./Code)
- serial number (S.N.)
This information can be found on the rat-
ing plate. The rating plate is affixed to the
underside of the appliance.
If the event of incorrect use of the appli-
ance or if the installation has not been
performed by an authorised installer, the
intervention by the After Sales Service
technician or dealer may not be free of
charge, even during the warranty period.
5. PRODUCT
DESCRIPTION
Cooking surface layout
1Single cooking area (197x220 mm) 2100 W, with
3000 W Booster function
2Single cooking area (197x220 mm) 2100 W, with
3000 W Booster function
3Single cooking area (160 mm) 1400W, with 2100 W
Booster
4Single cooking area (200 mm) 2300 W, with 3000 W
Booster
5Control panel
1 + 2 Combinable cooking area (395 x 220 mm) 3000 W,
with 3700 W Booster function.
INDICATORS
Pan detection
Each of the cooking areas is fitted with a
system to detect the presence of a pan.
The pan presence detection system re-
cognises pans with a magnetic base,
suitable for use with induction hobs.
If the pan is removed during cooking or if
an unsuitable pan is used, the symbol
appears on the display.
Residual heat indicator
The residual heat indicator is a safety
feature, indicating that the surface of the
cooking area is still at a temperature of
50 °C or above, which may cause burns if
touched by a bare hand. The digit for the
corresponding cooking area indicates
.
6. CONTROL PANEL
912
10
3
4
56
7
8
1On/Off
2Pause key
3Timer control and cooking time indicator
4Timer symbol
5“Bridge” symbol
6Power level indicator
7Defrost symbol
8Defrost key
9Swipe keyboard
10 Lock key
The cooking areas can be activated by
pressing the corresponding swipe key-
board. The digit becomes brighter to
confirm the operation.
It is also possible to activate the cooking
areas simply by placing a pan on the
cooking area. The hob automatically re-
cognises the presence and size of the
pan and therefore activates the required
cooking areas.
8

7. POWER LIMITATION
When connecting to the domestic power
supply for the first time, the installer must
set the power of the cooking areas based
on the actual capacity of the domestic
power supply.
If this is not necessary, the hob can be
turned on directly using , otherwise,
follow the operations below to access the
menu.
• Connect the hob to the domestic
mains power (this operation must be
performed each time the menu is ac-
cessed).
• All the digits light up for a few seconds.
• As soon as the digits go out again,
press and hold and for 4
seconds until the left swipe keyboards
light up.
• Press and hold both swipe keyboards
on the left for 4 seconds until the 3
control digits indicate “CF6”.
• Press until “PHA“ appears.
• Press the last keyboard on the left to
select the correct setting.
See the following table for the specifica-
tions:
Value on swipe
keyboard KW Notes
0 7.4 Standard initial setting
1 6
2 5
3 4
4 3.5
5 3
6 2.5
Once the correct value has been
entered, confirm by pressing and holding
and .
8. FUNCTIONS
Lock It is possible to lock the hob functions during use, e.g. to clean the hob.
To enable: press .
To disable: press .
Child lock This function prevents accidental use of the appliance
To enable: simultaneously press and , release and press again.
All the digits indicate .
The operations described must be completed within 10 seconds.
To disable: simultaneously press and , release and press again.
All the digits that indicate disappear.
The operations described must be completed within 10 seconds.
9

Boost function Every cooking area can be set to an additional power level for a maximum of 5 minutes.
To enable: select one of the 4 cooking areas and select “Boost” on the swipe keyboard. The corres-
ponding digit indicates .
To disable: select one of the other possible values on the swipe keyboard.
Cooking area timer The timer allows a specific cooking area to be switched off when the set time expires.
The cooking areas can be programmed individually because each one has its own timer.
To enable: turn on the hob and select one of the 4 cooking areas, then press “+” and "-” to set the
timer. The symbol of the cooking area lights up. Press “+” and “-” separately to set the count-
down. The increase and decrease of the value during the setting varies according to the time to be
set. The display in the time management controls area shows the countdown.
To confirm the set time, do not touch anything for 5 seconds.
To disable: wait until the end of the countdown or reset the time values (press “+” and “-” and reset
with “-”).
Timer (generic) Timer with alarm for generic use.
To enable: turn on the hob, then press “+” and "-” to set the timer. Press “+” and “-” separately to
set the countdown. The increase and decrease of the value during the setting varies according to
the time to be set. The display in the time management controls area shows the countdown.
To confirm the set time, do not touch anything for 5 seconds.
To disable: wait until the end of the countdown or reset the time values (press “+” and “-” and reset
with “-”).
Defrost function To enable: select one of the 4 cooking areas and press .
The digit of the selected area shows .
To disable: press or press .
Pause function This function allows you to pause/restart any active function on the hob, by reducing the power
available in the cooking area and resetting all the functions.
During the pause, all the digits indicate to inform the user that:
- No energy is produced in any of the cooking areas
- All functions and the timer are disabled.
To enable: with the hob on, press and hold for at least 1 second.
To disable: press and hold for at least 1 second and slide your finger from minimum to max-
imum along the swipe keyboard which shows an animation.
Recall function This function is used to recall the function settings of the hob if it is switched off by mistake using
.
With the hob off, to recover the settings press within 6 seconds, then press within 6
seconds. A beep is emitted to confirm the operation.
When the hob is off, if it is not turned back on within 6 seconds, the settings of the previous func-
tions are lost.
Heating function This function is used to heat a pan to the maximum power before continuing to cook at a selected
level. The time interval for which the cooking area is held at maximum power depends on the final
cooking level that has been set. See the table:
Power level Timer (seconds)
1 40
2 72
3 120
4 176
5 256
6 432
7 120
8 192
9 Not available
Boost Not available
Select one of the 4 cooking areas and press and hold the selected value (from 1 to 8) on the swipe
keyboard for 3 seconds. The hob will have a maximum power peak for a period of time that varies
according to the previously set cooking power, then it will go back to the value set at the beginning.
10

Combo mode (“bridge”
function) This function allows 2 cooking areas to be combined to use and control them as if they were one
and have a bigger cooking area at your disposal. This function allows you to use pans with a wider
base.
Only the cooking areas on the left can be selected for use with this function.
To enable: simultaneously press both keyboards on the left until a digit indicates and the symbol
lights up.
To set the power of the area that can be used in combo mode, use the last swipe keyboard on the
left.
In both cooking areas, the symbol lights up.
To disable: simultaneously press the keys used to enable the “bridge” function until the symbols
disappear.
Important! The hob automatically recognises the presence of a larger pan that occupies two cook-
ing areas, but it will manage the areas separately unless the “bridge” function is enabled.
AUTO function This function allows you to enable AUTO mode so that operation of the hob and hood are coordin-
ated. When the hob is switched on, the lights are also switched on. The hood speed is automatic-
ally set using the highest power level present on the hob.
Hob-Hood Coupling
With the hob off, simultaneously press “+” and “-” and the coupling procedure will be activated and
an animation will appear on the display.
CAUTION: once the procedure has been activated, refer to the hood manual and check that the K-
Link Coupling procedure has been activated. The coupling procedure takes 2 minutes.
Press “+” and “-” again to confirm.
Hob-Hood Decoupling
With the hob off, press “-” for 2 seconds. An animation will confirm the operation.
9. COOKING TABLE
Power level Cooking method To be used for
1Melting, heating gently Butter, chocolate, gelatine, sauces
2Melting, heating gently Butter, chocolate, gelatine, sauces
3Warming up Rice
4Prolonged cooking, thickening, stewing Vegetables, potatoes, sauces, fruit, fish
5Prolonged cooking, thickening, stewing Vegetables, potatoes, sauces, fruit, fish
6Prolonged cooking, braising Pasta, soups, braised meat
7Light frying Rösti (potato fry-ups), omelettes, breaded and fried
foods, sausages
8Frying, deep fat frying Meat, chips
9Quick frying at high temperature Steak
PQuick heating Boiling water
10. POWER MANAGEMENT
FUNCTION
1
23
4
“This product is equipped with electron-
ically controlled power management.
See the illustration.
This function monitors the electricity in-
put and limits the maximum power output
to 3700 W for cooking areas 1 and 2, op-
timising the power distribution and pre-
venting the system from overloading.
Hob in full power setting - the function di-
vides the power between cooking areas
and automatically decreases the power
of the other cooking area, if necessary
(the last command has highest priority).
Hob in power limitation setting - the func-
tion divides the power between cooking
areas and does not allow you to set the
power for the other cooking area above
11

the limit (to increase the power of a par-
ticular cooking area, the power setting
for the other one must be decreased
manually).
Example:
If boost level (P) is selected for hob 1,
hob 2 cannot exceed level 9 at the same
time and will be automatically limited.”
11. GUIDE TO PAN USE
What pans to use
Only use pots and pans with the bottom
made from ferromagnetic material which
are suitable for use with inductions hobs:
• cast iron
• enamelled steel
• carbon steel
• stainless steel (including partial)
• aluminium with ferromagnetic coating
or ferromagnetic plate
To determine if a pot or pan is suitable,
check for the symbol (usually
stamped on the bottom). You can also
hold a magnet to the bottom. If it clings to
the underside, the pan can be used on an
induction hob.
To ensure optimum efficiency, always
use pots and pans with a flat bottom that
distributes the heat evenly. If the bottom
is not perfectly flat, this will affect power
and heat conduction.
How to use
Minimum diameter of pot/pan base for
the different cooking areas.
To ensure that the hob functions prop-
erly, the pan must cover one or more of
the reference points indicated on the sur-
face of the hob, and must be of a suitable
minimum diameter.
Always use the hob that best corres-
ponds to the diameter of the bottom of
the pan.
Cooking areas Pan base diameter
Ø min.(recommen-
ded) Ø max (recommen-
ded)
Combined left 190 mm 230 mm
Single left 110 mm 190 mm
Central right 110 mm 160 mm
Right 110 mm 200 mm
Empty or thin-based pots/pans
Do not use empty or thin-based pots/
pans on the hob as it will be unable to de-
tect the temperature or turn off automat-
ically if the temperature is too high, thus
damaging the pan or the hob surface.
If this occurs, do not touch anything and
wait for all components to cool down.
If an error message appears, refer to
“Troubleshooting”.
Hint/tips
Noise during cooking
When a cooking area is active, it may
hum briefly. This is a characteristic of all
ceramic glass hobs and does not impair
the function or life of the appliance. The
noise depends on the pan used. If it
causes considerable disturbance, it may
help to change the pan.
12. TROUBLESHOOTING
Error code Description Possible causes of the error Solution
Hob switches off after 10
sec. Continuous key activation detected.
Water or pan placed on the control
panel.
Remove water or pan from the ceramic
glass surface and control panel.
ER21 Hob switches off. The internal temperature of electronic
parts is too high. Let the hob cool down.
Please check if the hob has sufficient
ventilation.
If the error persists, please contact
After Sales Service.
12

E2 Corresponding cooking
area switches off. Empty or unsuitable pan.
Pan or ceramic glass surface temper-
ature too high.
Electronic component temperature too
high.
Let the hob cool down.
Use a suitable pan.
Do not heat empty pans.
E3 Corresponding cooking
area switches off. Unsuitable pan.
The pan is losing its magnetic proper-
ties and may damage the induction
hob.
Use a suitable pan.
The error is automatically cancelled
after 8 seconds and the cooking area
can be used again.
If any other errors occur, the pan must
be changed.
If the error persists, please contact
After Sales Service.
E6 Hob does not switch on. Power supply voltage and/or frequency
is out of range. Check mains voltage and/or fre-
quency.
If necessary, contact After Sales Ser-
vice.
E8 Cooking areas are turned
off. Fan fault.
Fan blocked by dust or fibres. Clean and remove foreign bodies from
the fan.
If the error persists, please contact
After Sales Service.
EH Corresponding cooking
area switches off. Temperature sensor blocked for cook-
ing area.
Insufficient temperature variation de-
tected after switching on the hob.
Switch off the hob and switch it on
again after cooling down.
If the error persists, please contact
After Sales Service.
U400 Overvoltage due to an incorrect electrical connection. Disconnect the hob from the power
supply.
Reconnect the hob based on the dia-
gram provided.
If the error persists, please contact
After Sales Service.
E4
E5
E7
E9
ER20
ER22
ER31
ER36
ER40
ER47
EA
Disconnect the hob from the power supply.
Wait a few seconds, then reconnect the hob to the power supply.
If the problem persists, call the After Sales Service and specify the error code that appears on the display.
13. TECHNICAL DATA
Unit Value
Type of product Built-in Hob
Dimensions Width mm 900
Depth mm 410
Min./max height mm 53
Total power W7400
Parameter Value
Power supply voltage/frequency 220-240 V, 50 Hz; 220 V; 60 Hz;
2N~ 380-415 V, 50 Hz; 2N~ 380 V, 60 Hz;
Weight of the appliance 10 kg
14. ENERGY EFFICIENCY OF HOB
Number of cooking areas 4
13

Number of combinable cooking areas 1- Left
Cooking technology Induction
Dimensions of combinable cooking area Left 395 x 220 mm
Dimensions of cooking areas Central Ø 160 mm
Right Ø 200 mm
Energy consumption of combinable cooking area Left 192 Wh/kg
Energy consumption per cooking area Central 187 Wh/kg
Right 185 Wh/kg
Energy consumption of the hob (electric cooking) 188 Wh/kg
15. ENVIRONMENTAL
ASPECTS
Disposal of household appliances
The symbol on the product or pack-
aging indicates that the product must not
be disposed of with normal domestic
waste. The product must be disposed of
at a specialist recycling centre for elec-
trical and electronic components. By en-
suring that this product is disposed of
correctly, you will help prevent possible
negative consequences for the environ-
ment and health that might result from its
improper disposal. For more detailed in-
formation on how to recycle this product,
please contact your local municipal of-
fices, local waste disposal service or the
shop from which the product was pur-
chased.
Disposal of packaging materials
Materials with the symbol can be re-
cycled. Dispose of the packaging in spe-
cial recycling collection bins.
Energy saving
You can save energy during everyday
cooking if you follow hints outlined be-
low.
• When you heat water, only use the
quantity you require.
• If possible, always put the lids on the
pans.
• Place the pan on the hob before you
switch it on.
• Put smaller pans on the smaller cook-
ing areas.
• Put the pans directly in the centre of
the cooking area.
• Use residual heat to keep the food
warm or melt it.
16. CONFORMITY
Information on the product pursuant
to EU regulation no. 66/2014
Reference standards:
EN/IEC 60350-2
EN/IEC 50564
This appliance has been designed, man-
ufactured and sold in compliance with
EEC Directives.
“The technical data is provided on the
rating plate affixed to the underside of
the product.”
14

FR
1. INFORMATIONS SUR
LA SÉCURITÉ
Pour la sécurité person-
nelle et pour le fonctionne-
ment correct de l’appareil,
prière de lire attentive-
ment ce manuel avant
l’installation et la mise en
marche. Toujours garder
ces instructions avec l’ap-
pareil, même en cas de
cession ou de transfert à
des tiers. Il est important
que les utilisateurs
connaissent toutes les ca-
ractéristiques de fonction-
nement et de sécurité de
l’appareil. Ces tables de
cuisson disposent de sys-
tèmes d’induction
conformes aux exigences
des directives EMC et
EMF et ne devraient pas
interférer avec d’autres
appareils électroniques.
Les porteurs de pacema-
kers ou d’autres implants
électroniques doivent
consulter leur médecin ou
le fabricant de ces im-
plants pour évaluer leur
degré de sensibilité aux in-
terférences.
Faire effectuer les raccor-
dements électriques par
un technicien spécialisé.
Avant de procéder au rac-
cordement électrique, lire
la section RACCORDE-
MENT ÉLECTRIQUE.
Pour les appareils munis d’un
cordon d’alimentation, les
bornes ou la section des fils
entre le point d’ancrage du cor-
don et les bornes doivent être
disposées de manière à per-
mettre d’extraire le conducteur
sous tension en amont du câble
de mise à la terre au cas où le
cordon sortirait de son ancrage.
• Le fabricant ne pourra être te-
nu responsable des dom-
mages découlant d'une mau-
vaise installation ou d'un
mauvais usage.
• Vérifier que la tension élec-
trique indiquée sur la plaque
signalétique fixée à l’intérieur
de l’appareil correspond à la
tension du secteur.
• Les dispositifs de sectionne-
ment doivent être installés
dans l’équipement fixe,
conformément aux normes
sur les systèmes de câblage.
• Pour les appareils de Classe
I, contrôler que le réseau d’ali-
mentation domestique dis-
pose d’un branchement adé-
quat à la masse.
• Raccorder l’appareil au sec-
teur avec un interrupteur om-
nipolaire.
• Si le cordon d’alimentation
est endommagé, le faire rem-
placer par le fabricant, par un
service après-vente agréé ou
par un technicien spécialisé,
afin d’éviter tout risque ou si-
15

tuation de danger.
AVERTISSEMENT :
Avant d’installer l’appareil,
retirer les films de protec-
tion.
• Utiliser uniquement les vis et
les petites pièces fournies
avec l’appareil.
AVERTISSEMENT :
Toute installation de vis ou
de dispositifs de fixation
non conformes à ces ins-
tructions peut entraîner
des risques de décharges
électriques.
• Les opérations de nettoyage
et d’entretien ne doivent pas
être effectuées par des en-
fants, à moins qu’ils ne soient
surveillés par un adulte.
• Surveiller les enfants. S’as-
surer qu’ils ne jouent pas
avec cet appareil.
• Cet appareil ne doit pas être
utilisé par des personnes (en-
fants compris) ayant des ca-
pacités psychophysiques et
sensorielles réduites ou ne
disposant pas de l’expé-
rience et des connaissances
nécessaires, à moins qu’elles
ne soient attentivement sur-
veillées et instruites sur l’utili-
sation sûre de l’appareil par
une personne responsable
de leur sécurité.
• Cet appareil peut être utilisé
par des enfants âgés de plus
de 8 ans et par des personnes
ayant des capacités psycho-
physiques et sensorielles ré-
duites ou ayant une expé-
rience et des connaissances
insuffisantes à condition
qu’elles soient attentivement
surveillées et instruites sur
l’utilisation sûre de l’appareil
et sur les dangers qu’elle
comporte. S’assurer que les
enfants ne jouent pas avec
cet appareil.
AVERTISSEMENT : L’ap-
pareil et ses parties acces-
sibles peuvent atteindre
de très hautes tempéra-
tures durant l’utilisation.
Prendre garde de ne pas tou-
cher les résistances.
Les enfants de moins de 8ans
doivent être tenus à l’écart de
l’appareil, à moins qu’ils ne
soient surveillés en perma-
nence.
AVERTISSEMENT : Si la sur-
face présente des fissures,
éteindre l’appareil pour éviter
tout risque de décharge élec-
trique.
• Ne pas toucher l’appareil
avec les mains ou des parties
du corps mouillées.
• Ne pas utiliser des appareils à
vapeur pour nettoyer le pro-
duit.
• Ne pas poser d’objets métal-
liques tels que couteaux,
fourchettes, cuillères, et cou-
vercles sur la surface de la
table de cuisson, car ils pour-
raient atteindre des tempéra-
tures très élevées.
• Utiliser la commande prévue
pour éteindre la table de cuis-
son après son utilisation, ne
pas s’en remettre aux cap-
teurs des casseroles.
16

AVERTISSEMENT: Il est dan-
gereux de laisser la table de
cuisson sans surveillance
lorsque vous utilisez de l’huile
ou des graisses. Cela pourrait
provoquer une situation de dan-
ger et un risque d’incendie. Ne
JAMAIS essayer d’éteindre des
flammes avec de l’eau, mais
éteindre l’appareil et étouffer le
feu, par exemple avec un cou-
vercle ou une couverture d’ex-
tinction.
ATTENTION : Surveiller le pro-
cessus de cuisson. Un proces-
sus de cuisson court doit être
surveillé constamment.
• Cet appareil n’a pas été
conçu pour être mis en
marche via un minuteur ex-
terne ou un système de télé-
commande séparé.
AVERTISSEMENT : Risque
d'incendie: ne pas poser d'ob-
jets sur les surfaces de cuisson.
• L’appareil doit être installé de
manière à permettre le sec-
tionnement de l’alimentation
électrique avec un écart entre
les contacts (3 mm) à même
d’assurer le sectionnement
complet dans des conditions
de surtension de catégorie III.
• Ne jamais exposer l’appareil
aux agents atmosphériques
(pluie, soleil).
• Ranger les emballages hors
de portée des enfants et des
animaux domestiques.
• S’assurer que le dispositif est
directement raccordé à la
prise de courant.
• Ne jamais utiliser d’adapta-
teurs, de multiprises ou de ral-
longes pour raccorder l’appa-
reil.
• N’utiliser en aucun cas l’ap-
pareil à des fins autres que
celles pour lesquelles il a été
conçu.
• Les friteuses doivent être
constamment surveillées du-
rant l’utilisation : l’huile sur-
chauffée pourrait prendre
feu.
• Ne pas actionner l’appareil
avec un minuteur externe ou
un système de télécom-
mande séparée.
• Ne jamais installer l’appareil
derrière une porte décorative
afin d’éviter toute surchauffe.
• Ne pas se tenir debout sur
l’appareil, sous risque de l’en-
dommager.
• Ne pas poser de casseroles
ou de poêles sur le bord, sous
risque d’endommager les
joints en silicone.
2. INSTALLATION
Le technicien chargé de l’installation est
tenu de se conformer à la législation, aux
réglementations, aux directives et aux
normes (règlements sur la sécurité des
installations électriques, le recyclage
correct des composants, etc.) en vigueur
dans le pays d’utilisation!
• Pour plus d’informations sur l’installa-
tion, voir les Instructions de montage.
• Ne pas utiliser de colle silicone entre
l’appareil et le plan de travail.
• Veiller à ce que l’espace sous la table
de cuisson soit suffisant pour per-
mettre l’aération. Voir les Instructions
de montage.
17

• Le fond de l’appareil peut devenir très
chaud. Si l'appareil est monté au-des-
sus de tiroirs, installer un panneau de
séparation ignifuge sous l’appareil
pour empêcher l’accès au fond. Voir
les Instructions de montage.
• La ventilation de l’appareil doit être
conforme aux instructions du fabri-
cant.
• Créer une ouverture avant d’au moins
28 cm² dans le bloc cuisine où doit être
installé la table de cuisson pour per-
mettre une aération correcte du pro-
duit.
Exigences relatives au bloc cuisine
• Si l’appareil est monté sur des maté-
riaux inflammables, respecter scrupu-
leusement les directives et les règle-
ments relatifs aux installations à
basse tension et à la prévention
contre l’incendie.
• Pour les unités encastrables, les com-
posants (en plastique et en bois
contreplaqué) doivent être appliqués
avec des colles résistantes aux
hautes températures (min. 85 °C) :
l’utilisation de matériaux et de colles
non adéquates peut provoquer des
déformations ou des détachements
des composants.
• L’utilisation de bordures décoratives
en bois massif autour du plan de tra-
vail derrière l’appareil est autorisée, à
condition que la distance minimale
soit toujours conforme aux indications
fournies dans les plans d’installation.
Min.
28 mm
min.
100 mm
55 mm
max.
R 5 mm
41 0 mm
900 mm
min.
500 mm
390 +2
mm mm
880 +2
• Pour plus d’informations sur l’installa-
tion, voir les Instructions de montage.
• En absence de four sous la table de
cuisson, installer un panneau de sé-
paration sous l’appareil, comme illus-
tré dans les instructions de montage.
3. BRANCHEMENT
ÉLECTRIQUE
AVERTISSEMENT : Tous les
raccordements électriques
doivent être effectués par un ins-
tallateur agréé.
• Avant d’effectuer les raccordements,
vérifier que la tension nominale de
l’appareil indiquée sur la plaque si-
gnalétique correspond à la tension du
secteur. La plaque signalétique est
appliquée sur le côté inférieur de la
table de cuisson.
• Suivre le schéma de raccordement
(situé sur la face inférieure de la table
de cuisson).
• Utiliser exclusivement des pièces
d’origine fournie par le service des
pièces détachées.
• L’appareil est fourni avec un câble de
branchement.
• Si le cordon d’alimentation est endom-
magé, le remplacer par un cordon
d’origine. Contacter le Service tech-
nique.
18

Attention ! Ne pas souder les
câbles!
Raccordement électrique
AVERTISSEMENT : La plaque
est déjà configurée pour une
connexion électrique MONO-
PHASÉE, suivre les indications
suivantes pour toute variation.
• Les raccordements électriques
doivent être effectués par un techni-
cien spécialisé.
• Cet appareil a un branchement de
type « Y » avec un câble de type
H05V2V2-F. Section min. des
conducteurs: 5x2,5 mm².
• Les bornes de connexion sont acces-
sibles en retirant le couvercle de la
boîte de jonction.
• Vérifier que les caractéristiques de la
ligne électrique domestique (tension,
puissance maximale et courant) sont
compatibles avec celles de l’appareil.
• Brancher l’appareil de la façon illus-
trée sur le schéma (conformément
aux normes de référence pour la ten-
sion secteur en vigueur au niveau na-
tional).
Schéma de raccordement
220V - 240V 1N ~
LNoir
LMarron
NBleu
NGris
Jaune / Vert
380V - 415V 2N ~
L1 Marron
L2 Noir
NBleu
NGris
Jaune / Vert
380V - 415V 2N ~
L1 Marron
L2 Noir
N1 Bleu
N2 Gris
Jaune / Vert
4. NETTOYAGE ET
MAINTENANCE
• Ne jamais utiliser de tampons à récu-
rer, laine d'acier, acide muriatique ou
autres produits qui pourraient rayer ou
marquer la surface.
19

• Ne consommez aucun résidu alimen-
taire qui serait tombé ou se serait dé-
posé sur la surface et sur les éléments
fonctionnels ou esthétiques de la table
de cuisson.
• Avant d’effectuer toute opération de
nettoyage ou d’entretien, éteindre ou
débrancher l’appareil du secteur.
• Nettoyer l’appareil après chaque utili-
sation pour éviter que des résidus
d’aliments ne se carbonisent. Les
traces de saleté durcies ou brûlées
sont bien plus difficiles à éliminer.
• Éliminer la saleté quotidienne avec un
chiffon doux ou une éponge avec un
produit détergent approprié. Suivre
les conseils du fabricant en ce qui
concerne les produits nettoyants à uti-
liser. Utiliser les produits détergents
neutres.
• Enlevez toute trace de saleté durcie,
par exemple du lait qui a débordé pen-
dant l'ébullition, à l'aide d'un grattoir
pour surfaces en vitrocéramique
lorsque la table de cuisson est encore
chaude. Suivre les conseils du fabri-
cant en ce qui concerne le racloir à uti-
liser.
• Enlever les résidus alimentaires
riches en sucre, par exemple les écla-
boussures de confiture pendant la
cuisson, à l'aide d'un grattoir pour sur-
faces en vitrocéramique lorsque la
table de cuisson est encore chaude.
Sans cela, les résidus pourraient en-
dommager la surface en vitrocéra-
mique.
• Enlever tout résidu de matière plas-
tique fondue à l'aide d'un grattoir pour
surfaces en vitrocéramique lorsque la
table de cuisson est encore chaude.
Sans cela, les résidus pourraient en-
dommager la surface en vitrocéra-
mique.
• Éliminer les traces de calcaire en utili-
sant une petite quantité d’une solution
anticalcaire, par exemple du vinaigre
ou du jus de citron. Pour ce faire, at-
tendre que la table de cuisson soit
froide. Ensuite, nettoyer de nouveau
avec un chiffon humide.
• Ne pas couper ou préparer des ali-
ments sur la surface et ne pas y faire
tomber d’objets durs. Ne pas faire glis-
ser des casseroles ou des plats sur la
surface.
• Ne pas utiliser des appareils de net-
toyage à vapeur.
Entretien et réparation
• Veiller à ce que la réparation des com-
posants électriques soit exclusive-
ment confiée au constructeur ou aux
techniciens du Service d'Assistance.
• Veiller à ce que les câbles endomma-
gés soient exclusivement remplacés
par le producteur ou par les techni-
ciens du Service d'Assistance.
En cas de panne, essayer de la résoudre
en suivant les indications fournies dans
le guide à la solution des inconvénients.
S'il est impossible de résoudre le pro-
blème, contacter le Service d’Assis-
tance.
Lorsque vous contactez le service
après-vente, veuillez fournir les informa-
tions suivantes:
- type de panne
- modèle de l’appareil (Art./Réf.)
- numéro de série (S.N.)
Ces informations se trouvent sur la
plaque signalétique. La plaque signalé-
tique est appliquée sur le fond de l’appa-
reil.
En cas d’utilisation impropre de l’appa-
reil ou d’installation non effectuée par un
installateur agréé, vous pourriez devoir
payer la sortie du technicien du service
après-vente ou du revendeur, cela
même durant la période de validité de la
garantie.
5. DESCRIPTION DU
PRODUIT
Disposition de la surface de cuisson
20
Table of contents
Languages: