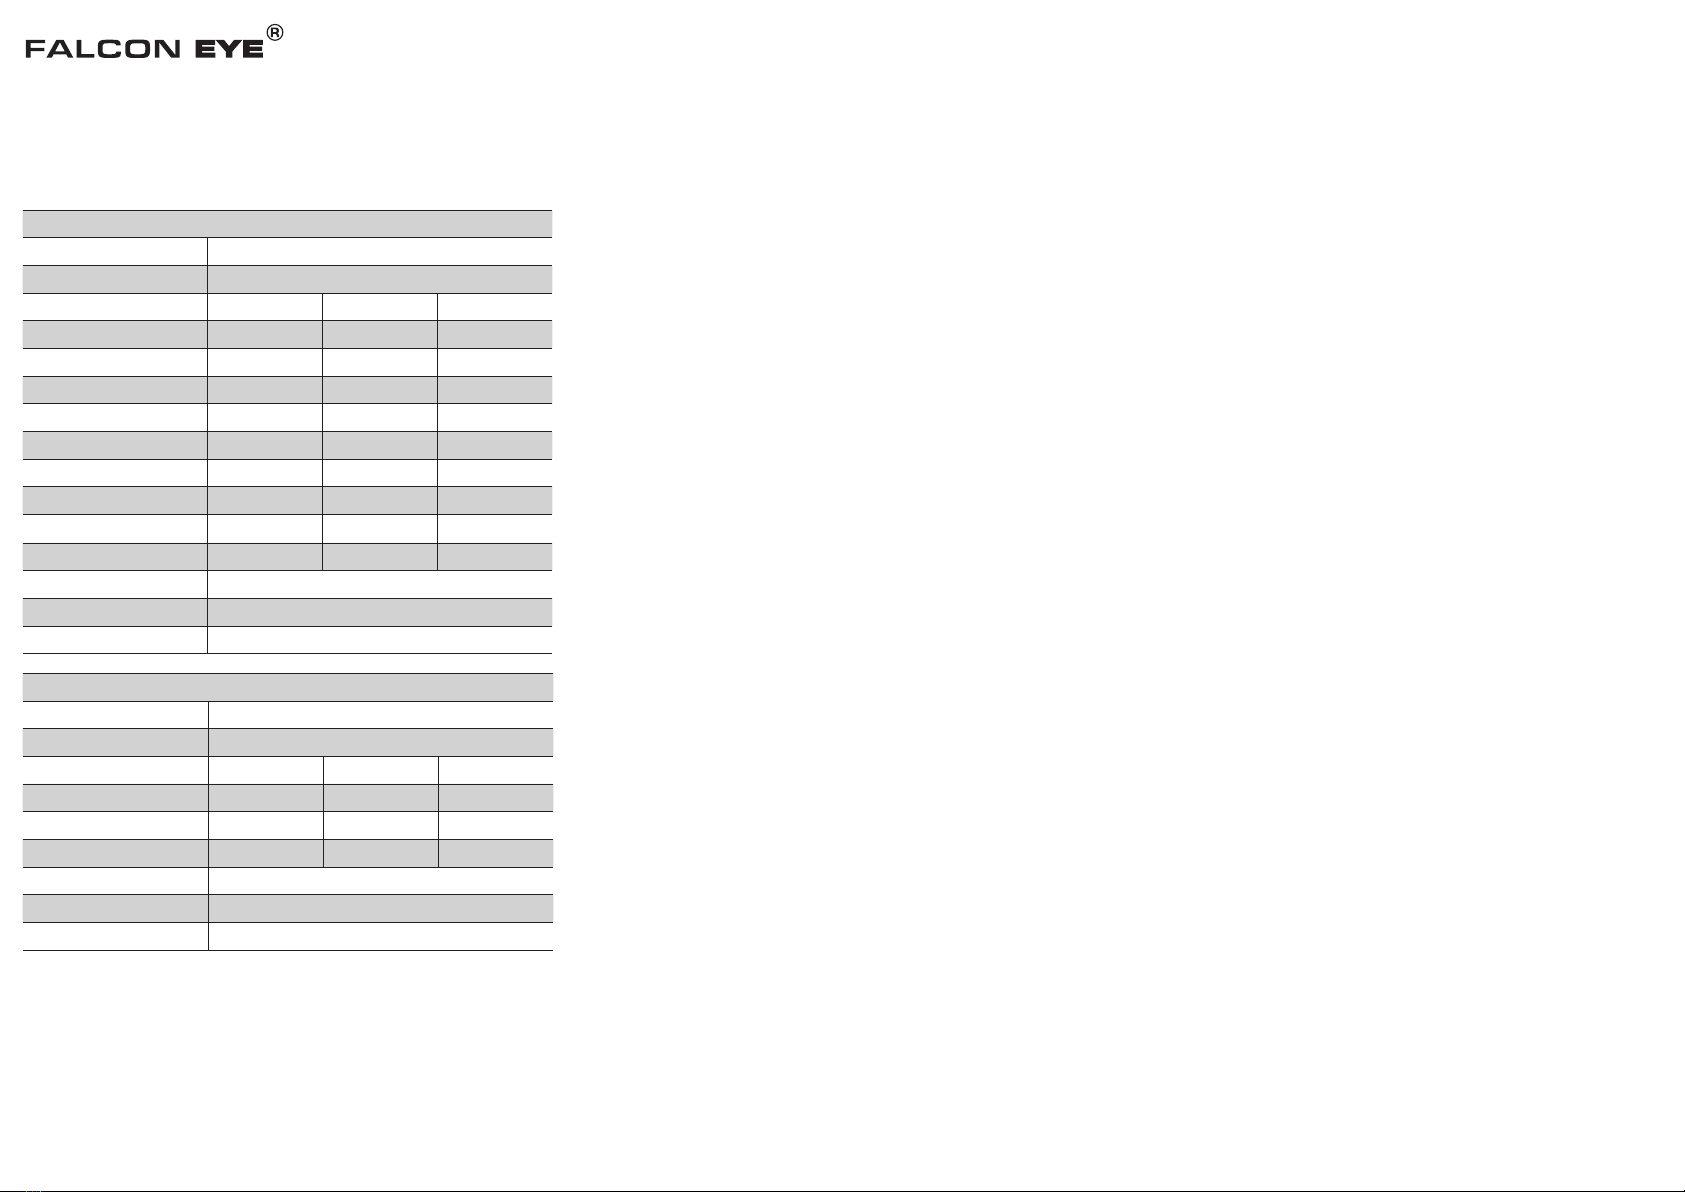
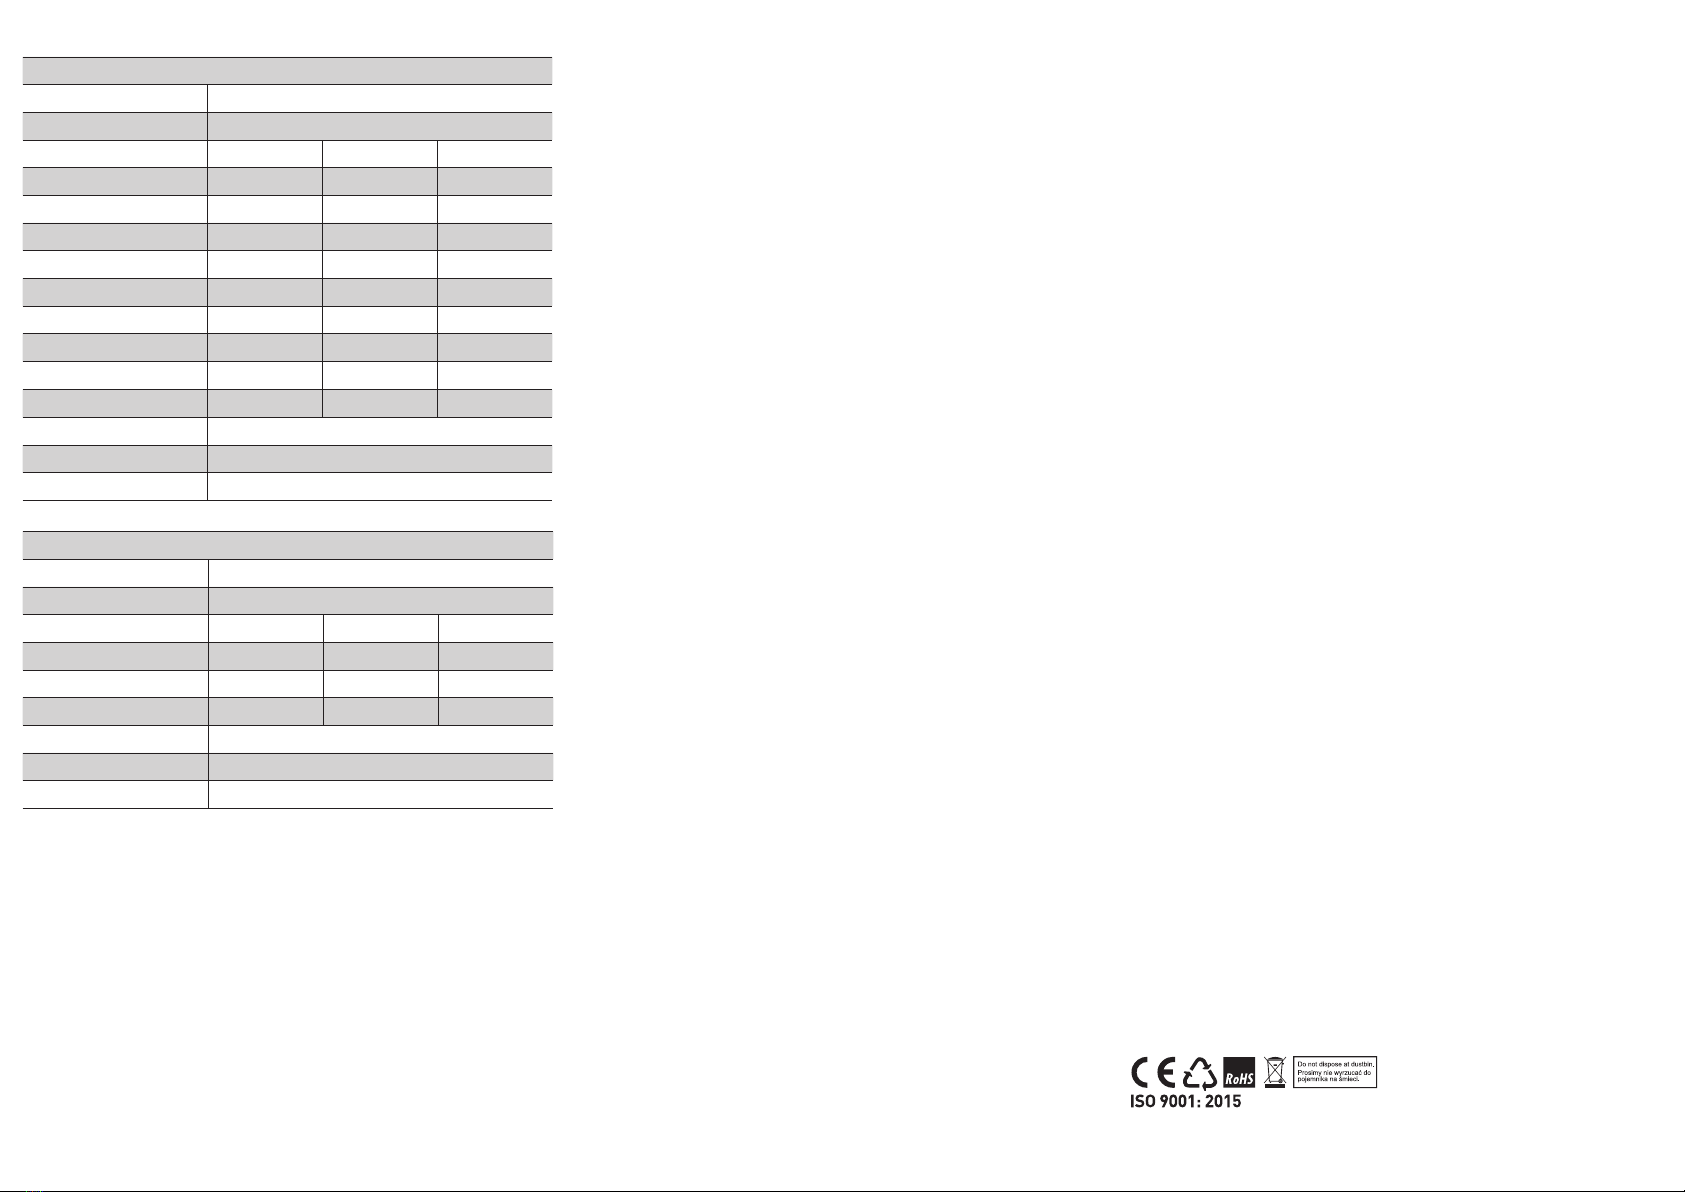
FALCON EYE FWS0007 User manual

EN / SPECIFICATION
HEADLAMP
Light source COB Led + Red Led
Power supply Li-Po 3.7V 1200 mAh
MODES OUTPUT RUN TIME DISTANCE
HIGH 900 lm 1 h 30 min 90 m
MEDIUM 500 lm 3 h 70 m
LOW 100 lm 9 h 30 m
STROBE - - -
COB LED HIGH 100 lm 10 h 13 m
COB LED LOW 50 lm 15 h 5 m
RED LED FLASHING - - -
SENSOR MODE HIGH 900 lm - -
SENSOR MODE LOW 500 lm - -
Dimensions 64,5 x 43,3 x 40 mm
Weight 90,5 g
Impact resistance 1 m
WORKSHOP LIGHT
Light source COB Led
Power supply Li-Ion 3600 mAh
MODES OUTPUT RUN TIME DISTANCE
HIGH 500 lm 4 h 25 m
MEDIUM 250 lm 8 h 18 m
LOW 125 lm 16 h 10 m
Dimensions 64,5 x 43,3 x 40 mm
Weight 190 g
Impact resistance 1 m
Thank you for choosing a Mactronic® product. Proper operation and main-
tenance guarantee the product’s high durability and reliability. Please read
the operating manual and keep it for reference, because it contains impor-
tant information about safety and operation of the product.
NOTICE
It is not recommended to use the flashlight for purposes other than in-
tended. The manufacturer explicitly voids the warranty if the flashlight has
been used for other than its intended purpose.
FLASHLIGHT OPERATION
WORK LAMP: To turn on the flashlight, press the right button located on the
front of the flashlight. The flashlight will turn on in low mode (LOW). Sub-
sequent button presses will cycle through the modes in the following order:
LOW →MEDIUM →HIGH →OFF. During operation and while charging, the
battery level is indicated by 4 blue LED lights. At the rear of the flashlight,
there is a strong magnet and a collapsible handle with a clip, allowing for
easy attachment of the flashlight to a work area without the need to hold
it in hand.
HEADLAMP: To turn on the headlamp, press one of the available power
buttons (either the right or left). Pressing the right power button will im-
mediately turn on the flashlight. Hold down the left power button for 3 se-
conds until the flashlight turns on. For the right power button, the available
functions/modes are activated in the following sequence: LOW →MEDIUM
→HIGH →STROBE →COB HIGH →COB LOW →RED LIGHT FLASHING
→OFF. If the mode change button is not pressed for 8 seconds, the next
press will turn off the light. Restarting will cycle back to the first mode
in the sequence. To activate the motion sensor mode, hold down the left
power button for 3 seconds. The motion sensor mode is a standby mode
that allows you to turn the light on or off with a hand motion from the left
side in front of the headlamp, within a detection range of up to 4 cm. For
the left power button, the available functions are activated in the following
sequence: SENSOR MODE HIGH →SENSOR MODE LOW →SENSOR MODE
COB HIGH →SENSOR MODE COB LOW →OFF. If the button is not pres-
sed during mode change for 8 seconds, the next press will turn off the
headlamp. To reactivate the motion sensor mode, hold down the left button
for 3 seconds. After turning on or off, the headlamp will indicate the battery
level using 4 blue LED lights for 5 seconds. This battery level indicator is
located on the front of the housing.
CHARGING
WORK LAMP: To charge the device, uncover the rubber cover of the USB-C
port located at the bottom of the flashlight. Connect the provided USB-US-
B-C cable to a USB wall charger, a computer’s USB port, or a Power Bank
station. Attach the other end of the cable to the USB-C port. The active
charging process will be indicated by the illumination of the 4-step charging
indicator, where a flashing LED indicates the current level of charge. Once
the charging process is complete, all indicator LEDs will remain steadily lit.
After disconnecting the charging cable, cover the port with the rubber co-
ver to protect it. You can also partially charge other devices by connecting
them to the USB port of the flashlight. To do this, uncover the rubber cover
of the USB-C port located at the bottom of the flashlight. Connect the provi-
ded USB cable to the USB port of the flashlight. Attach the other end of the
cable to the device you want to charge. The active charging process of the
external device will be indicated by the 4-step charging indicator.
HEADLAMP: To charge the device, uncover the rubber cover of the USB-C
port located at the bottom of the headlamp. Connect the provided USB-
-USB-C cable to a USB wall charger, a computer’s USB port, or a Power
Bank station. Attach the other end of the cable to the USB-C port of the
headlamp. The active charging process will be indicated by the illumination
of the 4-step charging indicator, where a flashing LED indicates the current
level of charge. When the charging process is complete, all indicator LEDs
will remain steadily lit. After disconnecting the charging cable, cover the
port with the rubber cover to protect it.
CAUTION!
Make sure you use only genuine parts designed for Mactronic® flashlight.
Using spare parts from other manufacturers may affect the quality and
parameters of the product. The rechargeable batteries used in this product
may be subject to re-processing. Pursuant to the EU’s WEEE regulation,
storage batteries must not be disposed of with normal household waste.
Instead, they must be disposed of at designated battery collection points.
Contact the management of your local waste collection company for advice
on the required ways and types of re-processing, or other instructions.
GENERAL INFORMATION
Modifications and repairs:
Unless authorized by Mactronic® in writing, any modifications and user at-
tempts at home repairs will automatically void the warranty.
Mactronic® warranty:
Mactronic® covers the product with a 2-year warranty for any manufactu-
red defects in material and/or workmanship. The warranty does not cover
the product, rust, unauthorized modifications, improper storage, damage
from falls, improper handling, corrosion from leaking batteries, and use of
the product to its intended purpose.
USING AND HANDLING THE BATTERY
To reduce the risk of fire, electrocution or other bodily harm, carefully read
the flashlight’s operating manual.
• Always make sure the battery’s polarity is correct.
• Remove the batteries if the flashlight is stored for extended time.
• Do not recharge alkaline batteries.
• Do not dispose of the batteries in fire.
• Keep the batteries out of reach of the children.
• Do not force the batteries open.
• Keep the flashlight away from UV radiation, humidity and chemical
products.
WORKSHOP LAMP KIT
FWS0007

DE / SPEZIFIKATION
STIRNLAMPE
Lichtquelle COB Led + Red Led
Haupteinspeisung Li-Po 3.7V 1200 mAh
LICHTMODI LUMENE ZEIT DISTANZ
HIGH 900 lm 1 h 30 min 90 m
MEDIUM 500 lm 3 h 70 m
LOW 100 lm 9 h 30 m
STROBE - - -
COB LED HIGH 100 lm 10 h 13 m
COB LED LOW 50 lm 15 h 5 m
RED LED FLASHING - - -
SENSOR MODE HIGH 900 lm - -
SENSOR MODE LOW 500 lm - -
Größe 64,5 x 43,3 x 40 mm
Gewicht 90,5 g
Stoßschutz 1 m
ARBEITSLAMPE
Lichtquelle COB Led
Haupteinspeisung Li-Ion 3600 mAh
LICHTMODI LUMENE ZEIT DISTANZ
HIGH 500 lm 4 h 25 m
MEDIUM 250 lm 8 h 18 m
LOW 125 lm 16 h 10 m
Größe 64,5 x 43,3 x 40 mm
Gewicht 190 g
Stoßschutz 1 m
Vielen Dank, dass Sie sich für ein Mactronic®-Produkt entschieden haben.
Eine ordnungsgemäße Bedienung und Wartung gewährleistet eine hohe
Lebensdauer und Zuverlässigkeit. Bitte lesen und befolgen Sie dieses Han-
dbuch zum späteren Gebrauch, da es wichtige Informationen zum sicheren
Betrieb und Nutzung enthält.
HINWEIS
Bestimmungswidrige Nutzung der Taschenlampe wird nicht empfohlen.
Der Hersteller nimmt die Garantie ausdrücklich zurück, wenn die Taschen-
lampe bestimmungswidrig benutzt wird.
BEDIENUNG DER TASCHENLAMPE
ARBEITSLAMPE: Um die Taschenlampe einzuschalten, drücken Sie die
rechte Taste, die sich vorne an der Taschenlampe befindet. Die Taschen-
lampe wird im niedrigen Modus (LOW) einschalten. Durch erneutes Drüc-
ken der Taste werden die Modi in folgender Reihenfolge durchlaufen: LOW
→MITTEL →HOCH →AUS. Während des Betriebs und beim Laden wird
der Akkustand durch 4 blaue LED-Leuchten angezeigt. Am hinteren Ende
der Taschenlampe befindet sich ein starker Magnet und ein klappbarer
Griff mit einem Clip, der ein einfaches Befestigen der Taschenlampe an
einem Arbeitsbereich ermöglicht, ohne sie in der Hand halten zu müssen.
STIRNLAMPE: Um die Stirnlampe einzuschalten, drücken Sie eine der ver-
fügbaren Ein-/Aus-Tasten (entweder rechts oder links). Durch Drücken der
rechten Ein-/Aus-Taste schaltet sich die Taschenlampe sofort ein. Halten
Sie die linke Ein-/Aus-Taste für 3 Sekunden gedrückt, bis die Taschenlam-
pe eingeschaltet ist. Für die rechte Ein-/Aus-Taste werden die verfügbaren
Funktionen/Modi in folgender Reihenfolge aktiviert: LOW →MEDIUM →
HIGH →STROBE →COB HIGH →COB LOW →ROTLICHT BLINKEND →AUS.
Wenn die Moduswechseltaste 8 Sekunden lang nicht gedrückt wird, wird
das Licht durch das nächste Drücken ausgeschaltet. Beim Neustart wird
wieder der erste Modus in der Reihenfolge ausgewählt. Um den Bewegun-
gssensor-Modus zu aktivieren, halten Sie die linke Ein-/Aus-Taste für 3
Sekunden gedrückt. Der Bewegungssensor-Modus ist ein Standby-Modus,
der es ermöglicht, das Licht mit einer Handbewegung von der linken Seite
vor der Stirnlampe innerhalb eines Erfassungsbereichs von bis zu 4 cm
ein- oder auszuschalten. Für die linke Ein-/Aus-Taste werden die verfügba-
ren Funktionen in folgender Reihenfolge aktiviert: SENSOR MODUS HIGH →
SENSOR MODUS LOW →SENSOR MODUS COB HIGH →SENSOR MODUS
COB LOW →AUS. Wenn die Taste während des Moduswechsels 8 Sekun-
den lang nicht gedrückt wird, wird die Stirnlampe durch das nächste Drüc-
ken ausgeschaltet. Um den Bewegungssensor-Modus wieder zu aktivieren,
halten Sie die linke Taste für 3 Sekunden gedrückt. Nach dem Ein- oder
Ausschalten zeigt die Stirnlampe den Batteriestand für 5 Sekunden mit 4
blauen LED-Leuchten an. Diese Batteriestandanzeige befindet sich an der
Vorderseite des Gehäuses.
LADEPROZESS
ARBEITSLAMPE: Um das Gerät zu laden, heben Sie die Gummikappe
des USB-C-Anschlusses auf, der sich an der Unterseite der Taschenlam-
pe befindet. Schließen Sie das mitgelieferte USB-USB-C-Kabel an ein
USB-Netzteil, einen USB-Anschluss eines Computers oder eine Power
Bank-Station an. Stecken Sie das andere Ende des Kabels in den USB-
-C-Anschluss. Der aktive Ladevorgang wird durch die Beleuchtung der
4-stufigen Ladeanzeige angezeigt, wobei eine blinkende LED den aktu-
ellen Ladezustand anzeigt. Sobald der Ladevorgang abgeschlossen ist,
bleiben alle Anzeige-LEDs dauerhaft beleuchtet. Nach dem Trennen des
Ladekabels decken Sie den Anschluss mit der Gummikappe ab, um ihn zu
schützen. Sie können auch andere Geräte teilweise aufladen, indem Sie sie
an den USB-Anschluss der Taschenlampe anschließen. Heben Sie dazu die
Gummikappe des USB-C-Anschlusses auf, der sich an der Unterseite der
Taschenlampe befindet. Schließen Sie das mitgelieferte USB-Kabel an den
USB-Anschluss der Taschenlampe an. Stecken Sie das andere Ende des
Kabels in das Gerät, das Sie aufladen möchten. Der aktive Ladevorgang des
externen Geräts wird durch die 4-stufige Ladeanzeige angezeigt.
STIRNLAMPE: Um das Gerät zu laden, heben Sie die Gummikappe des US-
B-C-Anschlusses auf, der sich an der Unterseite der Stirnlampe befindet.
Schließen Sie das mitgelieferte USB-USB-C-Kabel an ein USB-Netzteil,
einen USB-Anschluss eines Computers oder eine Power Bank-Station an.
Stecken Sie das andere Ende des Kabels in den USB-C-Anschluss der Stir-
nlampe. Der aktive Ladevorgang wird durch die Beleuchtung der 4-stufigen
Ladeanzeige angezeigt, wobei eine blinkende LED den aktuellen Ladezu-
stand anzeigt. Wenn der Ladevorgang abgeschlossen ist, bleiben alle Anze-
ige-LEDs dauerhaft beleuchtet. Nach dem Trennen des Ladekabels decken
Sie den Anschluss mit der Gummikappe ab, um ihn zu schützen.
VORSICHT!
Vergewissern Sie sich, dass Sie Originalteile für die Taschenlampe Mactro-
nic® nutzen. Nutzung von Ersatzteilen anderer Hersteller kann die Qualität
und die Parameter des Produktes beeinträchtigen. Die bei diesem Produkt
benutzten aufladbaren Akkus können verwertet werden. Gemäß der EU-Ve-
rordnung über Elektro- und Elektronik-Altgeräte sind die verbrauchten Bat-
terien in den dafür vorgesehenen Batteriebehältern zu entsorgen. Prüfen
Sie die Hinweise zum Recycling oder andere Vorgaben bei der zuständigen
Entsorgungsfirma.
ALLGEMEINE INFORMATIONEN
Modifikationen und Reparaturen:
Sämtliche Modifikationen und Versuche des Nutzers Reparaturen auf eige-
ne Faust vorzunehmen, denen Firma Mactronic® nicht zugestimmt hat, ha-
ben eine automatische Ungültigkeit des Garantiescheins zur Folge.
Garantie der Mactronic®:
Mactronic® gewährt eine Dreijahresgarantie für das Produkt. Die Garantie
kann auf bis zu 2 Jahre verlängert werden. Die Garantie umfasst jegliche
Werksfehler des Materials und/oder der Herstellung. Die Garantie gilt nicht
im Fall von Fehlern, die aus der gewöhnlichen Nutzung resultieren, Rost
und Fehlern, die wegen unberechtigter Modifikationen, unerlaubter Au-
fbewahrung entstanden sind, Beschädigungen infolge Herunterfallens,
unsachgemäßer Behandlung des Produkts, Korrosion als Konsequenz des
Batteriebzw. Akkulecks, oder auch Fehlern wegen eines bestimmungswi-
drigen Gebrauchs.
BEDIENUNG UND BATTERIEGEBRAUCH
Um die Gefahr von Bränden, Stromschlägen oder Verletzungen zu verringern,
beachten Sie die ausführliche Gebrauchsanweisung der Taschenlampe.
• Achten Sie immer auf die Polarität der Batterie.
• Entfernen Sie die Batterien aus der Taschenlampe, wenn Sie sie über
einen längeren Zeitraum aufbewahren.
• Laden Sie keine Alkalibatterien auf.
• Entsorgen Sie die Batterien nicht im Feuer.
• Lassen Sie die Batterien außerhalb der Reichweite von Kindern liegen.
• Öffnen Sie den Akku nicht.
• Halten Sie die Lampen von UV-Strahlung, Feuchtigkeit und Feuchtigkeit
und chemischen Produkten fern.

Made in PRC for Macronic®Group Sp. z o.o.
ul. Stargardzka 4, 54-156 Wrocław
©2023 Mactronic®mactronic.pl falconeye.pl
PL / SPECYFIKACJA
HEADLAMP
Źródło światła COB Led + Red Led
Zasilanie Li-Po 3.7V 1200 mAh
TRYBY LUMENY CZAS PRACY ZASIĘG
HIGH 900 lm 1 h 30 min 90 m
MEDIUM 500 lm 3 h 70 m
LOW 100 lm 9 h 30 m
STROBE - - -
COB LED HIGH 100 lm 10 h 13 m
COB LED LOW 50 lm 15 h 5 m
RED LED FLASHING - - -
SENSOR MODE HIGH 900 lm - -
SENSOR MODE LOW 500 lm - -
Wymiary 64,5 x 43,3 x 40 mm
Waga 90,5 g
Wstrząsoodporność 1 m
ARBEITSLAMPE
Źródło światła COB Led
Zasilanie Li-Ion 3600 mAh
TRYBY LUMENY CZAS PRACY ZASIĘG
HIGH 500 lm 4 h 25 m
MEDIUM 250 lm 8 h 18 m
LOW 125 lm 16 h 10 m
Wymiary 64,5 x 43,3 x 40 mm
Waga 190 g
Wstrząsoodporność 1 m
Dziękujemy Państwu za wybór produktu firmy Mactronic®. Odpowiednia
obsługa oraz konserwacja zapewnia wysoką trwałość i niezawodność. Pro-
simy o zapoznanie się z poniższą instrukcją i zachowanie jej na przyszłość,
gdyż zawiera ona istotne informacje dotyczące bezpiecznej obsługi oraz
użytkowania.
UWAGA!
Wykorzystanie latarki do celów niezgodnych z jej przeznaczeniem nie jest
zalecane. Producent jednoznacznie wycofuje gwarancje w przypadku jej
użycia niezgodnie z zalecanym przeznaczeniem.
OBSŁUGA LATARKI
WORK LAMP: Aby włączyć latarkę, naciśnij prawy przycisk znajdujący się
z przodu latarki. Latarka zostanie włączona w trybie niskim (LOW). Kolejne
naciśnięcia przycisku spowodują przełączanie się latarki między trybami
w kolejności: LOW →MEDIUM →HIGH →OFF. Podczas pracy latarki oraz
podczas procesu ładowania, poziom naładowania akumulatora jest sygna-
lizowany za pomocą 4 niebieskich diod LED. W tylnej części latarki znajduje
się silny magnes oraz rozkładany uchwyt z klipsem, co umożliwia zamoco-
wanie latarki w miejscu pracy bez konieczności trzymania jej w ręku.
HEADLAMP: Aby uruchomić czołówkę naciśnij jeden z dostępnych przyci-
sków włączeniowych (prawy bądź lewy). Po naciśnięciu prawego przycisku
włączeniowego latarka uruchomi się niezwłocznie. Lewy przycisk należy
przytrzymać przez 3 sekundy do momentu uruchomienia się latarki. Dla
prawego przycisku dostępne są funkcje/tryby uruchamiane w kolejności:
LOW →MEDIUM →HIGH →STROBE →COB HIGH →COB LOW →RED
LIGHT FLASHING →OFF. Gdy przycisk zmiany trybów pracy nie będzie na-
ciskany przez 8 sekund, kolejne jego naciśnięcie wyłączy lampkę. Ponow-
ne uruchomienie spowoduje przejście do pierwszego w kolejności trybu
światła. Aby aktywować tryb z sensorem ruchu przytrzymaj lewy przycisk
włącznikowy przez 3 sek. Tryb sensorowy jest trybem czuwania, który po-
zwala na dowolne uruchomianie bądź wyłączanie światła za pomocą ruchu
ręki z lewej strony przed czołówką – odległość wykrywania ruchu do 4 cm.
Dla lewego przycisku włączeniowego dostępne są funkcje uruchamiane
w kolejności: SENSOR MODE HIGH →SENSOR MODE LOW →SENSOR
MODE COB HIGH →SENSOR MODE COB LOW →OFF. Gdy podczas zmiany
trybów pracy przycisk nie będzie naciskany przez 8 sekund, kolejne jego
naciśnięcie wyłączy czołówkę. Aby ponownie aktywować tryb z sensorem
ruchu przytrzymaj lewy przycisk przez 3 sek. Czołówka przez 5 sekund po
uruchomieniu lub wyłączeniu wskazuje za pomocą 4 niebieskich diod LED
poziom naładowania akumulatora. Wskaźnik ten znajduje się w przedniej
części obudowy.
ŁADOWANIE
WORK LAMP: Aby naładować urządzenie, odsłoń gumową osłonę gniaz-
da USB-C znajdującego się u dołu latarki. Załączony przewód USB-USB-
-C podłącz do ładowarki sieciowej USB, portu USB komputera lub stacji
Power Bank. Drugi koniec przewodu podłącz do gniazda USB-C. Aktywny
proces ładownia zostanie zasygnalizowany zapaleniem się 4-stopniowego
wskaźnika ładowania, w którym migająca dioda oznacza aktualnie poziom
naładowania. Po zakończeniu ładowania, wszystkie diody sygnalizacji będą
świecić światłem stałym. Po odłączeniu przewodu ładowania, zasłoń gu-
mową osłoną gniazdo, celem jego zabezpieczenia. Możesz również nała-
dować częściowo inne urządzenie przy pomocy latarki podłączając ją do
gniazda USB urządzenia zewnętrznego. Aby tego dokonać, odsłoń gumową
osłonę gniazda USB-C znajdującą się w dolnej części latarki. Podłącz załą-
czony przewód USB do portu USB latarki. Drugi koniec przewodu podłącz
do urządzenia, które chcesz naładować. Aktywny proces ładowania urzą-
dzenia zewnętrznego zostanie zasygnalizowany za pomocą 4 stopniowego
wskaźnika ładowania.
HEADLAMP: Aby naładować urządzenie odsłoń gumową osłonę gniazda
USB-C znajdującego się u dołu czołówki. Załączony przewód USB-USB-C
podłącz do ładowarki sieciowej USB, portu USB komputera lub stacji Power
Bank. Drugi koniec przewodu podłącz do gniazda USB-C czołówki. Aktywny
proces ładownia zostanie zasygnalizowany zapaleniem się 4-stopniowego
wskaźnika ładowania, w którym migająca dioda oznacza aktualnie poziom
naładowania. Gdy proces ładowania się zakończy, wszystkie diody sygnali-
zacyjne będą świecić stałym światłem. Po odłączeniu przewodu ładowania,
zasłoń gumową osłoną gniazdo, celem jego zabezpieczenia.
OSTRZEŻENIE
Upewnij się, że używasz oryginalnych części zaprojektowanych do latarki
Falcon Eye®. Stosowanie części zamiennych wyprodukowanych przez in-
nych producentów może wpłynąć na jakość i parametry produktu. Łado-
walne akumulatory używane w tym produkcie mogą podlegać ponownej
przeróbce. Zgodnie z regulacją unijną WEEE nie wolno wyrzucać ogniw do
śmieci lecz do specjalnych pojemników na baterie. Sprawdź w miejscowym
zarządzie firmy wywożącej śmieci o sposobie i rodzaju ponownej przeróbki
lub o innych dyspozycjach.
INFORMACJE OGÓLNE
Modyfikacje i naprawy:
Wszelkie modyfikacje i podejmowane przez użytkownika próby nieautory-
zowanych napraw, na które firma Mactronic® nie wyraziła pisemnej zgody,
powodują automatyczne unieważnienie gwarancji.
Gwarancja firmy Mactronic®:
Firma Mactronic® udziela 2-letniej gwarancji na produkty.
Gwarancja ta obejmuje wszelkie wady fabryczne materiału i/lub wykonania.
Gwarancja nie obejmuje wad będących wynikiem normalnego użytkowania,
wystąpienia rdzy, wad powstałych wskutek nieuprawnionych modyfikacji,
niewłaściwego przechowywania, uszkodzeń powstałych w wyniku upad-
ków, niewłaściwego obchodzenia się z produktem, korozji spowodowanej
przez wyciek z baterii lub akumulatorów bądź wad powstałych w wyniku
użytkowania latarki w sposób niezgodny z jej przeznaczeniem.
OBSŁUGA i UŻYCIE BATERII
Dla zredukowania ryzyka wywołania pożaru, porażenia prądem lub dozna-
nia obrażeń ciała, należy zapoznać się ze szczegółową instrukcją użytko-
wania latarki.
• Bezwzględnie przestrzegaj biegunowości baterii.
• Wyjmuj baterie z latarki w przypadku długotrwałego przechowywania.
• Nie ładuj baterii alkalicznych.
• Nie wrzucaj baterii do ognia.
• Pozostawiaj baterie poza zasięgiem dzieci.
• Nie otwieraj baterii.
• Przechowuj lampki z dala od promieniowania UV,
wilgoci oraz produktów chemicznych.
Table of contents
Languages:
Popular Outdoor Light manuals by other brands

Adesso
Adesso CONEY Assembly instructions

Quoizel
Quoizel SCO9009MBK installation guide

Philips
Philips 163814716 Safety instructions

Original BTC
Original BTC 7672 instruction manual

NEBO
NEBO NEB-LSP-0012 Use and care guide

Acuity Brands Lighting
Acuity Brands Lighting Lithonia Lighting LDN8 SWW installation instructions

Clas Ohlson
Clas Ohlson 36-4517 instruction manual

LIGMAN
LIGMAN RA-40701 installation manual

LIGMAN
LIGMAN OD-50002 installation manual

DS Produkte
DS Produkte SS-6076 instruction manual

Cooper Crouse-Hinds
Cooper Crouse-Hinds CEAG HE 8 EURO operating instructions

Schreder
Schreder SHUFFLE installation instructions