Famisafe W62 User manual

Owner's Manual
Famisafe Cam W62

Thank you for choosing our product! To have a comprehensive understanding and using this device, to know all the features and simple operation
method, please read this manual first.
Part 1: Packing List
Check all the accessories if they are complete.
Item No. Accessories Quantity
1 Famisafe Cam W62 1
2 Buckle wall bracket 1
3 Antenna 1
4 Network cable 1
5 US standard power + wire 1
6 Instruction manual 1
7 Screws bag 1
Part 2: Software download
To connect your camera to mobile phone, you need yo download the App "Eyecloud" in the cellphone at very first, see below 3 methods.
1. Go to www.eyecloud.so to download the APP.
2. Search and download "Eyecloud" in APP Store, Android market etc.
3. Scan the QR code below to download.
Part 3: Register
1. For Android/iOS APP, click on "Register now", create a user name and password to finish register.
2. Also support the third party account login (no need to register).

Part 4: Add cameras to the network
Note: If it failed to add the camera by the 'Scan QR code', please choose the Method Two in the 'Others' to add the camera.
4.1 Scan QR Code
Please power on the camera, wait until the reboot of the camera finished(it takes about 30seconds), then the camera will say "Please useAPP for wifi
configuration" or "WiFi configuration is waiting".
(If the camera doesn't say anything, please reset the camera to factory default settings by holding the reset button for 10 seconds, then it will say
"reset completed, device will reboot soon")
1. Enter the APP, click the "+" on the top right corner, and click on "Scan QR Code" to scan the QR code on the camera.

2. Once thecamerasays "Please use APP for wifi configuration", please click onthe "Heard voice prompt"button, then putin thepassword of theWiFi
network that the mobile phone currently connecting to, click 'confirm' to go to next step.
3. During the configuration, please keep the phone and the camera within 2 meters (at this time, please maximize the volume of the mobile phone).
Click the 'Send' button on the APP, to send configuration signal to the camera.
4. After the camera prompts "wirelessconfiguration succeed," please wait about 3 0 seconds,the APP will showthe "Add Camera" page, click onit to
complete the adding.
Note: Place the phone close to the camera, and adjust the phone volume to maximum
Note: During this process, if it prompt that wifi configured successfully but the binding page does not pop up, please return to the Add Camera page,
to select 'Others' →'IP Camera' →'Search in LAN' or "Manually add" to bind the camera.
4.2 Other ways of adding

If no QR code can be found on the body of the device, please choose the 'Others' to add the camera.
Method One:
1. Enter the APP, click the "+"on the top right corner, choose 'Others' →'IP Camera'.
2. Choose 'Wireless Installation', please refer to the 'Wireless configuration add instructions' and the APP's voice prompt to finish the setting.
Note: Please refer to the step 2/3/4 in the 'Scan QR code' above to finish the 'Wireless Installation' settings.
Note: During this process, if it prompt that wifi configured successfully but the binding page does not pop up, please return to the Add Camera
page,select the '
Search in LAN
' or "
Manually add
" to bind the camera.
Method Two:
1. Please power on thecamera, and use network cable to connect camera with the router LAN port, make sure the router yellow indicator is flashing;
then choose the " Search in LAN" or "Manually add" method in the 'Others' to add the camera.
Please make sure the phone and camera are under the same router.

2. Login the APP, click on the "+" in the top right corner, choose 'Others' →'IP Camera'.
- Search Camera in LAN:
1. Click on "Search in LAN", you can find all the available cameras in the same router with the smartphone. If added successfully, the camera can be
added via the same way by other users(with different account). (Note: Camerasthat has been added successfully in this account will not be searched
again).

The binding page will pop up after about 3 0 seconds.
If it does not pop up, then please return to the Add camera page, select the "Manually add" method to add the camera.
- Manually add a camera:
After select "Manually add", please input camera's UID(15 digits, can be found on the label stick to the camera's body), or scan the QR code on the
camera's bottom sticker,the UID will be auto-fill in, then put in the camera's password to bind the camera.

Note: After the camera has been added by Method Two, if you want to make the camera work in WiFi mode, please follow the steps below:
1. In the home page of the APP, click the "in the top right corner of the camera →choose Parameter Settings →WiFi Setting",select the WiFi that
the smartphone/tablet connecting to, then input WiFi password, click on "done".
2. Wait until camera says 'please remove the network cable, camera will restart …', remove the network cable (Keep the camera powered on).
Unplug the network cable,camera will reboot automatically...

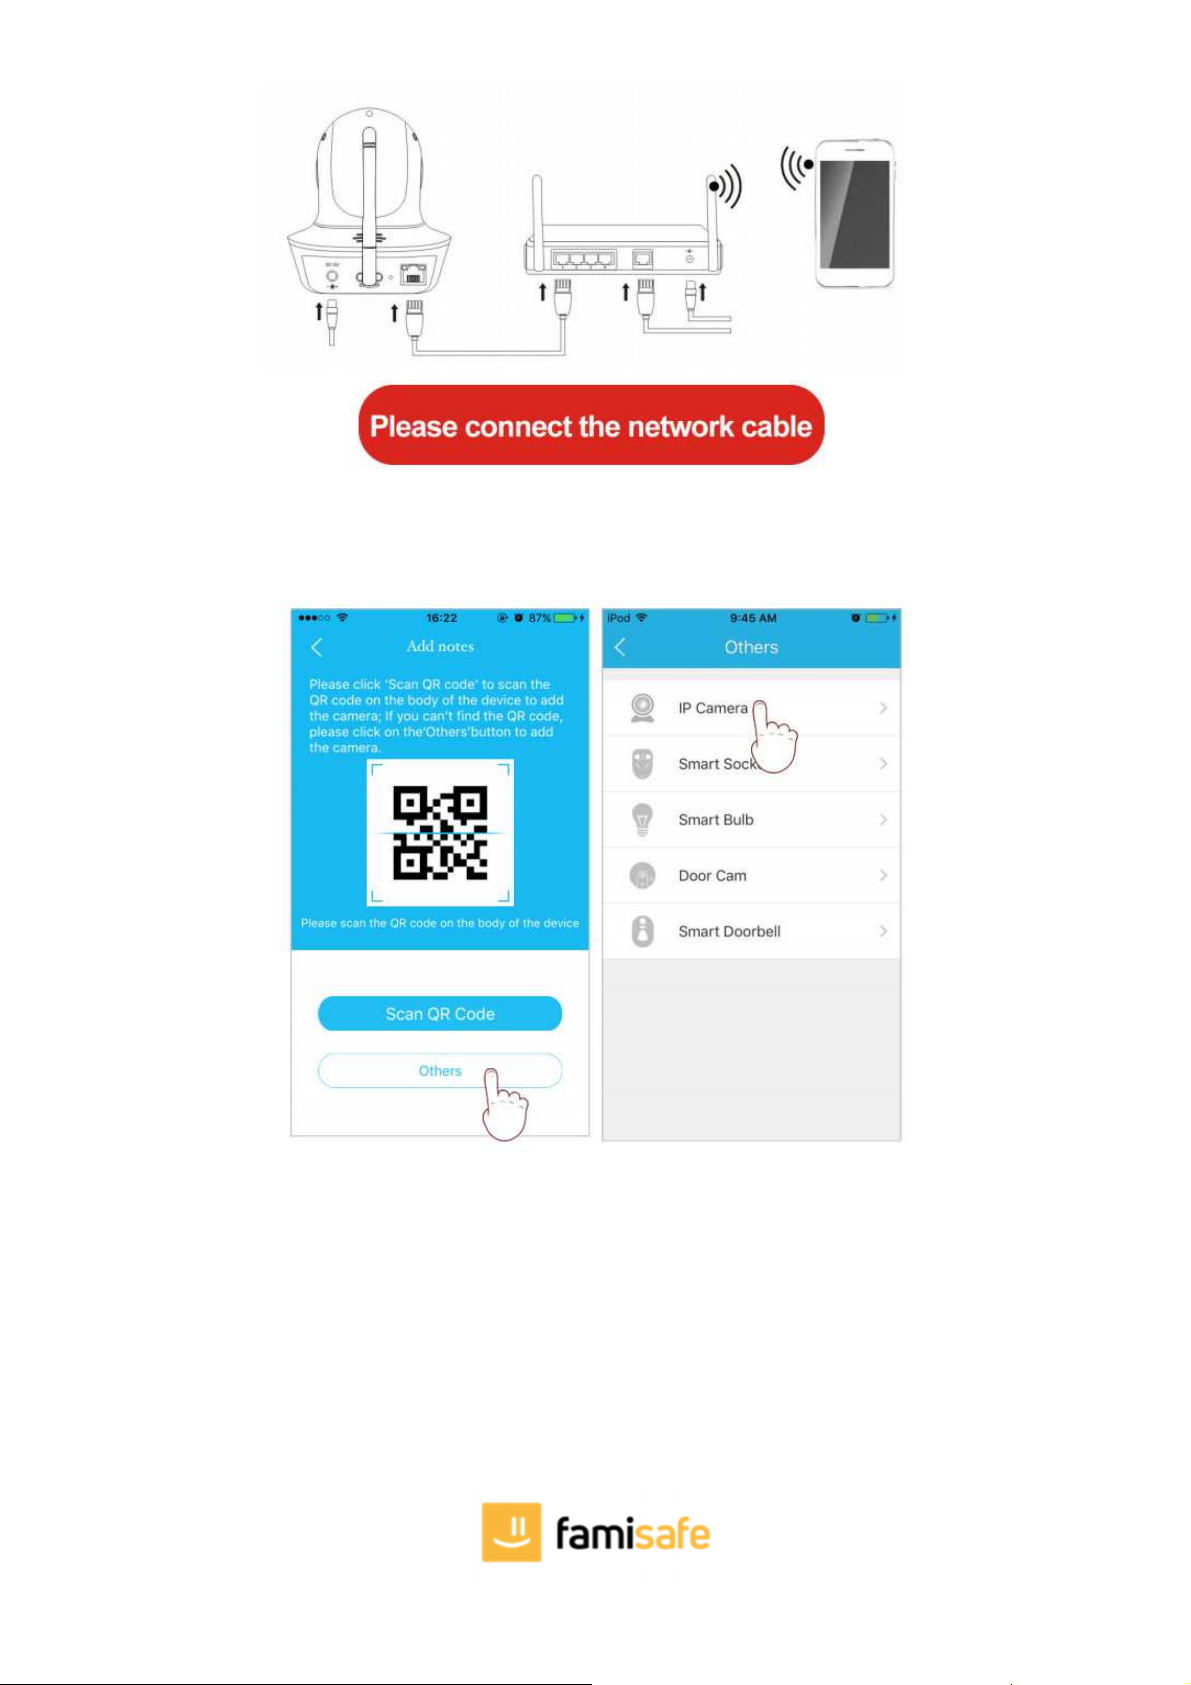
Note: If setup failed, please refer to network cable connection method or change a router to setup again.
Part 5: Parameter settings of cameras
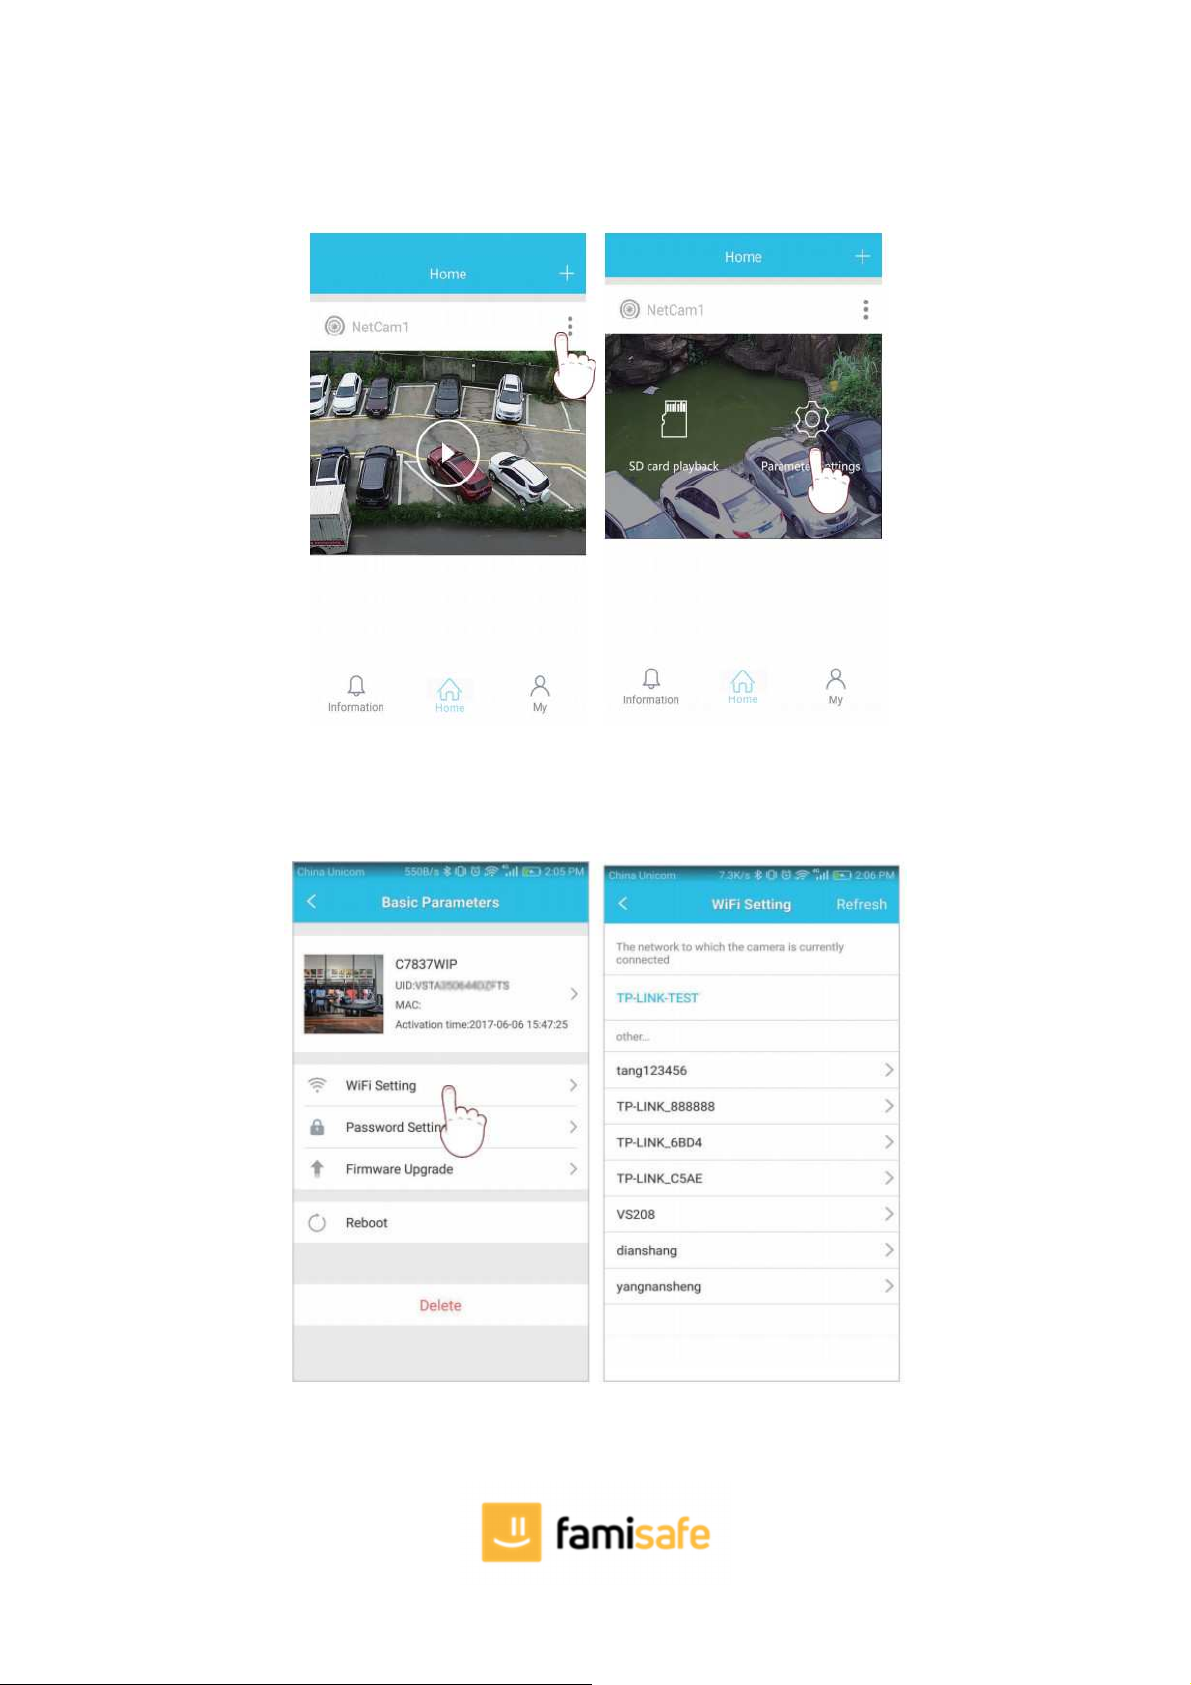
In the home page of the APP, click the settings icon in the top right corner, go to "Parameter Settings", you will get the following menus:
Camera Setting:
You can see the camera's basic information,set up wireless connection, modify password, upgrade firmware, reboot and delete
the camera.
Video Viewing:
can setup night vision mode, horizontal and vertical mirror view, light mode, brightness and contrast.
SD Card Recording:
can check SD card capacity, setting schedule recording, motion detection recording and select recording sound or not
(suggest you to format the SD card before recording to SD card).
Alarm:
can turn on/off the motion detection alarm, setup the alarm notification type, and alarm time frame. The sensitivity of motion detection alarm
was graded into three level "low/middle/high".
Please Note:
The functions on the user manual may be little different with physical, please make the final products as the standard. The typing errors in this
manual and discrepancies will be timely updated with the latest products. If we have updates, this manual will be subject to change without notice.
Our company reserves the right of final interpretation.
Table of contents