Farfisa TK 89 User manual

1
ENGLISHFRANÇAISDEUTSCH
ESPAÑOLITALIANO
GB/USA - YOU ARE ADVISED TO RETAIN THE MANUFACTURER NAME AND ADDRESS • F - IL EST RECOMMANDE DE RETENIR LE NOM ET L'ADRESSE DU FABRICANT • D - WIR EMPFEHLEN IHNEN, DEN NAMEN UND
DIE ADRESSE DES HERSTELLERS AUFZUBEWAHREN • NL - WIJ ADVISEREN DE NAAM EN HET ADRES VAN DE FABRIKANT TE BEWAREN • DK - BØR GEMMES I TILFÆLDE AF VENTUEL SENERE HENVENDELSE •
E - ES RECOMENDABLE QUE MANTENGA EL NOMBRE Y DIRECCION DEL FABRICANTE • P - SÃO ACONSELHADOS A MANTENER O NOME E ENDEREÇO DO FABRICANTE • GR - ΣAΣ ΣΥΝIΣTOΥME NA
KPATHΣETE THN ΔIEΥΘΥNΣH MAΣ IΣΩΣ THN XPEIAΣTEITE ΣTO MEΛΛON • S - SPARA TILLVERKARENS NAMN OCH ADRESS • SF - PYYDÄMME SÄILYTTÄMÄAN MAAHANTUOJAN NIMEN JA OSDITTEN
• N - TA VARE PÅ EMBALLASJEN I TILFELLE EN EVENTUELE SENERE HENVENDELSE TIL IMPORTØREN • I - SI RACCOMANDA DI CONSERVARE IL NOME E L'INDIRIZZO DEL PRODUTTORE.
BONTEMPI S.p.A. Viale Don Bosco, 35 - 62018 Potenza Picena (MC) - Italy • www.farfisa.eu • e-mail: info@farfisa.eu
USER’S MANUAL
(Guarantee card included)
TK 89

2
1. TECHNICAL CARACTERISTICS . . . . . . . . . . . . . . . . . . . . . . . .3
2. INTRODUCTION.....................................3
CONTENTS OF PACKAGE ................................3
MUSIC STAND ..........................................4
POWER SUPPLY .........................................4
MAINS SUPPLY ........................................4
BATTERY SUPPLY ......................................4
MICROPHONE ..........................................5
CONNECTING THE MICROPHONE ........................5
MICROPHONE VOLUME ................................5
OPTIONAL ACCESSORIES ...............................5
3. SOCKETS............................................5
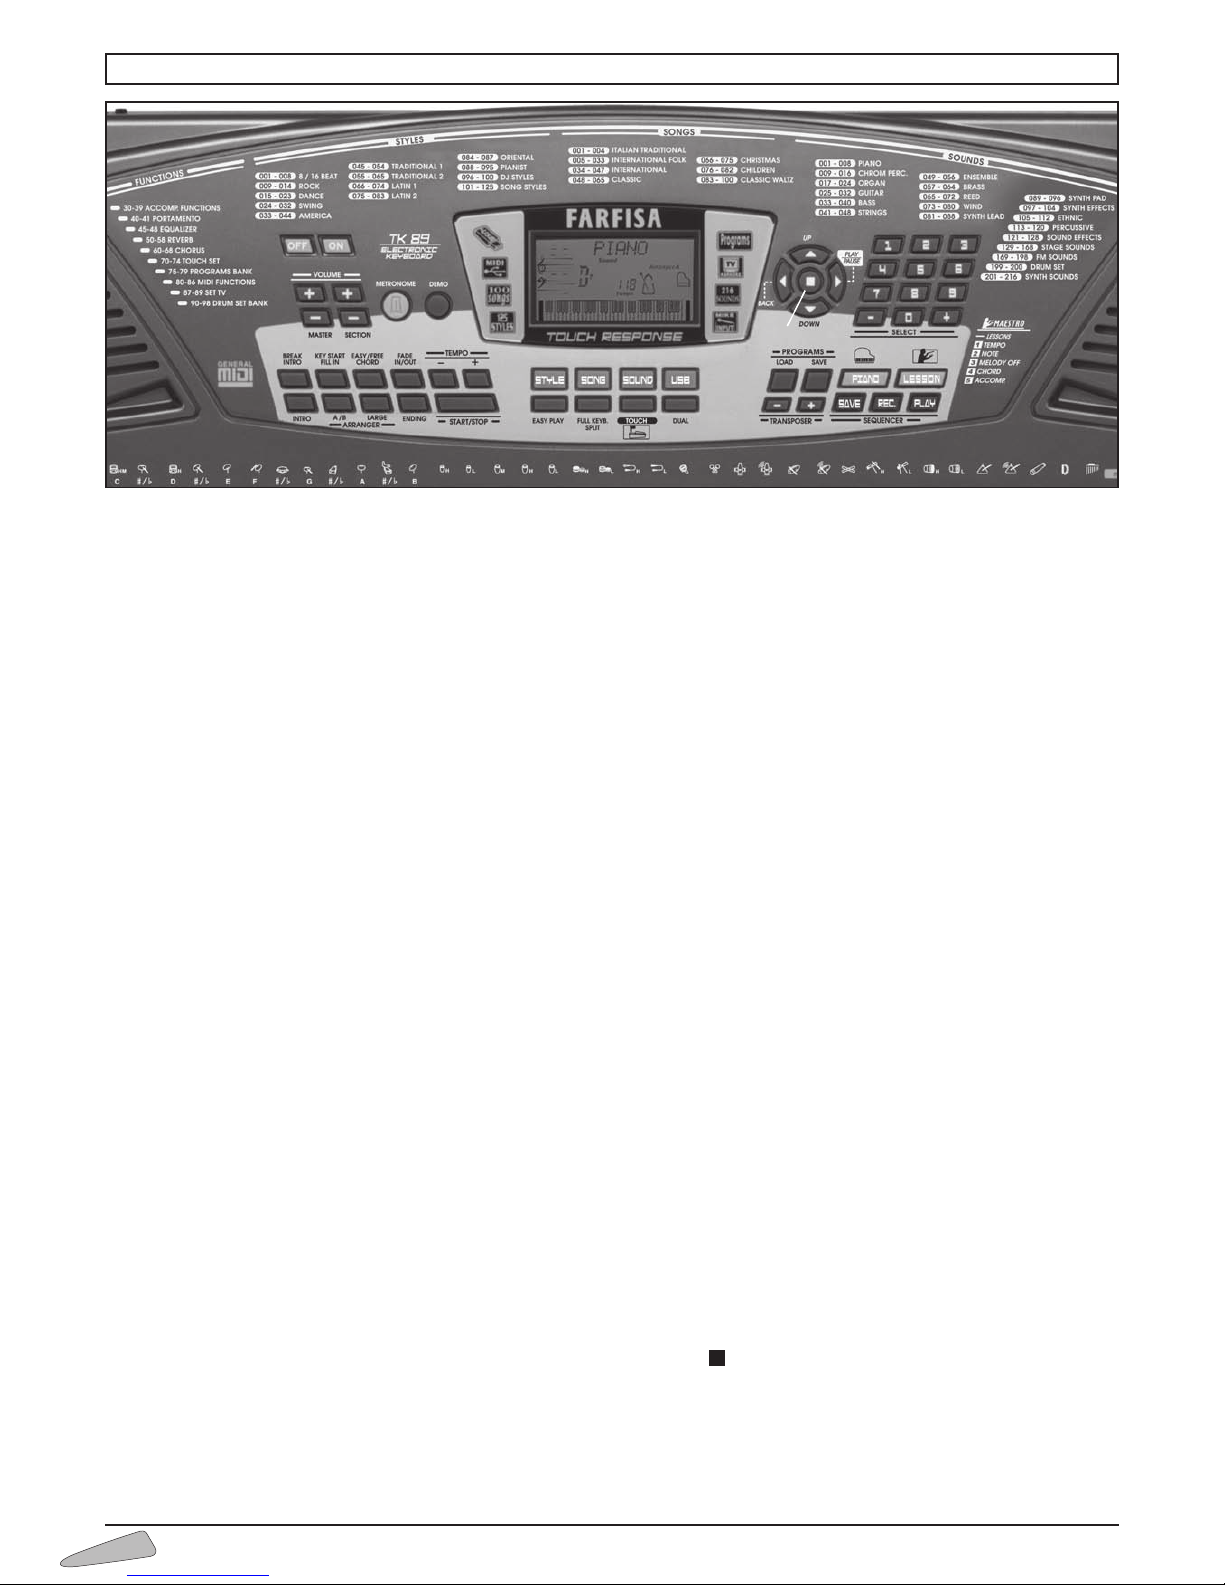
4. CONTROL PANEL ....................................6
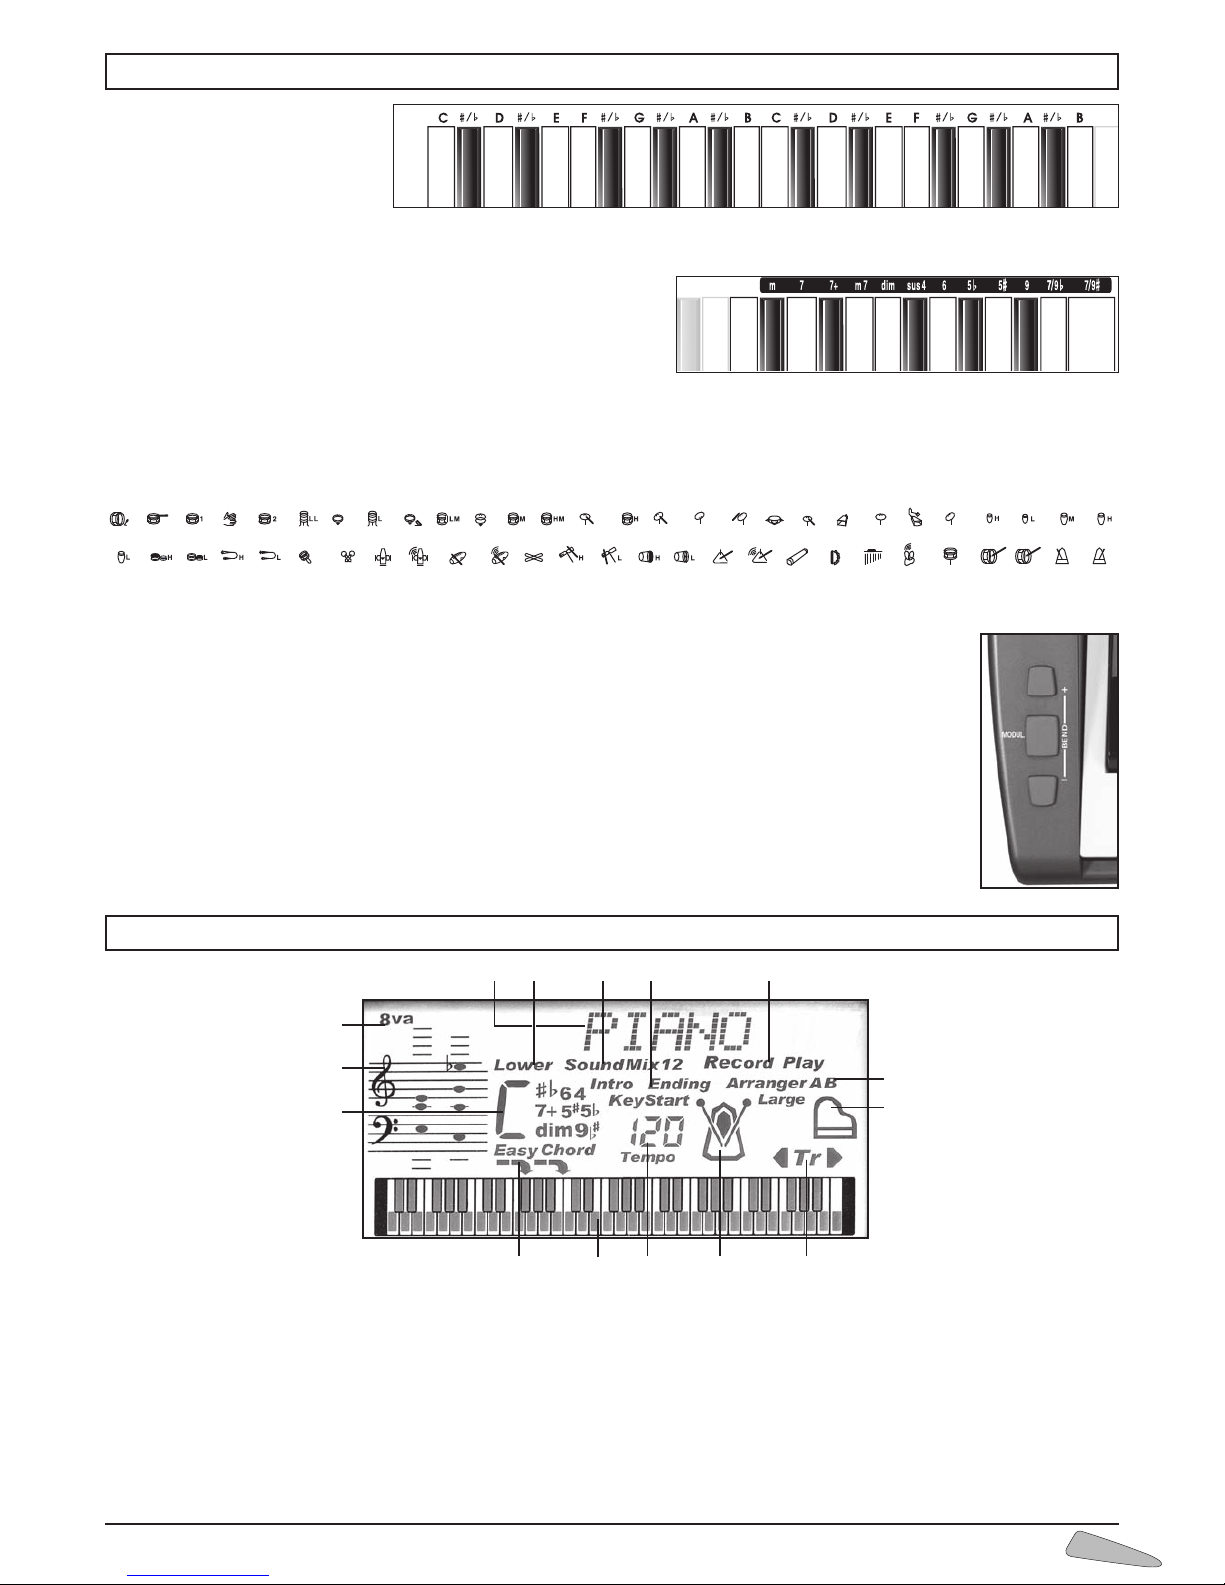
5. DIRECTIONS ON THE KEYBOARD.....................7
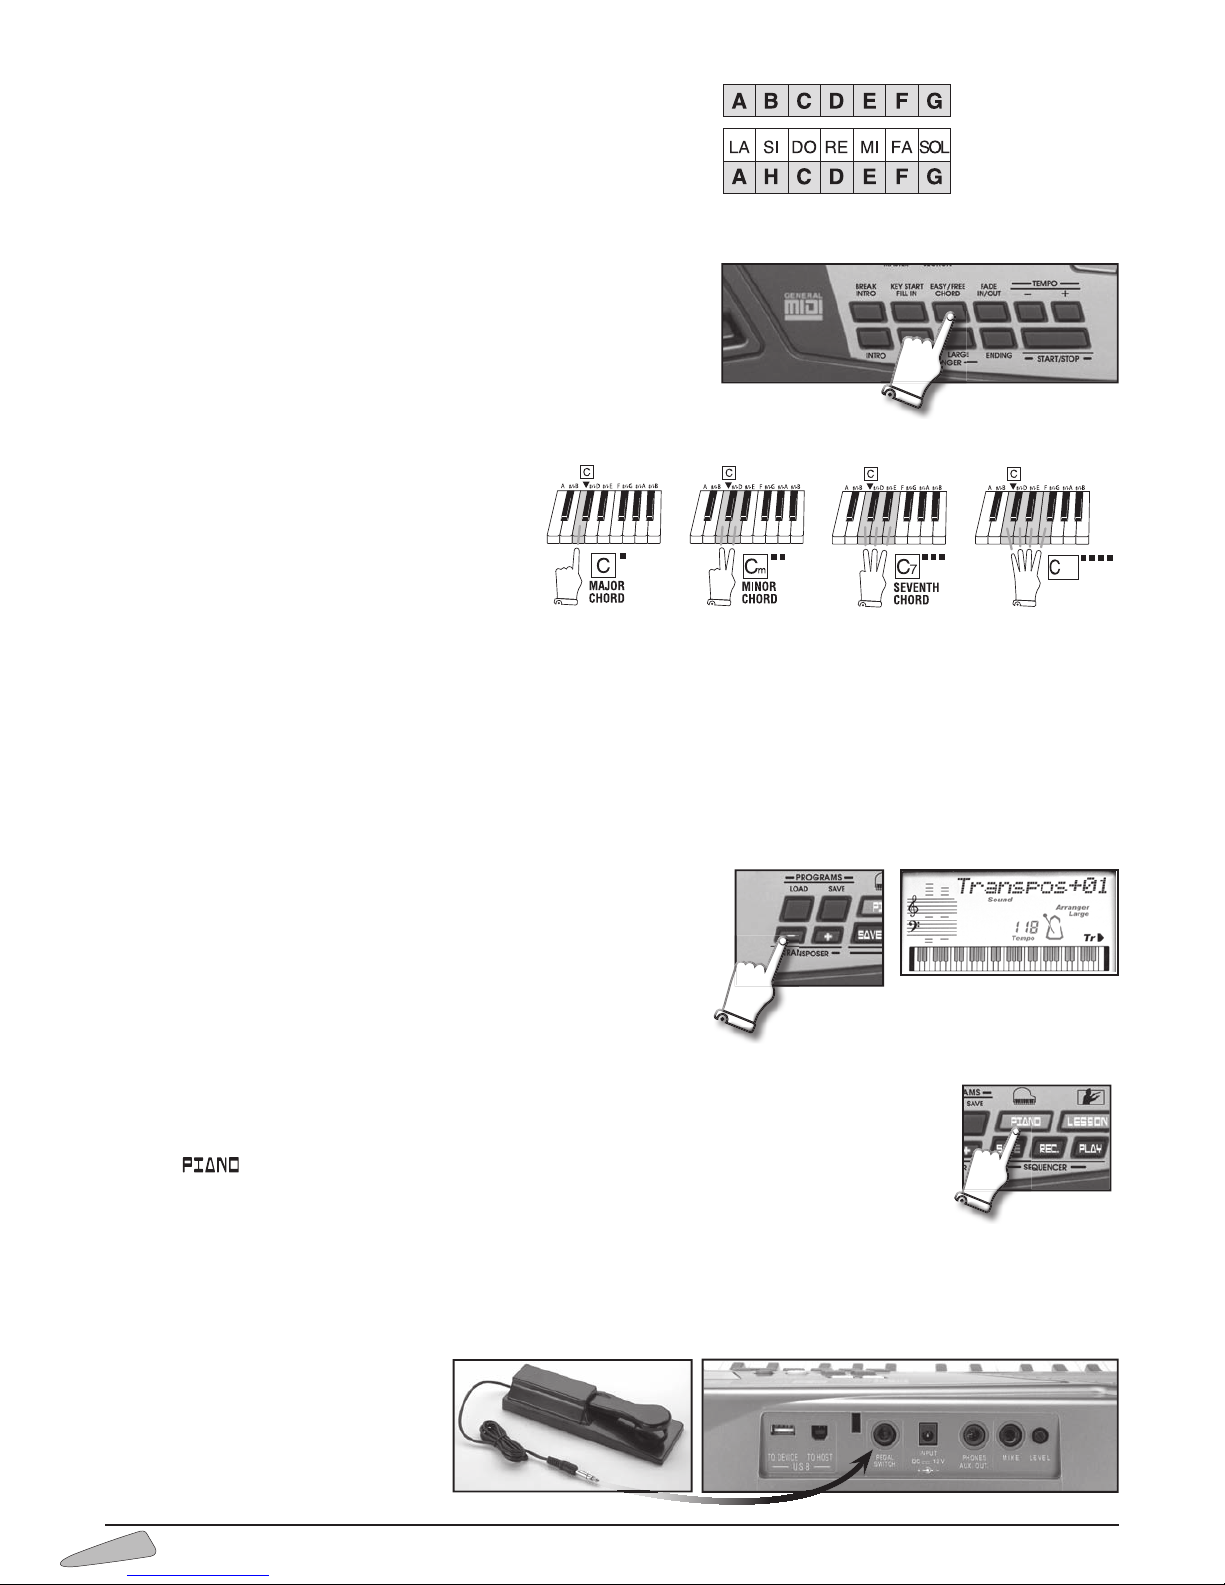
LETTERS ON THE LEFT...................................7
THE DICTIONARY CHORDS ..............................7
THE RHYTHM INSTRUMENTS OF THE MANUAL DRUM .....7
BENDING AND MODULATION CONTROLS................7
6. THE DISPLAY ........................................7
7. OPERATION . . . . . . . . . . . . . . . . . . . . . . . . . . . . . . . . . . . . . . . . .8
POWER ON/OFF ........................................8
DEMONSTRATIVE SONG (DEMO) ........................8
VOLUMES...............................................8
8. THE KEYBOARD .....................................8
TOUCH OF THE KEYBOARD (TOUCH).....................8
DIVISION OF THE KEYBOARD (SPLIT).....................8
9. SOUNDS ............................................9
SOUND SELECTION ......................................9
MIXED SOUNDS (DUAL)..................................9
SOUNDS ON THE LEFT HAND SIDE (LOWER) ..............9
CLASSICAL METHOD CHORDS (FREE CHORD) ..............10
SIMPLIFIED METHOD CHORDS (EASY CHORD) ..............10
TRANSPOSITION OF KEYS (TRANSPOSER) ...............10
THE PIANO.............................................10
THE SUSTAIN PEDAL ...................................10
10. STYLES ............................................11
STYLE SELECTION ......................................11
TEMPO .................................................11
ACCOMPANIMENT VOLUME .............................11
METRONOME ICON .....................................11
PIANIST STYLES .........................................11
ARRANGER A, B.........................................11
ARRANGER LARGE ......................................11
EASY PLAY ..............................................11
INTRO ..................................................12
ENDING ................................................12
KEY START .............................................12
FILL IN .................................................12
BREAK .................................................12
FADE ...................................................12
METRONOME ..........................................12
11. SONGS ............................................13
SONG VOLUME ........................................13
12. PROGRAMS ........................................13
13. SEQUENCER .......................................14
HOW TO RECORD A MUSICAL SEQUENCE ...............14
INDEX
HOW TO SAVE THE RECORDING ON A USB FLASH DRIVE . . . . . . . . 14
HOW TO RECALL A SEQUENCE FROM A USB FLASH DRIVE ...... 14
HOW TO DELETE A SEQUENCE FROM A USB FLASH DRIVE
.......14
14. LESSONS TO LEARN RIGHT AWAY (MAESTRO-LESSONS)....15
DISPLAY DIRECTIONS .........................................15
1 st LEVEL: TEMPO OF THE SONG...............................15
2
nd LEVEL: THE NOTES OF THE MELODY .......................15
3 rd LEVEL: THE SONG MELODY ................................16
4 th LEVEL: THE SONG CHORDS ................................16
5 th LEVEL: ACCOMPANIMENT WITH ORCHESTRA...............16
STRIP WITH NUMBERS AND LETTERS ..........................16
15. FUNCTIONS ............................................17
30-39 ACCOMPANIMENT FUNCTIONS .........................17
40-41 PORTAMENTO..........................................18
45-48 EQUALIZER.............................................18
50-58 REVERBER..............................................18
60-68 CHORUS ...............................................18
TOUCH-SENSITIVITY LEVELS (70-74 TOUCH SET) ...............18
75-79 PROGRAM BANKS . . . . . . . . . . . . . . . . . . . . . . . . . . . . . . . . . . . . . . 18
80-86 MIDI FUNCTIONS.......................................19
SOME TV ADJUSTMENTS (87-89 SET TV).......................19
MANUAL RHYTHM INSTRUMENTS (90-98 DRUM SET BANK) ....19
16. USB FLASH DRIVE .......................................20
COPYING FILES FROM PC HARD DISK TO USB FLASH DRIVE ..........20
HOW TO USE IT .....................................................20
EXCLUDING THE MELODY ...........................................20
CONTINUOUS PLAYING OF MIDI FILES ...............................20
LIST OF USB FLASH DRIVE FILES AND FOLDERS ON TV ...............20
DATA PROTECTION..................................................21
HOW TO FIND THE MIDI FILES .......................................21
MESSAGES ON THE DISPLAY
.....................................21
17. KARAOKE ...............................................21
18. CONNECTION TO A TELEVISION..........................22
VIDEO CONNECTION .........................................22
AUDIO CONNECTION .........................................22
19. SYNTH SOUNDS SECTION ...............................23
THE "FARFISA SYNTH SOUND MAKER" PROGRAM..............23
HOW TO DOWNLOAD THE "FARFISA SYNTH SOUND MAKER" PROGRAM..
23
THE ENTRIES AT THE TOP LEFT: "MIDI OUT", "ZOOM" AND "HELP"
.....23
ON / OFF.........................................................23
MASTER VOLUME.................................................23
PRESET SECTION .................................................24
OSCILLATOR SECTIONS 1 AND 2 ..................................24
GENERAL PARAMETERS SECTION .................................25
HOW TO PROGRAM A SOUND ....................................25
20. TROUBLE SHOOTING GUIDE .............................26
21. MAINTENANCE AND REMARKS ..........................26
22. CONNECTION TO A PERSONAL COMPUTER ..............27
23.
FREE MUSICAL SOFTWARE DOWNLOADABLE FROM INTERNET
..
28
24. STYLES LIST.............................................29
25. SOUNDS LIST ...........................................30
26. TABLE OF SONGS........................................32
27. DRUM SET TABLE (Midi Channel 10) .....................34
28.
MIDI IMPLEMENTATION CHART
...............................
36
GUARANTEE................................................40
BONTEMPI S.p.A. reserves all rights to modify specifications of this product without notice

3
ENGLISHFRANÇAISDEUTSCH
ESPAÑOLITALIANO
1. TECHNICAL CARACTERISTICS
FUNCTIONS: Arranger On/Off, Split 19/24, Ground On/Off,
Chord Memory On/Off, Medley Song On/Off, MIDI IN On/
Off, Portamento, 5 Touch levels, Midi Melody On/Off chan-
nel 4, Info TV On/Off, Delete file, Setting colours on TV
General control: ON/OFF, Master Volume, Microphone
volume, Select, Easy Play, Style, Song, Sund, USB, Dual,
Touch, Section volumes, Split/Full keyb., Play/Pause, Up,
Down, Back, Bending, Modulation
DEMO: Demonstrative song
SONGS: 100 pre-recorded musical songs with Medley
Song On/Off
MAESTRO: 5 learning levels (LESSONS)
DICTIONARY: Chord glossary on display
PROGRAMS: 40 programs for setting keyboard, 10 of
which are programmable
AMPLIFICATION: 5 + 5 watt stereo (RMS) - Two high-effi-
ciency Ø 100 mm loud speakers
POWER SUPPLY
: 8 x 1.5 Volt IEC R14/C batteries
AC/DC adapter: Vdc= 12 V / I = 2.25
VIDEO OUT: Socket for connecting a TV – PAL system,
COMPOSITE VIDEO output signal
LINE AUDIO OUT L / R: RCA sockets for external audio
connections
USB TO DEVICE: Socket for connecting a USB FLASH DRIVE
USB TO HOST: Connection to a computer for data recep-
tion and transmission
PEDAL SWITCH: Socket for sustain pedal
INPUT DC 12V: Socket for connecting mains adapter
PHONES/AUX-OUT: Socket for headphones and external
amplification
MIKE: Socket to connect microphone
LEVEL: Volume regulation of microphone
DIMENSIONS: (945 x 360 x 125) mm
WEIGHT: 6 Kg
KEYBOARD: 61 professional keys (C-C) touch sensitive
(DYNAMICS)
TOUCH: immediate exclusion and restoration of sensitivity to
touch (DYNAMICS)
POLYPHONY: maximum 64 notes
DISPLAY: 80 x 40 mm LCD - backlit
4 luminous CONDUCTORS
BASIC SOUNDS: 216 polyphonic tones
MIXED SOUNDS: thousands of combinations of sounds
EQUALISER: 4 equalization levels
TRANSPOSER: range +/– 12 semitones
PIANO: immediate selection of the piano tone
SYNTH SECTION: 16 SYNTH sounds editable with Personal
Computer
SOUNDS FOR ACCOMPANIMENT: 216 polyphonic tones
EFFETTI: 8 CHORUSES, 8 REVERBS and SUSTAIN
ECHO: effect for microphone input
STYLES: 125 rhythms with 4 ORIENTAL, 8 PIANIST, 25
SONG STYLES
Controls: START/STOP, DOWN BEAT, TEMPO +/–, KEY
START/FILL IN, BREAK, INTRO, ENDING, FADE
METRONOME: with immediate control
MANUAL DRUM: 8 rhythm percussion groups on keyboard.
SEQUENCER: REC and PLAY to record and listen.
SAVE to save on USB FLASH DRIVE (not included)
MIDI FILE MEMORY: to load and reproduce midi file
backing tracks from USB FLASH DRIVES
KARAOKE SCREEN INTERFACE: to view the texts of the
songs, folders and files of the USB FLASH DRIVE on a TV
SCREEN (not included) – reads the main LYRIC / KAR for-
mats
AUTOMATIC ACCOMPANIMENT: Free Chord, Easy Chord,
Arranger A and B, LARGE
2. INTRODUCTION
The package contains:
Adaptor
ADS 1223
User's manual
Music book
Music standMicrophone
Number strip
Keyboard TK 89
USB connecting cable
to a PC
VIDEO cable for
connection to TV

4
ADVICE ON USING THE BATTERIES
• Takewornbatteriesout.
• Rechargeonly"rechargeable"batteriesandalwaysinthe
presence of an adult.
• Avoidusingbatteriesofdifferenttypesatthesametime.
• Donotusecombinationsofnewandwornbatteries.
• Donotshortcircuitthepowersupplyterminals.
• Donotexposethebatteriestoheatsources.
INSTRUMENT IDENTIFICATION
Always quote the serial number on the bottom of the keybo-
ard in any correspondence.
WASTE DISPOSAL STANDARDS
For information regarding the disposal of the items mentio-
ned here below, please refer to Council Administration office
regarding specialised waste collection centres.
1. DISPOSAL OF BATTERIES
Protect the environment by disposing of
batteries in the special containers provided
for this use.
2. PACKAGING DISPOSAL
Take the paper, cardboard and corrugated board to the
appropriate waste collection centres. Plastic material must be
placed in the relevant collection containers.
The symbols indicating the various types of plastic are:
Key for the different types of plastic materials:
PET=Polyethyleneterephtalate•PE= Polyethylene, code 02
for PE-HD, 04 for PE-LD • PVC=Polyvinyl chloride • PP=
Polypropylene
PS=Polystyrene,Polystyrenefoam•O= Other polymers (ABS,
Laminates, etc.)
3. WASTE DISPOSAL OF USED ELECTRICAL AND ELECTRONIC
APPLIANCES
All articles displaying this symbol on the body,
packaging or instruction manual of same, must not
be thrown away into normal disposal bins but brou-
ght to specialised waste disposal centres.
Here, the various materials will be divided by cha-
racteristics and recycled, thus making an important contribu-
tion to environmental protection.
Music-stand
Insert the music-stand in the special holes located on the
backside of the keyboard.
Power supply
This electronic keyboard can function with mains or battery.
Mains supply
The instrument can be supplied by the AC/DC “ADS 1223”
(Vdc =12V / I = 2,25A) positive central adapter conforms to
national and international safety regulations covering electri-
cal appliances.
RECOMMENDATIONS: The socket (1) for the adapter plug
must be easily accessible. Inserting the plug into the socket at
the back of the instrument automatically cuts off supply from
the batteries. Ensure that the adapter is sufficiently ventilated
and that the ventilation slits are not covered with objects
such as newpapers, tablecloths, curtains, etc. Do not expose
the adapter to drops or splashes of water.
WARNING: All batteries or transformers with safety insulation
must be checked regularly for faults in cable, wire, or plug
insulation or other parts.
Battery supply
This instrument works with 8 x 1.5V IEC R14/C batteries (not
supplied) which are inserted in the housing at the bottom.
To open press on the
part of the lid mar-
ked OPEN. Fit the
batteries as shown at
the bottom of the
housing.
Using rechargeable
batteries (1,2V) does
not guarantee the
best contrast level on the display.
BONTEMPI S.p.A.
VIALE DON BOSCO, 35
62018 POTENZA PICENA (MC)
ITALY
MODEL
TK 89
SR
RATING
12V
14W
SER. N°.
G2858001
(1)
01
PET
02
PE
03
PVC
05
PP
06
PS
07
O

5
ENGLISHFRANÇAISDEUTSCH
ESPAÑOLITALIANO
3. SOCKETS
VIDEO - Socket for connecting TV.
AUDIO L / R - RCA sockets for external audio connection.
L (left) = left audio output; R (right) = right audio output.
USB TO DEVICE - Socket to connect a USB Flash Drive.
USB TO HOST - Socket to connect the keyboard to a compu-
ter using the provided cable.
PEDAL SWITCH - Socket for sustain pedal.
INPUT DC 12 V - Switches the instrument on with an AC/DC
adapter (Vdc = 12V - I = 2,25A).
PHONES / AUX . OUT - Socket for headphones and Hi-Fi;
output impedance 150 Ohm – To play without disturbing
and/or being disturbed, you can use a stereo headphone.
When the cable is inserted the speaker is automatically exclu-
ded and all sections of the keyboard can be heard in the
headphone. The socket also allows an additional stereo
amplifier, a recorder, etc. to be connected.
Warning: only connect stereo cables to the “PHONES/ AUX-
OUT” socket.
MIKE - Socket for connect a microphone.
Microphone
Connecting microphone
At the front of the TK 89 there is a MIKE socket for connecting
the dynamic microphone (included) (impedance 600 Ohm).
Microphone volume
Adjust the volume turning the LEVEL knob on the back of the
keyboard, near the jacks.
N.B.: An excessive volume increase could cause ano-
malous sounds.
Optional accessories
ADS 1223 BA 239/A
CV 149/A
LE 127
SM 420
LE 127
SM 420
BA 239/A
CV 149/A
ADS 1223
Metal legs Keyboard bench Dustcover for top of keyboard
Zip-up carry bag
Adaptor
ATTENTION: Use only the optional accessories specially for this keyboard. Use of unauthorised accessories can entail danger of
fires, electrical shocks and physical injuries to persons.

6
EASY PLAY - Depending on the style, selects right-hand
and left-hand tone, the best tempo for the performance
and sets the FREE CHORD setting on the keyboard. In the
100 songs, it selects the sound and the tempo connected to
the songs.
FULL KEYB. / SPLIT - Splits the keyboard between two
sounds or to set just one.
TOUCH - To enable or disable the touch sensitivity on the
keyboard (dynamic).
DUAL - Allows mixing and the selection of two sounds.
PROGRAMS - LOAD to select programs; SAVE to save pro-
grams.
PIANO - Enables PIANO tone and identification of chords
across the whole keyboard.
LESSON - Enters the 5 levels learning mode.
TRANSPOSER +/– - Allows pitch of notes to be changed.
SEQUENCER SAVE - To store the recording on the USB
Flash Drive.
SEQUENCER REC - Records what is being played.
SEQUENCER PLAY - Plays what has been recorded.
SELECT 0-9 and +/– - To select functions, rhythm styles,
songs, sounds and programs.
UP - DOWN - To move the cursor up or down and to select
files and folders of the USB Flash Drive.
BACK - To go back and select files and folders of the USB
Flash Drive.
PLAY/PAUSE - To play or pause the midi files of the USB
Flash Drive or of the Sequencer.
ENTER ( ) - To enter the folders or to carry out other fun-
ctions.
ON/OFF - Turns the instrument on and off.
VOLUME MASTER - Selects the master volume.
VOLUME SECTION - Selects the sections volume.
METRONOME - Switches on and off the metronome beat.
DEMO - Plays the demo song.
BREAK / INTRO -
Prepares a temporary variation of the
rhythm style or a short intro
.
KEY START / FILL IN - Allows rhythm to be enabled by pres-
sing one or more keys or enables changes while rhythm is
on.
EASY/ FREE CHORD - To compose chords using the simpli-
fied way or in the traditional way.
FADE IN/OUT - Rhythm fading and growing.
TEMPO +/– - Sets the tempo for style performance, songs
or metronome.
INTRO - Prepares musical introduction.
ARRANGER A/B - Selects the automatic accompaniment
with A and B rhythms.
ARRANGER LARGE - Selects the automatic accompani-
ment with Large rhythms.
ENDING - Carries out an ending musical phrase when the
rhythm is on.
START/STOP - Starts/Stops a rhythm style or a song.
STYLE - Selects the rhythm styles.
SONG - Selects the pre-recorded songs.
SOUND - Selects the right-hand sound or two sounds to
mix together.
USB - To select files or folders of the USB Flash Drive.
4. CONTROL PANEL
ENTER

7
ENGLISHFRANÇAISDEUTSCH
ESPAÑOLITALIANO
1) Indicates the
name of sounds,
rhythm styles,
volumes and
other functions.
2) Indicates the
selection for the
tone of the left
side of the keybo-
ard or Lower.
3) Shows the selec-
tion of the two
mixed sounds.
4) Indication of
“Intro”, ”Ending”,
”KeyStart” con-
trols for the rhythm style.
5) Indication of enabled SEQUENCER: “Record” or
“Play”.
6) Indication of active automatic accompaniment
and pattern (Arranger A, B, A-Large, B-Large).
7) Indicates “PIANO” function is active.
8) I n d i c a t e s
“TRANSPOSER” is
active (transposi-
tion high or low).
9) Metronome icon,
shows beat tempo.
10) Indicates the speed
of the rhythm style,
of the song, of the
metronome or the
MIDI file.
11) 61 key keyboard
showing notes that
are pressed or that
have to be pressed if
in MAESTRO mode.
12) Indication of Split point (19 or 24).
13) Indication of the identified chord and EASYCHORD
function.
14) Pentagram with notes displayed.
15) Indicates an octave higher for the last 5 keys.
Letters on the left
Indicate the basic note for the
name of the chord.
The dictionary chord
When function 39 Dictionary is enabled, the display shows name and
composition of chords.
The rhythm instruments of the MANUAL DRUM
With the 199 Drum Standard or 200 Drum Power function active, each key corresponds to a percussion instrument.
With the functions 90 to 97, other percussion instrument groups can be selected (see DRUM SET TABLE at the end of the User
Manual).
Bending and Modulation Controls
There are three buttons at the far left of the keyboard: two BEND (Pitch Bending) and one MODUL.
(Modulation).
Playing a note and pressing one of the two BEND buttons will create a pitch variation of that note. This varia-
tion simulates the“bending”of a chord of an instrument such as a guitar. The “Modulation”control performs a
pitch modulation of the sound.
6. THE DISPLAY
14
13 7
1
8
2 3 4 5
6
91011
12
15
5. DIRECTIONS ON THE KEYBOARD

8
8. THE KEYBOARD
It is composed of 61 touch sensitive professional keys.
TOUCH
The keyboard can play with a more or less strong volume depending upon the pressure that is put on the
keys (like a traditional piano).
To eliminate or to insert this function press TOUCH.
The display visualises “Touch Off” to eliminate and“Touch On” to insert the function.
The function is inserted when the instrument is turned on.
SPLIT
1. When simply turned on, one single sound is enabled over the whole keyboard, together with the chord
identifier.
2. By pressing the FULL KEYB/SPLIT button, the keyboard will be divided into two sections: one dedicated
to accompaniment to form chords (keys on the left) and the other one to play the melody (keys on the
right).
It is possible to set the point where the keyboard will be divided
into two modes:
a. by entering 31, the display indicates “Split 19”; this
means that the left part of the keyboard goes from the
first to the nineteenth key.
b. by entering 32, the display indicates “Split 24”; this
means that the left part of the keyboard goes from the
first to the twenty-fourth key.
The keyboard on the display shows the division point
with an arrow.
Chords can be played in the FREE CHORD mode, which means in the traditional way, or in the EASY CHORD mode, which means
in the simplified mode (see the "Lower" paragraph).
Switch on and switch off (ON/OFF)
The instrument can be turned on and off by using the ON/OFF button. When
turned on, the keyboard is set to operate with the PIANO sound, the 8 Beat 1
rhythm and the song 'O SOLE MIO.
Demo
Switching on the DEMO button, a melody that will emphasise the characteri-
stics of the keyboard will play.
To turn off the melody press the DEMO button.
Volume Master
To regulate the volume of the instrument you must use buttons MASTER
VOLUME + (to turn up) or MASTER VOLUME – (to turn down). By holding the
button pressed down, the variation becomes continuous.
To restore the standard volume press both MASTER VOLUME + and MASTER
VOLUME – buttons together.
7. OPERATION

9
ENGLISHFRANÇAISDEUTSCH
ESPAÑOLITALIANO
Sound selection
The keyboard features 216 sounds divided into 20 families (e.g. 025-032 GUITAR).
They are selected when the button is on by entering a three digit number between 001 and 216 of the SOUNDS list you
will find at the end of the Instructions Manual.
Example: for NYLON GUITAR type in number 025 (0, 2, 5with the SELECT keyboard.)
If the display shows “Disable”, this means an incorrect number has been typed in.
Sounds can be selected also by using the SELECT “+ / –” buttons.
IMPORTANT: With some sounds you might notice a slight difference of volume or sound quality when
playing them in different areas of the keyboard. This is an inevitable consequence of multiple sampling
and not a technical problem.
Dual
With the DUAL control, you can mix two sounds and create thousands of com-
binations.
To mix press DUAL; the display shows “SoundMix1”; select a sound and press
the button: the display shows“SoundMix2”; select the second sound
that will be mixed with the first one.
To select other sounds, keep using the button.
To return to just one sound, press the DUAL button again: the display shows
“Sound”.
To change the volume of the two sounds, to use the “+/–“ buttons of
VOLUME SECTION and to select the first or second sound, keep
button pressed.
The display visualises “Snd1Vol” or “Snd2Vol”
Sounds on the left hand side (LOWER)
The sounds for the ACCOMPANIMENT, when the rhythm is not playing, can be
selected by entering 30 Select Lower and the corresponding number in the
SOUNDS list.
To set the volume of the accompaniment section, use the VOLUME SECTION
+ / – buttons;
The display shows “LowerVol” and the value of the volume.
By keeping the button pressed, the variation will continue.
To return to the standard volume, simultaneously press the +and –buttons of
the VOLUME SECTION.
9. THE SOUNDS

10
Classical method chords (FREE CHORD)
Chords are played in the traditional way and all the main chords are identi-
fied.
Standard setting is active. To select it use the EASY/ FREE CHORD control;
the display shows“Free Chord”.
EASY PLAY enables Free Chord automatically.
The FREE CHORD mode works across the whole keyboard too when FULL
KEYBOARD is on.
The display shows the name of the chord in the Anglo-Saxon notation.
Simplified method chords (EASY CHORD)
This function allows you to compose chords on the
left side of the keyboard with the simplified mode:
one key will provide a major chord,
two keys a minor chord,
three keys a dominant 7th chord, and
four keys a diminished chord.
You can enable it with the EASY/ FREE CHORD but-
ton; the display shows “Easy Chord”.
The fundamental note of the chord (the most impor-
tant one and the one that gives the name to the
chord) is represented by the key pressed on the far
left.
For example, by pressing simultaneously C, D and E,
you will get a C7 dominant chord.
Transposition of keys (TRANSPOSER)
The TRANSPOSER +/– controls shift the whole keyboard tonality by +/– 12
semitones.
By pressing one of the two buttons, the display temporarily shows the cur-
rent value.
The TRANSPOSER variation is always indicated on the display by the “< Tr “
or “ Tr >“ signs. By simultaneously pressing the“+/–“ buttons of TRANSPOSER, you will return to the stan-
dard 00 value.
The Piano
With the button, the PIANO sound and the chord identifier will be immediately enabled on the
whole keyboard.
The Sustain Pedal (PEDAL SWITCH)
A normally-open pedal button can be connected to the PEDAL SWITCH socket.
It is used to lengthen the sound of the notes.
DIMINISHED
CHORD
dim
Anglo-Saxon notation
Latin notation
German notation

11
ENGLISHFRANÇAISDEUTSCH
ESPAÑOLITALIANO
Rhythmic style selection
The keyboard has 125 rhythmic styles enriched by
automatic accompaniments and completed by drums.
They are sub-divided into 13 families (e.g. 015-023
DANCE) , see the list at the end of the owner's manual.
To select them press the button and then a 3
digit figure from the STYLES list.
Example: to select DISCO 70 rhythm, digit number 019
(0, 1,and 9).
You can also select rhythms using buttons “+ / –” of
SELECT. To start or to stop a rhythm press the START/
STOP button.
Tempo
The “ + / – ” TEMPO buttons can be used to set the tempo of the rhythm or of a song.
To increase or decrease the speed of the song press the two buttons TEMPO + and TEMPO – .
By holding the button pressed down, the variation becomes continuous.
To go back to standard rhythm press buttons TEMPO + and TEMPO – together.
Accompaniment volume
To adjust the volume of the accompaniment section, use the VOLUME SECTION + / – buttons. The
display will show“Acc.Vol.”with the value of the volume. By holding the button pressed down, the
variation becomes continuous. To restore the standard volume press together buttons VOLUME
SECTION + and VOLUME SECTION –.
Metronome icon
The metronome icon of the display shows the musical quarters and the beginning of every beat or measure.
When a rhythm is on function and you select a new style this latter starts at the end of the previous rhythm pattern.
The Pianist Styles
The PIANIST styles are automatic accompaniments created with the piano
alone.
To select them, press the button and enter a three digit number from
the PIANIST list. See the STYLES list at the end of the Instructions Manual.
Arranger A, B
By pressing the ARRANGER A / B control, you will be able to switch between
a basic rhythm style and one with a variation. The display shows the selec-
ted mode by showing“Arranger A” or “Arranger B”.
Arranger Large
With the LARGE control, you can elaborate further on the arrangement of
the rhythm style.
The display shows “Large”.
Easy Play
Depending on the rhythm, EASY PLAY sets the tone for the right hand, the
best tempo for the performance and splits the keyboard to play chords in the
FREE CHORD mode.
10. THE STYLES

12
Intro
When a rhythm is stopped, by pressing the INTRO button the display will show
“Intro” and a rhythm style is predisposed, and a preliminary music sequence will
then starts when you press the START / STOP or KEY START buttons.
Ending
When a rhythm is on, by pressing the ENDING button, a final musical sequence
stars.
Key Start
The KEY START function starts the rhythm by pressing one or more keys on the
keyboard.
It is enabled with the rhythm stopped, the display visualises “Key Start”.
If the keyboard is split, you can activate the rhythm by playing a chord in the left
part of the keyboard.
If it is not split, play a chord including at least three keys anywhere on the keybo-
ard.
Fill In
When a rhythm is on function and you press the FILL IN button you produce a rhythmic variation of the drums.
Break
By pressing the BREAK control during the performance of a rhythm style, you will
activate an orchestral ‘break’.
By pressing BREAK when the rhythm is not playing, a brief introductive orchestral
break will be executed. The display shows “Intro”. During the "Ending", BREAK
restores normal rhythm.
Fading or Crescendo (FADE)
The fading function allows to fade the execution automatically lowering the volu-
me until it stops. FADE, selected before the rhythm starts, produces an increasing
volume from zero until the normal level.
While the rhythm is on, by pressing FADE the display visualises“Fade out” and
it will fade until disappearing.
With the rhythm stopped, by pressing FADE, the display visualises “Fade In”
and, when the rhythm starts, execution will having an growing volume.
Metronome
The metronome helps you to learn the music, giving the beat during musical exercises and simulating the traditional time-marking
instrument.
It can be turned on and off with the METRONOME button. To change the tempo, use the“TEMPO +/–“ buttons. To set the volume,
press the or button and use the VOLUME SECTION +/– button.
Chart of general BEATS for the METRONOME
32 - 60
60 - 66
66 - 76
76 - 108
108 - 120
120 - 168
168 - 200
200 - 240

13
ENGLISHFRANÇAISDEUTSCH
ESPAÑOLITALIANO
The instrument contains 100 classic repertoire songs.
To select the songs, enter a three digit number according to the SONGS list.
Example: for song 069 JINGLE BELLS,
•pressthe button (light on);
•typeontheSELECT numerical keyboard, 0, 6 and 9;
•presstheSTART/STOP button to start or stop the musical performance.
Song volume
To adjust the volume of a song, press the keys “ + / – ” of the
VOLUME SECTION. The display visualises “SongVol.” with the
volume value. By holding the button pressed down, the variation
becomes continuous. To restore the standard volume press toge-
ther buttons VOLUME SECTION + and VOLUME SECTION –.
When a song is being played, you can immediately listen to other songs by entering the number of the song you have chosen or
by using the SELECT “– / +” buttons.
The EASY PLAY control sets the melody of the song and the standard TEMPO on the keyboard..
11. SONGS
12. PROGRAMS
A program is a function which allows to set some parameters on the keyboard pressing
only two keys. It is possible to store and recall the different functions of the keyboard
by using the programs.
10 memorised programs are available in the USER bank.
To memorise a program in the User bank
1. press SAVE PROGRAMS. The display indicates “Save Prog ?”
2. press a number from 0to 9on the SELECT keyboard
3. the display indicates “ProgSaved”.
The program is memorised in the memory area indicated by the chosen number.
To recall the program
1. press LOAD PROGRAMS. The display indicates “Load Prog ?”
2. press a number from 0to 9on the SELECT keyboard
3. the display indicates “ProgLoaded”
To restore the initial programs of the User bank, type 76 Clear User.
To recall programs previously set by the manufacturer select a number from 77 to 79 as indicated in the Program Bank paragraph
in chapter 15. FUNCTIONS

14
With the Sequencer section it is possible to record and then to listen to all that was played. The Sequencer allows you to test
the your musical learning level. The musician can play the melody, record it with a song and then listen to the outcome.
How to record a musical sequence
Press the button The display will read “Record On” and “Record”
flashing to show that the Sequencer is on. Play the song you wish to record.
Press once again to stop recording. The display will read “Record
Off”.
Press tolisten towhat wasrecorded.Thedisplay willread“Sequencer”
and “Play” . Press once again to stop.
Nearly 14,000 notes can be memorised.
When the memory is full, the display reads “Record Off” temporarily and the indication “Record” disappears.
After a recording, when PL AY is on, variations made with the control panel can affect the recordings.
Recorded data remains in the memory as long as the keyboard is on.
If nothing has been recorded in the Sequencer, by pressing , the display reads “SequenEmpty” temporarily.
N.B.: Sounds coming from the microphone cannot be recorded.
The recorded sequence can be saved on a USB Flash Drive (not included).
How to save a recording on a USB Flash Drive
1. Insert a USB Flash Drive in the relevant socket (
USB TO DEVICE
) in the back of
the instrument. The control turns on.
2. Press . The display visualises “Saving File”, and then “File
saved”, to indicate that the musical sequence has been memorised in the
USB Flash Drive.
The display will then read“Seq00” which is the first name assigned automa-
tically to the musical sequence just memorised.
N.B.: The musical sequences memorised in the USB Flash Drive go from“Seq00”
to “Seq99”. The number is assigned automatically.
All of the sequences from “Seq00” to “Seq99” are automatically stored in the
folder “MySongs” and stay memorised even when the instrument turns off
or the USB Flash Drive is removed.
The folder “MySongs” is created automatically with the first SAVE.
The sequences from“Seq00” to “Seq99” are midi files and can be managed on the PC with the most widespread musical programs.
N.B.: If the USB Flash Drive is not inserted, pressing , the display will read“USB FD Off”. It is therefore not possible to save
the recording.
If no recording has been done and you press , the display will read “Disable”.
The USB Flash Drive cannot be inserted and removed with the instrument on as well.
How to recall a musical sequence already saved on a USB Flash Drive
1. Insert a USB Flash Drive in the relevant socket (
USB TO DEVICE
) in the back of the instrument.
2. With the controls UP ( ) and DOWN (), view the name of the folder
“MySongs” on the display and press ENTER ( ): the display reads
“Loading”;
3. With UP ( ) and DOWN () select the desired sequence, i.e. “Seq00”,
“Seq01”, “ Seq02”, etc… Then press () to listen to the sequence.
The display reads “Loading”, and then “FileLoaded” and Play on the
top right.
To pause the sequence that is playing, press () . The display reads Play which is flashing. To restart the sequence, press
() again. To stop the sequence being played, press ENTER ( ), or on the Sequencer or START / STOP in the STYLE
section.
How to delete a sequence from the USB Flash Drive
1. Enter the folder“MySongs” using the controls UP ( ), DOWN (), BACK () and ENTER ( ) and view the sequence you
wish to delete.
2. Write 86. The display reads “DeleteFile?”; pressing ENTER ( ), the sequence will be deleted.
N.B.: The midi files contained in other folders can be deleted also by following the same procedure.
13. SEQUENCER
ENTER

15
ENGLISHFRANÇAISDEUTSCH
ESPAÑOLITALIANO
The section helps you in the music learning process just as if a real musical teacher
were there with you, teaching you five fundamental aspects:
1. Tempo 2. Note 3. Melody Off 4. Chord 5. Accompaniment
Display directions
Press a key on the keyboard. The display shows which key you are pressing and the relative note will be shown on the penta-
gram.
1st level: Tempo of the song (TEMPO)
At the 1st level, you can become familiar with the melody notes and learn the tempo of the song.
=== How to do it:
After having chosen a tune, select level 1first by pressing the
button and then, when the display shows “LEVEL ?”,
number 1of SELECT.
Use the START/STOP control to start and stop the performance. You
can quicken or slow down the tempo by using the TEMPO “+/–“ but-
tons.
The song starts with some strokes of the metronome which indicate
the starting tempo. Right after, try playing the melody of the song
repeatedly pressing one or more keys trying to keep tempo with the
orchestra.
During your performance, the display will show the correct notes of
the melody.
The accompaniment will automatically follow you.
You will be able to change tune by pressing the corresponding button on the SONGS list, or by using the SELECT “+ / –“ but-
tons.
If you wish to listen to the whole song, press START/STOP, then press SONG and then START/STOP again.
2nd level: The Notes of the melody (NOTE)
When you are able to keep time you can try the 2nd level, which means playing the correct keys to perform the correct melody.
=== How to do it:
After having chosen a tune, select the 2nd level by pressing the button and then SELECT number 2.
Use the START/STOP control to start and stop the performance.
When the metronome stops, try to play the melody of the song; this time you have to press the right keys because the others will
not play. The display will help by showing you the correct melody keys in advance.
The accompaniment will automatically follow your performance.
14. LESSONS TO LEARN RIGHT AWAY (MAESTRO - LESSONS)

16
3rd level: The song Melody (MELODY OFF)
This time the accompaniment will play normally, without waiting for you. This means you will have
to perform the melody with the right keys while keeping time, or else the song will sound out of
tune.
=== How to do it:
After having chosen a song, select the 3rd level by pressing the button and then the
SELECT number 3.
Use the START/STOP control to start and stop the performance.
When the intro has ended, try playing the melody of the song.
The display will help by showing notes and keys for the melody.
4th level: The song Chords (CHORD)
At this level the song will be played with the rhythm section and the melody; you will be able to play the accompaniment chords
using the left side of the keyboard.
If you do not play the right chord, the rhythm part will keep on going with the last chord and the
melody will stop.
=== How to do it:
After having chosen a song, select the 4th level by pressing the button and then SELECT
number 4.
Use the START/STOP control to start and stop the performance. When starting you will always have
a metronome counting for you.
Play the first chord and then the others, following the directions shown on the display.
If you play a wrong chord, the melody will not play, and if you play it at the wrong time, accompani-
ment and melody will be out of tempo.
To make the first lessons easier, try slowing the tempo of the song, using the TEMPO +and –but-
tons.
The display will help by showing the name of the chord, the keys and the notes on the pentagram.
There are two ways of playing chords:
•Free Chord for playing chords in the traditional way.
•Easy Chord for playing simplified chords.
To choose the desired mode, see the“LOWER” paragraph.
5th level: Accompaniment with orchestra (ACCOMP.)
At this level the song will be played with the drums rhythm section together with the melody and you will be able to play the
accompaniment. Rhythm and melody will keep going so you will have to play the right chord in time, or else it will be out of
tune.
=== How to do it:
After having chosen a song, select the 5th level by pressing the button and then the
SELECT number 5.
Use the START/STOP control to start and stop the performance.
To start the complete accompaniment, play the first chord following the directions shown on the
display.
The display will help by showing the name of the chord, the keys and the notes on the pentagram.
There are two ways of playing chords:
•Free Chord for playing chords in the traditional way.
•Easy Chord for playing simplified chords.
To choose the desired mode, see the “LOWER”
paragraph.
Strip with numbers and letters
Position the strip with numbers and letters above
the keyboard as shown in the picture.
The numbers on the strip correspond to the keys
that have to be pressed in order to play the tune
of the simplified scores contained in the enclo-
sed Farfisa Music book.

17
ENGLISHFRANÇAISDEUTSCH
ESPAÑOLITALIANO
FUNCTIONS FOR ACCOMPANIMENT (30-39 ACCOMP. FUNCTIONS)
Function 30 • Selection of sound for left hand (Select Lower)
The selection of sounds for accompaniment, when rhythm is stopped, is obtained by writing
30 Select Lower and then the number relative to the SOUNDS list.
To adjust the volume of the accompaniment section, press the buttons VOLUME SECTION + / –.
The display reads“LowerVol”and the value of the volume. By keeping the button pressed, the
variation becomes continuous.
To restore the standard volume, press the buttons +and –of the VOLUME SECTION together.
Functions 31-32 • Division of the keyboard 19/24 (Split 19/24)
The point where the keyboard splits can be set in two ways:
a. Composing 31, the display will read “Split 19” and namely that the left side of the keyboard goes from the 1st to the 19th key
b. Composing
32
, the display will read “Split 24” and namely that the left side of the keyboard goes from the 1st to the 24th key
Above the image of the keyboard on the display an arrow will appear indicating the splitting point.
Split 24 is active when the instrument is turned on.
Functions 33-34 • Arrangement (Arranger On/Off)
Composing 33 Arranger On activates the automatic arrangement and composing 34 Arranger Off deactivates it. The display
reads "ArrangOn" or "ArrangOff".
Automatic arrangement is present when a rhythm is on. The arrangement is active when turning the instrument on.
Functions 35-36 • Musical carpet (Ground On/Off)
When a rhythm is playing and FREE CHORD is active, the carpet will act as a
musical background for the arrangement. The carpet is activated with the
number 35 Ground On and deactivated with number 36 Ground Off. The
display reads "GroundOn" or "GroundOff". The function is active
when the instrument is turned on. To adjust the volume of the musical car-
pet, press the buttons “+ / –” of the VOLUME SECTION when the rhythm is
playing and after having typed the number 30 Select Lower. The display
visualises “GrndVol.”
Functions 37-38 • Continuous playing of songs or MIDI files (Medley On/Off)
With this function it is possible to listen to all of the songs in succession,
starting with the one selected. It is activated by typing the number 37
Medley On and deactivated with 38 Medley Off. The display reads
"MedleyOn" or "MedleyOff". The function is not active when the instru-
ment is turned on.
It is also possible to automatically play the MIDI files contained in a folder of
the USB Flash Drive.
Press the control. The light turns on. Select a folder of the USB Flash
Drive, press ENTER ( ), type 37 Medley On and press . Right after
the "Loading" of the display, all of the midi files of that folder will play auto-
matically one after the other
Function 39 • Chord Dictionary (Dictionary)
The Dictionary function allows viewing on the display the name of a chord, the notes that make it up on the pentagram and
the keys needed to compose the chord. It is activated by composing the number 39; the display reads “Dictionary”. By pres-
sing a key in the first two octaves on the left, you choose the main key C, D, E, F, G, A or B (DO, RE, MI, FA, SOL, LA or SI) with the
relative “ ” or “ ” and the type of chord in the last octave on the right.
15. FUNCTIONS

18
40-41 PORTAMENTO
Functions 40-41 • Portamento
The portamento creates a pitch slide between two keys. It is more evident when playing keys far part.
It is activated by typing 40 Portamento On and deactivated with 41 Portamento Off. The display reads "PortamOn" or
"PortamOff".
Function 42 • Resetting of SYNTH SECTION sounds (Clear Synth)
With the "FARFISA Synth Sound Maker" program loaded onto the PC, it is possible to change the parameters of the sounds from
201 to 216 of the SYNTH SECTION.
To restore the initial parameters of the SYNTH SECTION sounds, type 42 Clear Synth. The display reads "ClrSynth".
45-48 EQUALIZER
Allows choosing among four different equalisations suitable for different types of music. There are enabled by typing:
Function 45 • Flat excludes equalisation.
Function 46 • Disco for disco music.
Function 47 • Jazz for Jazz music.
Function 48 • Classic for classical music.
N.B.: When the keyboard is disconnected from an external amplification, it is recommended to choose an average equalisation and above
all to adjust the initial volume at minimum.
50-58 REVERBER
Functions 50-58 • Reverberation
The reverberation effect allows listening to sounds as if they were reproduced in a large hall.
Eight different types of reverberation can be chosen: typing 50 produces the “Room-1” effect, with 51 “Room-2”, with 52
“Room-3”, with 53 “Hall-1”, with 54 “Hall-2”, with 55 “Plate”, with 56 “Delay”, with 57 “Pan Delay” and with 58 “Reverb Off”,
the reverberation effect is completely excluded.
60-68 CHORUS
Functions 60-68 • Chorus
The chorus effects enhance the sounds of the SOUNDS section with particular modulations which a smaller or larger impact depen-
ding on the sound selected.
Eight different types of chorus can be chosen: typing 60 produces the“Chorus-1”effect, with 61“ Chorus-2”, with 62 “ Chorus-3”,
with 63 “Chorus-4”, with 64 “Feed Back”, with 65 “Flanger”, with 66 “Short Delay”, with 67 “FB Delay” and with 68 “Chorus
Off” the chorus effect is excluded completely.
TOUCH-SENSITIVITY LEVELS (70-74 TOUCH SET)
Functions 70-74 • Touch-sensitivity levels
It is possible to choose among 5 dynamic levels: typing code 70 enables the Very Soft level; typing 71 the Soft level, with 72 the
Normal level, with 73 the Hard level and with 74 the Heavy level. Level 72 Normal is usually active.
75-79 PROGRAM BANKS
The keyboard is able to recall some groups of the 10 programs previously prepared by the user or inserted by the maker in the
"PROGRAM" memory (see chapter 12 "PROGRAMS").
Function 75 • ProgUser to recall the programs that the user stored previously
Function 76 • ClearUser to restore in the memory the data of the first time the instrument
Function 77 • ProgLatin programs for Latino music
Function 78 • ProgSwing programs for swing music
Function 79 • PrgTradit programs for traditional music

19
ENGLISHFRANÇAISDEUTSCH
ESPAÑOLITALIANO
=== How to select a program
Let's suppose that we wish to set program number 7of the Traditional bank:
•type79 Traditional, the display reads "PrgTradit";
•presstheLOAD button, and the display reads "Load Prog ?";
•typethenumber7, the display reads "ProgLoaded".
Now the keyboard is set up with the rhythm, sounds and effects of program 7of the Traditional bank
80-86 MIDI FUNCTIONS
Functions 80-81 • Excluding Midi In (Midi In On/Off)
When the keyboard is connected to a Personal Computer, it is recommended to use the programs which allow excluding the resen-
ding out of data coming in. If this were not possible, double notes would be heard. To avoid this anomaly, the keyboard allows
excluding the data coming from the PC by composing number 81 Midi In Off. To reactivate reception, compose number 80 Midi
In On. The function is active when the instrument is turned on. The display reads "MidiInOff" or "MidiInOn".
Functions 82-83 • Excluding the melody (Melody On/Off)
When uploading a midi file from the USB Flash Drive and it is carried out, the trace of the melody can be excluded (normally midi
channel 4).
To exclude the melody trace, type 83 Melody Off. To restore it, type 82 Melody On.
The display reads "MelodyOff" oppure "MelodyOn".
Functions 84-85 • List of USB Flash Drive files and folders on TV (Info TV On/Off)
It is possible to view the contents of the USB Flash Drive on the TV screen.
Type 84 Info TV On to view it on the TV screen or 85 Info TV Off to exclude viewing. The display reads "InfoTvOn" or
"InfoTvOff". Normally 84 Info TV On is active.
Function 86 • Deleting files from the USB Flash Drive (Delete file)
It is possible to cancel files from the USB Flash Drive.
Select the file to be deleted using the control UP ( ), DOWN () or BACK () , Type 86 Delete File, The display will read
"DeleteFile?" and press ENTER ( ) , to delete the file.
In order to abort this cancellation, press any other control.
SOME TV ADJUSTMENTS (87-89 SET TV)
Functions 87-89 • Set TV
Some colour saturation or hue features can be adjusted on the TV.
To carry out these adjustments, type 87 Set TV On, the display reads "SetTVOn".
Using the controls ( ) or () the display reads "Luminan" and the colour saturation can be adjusted. Using the controls
UP ( ) or DOWN () the display reads "HueAdj" and the colour hue can be adjusted.
Both adjustments go from a minimum of 001 to a maximum of 060.
In order to cancel colour saturation or hue adjustment, type 88 Set TV Off.
The display reads "SetTvOff"
To restore the standard colour saturation or hue values, type 89 TV Default.
The display reads "TvDefault".
MANUAL RHYTHM INSTRUMENTS (90-98 DRUM SET BANK)
Functions 90-98 • Drum Set Bank
The MANUAL DRUM allows you to play manual rhythmic sequences using the keys with the respective symbols of the percussion
rhythmic components.
Typing 90, the display reads "DrmStd" and the Drum Standard percussion instrument block is activated. With 91 "DrumRoom",
the Drum Room block is activated. With 92 "DrmPower" the Drum Power block, with 93 "DrumElec" the Drum Electric block,
with 94 "DrmTR808" the Drum TR 808 block, 95 "DrumJazz" the Drum Jazz block, 96 "DrmBrush" the Drum Brush block,
97 "DrmOrch" the Drum Orchestra block and with 98 "Drum Off" the Drum block is excluded.
To adjust the volume, act on VOLUME SECTION when the control is active with the LED on.
At the end of the User Manual, the‘DRUM SET TABLE’ has a list of the rhythmic instruments.
The rhythmic components are amplified from the right loudspeaker to the left with a stereophonic mix.
To exit from this percussion instrument block, just select another sound.

20
16. USB FLASH DRIVE
The USB Flash Drive (not included) is an external memory where you can save the recordings carried out with the Sequencer of the
instrument or SMF (Standard Midi Files) uploaded from a Personal Computer.
The midi backing tracks with the abbreviation SMF (Standard Midi Files) can be found in the best music shops or on the Web.
Copying files from PC hard disk to USB Flash Drive
It is possible to transfer files present on a computer hard disk onto an instru-
ment by copying them onto the USB Flash Drive, and then connecting it to
the keyboard. Once the data has been copied, connect the USB Flash Drive
to the
USB TO DEVICE
port behind the instrument and reproduce the .MID and
.KAR songs.
The TK 89 keyboard reads the SMF data present in the USB Flash Drive, it uploads them in
the internal memory and plays the backing track. If an external TV is connected, the texts
of the song can be viewed (if there are any) for karaoke.
How to use it
Insert the USB Flash Drive in the relevant socket (
USB TO DEVICE
) behind the
instrument. The control lights up automatically and the name of the first
SMF or the names of the folders containing the SMFs appear on the display.
N.B.: When connecting the USB Flash Drive to the
USB TO DEVICE
port, make sure to
insert it correctly. Do not try to force it the wrong way.
Press the () control, the display reads “Loading” while the file is
uploaded in the memory. The music is then played and the text of the song (if
present) shows up on the external TV screen.
To adjust the VOLUME, act on the controls + / – of VOLUME SECTION. The display reads “Seq.Vol.” with the desired volume
value.
The controls for ‘navigating’ inside the USB Flash Drive are UP ( ) and DOWN () to scroll the tit-
les or folders, BACK () to go back, ENTER ( ) to enter a folder or to stop the backing track being pla-
yed and () to start the selected backing track or to pause it.
Excluding the melody (Melody On/Off)
When uploading a midi file from the USB Flash Drive and it is carried out, the trace of the melody can be excluded (normally midi
channel 4).
To exclude the melody trace, type 83 Melody Off. To restore it, type 82 Melody On.
The display reads "MelodyOff" or "MelodyOn".
Continuous playing of MIDI files (Medley On/Off)
It is possible to automatically play the MIDI files contained in a folder of the USB Flash Drive.
Press the control. The light turns on. Select a folder of the USB Flash Drive, press ENTER ( ), type 37 Medley On and press
(). Right after the "Loading" of the display, all of the midi files of that folder will play automatically one after the other. The
function is not active when the instrument is turned on. To deactivate it, type 38 Medley Off. The display read "MedleyOn" or
"MedleyOff".
List of USB Flash Drive files and folders on TV (Info TV On/Off )
It is possible to view the contents of the USB Flash Drive on the TV screen.
Type 84 Info TV On to view it on the TV screen or 85 Info TV Off to exclude viewing. The display reads "InfoTvOn" or
"InfoTvOff". Normally 84 Info TV On is active.
N.B.:
For quicker management of reading SMF, it is recommended not to save too many files per folder.
The names of files longer than 50 characters or with special accents are not recognised. It is therefore recommended to rename
them with a Personal Computer.
ENTER
computer
USB socket on keyboard
Table of contents
Other Farfisa Electronic Keyboard manuals