FastenMaster FrameFAST FMTOOL-T2TP User manual

QUICK START GUIDE
For more information including FrameFAST instructional videos visit fastenmaster.com.
For warranty assistance contact FastenMaster at 800·518·3569 or email your request
to info@fastenmaster.com. FastenMaster 153 Bowles Road Agawam, MA 01001
Models:
Contents:
(1) FrameFAST tool
(corded or cordless)
(1) truss to plate
installation head (2) replacement bits
(1) Quick Start Guide
The FrameFAST tool includes the following items inside the plastic case:
(1) bit replacement tool
(1) Milwaukee/DeWalt
literature packet
(1) FrameFAST
limited warranty
FMTOOL-T2TP
FrameFAST Tool (corded with Milwaukee Drill)
FMTOOL-T2TP-MILC
FrameFAST Tool (cordless with Milwaukee Drill)
FMTOOL-T2TP-DWC
FrameFAST Tool (cordless with Dewault Drill)
PART NO. FMFFQUICKSTART (0620)
➊Release Red Thumb Lock
The FrameFAST Tool is packaged with a red
bit changing tool. To remove and replace a
driver bit position the tool upright, with the
motor gently placed on the floor. Carefully press
downward on the telescoping FrameFAST tool.
To avoid injury, never lean directly over the tool
when compressing and be sure to grasp the tool
BELOW the red thumb lock.
Once fully compressed, the driver bit will
be visible.
➋Driver Bit Removal
Slide the red bit changing tool over the driver bit.
Continue to ensure that the FrameFAST tool remains
fully compressed and gently press down on the bit
changing tool to disengage the driver bit.
➌Insert New Driver Bit
Next, insert the new driver bit through the driver bit
replacement tool, and into the FrameFAST tool. Be sure
that the bit is properly locked in place by pressing down
on the red bit replacement tool . The bit should fall right
into place within the locking chuck. Remove the red bit
replacement tool and store in the durable plastic case.
Check that the driver bit is secure. It should not pull out
of place without the use of the driver bit replacement
tool. Once the bit is securely replaced, reinstall the
FrameFAST installation head as shown in steps 3
and 4 of the FrameFAST quick start guide.
Replacing Driver Bits
Lift
Thumb
Lock
Push Down
L
i
f
t
T
humb
L
oc
k
P
us
h
D
own
Close
Place Head
Load Scre
w
L
oa
d
S
c
r
e
w
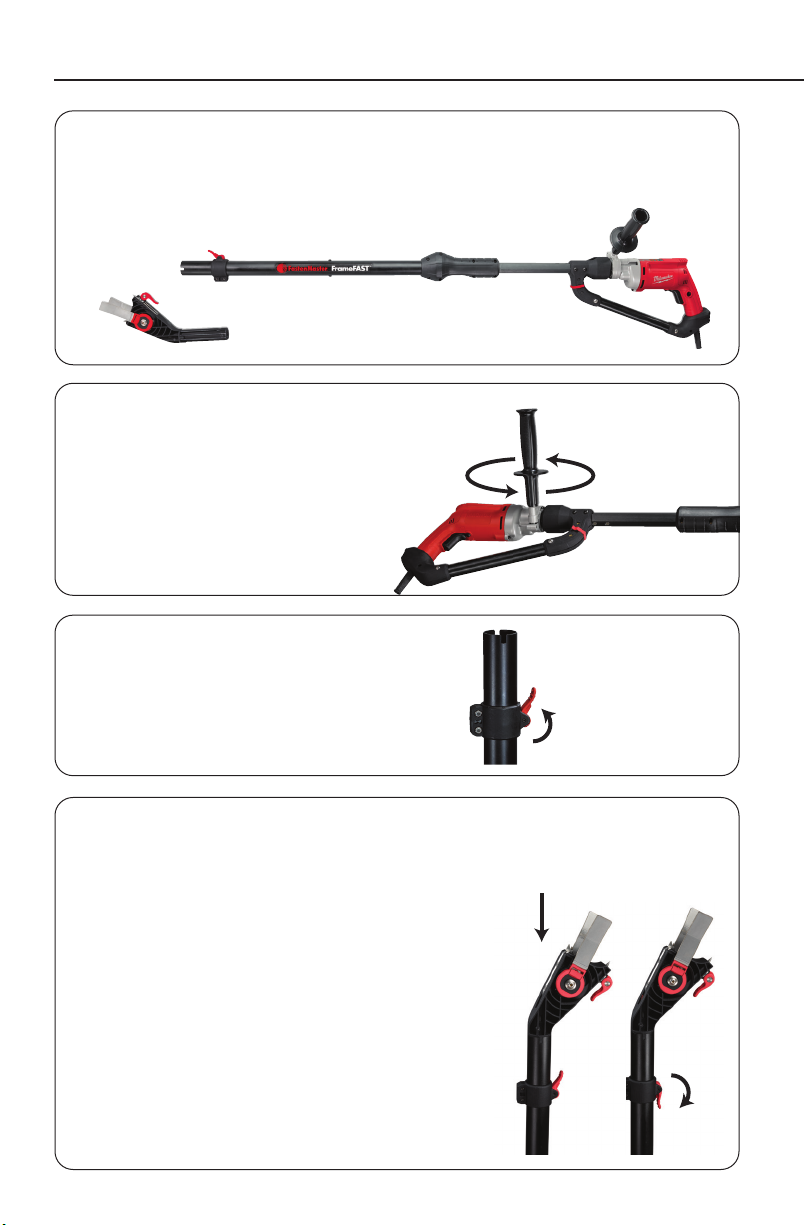
➊Remove Tool
Remove the FrameFAST tool and installation head
from the durable plastic case
➋Position the Stability Handle
Position the stability handle on the
tool and tighten by twisting
the hand grip
➌Unlock the Thumb Lock
Position the tool upright, with the motor
gently resting on the floor and flip the
red thumb lock upwards
➍Insert Installation Head
Insert the installation head into the end
of the FrameFAST tool. The Truss-to-Top
Plate Head is for upward installations
only, so it must be positioned as shown in the
picture. Optional installation heads for Stud-
To-Plate and Plate-To-Rim connections can be
rotated 180 degrees to accommodate both
upward and downward installations. Note:
To rotate heads that accommodate both
upward and downward installations, lift the
red thumb lock on the FrameFAST tool and
remove the head prior to rotating and then
reinsert into the end of the FrameFAST tool
and secure with the thumb lock.
➎Connect to Power Source
Refer to the literature packet from the drill motor manufacturer (Milwaukee
or Dewalt) for detailed instructions on how to safely connect to power.
Cordless FrameFAST Tools are not provided with batteries.
Recommended batteries are as follows:
FMFFTOOL-T2TP-MILC: Milwaukee cordless option:
Suggested battery Milwaukee M18 Red Lithium XC 5.0
FMFFTOOL-T2TP-DWC: DeWalt cordless option:
Suggested battery DeWalt 20V MAX XR 5.0AH Lithium
Ion DCB205T
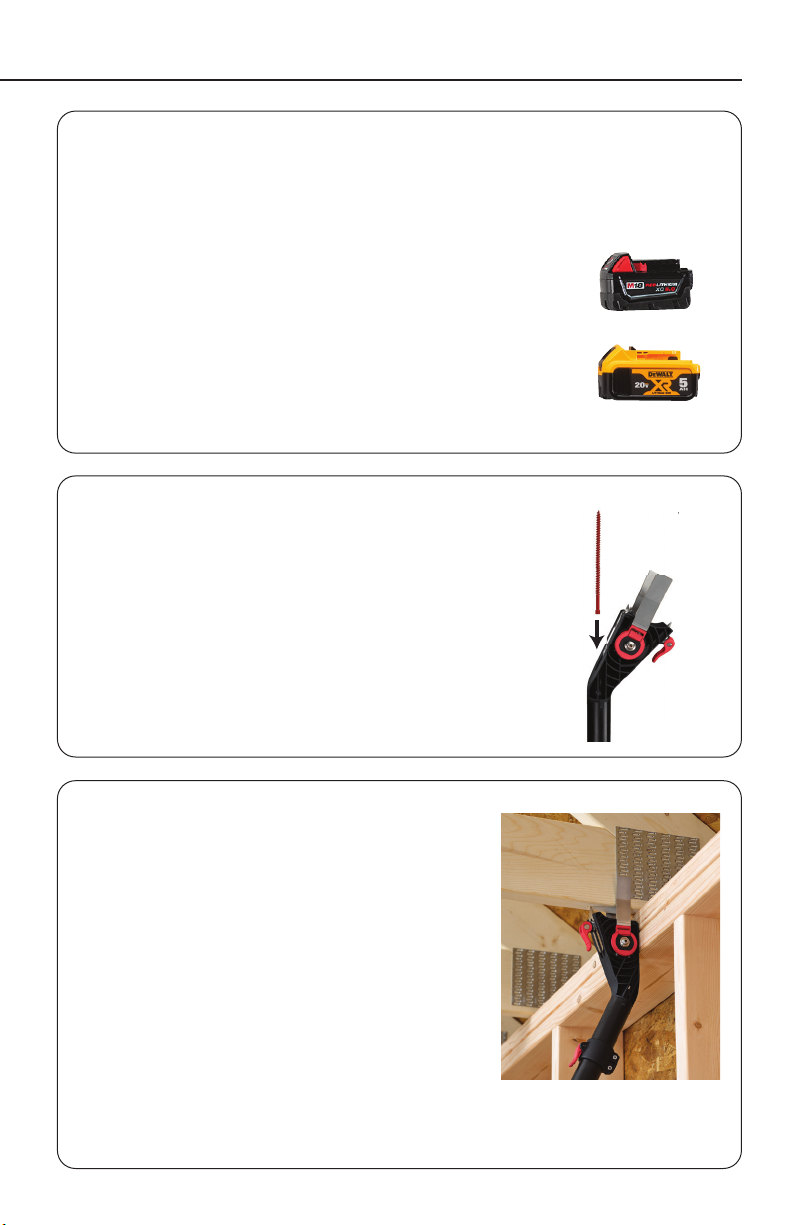
➏Load Fastener
With the tool positioned vertically as shown in the
picture, load one FrameFAST screw with the tip of
the screw facing upwards.
Note: Using any screw, other than FastenMaster
FrameFAST 6" threaded screws, is not
recommended and will void the limited warranty
on the FrameFAST tool and installation heads
➐Installation
Set the screw gun to "forward" and the speed
to #2. Refer to screw gun manufacturer's
instructions for more detailed instructions
related to the operation of the screw gun.
For Truss-To-Top Plate installations, position the
FrameFAST tool such that the front edge of the
installation head is flush with the vertical face
of the wall plate. Once the tool is properly
positioned, press firmly forward to set the
positioning cleats. This will stabilize the tool for
precise installation angle and offset.
Next, pull the trigger on the screw gun and
drive until the telescoping FrameFAST tool is fully compressed. When the screw has
been driven to the proper depth it will automatically disengage from the driver bit
Twist
Lift Thumb Lock
How to Set up Tool
Close
Place Head
Load Scre
w
L
oa
d
S
c
r
e
w
➊Remove Tool
Remove the FrameFAST tool and installation head
from the durable plastic case
➋Position the Stability Handle
Position the stability handle on the
tool and tighten by twisting
the hand grip
➌Unlock the Thumb Lock
Position the tool upright, with the motor
gently resting on the floor and flip the
red thumb lock upwards
➍Insert Installation Head
Insert the installation head into the end
of the FrameFAST tool. The Truss-to-Top
Plate Head is for upward installations
only, so it must be positioned as shown in the
picture. Optional installation heads for Stud-
To-Plate and Plate-To-Rim connections can be
rotated 180 degrees to accommodate both
upward and downward installations. Note:
To rotate heads that accommodate both
upward and downward installations, lift the
red thumb lock on the FrameFAST tool and
remove the head prior to rotating and then
reinsert into the end of the FrameFAST tool
and secure with the thumb lock.
➎Connect to Power Source
Refer to the literature packet from the drill motor manufacturer (Milwaukee
or Dewalt) for detailed instructions on how to safely connect to power.
Cordless FrameFAST Tools are not provided with batteries.
Recommended batteries are as follows:
FMFFTOOL-T2TP-MILC: Milwaukee cordless option:
Suggested battery Milwaukee M18 Red Lithium XC 5.0
FMFFTOOL-T2TP-DWC: DeWalt cordless option:
Suggested battery DeWalt 20V MAX XR 5.0AH Lithium
Ion DCB205T
➏Load Fastener
With the tool positioned vertically as shown in the
picture, load one FrameFAST screw with the tip of
the screw facing upwards.
Note: Using any screw, other than FastenMaster
FrameFAST 6" threaded screws, is not
recommended and will void the limited warranty
on the FrameFAST tool and installation heads
➐Installation
Set the screw gun to "forward" and the speed
to #2. Refer to screw gun manufacturer's
instructions for more detailed instructions
related to the operation of the screw gun.
For Truss-To-Top Plate installations, position the
FrameFAST tool such that the front edge of the
installation head is flush with the vertical face
of the wall plate. Once the tool is properly
positioned, press firmly forward to set the
positioning cleats. This will stabilize the tool for
precise installation angle and offset.
Next, pull the trigger on the screw gun and
drive until the telescoping FrameFAST tool is fully compressed. When the screw has
been driven to the proper depth it will automatically disengage from the driver bit
Twist
Lift Thumb Lock
How to Set up Tool
QUICK START GUIDE
For more information including FrameFAST instructional videos visit fastenmaster.com.
For warranty assistance contact FastenMaster at 800·518·3569 or email your request
to info@fastenmaster.com. FastenMaster 153 Bowles Road Agawam, MA 01001
Models:
Contents:
(1) FrameFAST tool
(corded or cordless)
(1) truss to plate
installation head (2) replacement bits
(1) Quick Start Guide
The FrameFAST tool includes the following items inside the plastic case:
(1) bit replacement tool
(1) Milwaukee/DeWalt
literature packet
(1) FrameFAST
limited warranty
FMTOOL-T2TP
FrameFAST Tool (corded with Milwaukee Drill)
FMTOOL-T2TP-MILC
FrameFAST Tool (cordless with Milwaukee Drill)
FMTOOL-T2TP-DWC
FrameFAST Tool (cordless with Dewault Drill)
PART NO. FMFFQUICKSTART (0620)
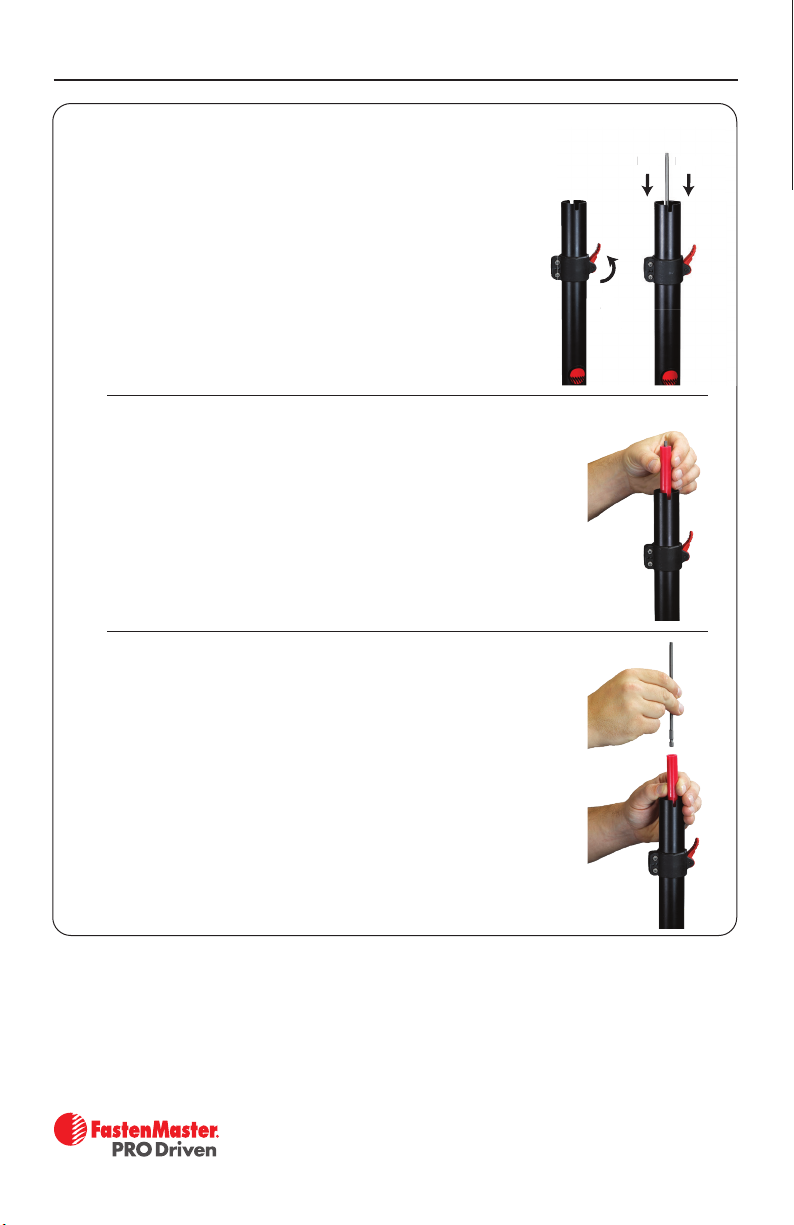
➊Release Red Thumb Lock
The FrameFAST Tool is packaged with a red
bit changing tool. To remove and replace a
driver bit position the tool upright, with the
motor gently placed on the floor. Carefully press
downward on the telescoping FrameFAST tool.
To avoid injury, never lean directly over the tool
when compressing and be sure to grasp the tool
BELOW the red thumb lock.
Once fully compressed, the driver bit will
be visible.
➋Driver Bit Removal
Slide the red bit changing tool over the driver bit.
Continue to ensure that the FrameFAST tool remains
fully compressed and gently press down on the bit
changing tool to disengage the driver bit.
➌Insert New Driver Bit
Next, insert the new driver bit through the driver bit
replacement tool, and into the FrameFAST tool. Be sure
that the bit is properly locked in place by pressing down
on the red bit replacement tool . The bit should fall right
into place within the locking chuck. Remove the red bit
replacement tool and store in the durable plastic case.
Check that the driver bit is secure. It should not pull out
of place without the use of the driver bit replacement
tool. Once the bit is securely replaced, reinstall the
FrameFAST installation head as shown in steps 3
and 4 of the FrameFAST quick start guide.
Replacing Driver Bits
Lift
Thumb
Lock
Push Down
L
i
f
t
T
humb
L
oc
k
P
us
h
D
own
This manual suits for next models
2
Popular Construction Equipment manuals by other brands


MULTIQUIP
MULTIQUIP Stow C10SH8 Operation and parts manual

SIP
SIP 03683 manual

Venturo
Venturo ET18KXXP-20 PARTS & INSTALLATION MANUAL

GÜDE
GÜDE GSK 110/330 Translation of original operating instructions

Atlas Copco
Atlas Copco SECOROC COP 34 manual

Worldwide Construction And Forestry Division
Worldwide Construction And Forestry Division 745 Operator's manual


